I’m Stella Eve Louise, and I prefer to begin by asking what a piece actually needs. Sometimes sanding is necessary because paint is peeling or the surface is damaged. At other times, it adds work without solving the real problem. A thorough clean, a suitable bonding primer, or an all-in-one furniture paint may provide the preparation the surface needs.
A small table, laminate bookcase, bathroom vanity, glossy kitchen unit, leather chair, or dated dresser can all be approached differently. The finishes may vary, but the same rule runs through every successful no-sanding makeover: skipping sanding does not mean skipping preparation.
Before You Paint Furniture Without Sanding
A no-sanding method works best when the existing finish remains firmly attached. Run your hand over the furniture and check for peeling paint, flaking varnish, swollen laminate, loose veneer, deep scratches, grease, wax, and damaged edges.
Do not paint directly over loose or failing material. If the old finish lifts when lightly scratched or rubbed, it must be repaired or removed first. Paint cannot create a strong foundation over a surface that is already separating.
Cleaning matters even more when you aren’t sanding. Kitchen grease, furniture polish, hand oils, dust, and wax can prevent a new coating from bonding. Manufacturers of low-preparation furniture paints still instruct users to clean surfaces thoroughly before application, even when stripping, sanding, and separate priming are not required.
You’ll normally need one of two systems:
· An all-in-one furniture or cabinet paint specifically made for low-preparation surfaces
· A high-adhesion bonding primer followed by compatible furniture paint
A bonding primer can be useful on laminate, glossy finishes, ceramic-like surfaces, and other difficult materials. Some bonding primers are specifically designed to adhere to dense, glossy surfaces without sanding, but you should always follow the instructions for the exact product you choose.
Review a bonding-primer technical guide.
Remove knobs, handles, doors, and drawers where practical. Label cabinet doors and hardware so everything returns to the correct position. Protect the floor, open windows, and follow the paint manufacturer’s ventilation and safety guidance.
Paint an IKEA Laminate Bookcase Without Sanding

Laminate furniture is often the point where people become nervous about skipping sanding. The surface can feel slick and almost plastic-like, so ordinary wall paint may struggle to grip it. This makeover uses an adhesion primer intended for difficult surfaces before adding the new colour, creating a practical route for updating an IKEA-style bookcase without roughening the entire unit.
The important detail is the primer. No-sanding does not mean applying any leftover paint directly to laminate and hoping for the best. A bonding layer helps connect the smooth furniture surface to the decorative topcoat.
A bookcase is also a sensible first project because most of its areas are flat and easy to reach. The shelves will experience rubbing from books, baskets, and decorations, though, so careful curing matters just as much as appearance.
Materials and Tools
· Laminate bookcase in sound condition
· Degreasing cleaner suitable for the surface
· Clean lint-free cloths
· High-adhesion primer intended for laminate
· Compatible furniture or cabinet paint
· Small foam or microfibre roller
· Soft angled brush
· Paint tray
· Painter’s tape
· Screwdriver
· Drop cloth
· Optional protective topcoat when recommended by the paint system
Paint the Bookcase in Four Steps
1. Empty, inspect, and clean the whole unit. Remove adjustable shelves and hardware, then clean every area you plan to paint. Pay attention to shelf edges and the places where hands usually grip the bookcase, because polish and skin oils can remain there even when the surface looks clean.
2. Apply the adhesion primer carefully. Use a small roller across broad panels and a brush in corners, grooves, and around fixed supports. Keep the coat controlled rather than heavy, then allow it to dry and cure according to the manufacturer’s instructions before adding colour.
3. Build the painted finish gradually. Apply the first coat with light roller pressure and finish each section in the same direction. Let it dry fully, then add another thin coat rather than trying to hide the original finish with one thick application.
4. Reassemble only after the coating has hardened sufficiently. Place the shelves back gently and avoid dragging heavy books or storage baskets across the fresh paint. Add felt pads beneath decorative objects if you are concerned about early scratching.
I know it can feel tempting to put everything back as soon as the paint feels dry, but dry paint and fully hardened paint are not always the same thing. This is where patience may protect several hours of work.
For a simpler update, paint only the back panel or the outside frame. You could also line the back with removable wallpaper after painting, giving the bookcase more depth without covering every laminate surface.
Refresh a Bathroom Vanity With All-in-One Paint

A bathroom vanity has to cope with damp hands, cosmetics, cleaning products, and regular contact, so the paint needs more than an attractive colour. This project uses a low-preparation paint system applied with a microfibre roller, producing a smoother and lighter finish without sanding the existing surface.
The transformation works because the original cabinet structure remains useful. There is no reason to replace sound doors, drawers, and storage simply because the finish feels too dark or dated.
Cleaning is particularly important here. Residue from hairspray, soap, hand cream, furniture polish, and bathroom cleaners may remain around handles and drawer fronts. I’d clean these areas twice rather than discover an adhesion problem later.
Materials and Tools
· Bathroom vanity with a firm existing finish
· Degreasing cleaner
· Clean cloths and fresh water for wiping residue
· Low-preparation cabinet paint or suitable bonding primer and paint
· Small microfibre roller
· Soft brush for corners and moulding
· Paint tray
· Screwdriver
· Painter’s tape
· Drop cloth
· Replacement knobs or pulls, if desired
Repaint the Vanity in Four Steps
1. Remove the doors, drawers, and hardware where possible. Label each part before moving it so hinges and doors return to their original locations. Clean the cabinet frame and every removable piece, including the edges that are normally hidden while the doors are closed.
2. Test the coating on a discreet section. Apply a small amount inside a door or on another hidden area and let it dry as directed. Check whether it grips securely before covering the whole vanity, especially if the original surface is glossy or you don’t know which finish was previously used.
3. Paint detailed areas before rolling the flat sections. Use the brush around panel edges, corners, and mouldings, then lightly roll the centre areas while the brushed paint is still workable. Keep the layers thin and check the lower edges for drips before moving to the next door.
4. Allow the pieces to cure before reassembly. Reattach the hardware carefully and avoid tightening screws so aggressively that they twist against soft paint. Treat the vanity gently during the early curing period and clean it with mild methods recommended for the chosen coating.
One practical detail I wouldn’t skip is placing doors horizontally while painting. It gives the coating time to level and makes it easier to spot paint gathering along the lower edge.
New handles can sharpen the final result, but measure the existing holes before buying replacements. Reusing the original hardware with a careful clean may be enough, particularly when the new paint colour already creates a strong contrast.

Give a Small End Table a One-Day Colour Update

An end table is small enough to finish without taking over the room, yet large enough to reveal whether your preparation and painting technique are working. This project uses an all-in-one furniture paint intended to combine several finishing stages into a simpler application.
Flat tops can be deceptive. They look easy, but light reflects across them and makes heavy roller lines, drips, and missed areas more visible. The legs and lower rails usually need a brush, while the tabletop often looks smoother when painted with a fine roller.
Before choosing a no-sanding route, check the top for water damage, lifted veneer, deep cup rings, and flaking finish. Paint may change the colour, but it will not flatten damaged material underneath.
Materials and Tools
· Small wooden or previously painted end table
· Cleaner and lint-free cloth
· All-in-one furniture paint or bonding primer and compatible paint
· Fine roller
· Small angled brush
· Paint tray
· Screwdriver
· Wood filler for minor dents, when needed
· Drop cloth
· Optional new knob or handle
Update the Table in Three Steps
1. Prepare the surface and make small repairs. Remove the drawer and hardware, clean the table thoroughly, and check that all joints remain stable. Fill only the dents that will remain obvious beneath paint, then smooth the filler locally if the repair product requires it rather than sanding the entire table.
2. Paint the legs and details first. Work from the underside upward so you can reach inner rails and corners without leaning against freshly painted areas. Then roll the top and drawer front in thin, even passes, checking around every edge for paint that has begun to collect.
3. Add another coat and finish the details. Once the first coat is ready for recoating, apply the next layer with the same controlled technique. Let the finish harden before replacing the drawer and styling the top with lamps, books, or other objects.
For me, the top edge is the area worth watching. Paint likes to wrap over it and form a small ridge underneath, so run a nearly dry brush along the lower edge before leaving each coat to settle.
A leftover sample-size amount of suitable furniture paint may be enough for a small table. You could also paint the base while leaving a sound wooden top visible, although any exposed wood may need separate cleaning or refinishing.
Repaint Gloss Kitchen Units Without Sanding

Gloss kitchen units can make a room feel tied to a particular style or decade, even when the cabinets remain strong and useful. This project uses a paint system promoted for glossy units without separate sanding or priming, allowing the existing kitchen structure to stay in place.
Cabinet painting demands careful organisation because you are working with several doors, drawer fronts, hinges, and handles. Label everything. A door that seems identical to the one beside it may hang differently when returned to the wrong opening.
Official instructions for no-sanding cabinet paint still emphasise cleaning away grease, oil, and wax. A small microfibre roller can cover flat sections, while a soft brush helps with corners and detailed areas.
Read a manufacturer’s cabinet-paint application instructions.
Materials and Tools
· Sound kitchen cabinet doors and drawer fronts
· Strong surface cleaner or degreaser approved by the paint brand
· Clean water and lint-free cloths
· Cabinet paint designed for glossy low-preparation surfaces
· Small microfibre rollers and spare sleeves
· Soft brush
· Paint trays
· Painter’s tape
· Screwdriver or drill
· Labels and marker
· Drop cloths
· Containers for hardware
Paint the Units in Five Steps
1. Create a numbering system before removing anything. Mark each door and drawer in a concealed location and place its hardware in a matching labelled container. Photograph hinge positions as a reference, especially when the cabinets use adjustable concealed hinges.
2. Degrease the cabinets thoroughly. Clean the areas around handles, the doors beside the cooker, and the lower cabinets where splashes often settle. Wipe away cleaner residue and allow every piece to dry before testing the paint.
3. Test adhesion on one door. Apply the chosen system to the back of a single door and let it cure as directed. Check the finish before committing to the whole kitchen, because a small test is easier to correct than twenty cabinet fronts.
4. Paint the doors and fixed frames separately. Brush corners and mouldings, then roll the broad sections in thin layers. Work around the room in a consistent order, and check horizontal edges for drips before the coating begins to set.
5. Reassemble carefully after curing. Rehang the doors using the labels and photographs, then adjust the hinges so the gaps remain even. Add the handles last and avoid harsh cleaning while the finish continues hardening.
The part I’d plan most carefully is where the doors will dry. Balancing freshly painted doors against a wall is a reliable way to collect marks, dust, and perhaps one very annoyed fingerprint.
For a smaller change, paint only the lower cabinets and keep the upper units in their existing finish. This reduces the workload and can introduce contrast without making every surface the same colour.
Create a Faux Wood Finish on a Painted Dresser

Painting furniture without sanding does not limit you to a flat block colour. This dresser makeover builds a faux wood effect by applying brown antiquing gel over an all-in-one painted base, creating visible depth and grain-like movement.
The success of this finish depends on restraint. If every brushstroke is equally dark and perfectly straight, the surface may look printed rather than naturally varied. A little inconsistency helps, but the grain direction still needs to make sense across drawers, sides, and the top.
This method is helpful when the original wood tone feels too orange or uneven, yet you still want a warmer furniture finish rather than opaque white, grey, or black.
Materials and Tools
· Dresser with a firm existing surface
· Degreasing cleaner and cloths
· All-in-one base paint or bonding primer and furniture paint
· Brown antiquing gel or compatible glazing product
· Chip brush or wood-graining tool
· Fine roller
· Soft brush
· Gloves
· Paint tray
· Screwdriver
· Drop cloth
· Optional replacement hardware
Build the Faux Finish in Four Steps
1. Clean and apply an even base colour. Remove the drawers and hardware, then prepare the entire piece according to the selected paint system. Choose a base shade that can remain visible beneath the brown glaze and allow it to dry fully before adding the faux grain.
2. Practise the grain on a sample board. Brush a small amount of antiquing gel across a painted offcut, varying the pressure and spacing. This gives you time to understand the product before making long marks across the dresser top.
3. Work one furniture section at a time. Apply the gel sparingly, then pull the brush in the direction natural wood grain would usually run. Soften any harsh marks before the product sets, and avoid carrying wet glaze onto an area you have already finished.
4. Let the finish cure before adding hardware. Check whether the selected system requires a separate protective coat and use only compatible products. Reattach the handles carefully so they do not twist through the fresh layers.
For me, this is a project where stopping early often gives the better finish. I know it can feel tempting to add one more dark streak, then another, but too many marks can hide the softer variation underneath.
You could use the faux wood effect only on the top and drawer fronts while painting the frame in a solid coordinating colour. That variation is easier to control and gives the dresser a clear two-tone structure.
Common Mistakes to Avoid
Treating “No Sanding” as “No Preparation”
Even paint designed for minimal preparation needs a clean, dry, stable surface. Grease and furniture polish create a barrier between the furniture and the new finish. Clean thoroughly and follow the exact product directions.
Painting Over Peeling or Chipped Finishes
A new coating cannot permanently secure material that is already lifting. Remove or repair the unstable areas first, even when that means some localised scraping or sanding.
Mixing Products Without Checking Compatibility
A random primer, paint, glaze, and topcoat may react poorly together. Stay within one recommended system or confirm that every layer is compatible before applying it to the whole piece.
Applying Thick Coats
Heavy paint can sag around drawer edges, settle in mouldings, and remain soft for longer. Several controlled coats usually create a neater result than one thick attempt at complete coverage.
Ignoring Cleaner Residue
A strong cleaner may remove grease but leave its own film behind. Follow the product directions and wipe or rinse the surface when required before painting.
Reassembling Furniture Too Soon
Handles, hinges, drawers, and shelf contents can mark paint that feels dry but has not hardened. Give the coating the curing period stated by its manufacturer.
Assuming Every Surface Uses the Same Method
Laminate may need an adhesion primer, while some all-in-one coatings are designed to bond directly after cleaning. Leather needs a flexible compatible coating. Match the system to the material rather than using one method everywhere.
Frequently Asked Questions
Can all furniture be painted without sanding?
No. The existing finish must be secure, and the new coating must be suitable for the surface. Peeling paint, loose veneer, rust, water damage, and unstable coatings usually require repair before painting.
What should I use instead of sanding?
Depending on the furniture, you may use an all-in-one low-preparation paint, a bonding primer, or a manufacturer-approved liquid surface preparation product. Cleaning remains necessary whichever method you choose.
Can I paint laminate furniture without sanding?
Yes, when the laminate remains firmly attached and you use a primer or paint system designed to bond to slick surfaces. Test the method on a hidden area before painting the complete piece.
Does chalk paint always work without sanding?
Not automatically. Some products are marketed for minimal preparation, while others need a primer or additional surface work. Read the manufacturer’s directions rather than relying only on the paint category.
Do I need a protective topcoat?
That depends on the paint. Some all-in-one products include a sealer, while other furniture paints need wax or a clear protective finish. High-contact surfaces such as tabletops may need extra protection when the manufacturer recommends it.
How do I prevent roller marks?
Use the roller type recommended for the paint, apply thin coats, and avoid repeatedly rolling over paint that has started drying. Keep consistent pressure and finish each section in the same direction.
How should I clean painted furniture afterward?
Use a soft cloth and a mild cleaning method approved for the coating. Avoid abrasive pads, harsh solvents, and heavy scrubbing, particularly while the paint is still curing.
Let the Existing Furniture Earn Its Next Finish
Learning how to paint furniture without sanding is really about choosing the correct preparation rather than avoiding work at any cost. A clean, stable dresser may accept an all-in-one paint, laminate may benefit from an adhesion primer, and glossy cabinets need careful degreasing before the first roller touches them.
Begin with a small piece if you’re uncertain. An end table or single bookcase gives you room to practise cleaning, testing, rolling, and waiting for the finish to harden. Once you understand how the chosen paint behaves, larger projects become much less intimidating.
Which piece of furniture would you test a no-sanding makeover on first?
]]>I’m Stella Eve Louise, and I especially like this finish for furniture and counters that remain useful but no longer suit the room around them. A plain nightstand, secondhand table, dated vanity, or worn furniture top can become the foundation for something much more considered without replacing the entire object.
The paint colours can stay close to familiar white and grey marble, or move into pink, gold, green, black, and warmer stone-inspired combinations. What matters is building the effect slowly. A smooth base gives the design somewhere to sit, soft cloudy layers create depth, and a few carefully blended veins provide structure. I don’t think covering every inch with dark lines improves the finish. Usually, the quieter areas make the strongest veins more believable.
Before You Begin Painting a Marble Effect
Clean the surface before deciding which paint or primer to use. Grease, furniture polish, dust, soap residue, and hand oils can interfere with adhesion even when the surface appears clean. Kitchen and bathroom counters deserve extra attention around taps, handles, edges, and frequently touched areas.
Inspect the existing finish as well. Peeling paint, lifted laminate, loose veneer, swollen wood, and cracked acrylic need repair before decorative painting begins. A marble pattern may disguise colour, but it won’t make an unstable surface secure.
Choose products that suit the material beneath them. Wood, laminate, acrylic, previously painted furniture, and countertops may require different primers and protective finishes. For frequently used surfaces, confirm that the final sealer is suitable for the expected wear, moisture, and cleaning routine.
Keep a photograph or sample of real marble nearby. You aren’t trying to copy every line exactly. It simply helps you notice how veins divide, fade, widen, reconnect, and disappear beneath softer colour.
Work in a ventilated space and follow the safety instructions for primers, paints, glazes, and clear coatings. Wear gloves when required, protect the surrounding floor, and keep children and pets away from wet coatings and tools.
Paint a Soft Faux Marble Top on a Nightstand

This nightstand makeover uses several chalk-paint colours, a brush, and blown air to create a soft faux marble effect across the top. The finished surface appears lightly layered rather than covered with sharply defined veins, which suits a small bedroom piece where a heavily patterned top could feel overpowering.
The technique is useful for beginners because the cloudy background does part of the work. Instead of relying only on fine brush lines, you can let diluted colour spread and blend into the base. A hair dryer or similar source of cool, controlled air may help move wet paint, although the airflow should remain gentle enough to avoid pushing everything into one large puddle.
Materials and Tools
- A clean nightstand or bedside table
- Primer suitable for the existing surface
- Pale base paint
- Two or three grey, beige, or muted stone-coloured paints
- Small paintbrushes
- Soft flat brush
- Water or compatible glazing medium
- Small cups for mixing
- Natural sponge or lint-free cloth
- Hair dryer on a cool or low setting, if suitable
- Protective clear coat intended for furniture
Create the Finish in Four Steps
- Prepare a smooth, even background. Remove the drawer and hardware if they interfere with painting, then clean and prime the top as required. Apply the pale base colour in thin coats and allow it to become fully ready for decorative work before adding the marble details.
- Build soft cloudy patches. Dilute small amounts of the secondary colours and dab them lightly across selected areas. Blend the edges with a clean damp brush or sponge so the patches appear to sit beneath the surface rather than forming obvious painted circles.
- Add and move the veins. Paint a few loose, broken lines through the cloudy areas, changing the pressure so they don’t remain the same width. While the paint is still workable, use a soft brush or gentle airflow to feather parts of the lines and create small branches.
- Refine and protect the top. Soften any vein that looks too dark by glazing a little base colour over it. Once the effect has dried properly, apply a compatible clear finish and let it harden before returning lamps, books, or drinks to the nightstand.
The part I would watch carefully is the airflow. Too much pressure can scatter wet paint towards the edge and leave a pattern that looks more like a weather map than stone.
A smaller variation could be painted only inside a tray top or drawer-front panel. Warm beige and pale taupe would create a softer limestone-like appearance, while blue-grey accents could suit a cooler bedroom palette.
Give a Reclaimed Decorative Table a Layered Grey Marble Finish

@jonathonmarcmendes_paintedlove
This furniture flip begins with a decorative table found at a reuse centre and adds a faux marble finish using layered furniture paint. The table’s shaped base and detailed construction already provide interest, so the painted top acts as a focal point without requiring a completely new piece of furniture.
A detailed table can carry stronger veining than a small plain surface, but the pattern still needs direction. Marble veins usually move across the top rather than forming separate outlines around every corner. Letting a few lines continue over the edge can also make the surface appear more like a single slab.
Materials and Tools
- Reclaimed decorative table
- Surface cleaner
- Primer compatible with the existing finish
- Light base paint
- Medium and dark grey furniture paints
- Glazing medium or water when compatible
- Small artist’s brush
- Soft blending brush
- Sponge
- Fine roller for the base
- Clear furniture sealer
Recreate a Similar Look in Four Steps
- Repair the table before decorating it. Tighten weak joints, repair loose moulding, and clean away dust or polish. Prepare the top according to its condition, then apply primer and a smooth light base coat.
- Map the main movement lightly. Use chalk or a very diluted grey to suggest two or three main routes across the top. Avoid creating a symmetrical pattern, and leave generous areas almost untouched.
- Layer colour around the main veins. Add pale grey clouds beside parts of the marked lines, then blend them with a soft brush. Paint the darker vein in broken sections, adding thin branches that become lighter as they move away from the main line.
- Connect the top and edges. Carry selected veins gently over the edge while leaving others to disappear before reaching it. Once dry, soften anything too harsh with a thin glaze of the base colour, then seal the surface with a product suitable for furniture use.
For me, the furniture shape matters as much as the marble design. A decorative base already asks for attention, so I’d keep the top varied but not crowded.
You could leave the legs in their original wood finish for contrast, paint the base in a deep solid colour, or add a small amount of gold wax to raised details. The marble should still remain the main surface treatment rather than competing with several unrelated effects.
Add Colourful Veining to a Hand-Painted Table

Faux marble doesn’t have to imitate only white Carrara stone. This hand-painted table uses colour and visible veining to create a more expressive finish while still relying on the movement associated with natural stone. The creator describes building the result through paint and veining, with the project developing through experimentation.
Colour works best when several shades belong to the same visual family. A green marble effect, for example, may combine pale sage, deeper green, grey, cream, and a restrained warm accent. Using every colour at equal strength can flatten the design because the eye no longer knows where to rest.
Materials and Tools
- Table with a stable paintable top
- Suitable primer
- Base paint in the lightest chosen colour
- Two or three coordinating coloured paints
- Small amount of dark paint for deeper veins
- Optional metallic paint or wax
- Natural sponge
- Fine artist’s brushes
- Soft blending brush
- Mixing palette
- Protective clear coat
Paint the Coloured Marble in Five Steps
- Choose a limited colour family. Select one pale base, one middle colour, and one deeper shade before beginning. Add metallic colour only as a restrained accent rather than treating it as another full layer.
- Apply the background with uneven variation. Cover the prepared surface with the lightest colour, then blend small areas of the middle shade into it. Keep some sections calm because the quieter base will help the coloured veins stand out.
- Create the main veins. Paint a few irregular lines with the deeper shade, turning the brush as you work. Vary their width and let them stop, fade, or split instead of carrying every line from one side to the other.
- Add softer branches and mineral-like details. Mix the deeper colour with the base shade to create lighter branches. Then add a small amount of metallic colour beside selected sections, blending it so it appears embedded rather than drawn on top.
- Glaze and seal the design. Brush a translucent layer of the base colour over any area that feels too busy. Once the pattern has dried, apply a compatible finish that suits how the table will be used.
I know it can feel tempting to keep adding colour because the palette looks attractive on the brush. Then you step back and realise the surface has nowhere quiet left. Pausing early is usually easier than painting the calm areas back in.
A beginner-friendly version could use only pale green, cream, and one darker green. Black marble with fine white and gold veining is another option, although dust and uneven brush marks may remain more visible on a dark base.
Refresh a Closet Vanity With a Grey Marble Paint Kit

This closet vanity receives a white and grey marble-style top using a coordinated countertop paint system. The lighter surface changes the appearance of the vanity without requiring the cabinet base or surrounding storage to be replaced.
A kit can simplify colour selection because the primer, base, vein colours, and protective finish are designed to work together. Even so, the result still depends on how the veins are placed and blended. The materials provide the system; they don’t make every painted line automatically look like marble.
Vanity tops experience cosmetics, spills, hot tools, and repeated cleaning, so follow the coating manufacturer’s instructions closely. Do not assume that a finish suitable for a decorative table automatically suits a counter.
Materials and Tools
- Clean vanity top in repairable condition
- Countertop coating system suitable for the surface
- Degreasing cleaner
- Painter’s tape and masking material
- Foam roller
- Small brush
- Fine veining brush
- Sponge or soft blending brush
- Gloves and other protection required by the product
- Compatible protective topcoat
Complete the Vanity in Four Steps
- Remove or mask everything around the top. Take away loose fittings where practical and protect walls, cabinet fronts, mirrors, and flooring. Clean the vanity carefully, especially near cosmetics and frequently handled edges.
- Apply the required primer and base. Follow the product sequence rather than substituting drying or recoating times. Roll the broad surface smoothly and use a brush around the back edge, corners, and openings.
- Paint restrained grey veins. Begin with fewer lines than you think you need, using different widths and broken sections. Soften parts with the recommended sponge or brush, then add a small number of finer branches.
- Seal and allow the surface to harden. Apply the approved protective coating evenly and keep the vanity clear while it cures. Avoid placing bottles, trays, or hot tools back on the surface simply because it feels dry to a fingertip.
One detail I wouldn’t skip is practising the vein movement on a painted sample board. It gives your hand a chance to loosen up before the brush reaches the actual vanity.
A softer variation could use warm greige veins rather than cool grey. You could also paint only a removable vanity insert or small dressing table before committing to a fixed countertop.
Create a Marble Effect on an Acrylic Vanity Top

@countrycottageinteriorsonline
An acrylic vanity top can be difficult because the surface is smooth, non-porous, and regularly exposed to water. This project uses the existing acrylic top as the base for a painted faux marble effect, showing how a fixed bathroom feature can be visually changed without removing it.
The preparation method matters more here than on an unfinished wooden board. The primer and coating must be suitable for acrylic or the exact synthetic surface involved. A decorative result that looks convincing on the first day is not useful if it lifts around the sink after repeated cleaning.
Materials and Tools
- Acrylic vanity top in sound condition
- Cleaner suitable for bathroom residue
- Adhesion primer approved for acrylic or similar non-porous material
- Pale countertop paint
- Grey and darker vein colours
- Fine brush
- Soft blending brush or sponge
- Painter’s tape
- Foam roller
- Gloves
- Water-resistant compatible topcoat
Build the Finish in Five Steps
- Identify the surface before buying paint. Confirm whether the top is acrylic, cultured material, laminate, or another synthetic product. Clean it thoroughly and complete any surface preparation required by the selected coating.
- Mask the sink and surrounding areas carefully. Press tape firmly around curves, taps, the backsplash, and cabinet edges. Protect the sink bowl from drips, especially when using primers or sealers that may be difficult to remove later.
- Create a smooth base layer. Apply the primer and pale base using the recommended tools. Keep the roller texture even and check around the sink opening for ridges or pooled paint.
- Paint veins that respond to the shape. Let the pattern move across the surface and around the sink rather than outlining the basin. Blend some sections almost completely into the background, then add a few narrow dark details for depth.
- Protect the finish against bathroom use. Apply the compatible topcoat as directed and keep water, soap, cosmetics, and cleaning tools away while it cures. Inspect the edges near the sink before returning the vanity to regular use.
The sink opening can make people change the direction of every vein, but I’d avoid creating a neat ring around it. Natural stone would continue behind the cut-out, so the pattern should feel as though the basin interrupted a larger slab.
For a lower-risk trial, practise on a spare acrylic panel or a removable bathroom shelf. A smaller sample also helps you test whether the colours become warmer or cooler under the room’s lighting.
Add Pink and Gold Veining to a Furniture Top

A warm white base, pink painted movement, and gold wax create a softer alternative to the familiar grey marble finish. The project uses colour to change an overlooked furniture piece while allowing the top to stand apart from the painted base.
Pink and gold can become overly decorative very quickly, so their proportions matter. Pink works well as a cloudy mineral tone, while gold is more convincing when it appears in occasional fine sections rather than outlining every vein.
Materials and Tools
- Furniture piece with a flat or gently shaped top
- Cleaner and suitable primer
- Warm white furniture paint
- Pale and medium pink paint
- Fine grey, brown, or muted plum paint for depth
- Gold wax or compatible metallic paint
- Small artist’s brush
- Soft blending brush
- Sponge
- Clear protective finish when compatible
Paint the Warm Marble Effect in Four Steps
- Create a warm neutral foundation. Prepare the furniture and apply a warm white or soft cream base. Let the surface become ready for decorative painting so the pink layers don’t mix accidentally into wet base paint.
- Add pale pink movement. Dab diluted pink in loose diagonal areas and soften the edges with a sponge. Keep the coverage uneven, allowing the warm white to remain dominant.
- Paint the veins and metallic accents. Add a few deeper pink or muted plum lines through selected cloudy areas. Once they are blended, place very fine gold accents beside only a small portion of the veins.
- Balance and protect the surface. Step back and cover any overly bright detail with a thin warm-white glaze. Allow the design to dry, then add a compatible protective finish if the furniture will receive regular use.
For me, the gold should be something you notice after the pink, not the first thing visible from across the room. A little metallic finish can suggest mineral detail; too much starts to look like decorative striping.
You could replace pink with muted blue, terracotta, or sage. Silver or pewter accents may suit cool colours better than gold, while a plain painted base can keep the furniture from becoming visually heavy.
Common Mistakes to Avoid
Drawing Every Vein the Same Width
Real marble contains thick sections, fine branches, faded marks, and veins that disappear. Change your brush pressure and colour strength so the pattern doesn’t resemble repeated lightning bolts.
Covering the Entire Surface With Veins
Marble needs calm background areas. When every section contains a dark line, the finish becomes flat and busy. Begin with fewer veins and add only where the surface genuinely feels empty.
Skipping the Surface Test
A paint technique that works on wood may not bond to laminate, acrylic, or a countertop coating. Test the primer, paint, and protective finish together on a hidden area or sample surface before committing to the full project.
Blending Until All the Detail Disappears
Softening is important, but overblending can turn several colours into one muddy patch. Blend the edges of veins while allowing selected darker sections to remain visible.
Using Too Many Unrelated Colours
A marble finish can be colourful without becoming random. Choose a base colour, one or two related tones, and a restrained accent. Repeat those colours in different strengths rather than introducing a new shade every few inches.
Applying a Sealer That Doesn’t Suit the Surface
Furniture tops, vanities, and counters experience different levels of water, heat, cleaning, and abrasion. Use a finish approved for both the paint system and the intended surface.
Rushing Between Layers
Painting new veins into a wet base can make the design spread unpredictably. Sealing paint that hasn’t dried sufficiently may also disturb the pattern. Follow the product directions and allow each stage the time it requires.
Frequently Asked Questions
Which surface is easiest for a first faux marble project?
A small wooden table top, tray, or furniture panel is usually more manageable than a fixed countertop. You can reach the edges easily, practise the veins without awkward corners, and repaint the base if the first arrangement feels too busy.
What type of brush creates realistic marble veins?
A fine artist’s brush can create narrow lines, while a small soft brush helps blend and widen selected areas. Some people also use feathers, but the tool matters less than changing pressure and avoiding perfectly straight lines.
Can faux marble be painted over laminate?
It may be possible when the laminate remains firmly attached and you use preparation products approved for slick, non-porous surfaces. Test adhesion before painting the full piece and follow the coating manufacturer’s instructions.
Should the veins continue over the edge?
Selected veins can continue over an edge to suggest that the surface is one solid slab. Do not carry every line over in exactly the same way. Some should fade, split, or stop before reaching the edge.
How can I fix a vein that is too dark?
Let the area settle, then soften it with a damp blending brush if the paint remains workable. Once dry, you can apply a thin glaze of the base colour over part of the vein and repaint only a small amount of detail.
Does every faux marble surface need a glossy finish?
No. Polished marble usually suggests more shine, while honed stone has a softer appearance. Choose the sheen according to the look you want and the practical demands of the surface, using only a finish compatible with the paint beneath it.
Can I use faux marble painting on a kitchen counter?
Only use a complete coating system approved for that counter material and intended level of use. Consider water, heat, food preparation, cleaning products, and curing requirements before beginning. Do not apply ordinary craft paint to a working counter and assume a clear coat will solve every durability issue.
Let the Quiet Parts Make the Marble Look Real
The most useful faux marble painting techniques aren’t really about drawing more veins. They are about building depth, leaving calm areas, and knowing when a line needs to be softened rather than extended.
Begin on a small nightstand, tray, or furniture top where you can practise without working around taps and fixed cabinets. Once the cloudy background feels natural, add one main vein, then a few lighter branches. You can always introduce another detail, but removing ten unnecessary lines is a less cheerful afternoon.
An old surface doesn’t need to resemble one particular type of stone. Grey, green, pink, gold, cream, and darker colours can all work when they are used with balance. Which forgotten table, vanity, or furniture top would you choose for your first painted marble finish?
]]>I’m Stella Eve Louise, and I prefer to look at what can be kept before replacing a large working feature. Paint can help an existing garage door sit more comfortably beside the brick, siding, roof, trim, shutters, and front entrance. It can also highlight panel details that disappeared beneath an old pale finish.
The best result begins long before the roller touches the door. You need to identify the material, check the manufacturer’s painting instructions, clean the surface thoroughly, repair loose paint or rust, and choose products made for exterior use.
Garage doors move, flex, heat up in sunlight, and meet weather from several directions. That makes product compatibility and patient preparation more important than trying to finish everything in one hurried afternoon.
Before You Begin
Check the label, paperwork, or manufacturer details for the garage door before changing its finish. Some manufacturers restrict the types or colours of paint that can be used, and ignoring those instructions may affect the warranty. Dark colours can also create additional heat concerns on certain doors, particularly when a pale factory finish is changed to black.
Examine the door while it is closed and again while each section is visible. Look for:
- Loose or flaking paint
- Rust on metal panels
- Cracked or exposed wood
- Dents or damaged overlays
- Failing seals
- Loose decorative hardware
- Moisture trapped around lower edges
- Paint already sticking between moving sections
A garage door with broken springs, damaged tracks, severe panel distortion, or unsafe movement needs professional repair before cosmetic work begins. Painting must never involve adjusting or dismantling the spring, cable, track, or opener system.
Choose a dry period and avoid painting in rain, strong direct sunlight, or conditions outside the product’s permitted temperature range. Paint that dries too quickly can become difficult to level, while cold or damp conditions may delay curing. Always rely on the technical instructions printed for the exact primer and paint rather than using a general drying estimate.
Materials and Tools
- Cleaner suitable for the garage-door material
- Bucket, sponge, and soft brush
- Garden hose
- Scraper for loose paint
- Sandpaper or sanding sponge
- Wire brush for localised rust
- Exterior primer suitable for wood or metal
- Compatible exterior paint
- Angled brush
- Small roller and tray
- Painter’s tape
- Drop cloths
- Gloves
- Eye protection
- Dust protection when sanding
- Step ladder used on firm, level ground
- Small touch-up brush
Do not paint the tracks, rollers, cables, springs, flexible seals, or moving joints unless the door manufacturer specifically allows it. Protect windows, handles, trim, weather seals, and surrounding masonry before beginning.
Refresh a Faded Door With Charcoal Grey

A charcoal garage door can create stronger contrast than white or beige while remaining softer than pure black. This makeover uses a deep grey finish to separate the door from the lighter exterior and make its horizontal sections more noticeable.
Charcoal is often easier to coordinate with roofing, stone, shutters, dark window frames, and metal lighting. The undertone still matters. One grey may appear blue beside warm brick, while another can turn brown or green in afternoon light.
Paint a sample board and hold it vertically beside the door at different times of day. A small sample viewed indoors cannot show how the colour will react to direct sun, shade, nearby landscaping, and exterior lighting.
Materials and Tools
- Exterior cleaner
- Scraper and sanding sponge
- Rust-inhibiting primer for exposed metal, if needed
- Exterior paint approved for the door
- Angled brush
- Fine roller
- Painter’s tape
- Drop cloth
- Sample board
Paint the Charcoal Finish in Four Steps
- Clean and assess the existing coating. Wash the door from top to bottom and remove residue with clean water. Once dry, scrape loose paint and feather rough edges so the new coating does not simply copy every ridge beneath it.
- Prime only as the surface requires. Spot-prime bare metal, rust-treated areas, repairs, or exposed material with a compatible primer. A fully sound painted surface may need different preparation, so follow the chosen paint and door manufacturer’s directions.
- Cut in around the panel details. Use an angled brush around windows, recessed sections, raised edges, and the door perimeter. Then roll the flatter areas in controlled sections, keeping the roller lightly loaded to reduce drips.
- Apply the next coat and inspect the joins. Follow the stated recoating time, then repeat the same order. Before operating the door, check that paint has not bridged flexible seals or collected between panel edges.
For me, charcoal works best when it connects to at least one other feature on the house. It might relate to the roof, window frames, shutters, or exterior lights rather than appearing as one unrelated dark rectangle.
A medium grey is a safer variation for doors receiving strong sun or for homeowners who want less contrast. You could also paint the surrounding trim in a slightly lighter version of the same colour family.
Use Deep Green as an Exterior Accent

This project uses a deep green on the garage door and shutters, giving the home a repeated accent rather than treating the garage as a separate feature. The colour works because it appears in more than one place and relates to the exterior as a complete palette.
Green can sit comfortably beside warm brick, cream siding, timber details, planting, and muted stone. Even so, the exact shade needs testing. Dark olive, blue-green, forest green, and grey-green can look very different beside the same wall.
Materials and Tools
- Exterior paint in a tested green shade
- Compatible primer
- Cleaner and sponge
- Sanding materials
- Angled brush
- Small roller
- Painter’s tape
- Sample boards
- Colour references from the shutters or trim
Coordinate the Colour in Four Steps
- Study the existing exterior palette. Note the undertones in brick, roofing, stone, siding, and fixed window frames. Choose several green samples that connect with those permanent materials rather than matching only a cushion, plant pot, or temporary decoration.
- Test the colour vertically outdoors. Paint large sample boards and move them beside the garage door, shutters, and front entrance. Check them in morning sun, afternoon light, full shade, and under exterior lighting.
- Prepare and paint the garage door systematically. Clean, repair, prime where required, and paint from the upper panels downward. Keep the application consistent so the same colour does not appear patchy across different sections.
- Repeat the accent carefully elsewhere. Paint shutters or another suitable exterior feature only when the material and coating system allow it. There’s no need to repeat the green on every possible object around the house.
The part I would keep restrained is the repetition. A garage door and shutters may create enough connection; adding green to the trim, railings, furniture, pots, and front door could make the exterior feel overplanned.
A muted sage can create a lighter version, while a deep blue-green may suit cool grey siding. You could also keep the garage door neutral and introduce green only through the surrounding trim.
Coordinate the Garage Door With the Main Entrance

A garage door often feels disconnected because its colour relates to neither the front entrance nor the fixed materials around it. This exterior refresh coordinates the garage and other doors so they read as part of one design rather than isolated updates.
Coordination does not require painting every door exactly the same colour. A garage door can use a quieter mid-tone while the front door carries the deeper accent. Another option is to repeat one colour while changing the sheen or surrounding trim.
Benjamin Moore recommends considering the full exterior, including trim and shutters, when selecting a garage-door colour. Testing the proposed colour before committing also helps determine whether the door should blend in or stand out.
Materials and Tools
- Exterior colour samples
- Large sample boards
- Exterior cleaner
- Material-appropriate primers
- Compatible paints for each door
- Brushes and rollers
- Painter’s tape
- Notebook or phone camera for comparing options
Plan the Coordinated Finish in Four Steps
- Identify which feature should receive the most attention. Decide whether the front entrance or the garage should be the stronger focal point. A large garage door may need a quieter shade when the entrance already has decorative glass, columns, or a bold colour.
- Build a small exterior palette. Choose a main wall colour, trim colour, and one or two accents. Place the samples beside the roof, masonry, windows, and paving rather than judging them individually.
- Paint each surface with its correct system. A wooden front door and metal garage door may require different primers and coatings even when their finished colours look similar. Follow the preparation instructions for each material.
- Inspect the complete facade before adding more colour. Let the major painted areas settle visually, then decide whether handles, lights, shutters, or planters need any change. Often they do not.
I’d rather coordinate through related undertones than force an exact match across materials. The same paint colour can appear different on wood, metal, and textured siding, so visual balance matters more than matching a label.
For a gentle result, use a warm greige garage door with a deeper brown or green entrance. For stronger contrast, repeat a dark door colour and keep the surrounding trim light.
Paint a Faux Wood Finish on a Metal Garage Door

This project changes a plain garage door with a faux wood treatment, then finishes the look with black decorative hardware. The horizontal brown movement follows the panel layout, making the painted surface resemble timber from a distance.
A faux wood finish requires more planning than a solid colour. The base coat, glaze or upper colour, grain direction, and protective system must all be compatible with the garage-door material. A decorative gel stain or glaze should not be applied merely because it worked on indoor furniture.
The grain should follow the visual construction of the door. Horizontal panels normally look more convincing when the main grain runs horizontally, while vertical frame details may change direction.
Materials and Tools
- Cleaner
- Material-appropriate primer
- Warm tan or brown exterior base coat
- Compatible darker glaze, coating, or faux-finish product
- Wide brush or graining tool
- Small detail brush
- Clean cloths
- Sample metal panel or board
- Exterior protective finish when required
- Optional manufacturer-approved decorative hardware
Build the Faux Wood Effect in Five Steps
- Test the complete system first. Apply the primer, base, grain colour, and any protective finish to a sample surface. Check adhesion, colour, sheen, and whether the upper layer remains workable long enough to create grain.
- Apply an even warm base. Prepare the door fully and cover it with the lighter colour. The base should remain visible through the darker layer, so avoid choosing two colours that are almost identical.
- Work panel by panel. Apply a controlled amount of the darker product and drag the brush or graining tool in the intended direction. Vary the pressure and allow some sections to remain lighter.
- Create joins that respect the door design. Stop the grain at panel edges rather than dragging one continuous mark across hinges, gaps, windows, or frame details. Step back after each row to check whether the movement remains consistent.
- Protect and finish the appearance. Add only the protective coating recommended for the chosen system. Install decorative handles or magnetic accents only when they are suitable for the door and cannot interfere with its movement.
For me, the grain should be visible without turning every panel into a collection of dark stripes. A softer finish often reads as wood more convincingly from the driveway.
You could use a pale oak palette, medium walnut, weathered grey wood, or a deeper brown. Practise on a small side door or removable sample before attempting the full garage door.
Refresh a Real Wooden Garage Door With Exterior Stain

A real wooden garage door may not need opaque paint at all. This project refreshes stained timber so its natural grain remains part of the final appearance rather than being hidden beneath a solid coating.
Wood needs close inspection before refinishing because lower edges, panel joins, and exposed sections may hold moisture or show cracking. Peeling clear finish, grey fibres, and uneven fading must be prepared according to the stain manufacturer’s instructions.
Exterior stain can be transparent, semi-transparent, or more solid in appearance. The existing finish and condition of the door will determine which options remain practical. Benjamin Moore lists exterior stain as an appropriate finish option for wooden garage doors, alongside exterior acrylic paint for wood and metal.
Materials and Tools
- Wood cleaner suitable for exterior doors
- Scraper
- Sanding materials
- Exterior wood stain
- Compatible conditioner or primer when specified
- Natural- or synthetic-bristle brush suited to the product
- Cloths
- Painter’s tape
- Drop cloth
- Protective equipment
Refresh the Wood in Four Steps
- Inspect the timber and existing finish. Check for cracks, rot, failing joints, loose finish, and water damage. Repair structural problems before treating colour loss as the main issue.
- Clean and prepare the grain. Remove surface dirt and loose coating without damaging sound wood. Sand or strip only as required by the stain system, then remove the dust completely.
- Apply the stain in manageable sections. Follow the panel and grain direction, keeping the edge workable so one area does not dry before the next begins. Wipe or brush excess product according to the manufacturer’s instructions.
- Check the door after the finish cures. Reconnect and operate the door carefully, then inspect the edges and joints. Maintain the wood before the finish begins failing badly again.
One detail I wouldn’t ignore is the lower edge. It sits close to rain splash, damp paving, and road dirt, so fading or coating failure may begin there before it becomes obvious across the main panels.
A more opaque stain can help unify uneven wood while retaining some texture. A clear or lighter treatment may suit timber that remains consistent and attractive after cleaning.
A Reliable Five-Step Garage-Door Painting Method
The project ideas use different colours and decorative finishes, but the basic professional process remains similar.
- Confirm the material and approved coating. Identify whether the door is steel, aluminium, wood, composite, vinyl, or another material. Read the manufacturer’s paint restrictions before choosing a primer, colour, or dark finish.
- Clean and repair the surface. Wash from top to bottom with an appropriate cleaner, rinse, and allow the door to dry. Remove loose paint, treat rust, dull glossy areas when required, and repair only with products suitable for the door.
- Mask and secure the working area. Disconnect the opener, protect windows and trim, cover the driveway, and keep people away from the work zone. Do not interfere with springs, cables, rollers, or tracks.
- Prime and paint from the top down. Brush panel recesses and edges before rolling the flat areas. Follow the stated drying and recoating times, and avoid overloading the roller.
- Inspect before returning the door to service. Remove tape carefully, check for paint bridging between moving sections, and allow the coating to cure. Reconnect the opener only after the door moves freely and safely.
This sequence matches manufacturer guidance that emphasises cleaning, removing loose paint, treating rust, protecting hardware and windows, applying compatible primer, and working from the upper panels downward.
Common Mistakes to Avoid
Ignoring the Manufacturer’s Colour Restrictions
A paint colour may affect heat absorption, door performance, and warranty coverage. Check the documentation before changing a pale door to black or another very dark shade.
Painting Over Dirt or Chalking
Exterior grime creates a weak layer beneath the paint. Wash the door properly, rinse away cleaner residue, and let it dry before continuing. Clopay recommends cleaning from top to bottom and avoiding abrasive powders or solvents on its doors.
Leaving Rust Beneath New Paint
Rust may continue spreading beneath the coating. Remove loose rust with a wire brush and use a suitable rust-inhibiting primer on exposed areas.
Painting the Moving Hardware
Paint on tracks, rollers, cables, springs, seals, or joints can interfere with operation. Mask these areas and keep decorative coatings on approved surfaces only.
Painting in Direct Hot Sun
Strong sunlight may heat the door and make the paint dry too quickly to level properly. Choose a suitable weather window and follow the environmental limits stated for the coating.
Applying One Heavy Coat
Heavy paint can sag, collect in panel corners, and bridge moving gaps. Use controlled layers and allow the recommended time between coats.
Reconnecting the Opener Too Soon
The door should move freely without sticking before automatic operation resumes. Inspect the panel joints and remove accidental paint bridges first.
Choosing Colour Without Viewing It Outdoors
A colour may change beside brick, siding, roof materials, and natural light. Test large samples vertically and observe them throughout the day.
Frequently Asked Questions
What type of paint should I use on a garage door?
Use an exterior coating approved for the door’s material and permitted by its manufacturer. Benjamin Moore recommends exterior acrylic options for wood and metal, while individual garage-door manufacturers may specify or prohibit particular coatings.
Do I need to sand the garage door?
Remove loose paint and smooth rough edges, and dull an existing glossy finish when the selected coating requires it. The amount of sanding depends on the surface condition, material, and product instructions.
Is primer always necessary?
Bare material, repairs, exposed metal, rust-treated areas, and major colour changes often need primer. A sound existing coating may not require full priming when the new paint specifically allows direct application.
Can I paint a white garage door black?
Only after checking the manufacturer’s approved colour range and warranty conditions. Some doors may absorb excessive heat or experience performance problems when changed to a very dark colour.
Should I use a brush, roller, or sprayer?
A brush helps with edges, recesses, and window details, while a roller works well across broad flat panels. Spraying can produce a smooth finish but requires careful masking, suitable equipment, weather control, and safe handling.
Can I paint the door while it is closed?
Many sections can be painted while the door is closed, but carefully repositioning it may help expose panel edges. Disconnect the opener first and follow the manufacturer’s safety instructions. Never place hands near springs, cables, or other high-tension components.
How should I maintain the painted door?
Wash it gently using the cleaning method approved by the manufacturer and inspect it for chips, rust, or coating failure. Avoid abrasive cleaners and solvents that may damage the finish.
Let Preparation Do Most of the Professional Work
Learning how to paint your garage door like a pro has less to do with owning an expensive sprayer and more to do with making sensible decisions before opening the paint.
Check the door instructions, choose a colour that suits both the house and the material, clean every panel, repair unstable areas, and keep paint away from the moving system. Then work from the top down with controlled coats rather than trying to cover the whole door heavily in one pass.
Begin with large exterior colour samples before committing to charcoal, green, black, faux wood, or another strong finish. The right choice should connect the garage to the rest of the house rather than making it compete with the front entrance.
Which finish would suit your home best: a calm charcoal, a coordinated colour from the existing exterior, or a warmer faux wood effect?
]]>Hi, I’m Stella, and I love simple home upgrades that make a space feel cleaner without turning the whole weekend into a construction project. Patio concrete paint can do exactly that. The right paint can refresh old concrete, add grip, hide stains, and make your patio look more intentional.
But here’s the catch. Not every concrete paint suits outdoor patios. Some paints work better for garages. Some handle foot traffic beautifully but hate car tires. Some look pretty but turn slippery after rain. Fun, right? Because apparently, even paint has drama.
So, I rounded up the best concrete paint for patio options and arranged them by use case. After that, I’ll walk you through how to choose the right one for your patio, how to apply it properly, and the mistakes I would absolutely avoid.
Best Concrete Paint for Patio
| Product Image | Product Name | Features | Price |
|---|---|---|---|
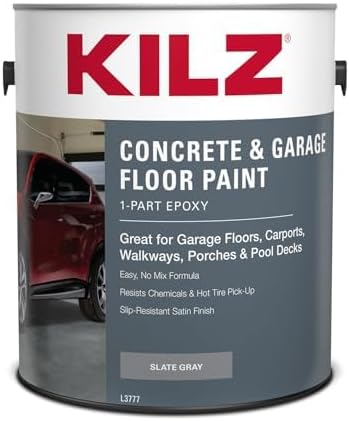 |
KILZ 1-Part Epoxy Acrylic Concrete & Garage Floor Paint | Long-lasting protection. Covers 300–400 sq. ft. per gallon. Best for concrete surfaces. Resists peeling |
Check Price |
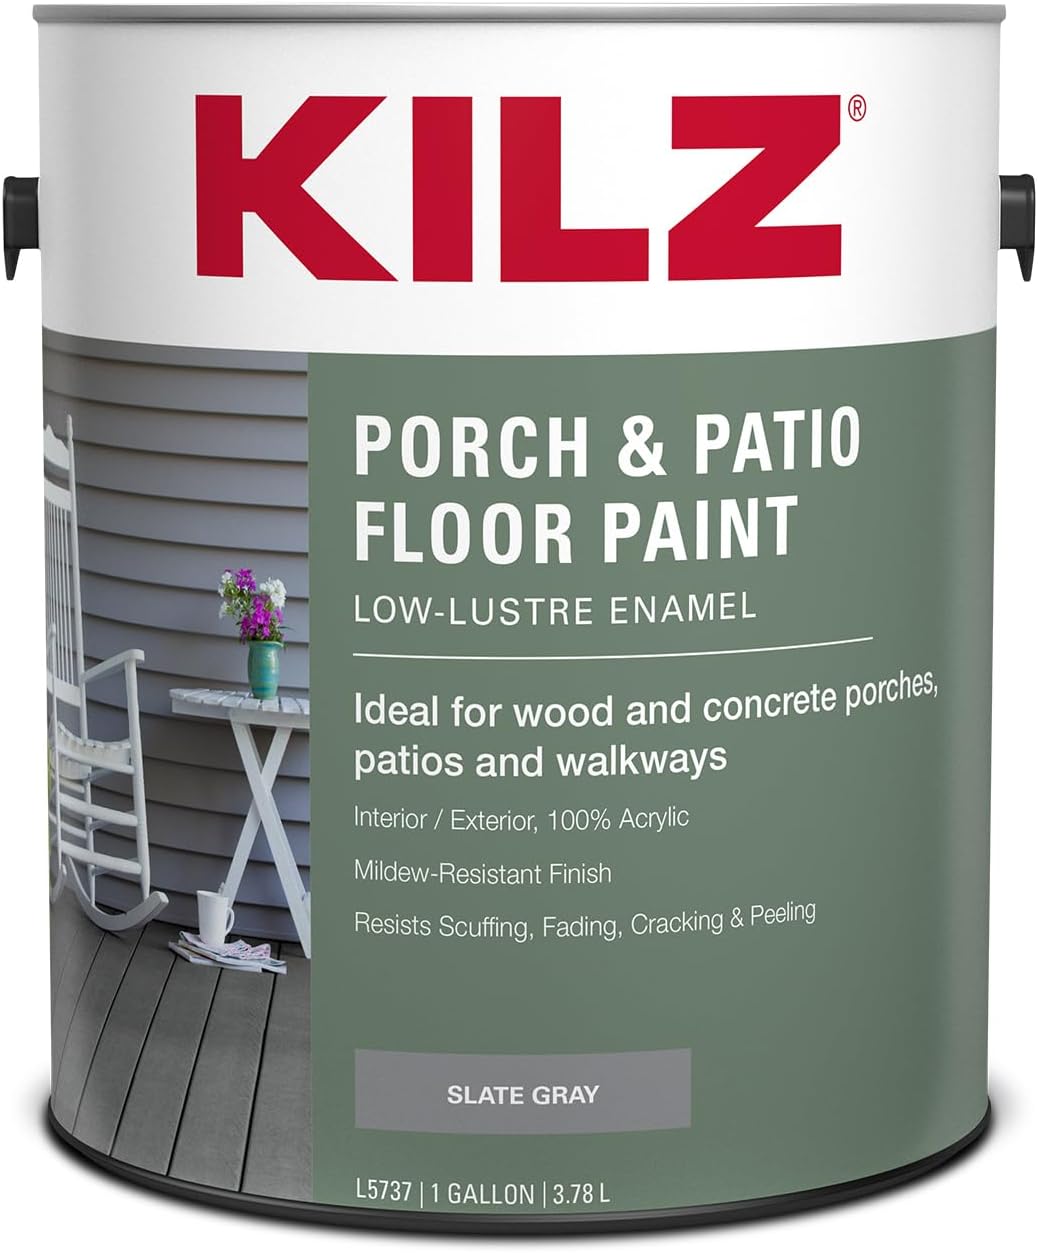 |
KILZ Low-Lustre Enamel Porch & Patio Latex Floor Paint | Good for concrete and wood. Low-lustre finish looks clean. Good choice for general patio makeovers. Easy to clean |
Check Price |
 |
CALIFORNIA PAINTS ALLFLOR Porch, Patio & Floor Enamel | Patios with regular foot traffic. Pool decks. Porches. Basement floors. |
Check Price |
 |
INSL-X Tough Shield Floor and Patio Paint | Residential patios. Porches Concrete walkways. Light commercial floors. Satin finish lovers. |
Check Price |
 |
KILZ Decorative Concrete Coating | Crack resistant. Protective finish. Adds depth. Washable. |
Check Price |
 |
Rust-Oleum Concrete & Garage Floor Paint and Primer | UV resistant. Satin finish. Good quality |
Check Price |
 |
INSL-X Sure Step Acrylic Anti-Slip Paint | Wet patios. Pool decks. Outdoor stairs. Walkways. Safety-focused buyers. |
Check Price |
 |
KILZ Over Armor Smooth Exterior Resurfacer | Old patios. Weathered concrete. Small cracks. Pool deck edges. Sidewalk-style concrete areas. |
Check Price |
KILZ Low-Lustre patio paint works on wood and concrete porch and patio floors with resistance to scuffing, fading, cracking, and peeling. KILZ Over Armor is designed to hide imperfections, bridge cracks, and work on concrete patios, pool decks, sidewalks, porches, and similar surfaces.
How to Choose the Right Concrete Paint for Your Patio
Check Your Patio Condition First
Before you buy anything, look at your concrete closely. Does it have cracks? Does it feel powdery? Does water soak in or sit on top? Does old paint peel off?
If your patio looks smooth and clean, a standard porch and patio paint like KILZ Low-Lustre may work beautifully. If your concrete has visible wear, small cracks, and rough patches, KILZ Over Armor makes more sense.
A simple test helps here. Pour a small amount of water on the concrete. If the concrete absorbs it, paint can likely bond after proper prep. If water beads up, old sealer may block adhesion, and you’ll need extra prep.
Match the Paint to the Surface Use
Ask yourself one honest question: What will happen on this patio?
If you only use the space for chairs, plants, and coffee, you can choose a standard patio paint. If kids run across it after swimming, choose a non-slip coating. If you park anything on it, choose a product that allows tire contact.
Here’s a quick guide:
- Covered patio: KILZ Low-Lustre
- Old cracked patio: KILZ Over Armor
- Wet patio or pool deck: INSL-X Sure Step
- High foot traffic patio: INSL-X Tough Shield
- Driveway-style concrete: KILZ 1-Part Epoxy or Rust-Oleum concrete floor paint
KILZ 1-Part Epoxy works on properly prepared concrete, masonry, stone, and brick, and it is listed for porches, driveways, and pool decks with resistance to hot tire pickup, scuffing, cracking, peeling, and fading. Rust-Oleum’s concrete floor paint also lists patios, walkways, basements, pool decks, driveways, and garages among its uses, with a UV- and weather-resistant formula.
Think About Finish and Texture
A patio floor needs balance. You want it to look nice, but you also want shoes to grip it. Glossy finishes can look attractive, but they can show dust, scratches, and wet marks faster.
For most patios, I prefer:
- Low-lustre for a soft clean look
- Satin for a slightly polished finish
- Textured or anti-slip for wet areas
- Decorative stone-look coating for patios that need visual interest
KILZ Decorative Concrete Coating creates a stone-like speckled texture, fills hairline cracks, and works on patios, pool decks, walkways, porches, garages, and driveways. It suits buyers who want a more decorative finish.
How to Paint a Concrete Patio Step by Step
Step 1: Clean the Concrete Like You Mean It
Paint hates dirt. Paint also hates grease, dust, loose old coating, mildew, and random mystery stains. Basically, paint has standards.
Start with a stiff broom, then wash the patio with a concrete cleaner. If you see oil stains, scrub them with a degreaser. If the surface has mildew, use a mildew-removing cleaner.
Let the concrete dry completely. Do not rush this step. Moisture under paint can cause bubbling and peeling, and then your patio starts looking worse than before. Love that for no one.
Step 2: Repair Cracks and Rough Spots
Use a concrete patch or filler for deeper cracks. Smooth it well and let it cure based on the product label. If you use a resurfacing paint like KILZ Over Armor, it can hide smaller cracks, but you still need a stable surface underneath.
Paint can improve appearance, but it cannot fix structural damage. If your patio has major cracks, sinking areas, or serious drainage issues, fix those first.
Step 3: Etch or Prime When Needed
Bare concrete often needs etching or primer. KILZ recommends letting new concrete cure for 30 days and preparing uncoated concrete or masonry with a cleaner and etcher before priming with a concrete and masonry bonding primer.
This step may feel annoying, but it can make or break the whole project. If paint cannot grip the concrete, it will peel. And then you’ll spend another weekend scraping paint instead of enjoying your patio. Sounds dreamy, right? :/
Step 4: Apply Thin, Even Coats
Use a roller for large areas and a brush for edges. Work in manageable sections. Do not pour half the can onto the slab and hope your roller handles it like a magic wand.
Most patio paints perform better with two thin coats instead of one thick coat. Thick coats can dry unevenly, trap moisture, and peel sooner.
Step 5: Respect the Drying and Cure Time
Dry-to-touch does not mean ready for furniture, pets, or a full patio party. Many coatings need several days before normal use and longer before heavy cleaning.
For example, KILZ Decorative Concrete Coating says it dries to the touch in one hour, allows recoating in three to four hours, permits light foot traffic after 24 hours, and fully cures in 72 hours. It also recommends waiting 30 days before cleaning.
So yes, patience helps. Annoying? A little. Worth it? Absolutely.
Common Mistakes to Avoid When Painting a Concrete Patio
Mistake 1: Skipping Surface Prep
People love to skip prep because it feels boring. But surface prep decides whether the paint lasts or peels. Clean, dry, sound concrete gives paint the best chance to bond.
If your patio has dust, grease, loose coating, or trapped moisture, even a great product can fail. Paint cannot perform miracles, despite what we all secretly wish.
Mistake 2: Choosing Garage Paint for Every Patio
Garage floor paints can work outdoors only when the product label says they can. Some garage coatings handle tires but may not suit full sun, rain, or pool areas.
Always check the actual product use. KILZ 1-Part Epoxy suits interior and exterior horizontal concrete surfaces, including porches, driveways, and pool decks. INSL-X Tough Shield, on the other hand, works for patios and floors but says not to use it on garage floors or car parking surfaces.
Mistake 3: Ignoring Slip Resistance
A patio can look gorgeous and still feel unsafe. If your patio gets wet, choose a paint with grip. Pool decks, steps, and sloped concrete need extra attention.
For those areas, I would look closely at INSL-X Sure Step or a textured coating. Pretty matters, but not falling matters more. IMO, that’s a fair trade.
Mistake 4: Painting in Bad Weather
Do not paint when rain threatens, when temperatures drop too low, or when direct heat bakes the slab. INSL-X Sure Step specifically warns against exterior application when rain threatens and says the product does not suit immersion service.
Choose a mild, dry day. Your paint will spread better, dry more evenly, and cure with fewer issues.
Mistake 5: Buying Too Little Paint
Concrete can drink paint like it has been walking through the desert. Rough or porous concrete usually needs more product than smooth concrete.
Always check coverage, then buy a little extra. Running out halfway through the second coat can create color mismatch, uneven texture, and a tiny emotional breakdown in aisle seven.
Quick Real-Life Example: Which Paint Would I Choose?
Let’s say my friend Sarah has a small backyard patio. It has no big cracks, but it looks faded and dusty. She wants a clean gray finish for a seating area with two chairs, a small table, and planters.
I would suggest KILZ Low-Lustre Enamel Porch & Patio Latex Floor Paint first. It gives her a clean look and suits concrete patios.
Now let’s say another friend has an older patio with small cracks and uneven spots. She doesn’t want a perfect showroom finish; she wants the patio to look fresh and less worn. I would point her toward KILZ Over Armor Smooth Exterior Resurfacer.
For a poolside patio, I would choose INSL-X Sure Step because grip matters. Nobody wants to test gravity while carrying lemonade.
FAQs About the Best Concrete Paint for Patio
What is the best concrete paint for patio use?
For most people, I would choose KILZ Low-Lustre Enamel Porch & Patio Latex Floor Paint as the best overall patio paint. It is a practical option for porch and patio floors and gives outdoor concrete a clean, refreshed look.
Do I need primer before painting a concrete patio?
Many bare concrete patios need etching and primer. Always read the product label. If your concrete has never had paint or sealer, primer can help the paint bond better and last longer.
Can I paint over old concrete paint?
Yes, you can paint over old concrete paint if the old coating still bonds tightly. Scrape loose paint, sand rough edges, clean the surface, and prime when needed. Never paint over peeling paint and hope for the best. Hope makes a terrible primer.
Which concrete paint works best for slippery patios?
For slippery patios, I would choose an anti-slip product like INSL-X Sure Step Acrylic Anti-Slip Paint. It suits patios, stairs, walkways, and pool decks, and it focuses on skid resistance.
Can I use patio concrete paint on a driveway?
Only use it on a driveway if the product label clearly allows automotive traffic or hot tire pickup. Some patio paints specifically say not to use them where cars drive or park.
How long does concrete patio paint last?
A good patio paint can last several years when you prep the surface properly, apply it correctly, and avoid harsh abuse. Sun, rain, foot traffic, poor drainage, and bad prep can shorten its life quickly.
What color works best for concrete patios?
Gray, slate, sand, and tile red usually work well. I personally like soft gray because it hides dust better than white and looks cleaner than dark black in full sun.
Conclusion: Choose the Paint That Matches Your Patio, Not Just the Pretty Can
The best concrete paint for patio depends on your surface, weather, foot traffic, and safety needs. If you want the safest all-around pick, start with KILZ Low-Lustre Enamel Porch & Patio Latex Floor Paint. If your concrete looks older or cracked, consider KILZ Over Armor Smooth Exterior Resurfacer. If slipping worries you, INSL-X Sure Step deserves a serious look.
Here’s the key takeaway: prep matters as much as the paint. Clean the concrete, repair cracks, prime when needed, apply thin coats, and let everything cure properly. Your patio will reward you by looking fresh instead of peeling like a bad sunburn.
Have you painted a concrete patio before, or are you planning your first one? Share your patio situation, your favorite product, or your biggest painting question in the comments. I’d love to hear what you’re working on.
]]>Hi, I’m Stella, and if you’re searching for the best airless paint sprayer for cabinets, I’m guessing you want one thing: a smooth, clean, professional-looking finish without brushing every corner like it owes you money. Cabinets need more care than walls because every drip, streak, and uneven patch shows up fast. That is why choosing the right sprayer matters.
I looked at strong options based on brand trust, cabinet-use potential, features, and practical DIY use. Below, I’ve listed the product links first. After that, I’ll explain how to choose the right one, how to use it properly, and what mistakes to avoid so your cabinets don’t end up looking like a rushed weekend regret.
| Product Image | Product Name | Features | Price |
|---|---|---|---|
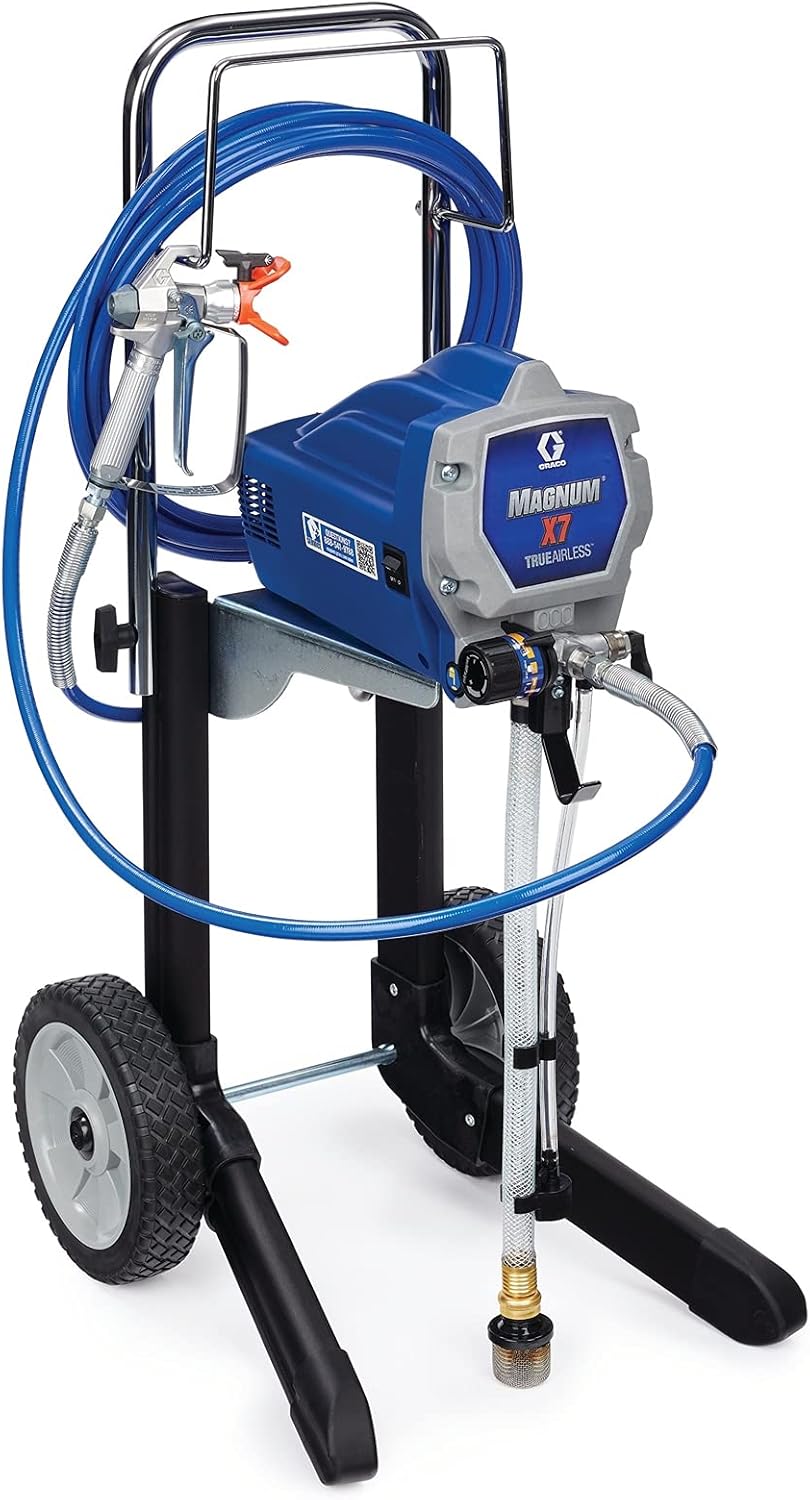 |
Graco Magnum X7 | Great for bigger DIY projects. Strong Graco brand trust. Good option for full kitchen cabinet refinishing. Works directly from paint buckets. |
Check Price |
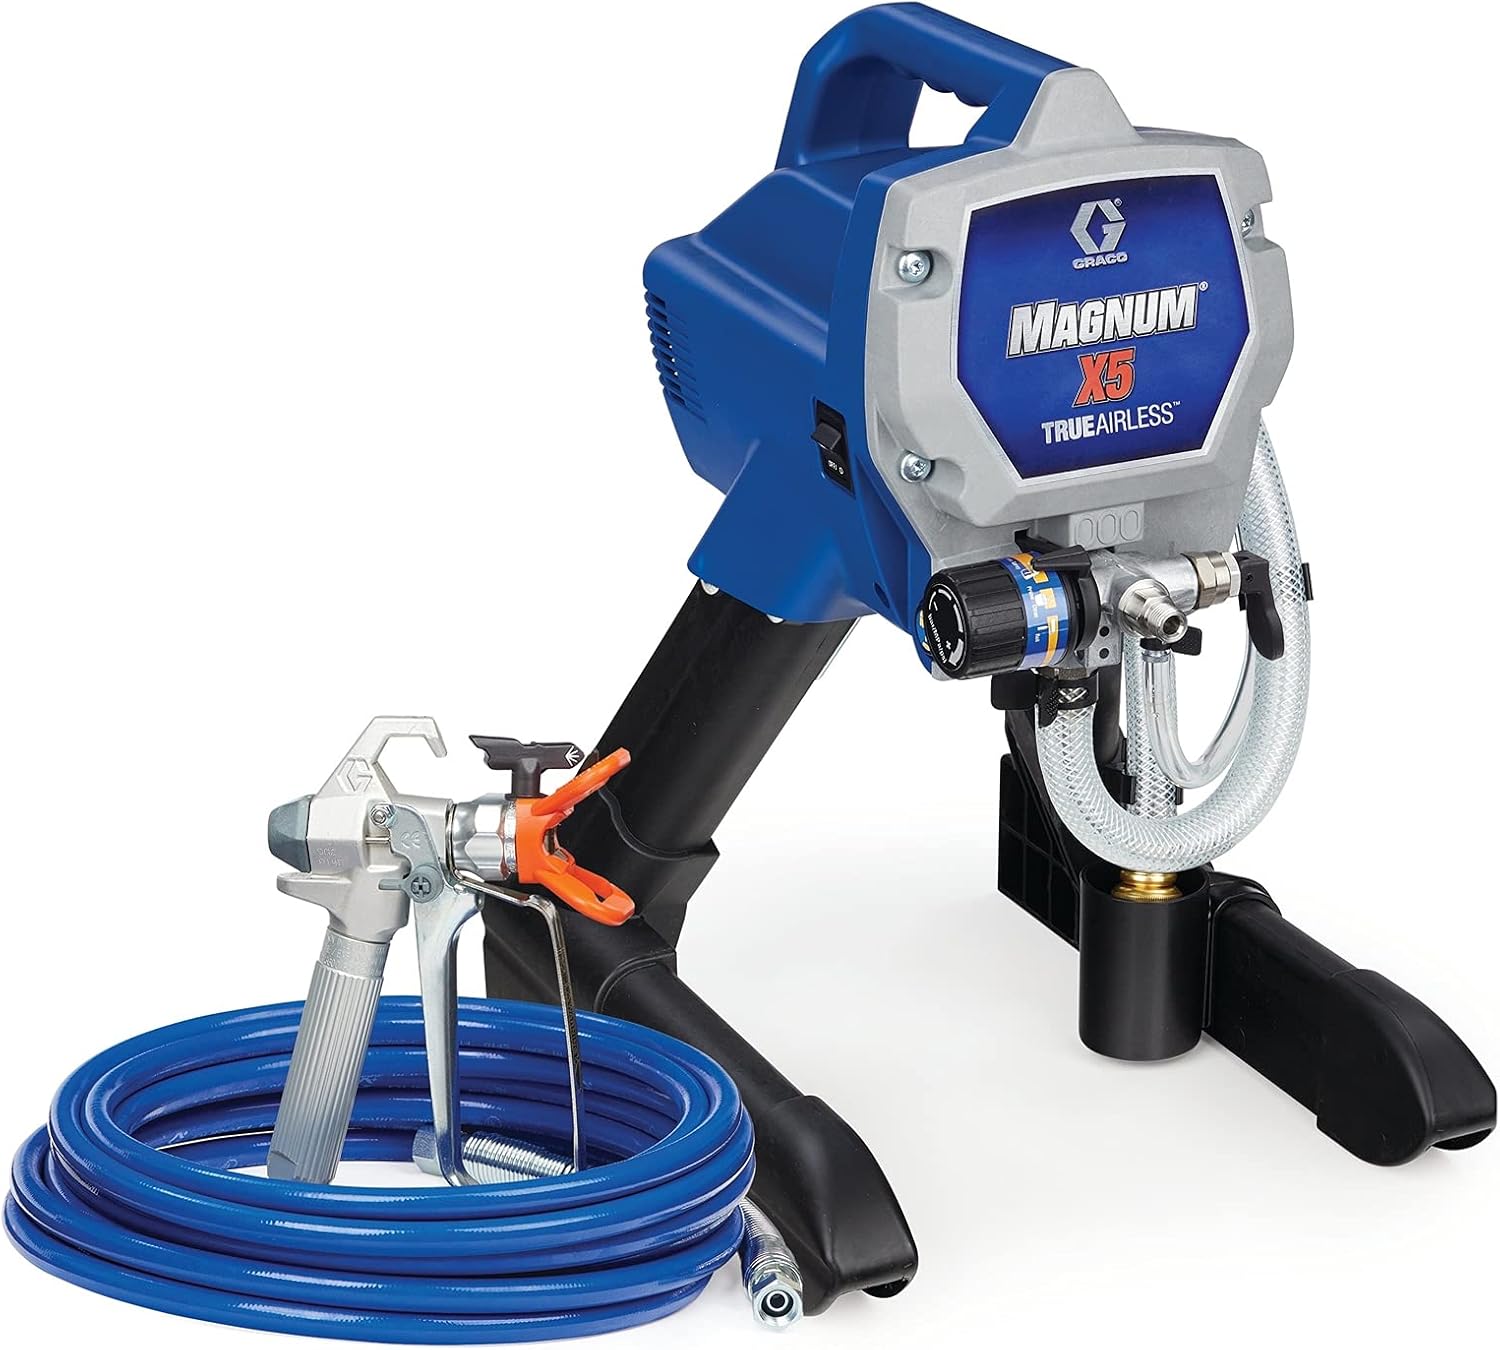 |
Graco Magnum X5 | Good for cabinets, doors, walls, trim, and fences. More manageable than the X7 for many homeowners. Reaches up to 3000 PSI. Strong option for medium-size home projects. |
Check Price |
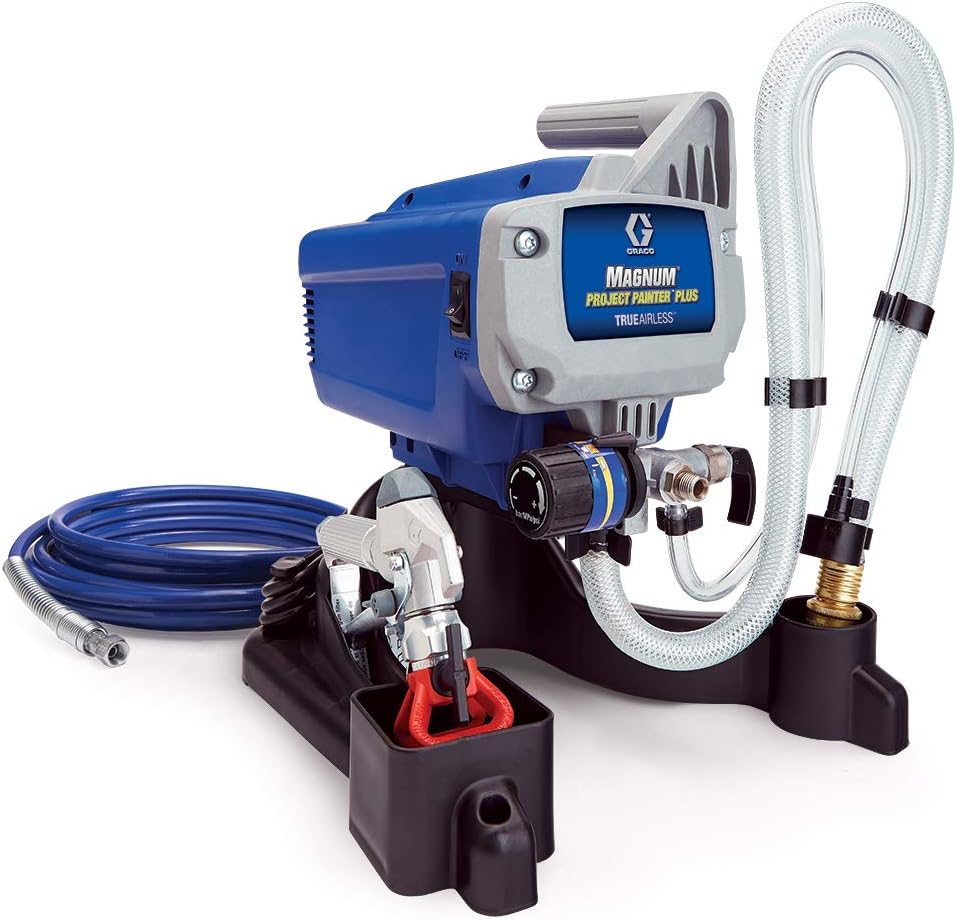 |
Graco Magnum Project Painter | Lower price than X5 and X7. Adjustable pressure control. Good entry point into Graco airless sprayers. Practical for small cabinet and home projects. Useful for budget-conscious DIYers. |
Check Price |
 |
MaXpray M1 | Lower price than many Graco models. Beginner-friendly positioning. Useful for DIYers who want value first. Comes with helpful accessories. Good alternative for simple home projects. |
Check Price |
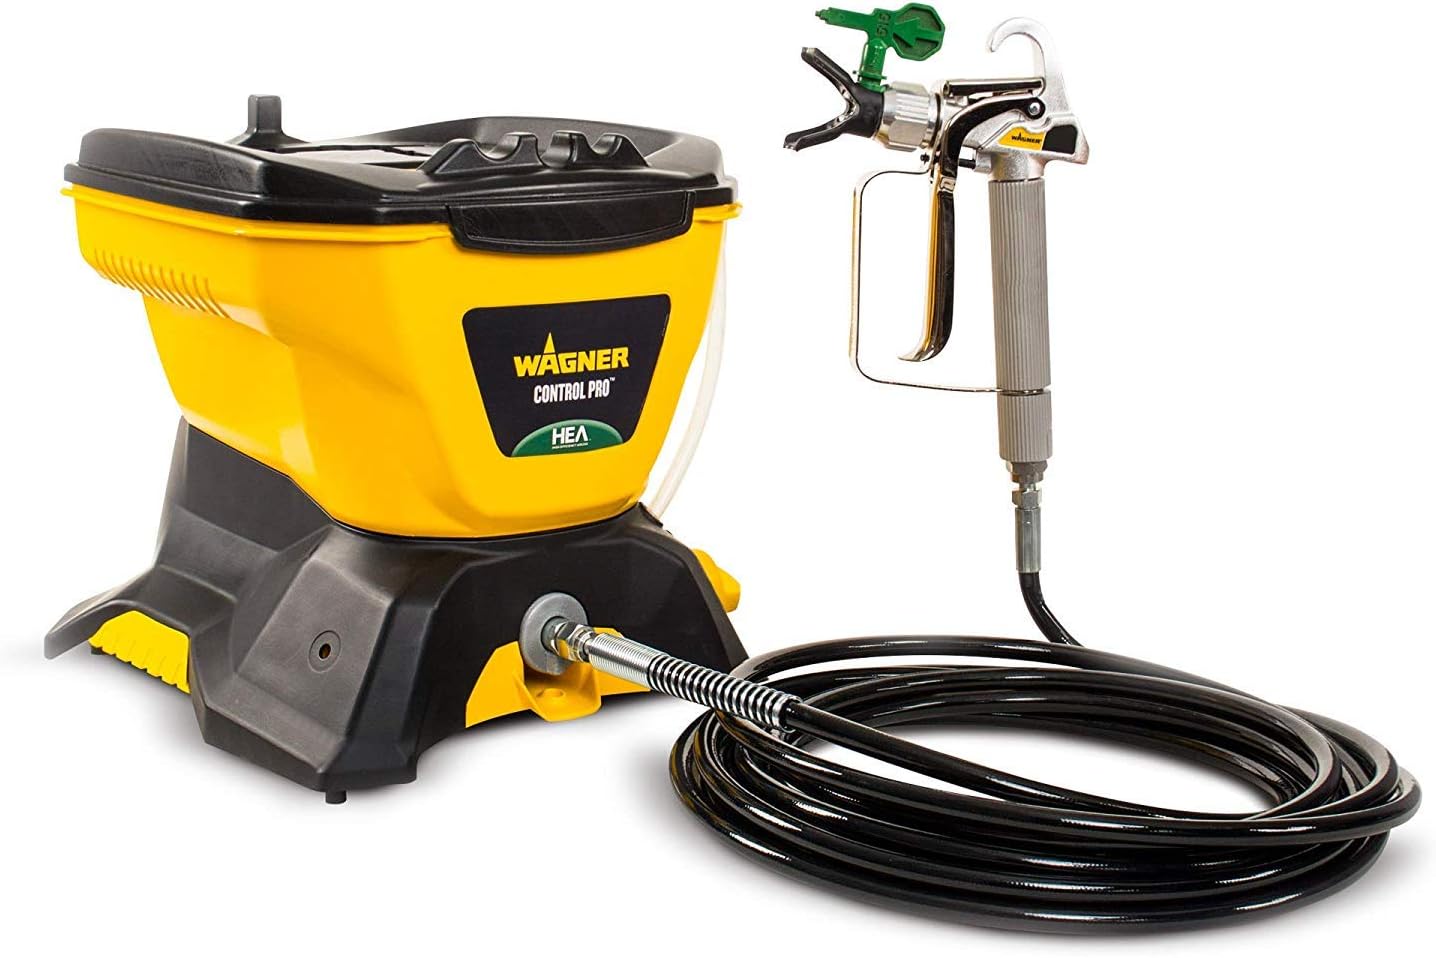 |
Wagner Control Pro | Lower overspray focus Softer spray pattern. Simple tank-style design. Useful for beginners who fear messy spraying. Good choice for controlled DIY painting. |
Check Price |
 |
Graco TrueCoat 360 Dual Speed | Compact handheld design Good for smaller projects. No thinning required. Easier to store than stand/cart sprayers. Nice option for touch-ups and small cabinet sets. |
Check Price |
My Top Picks and Why They Work for Cabinets
1. Graco Magnum X7 Best Premium Airless Paint Sprayer for Cabinets
The Graco Magnum X7 gives you more power, more hose support, and more flexibility than smaller DIY sprayers. It can spray directly from a 1- or 5-gallon bucket, uses a stainless steel piston pump, supports long hose use, and includes adjustable pressure control.
Would I buy this only for two cabinet doors? Probably not. That would feel like buying a wedding cake for a coffee break. But if you plan to paint a full kitchen, doors, trim, walls, fences, or future projects, the X7 makes much more sense.
Why I like it:
- Great for bigger DIY projects
- Strong Graco brand trust
- Good option for full kitchen cabinet refinishing
- Works directly from paint buckets
- Offers strong long-term value
Best for: homeowners who want one serious sprayer for cabinets and larger home projects.
My honest opinion: The X7 works best when the buyer wants long-term value, not just a one-time quick cabinet refresh.
2. Graco Magnum X5 Best Overall Airless Paint Sprayer for Cabinets
The Graco Magnum X5 feels like the sweet spot for most DIY cabinet painters. It gives a strong balance of power, usability, and practicality without feeling too commercial for home use.
The X5 supports adjustable pressure, reaches up to 3000 PSI, and works well for medium-size home projects. Its feature set includes a good hose range, a practical tip size range, and enough power for cabinets, doors, walls, trim, and fences.
For cabinets, the X5 gives you enough performance without pushing you into a larger setup than you may need. You still need the right spray tip, good prep, and patience. Yes, patience. Sadly, no tool brand sells that in a two-pack.
Why I like it:
- Best balance of price, power, and usability
- Good for cabinets, doors, walls, trim, and fences
- More manageable than the X7 for many homeowners
- Strong option for medium-size home projects
- Practical choice for most DIY cabinet painters
Best for: most DIY cabinet painters who want a reliable sprayer that can handle more than cabinets.
My honest opinion: If I had to recommend one product to the average reader, I’d choose the Graco Magnum X5. It gives enough performance without pushing everyone into a higher-priced model.
3. Graco Magnum Project Painter Plus Best Budget Graco Pick
The Graco Magnum Project Painter Plus makes sense for readers who want the Graco name but don’t want to spend X5 or X7 money. It is a practical entry point for DIY users who want a trusted brand at a more affordable price.
It suits projects up to 5 gallons, offers fully adjustable pressure, sprays directly from 1- or 5-gallon buckets, and supports up to 50 feet of paint hose. That makes it a solid choice for small to medium cabinet jobs, especially if someone wants to repaint a kitchen without buying a more expensive machine.
Why I like it:
- Lower price than X5 and X7
- Adjustable pressure control
- Good entry point into Graco airless sprayers
- Practical for small cabinet and home projects
- Useful for budget-conscious DIYers
Best for: budget-conscious DIYers who still want a trusted brand.
4. MaXpray M1 Best Budget Alternative to Graco
The MaXpray M1 gives you a lower-cost alternative for readers who feel Graco prices look a little spicy. It targets DIY painting projects and comes with accessories, which helps beginner buyers feel like they get more value.
I still would not rank it above Graco for trust, but I would include it as a budget alternative.
Why I like it:
- Lower price than many Graco models
- Beginner-friendly positioning
- Useful for DIYers who want value first
- Comes with helpful accessories
- Good alternative for simple home projects
Best for: readers who want an affordable airless sprayer and don’t mind choosing a less established brand.
My honest opinion: I’d include this product, but I’d avoid calling it the “best overall.” It fits better as the “budget alternative” pick.
5. Wagner Control Pro 130 Best Low-Overspray Option
The Wagner Control Pro 130 uses HEA technology, which Wagner says produces up to 55% less overspray and creates a softer spray pattern. That matters for cabinets because overspray can turn your garage, walls, floor, and possibly your poor dog’s tail into a paint project. Not cute.
It also holds up to 1.5 gallons in the tank, which helps with continuous painting.
Why I like it:
- Lower overspray focus
- Softer spray pattern
- Simple tank-style design
- Useful for beginners who fear messy spraying
- Good choice for controlled DIY painting
Best for: beginners who want easier control and less overspray.
My honest opinion: I like the concept, but I’d still recommend Graco first for cabinet-focused buyers who care most about finish quality and long-term support.
6. Graco TrueCoat 360 Dual Speed Best Handheld Pick
The Graco TrueCoat 360 Dual Speed suits small cabinet projects because it has a handheld design. It handles smaller projects, needs no thinning, and uses a stainless steel piston pump with high and low pressure options.
That makes it interesting, but I would not make it the main recommendation because handheld sprayers can feel more limited for full kitchen cabinet jobs.
Why I like it:
- Compact handheld design
- Good for smaller projects
- No thinning required
- Easier to store than stand/cart sprayers
- Nice option for touch-ups and small cabinet sets
Best for: small cabinet jobs, furniture, doors, and quick DIY projects.
My honest opinion: I like this as a convenience pick, not as the best value for a full cabinet makeover.
7. Titan ControlMax 1700 Good Alternative, But Not My First Pick
The Titan ControlMax 1700 also uses HEA technology and focuses on lower overspray. Titan says the ControlMax 1700 Pro decreases overspray by up to 55%, delivers a softer spray, and improves control.
I’d include Titan as an alternative.
Best for: readers who want a non-Graco HEA sprayer and plan to use it for more than cabinets.
How to Choose the Right Airless Paint Sprayer for Cabinets
Picking a sprayer by price or brand name alone can help, but it does not tell the whole story. Cabinets need a finer finish than walls or fences. So, before you add something to cart and start feeling powerful, check these things first.
Choose Adjustable Pressure
Cabinets need control. A sprayer with adjustable pressure lets you slow the paint flow and reduce overspray. This helps you avoid heavy coats, runs, and that thick orange-peel texture nobody asked for.
Look for:
- Adjustable pressure dial
- Good trigger control
- Compatibility with fine-finish tips
- Easy priming and cleaning
Use the Right Fine-Finish Tip
This part matters a lot. You can buy a great sprayer and still get a poor cabinet finish if you use the wrong tip.
For cabinets, look at fine finish low pressure tips. Graco’s FFLP310 tip, for example, produces a 6–8 inch fan pattern, has a 0.010-inch orifice, and Graco lists it for fine finish applications.
For many cabinet coatings, people often look at sizes like:
- 210 for narrow rails, trim, and smaller pieces
- 310 for cabinet doors and drawer fronts
- 410 for wider panels or faster coverage
Always match the tip to your paint or coating. Paint thickness matters. Cabinet enamel behaves differently than stain or primer. FYI, the tip can make or break the finish.
Think About Project Size
Ask yourself one simple question: Am I painting one small cabinet, or am I repainting an entire kitchen?
For a full kitchen:
- Graco X5
- Graco X7
- Project Painter Plus
For smaller jobs:
- Graco TrueCoat 360 DS
- MaXpray M1
- Wagner Control Pro 130
For repeated projects:
- Graco X5 or X7
Bigger sprayers give more flexibility, but they also require more cleanup. And yes, cleanup counts. Nobody wants to finish painting and then spend forever rinsing hoses while questioning every life choice.
Step-by-Step: How I’d Spray Cabinets for a Smooth Finish
Here’s the simple process I’d follow for cabinet painting.
Step 1: Remove Doors and Hardware
Take off cabinet doors, drawer fronts, knobs, hinges, and handles. Label everything. I mean everything.
Use painter’s tape and small bags for screws. You’ll thank yourself later when you don’t stand in the kitchen holding one mystery hinge like it’s a crime scene clue.
Step 2: Clean the Cabinets
Cabinets collect grease, fingerprints, cooking residue, and random kitchen drama. Clean them with a degreaser before sanding.
If you skip cleaning, your paint may not bond properly. Then you’ll blame the sprayer, the paint, the weather, and maybe Mercury retrograde. But the real issue started with grease.
Step 3: Sand Lightly
Use light sanding to dull the surface. You do not need to destroy the cabinet surface. You just need to give primer something to grip.
After sanding, vacuum the dust and wipe everything with a tack cloth.
Step 4: Prime Properly
Use a cabinet-friendly primer. Spray light, even coats. Let the primer dry fully before sanding lightly again.
Primer helps with adhesion, stain blocking, and smoother paint coverage.
Step 5: Spray Thin Coats
Spray two or three thin coats instead of one heavy coat. Keep your wrist steady and move before pulling the trigger.
Use this pattern:
- Start moving your hand.
- Pull the trigger.
- Keep the sprayer parallel to the surface.
- Release the trigger before stopping.
- Overlap each pass by about 50%.
Ever wondered why pros make spraying look easy? They control movement first and trigger second.
Step 6: Let Everything Cure
Dry paint and cured paint are not the same. Let cabinet doors cure before reinstalling hardware. If you rush, you can dent, scratch, or stick the finish.
IMO, curing time tests your patience more than the actual painting.
Common Mistakes to Avoid When Spraying Cabinets
Mistake 1: Buying the Cheapest Sprayer Only Because It Looks Popular
Cheap sprayers can work, but cabinets punish weak tools. A poor spray pattern can leave blotches, splatter, or texture. Save money where it makes sense, but don’t gamble with the finish if you want a polished kitchen.
Mistake 2: Using the Wrong Tip
A wall tip can dump too much paint on cabinet doors. Use a fine-finish tip when the sprayer supports it. This one choice can improve the finish more than people expect.
Mistake 3: Skipping Prep
Prep feels boring, but it decides the final result. Clean, sand, prime, and mask properly. If you skip prep, your paint may peel, chip, or show imperfections.
Mistake 4: Spraying Too Close
Hold the sprayer too close and you’ll get runs. Hold it too far and you’ll get dry spray. Try to keep a steady distance, usually around 10–12 inches, depending on the sprayer and tip.
Mistake 5: Ignoring Cleanup
Airless sprayers need proper cleaning. Dried paint inside the hose, gun, or tip can cause clogs later. Clean the system right after use, even if you feel tired. Your future self deserves better 
Quick Cabinet Sprayer Buying Guide
Choose the Graco Magnum X7 if you want a premium pick and plan to use it for cabinets plus larger projects.
Choose the Graco Magnum X5 if you want the best overall balance of power, control, and price.
Choose the Graco Project Painter Plus if you want a budget-friendly Graco with a practical feature set.
Choose the MaXpray M1 if you want a lower-cost alternative for simple DIY use.
Choose the Wagner Control Pro 130 if overspray worries you and you want a softer HEA spray pattern.
Choose the Graco TrueCoat 360 DS if you want a compact handheld sprayer for small projects.
Choose the Titan ControlMax 1700 if you want another HEA alternative, but compare product details carefully before buying.
FAQs About Airless Paint Sprayers for Cabinets
What is the best airless paint sprayer for cabinets?
For most people, I’d pick the Graco Magnum X5 as the best overall choice. It has a strong balance of power, price, usability, and enough performance for cabinets and other home projects.
Is the Graco X7 better than the X5 for cabinets?
The X7 gives more capacity and supports larger projects, but the X5 makes more sense for many DIY users. If you plan to paint cabinets only, the X5 usually feels more practical. If you plan to paint cabinets, walls, fences, and exteriors, the X7 gives more room to grow.
Can I use an airless sprayer for kitchen cabinets?
Yes, you can use an airless sprayer for kitchen cabinets. Use the right fine-finish tip, prep the cabinets properly, and spray thin coats. The sprayer helps with speed, but your technique decides the finish.
Do I need to thin paint for an airless sprayer?
Many airless sprayers can spray unthinned paint, but always check your paint and sprayer instructions. Some cabinet enamels may still perform better with proper filtering, correct tip size, and pressure adjustment.
What spray tip should I use for cabinets?
Many cabinet painters use fine-finish low-pressure tips such as 210, 310, or 410, depending on the surface width and coating. A smaller tip gives more control, while a wider tip covers larger panels faster.
Is HVLP or airless better for cabinets?
HVLP sprayers can give excellent control and fine finishes, but they work slower. Airless sprayers work faster and handle thicker coatings better. For a full kitchen cabinet project, a good airless sprayer with a fine-finish tip can save serious time.
Conclusion: My Final Recommendation
If you want the premium option, start with the Graco Magnum X7. If you want the best all-around pick for most cabinet projects, I’d choose the Graco Magnum X5. If you want a budget-friendly Graco, go with the Project Painter Plus. For cheaper alternatives, the MaXpray M1 and Wagner Control Pro 130 both deserve a look.
The biggest takeaway? Don’t choose a sprayer only by price. Cabinets need control, prep, the right tip, and thin coats. A good sprayer helps, but your setup and technique create the final finish.
Have you tried spraying cabinets before, or are you planning your first kitchen makeover? Share your experience, ask a question, or save this guide before you buy. Your future cabinet doors will appreciate the effort silently, of course, because cabinets have manners.
]]>Hi, I’m Stella, and if you’re trying to choose the best air compressor for spray painting, I’ll keep this simple, practical, and honest. I’m not going to pretend every compressor works beautifully
with a spray gun, because it doesn’t. Some compressors look powerful because they shout “175 PSI” on the listing, but for painting, CFM matters way more than max PSI.
| Product Image | Product Name | Features | Price |
|---|---|---|---|
 |
VEVOR 13-Gallon Air Compressor | 2HP motor. Decent tank size. Quiet-ish operation. Enough airflow for lighter spray work. |
Check Price |
 |
Klutch 29-Gallon Air Compressor | Portable air compressor. 2.5 HP motor. Large rubber wheels. Easy to set-up. |
Check Price |
 |
California Air Tools 20020 | 20 Gallon tank capacity. 2.0 HP motor. Work only 14 amps. Minimal noise |
Check Price |
 |
Craftsman 20-Gallon | Stainless steel body. 1.8 HP motor. Ready to use. |
Check Price |
 |
VEVOR 20-Gallon | Good airflow. Solid tank size. Heavy-duty pump. 2 HP motor. |
Check Price |
My top picks and why I’d choose them
1. VEVOR 13-Gallon Air Compressor best budget pick
The VEVOR 13-Gallon Air Compressor stands out as a practical budget-friendly option for light spray painting. It lists 4.6 SCFM at 90 PSI, which gives it more painting potential than many small pancake compressors.
I’d choose this one for small furniture projects, cabinet doors, trim pieces, craft work, and light DIY spray painting. It will not magically turn your garage into a professional auto body shop, but for the price, it makes sense. Ever bought a tool that looked “pro” online and then acted like a toy? Yeah, I try to avoid those.
The best thing here is the balance. You get a decent tank size, quiet-ish operation, and enough airflow for lighter spray work.
2. Klutch 29-Gallon Air Compressor best overall DIY choice
The Klutch 29-Gallon Air Compressor gets my strongest practical vote. It offers a useful mix of tank capacity, airflow, and general garage usability.
The listing mentions 5.1 SCFM at 90 PSI, quick recovery, a 29-gallon tank, and recommended use for spraying.
If a friend asked me, “Stella, which one should I buy for regular DIY spray painting?” I’d point her toward this one first. Why? Because the bigger tank gives you more air reserve, and spray painting needs a steadier air supply. A tiny compressor can start strong, then quickly fall behind while your spray pattern changes. Fun? Not really. Annoying? Absolutely.
This one suits garage users, furniture painters, hobbyists, woodworking projects, and people who want one compressor for spraying plus other air tools.
3. California Air Tools 20020 best quiet compressor for spray painting
The California Air Tools 20020 makes sense if noise matters to you. The product specs list a 20-gallon tank and 70 dB noise level.
It also shows 6.40 CFM at 40 PSI and 5.30 CFM at 90 PSI, which gives it solid airflow for many DIY spray painting tasks.
I like this one for indoor-ish garage work, small workshops, and anyone who doesn’t want a compressor screaming in the background like it just discovered taxes. If you paint furniture, cabinets, doors, or smaller panels, this compressor gives a nice mix of quiet operation, oil-free maintenance, and usable CFM.
IMO, this is the cleaner “premium DIY” pick. It costs more than some budget units, but the quiet operation makes it easier to live with.
4. Craftsman 20-Gallon best recognizable brand pick
The Craftsman 20-Gallon Air Compressor has a familiar brand name and works well for general garage use. The listing also shows recommended uses that include air brushing, nailing, and spraying.
Its airflow sits at 4 SCFM at 90 PSI, so I’d place it behind the Klutch and California Air Tools models for spray painting.
Would I use it for light spray painting? Yes. Would I choose it for long continuous HVLP work? No. This compressor suits someone who wants a known brand for general garage tasks with occasional spray painting.
5. VEVOR 20-Gallon 6.5 SCFM best airflow spec
The VEVOR 20-Gallon 6.5 SCFM model looks interesting because the listing shows 6.5 SCFM at 90 PSI, which beats several compressors above it on airflow.
This one could fit buyers who care more about airflow and want a stronger spec for spray painting. Still, I’d present it carefully: good airflow, solid tank size, and a practical option for users who want more air delivery.
How to choose the right air compressor for spray painting
Start with CFM, not PSI
Here’s the big rule: CFM matters more than PSI for spray painting. PSI shows pressure, but CFM tells you how much air the compressor can actually deliver. Spray guns need a continuous air supply, and a weak compressor can’t keep the spray pattern stable.
Atlas Copco explains that compressor sizing depends on both required CFM and PSI, but spray painting usually makes airflow the real deal-breaker.
Professional spray-finishing guidance also notes that many paint spray guns need around 10 to 15 CFM at 90 PSI for proper atomization.
Does that mean every DIY painter needs a huge industrial compressor? Not always. If you use an LVLP spray gun, paint small pieces, or work in short passes, you can manage with lower CFM. But if you want to paint a whole car or large panels, you need a bigger setup.
Match the compressor to your project
Use this simple guide:
- Small crafts, touch-ups, small furniture: 4–5 CFM can work with the right spray gun.
- Cabinets, doors, chairs, trim: 5–7 CFM feels more comfortable.
- Large panels or automotive painting: Look closer to 10+ CFM.
- Full car painting: Choose a serious compressor with a large tank and strong airflow.
For automotive painting, Atlas Copco notes that HVLP guns may need up to 20 CFM, while conventional spray guns may need 10–15 CFM.
That’s why I don’t love tiny pancake compressors for spray painting. They sell like crazy, but they fit nail guns and tire inflation better than smooth paint work. FYI, a 6-gallon compressor can look cute in your garage, but cute doesn’t spray a door evenly.
Don’t ignore tank size
A bigger tank gives your compressor more stored air. That helps the spray gun run longer before the motor cycles again.
For spray painting, I usually prefer:
- 13 gallons for small DIY jobs.
- 20 gallons for better comfort and longer spray passes.
- 29 gallons and above for more serious garage use.
- 60 gallons and above for large panels, vehicles, and shop work.
Tank size does not replace CFM, though. A huge tank with poor airflow still struggles once the stored air drops.
Step-by-step setup for better spray painting results
Step 1: Check your spray gun’s CFM requirement
Before you buy a compressor, read your spray gun specs. Check the required CFM and PSI. Then choose a compressor that meets or beats that airflow requirement.
I like to add a little breathing room. If your gun needs 4 CFM, don’t buy a compressor that barely delivers 4 CFM and then expect perfection. Tools love margin. So do paint jobs.
Step 2: Add a moisture filter
Moisture can ruin a finish. It can cause sputtering, bubbles, fish eyes, and random texture problems.
Add these to your setup:
- Water separator
- Air regulator
- Inline filter
- Good-quality hose
- Proper fittings
Clean, dry air matters just as much as compressor power. Honestly, this step saves people from blaming the paint, the gun, the weather, their neighbor’s cat, and everything else.
Step 3: Set pressure at the gun
Set your pressure while pulling the trigger. Many beginners set pressure at the compressor and forget pressure drops through the hose and fittings.
A basic process looks like this:
- Connect the hose and filter.
- Fill the compressor tank.
- Pull the spray gun trigger.
- Adjust the regulator while air flows.
- Test the spray pattern on cardboard.
- Adjust fan pattern and fluid flow.
- Spray your project in smooth, even passes.
Step 4: Test before painting the real piece
Never test your first spray pattern on the final surface. That’s brave, but not smart.
Use cardboard, scrap wood, or an old panel. Check for sputtering, uneven fan shape, dry spray, heavy edges, or orange peel texture. Fix the issue before you touch the real project.
My quick example: painting cabinet doors
Let’s say I want to repaint cabinet doors in a small garage. I’d choose something like the California Air Tools 20020 if noise matters, or the Klutch 29-Gallon if I want more tank capacity and stronger overall usability.
I’d pair the compressor with an LVLP spray gun because LVLP guns usually suit smaller compressors better than many HVLP guns. Then I’d add a water separator and test the pattern before spraying primer.
For this type of project, I don’t need a massive 60-gallon shop compressor. But I also don’t want a tiny compressor that stops every few seconds like it needs emotional support.
Common mistakes to avoid
Mistake 1: Buying only by PSI
Many beginners see 175 PSI and think, “Wow, powerful!” But spray painting needs airflow. Always check CFM at 90 PSI.
Mistake 2: Using a tiny compressor for big projects
A small compressor may work for touch-ups, but it will struggle with large doors, fences, cabinets, or car panels. Your spray pattern can fade as pressure drops.
Mistake 3: Forgetting moisture control
Water in your airline can destroy your finish. Add a filter and drain the tank regularly.
Mistake 4: Choosing the wrong spray gun
A high-CFM HVLP gun can overwhelm a small compressor. If you buy a smaller compressor, consider an LVLP spray gun.
Mistake 5: Ignoring duty cycle
If your compressor runs nonstop, you push it too hard. Give it rest time, especially during longer paint sessions.
FAQs about the best air compressor for spray painting
What size air compressor do I need for spray painting?
For small DIY projects, I’d start around 13–20 gallons with at least 4–5 CFM at 90 PSI. For larger work, choose more airflow and a bigger tank.
Can I spray paint with a 6-gallon compressor?
You can use it for very tiny jobs or airbrushing-style work, but I would not recommend it for serious spray painting. It usually runs out of steady airflow too quickly.
Is oil-free or oil-lubricated better for painting?
Oil-free compressors need less maintenance and reduce oil contamination concerns. Oil-lubricated compressors can run smoothly and last well, but you should use good filtration for painting.
What is the best overall compressor from this list?
I’d choose the Klutch 29-Gallon Air Compressor as the best overall DIY spray painting pick because it offers a bigger tank, decent CFM, and strong overall usability.
What is the best budget option?
The VEVOR 13-Gallon Air Compressor looks like the best budget-friendly option because it offers a practical tank size, usable airflow, and a beginner-friendly setup for small spray painting projects.
Conclusion: my final recommendation
If you want the safest recommendation, lead with the VEVOR 13-Gallon for budget buyers and the Klutch 29-Gallon as the best overall DIY choice. If your audience cares about quiet operation, feature the California Air Tools 20020 as the premium garage-friendly option.
The main takeaway? Don’t buy an air compressor for spray painting based on PSI alone. Check CFM, tank size, spray gun requirements, noise level, and filtration setup. Your paint finish will thank you later.
Have you tried spray painting with a small compressor before? Share your experience, compare your setup, or bookmark this guide before you buy because nobody wants to learn about low CFM halfway through a paint job.
]]>The laminate is basically plastic, the core hates moisture, and the edges swell if you look at them wrong.
Still, you can get a clean, durable finish if you approach it like a small renovation rather than a quick craft.
I’ve painted a lot of budget furniture over the years. Some projects went perfectly. A few chipped within a month because I rushed prep or used the wrong primer.
The difference between a finish that fails and one that looks store-bought usually comes down to three things: the right primer, careful surface prep, and thin, patient coats with proper cure time.
In this guide I’ll break down exactly what to do, what not to do, and how to fix the common “it’s peeling already” problems.
What You’re Actually Painting: Pressed Wood + Laminate
Pressed wood (often particleboard) is wood particles glued together under pressure. It’s dense but very vulnerable to water.
The outer shell is a thin laminate, basically a plastic veneer with a printed pattern that looks like wood. Paint doesn’t love sticking to plastic, and the pressed core under it will swell if it gets wet.
That means your approach needs to:
- Clean off waxes, polish, and kitchen oils so primer can bite.
- Slightly scuff the laminate without sanding through it.
- Lock down edges and chips with filler or epoxy so they stop wicking moisture.
- Use a bonding primer designed for slick surfaces.
- Paint in thin coats and let each coat cure.
If you do those five things, you can expect a finish that’s tough enough for daily use.
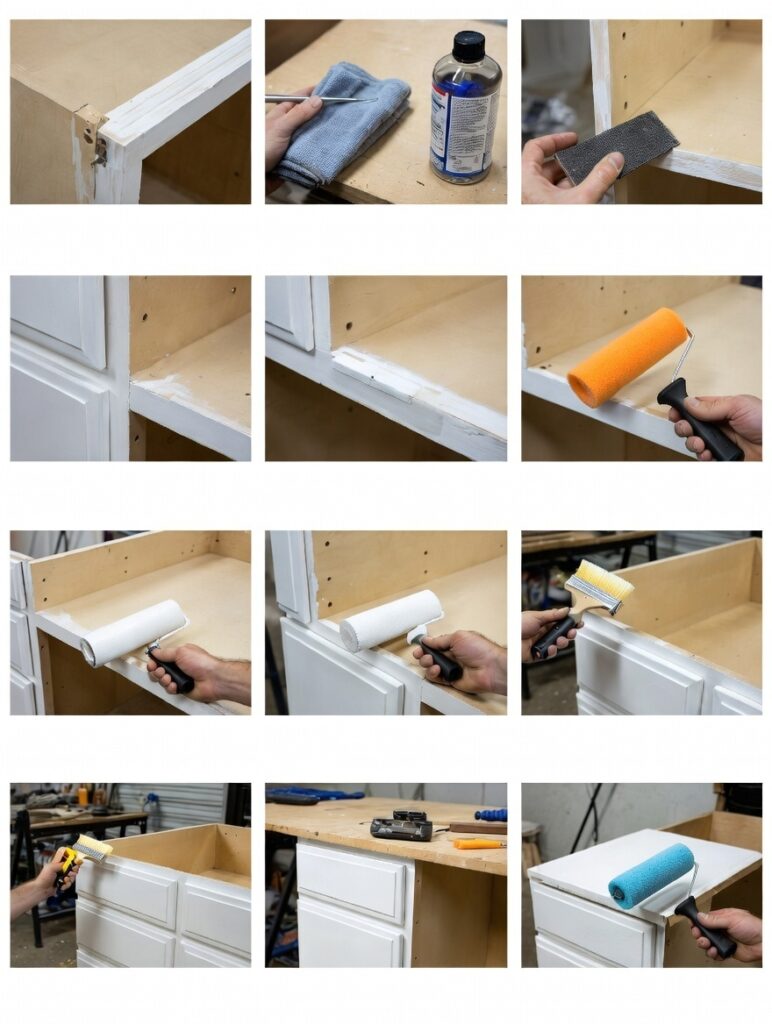
Tools, Materials, and Setup
Core supplies
- Cleaner: A degreasing cleaner or TSP substitute. I avoid soaking the surface. Spray on a cloth, not the furniture.
- Scuffing tools: 220-320 grit sandpaper, a fine sanding sponge, and a tack cloth or vacuum.
- Filler: High-quality wood filler for small chips. For deep damage or corners, a two-part epoxy putty is miles better.
- Caulk: Paintable caulk for tiny gaps at seams or wall-to-furniture lines.
- Primers: One of the following
- Acrylic bonding primer labeled for laminate or glossy surfaces
- Shellac-based primer if you need maximum adhesion and stain block (ventilate well)
- Paint:
- Waterborne alkyd enamel, cabinet-grade acrylic enamel, or high-quality 100% acrylic latex.
- Sheen: satin or semi-gloss for durability and cleanability.
- Applicators: High-density foam roller for smooth surfaces, good quality synthetic brush for edges. A small sprayer is great if you have a place to spray.
- Topcoat (optional): Water-based polyurethane or polycrylic if you want extra protection. Not always necessary with waterborne alkyds.
- Other: Painter’s tape, drop cloth, respirator or mask, nitrile gloves.
Workspace
- Work somewhere dust-lite and well ventilated.
- Elevate doors or drawer fronts on painter’s pyramids so you can roll edges.
- Keep humidity moderate if possible. High humidity slows cure and can cause a gummy feel.
Time planning
- Day 1: Cleaning, scuff sanding, repairs, first primer coat.
- Day 2: Sand primer, second primer coat, first color coat.
- Day 3: Second color coat. Optional third coat or topcoat.
- After: Gentle use for a few days. Full cure for most paints is 7 to 30 days.
I’ve done it in one weekend many times. The key is to let each layer fully dry before moving on.
Step-by-Step: From Glossy Laminate to Painted and Durable
1) Inspect and decide how far to go
- Look for swelling along edges and around screw holes. Pressed wood swells into a fuzzy, raised lip.
- Check for delamination. If the laminate is lifting, you might need to reglue it before paint.
- Pick your battles. A dresser with a few chips is fine. A desk that has a soggy, bulging edge might need epoxy rebuild or a new edge band.
My take: If more than 20% of the edges are blown out, I either replace the edging or use iron-on veneer before paint. It looks better and stays crisp.
2) Deep clean
- Wipe with a damp microfiber and a degreasing cleaner. Food grease, silicone furniture polish, and hand oils ruin adhesion.
- Don’t flood the surface. Spray the cloth, not the piece. Dry immediately with a separate towel.
Tip: If your rag keeps getting brown or waxy, keep cleaning until it wipes clean. That residue is what causes fisheyes and peeling later.
3) Light scuff sand
- Use 220-320 grit to dull the shine. You’re not trying to remove the laminate. You just want microscopic scratches so primer can grab.
- Keep pressure even. Corners burn through quickly.
- Vacuum or wipe with a tack cloth to remove dust.
Personal insight: When I rushed this step in the past, I could scrape the paint off with a fingernail a week later. After a proper scuff, the primer feels like it fused to the surface.
4) Repair chips and edges
- Shallow chips: Press in wood filler, slightly proud of the surface. Let dry fully.
- Deep damage or swollen corners: Carve away the loose, puffy fibers with a sharp chisel or utility knife. Mix and apply a two-part epoxy putty, shape it, and sand smooth once cured.
- Screw holes you won’t reuse: Fill twice, sanding between, to prevent later dimples.
Edge sealing trick: I often run a bead of thinned wood filler along raw edges, then sand it back to crisp. It acts like a pore sealer so those edges don’t guzzle primer unevenly.
5) Caulk seams
- If your piece meets a wall or has visible gaps at trim seams, run a thin bead of paintable caulk. Smooth with a damp finger. Let it skin over before priming.
6) Prime for adhesion
- Choose a bonding primer explicitly labeled for laminate or glossy surfaces.
- Apply a thin, even coat with a foam roller on flats and a brush on edges.
- Let it dry per the label. If the surface still looks patchy or you sanded through to raw particleboard in spots, apply a second thin coat.
When to use shellac primer: If you suspect stains, ink, or you sanded into the brown core, shellac blocks bleed-through and grabs like crazy. It dries fast but smells strong. I use it under light colors to keep tan edges from ghosting.
7) Sand the primer
- A quick pass with 320 grit knocks down dust nibs and leaves a silky base.
- Vacuum and tack cloth again.
8) Paint in thin, patient coats
- First color coat: roll thin, then tip off lightly with a brush on long runs to level. Don’t overwork it.
- Check for holidays (missed spots) at a shallow angle.
- Wait the full recoat time, then apply the second coat. Two coats usually cover. A third can help with whites and very dark colors.
Sprayer note: If you spray, strain your paint, do light passes, and keep moving. Spraying can produce a glassy finish on laminate that looks factory.
9) Optional topcoat
- If you used a waterborne alkyd or cabinet enamel, you may not need a topcoat.
- For soft acrylics, kid furniture, or desktops, a water-based polyurethane adds toughness.
- Apply two light coats, sanding very lightly between with 400 grit.
10) Cure and reassemble
- Resist the urge to load drawers immediately. Let parts sit flat and cure.
- Reinstall hardware with care so you do not scratch the fresh paint.
- Gentle use for a few days. Avoid setting heavy or rubber-footed items on top for a week to prevent impressions.
Real-World Examples and What I Learned
Case study 1: Thrifted laminate dresser
- Issue: Two swollen top corners and peeling laminate on one drawer front.
- Fix: I injected wood glue under the lifted laminate, clamped overnight, and rebuilt the corners with epoxy putty.
- Primer: Shellac-based because of a water stain ghosting through.
- Paint: Waterborne alkyd enamel in satin. Two coats.
- Result: After a year, zero chips. The epoxy corners look crisp, and the sheen is easy to wipe.
- Lesson: Epoxy on corners is worth the extra hour. Wood filler would have cracked the first time the drawer bumped something.
Case study 2: Laminate desk with keyboard wear
- Issue: Shiny, greasy wear spot and tiny pits from years of typing.
- Fix: Degreaser took several passes. I skimmed the worn area with a flexible putty knife and filler, sanded to dead flat.
- Primer: Dedicated bonding acrylic primer.
- Paint: Cabinet-grade acrylic enamel. I added a water-based polyurethane topcoat because of heavy daily use.
- Result: Smooth writing surface that feels like a new desk.
- Lesson: On desktops, the topcoat is cheap insurance against coffee mugs and notebooks.
Case study 3: Quick-turn bookcase
- Issue: None beyond the slick surface.
- Fix: Minimal repairs. I just scuff-sanded and primed.
- Paint: One thin coat of primer, two thin coats of paint. No topcoat.
- Result: Great after six months, but I wouldn’t trust it in a kid’s room without a topcoat.
- Lesson: You can keep it simple when the piece is low-traffic.
Choosing Primer and Paint: What Works on Laminate
You have options, and they all work if used correctly. Here is how I decide:
- Shellac-based primer if I need maximum adhesion or I’m seeing stains or tannin bleed. Downsides: strong smell, alcohol cleanup. Upside: it grabs like a barnacle.
- Acrylic bonding primer for most jobs. Look for language like “for laminate, glossy, or hard-to-coat surfaces.” Easy cleanup, low odor, reliable results.
For the color coats:
- Waterborne alkyd enamel is my go-to for dressers and cabinets. It levels well, cures hard, and cleans like a dream.
- Cabinet-grade acrylic enamel is also great. It is slightly softer at first but becomes tough with a proper cure.
- Standard acrylic latex can work on decor pieces or bookcases. Pair with an optional topcoat for durability.
Sheen matters. Satin hides minor flaws and cleans well. Semi-gloss is harder and brighter but shows imperfections. I use semi-gloss on doors and trim, satin on furniture.
Troubleshooting and Repairs After the Fact
Peeling at corners
Likely cause: poor cleaning or skipped scuff sanding.
Fix: Feather-sand the failed area, wipe clean, spot prime with shellac primer, repaint in thin coats.
Bubbles or blisters
Likely cause: moisture trapped under paint or painting in high humidity.
Fix: Let it fully dry. Sand flat. Prime again. Avoid heavy coats and try to paint in a drier window.
Fisheyes or craters
Likely cause: silicone contamination from furniture polish.
Fix: Deep clean again with a degreaser. Shellac primer helps bridge over silicone. Then repaint.
Rough, sandpaper feel
Likely cause: dust nibs or over-rolling as paint tacked up.
Fix: Lightly sand with 320-400 grit to smooth. Wipe dust and recoat. Work faster and roll thinner next time.
Visible seams telegraphing through
Likely cause: seams not caulked or filled before paint.
Fix: Score the paint lightly, apply paintable caulk, let it cure, spot prime, repaint.
Common Mistakes to Avoid
- Skipping the deep clean. A shiny surface covered in polish will laugh at your paint.
- Aggressive sanding. Sanding through the laminate exposes the thirsty core. Keep it light and even.
- Using the wrong primer. A general-purpose wall primer is not the same as a bonding primer.
- Thick coats. Thick paint traps solvents, takes forever to cure, and chips more easily. Thin, even coats win.
- Painting in a damp garage. Humidity extends dry time and invites bubbles.
- Ignoring edges. They are the first to chip. Seal, prime, and handle them carefully between coats.
- Reassembling too early. Fresh paint dents and sticks. Give it time.
Maintenance after You Paint
- For the first week, clean with a barely damp cloth, no harsh cleaners.
- Avoid rubber feet or pads that can bond to fresh finishes. Felt pads are safer.
- If a chip happens, don’t panic. Feather-sand, spot prime, and touch up in small, thin layers.
Conclusion
Painting pressed wood with a laminate surface is all about preparation and patience. The material wants to fight you, but you can absolutely win with the right sequence.
Clean it like you mean it, scuff just enough, prime with something designed for slick surfaces, and apply paint in thin, confident passes. If you run into problems, most are fixable with a bit of sanding and spot priming.
I’ve taken beat-up, unloved laminate pieces and turned them into sturdy, nice-looking furniture that holds up for years. You can do the same.
FAQs
Can I paint laminate without sanding at all?
You can get away with minimal sanding if you use a top-tier bonding primer, but I always do a quick scuff. It takes ten minutes and saves you from chipping later.
Is chalk paint a shortcut for laminate?
Chalk paint sticks better than basic wall paint, but it still needs a good clean and usually a bonding primer to be reliable on laminate. I treat chalk paint as a style choice, not a prep shortcut.
What if the laminate is peeling off?
Peel back the loose section, scrape old glue, and re-adhere with wood glue or contact cement. Clamp flat with a caul. After it cures, prime and paint. If the layer is shattered or missing, rebuild the area with epoxy putty and sand it flush.
Do I need a topcoat on every project?
No. Waterborne alkyd enamel or cabinet-grade acrylic is tough by itself. I add a water-based polyurethane on desktops, tabletops, and kids’ furniture for extra insurance.
How long until I can use it normally?
You can handle it lightly after a day, but full hardness can take 7 to 30 days depending on the paint. During that time, avoid heavy objects, rubber pads, and strong cleaners.
]]>I especially like this pattern on an older canvas because the design can cover tired artwork without needing a detailed drawing. A sound canvas from a charity shop, an unfinished practice piece, or a board left from another project can become a useful decorative panel with a limited palette and careful measuring.
The method is repetitive, but it should not feel rigid. A slightly softened brush edge can make the checks feel hand-painted, while straight spacing keeps the full composition settled.
I don’t think the first canvas needs to be large. A small square or rectangular surface is easier to tape, turn, and compare from a distance. The most important choice is not the colour itself; it is whether the base, the single bands, and the crossed areas remain visibly different after everything dries.
Before You Start Painting the Canvas
Choose a canvas that is firm, dry, and free from loose paint. If you are reusing a previously painted piece, check whether thick texture, peeling colour, dust, or oily residue will interfere with the new grid. Raised brush ridges can remain visible beneath gingham, so smooth only the unstable or distracting areas rather than trying to make an old canvas look factory-new.
Prime or cover the existing artwork with an appropriate acrylic ground when the old design remains too dark or uneven. Let the foundation dry fully before measuring. Fresh base paint can feel dry on top while still being soft enough for painter’s tape to lift it, and that is a frustrating way to discover that patience was the missing tool.
Set Aside Surfaces That Are Unsuitable for Gingham Painting
- Wet, damp, or greasy surfaces
- Wood with peeling paint or loose varnish
- Badly cracked, warped, or damaged surfaces
- Heavily textured surfaces that may create uneven lines
- Fabric with stains, wrinkles, or loose fibres
- Fabric that has not been washed before painting
- Glossy laminate that has not been sanded or primed
- Surfaces covered with dust, wax, oil, or cleaning residue
- Flexible materials that may cause ordinary acrylic paint to crack
- Previously painted surfaces with flaking or unstable coatings
A gingham pattern requires straight lines and evenly painted sections. Choose a clean, dry, smooth, and stable surface to achieve neat edges and consistent squares.
For a Surface Suitable for Painting, Inspect:
- Whether the surface is clean and completely dry
- Whether sanding or priming is required
- Whether the existing paint or finish is firmly attached
- Whether painter’s tape will stick without damaging the surface
- Whether the surface is smooth enough for straight lines
- Whether the chosen paint is suitable for the material
- Whether the available area is large enough for an even grid
- Whether the planned square size fits the project
- Whether the base colour provides enough contrast
- Whether the surface has been tested with a small amount of paint
- Whether fabric has been washed, dried, and ironed
- Whether the base coat is fully dry before applying tape
Measure the complete painting area before choosing the size of the squares. A small test section can help you check the colours, tape adhesion, and paint consistency.
Useful Materials and Tools
- Wooden board, canvas, fabric, or another suitable surface
- Mild surface cleaner
- Clean cloth or sponge
- Fine-grit sandpaper
- Surface-appropriate primer
- Light-coloured base paint
- Medium shade for the stripes
- Darker shade for the overlapping squares
- Fabric paint or fabric medium for textile projects
- Low-tack painter’s tape
- Measuring tape or ruler
- Carpenter’s square or set square
- Pencil or washable chalk marker
- Small foam roller
- Flat paintbrush
- Detail brush for corrections
- Paint tray or palette
- Paper towels
- Drop cloth or protective sheet
- Sealant or clear topcoat where required
- Safety gloves
Use low-tack tape on delicate surfaces and avoid applying too much paint at once. Several light coats usually create cleaner edges than one heavy coat.
Before committing to the full canvas, paint one sample crossing on a piece of prepared card. Add the base, one vertical band, and one horizontal band. The crossing should become darker without turning muddy or completely opaque. That small test will tell you more than staring at wet paint in the palette.
Plan the Gingham Scale and Colour Values

The pattern needs three visible values: the lightest base, the medium single bands, and the darkest crossed squares. You can create all three from one colour mixed at different strengths, or use a pale base with a related transparent stripe colour. The second approach often feels softer because the overlap develops naturally rather than being painted as a separate block.
Scale matters just as much as colour. Narrow checks create a busier surface and require more tape changes, while wider bands feel calmer and are easier to control on a first canvas. Measure the finished area rather than the full frame size, then choose a band width that produces a balanced repeat without leaving a tiny unwanted strip at one edge.
Materials and Tools
· Prepared scrap card or small canvas offcut
· Base colour and stripe colour
· White or pale neutral for mixing
· Optional acrylic glazing medium
· Ruler and pencil
· Painter’s tape
· Flat brush
· Palette
Create This Stage
1. Prepare the three values. Paint a small base patch, then mix a middle stripe colour that remains transparent enough to show the base. Cross a second band over the first. Let the sample dry before judging it because wet acrylic usually looks deeper and glossier than the final surface.
2. Choose the band width. Mark several possible widths on paper and view them from the distance where the finished canvas will hang. A small canvas usually benefits from a check large enough to read clearly without squeezing dozens of lines into the space.
3. Calculate the repeat. Measure the usable width and height, then divide each measurement by the proposed band width. Adjust slightly so both directions finish with a deliberate full or partial band. Keep a written note of the final spacing.
4. Create a paper map. Draw a simplified grid on paper and label the base, vertical bands, horizontal bands, and intersections. This is especially helpful when the pattern includes a border or when the canvas dimensions are not perfectly square.
For me, the dried crossing is the real decision point. If the overlap disappears, strengthen the stripe mixture slightly. If it looks like a solid painted square, make the bands more transparent rather than changing the whole palette.
A muted blue, sage, clay pink, ochre, or warm grey can all work over a pale base. For a quieter canvas, use two close tones. For stronger graphic contrast, use cream with navy or charcoal, but keep the bands transparent enough to preserve the layered gingham effect.
Create a Smooth Base Without Heavy Texture

A repeated grid makes surface differences easy to notice. Thick paint ridges, missed corners, and patchy coverage can cause some checks to appear darker before the stripe layers are added. The goal is not a perfectly manufactured surface, but the base should be consistent enough that the pattern, rather than old texture, becomes the main detail.
When covering an older canvas, use thin controlled layers instead of one heavy coat. A wide soft brush can keep the direction of the base paint calm, while a small brush reaches the wrapped edges. Decide whether the gingham will continue around those edges or stop neatly at the front; making that choice now prevents awkward tape lines later.
Materials and Tools
· Sound reused canvas or canvas board
· Soft brush and dry cloth
· Acrylic ground or compatible base paint
· Wide flat brush or small roller suited to canvas
· Small brush for edges
· Palette or paint tray
· Optional fine abrasive pad for unstable raised areas
· Drop cloth
Create This Stage
1. Inspect and clean the surface. Remove dust with a dry soft brush or cloth. Check for loose paint, deep cracks, dents, or sagging canvas. Repair or reject unstable areas rather than expecting a new layer to hold them together.
2. Reduce distracting texture. Where old paint forms sharp unstable ridges, smooth only those areas using a method suitable for the existing surface. Do not aggressively abrade an unknown or valuable artwork. A sound inexpensive reuse canvas is the sensible choice for this project.
3. Apply the first base layer. Brush the acrylic ground or pale base across the canvas in thin even passes. Work from one side to the other and feather the joins before they begin drying. Keep heavy paint away from the inside edge of the stretcher bars.
4. Build coverage gradually. Add another thin layer only after the first has settled according to the product guidance. Turn the canvas under side light and look for shiny thick areas, missed texture, or exposed old colour.
5. Let the base become firm. Place the canvas flat or upright where dust will not settle onto it. Do not begin taping simply because the surface looks dry. Give the coating enough time to develop a dependable bond before measuring the grid.
I know it can feel tempting to rush from the pale base straight into the interesting stripes. I’d rather leave the canvas alone a little longer than pull off the first tape line with part of the foundation attached.
A coloured base can replace white. Pale peach, warm cream, light blue, soft green, or a tinted grey may create a gentler finish. Keep the base lighter than the band colour so the three-value structure remains clear.
Measure and Paint the Vertical Bands

The vertical bands create the pattern’s first rhythm. A small measuring error can repeat across the canvas and become obvious only after the horizontal bands are added. Work from one fixed edge and mark every position from that same starting point. Moving the ruler from stripe to stripe can quietly carry a tiny error across the entire width.
Painter’s tape gives a clean structure, but the stripe itself does not have to become hard and plastic-looking. Use a thin glaze-like layer and remove most excess paint from the brush before working near the tape. Heavy paint can form a ridge, bleed beneath the edge, and make the later intersections too dark.
Materials and Tools
· Fully dry prepared canvas
· Ruler or tape measure
· Set square or straightedge
· Light removable pencil
· Low-tack painter’s tape
· Middle-value stripe mixture
· Small flat brush or dense foam applicator
· Clean cloth
Create This Stage
1. Mark every band from one edge. Choose the left or right canvas edge as the fixed measuring point. Place small marks along the top and bottom at every band position. Check the final spacing before joining the marks because correcting pencil is easier than correcting paint.
2. Apply the tape without stretching it. Connect matching top and bottom marks with low-tack tape. Press the edge that will meet the paint, but do not pull the tape so tightly that it bows or lifts the base later. Use a set square to confirm the first few lines.
3. Seal only when necessary. On a textured canvas, a very thin pass of the base colour along the tape edge may reduce bleeding. Keep this layer minimal and let it settle before adding the stripe colour. Too much sealing paint creates another ridge.
4. Paint the vertical bands lightly. Apply the stripe mixture in thin vertical passes. Move from the tape edge towards the centre of each band rather than brushing sideways underneath it. Build colour gradually and keep the base visible through the stripe.
5. Remove the tape carefully. Lift the tape back over itself while the paint is manageable and follow the product guidance. If an edge begins to pull, stop and use a fine tool to separate the paint film. Let the vertical bands dry fully before measuring across them.
The first three bands are worth checking from across the room. If they already look crowded or too dark, continuing across the canvas will not improve them. Correct the mixture or width early.
For a hand-painted interpretation, skip the tape and use a flat brush guided by light pencil lines. The bands can have slightly softened edges, but keep their centres and spacing straight so the finished pattern still feels intentional.
Layer the Horizontal Bands to Form the Checks

The canvas begins to look like gingham only when the horizontal bands cross the dry vertical set. Each crossing receives two layers of the stripe mixture and should become naturally deeper. This is why both directions need the same paint strength. A darker second mixture can make the intersections look pasted on rather than woven into the pattern.
Turn the canvas if that gives you a more comfortable brushing direction. Working with the bands in the same physical motion can improve consistency. Before applying new tape, make sure the vertical paint feels firm and does not become tacky under light pressure.
Materials and Tools
· Dry canvas with completed vertical bands
· Original measuring notes
· Ruler and set square
· Fresh low-tack painter’s tape
· The same stripe mixture used vertically
· Flat brush or foam applicator
· Palette and clean cloth
Create This Stage
1. Repeat the original spacing. Measure from one fixed top or bottom edge and use the same band width chosen for the vertical direction. Mark both sides of the canvas so every horizontal line connects cleanly across the surface.
2. Tape across the dry stripes. Apply fresh tape along the marks without dragging it repeatedly across the vertical paint. Press the painting edge carefully, especially where the tape crosses a raised band edge. Do not use old paint-marked tape for the second direction.
3. Match the stripe mixture. Stir the saved paint thoroughly or mix a new batch using the written sample notes. Test it over one spare vertical stripe on the practice card. The single horizontal area should match the vertical value when dry.
4. Paint the horizontal passes. Work in thin even layers and avoid scrubbing over each intersection. The crossing will deepen automatically because the vertical layer remains beneath it. Stop before the paint becomes opaque.
5. Reveal and assess the grid. Remove the tape carefully, then let the canvas dry before judging the values. View it straight on and from several steps away. Look for drifting rows, weak intersections, or bands that suddenly change width.
This is the stage where restraint matters most. I don’t think the darkest squares should be repainted immediately just because they look pale while wet. Let the acrylic dry, then decide whether any correction is actually needed.
The horizontal bands can use a closely related second colour for a plaid-like variation, but that changes the design away from classic one-colour gingham. Keep both stripe colours transparent and test the crossing first so it does not become muddy.
Refine the Intersections and Finish the Canvas

A finished pattern rarely needs every line repainted. Small bleeds, one pale crossing, or a slightly rough edge can usually be corrected with a fine brush and the saved base or stripe colour. Broad corrections are more noticeable because they interrupt the transparency that gives gingham its fabric-like depth.
Decide how the pattern ends at the canvas edge. Continuing it around the wrapped sides can make the piece feel complete without a frame, while a plain painted edge creates a clean border. Either option works when it is consistent. A random mixture of wrapped checks and unpainted sections looks unfinished rather than relaxed.
Materials and Tools
· Fully dry gingham canvas
· Saved base and stripe colours
· Fine detail brush
· Small flat brush
· Clean water and cloths
· Optional compatible matte or satin protective finish
· Hanging hardware suited to the finished canvas
Create This Stage
1. Inspect the values in normal light. Place the canvas upright and view it where it may eventually hang. Check that the base, single stripes, and intersections remain distinct. Side light is useful for finding ridges, but ordinary room light is better for judging the overall pattern.
2. Correct only clear problems. Use the base colour to tidy small bleeds after they are fully dry. Strengthen a weak band with a thin matching glaze rather than one opaque patch. Keep corrections inside the existing geometry.
3. Finish the outer edges. Continue the pattern around the sides using the original spacing, or paint all edges in one supporting colour. Protect the front while working and keep drips from wrapping onto the finished checks.
4. Test a protective coating. A decorative canvas may not need a separate finish. When protection is useful, test a compatible matte or satin product on the practice sample first because some coatings can deepen colour, increase shine, or soften the contrast.
5. Prepare the canvas for display. Let every layer cure according to the selected materials, then attach suitable hanging hardware. Check that the canvas hangs level because a tilted grid looks more obvious than a tilted loose abstract painting.
For me, the strongest finish is the one that still lets the layers show. A completely opaque dark square at every crossing may look neat, but it loses the gentle transparency that makes gingham different from checkerboard.
You can leave part of the canvas plain and place the gingham within a central rectangle, arch, circle, or wide border. A partial pattern uses fewer tape lines and can make an older canvas feel more contemporary without covering every inch.
Common Mistakes to Avoid
Using opaque paint for both stripe directions. When each band completely hides the base, the second direction cannot create a naturally darker crossing. Mix a transparent or lighter middle value and test the overlap before painting the canvas.
Measuring from the previous stripe. Small errors accumulate when each new mark depends on the last one. Measure every position from the same fixed edge and compare the final spacing before taping.
Taping over a soft base. Paint may lift even when it appears dry. Let the base become firm, use low-tack tape, and test the complete paint-and-tape system on a sample first.
Loading too much paint near the tape. A wet heavy brush pushes colour beneath the edge and leaves a ridge. Remove excess paint from the applicator and build the band with thin controlled passes.
Repainting every intersection separately. Darkening each crossing by hand can flatten the layered effect and create inconsistent squares. Let the two stripe directions form the value naturally, then correct only the few areas that genuinely need it.
Ignoring the canvas edges. A front pattern with accidental drips and unfinished wrapped sides can make the piece feel incomplete. Decide before painting whether the checks continue around the edge or stop at a clean border.
Judging the colour while it is wet. Wet acrylic often looks darker and shinier. Let the sample and each stage dry before strengthening the bands or changing the mixture.
Frequently Asked Questions
Can a beginner paint gingham on canvas?
Yes. A small canvas with wide bands is manageable because the process relies more on measuring and thin paint layers than on drawing skill. Make a practice crossing first and keep the palette limited.
What paint works for a gingham canvas?
Acrylic paint is a practical choice for prepared canvas. Use a compatible glazing medium when the stripe mixture needs more transparency, and follow the product directions rather than thinning the paint excessively with water.
How do I make the crossed squares darker?
Use the same translucent stripe mixture in both directions. The horizontal layer passes over the vertical one and naturally creates a deeper value. Test the result after drying before adding any extra paint.
Can I paint gingham without painter’s tape?
Yes. A flat brush and light pencil guides can create a softer hand-painted pattern. Keep the band centres straight and the spacing consistent, even when the edges remain slightly relaxed.
Why did the tape lift my base paint?
The base may not have bonded firmly, the tape may have been too strong, or the surface may have contained dust or unstable old paint. Test the system first, allow adequate drying, and peel the tape back slowly rather than pulling it sharply upward.
Should I seal the finished canvas?
A decorative canvas does not always require a separate coating. When a finish is useful, test a compatible matte or satin product on the practice sample because it may change the colour depth and shine.
Can I reuse an old painted canvas?
Yes, provided the canvas and existing coating are sound. Clean it, remove unstable texture, and cover the old image with an appropriate acrylic ground or base. Avoid altering valuable or unknown artwork simply for a craft experiment.
Let the Layers Create the Gingham Effect
Learning how to paint a gingham pattern on canvas is mostly a lesson in controlled repetition. The base needs to stay visible, the first set of bands must establish dependable spacing, and the second set should deepen the crossings without covering them completely. Once those three values work together, the pattern begins to resemble woven colour rather than a collection of painted blocks.
Begin with a small reused canvas and a quiet palette. Make one proper sample crossing, keep written notes about the band width and mixture, and let every stage dry before deciding it needs more paint. I’d rather see a few soft hand-painted edges than a perfectly sharp grid buried beneath heavy opaque layers.
Which colour would you try first for a gingham canvas: muted blue, warm clay, soft green, or a simple cream-and-charcoal combination?
]]>You’re left thinking: “How did this happen, and how can I bring this paintbrush back to life?” The good news is that you can revive even the most hardened brushes with just a little time, effort, and the right approach.
Whether you’re a professional artist, a DIY enthusiast, or someone who just enjoys a weekend of home improvement projects, understanding how to clean your paintbrush properly is essential to ensuring your tools remain in top shape and your painting results are always flawless.
In this guide, I’ll walk you through the best methods for cleaning and reviving stiff paintbrushes. You’ll learn why brushes get stiff, how to restore them, and some common mistakes to avoid.
Why Do Paintbrushes Get Stiff?
Before we dive into the cleaning methods, it’s important to understand why brushes get stiff in the first place. The stiffness can be caused by several factors, primarily related to the type of paint you’re using and how it’s been cleaned (or not cleaned) afterward. Here’s a breakdown:
Paint Drying on the Bristles: The most common culprit is paint drying on the bristles, especially if you don’t clean the brush thoroughly after each use. Water-based paints, such as latex, can dry up quickly, forming a hard shell over the bristles.
Oil-based paints tend to dry slower, but if left too long, they can also harden, making it nearly impossible to use the brush again without proper cleaning.
Improper Cleaning: Not cleaning a brush right away after use leads to paint buildup. Over time, that buildup can solidify, turning your soft, flexible brush into something stiff and unusable. Paint left to harden on the bristles can also clog the ferrule (the metal part that holds the bristles), which impacts the brush’s performance and longevity.
Environmental Conditions: Extreme temperatures (too hot or too cold) can affect both the paint and your brush. For example, when a brush is stored in a very hot environment, the paint can harden even faster, leading to stiffness.
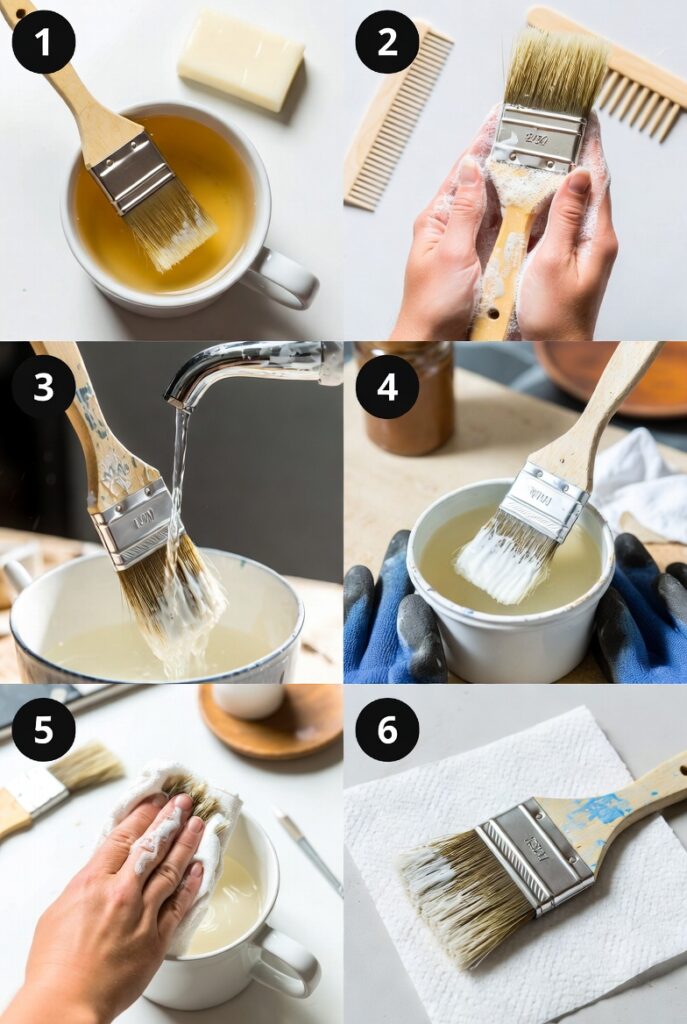
Step-by-Step Guide for Oil-Based Paints
Oil-based paints require a different cleaning approach because of the thicker, more stubborn consistency. You’ll need a solvent or paint thinner to break down the oil-based paint.
Step 1: Remove Excess Paint
Start by scraping off any excess paint on the bristles using a paint scraper or the edge of your paint can.
Step 2: Use Paint Thinner or Mineral Spirits
Pour some paint thinner or mineral spirits into a container. Dip the brush into the solvent, making sure the bristles are submerged but not completely soaked. Gently agitate the brush to loosen the dried paint.
Step 3: Scrub the Bristles
For heavily caked paint, use a brush comb or an old toothbrush to scrub the bristles gently. Be patient, as oil-based paints can be tough to remove.
Step 4: Rinse and Repeat
Once the paint is dissolved, rinse the brush with warm water. Repeat the process if needed.
Step 5: Clean with Soap
After removing the oil-based paint, wash the brush with mild dish soap and warm water. This will help remove any remaining solvent and ensure your brush is completely clean.
Step 6: Dry the Brush
Finally, reshape the bristles and allow the brush to dry completely before storing.
Proven Methods to Revive a Stiff Paintbrush
If your paintbrush has already become stiff, don’t worry. You don’t need to throw it out just yet. Here are a few methods that have worked for me in the past, and I believe they’ll help you too.
Using Soapy Water to Soften Brushes
If your paintbrush is stiff from water-based paint, soaking it in soapy water can help loosen the dried paint.
- Fill a container with warm water and add a few drops of dish soap.
- Immerse the brush in the water and let it soak for 15 to 20 minutes.
- After soaking, gently rub the bristles with your fingers or an old toothbrush to remove the softened paint.
- Rinse with clean water and reshape the bristles.
Utilizing Paint Thinner or Solvents for Oil-Based Paints
For brushes that have dried oil-based paint, using a solvent like mineral spirits or paint thinner will help break down the dried paint.
- Pour a small amount of mineral spirits or paint thinner into a container.
- Dip the brush into the solvent and gently swirl it around.
- Use a brush comb to loosen any stubborn paint.
- Wash the brush with soap and water afterward to remove any remaining solvent.
Vinegar and Baking Soda Trick
This is a personal favorite method of mine. The combination of vinegar and baking soda works wonders for removing dried paint from brushes.
- Mix equal parts of white vinegar and baking soda in a container.
- Dip your stiff brush into the mixture and let it soak for 30 minutes.
- After soaking, scrub the brush gently with a toothbrush to remove the softened paint.
- Rinse the brush under warm water, reshape the bristles, and let it dry.
Mistakes to Avoid When Cleaning Paint Brushes
When cleaning stiff paintbrushes, it’s easy to make a few common mistakes that can damage the brush or make the cleaning process harder than it needs to be. Here are a few things to watch out for:
Not Acting Quickly Enough: If you let paint dry on your brush for too long without cleaning it, the paint can harden and become difficult to remove.
Using the Wrong Solvents: Always use the appropriate solvent for the type of paint you’re working with. Using water-based cleaners on oil paints, or vice versa, will only make the problem worse.
Over-Soaking the Brush: While soaking can help soften the paint, leaving your brush submerged for too long (especially in harsh solvents) can damage the bristles and cause them to fray.
Rinsing with Hot Water: Hot water can cause the paint to bond with the bristles more firmly, especially if you’re dealing with water-based paints.
Conclusion
In summary, cleaning stiff paintbrushes doesn’t have to be a daunting task. With the right techniques and a little patience, you can restore your brushes to their former glory.
Whether you’re dealing with dried latex paint or stubborn oil-based paints, there are proven methods to bring your brushes back to life and extend their lifespan.
To ensure you get the best results, remember to clean your brushes promptly after use, choose the right cleaning materials, and avoid common mistakes like soaking the brush for too long or using the wrong solvent.
]]>I’m Stella Eve Louise, and I’d rather work with sound cabinets than remove them simply because the finish no longer suits the room. Paint can change white laminate, glossy coloured doors, faux-wood surfaces, and cabinets with contrasting timber trim, but the result depends heavily on what happens beneath the final colour.
Laminate is smooth and non-porous, so ordinary wall paint may struggle to grip it properly. Cleaning, gentle surface preparation, a compatible bonding primer, and cabinet-grade paint are usually more important than buying an expensive brush or choosing a fashionable colour.
Paint manufacturers specifically recommend cleaning laminate carefully, dulling glossy surfaces when required, and using products intended to bond to difficult finishes.
I don’t think the goal should be finishing the kitchen as quickly as possible. A professional-looking result comes from labelled doors, thin coats, clean edges, and enough patience to let each product do its job.
Map the Doors, Finish, and Wear Zones
Open every cabinet and inspect the doors, drawer fronts, frames, side panels, shelves, kickboards, and areas around the handles. Kitchen grease often collects around pulls, upper doors, cooking areas, and the edges people touch without noticing.
Identify whether you are dealing with:
- Laminate
- Melamine
- Vinyl-wrapped doors
- Thermofoil
- Painted MDF
- Wood veneer
- Solid timber trim
- A combination of several materials
This distinction matters. A sound laminate surface can often be cleaned, prepared, primed, and painted, while loose vinyl wrap may need a different repair or removal method. Peeling edges, swollen fibreboard, and crumbling corners must be corrected before paint is applied.
Number each door and drawer with removable labels. Mark the cabinet opening with the same number, and place every hinge, screw, handle, and fixing in a labelled container. Even doors that appear identical may hang differently after years of adjustment.
Check for:
- Loose laminate or edge banding
- Peeling vinyl
- Grease and cooking residue
- Water damage
- Swollen MDF or particleboard
- Chipped corners
- Old hardware holes
- Misaligned hinges
- Doors that rub against the frame
- Silicone sealant along painted edges
- Deep scratches
- Glossy surfaces
- Loose shelves or cabinet frames
Clean before sanding. Sanding a greasy cabinet can spread residue across the surface and drive it into scratches rather than removing it. Cabinet-painting guidance recommends removing grease and food residue before surface preparation because contamination can interfere with adhesion.
Whether sanding is required depends on the selected primer and coating system. Some specialised bonding products are designed to grip glossy surfaces with little or no sanding, while other systems instruct you to dull the laminate first. Follow one complete product system rather than combining preparation instructions from several unrelated paints.
When sanding is required, work gently. The aim is to remove shine and provide a better key for the primer, not grind through the decorative laminate into the board underneath.
Useful Materials and Tools
- Screwdrivers or drill driver
- Removable labels
- Containers for hardware
- Cabinet-safe cleaner or degreaser
- Microfibre cloths
- Fine sanding sponges
- Vacuum with brush attachment
- Dust-removal cloths
- Filler suited to the damaged surface
- Filling knife
- Adhesive for loose edge banding
- Bonding primer suitable for laminate
- Cabinet, furniture, or trim paint
- Angled synthetic brush
- Fine-finish mini roller
- Paint tray
- Painter’s tape
- Door supports or painting stands
- Drop cloths
- New hinges, knobs, or pulls if required
- Hardware primer and paint
- Protective gloves
- Eye protection
- Suitable respiratory protection
Keep the room well ventilated and follow the safety information supplied with cleaners, primers, paints, fillers, and spray products. Remove doors safely and ask for help with heavy panels rather than balancing them against counters or walls.
Refresh an Entire Laminate Kitchen With Bonding Primer

A complete laminate-kitchen transformation shows how much can change when the original layout and cabinet boxes remain in place. The selected makeover works with the existing surfaces and uses a high-adhesion primer before the decorative colour is added.
Painting a whole kitchen requires consistency. The same cleaning, preparation, primer thickness, roller technique, and drying conditions should be used across every door. If one door receives heavier paint or less preparation, it may look different even though the same colour appears on the tin.
Materials and Tools
- Labelled cabinet doors and drawers
- Cleaner or degreaser
- Fine sanding sponge when required
- Bonding primer
- Cabinet-grade paint
- Angled brush
- Fine-finish roller
- Door stands or supports
- Painter’s tape
- New handles if desired
Paint the Kitchen in Five Steps
- Remove and organise every movable part. Label the doors, drawers, hinges, and handles before taking them apart. Photograph unusual hinge positions and keep each door’s hardware together so the final alignment remains manageable.
- Clean and repair the surfaces. Degrease the fronts, backs, edges, frames, and areas around the handles. Secure loose laminate, fill chips, and correct doors that rub before any primer is applied.
- Prepare and prime the laminate. Sand only as directed by your coating system, then remove the dust completely. Apply an even layer of bonding primer to the doors and fixed cabinet sections, paying attention to corners and edges without creating ridges.
- Apply the cabinet colour in thin layers. Brush detailed areas first and use a fine roller on broad flat sections. Smooth drips immediately and avoid repeatedly rolling paint that has already begun to set. Sherwin-Williams similarly recommends brushing detailed areas and following promptly with a roller across the flatter sections.
- Let the finish strengthen before reassembly. Follow the paint manufacturer’s handling and curing instructions rather than treating touch-dry paint as fully hardened. Rehang each door carefully, adjust the hinges, and avoid scrubbing the new finish immediately.

For me, the fixed cabinet frames deserve as much care as the doors. Freshly painted doors will not create a convincing transformation when grease, chips, or uneven brush marks remain around the openings.
A restrained single-colour kitchen is easier for beginners. Another option is to paint only the lower cabinets and keep sound upper doors in their existing colour.
Repaint Laminate Doors With Contrasting Wood Trim

Many older kitchen doors combine a laminate centre with real or imitation wood edging. The selected project keeps this familiar door style but changes the colour balance with a two-tone painted finish.
These doors need careful inspection because the centre and trim may be different materials. The laminate may need bonding primer, while unfinished or previously coated timber may require another preparation method. Use compatible products and test them together before committing to every door.
Materials and Tools
- Laminate doors with wood trim
- Degreasing cleaner
- Fine sanding materials
- Primer suited to laminate
- Primer suited to the trim when different
- One or two cabinet colours
- Painter’s tape
- Angled brush
- Fine-finish roller
- Small detail brush
Create the Two-Tone Finish in Five Steps
- Determine what each section is made from. Check the centre panel, edging, and back separately. A laminate centre and real-wood frame may not need identical preparation.
- Clean the joints and corners carefully. Grease can settle along the line where the trim meets the laminate. Use a cloth and small brush to clean the recess without forcing water beneath loose edges.
- Prepare and prime each material correctly. Mask the sections when separate primers are necessary. Keep the primer layer thin at the joint so the painted edge does not develop a raised ridge.
- Apply the main and accent colours. Complete the lighter or larger section first, allow it to reach the taping stage specified by the product, and then mask for the second colour. Remove tape carefully before it tears the new finish.
- Inspect every door as part of the full set. Place the doors beside one another before rehanging them. Correct obvious colour or edge inconsistencies while they remain easy to reach.
I know it can feel tempting to use the strongest contrast possible, but the door already contains several visual lines. Closely related colours may allow the trim detail to show without making every cabinet look outlined.
You could paint the laminate centre and retain a sound natural-wood border. Another approach is to paint the complete door one colour and use contrasting hardware to simplify the design.
Repair and Paint Peeling Laminate Bathroom Cabinets

Bathroom cabinets face splashes, damp hands, cleaners, and changing humidity. The selected project refreshes peeling laminate bathroom cabinetry with paint rather than removing the whole vanity.
Paint should not be used to glue down a loose surface. Identify whether the laminate can be reattached, whether a small failed section needs removal, or whether the underlying board has swollen beyond a sound repair.
Materials and Tools
- Bathroom vanity or cabinet
- Cleaner
- Scraper or seam tool
- Adhesive compatible with laminate
- Small clamps
- Filler
- Fine sanding sponge
- Bonding or stain-blocking primer
- Cabinet paint
- Fine roller and brush
- Replacement caulk where appropriate
Restore the Vanity in Five Steps
- Find the cause of the peeling. Look for water entering around the sink, floor, plumbing, side panels, or door edges. Correct active leaks and let the cabinet dry before beginning cosmetic work.
- Secure or remove unstable material. Reattach sound laminate when a suitable adhesive and clamping method can hold it flat. Remove only sections that cannot be stabilised, then fill and smooth the transition.
- Clean and prepare the cabinet. Remove soap residue, cosmetics, oils, and cleaning-product buildup. Sand and prime according to the selected coating system, paying close attention to repaired edges.
- Apply paint in controlled coats. Use a brush around mouldings and a fine roller across the doors. Keep paint out of hinge joints and avoid creating thick layers on edges that meet when the cabinet closes.
- Seal surrounding joints appropriately. After the finish reaches the required stage, replace failed sealant where water could enter. Keep the painted surface dry and gently handled during its initial curing period.
The part I would check carefully is the lower edge of each door. That is where water often sits after wet hands reach for a handle, and it may reveal the first sign of a failed repair.
A dark vanity can hide minor variations around repaired edges, while a pale finish may make a small bathroom feel more open. You could also paint the outside and leave sound interiors unchanged.
Get a Smooth Finish Without Using a Paint Sprayer

A spray system can produce a very smooth surface, but it is not the only way to repaint laminate cabinets. The selected tutorial demonstrates a cabinet process based on door removal, surface preparation, and hand application rather than relying on a paint sprayer.
The brush and roller need different jobs. An angled brush reaches profiles, corners, and narrow edges, while a fine roller spreads paint consistently across flat panels. Official cabinet-painting guidance also recommends combining a brush for detail with a mini roller for broad areas.
Materials and Tools
- Prepared laminate doors
- Angled synthetic brush
- Fine-finish mini roller
- Paint tray
- Cabinet paint
- Door supports
- Fine abrasive between coats when directed
- Dust-removal cloths
- Strong side lighting
Roll and Brush the Cabinets in Five Steps
- Set up a clean painting area. Raise doors on stable supports so you can reach the edges without touching the main surface. Keep dust, pets, loose fabric, and regular household traffic away from wet paint.
- Brush the detailed sections first. Apply paint to recessed panels, profiles, and edges with a small amount of product. Feather the brush marks outward before they begin setting.
- Roll the flat areas immediately. Use the roller to spread and level the paint across the broad panel. Maintain a consistent direction and avoid pressing hard enough to squeeze paint into ridges.
- Inspect between coats. Follow the paint instructions for recoating and sanding. Remove nibs, drips, or rough texture gently, then clean away every particle before applying the next layer.
- Finish every door with the same sequence. Brush and roll in the same order, using a similar amount of paint each time. Consistency usually matters more than trying to complete each door rapidly.

For me, the roller should do the levelling rather than carry a heavy amount of paint. An overloaded roller may look efficient for approximately thirty seconds, right before the drips begin travelling toward the floor.
A foam roller can work with some paint systems, while certain coatings level better with another fine-finish sleeve. Test the paint, roller, and primer combination on one door back or sample panel.
Spray the Doors and Refresh the Cabinet Hardware

Spraying can create a fine, even finish across flat cabinet doors when the equipment, paint, ventilation, masking, and technique are appropriate. One selected project uses an affordable sprayer and enamel-style cabinet paint, while the second focuses on cleaning, priming, and spray-painting the removed hardware.
This method requires more preparation than simply carrying the doors outside. Overspray can travel beyond the immediate work area, and every door needs stable support, consistent distance, and a clean environment.
Materials and Tools
- Properly prepared cabinet doors
- Compatible paint sprayer
- Paint suited to spraying and cabinets
- Filters or strainers when recommended
- Large protected work area
- Door supports
- Appropriate ventilation
- Suitable respiratory and eye protection
- Clean cabinet hardware
- Metal-compatible primer
- Hardware spray paint
- Cardboard or holding jig
Spray the Doors and Hardware in Five Steps
- Prepare a safe spray area. Follow the equipment and coating instructions for ventilation, protective equipment, masking, and cleanup. Protect surrounding surfaces well beyond the doors themselves.
- Practise the spray pattern. Test the material flow, fan shape, distance, and movement on scrap material. Correct spitting, heavy edges, or dry overspray before approaching the prepared cabinet doors.
- Spray the doors in light passes. Begin moving before pulling the trigger and continue beyond the door edge before stopping. Overlap each pass consistently without lingering at corners.
- Clean and repaint the hardware separately. Remove grease and loose coating, then use a primer and paint suitable for the handle material. Support each piece so all visible surfaces can be coated without touching wet paint.
- Inspect and reassemble the complete set. Let both the doors and hardware reach their recommended handling stage. Install the pulls gently and avoid tightening screws so aggressively that they cut into the new finish.
I’d rather apply another controlled pass than try to make the first spray coat completely opaque. Heavy application can sag along the door edges before the front appears evenly covered.
New handles remain an option when the old ones are damaged or uncomfortable. Reusing the originals, however, preserves more of the existing kitchen and avoids drilling another set of holes.
Why Painted Laminate Cabinets Chip, Peel, or Stick
Leaving Grease Around Handles
Primer cannot bond properly through cooking residue, furniture polish, or skin oils. Clean the handles, door edges, frames, and recessed corners rather than wiping only the visible centre panels.
Choosing Wall Paint Instead of a Cabinet Finish
Cabinets receive repeated handling and cleaning. Choose paint intended for cabinets, furniture, doors, or trim so the finished surface is better suited to regular contact.
Skipping the Bonding Layer
Slick laminate can resist ordinary coatings. A compatible bonding primer creates a more reliable base unless the chosen cabinet system specifically states that a separate primer is unnecessary.
Sanding Through the Decorative Surface
Laminate can be thin. Sand only enough to dull the finish when required, and stop before exposing the fibreboard or particleboard underneath.
Painting Over Loose Vinyl or Laminate
Paint may temporarily cover a lifting edge, but it will not restore adhesion beneath it. Secure, repair, or remove unstable material before priming.
Applying Heavy Coats
Thick paint can run, remain soft underneath, collect along edges, and interfere with closing doors. Build the finish gradually and correct drips while they are still manageable.
Letting Painted Edges Rub Together
Painted doors and frames can chip when the hinges are poorly adjusted. Test every opening and correct rubbing before regular use.
Reinstalling Handles Too Early
A surface may feel dry but remain vulnerable to pressure. Tight screws and twisting handles can damage paint that has not reached the required handling or curing stage.
Mixing Incompatible Products
A strong primer does not guarantee that every topcoat or clear finish will bond to it. Check compatibility across the cleaner, filler, primer, paint, and optional protective coating.
Forgetting to Label Doors
Unlabelled doors can return to the wrong openings, leading to uneven gaps and unnecessary hinge adjustments. A small piece of removable tape can prevent a surprisingly long reassembly afternoon.
Frequently Asked Questions
Can laminate cabinets really be painted?
Yes, provided the laminate remains sound and the surface is cleaned and prepared with compatible products. Bonding primer and cabinet-grade paint are commonly recommended for slick laminate surfaces.
Must I sand laminate cabinets?
It depends on the coating system. Some manufacturers instruct users to dull the surface, while specialised primers or complete cabinet systems may be designed to work with little or no sanding. Follow the instructions for the exact products you use.
Should I remove the cabinet doors?
Removing and labelling the doors normally makes cleaning, edge preparation, painting, and hinge adjustment easier. It also reduces the risk of paint collecting around hinges.
Can I paint cabinets without a sprayer?
Yes. An angled brush and fine-finish mini roller can create a smooth result when the paint is applied in controlled layers.
Do painted cabinets need a clear topcoat?
Not every cabinet paint requires one. Some products are designed as complete finishes, while other systems include or recommend a separate protective layer. Follow the selected paint manufacturer’s instructions.
Can peeling laminate be painted?
Only after the unstable surface has been repaired or removed. Paint over an actively peeling edge is likely to fail along with the material beneath it.
How should I clean painted laminate cabinets?
Use gentle cleaning methods compatible with the finished coating. Avoid abrasive pads and harsh cleaners unless the paint manufacturer confirms that they are suitable.
Let the Existing Cabinets Earn Their New Colour
Learning how to paint laminate cabinets like a pro begins with resisting the urge to open the paint tin first. The finish depends on accurate labels, thorough cleaning, sound repairs, suitable preparation, and products designed to grip a slick surface.
A complete kitchen can be changed with one restrained colour, while timber-trimmed doors can take a two-tone design. Glossy units can become softer, a peeling vanity can be repaired, and cabinet doors can be finished with either a brush and roller or a carefully controlled spray system.
Begin with one test door. Complete the full preparation, primer, paint, and handling process before repeating it across the kitchen. That small trial can reveal adhesion, texture, colour, and roller problems while they remain easy to correct.
Which laminate cabinets would you paint first: glossy kitchen doors, a bathroom vanity, wood-trimmed units, or a plain utility-room cupboard?
]]>