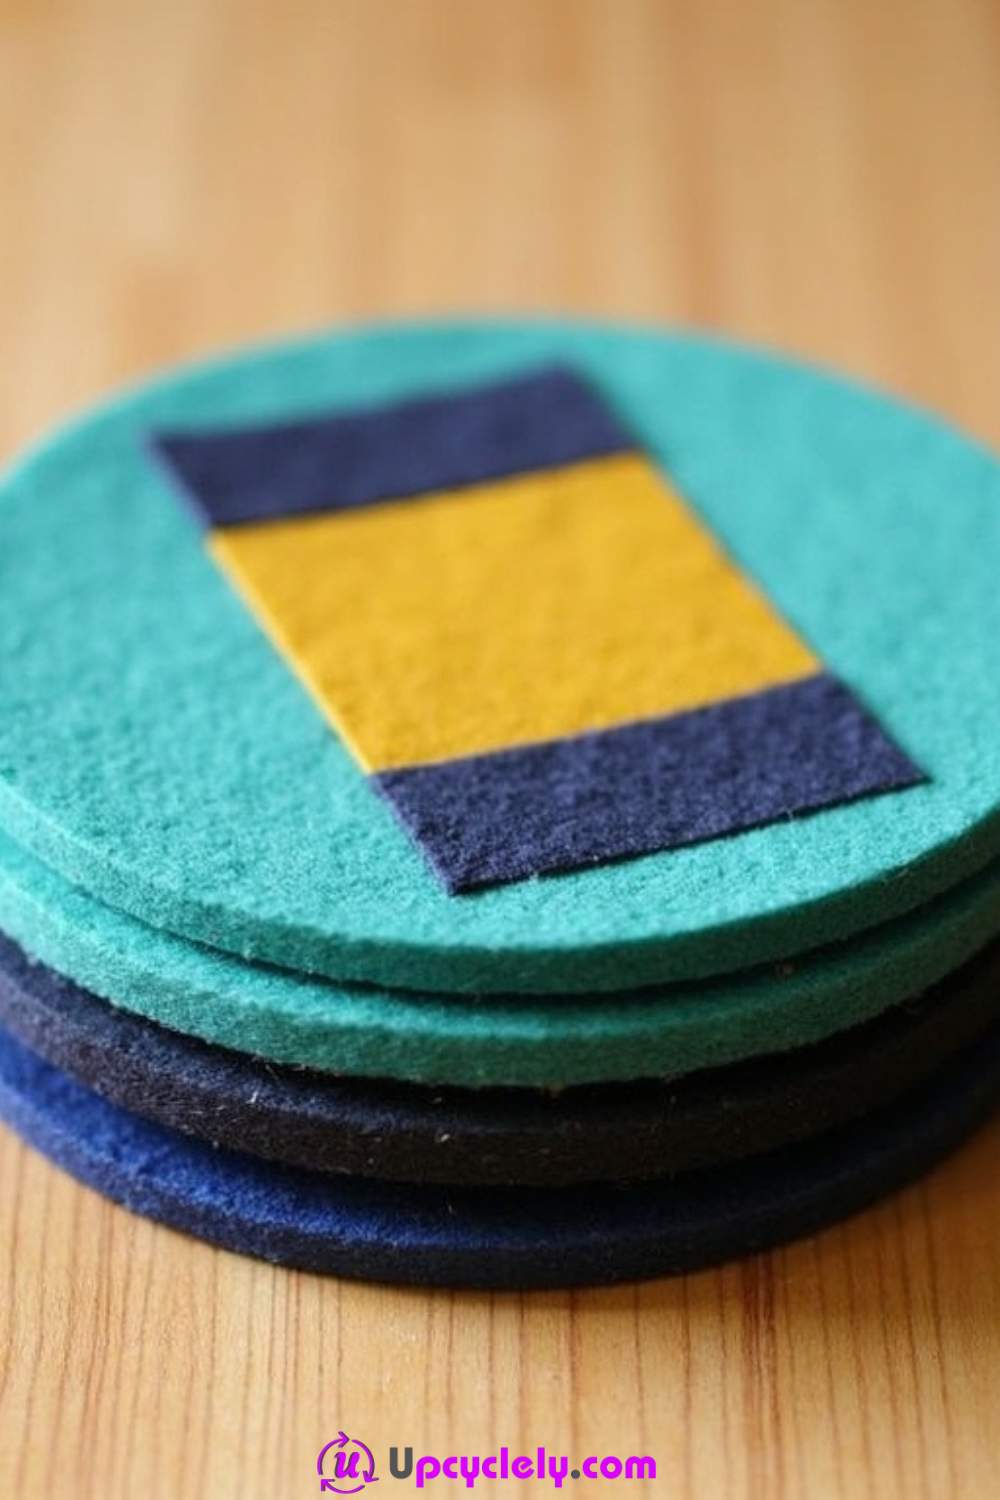
Felt Coasters
Materials Needed:
- Felt sheets in teal, dark blue, and yellow.
- Scissors.
- Fabric glue or a needle and thread for stitching.
- A circular object or compass for tracing.
- Ruler and pencil.
Steps to Create:
- Trace and Cut the Base Circle
I start by using a bowl or any circular object to trace a perfect circle onto the teal felt sheet. I prefer a coaster size of about 4 inches in diameter. Carefully cut the circle using sharp scissors so the edges stay smooth. - Design the Geometric Pattern
Next, I grab my dark blue and yellow felt sheets and a ruler. On the blue felt, I measure and cut two identical rectangles about the size of my fingernail. Then, on yellow felt, I measure one slightly smaller rectangle that will be sandwiched between the two blue ones, creating that modern geometric pattern. - Adhere the Design
Once my shapes are ready, I use a minimal amount of fabric glue to carefully attach the rectangles in the center of the teal circle. I give it a moment to dry, pressing lightly to ensure everything stays flat and secure. This is the part where I feel like my coaster really comes to life! - Layer and Finish
To make the coaster more durable and thicker, I cut a second teal circle and stick it to the backside of the first one. I align the edges perfectly and, for an extra personal touch, stitch around the perimeter using contrasting thread. It’s these small details that make handmade items stand out.
Pro Tip:
Always test your fabric glue on a small scrap piece of felt to ensure it doesn’t discolor or harden excessively.
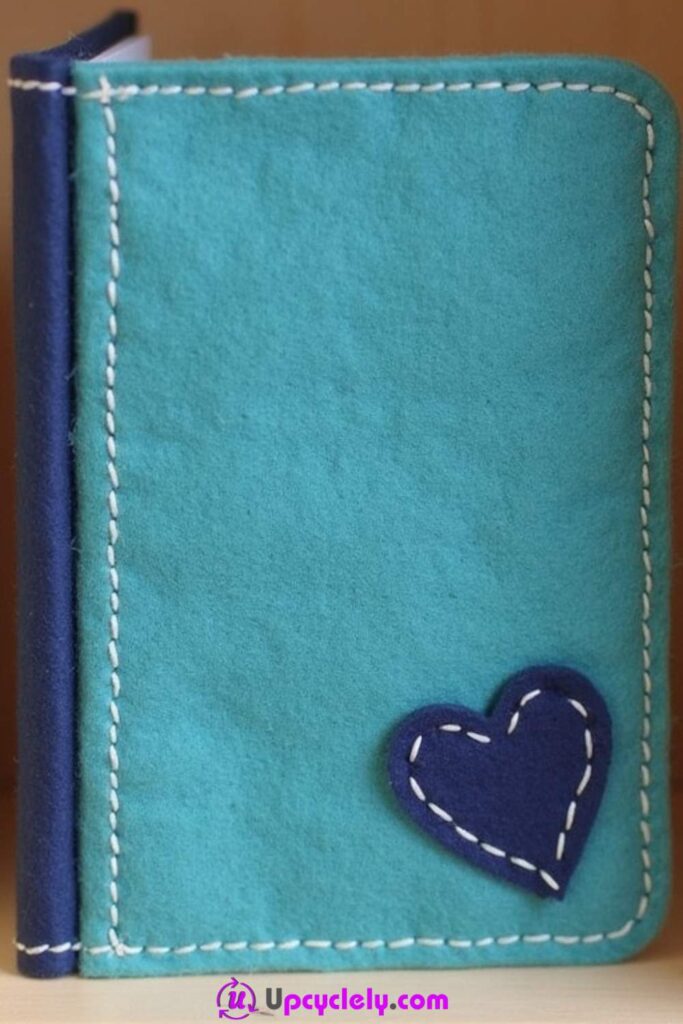
Felt Book Cover
Materials Needed:
- Turquoise and dark blue felt sheets.
- White thread and a needle.
- Scissors.
- Pencil and ruler.
- A book or notebook for sizing.
Steps to Create:
- Measure the Felt
I start by measuring the height and width of my book when it’s fully opened, adding an extra inch on all sides to account for seams and fold-over flaps. With these dimensions, I mark and cut out a rectangle from my turquoise felt sheet. - Cut and Attach the Spine
Using the dark blue felt, I cut a strip that matches the full height of the book’s spine. I position it carefully along the fold line. Stitching it in place is oddly calming—from the rhythmic motion of the needle to seeing the two colors come together. - Add the Heart Applique
To add that cute little heart detail, I cut a heart shape out of the dark blue felt and hand-sew it into the bottom corner of the front cover, making sure my stitches are neat and evenly spaced. It’s a simple touch, but it gives the cover so much charm. - Fit and Finalize
Finally, I fold and sew down the extra inch of felt on the top, bottom, and sides to create pockets for the book’s cover to slide into. When I slip the book inside, it feels snug and dressed up, like it was made just for this!
Pro Tip:
For added durability, you can use interfacing or an additional felt layer to make the cover sturdier and more protective.
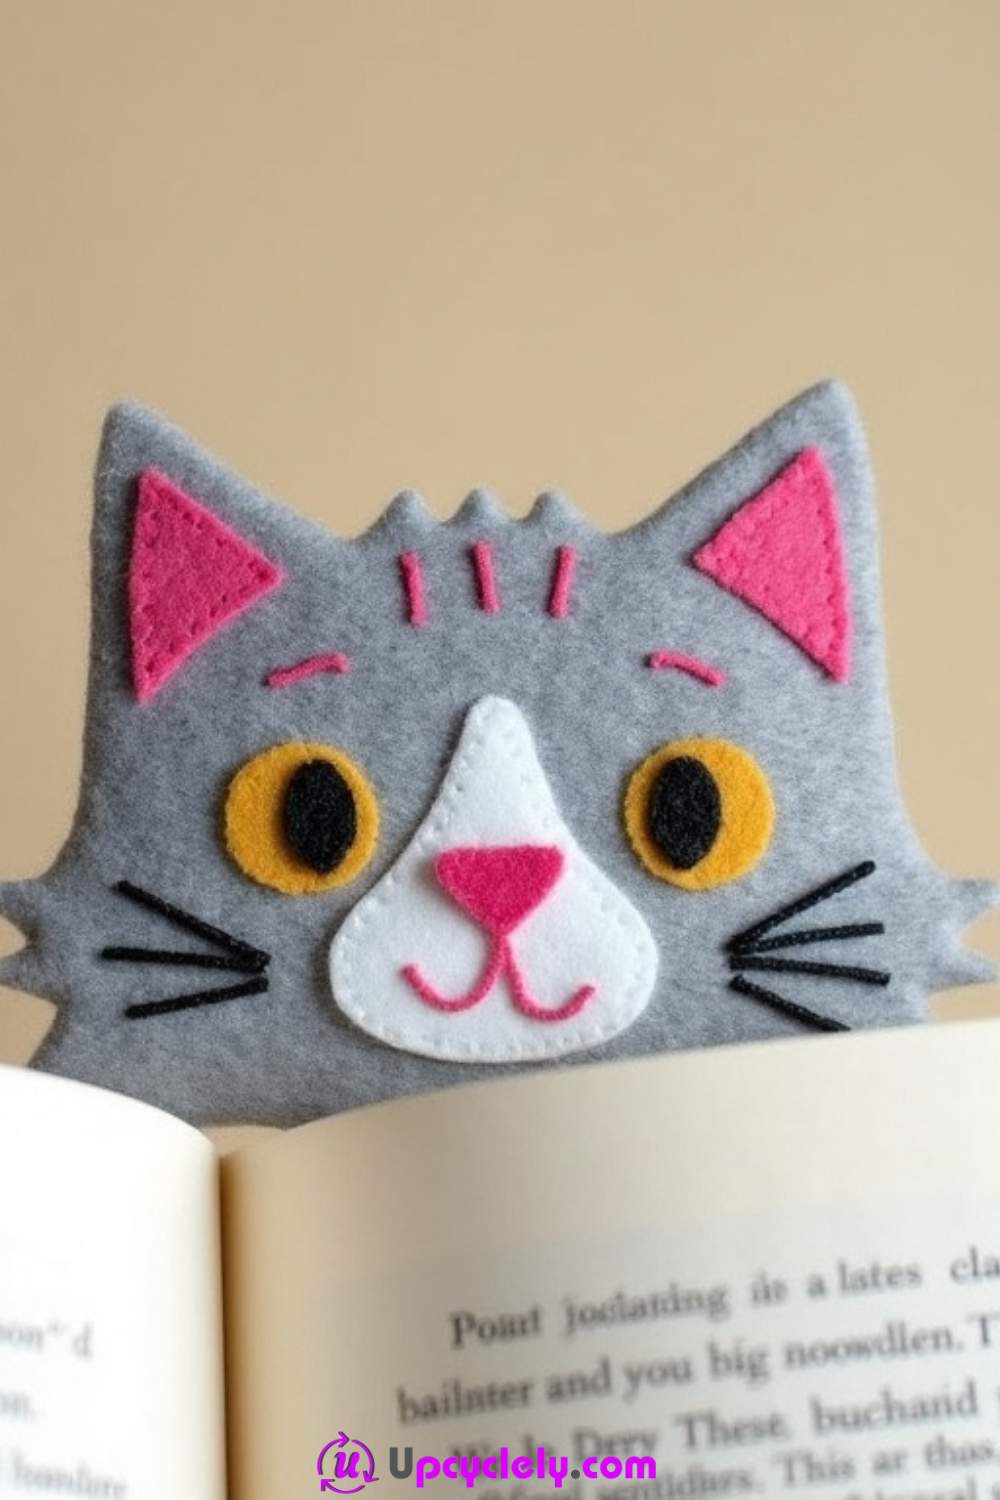
Felt Bookmark
Materials Needed:
- Gray, pink, yellow, and black felt sheets.
- Pencil and paper (for sketching the cat face).
- Fabric glue or needle and thread.
- Scissors.
Steps to Create:
- Sketch the Cat Design
I start by sketching a simple cat face with large ears and rounded cheeks onto paper. This allows me to adjust the design until I’m happy with it. Then I transfer the design onto my gray felt sheet and cut it out as the main base. - Cut and Add Details
Using pink felt, I create inner ear pieces, a small triangle for the nose, and a tiny curved mouth. For the whiskers, I cut thin strips of black felt. From the yellow felt, I cut two big circular eyes. Assembly brings this cat personality to life, and I can’t help but feel excited as the face takes shape. - Assemble the Bookmark
I glue or sew all the small details onto the gray felt face in the right positions. Layering felt in this way transforms something flat into a whimsical and engaging piece. - Attach a Backing
To make sliding this into a book easy, I attach a rectangular strip of felt to the back of the cat face. This strip can peek over the book while holding the pages you’re saving. It’s functional but also adorable!
Pro Tip:
If you’re making several bookmarks, personalize the cat faces by changing up the colors or adding expressions.
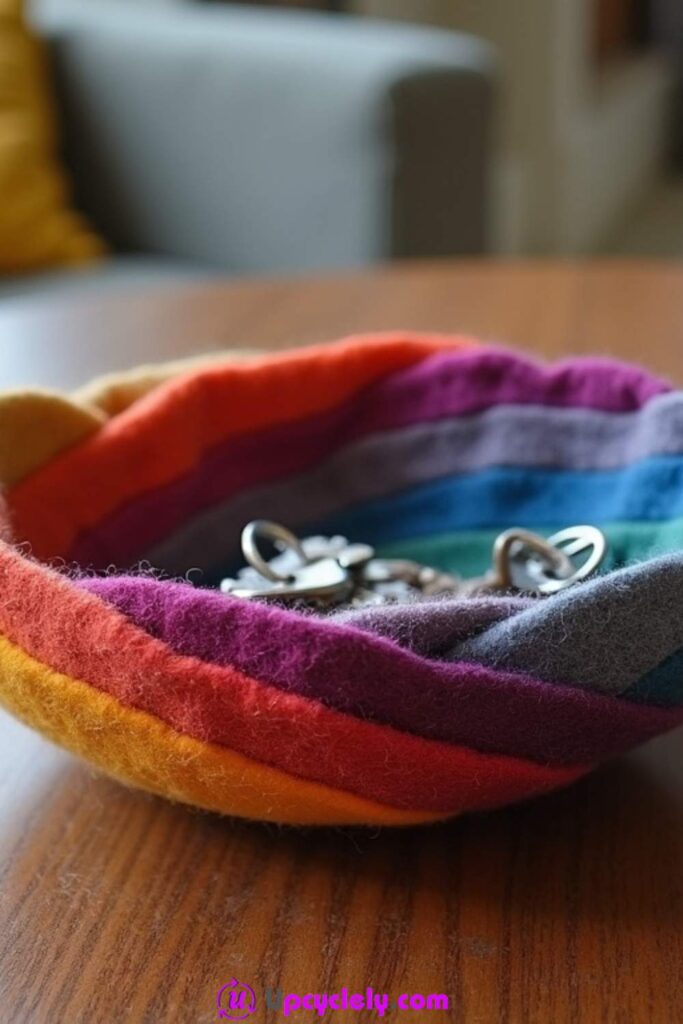
Felt Bowl
Materials Needed:
- Felt sheets in rainbow colors.
- Scissors.
- Hot glue gun.
- Bowl or template.
Steps to Create:
- Prepare the Bowl Layers
I begin by cutting circles from each of my rainbow-colored felt sheets, each circle slightly smaller than the one before it. Starting with red for the largest, I work my way down through orange, yellow, green, blue, indigo, and violet. - Shape the Layers
Using a small bowl as a mold, I position the largest circle at the base, layering the smaller circles inside it one by one, shaping them into a slight curve. This is the part where it starts looking real, and I get so excited to see the colors blend. - Glue the Layers
Applying a light layer of hot glue between each felt circle holds the layers together. I press each layer in place to make sure it maintains the bowl’s shape while drying. - Add Functional Details
Once the bowl feels sturdy, I add an optional lip or edge by folding the topmost layer slightly outward and gluing it down. Now it’s ready to hold keys, jewelry, or little keepsakes!
Pro Tip:
Achieve a smoother curve by gently heating the felt with a hairdryer to make it more flexible while shaping..
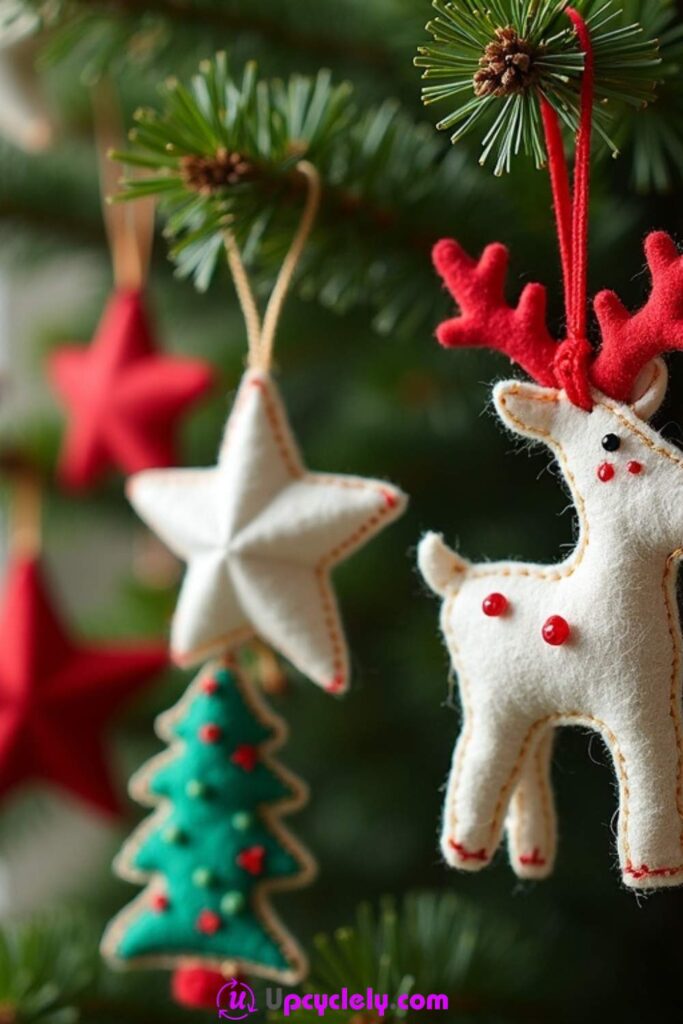
Felt Christmas Ornaments
Materials Needed:
- White, red, and green felt sheets.
- Fabric glue or needle and thread.
- Embroidery thread.
- Scissors.
- Thin ribbon or string for hanging.
Steps to Create:
- Cut Ornament Shapes
I cut out festive shapes like stars, trees, and reindeer from the felt sheets. For each ornament, I cut two identical pieces to create a front and back. - Decorate the Details
Using small scraps of felt, I decorate the ornaments. A red nose and antlers for the reindeer, red stitching around the white star, and tiny red circles for the tree’s ornaments are my personal favorites. Figuring out these small touches always puts me in a Christmas spirit. - Sew and Stuff
I sew around the edges of each piece, leaving a small opening to push in a bit of cotton stuffing. This is my favorite step because it makes the ornaments three-dimensional. Once stuffed, I stitch up the last bit. - Add Hanging Loops
I cut lengths of ribbon or string, fold them over, and stitch or glue them to the top center of each ornament. Watching these ornaments come together feels so rewarding, knowing they’ll hang on a tree soon.
Pro Tip:
Layer your felt details slightly off-center or at angles to give your ornaments a quirky handmade feel. Perfection isn’t the goal; warmth and charm are!
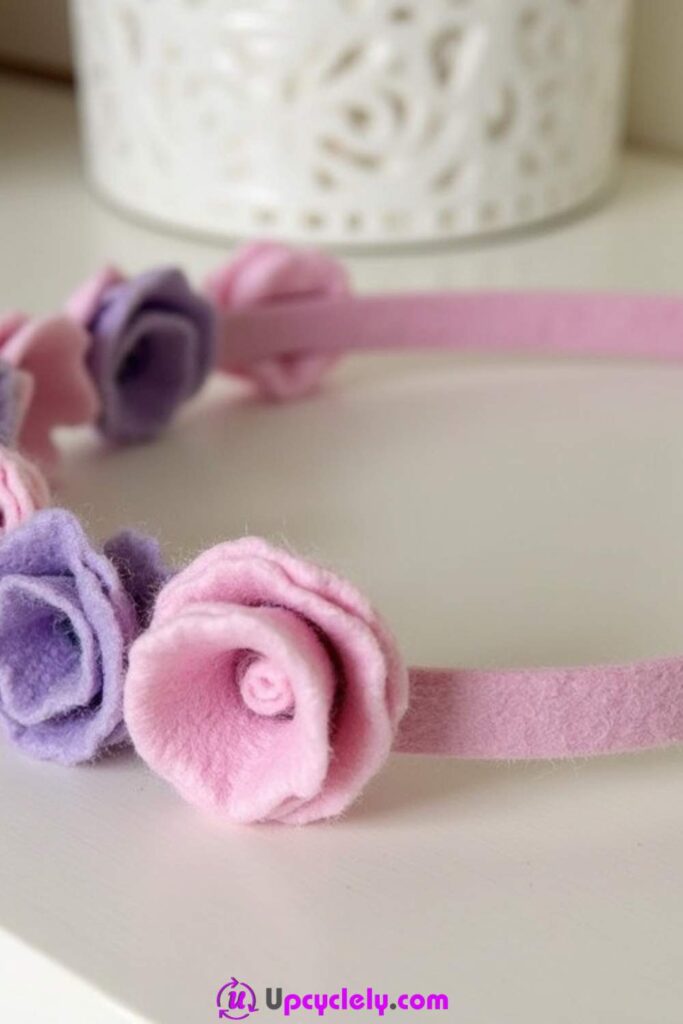
Felt Headbands
Materials Needed:
- A plain headband (plastic or fabric-based).
- Felt sheets in pink and purple.
- Hot glue gun and glue sticks.
- Scissors.
- Pencil and paper for templates.
Steps to Create:
- Prepare the Templates
I start by sketching simple flower shapes that resemble roses on paper. I draw three different sizes, making sure they’re proportional to the headband. Once satisfied, I cut out these templates and place them onto my pink and purple felt sheets to trace. - Cut and Layer the Flowers
Each flower requires layers, so I cut a series of felt petals based on the templates. Smaller petals go on top, while larger ones form the base. I love this step because it’s when the flowers begin to show their character. I slightly curl the petals’ edges by using my fingers to give them dimension. - Assemble the Flowers
Using a hot glue gun, I start layering the petals, smallest to largest, creating a blooming effect. By alternating pink and purple felt, the flowers look soft yet lively. Once the flowers are done, I set them aside to cool and harden slightly. - Attach to the Headband
I carefully glue the flowers onto the top arc of the headband, spacing them evenly or clustering them slightly for a more natural look. This step is so rewarding as the headband transforms into an elegant piece that’s perfect for any occasion.
Pro Tip:
For extra embellishment, add tiny pearls or beads in the center of each flower to give them a touch of elegance.
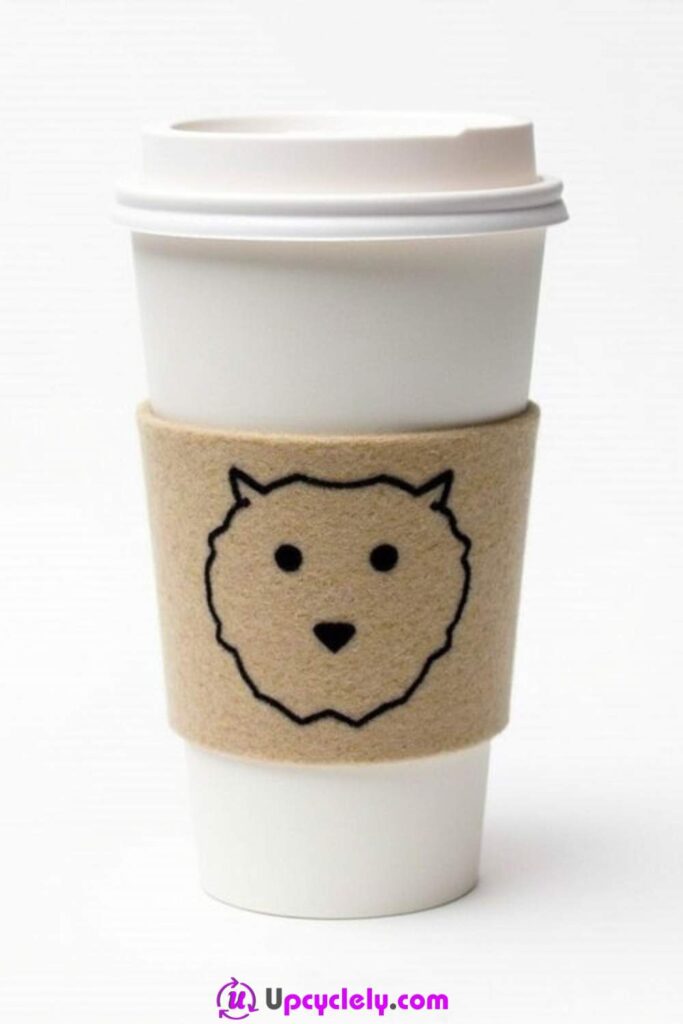
Felt Cup Sleeves
Materials Needed:
- Felt sheets in tan or light brown.
- A disposable coffee cup for sizing.
- Fabric marker for designs.
- Scissors.
- Hot glue gun or needle and thread.
Steps to Create:
- Measure and Cut the Base Sleeve
I wrap the felt sheet snugly around the coffee cup and mark where the ends meet. Adding about half an inch for comfort, I trim the felt into a rectangular shape. It’s always important to double-check the size before making cuts! - Design the Decoration
Using a fabric marker, I draw the face of a bear or any other adorable animal onto the felt. I can’t help but smile as the simple doodle adds personality to the craft. If drawing isn’t your thing, pre-made felt stickers can easily be used here. - Join the Sleeve Ends
I carefully glue or stitch the shorter ends of the rectangle together to form a loop that slides over the cup. If stitching, I make it neat and tight, as this section sees the most wear and tear. - Secure the Decoration
Once the sleeve is fully assembled, I go over the edges of the design lightly with glue to ensure it won’t smudge or peel. Simple yet so personal, every sip feels like it comes with a hug.
Pro Tip:
Add an insulating layer by doubling up the felt for extra hand comfort, especially for hot beverages.
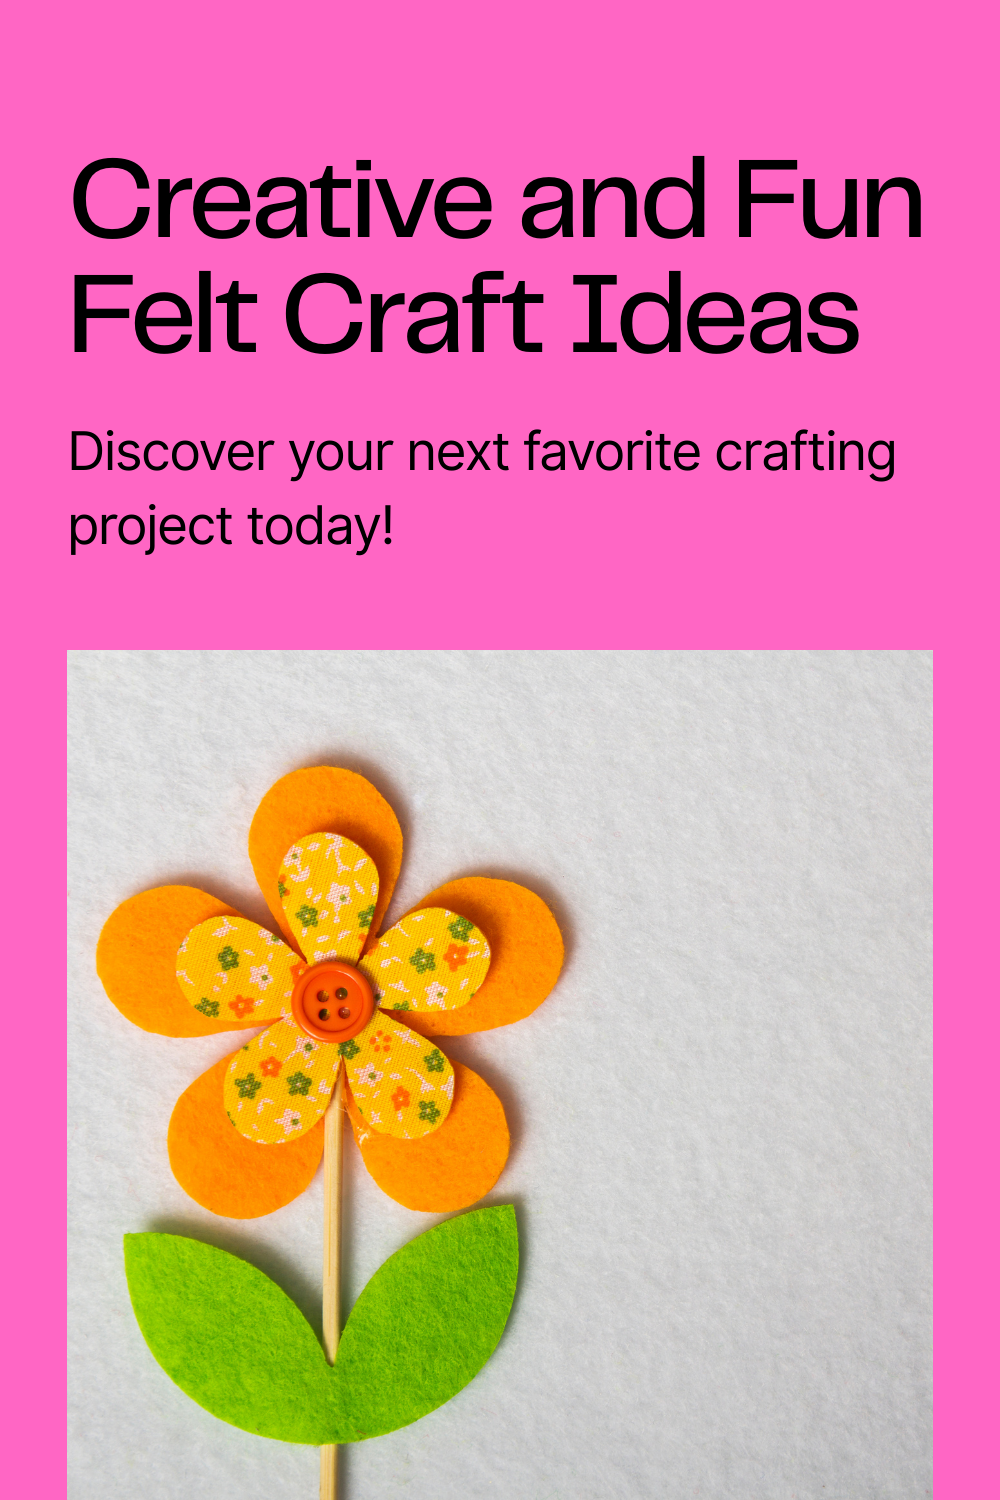
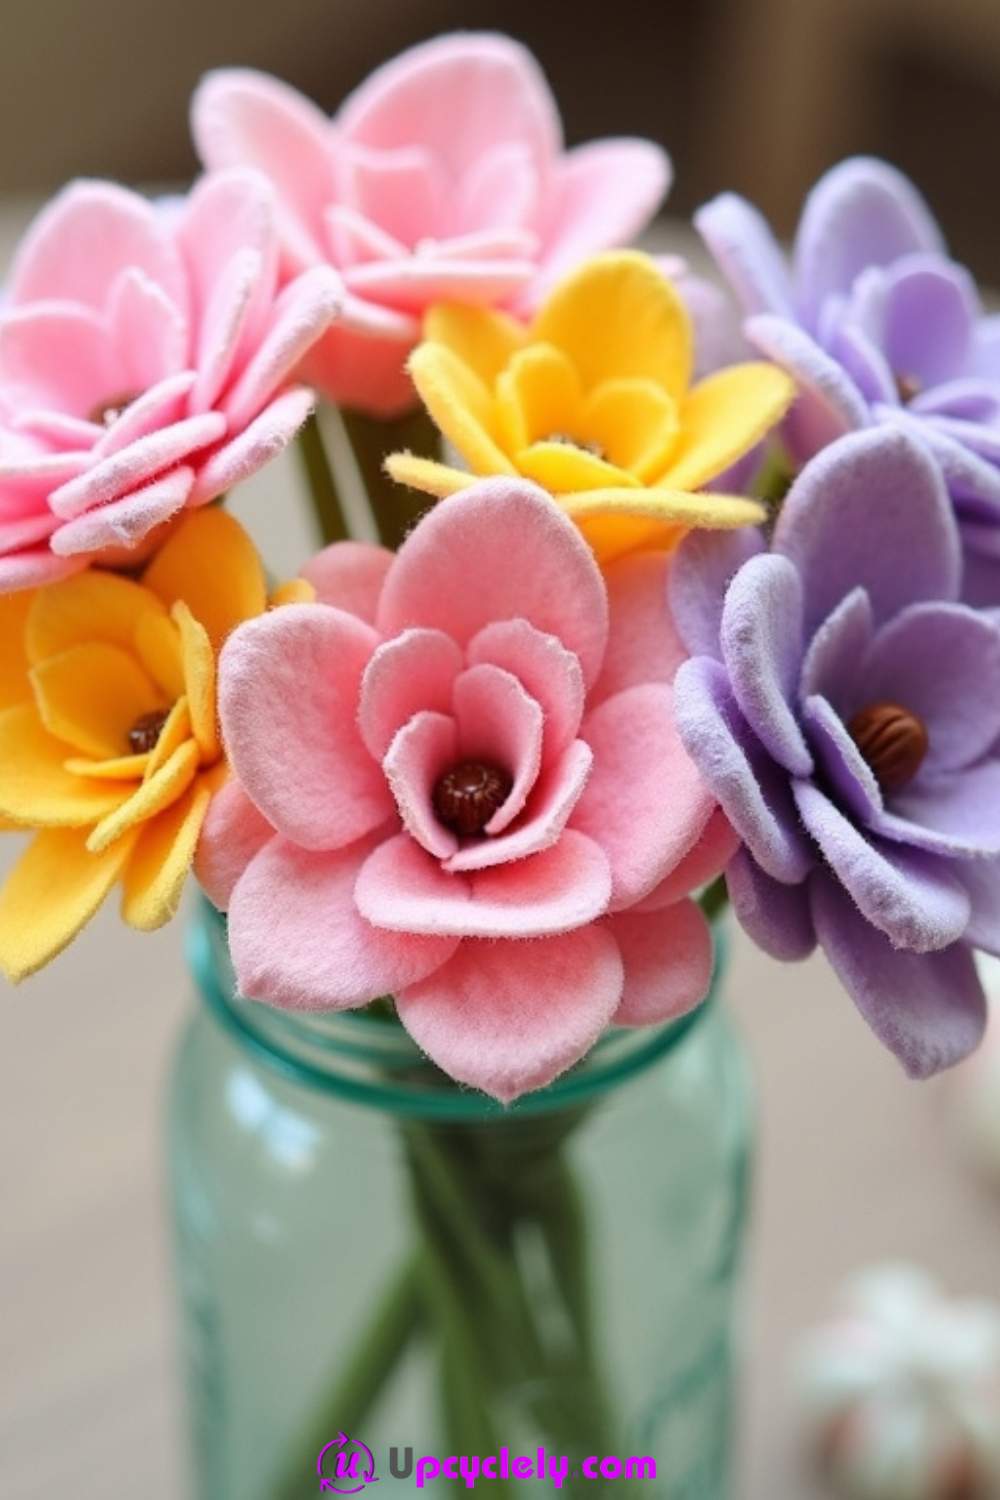
Felt Fabric Flowers
Materials Needed:
- Felt sheets in pink, yellow, and purple.
- Scissors.
- Floral wire or green pipe cleaners.
- Hot glue gun.
- A small glass jar for display.
Steps to Create:
- Cut Petals and Centers
I cut petal shapes from the felt sheets in varying sizes. The larger petals go on the outside, while the smaller ones form the inner layers of each flower. For the centers, I use contrasting colors like yellow to make the flowers pop. - Shape the Flowers
Using my fingers, I slightly curl each petal to give it depth and a more lifelike appearance. Shaping the petals always feels meditative to me. Seeing them take form sparks a little bit of joy with every fold. - Assemble the Blooms
I start gluing the petals to the floral wire one by one, fanning them out naturally. Layering the petals is my favorite part because it brings all the pieces together. Once the petals are secure, I wrap a narrow strip of green felt around the base for a polished finish. - Arrange in a Jar
Once all flowers are assembled, I place them in a small glass jar for a simple yet elegant display. It’s the perfect touch for a windowsill or a dining table.
Pro Tip:
Experiment with mixing felt textures, like using glitter felt for the centers, to create extra visual interest.
Felt Finger Puppets
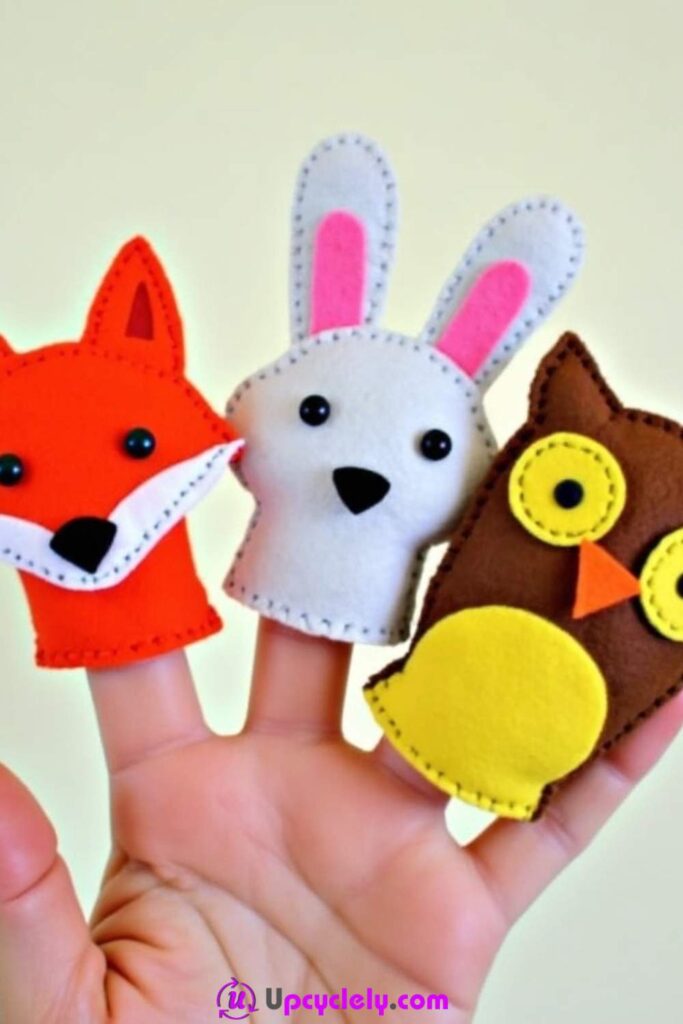
Materials Needed:
- Felt sheets in orange, white, brown, and yellow.
- Craft scissors.
- Needle and thread or fabric glue.
- Marker for details.
Steps to Create:
- Create Templates
I start by drawing simple animal shapes, such as a fox, owl, and rabbit, onto paper. The template is key, as it ensures the puppets fit comfortably over my fingers. - Cut and Sew the Base
Using the templates, I cut out two identical shapes for each puppet from the felt sheets. I stitch around the edges, leaving the bottom open. It’s thrilling to see these flat pieces come to life as finger puppets. - Add the Details
Faces, ears, eyes, and bellies are where I get to be playful. I cut small shapes from contrasting felt colors and either stitch or glue them on. The fox’s white snout and the owl’s big yellow eyes always make me chuckle. - Fine-Tune for Fit
Before finishing, I slide the puppet onto a finger to ensure it fits well. Adjustments are easy at this stage, and once I’m happy, I secure everything in place.
Pro Tip:
Use embroidery thread for stitching details like smiles or whiskers to make the puppets more expressive.
Felt Gift Bags
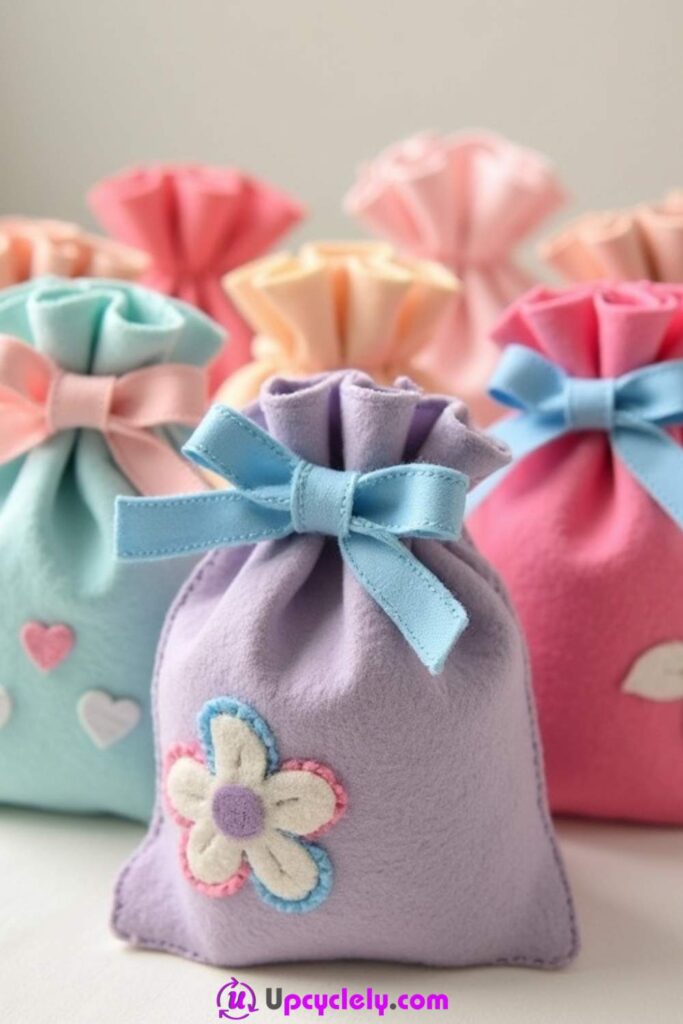
Materials Needed:
- Felt sheets in pastel colors (pink, purple, blue).
- Embellishments like felt flowers or hearts.
- Satin ribbons.
- Hot glue gun or needle and thread.
- Scissors.
Steps to Create:
- Cut Bag Shapes
I start by cutting rectangular pieces of felt and fold them in half vertically to form the bag structure. The size depends on what the bag will hold, but I generally aim for about 6 inches tall. - Sew or Glue the Sides
I run a neat stitch along the two vertical sides of the folded felt or use hot glue. Leaving the top open, the bag begins to take shape and feels more real with each step. - Add Decorations
Using contrasting felt, I cut out flowers, hearts, or other patterns and attach them to the bag’s surface. Picking the design is where my creativity runs wild, and it’s one of the most enjoyable parts. - Attach the Drawstring
At the top of the bag, I fold the edge over half an inch, sew it down, and thread a satin ribbon through the casing to create a drawstring closure. Tying the ribbon feels like the icing on the cake!
Pro Tip:
Customize the bags further by adding names or initials cut from felt for personalized gifting.
Felt Mini Banners
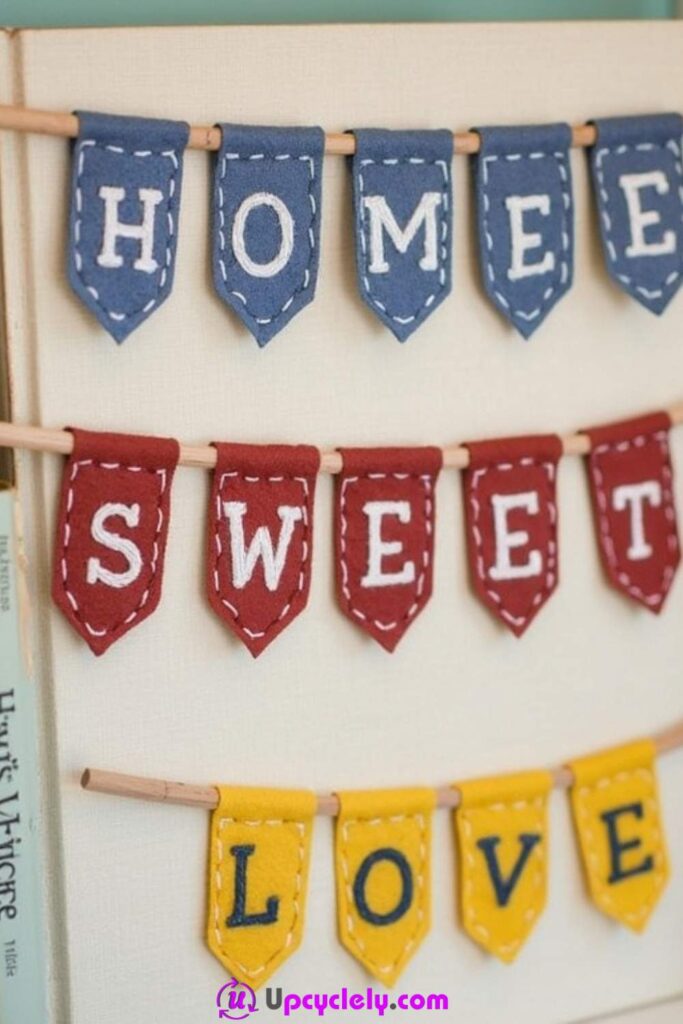
Materials Needed:
- Felt sheets in blue, red, and yellow.
- White and dark blue embroidery thread.
- Wooden rods (about 10 inches each).
- Scissors.
- Embroidery needle.
- Fabric glue or hot glue gun.
- String or twine for hanging.
Steps to Create:
- Prepare the Banner Shapes
I start by cutting rectangular pieces of felt for the banners, about 8 inches tall. To give them that pennant look, I trim the bottom into a V shape. It’s so satisfying to see them transform from basic rectangles into bold, decorative pieces in just a few cuts. - Add the Letters
Using my embroidery needle and white thread, I carefully stitch letters onto the banners (like “HOME,” “SWEET,” and “LOVE”). For a clean finish, I sketch the letters lightly with a pencil before stitching. This step requires some patience, but it’s worth it to see the words emerge from the felt. - Attach to the Wooden Rod
I fold the top edge of each banner around a wooden rod and use fabric glue to secure it. This part makes me feel like I’m truly crafting something homemade and timeless. - String and Hang
Once the glue has set, I tie a length of twine to the ends of each rod to create the hanger. Hanging them up gives me a little wave of pride. They instantly make a space feel warm and welcoming.
Pro Tip:
For an extra cozy touch, embellish the banners with small felt flowers or buttons.
Felt Jewelry
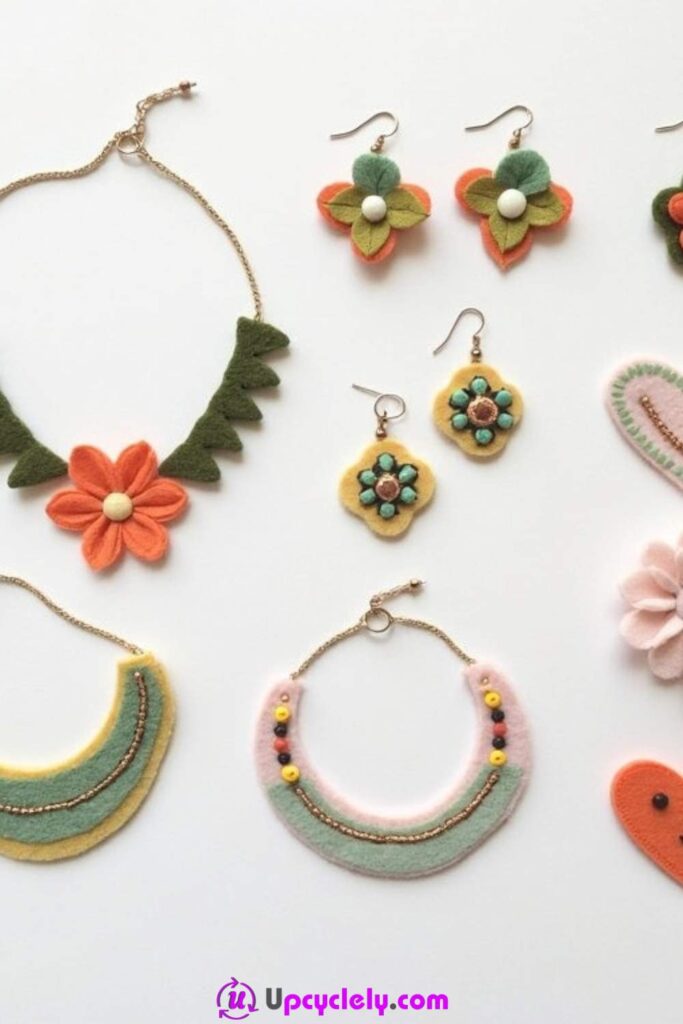
Materials Needed:
- Felt sheets in pink, green, yellow, and orange.
- Beads in various colors.
- Earring hooks and necklace chains.
- Scissors.
- Small pliers.
- Embroidery thread and needle.
- Hot glue gun.
Steps to Create:
- Cut the Felt Shapes
I cut flower and heart shapes from the felt sheets. Each piece is designed to be light and delicate. I alternate colors to create playful combinations that catch the eye. - Add Beads and Details
I sew or glue beads onto the felt pieces to act as accents, like the stamens of a flower or the features of a heart. It’s the little details that make each piece of jewelry unique and personal. - Attach Earring Hooks or Chains
Using small pliers, I attach earring hooks to the felt shapes or connect them to necklace chains. The transformation into wearable art feels magical. Every piece carries its own charm. - Layer and Refine
To make the jewelry pop, I layer smaller felt details onto larger base pieces using hot glue or stitches. For example, I might add a tiny orange heart to a pink flower. These little touches make the pieces truly shine.
Pro Tip:
Experiment with color blocking or contrasting beadwork to make bolder, statement pieces.
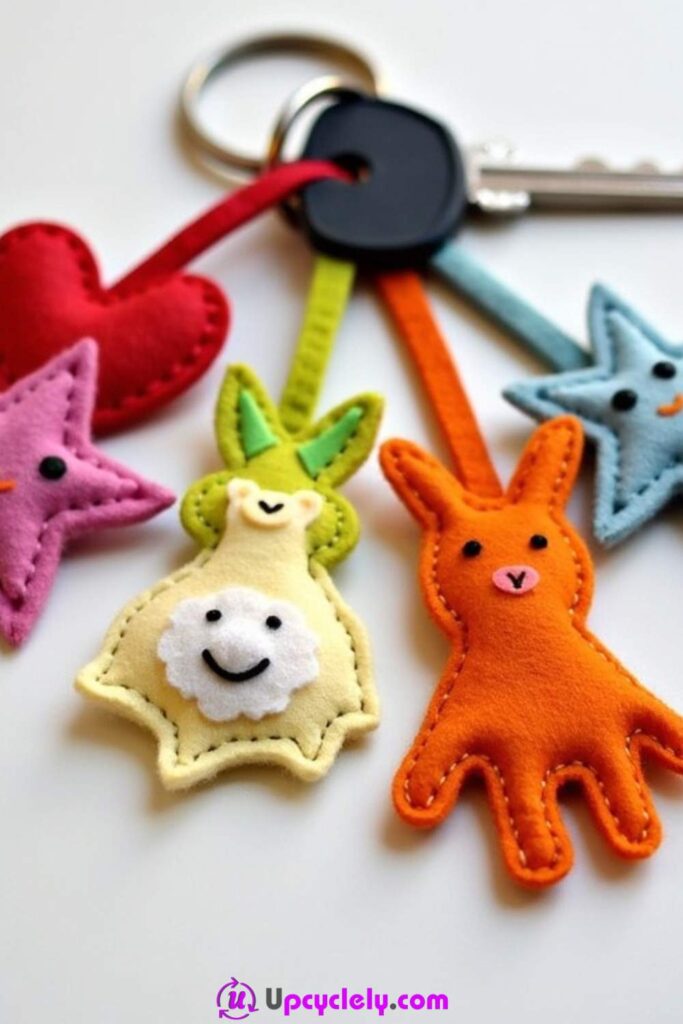
Felt Keychains
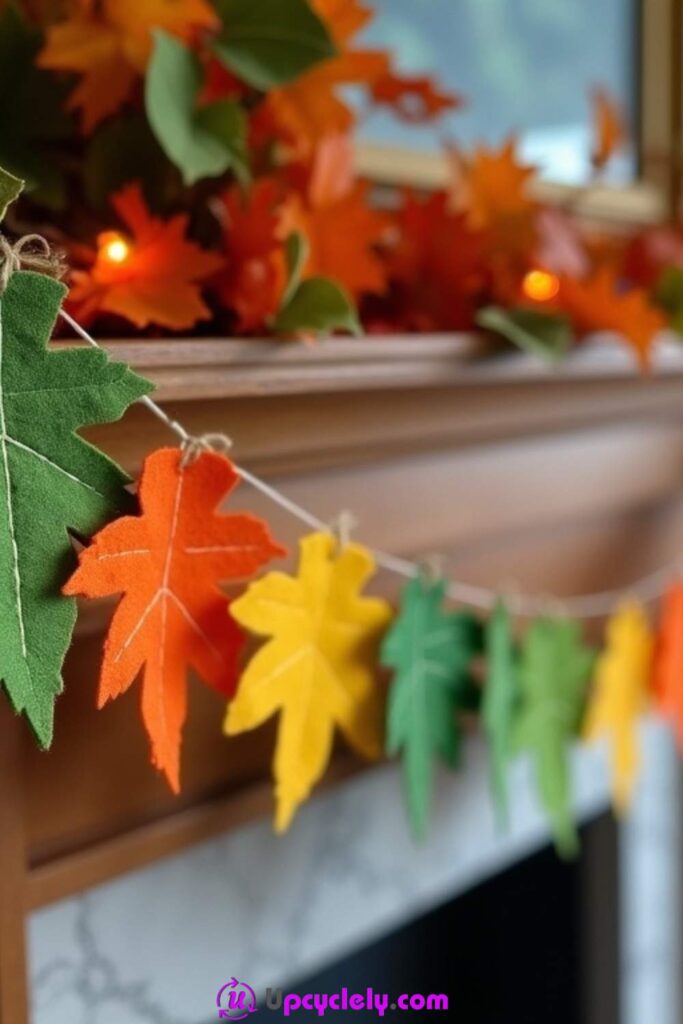
Felt Leaf Garland
Materials Needed:
- Felt sheets in green, orange, yellow, and red.
- Embroidery thread in brown or dark green.
- Scissors.
- String or twine.
- Hot glue gun.
Steps to Create:
- Cut the Leaves
I carefully cut out leaf shapes from the different colored felt sheets. To add variety, I create a mix of maple, oak, and simple oval leaves. This step is where I start envisioning the garland’s final look, and that excites me. - Stitch the Veins
Using embroidery thread, I sew simple vein patterns onto each leaf. The texture this adds makes the leaves come alive, like bringing a piece of autumn indoors. - Secure to the String
I glue the tops of the leaves onto a string or twine, spacing them evenly. Watching the garland take shape is the most rewarding part. With every leaf I add, it starts to look more festive and welcoming. - Add Finishing Touches
I might loop a soft string of fairy lights through the garland for some extra magic. Seeing the warm lights hit the colorful leaves makes me feel like I’ve captured the spirit of fall.
Pro Tip:
Use metallic thread for stitching the veins to give your leaves a subtle shimmer.
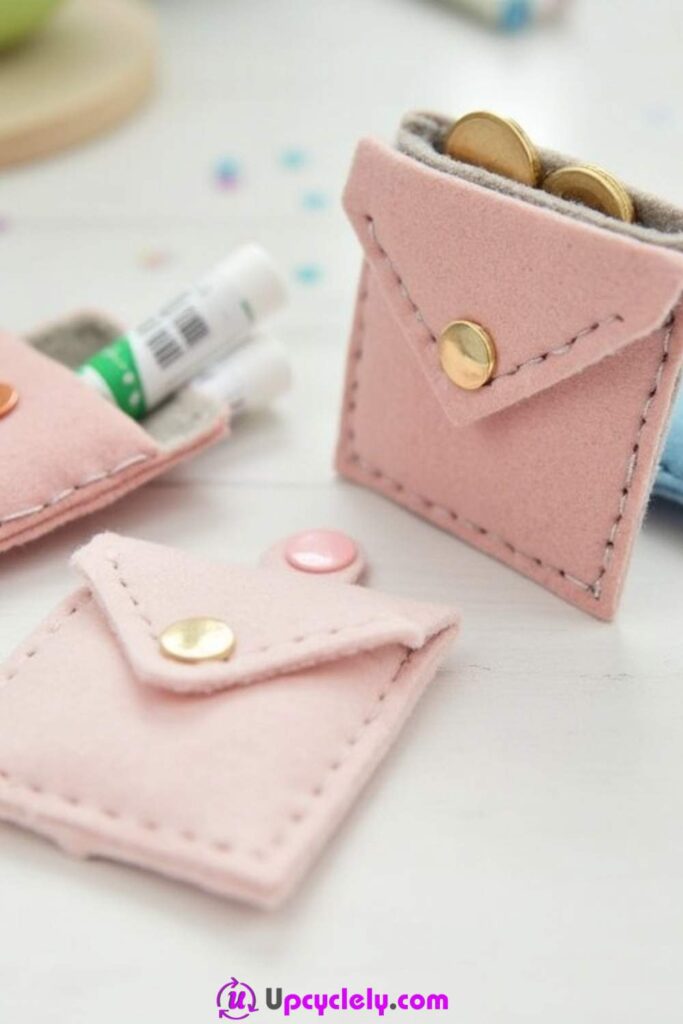
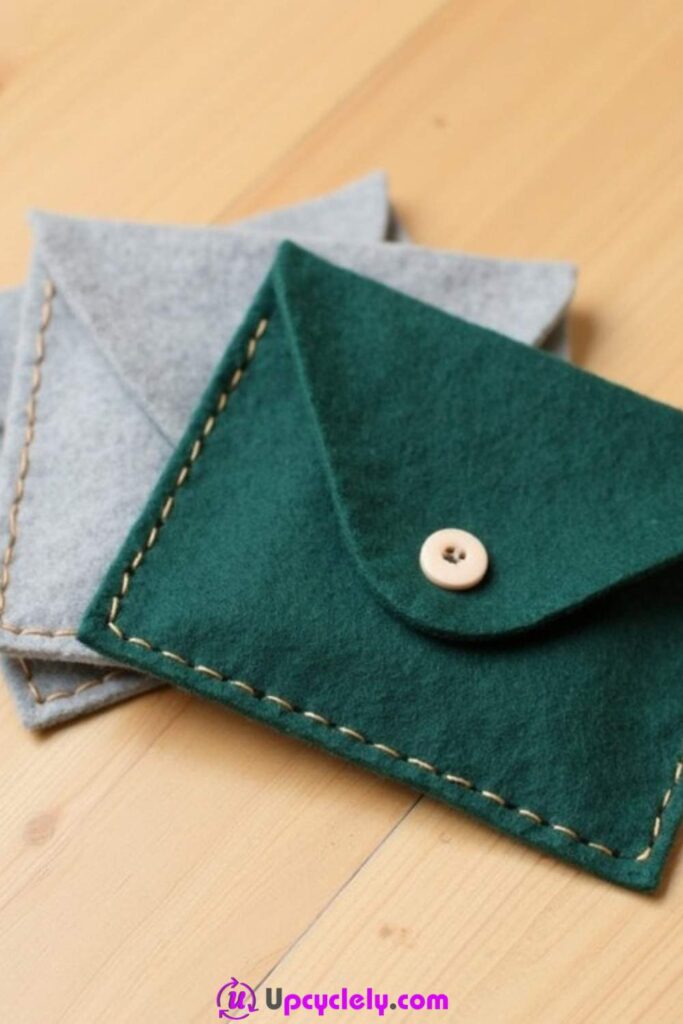
Felt Pouches
Materials Needed:
- Felt sheets (light pink, light blue, or your preferred colors).
- Scissors.
- Snap buttons (metallic or plastic).
- Needle and embroidery thread.
- Ruler and pencil.
- Hot glue gun (optional).
Steps to Create:
- Cut the Felt for Perfect Pouches
I start by cutting rectangular pieces of felt, roughly 4 inches by 8 inches, so that when folded, they form a square pouch. I make sure my cuts are clean and straight; the edges matter a lot for a polished look that feels professional yet handmade. - Shape the Flap
Folding the felt in half, I use a pencil to sketch a triangular flap on the top layer of the felt. This flap adds a unique and stylish touch to the pouch. Once I’m happy with the shape, I cut along my lines carefully. - Sew or Glue the Edges
Using a contrasting thread, I sew along the edges to unite the sides. I find embroidery stitches along the seams add personality and durability to the pouch. If I’m in a hurry, I use a hot glue gun, making sure it holds firmly. - Secure the Snap Button
Attaching the snap button is the most satisfying step! I carefully press it into place, ensuring it aligns well with the flap. Once it snaps open and closed smoothly, I know this pouch is ready for use.
Pro Tip:
Add a little appliqué or embroidery design to the flap for an extra touch of charm! It could be a monogram or a tiny felt flower.
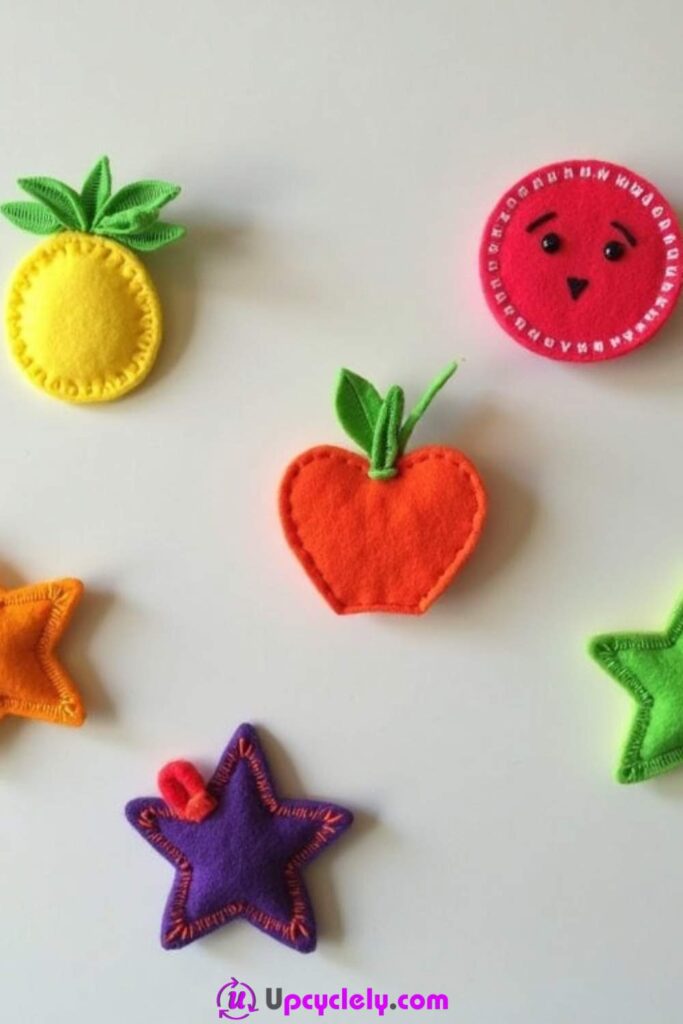
Felt Magnets
Materials Needed:
- Felt sheets in various bright colors (yellow, red, orange, green, purple).
- Small round magnets.
- Scissors.
- Fabric glue or hot glue gun.
- Embroidery thread and needle (optional).
Steps to Create:
- Design and Cut Fun Shapes
I like to draw simple shapes like stars, apples, and pineapples on a sheet of felt before cutting. Keeping the designs playful and slightly whimsical makes these magnets stand out on any fridge or board. - Add Decorative Stitching
Using embroidery thread, I sew decorative outlines, veins on leaves, or even add faces to stars. Stitching not only elevates the design but also makes each piece feel a little more alive and fun. - Attach the Magnet
With a dab of strong fabric glue, I attach a small magnet to the back of each felt shape. I make sure to press firmly and hold for a few seconds to ensure it sticks properly. It’s always exciting to see how these flat creations transform into functional, adorable magnets! - Finishing Touches
I double-check each magnet for stray threads or glue smudges. This is the moment where everything comes together, and I can’t wait to use them myself or gift them to friends.
Pro Tip:
Personalize your magnets by incorporating initials or seasonal themes like snowflakes in winter or flowers in spring.
Felt Mobile
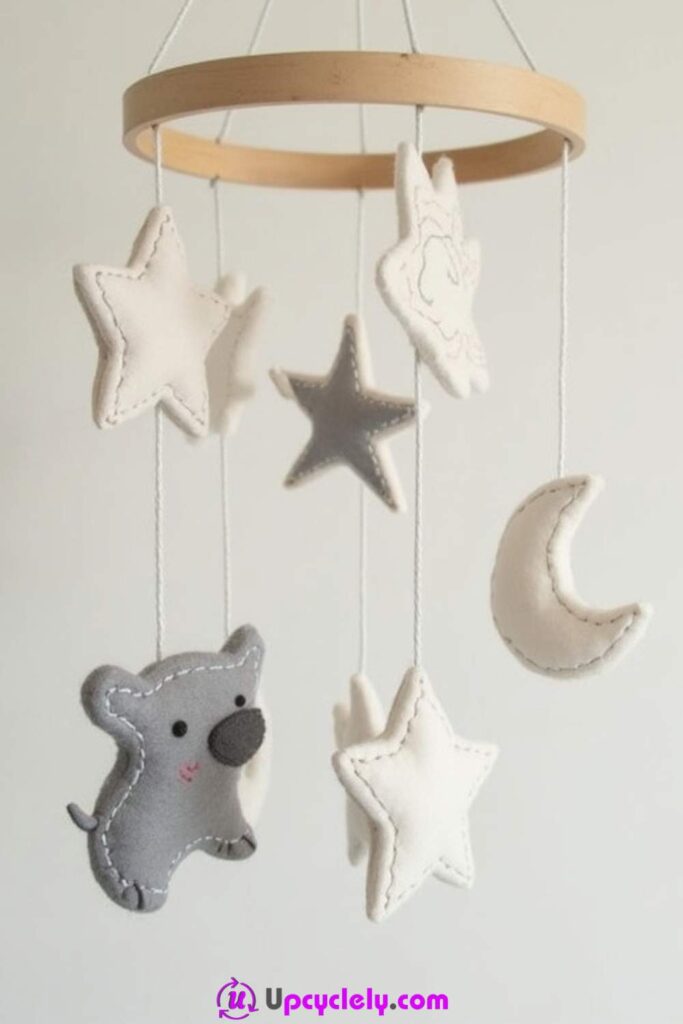
Materials Needed:
- Felt sheets in white, gray, and soft pastels.
- Circular wooden ring (about 10 inches in diameter).
- Embroidery thread and needle.
- Scissors.
- Strong thread or fishing wire for hanging.
Steps to Create:
- Cut Out the Shapes
I begin by cutting stars, crescent moons, and animal shapes like koalas from felt sheets. I find using a template helps maintain consistency across all pieces. This is the step where the theme of the mobile starts to take form. - Sew the Edges and Stuff
Each piece is made of two identical felt shapes stitched together. Before completely closing the seam, I lightly stuff the shape with cotton to give it a lovely, puffy texture. Seeing these shapes become three-dimensional is so rewarding. - Attach Strings to Shapes
I thread a thin string or clear fishing wire through the tops of each shape, tying it securely and leaving enough length to hang them at varying heights. Arranging the shapes with balance in mind is my favorite part of this step. - Secure to the Wooden Ring
Finally, I tie each string onto the wooden ring, evenly distributing the shapes to create a balanced mobile. Once all the elements are in place, I attach a longer thread to the top of the ring for hanging.
Pro Tip:
Add tiny felt clouds or stars in glitter felt for a magical touch that captures the imagination.
Felt Phone Case
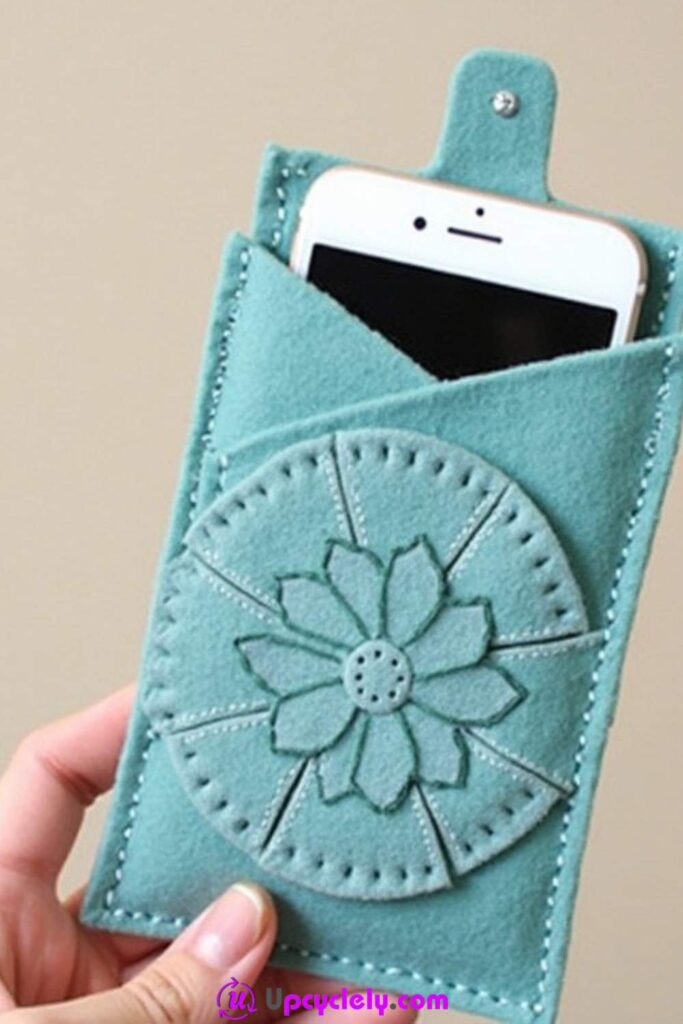
Materials Needed:
- Felt sheet in vibrant or neutral color (e.g., turquoise).
- Scissors.
- Needle and thread.
- Snap button.
- Pencil for sketching.
- Ruler.
Steps to Create:
- Measure and Cut the Felt Base
I measure my phone and add about half an inch to the dimensions to account for seams. Then, I cut two identical pieces of felt. It’s critical at this step to ensure the pieces align perfectly for a sleek look. - Create and Embroider the Design
Before sewing the case together, I sketch and stitch a simple floral or geometric design on what will be the front piece. This touch feels personal and makes the case one-of-a-kind. - Stitch the Case Together
With both felt pieces aligned, I sew along three of the edges, leaving the top open. I use contrasting thread for an extra pop, making each stitch count as part of the overall design. - Add the Closure
For the top flap, I cut a smaller piece of felt and sew it to the back panel. Adding a snap button ensures the phone stays securely in place. This final step always makes me feel a sense of accomplishment as the case comes together perfectly.
Pro Tip:
Use a soft inner lining like cotton fabric for added protection and a more polished look.
Felt Place Mats
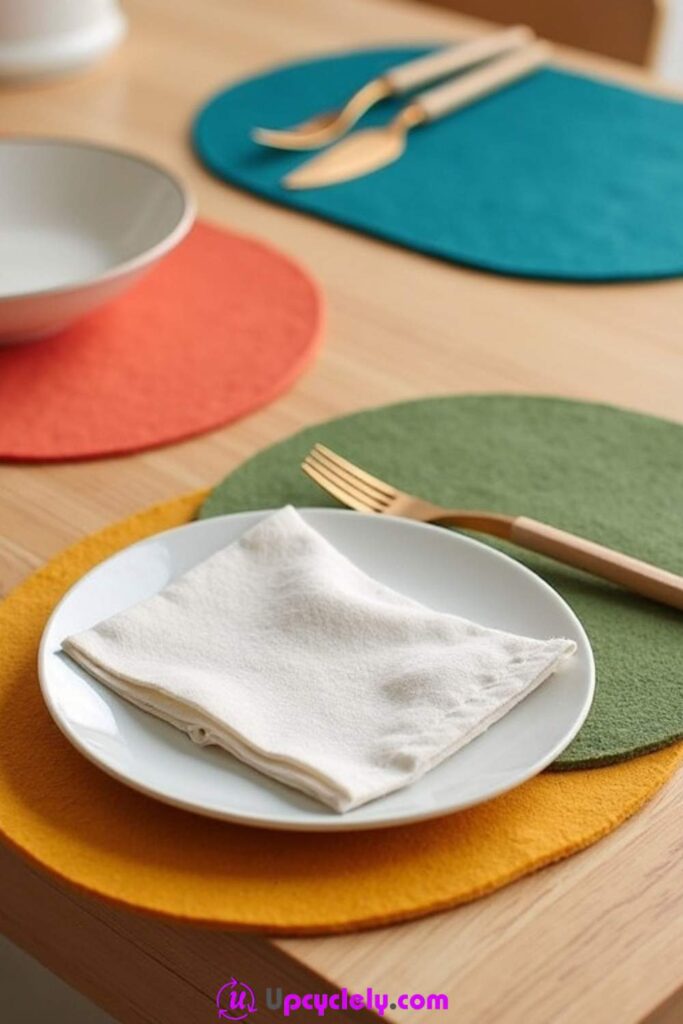
Materials Needed:
- Felt sheets in colors like orange, green, and blue.
- Scissors.
- Ruler.
- Chalk or colored pencil for marking.
- Decorative ribbon or edge trim (optional).
Steps to Create:
- Cut the Mats to Size
Using a ruler, I measure and mark ovals on the felt sheets, usually around 12 inches long and 8 inches wide. I cut carefully to maintain clean and even edges because the shape is the star of this craft. - Add Decorative Edges
For a little extra flair, I sew a decorative ribbon or trim around the edges of each placemat. It’s a small detail but one that makes the whole table setting pop with personality. - Reinforce the Felt
To make the mats more durable, I glue or stitch an extra layer of felt to the underside of each placemat. This step ensures the mats will hold up over time and through multiple uses. - Set the Table
The moment of truth! I place the mats on the table and arrange plates and utensils on top. It’s so satisfying to see these colorful, handmade pieces transform an ordinary table setting.
Pro Tip:
Use seasonal colors to create placemats for holidays or special events, like red and green for Christmas or pastels for Easter.
Felt Tissue Box Cover
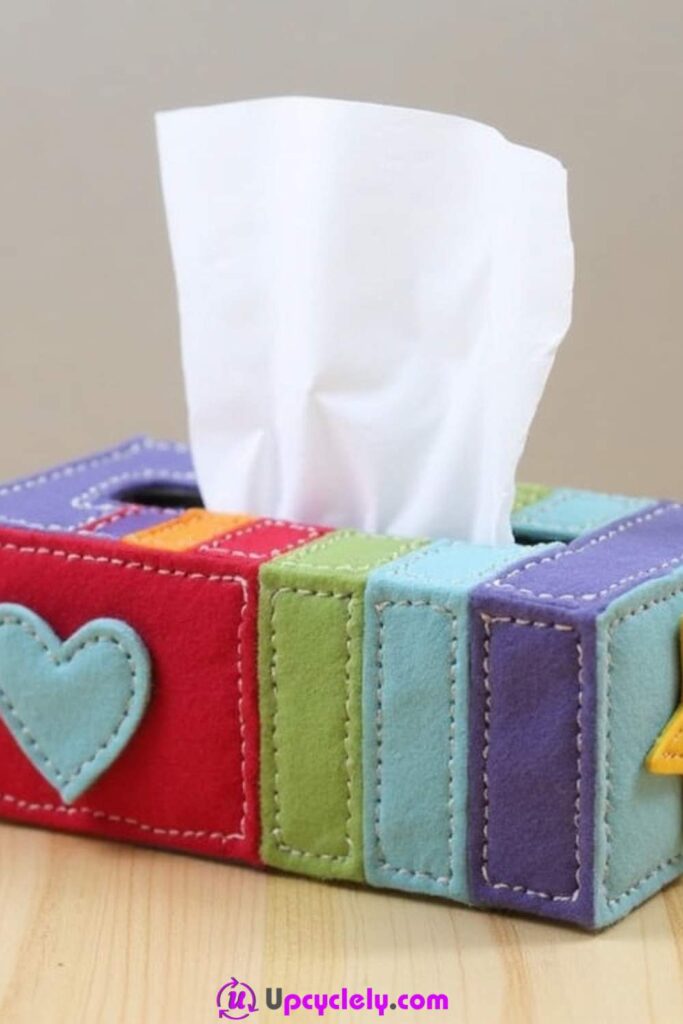
Materials Needed:
- Felt sheets in various colors (red, green, blue, purple, orange)
- White thread and needle
- Scissors
- Fabric glue (optional)
- Decorative felt shapes (heart, star, etc.)
- A tissue box for measurement
Steps to Create:
- Measure and Cut Panels: Start by measuring the dimensions of your tissue box. Cut felt sheets into panels that match the sides of the box. For a standard rectangular box, you’ll need six panels: one for each side and one for the top and bottom.
- Design the Panels: Choose vibrant colors for each panel. Add decorative felt shapes like hearts or stars to some panels. Sew or glue these shapes onto the panels for a playful touch.
- Stitch the Panels Together: Using white thread, stitch the panels together. Start with the sides, then attach the top and bottom. Keep your stitches visible for a charming, handmade look.
- Add the Tissue Slot: On the top panel, cut a slit wide enough for tissues to pull through. Reinforce the edges of the slit with stitching to prevent fraying.
Pro Tip: Use contrasting colors for the stitching to make the design pop. This adds a whimsical, child-friendly vibe to your tissue box cover.
Felt Trivet
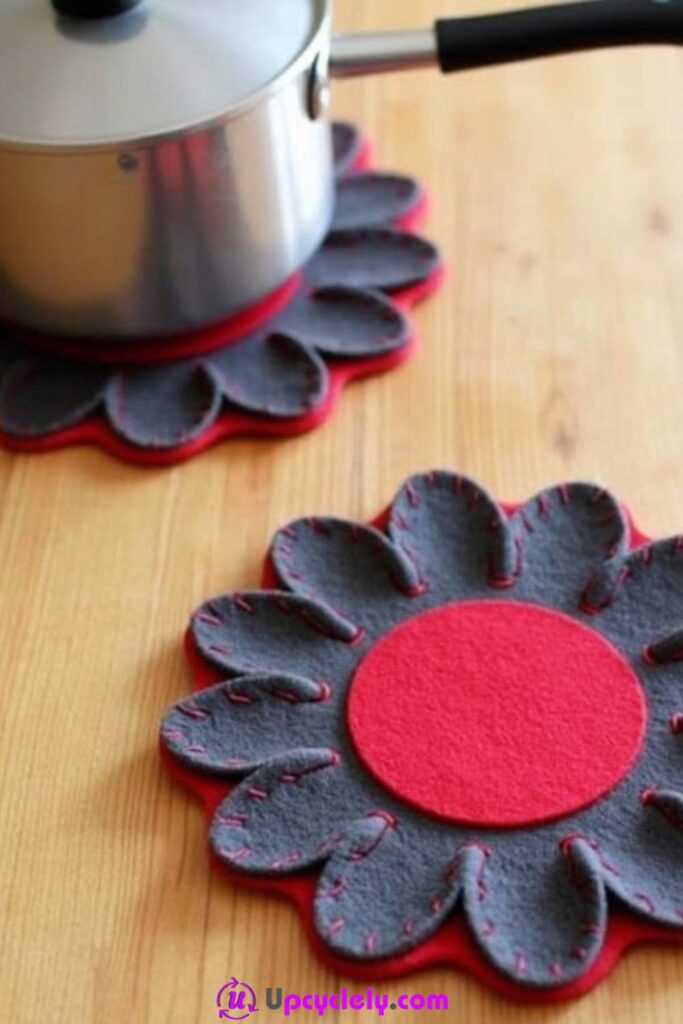
Materials Needed:
- Felt sheets in gray and red
- Scissors
- Needle and thread (red)
- A saucepan or pot for size reference
Steps to Create:
- Cut the Flower Shape: Draw a flower shape on the gray felt and cut it out. Make sure the size is large enough to hold a saucepan or pot.
- Create the Centerpiece: Cut a circular piece from the red felt for the flower’s center. Place it in the middle of the gray flower.
- Stitch the Details: Use red thread to stitch the red circle onto the gray flower. Add decorative stitching along the edges of the petals for a handcrafted look.
- Test the Trivet: Place a saucepan on the trivet to ensure it’s sturdy and functional. Adjust the size if needed.
Pro Tip: Double-layer the felt for extra thickness and heat resistance. This ensures your trivet is both decorative and practical.
Felt Wall Art
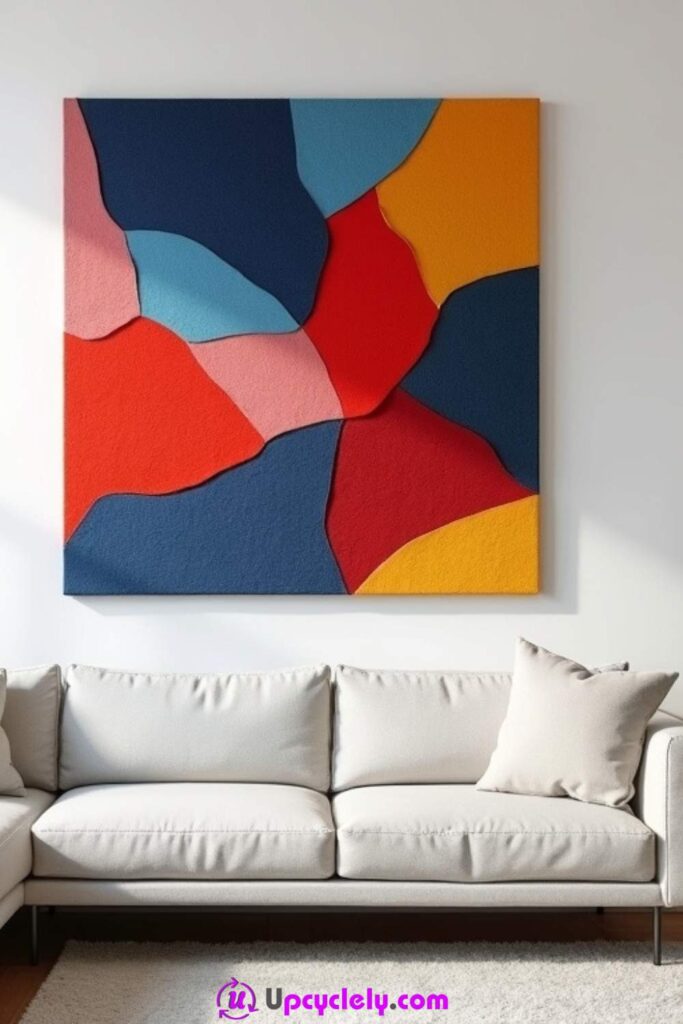
Materials Needed:
- Felt sheets in various colors (dark blue, light blue, red, orange, pink, yellow)
- Scissors
- Canvas or wooden board
- Fabric glue
- Ruler and pencil
Steps to Create:
- Plan Your Design: Sketch a mosaic-like pattern on paper. Decide on the arrangement of colors and shapes.
- Cut the Felt Pieces: Cut the felt sheets into irregular shapes based on your design. Use a ruler for straight edges and scissors for curves.
- Assemble the Mosaic: Glue the felt pieces onto the canvas or board, starting from one corner and working your way across. Leave small gaps between pieces for a patchwork effect.
- Frame and Display: Once the glue dries, frame your artwork or hang it as is. The vibrant colors will brighten any room.
Pro Tip: Use a mix of bold and pastel colors to create depth and visual interest. This makes your wall art stand out as a centerpiece.
Felt Wallets
Materials Needed:
- Felt sheets in green and gray
- Scissors
- Needle and thread (contrasting colors)
- Buttons for closures
- Ruler and pencil
Steps to Create:
- Cut the Felt: Measure and cut the felt into rectangles. The size depends on what you plan to store in the wallet. Fold the rectangle in half to form the wallet shape.
- Add the Button Closure: Sew a button onto one side of the wallet. Cut a small slit on the opposite side to create a buttonhole.
- Stitch the Edges: Use contrasting thread to stitch the edges of the wallet. This not only secures the sides but also adds a decorative touch.
- Layer and Customize: Add inner pockets or dividers using additional felt pieces. Sew these into place for better organization.
Pro Tip: Choose eco-friendly felt made from recycled materials. It’s a small step towards sustainability while crafting something beautiful.