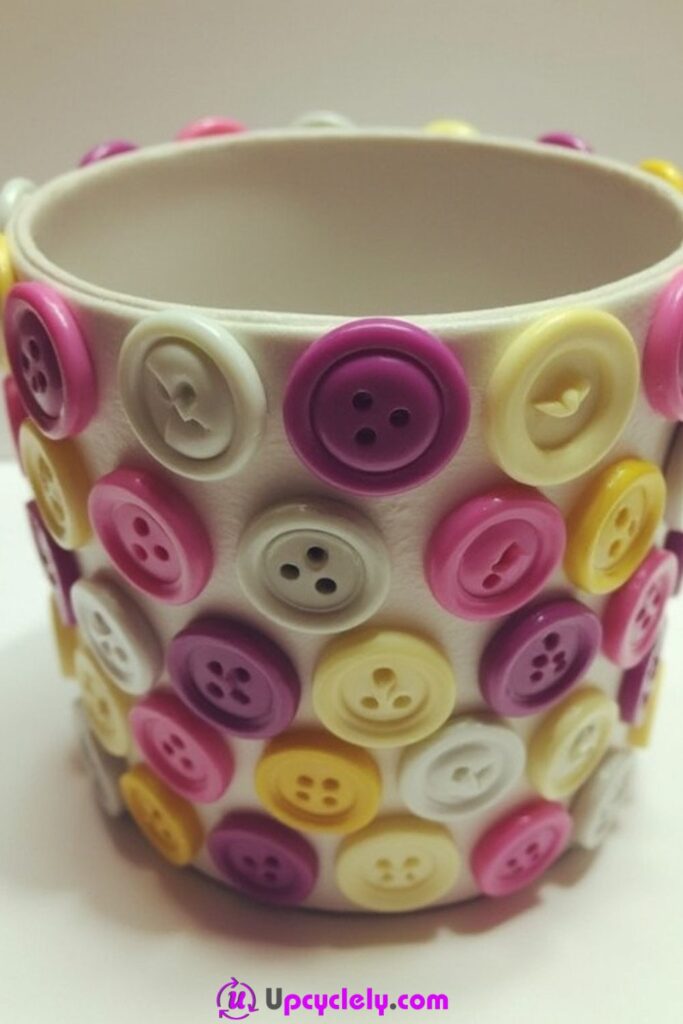
Button-Covered Jar

Materials Needed
- A glass jar (any size)
- Variety of buttons in different sizes, colors, and patterns
- Strong adhesive (such as E6000 glue or a hot glue gun)
- Tweezers or toothpicks for detailed placement
- Protective newspaper or drop cloth
Steps
- Prepare Your Workspace
Begin by laying down a newspaper or drop cloth to protect your table. Wash and dry the jar thoroughly to ensure the surface is free of dirt or grease. This will help the adhesive bond securely. - Sort Your Buttons
Organize your buttons by size and color. This step isn’t just practical; it also makes designing easier. Decide whether you want a random, colorful look or a more symmetrical pattern for your jar. - Apply Glue and Place Buttons
Starting at the bottom edge of the jar, apply a thin layer of glue in small sections. Press buttons onto the glued area one by one, using tweezers for precision. Mix large, small, and patterned buttons for a textured, artistic effect. - Continue Layering Until Complete
Work your way up the jar surface, ensuring no gaps are left. Once you’ve covered the entire jar, allow it to dry overnight in a ventilated area.
Pro Tip
Use a clear or neutral adhesive for a clean finish. If you want your jar to shine under light, mix in some metallic or glittery buttons!
Button Animal Shapes
Materials Needed
- Buttons in assorted colors and shapes
- Thin colored paper or white cardstock
- Craft glue or glue dots
- Craft scissors
- A pencil
Steps
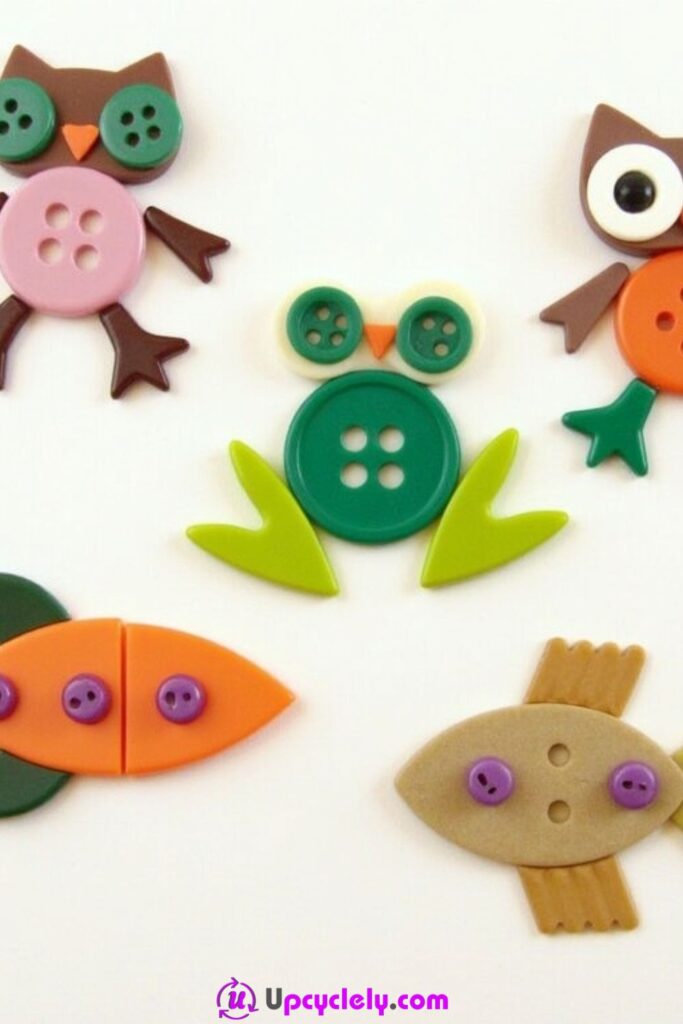
- Draw Your Animal Outlines
Start by sketching simple animal shapes (like owls, frogs, and fish) onto your cardstock. Keep the designs basic so they can be easily filled with buttons. - Gather the Right Buttons
Spend a little time selecting buttons that will match your animals. For example, use round green buttons for the frog’s body or small black buttons for the eyes. - Glue the Buttons in Place
Apply glue along your animal outline first, then press buttons down one by one to form the shape. Use small buttons for fine details like eyes, legs, and fins, and larger ones for main body sections. - Fill in Any Gaps
Once the buttons are in place, cut small bits of paper to fill in any gaps or areas that aren’t covered nicely. This’ll help make your animals look polished.
Pro Tip
For a 3D effect, layer buttons on top of each other! You’ll add depth and texture that sets your animals apart.
Button Bracelet
Materials Needed
- Stretchy elastic cord (such as jewelry-making cord)
- Assorted buttons in colors and designs you love
- Scissors
- Tape or a clip to hold the string end
Steps
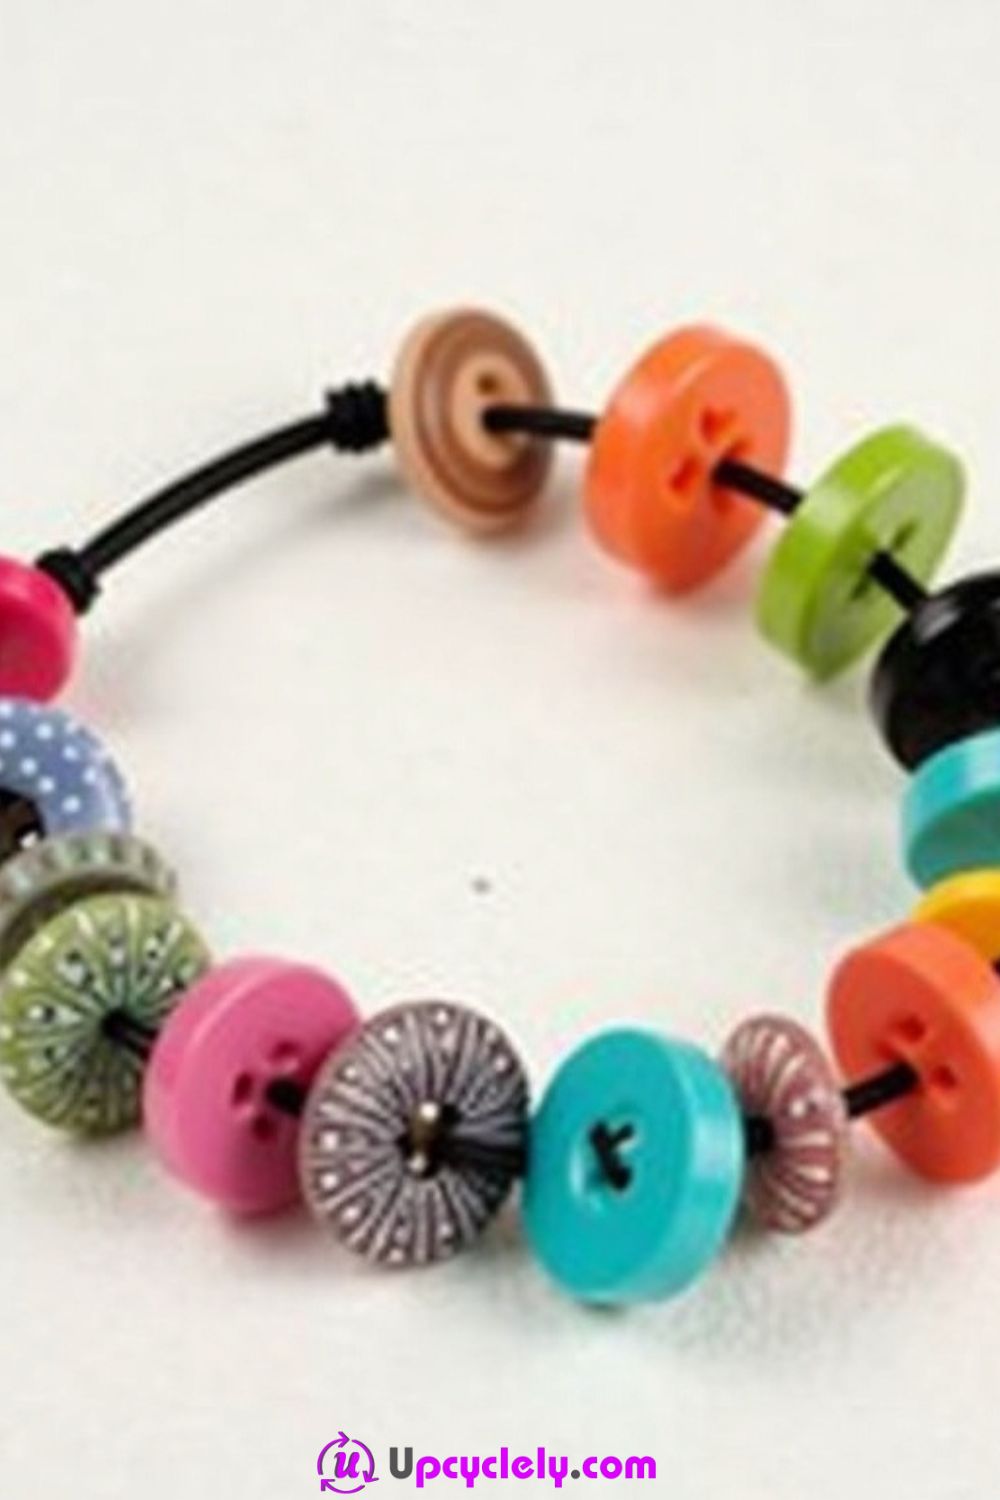
- Measure and Cut the Cord
Wrap the elastic cord around your wrist to measure the length you need, leaving an extra two inches. Cut it and secure one end using tape or a clip to keep buttons from sliding off. - Choose Your Buttons
Pick a variety of buttons that complement each other. Use a mix of plain and patterned ones for visual interest. Ensure each button has holes large enough for your cord to pass through. - Thread the Buttons
Start threading buttons onto the elastic cord. Slide them through their holes until they sit snugly next to each other. Alternate colors and shapes as you go for a fun pattern. - Secure the Ends
Once the bracelet is full, tie a firm knot at the end of the cord. Pull tightly to ensure the buttons don’t shift. Trim excess elastic, leaving just a short tail.
Pro Tip
Double up the cord for extra durability and less chance of breakage, especially if you plan to wear the bracelet often.
Button Brooch
Materials Needed
- Selection of small and medium-sized buttons
- A brooch pin
- Strong craft glue
- A cardboard disc slightly smaller than your desired brooch size
- Paint or fabric (optional, for covering the cardboard base)
Steps
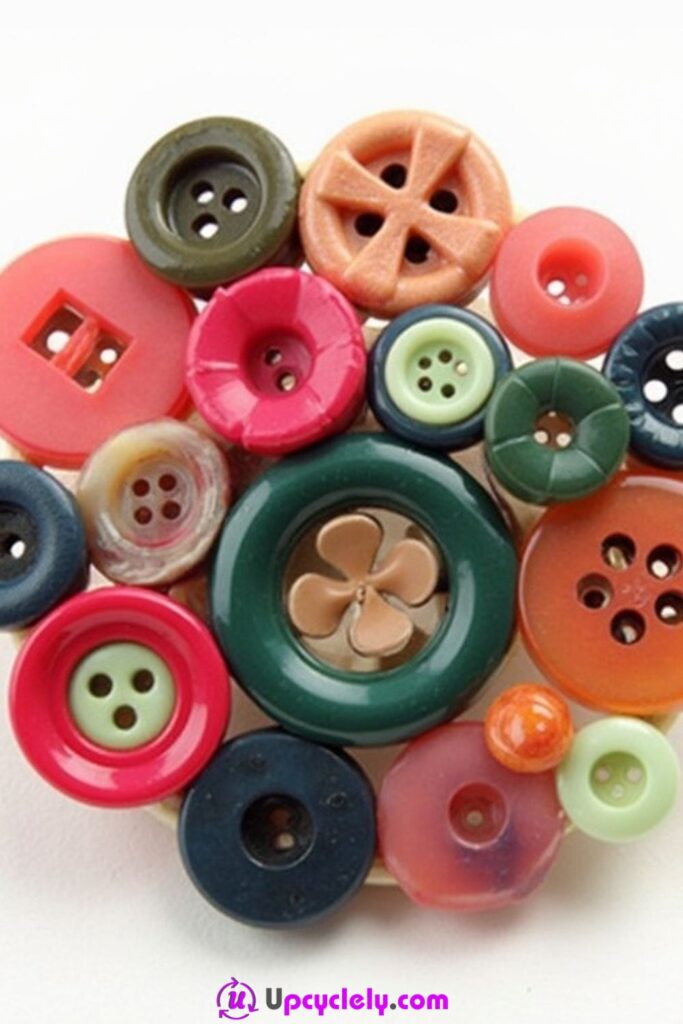
- Create a Base
If desired, paint or cover your cardboard disc to match your button theme. This will be the base of your brooch. - Arrange Buttons
Lay the buttons out on the disc without glue to determine the design. Place a standout button in the center, and arrange smaller ones around it to make a flower-like pattern. - Glue Buttons to Base
Starting from the center, glue each button to the cardboard base. Press down gently to secure them in place. Allow everything to dry completely. - Attach the Brooch Pin
Flip the brooch over and carefully attach the pin with glue. Place it near the middle of the back for balance. Once dry, your brooch is ready to wear!
Pro Tip
Experiment with unique buttons, like vintage or flower-shaped ones, for a one-of-a-kind accessory.
Button Christmas Ornaments
Materials Needed
- Wooden ornament bases (star, tree, or snowman shapes)
- Red, green, and brown buttons
- Twine or decorative string
- Craft glue
- Acrylic paint (optional)
Steps
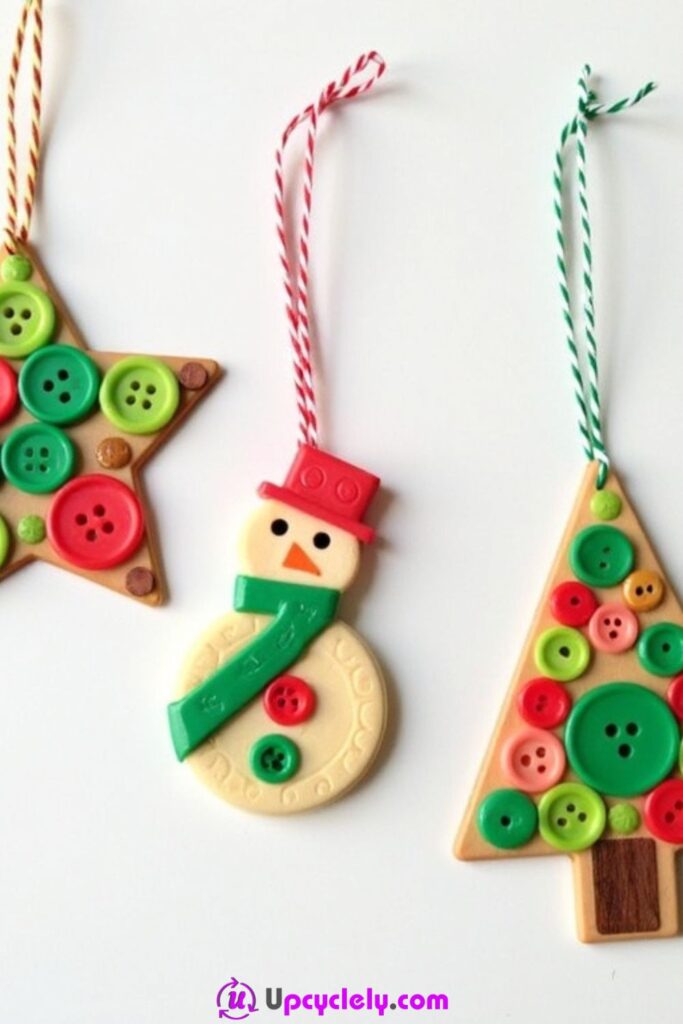
- Prepare the Ornament Base
Paint the wooden shapes to act as a background (such as white for the snowman). Allow the paint to dry before adding buttons. - Sort Buttons by Shape and Size
Group your green buttons for the tree, red ones for accents, and mix brown buttons for detailing the star or snowman features. - Decorate with Buttons
Apply glue to the wooden base in small sections. Press buttons into place in a random or patterned arrangement. Use the buttons to mimic ornaments or facial features for the snowman. - Attach Twine for Hanging
Once dry, thread a piece of twine through the ornament’s hole and tie it securely in a loop. Your ornament is now ready to hang!
Pro Tip
Add small sparkly gems or glitter alongside the buttons for an extra festive touch that catches the light beautifully.
Button Keychain
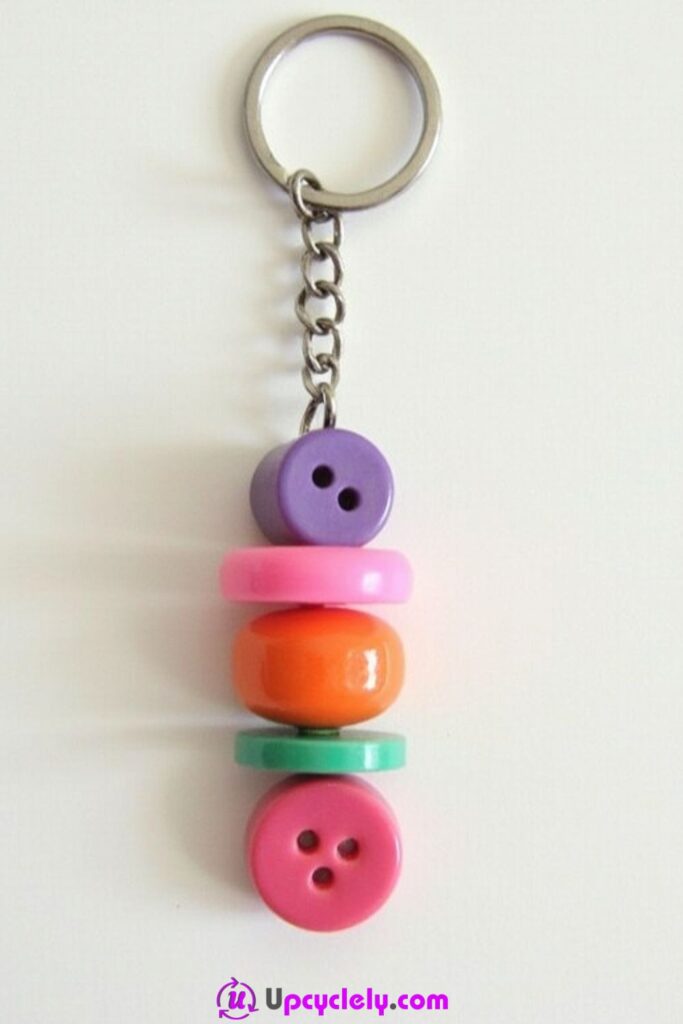
Materials Needed:
- A metallic keyring with a short chain
- 5-6 colorful buttons in different sizes and colors
- Strong craft glue or needle and thread
- Small beads (optional)
- Thin jewelry wire or string
Steps to Create:
- Select and Plan
I begin by picking out my buttons. I like to choose ones in contrasting colors and sizes to create a layered effect. Plan their order in a stack that looks visually appealing. - Stack and Secure
Use craft glue to secure the buttons in a stack. Place the largest button at the bottom and build upwards. If you prefer a more durable craft, thread the buttons through a thin jewelry wire, looping at the bottom to hold them in place. - Attach Wire or String
Once my button stack is ready, I thread the top of my wire or string through the chain of the keyring, securing it tightly. You can twist the wire or knot the string to make sure it doesn’t come undone. - Finishing Touches
Add small beads or charms between the buttons for extra flair. Cut any excess wire or string, and your keychain is ready!
Pro Tip:
For a polished and professional look, use metallic or glittery buttons as accents in your stack.
Button Earrings
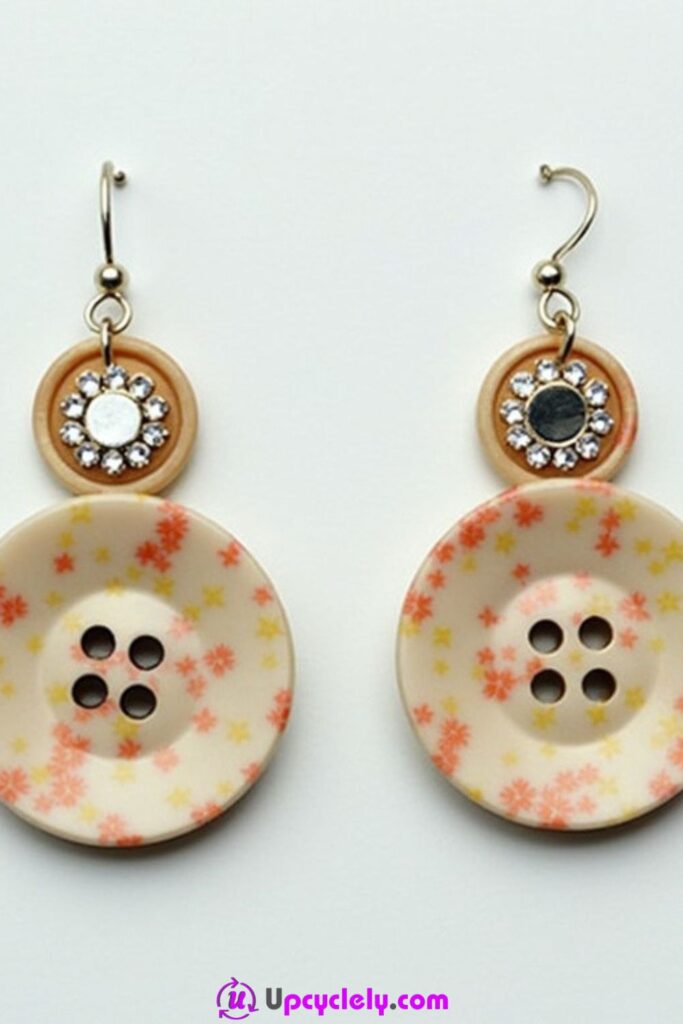
Materials Needed:
- Two earring hooks
- Two large buttons with pretty patterns
- Small rhinestones or beads
- Strong adhesive or glue
- Jewelry pliers
Steps to Create:
- Choose Your Focal Buttons
I pick two large, beautiful buttons with intricate patterns or colors. These will be the focal piece of my earrings. - Decorate the Buttons
Add small rhinestones, beads, or embellishments to the buttons using adhesive to make them look stylish and eye-catching. It’s important to wait for the glue to dry completely before moving on. - Attach Hooks
Using jewelry pliers, attach a small jump ring to the top of each button. Then, connect the jump ring to the earring hooks. Ensure everything is secure to avoid any mishaps. - Balance and Test
Hold up the earrings to check their balance and appearance. Adjust the position of decorations if needed, then give them a final wipe to remove adhesive smudges.
Pro Tip:
For a more cohesive design, match the button color to the metal tone of your earring hooks..
Button Flowers
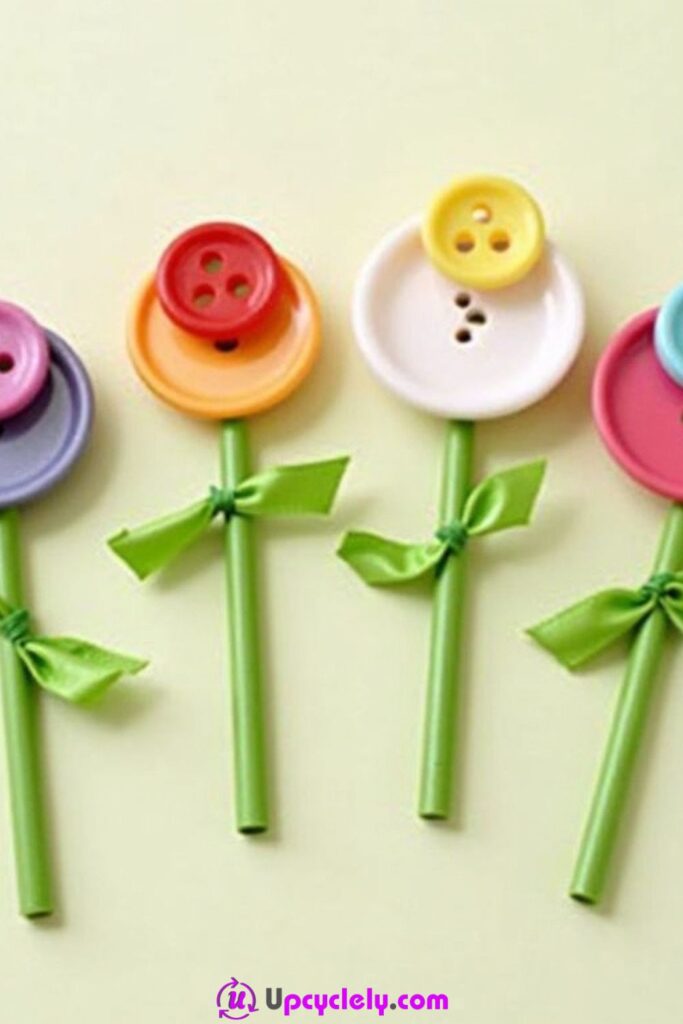
Materials Needed:
- Large and small colorful buttons
- Green straws or floral wire
- Thin green ribbon
- Hot glue gun or craft adhesive
Steps to Create:
- Layer Your Flowers
Start by stacking a smaller button on top of a larger one to create the flower’s center and petals. Glue them together firmly. - Create Stems
Cut the straws to your preferred stem length or use floral wire if you want flexibility. Attach the stems to the back of the stacked buttons with a hot glue gun. - Add Leaf Ribbons
Tie a green ribbon around each stem to mimic leaves. Secure the knot close to the button base and trim the edges for neatness. - Arrange and Display
Gather the flowers together in a vase or tie them into a bouquet. Position them on your table or hang them as wall decor.
Pro Tip:
To make the flowers more lifelike, use textured buttons or mix matte and glossy finishes for a unique feel.
Button Garland

Materials Needed:
- A variety of colorful buttons
- Thick thread or thin twine
- Needle
- Scissors
Steps to Create:
- Plan the Design
I lay out my buttons in a rough sequence on the table. This helps me visualize how the garland will look once strung together. - Thread the Needle
Thread a large embroidery needle with twine. Make sure the twine’s length matches the desired size of your garland, with extra for knots. - String the Buttons
Carefully thread buttons onto the twine, alternating colors, shapes, and sizes. I like to use a mix of large and small buttons to add dimension. Knot the twine after each button to keep them spaced evenly. - Secure and Finish
Once all the buttons are in place, tie secure knots at both ends of the twine. Cut off any excess and hang your garland where it can shine.
Pro Tip:
Use buttons with shiny or metallic finishes to make your garland pop, especially when hung under lights.
Button Hair Clips
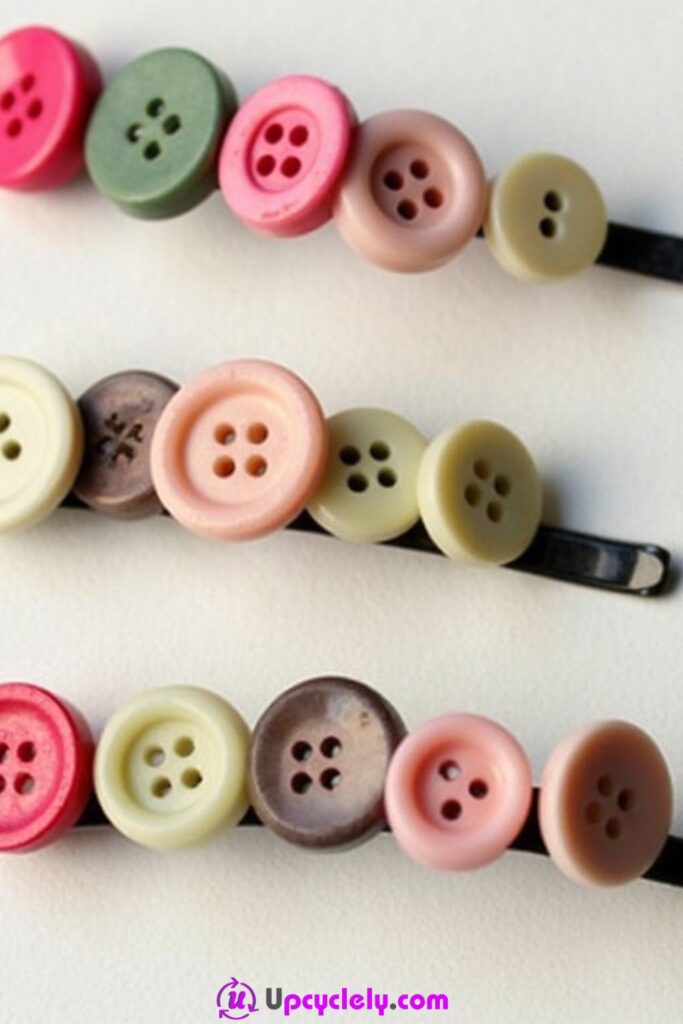
Materials Needed:
- Plain hair clips
- A selection of buttons in soft, pastel colors
- Strong craft glue or needle and thread
- Small gems or beads (optional)
Steps to Create:
- Choose Buttons
Pick buttons in complementary pastel shades to match the style of the hair clips. I aim for a mix of sizes but keep the palette harmonious. - Prepare Hair Clips
Clean the surface of the clips to ensure the glue sticks well. For a sewn approach, use clips with holes or fabric that you can pass needles through. - Attach Buttons
Securely attach the buttons to the clips using glue or by sewing them. Place the largest button first, then layer smaller ones if you prefer a stacked look. Allow the adhesive to dry completely before using. - Add Accents
To elevate the design, add small gems or beads between the buttons. These accents create sparkle and give the clips an extra decorative touch.
Pro Tip:
To make a cohesive set, design all the clips with a similar theme or color palette.
Button Picture Frame
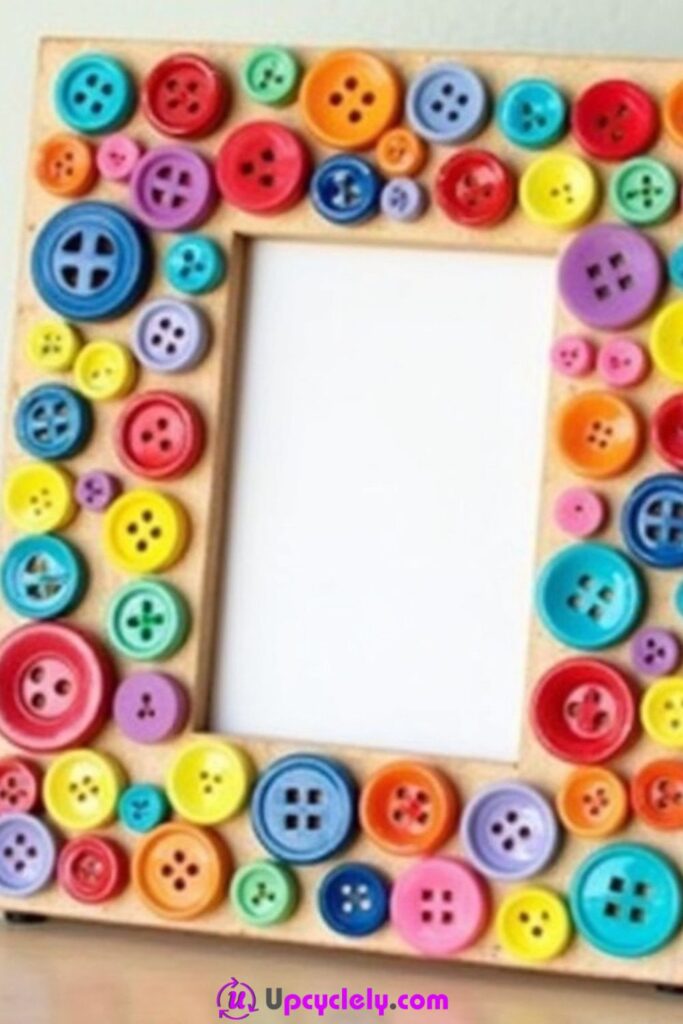
Materials Needed:
- A plain photo frame (wood or plastic)
- Variety of colorful buttons in different sizes
- Hot glue gun and glue sticks
- Tweezers (optional for precise placement)
Steps to Create:
- Prepare Your Frame
I start by cleaning the surface of the photo frame to ensure the glue sticks easily. If the frame has removable glass, I take it out to avoid accidentally getting glue on it. - Plan the Button Layout
Next, I arrange the buttons around the edges of the frame without gluing them yet. This helps me experiment with the colors and sizes to find the perfect arrangement. - Glue the Buttons
Once satisfied with my layout, I use a hot glue gun to attach the buttons, starting with the larger ones at the corners and building out with the smaller buttons. I quickly press each button in place before the glue sets. - Add Final Touches
For gaps or empty spaces, I add smaller buttons for a finished look. After the glue dries, I reassemble the frame and insert a photo.
Pro Tip:
For a cohesive design, stick to a color theme or use buttons with similar finishes, such as glossy or matte.
Button Love Sign
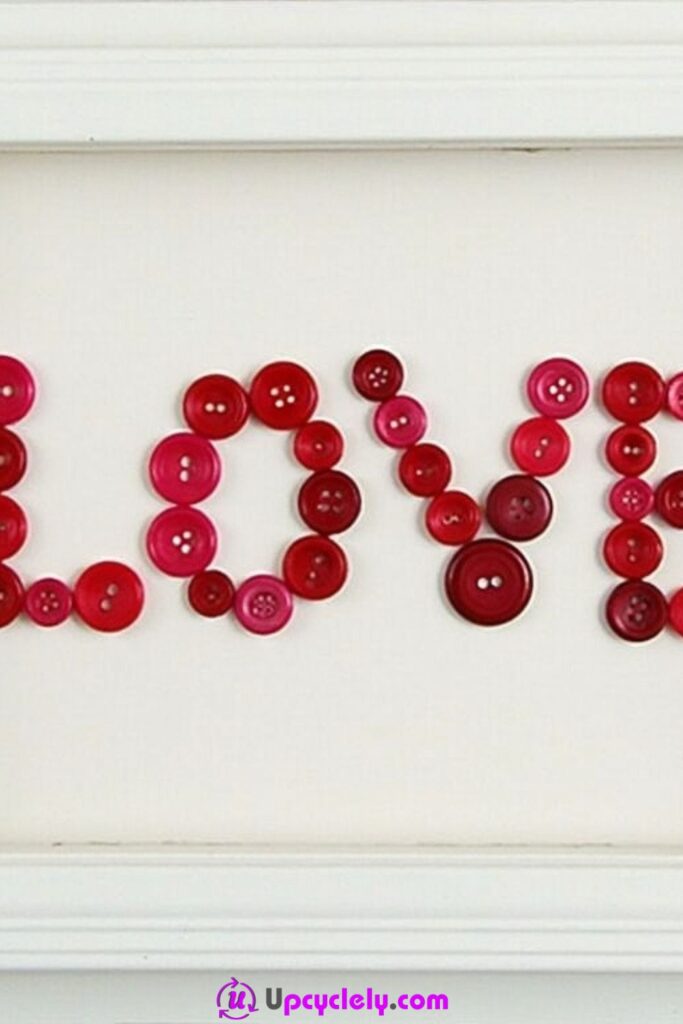
Materials Needed:
- Blank canvas or wooden board
- Buttons in red and pink shades
- Pencil
- Strong craft glue
Steps to Create:
- Sketch the Letters
I use a pencil to lightly sketch the word “LOVE” in large, bold letters on the canvas or board. The letters should be big enough to fit multiple buttons inside them. - Sort Your Buttons
I sort the red and pink buttons by size. Large buttons can form the base while smaller ones can fill in gaps or form details. - Glue the Buttons on Canvas
Starting with the letter “L,” I glue buttons according to the sketch. I carefully overlap some buttons and make sure every inch of the letters is covered. - Refine the Design
I step back after each letter to adjust spacing or add smaller buttons where needed, ensuring a neat and full appearance.
Pro Tip:
For added dimension, layer a second row of buttons over gaps or use glitter buttons as accents.
Button Magnets
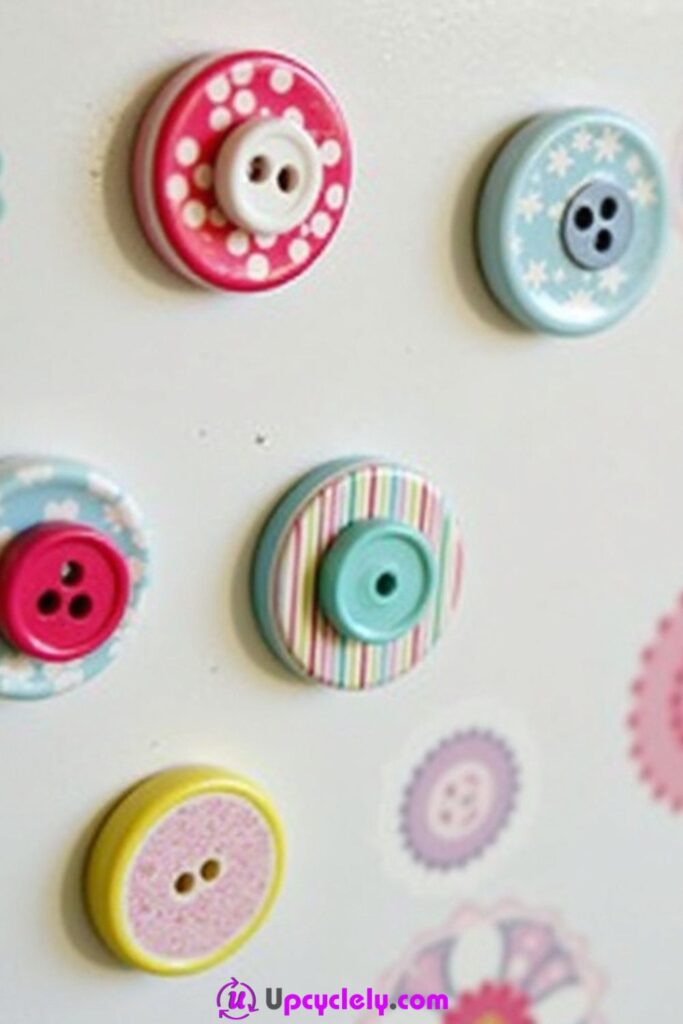
Materials Needed:
- Button-shaped flat magnets (or plain magnets and buttons)
- Colorful buttons
- Strong adhesive
- Optional paints and rhinestones
Steps to Create:
- Prepare the Buttons
I choose vibrant buttons and make sure they are clean and free of dust. If the buttons have a dull finish, I paint or decorate them beforehand and allow them to dry. - Attach the Magnets
I use strong adhesive to glue the flat side of each magnet to the back of a button. If I’m working with pre-decorated magnetic shapes, I ensure the magnets securely hold the decoration in place. - Add Embellishments
Once the glue dries, I embellish the magnets further with small rhinestones or paint designs. This step adds a touch of personality to each piece. - Test the Strength
Finally, I test the magnets on a metal surface to confirm they hold securely and adjust any decorations if needed.
Pro Tip:
Use high-quality magnets for better strength, especially if you plan to use them to hold papers on a refrigerator.
Button Napkin Rings
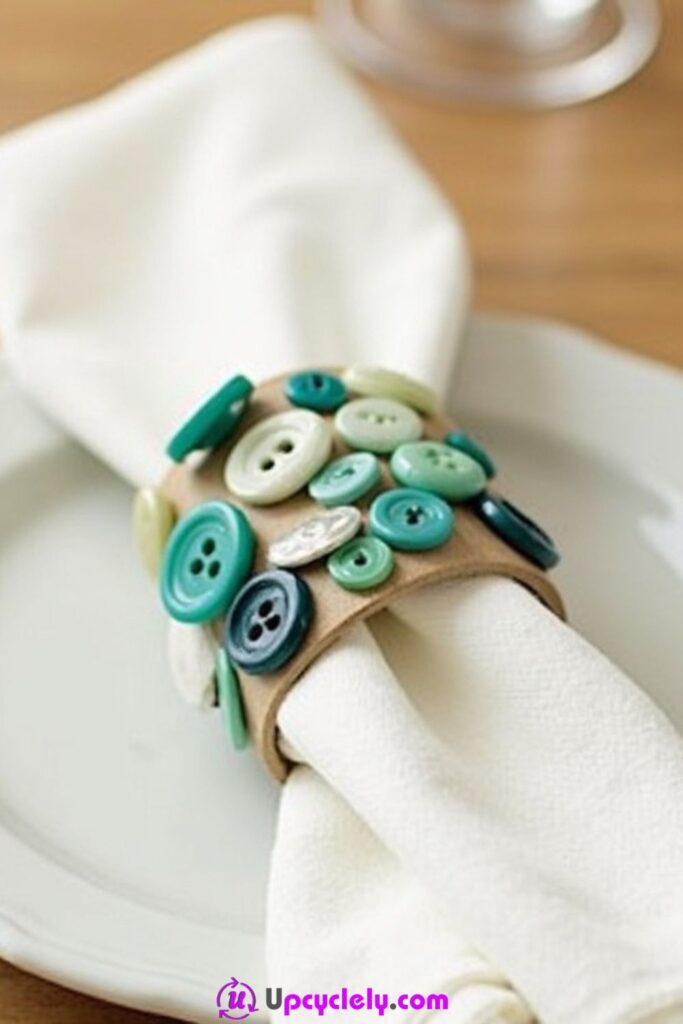
Materials Needed:
- Basic napkin rings or thick strips of sturdy cardboard
- Buttons in green, teal, blue, and white shades
- Hot glue gun
- Fabric strips (optional for a base)
Steps to Create:
- Prepare the Base
If I’m using cardboard, I cut it into rectangular strips and shape them into circular bands, securing the ends with glue. For a classier look, I cover them with fabric first. - Arrange Your Buttons
I lay out the buttons in the color scheme I want, mixing different sizes for an eclectic look. - Glue Buttons Onto the Ring
Once I’m happy with the layout, I glue the buttons onto the rings one by one, overlapping them slightly to create depth and interest. - Set Dry
After fully covering each ring in buttons, I allow them to dry for a few hours before inserting napkins to ensure everything holds perfectly.
Pro Tip:
For a more uniform napkin ring, use buttons that are the same size, but mix glossy and matte finishes.
Button Paperclip Holder
Materials Needed:
- Cylindrical container (e.g., tin can or small jar)
- Variety of colorful buttons
- Hot glue gun
- Small sheet of felt (optional for inner lining)
Steps to Create:
- Clean and Prep the Container
I clean the container thoroughly and optionally line the inside with felt to give it a softer look and texture. - Sort and Position Buttons
I choose buttons in a colorful mix and play with different arrangements, deciding whether to keep a pattern or make them random. - Glue Buttons to the Surface
Starting from the base, I glue the buttons onto the container in horizontal rows. It’s important to press each button firmly so it adheres well. - Fill Gaps and Finish Edges
I fill any gaps with smaller buttons and ensure the edges are finished cleanly for a polished appearance.
Pro Tip:
For added utility, make separate holders for pens, markers, and paperclips with matching button designs!
Button Wall Hooks
Materials Needed:
- Wooden plank or rectangular frame
- Variety of colorful buttons
- Strong adhesive or hot glue gun
- Metallic hooks for keys or bags
- Nails and a hammer (for wall mounting)
Steps to Create:
- Prepare Your Base
I start with a clean wooden plank or rectangular frame. If you prefer a polished look, paint your base in a complementary color and allow it to dry completely. - Arrange Buttons Creatively
Lay out your buttons on the wooden plank in a random arrangement. I like to mix bright and muted colors for a balanced, eye-catching design. Play with the layout until it feels right. - Glue the Buttons
Secure each button to the plank using a strong adhesive or hot glue. Press them firmly to make sure they stick well. Leave enough space at the bottom to attach the hooks. - Add Hooks
Measure and mark equal distances for where the hooks will go. Drill small pilot holes if necessary, then screw in the hooks tightly. Test their durability by hanging a lightweight item.
Pro Tip:
For extra durability, consider sealing the buttons with a clear spray lacquer to protect them from wear and tear.
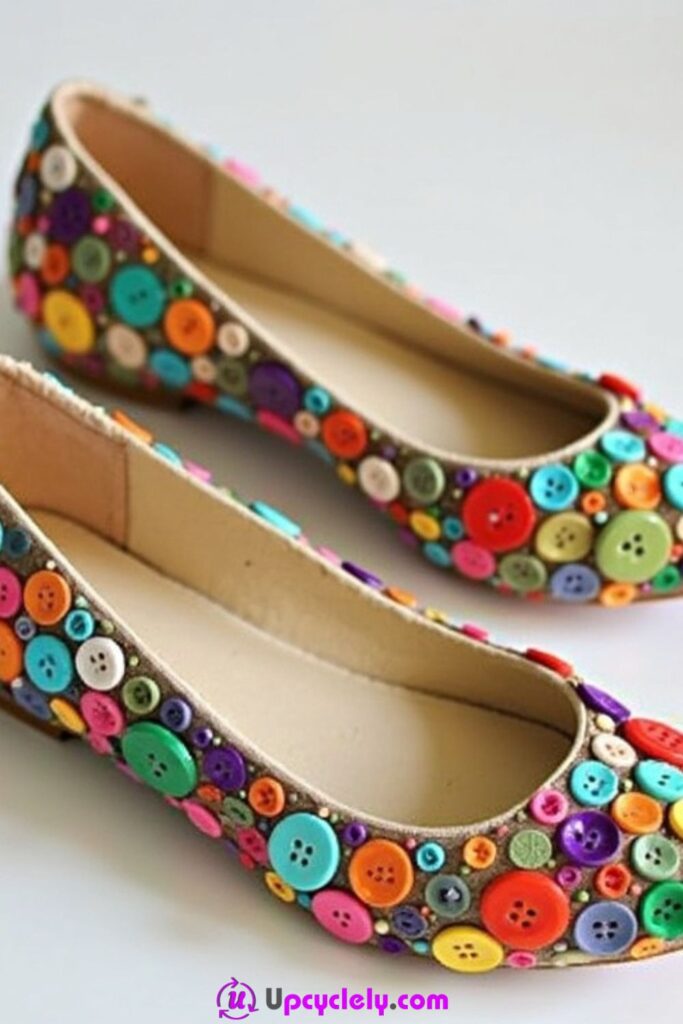
Button Shoes
Materials Needed:
- A plain pair of ballet flats
- Buttons of various colors and sizes
- Hot glue gun or fabric glue
- Tweezers for precise placement
Steps to Create:
- Prepare the Shoes
Before gluing anything, I clean the surface of the shoes thoroughly. If the fabric is delicate, I test a small patch with the glue to make sure it doesn’t damage the material. - Design the Layout
Plan how the buttons will be arranged on the shoe. You can cover the entire surface or stick to specific sections like just the toes. I find placing the larger buttons first makes the design process simpler. - Glue the Buttons
Starting at the front of one shoe, I apply glue on the back of each button and press it firmly onto the fabric. Work in small sections to avoid the glue drying out before placement. - Repeat and Finish
Once the first shoe is done, repeat the process on the second shoe. Allow the glue to dry for several hours before wearing or displaying the shoes.
Pro Tip:
Use waterproof adhesive if you plan to wear these shoes outdoors, ensuring the buttons stay secure even in damp conditions.
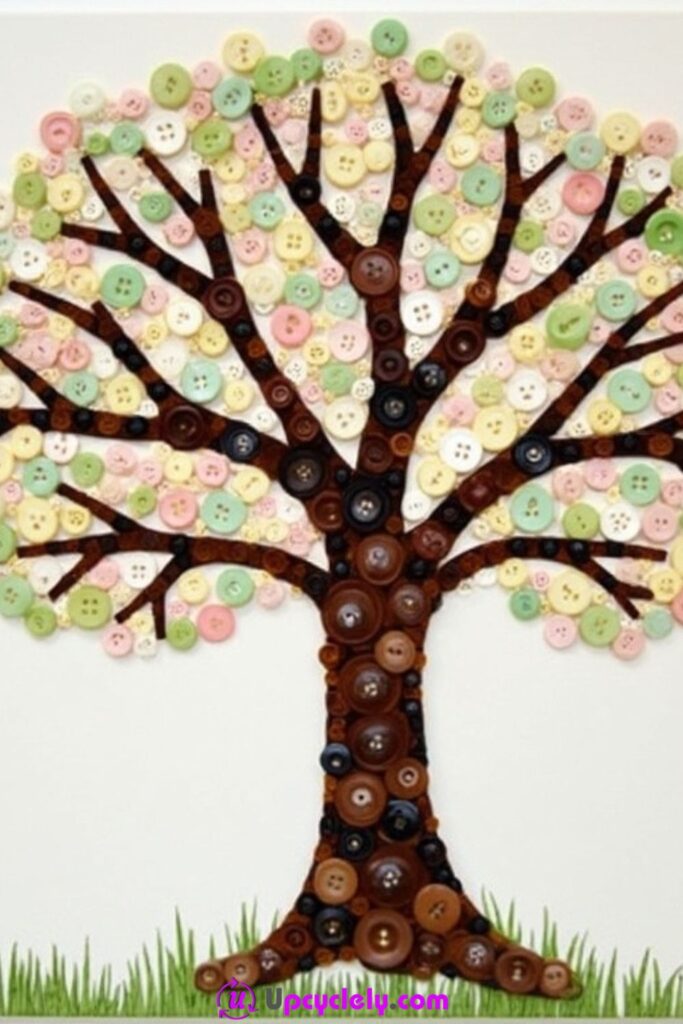
Button Tree
Materials Needed:
- Blank canvas
- Buttons in browns for the trunk and assorted pastels for leaves
- Strong craft glue
- Pencil for sketching
Steps to Create:
- Sketch the Tree
On a blank canvas, I draw a simple outline of a tree with a sturdy trunk and branching arms. Don’t worry about perfection; this will be covered with buttons. - Create the Tree Trunk
Using brown buttons of varying sizes and shades, I glue them along the trunk and branches, filling every part of the outline. - Form the Leaves
For the foliage, I switch to pastel-colored buttons. Starting at the ends of the branches, I glue the buttons densely to mimic fluffy clusters of leaves. - Fill in the Grass
To finish, I add green buttons along the base of the tree to create the appearance of grass. This step pulls the whole piece together.
Pro Tip:
Add an occasional shiny or glitter button among the leaves for a whimsical look!