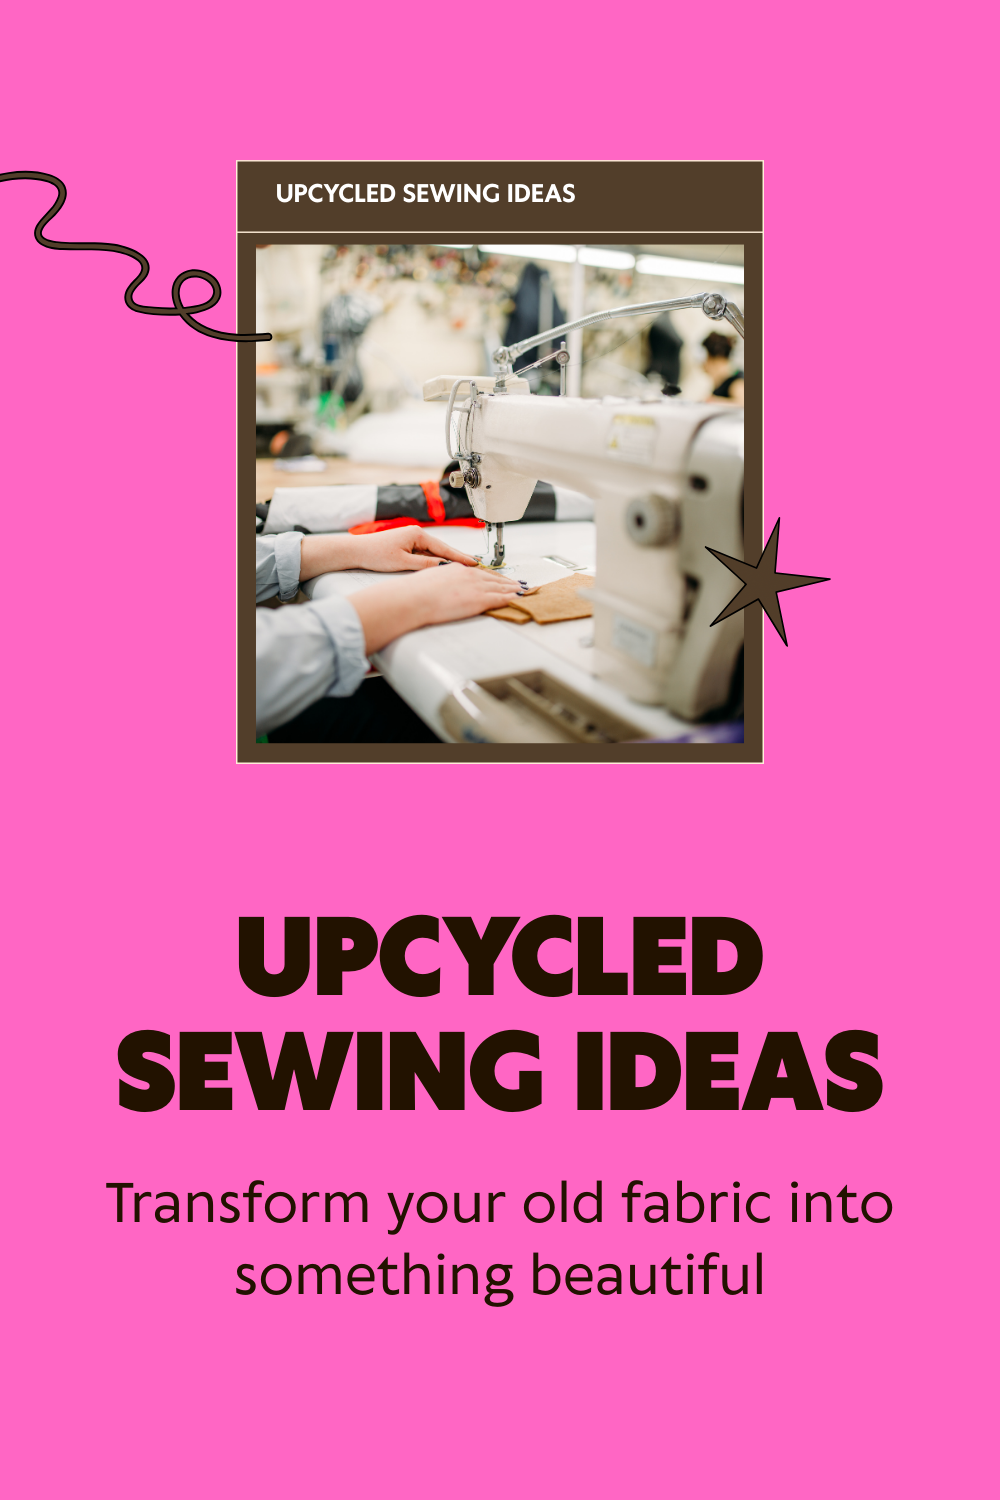
Upcycled Sewing Ideas: Turn Fabric Scraps into a Stylish Patchwork Jacket
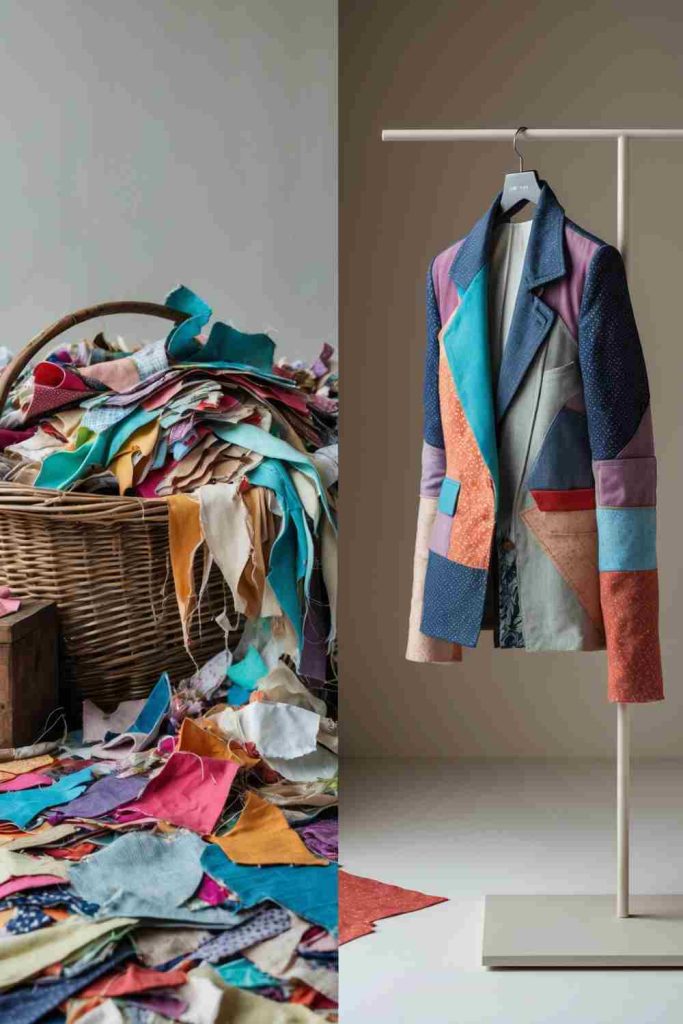
How to Create a Patchwork Jacket from Fabric Scraps
- Gather and Sort Fabric Scraps
Collect colorful fabric scraps and sort them by color or pattern. Choose pieces that complement each other to create a cohesive look for your jacket. - Cut and Arrange Patches
Cut your fabric scraps into squares, rectangles, or other shapes of your choice. Plan the layout by arranging the patches on a flat surface until you’re happy with the design. - Sew the Patches Together
Use a sewing machine or hand stitch to join the fabric patches together. Create larger sections by sewing rows of patches, then attach these sections to form the jacket’s front, back, and sleeves. - Assemble and Finish the Jacket
Use a jacket pattern as a base or repurpose an old jacket for fit. Sew the patchwork sections together to create the garment. Add finishing touches like lining, buttons, or a zipper if desired.
Upcycled Sewing Ideas: Turn Fabric Scraps into Stylish Fabric Baskets
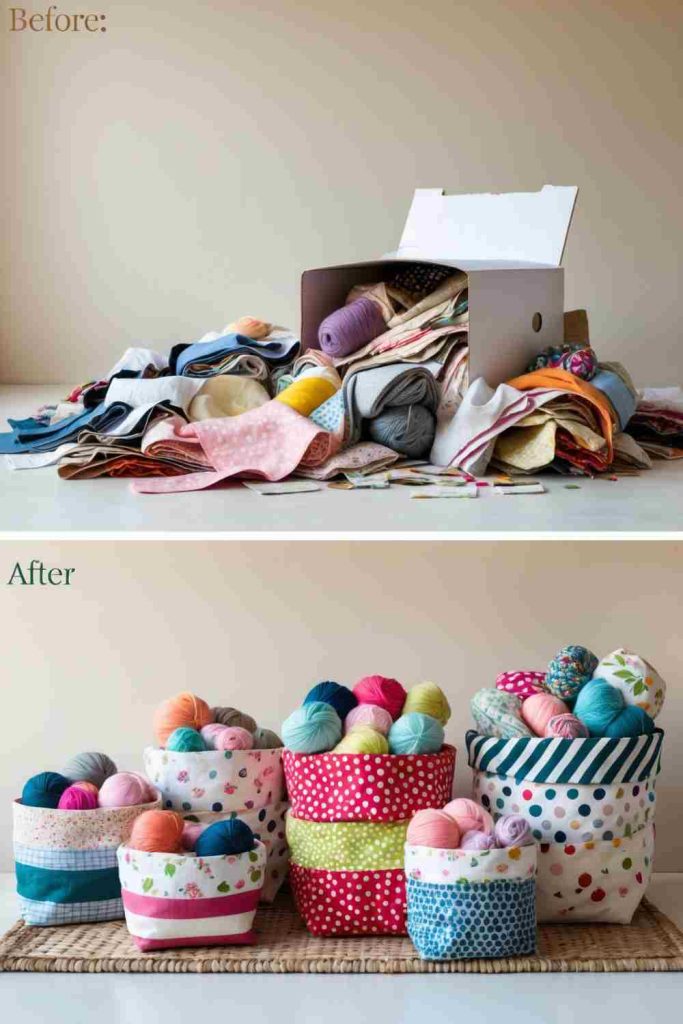
How to Create Decorative Fabric Baskets from Fabric Scraps
- Gather Your Materials
Collect fabric scraps in various colors and patterns. Ensure your pieces are large enough to form basket sides and a base. You’ll also need interfacing for structure, scissors, pins, and a sewing machine. - Cut and Prepare the Fabric
Cut the fabric scraps into rectangles or squares for the sides and another piece for the base. Add interfacing to the back of each piece to give the basket more stability. - Sew the Basket Pieces Together
Start by sewing the sides together to form a rectangle, then attach the bottom piece. Use a zigzag stitch for added durability. - Add Final Touches
Fold and hem the top edge of the basket for a clean finish. You can also add handles by sewing strips of fabric to the sides. Your fabric basket is now ready for use!
Upcycled Sewing Ideas: Transform Fabric Scraps into Spiral Wall Art
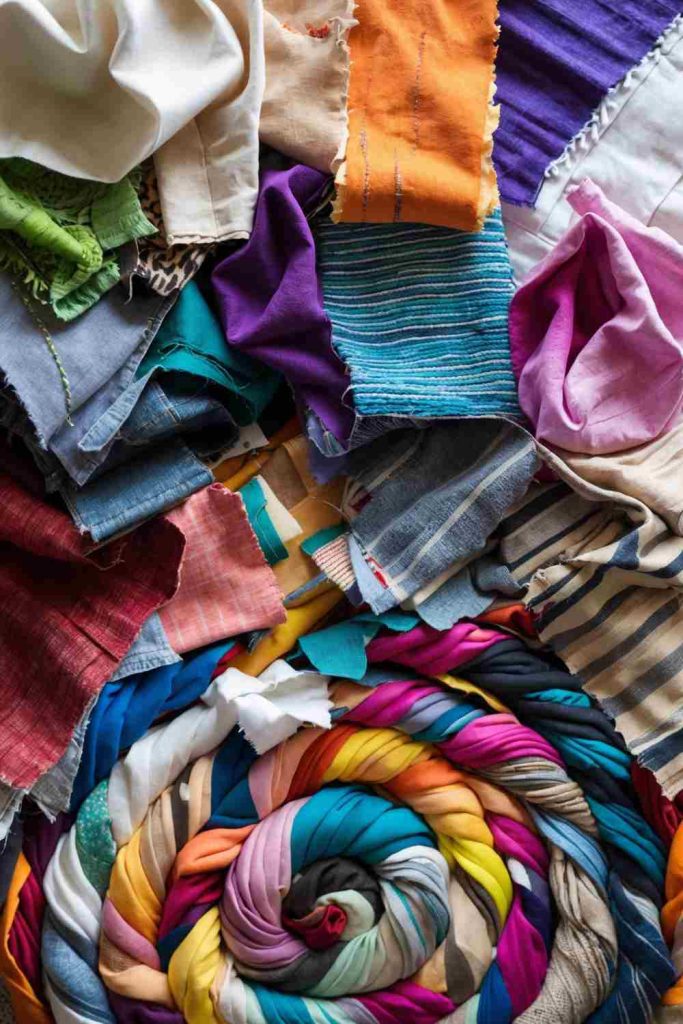
How to Create Spiral Wall Art from Fabric Scraps
- Gather Your Materials
Collect fabric scraps in a variety of colors and patterns. You’ll also need a canvas or sturdy cardboard, scissors, glue (fabric or hot glue), and a needle and thread for optional decorative stitching. - Prepare and Arrange the Fabric
Cut your fabric scraps into strips of similar width. Starting at the center of your canvas, coil the strips into a spiral pattern, layering different colors and patterns for a dynamic look. - Secure the Pieces
Glue the fabric strips onto the canvas as you build the spiral, ensuring each piece is firmly held in place. Adjust as needed to maintain a uniform and balanced design. - Add Finishing Touches
Once the spiral is complete, add some optional stitch detailing along the edges or between strips for a textured look. Hang your finished piece on the wall for a bold and colorful statement!
Upcycled Sewing Ideas: Transform Fabric Scraps into Decorative Book Covers
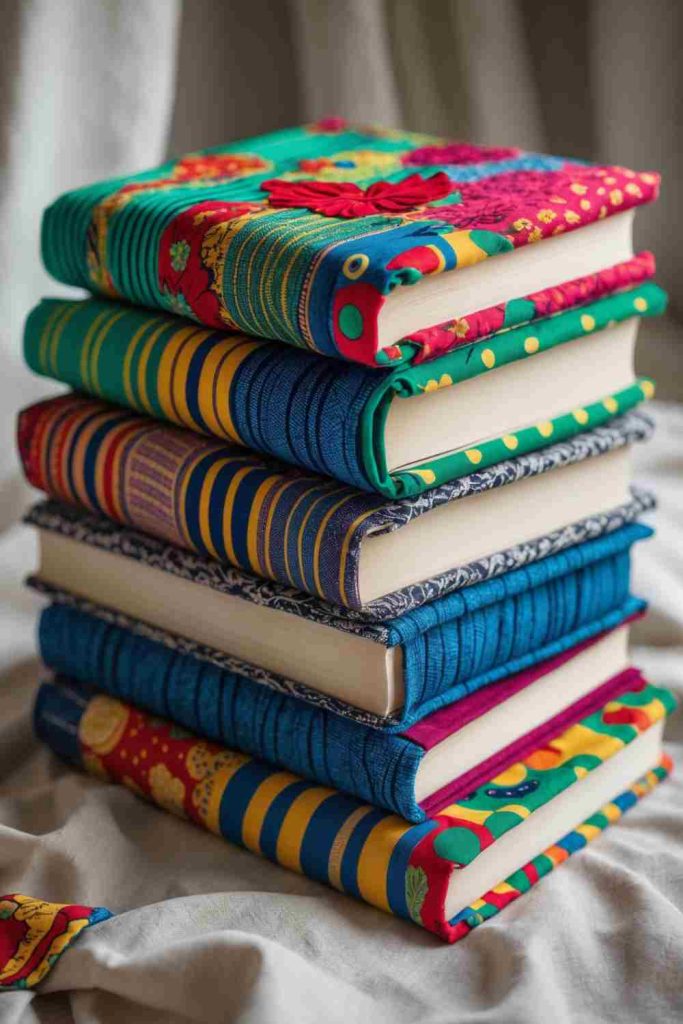
How to Decorate Books with Fabric Scraps
- Pick Your Books and Fabric Scraps
Select hardcover books and fabric scraps in a variety of patterns and colors. Choose complementary designs to create a cohesive or eclectic look. - Trim the Fabric
Measure your book’s cover (include spine) and cut the fabric, leaving a 1-inch border on all sides for folding. Iron the fabric to remove wrinkles for a clean finish. - Attach the Fabric to the Book
Apply fabric glue or a strong adhesive evenly on the cover’s surface. Place the fabric on top, smoothing it out to avoid bubbles or wrinkles. Tuck the excess fabric inside the book’s covers and secure it with glue. - Add Finishing Details
Trim any leftover fabric along the edges for a neat look. You can add decorative elements like ribbon bookmarks, embroidery accents, or labels to personalize them further.
Upcycled Sewing Ideas: Turn Old Denim Jeans into Chic Hanging Planters
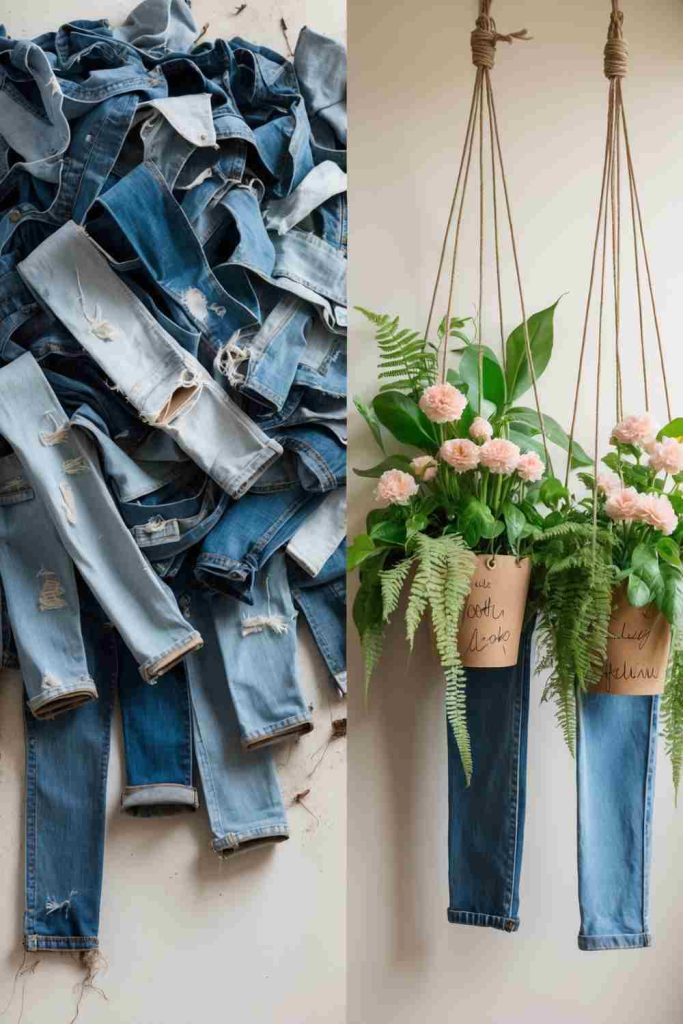
How to Create Hanging Planters from Old Denim Jeans
- Gather Your Materials
Cut off the leg portions of old denim jeans. You’ll also need scissors, sturdy rope, a needle and thread (or fabric glue), and potted plants or liners to hold the soil. - Prepare the Planters
Measure the desired length for your planter and trim the jean leg accordingly. Seal the bottom with hand stitching, a sewing machine, or fabric glue to create a closed pouch. - Add Hanging Ropes
Create small holes near the open top of the jeans and thread through pieces of rope, knotting them securely to form loops for hanging. - Insert Plants and Finish Up
Place a plant or a lined pot inside the denim pouch, adjusting it for a snug fit. Hang your planter in a desired spot and enjoy your denim-upcycling masterpiece!
Upcycled Sewing Ideas: Turn Fabric Scraps into a Stylish Twisted Headband
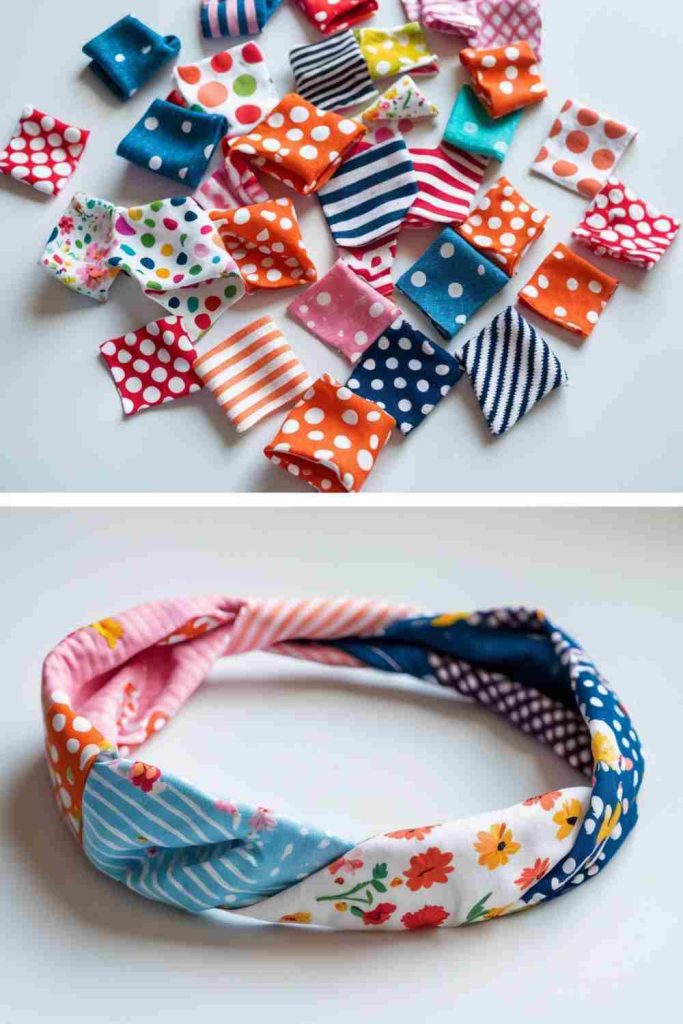
How to Create a Twisted Fabric Headband from Fabric Scraps
- Gather Your Materials
Collect fabric scraps in different colors and patterns. You’ll also need scissors, a sewing needle and thread (or a sewing machine), an iron, and an elastic band. - Cut and Prepare the Fabric
Cut your fabric scraps into long strips of similar width. Iron them flat for a polished look. Combine various patterns and colors to create a unique, vibrant headband. - Twist and Stitch
Twist two or three fabric strips together to form a braided or entwined design. Secure the ends of the twist by stitching them together to keep the strips in place. - Add Elastic and Finish
Attach a small piece of elastic to the ends of the twisted fabric to form a complete headband. Stitch securely, ensuring it fits snugly but comfortably on your head.
Upcycled Sewing Ideas: Create Vibrant Quilted Rolls from Fabric Scraps
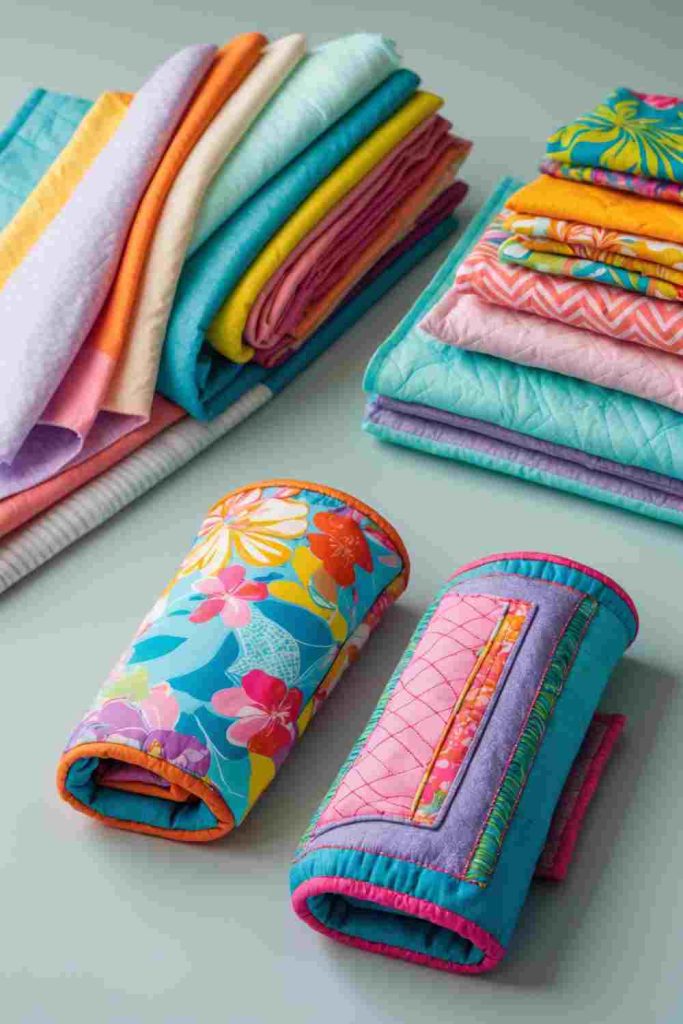
How to Make Quilted Rolls from Fabric Scraps
- Collect Your Fabric Scraps
Gather assorted fabric scraps in vibrant colors and patterns. Complementary designs work well for a dynamic look. You’ll also need batting or stuffing, scissors, and sewing tools. - Cut and Arrange the Fabric
Cut the fabric scraps into small pieces or strips. Arrange them in a patchwork design, alternating colors and patterns as you like. Stitch the pieces together to form a fabric rectangle. - Quilt the Fabric
Add a layer of batting underneath your patchwork. Sew straight or zigzag lines across the fabric to secure the quilted effect, creating a cohesive and textured roll cover. - Roll and Finish
Roll your quilted sheet around a cylindrical foam or stuffing to form the roll shape. Secure the edges by sewing them together neatly. You can even add ties or decorative ribbons at the ends for a polished finish.
Upcycled Sewing Ideas: Make Colorful Fabric Bookmarks from Scraps
How to Make Fabric Bookmarks from Scraps
- Gather Your Supplies
Collect fabric scraps in various colors or patterns. You’ll also need scissors, a sewing needle and thread (or a sewing machine), interfacing for stability, and optional ribbon or twine for loops. - Cut the Fabric
Cut your scraps into rectangular shapes for the bookmarks. Use interfacing to add structure by cutting it slightly smaller than your fabric pieces and layering it in between. - Sew and Assemble
Layer two fabric rectangles together, with interfacing in between. Sew around the edges, leaving a small gap to turn it inside out. After turning, topstitch around the edges for a clean finish. - Add the Loop
Attach a small ribbon or fabric loop to the top of the bookmark by sewing it into place. This adds a decorative element and makes it easy to locate in your book.
Upcycled Sewing Ideas: Craft Colorful Pincushions from Fabric Scraps
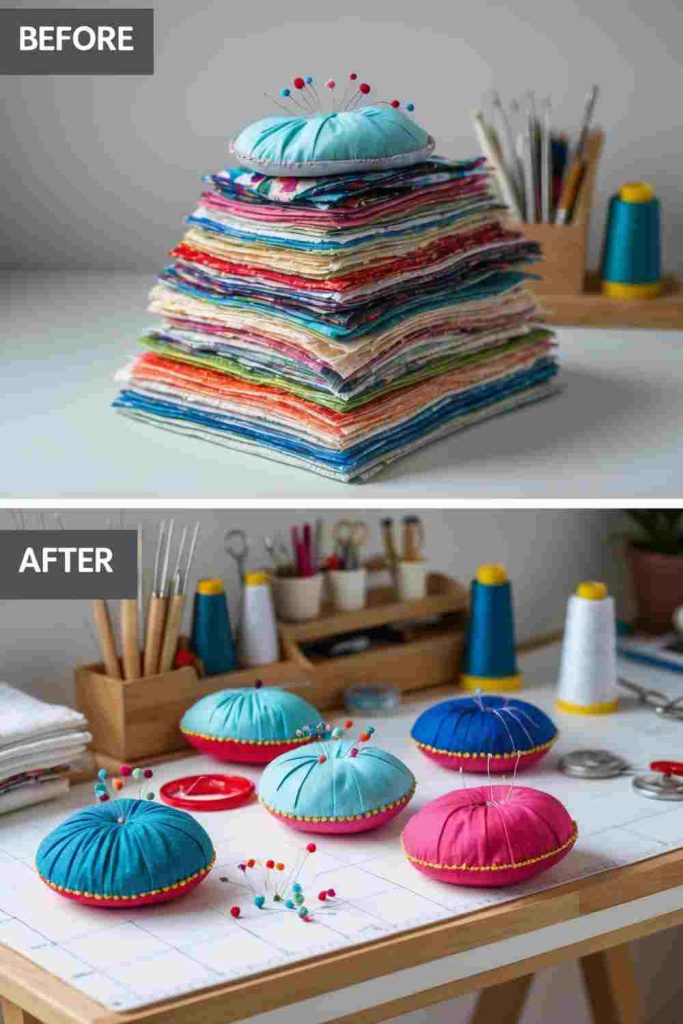
How to Make Pincushions from Fabric Scraps
- Gather Materials
Collect small pieces of fabric scraps in fun colors and patterns. You’ll also need stuffing (like polyfill or fabric remnants), scissors, a sewing needle and thread (or a sewing machine), and pins. - Cut the Fabric
Cut your fabric scraps into circles or squares, depending on the shape you want. For a classic round pincushion, ensure the pieces are large enough to hold comfortably in your hand once stuffed. - Sew and Stuff
Stitch around the edges of the fabric, leaving a small opening. Turn the piece inside out, stuff it with your chosen filling until plump, and sew the opening shut for a clean finish. - Add Decorative Touches
Embellish your pincushion with buttons, embroidery, or contrasting stitches. Insert colorful pins to complete the look and make it ready for your sewing projects.
Upcycled Sewing Ideas: Make Beautiful Drawstring Bags from Fabric Scraps
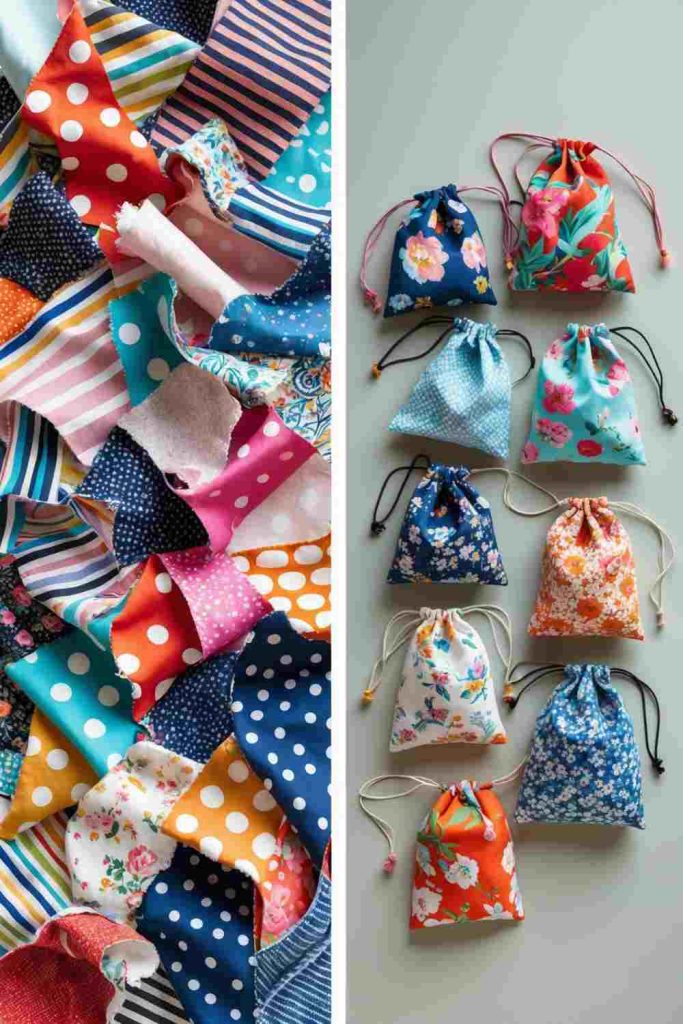
How to Make Drawstring Bags from Fabric Scraps
- Choose and Prepare Fabric Scraps
Gather fabric scraps in your favorite patterns and colors. Cut the fabric into rectangles, making sure the size fits your needs. For a small bag, 10×8 inches works well. - Sew the Bag
Fold the fabric rectangle in half with the right sides facing each other. Sew along the sides and bottom edges, leaving the top open. - Create the Drawstring Casing
Fold down the top edge about an inch to create a casing for the drawstring. Sew around it, leaving a small gap to thread the string through. - Insert the Drawstring
Use a safety pin to thread a length of string, ribbon, or twine through the casing. Knot the ends together and pull to close your new bag!
Upcycled Sewing Ideas: Craft Plush Nursery Letters from Fabric Scraps
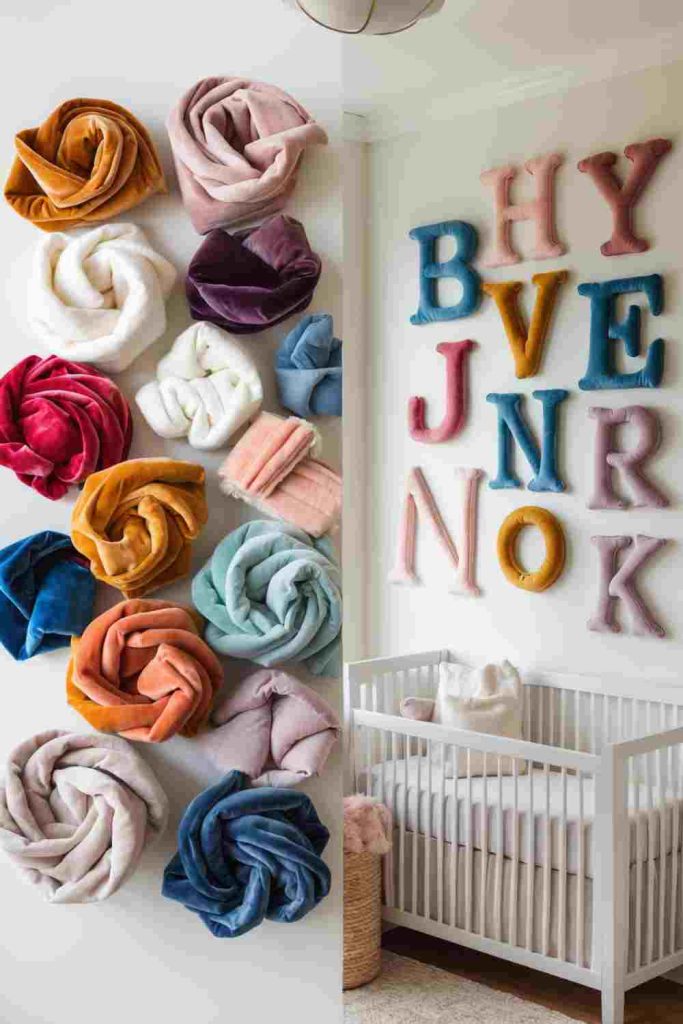
How to Make Plush Nursery Letters from Fabric Scraps
- Prepare Your Materials
Gather fabric scraps in a variety of colors and patterns. You’ll also need letter templates, scissors, thread, a sewing needle (or machine), and stuffing like polyfill. - Cut Out the Letters
Trace your letter templates onto the fabric scraps. Cut out two identical pieces for each letter to create the front and back. - Sew the Edges
Place the two fabric pieces together, with the right sides facing in. Sew around the edge, leaving a small opening. Turn the letter inside out to hide the seams. - Stuff and Close
Fill the letter with stuffing until it’s firm and plush. Sew the opening shut by hand or with your sewing machine. Add decorative stitching if desired.
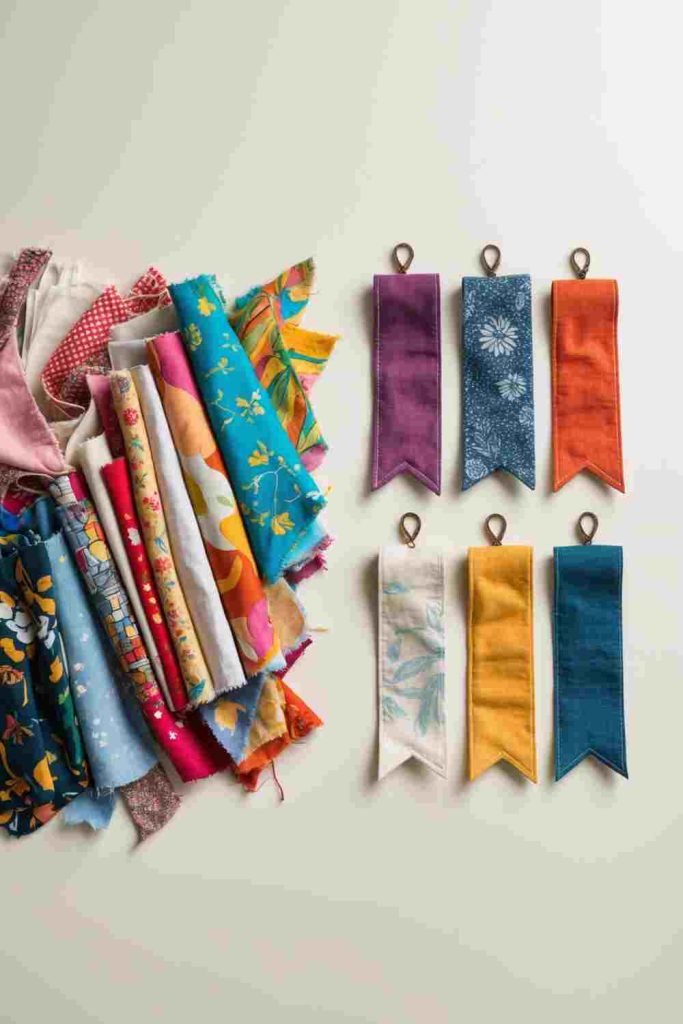
Upcycled Sewing Ideas: Craft Embroidered Tags & Bookmarks from Fabric Scraps
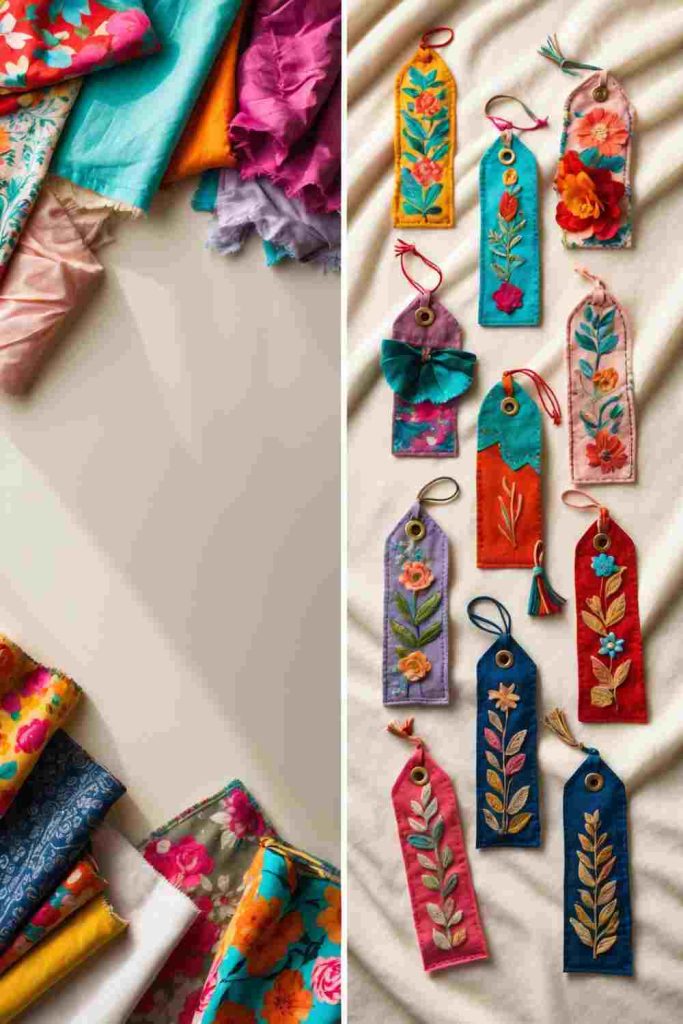
How to Make Embroidered Tags or Bookmarks from Fabric Scraps
- Cut Your Fabric
Select your fabric scraps and cut them into rectangles, ensuring they’re the size you want for your tag or bookmark. You can layer two pieces for added thickness and durability. - Add Embroidery
Use embroidery thread and needles to stitch floral patterns, initials, or abstract designs onto the fabric. Get creative and use a variety of colors for vibrant results! - Make a Loop or Tassel
Attach a ribbon, string, or tassel to one end of the fabric to serve as a loop for hanging or make it easier to use as a bookmark. - Finish the Edges
Sew or glue the edges of the fabric to prevent fraying. Add any final embellishments like buttons, bows, or tiny beads for extra charm.
Upcycled Sewing Ideas: Transform Fabric Scraps into Adorable Stuffed Bears
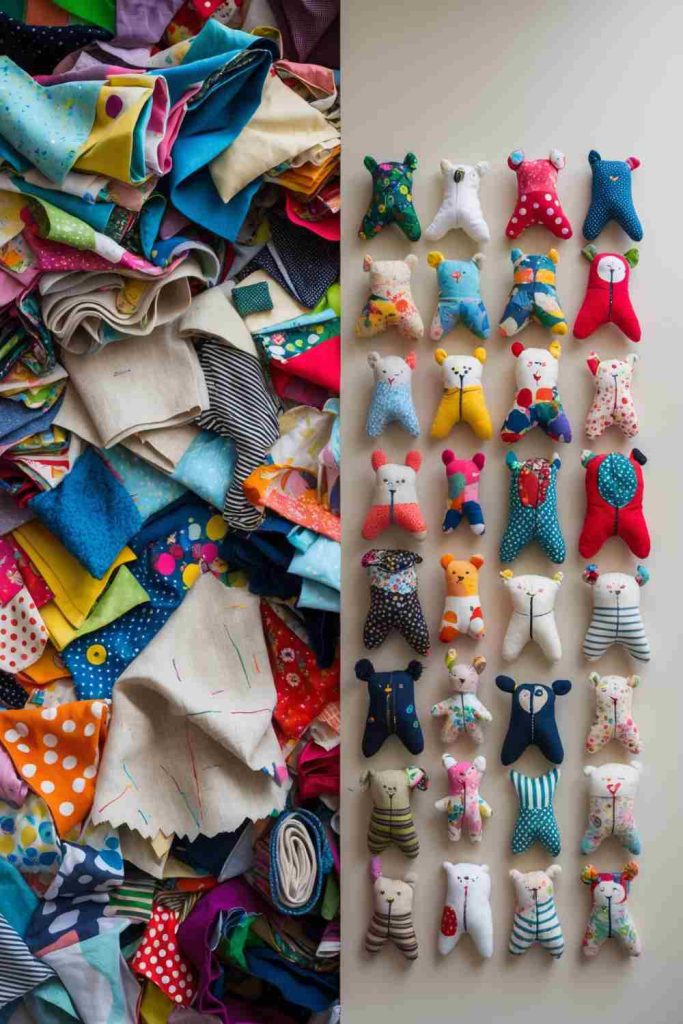
How to Make Stuffed Bears from Fabric Scraps
- Prepare the Fabric Scraps
Choose colorful fabric pieces with fun patterns for a playful look. Use a bear template to trace and cut two identical shapes from your scraps. - Sew the Pieces Together
Place the two fabric pieces with the right sides facing each other. Sew around the edges, leaving a small opening for stuffing. Then, flip the fabric inside out. - Stuff the Bear
Fill the bear with stuffing such as polyfill or leftover fabric bits until it’s soft and firm. Adjust as needed to achieve the desired shape. - Finish and Decorate
Hand-sew the opening closed, and add details like buttons, embroidery, or stitched facial features to bring your bear to life!
Upcycled Sewing Ideas: Make Rustic Bread Bags from Fabric Scraps
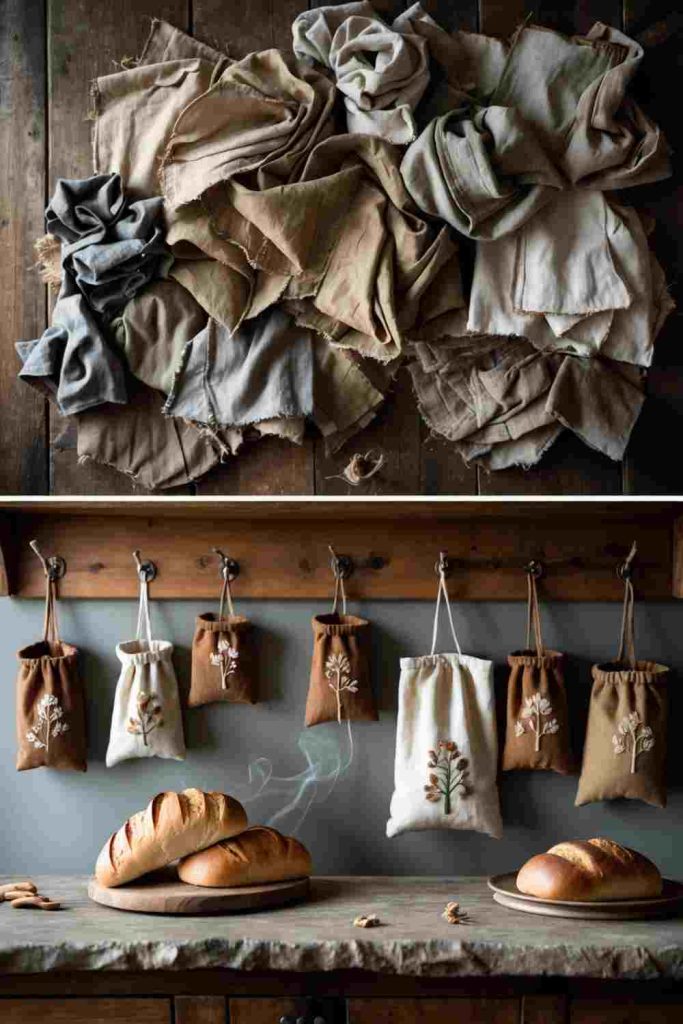
How to Make Rustic Bread Bags from Fabric Scraps
- Choose Your Fabric Scraps
Select natural fabric scraps like linen or cotton in earthy tones or with subtle patterns. Ensure the fabric is breathable and durable for storing bread. - Cut and Sew the Base
Cut the fabric into a large rectangle (adjust size based on the desired bread bag size). Fold it in half and sew along two of the open edges, leaving the top open. - Create a Drawstring Top
Fold the open edge down to form a casing for the drawstring. Sew around the edge, leaving a small gap to thread a ribbon or string through. - Add Details
Thread a string or ribbon through the casing, tie the ends, and pull to close. Decorate with embroidery or patches for a personal touch, if desired!
Upcycled Sewing Ideas: Make Colorful Quilted Coasters from Fabric Scraps
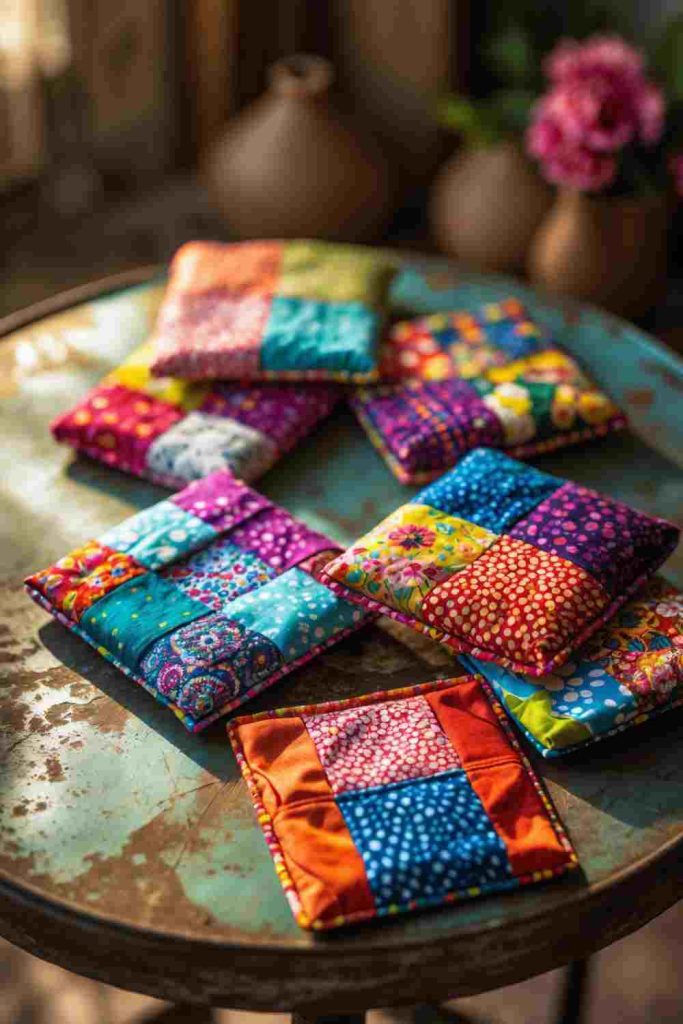
How to Make Quilted Coasters from Fabric Scraps
- Cut Your Fabric
Select fabric scraps with fun colors and patterns. Cut the scraps into small squares or strips to create a patchwork design. - Layer the Pieces
Arrange the fabric scraps on a piece of batting or felt. Add a backing fabric to form a sandwich with the batting in the middle. - Sew the Quilt
Use a sewing machine or hand stitch to sew the scraps in place. Sew decorative lines or patterns to secure the layers and add texture. - Trim and Finish
Trim the coaster to your desired shape and size. Finish the edges with a zigzag stitch or bias tape for a clean look.
Upcycled Sewing Ideas: Create Colorful Fabric Party Banners from Scraps

How to Make Fabric Party Banners from Scraps
- Select Your Fabric Scraps
Gather fabric scraps in a variety of bright colors and patterns. Choose pieces that fit your party theme or mix and match for a playful look. - Cut into Shapes
Cut the fabric into triangles, squares, or any shape you like. Make sure each shape is roughly the same size for a uniform banner. - Attach to String
Fold the top edge of each fabric piece over a string or ribbon and sew it in place. Alternatively, you can use fabric glue for a no-sew option! - Hang and Celebrate
Once your banner is assembled, hang it across walls, doorways, or tables to complete your party decor.
Upcycled Sewing Ideas: Turn an Old Sweater into a Cozy Pet Bed

How to Make a Cozy Pet Bed from an Old Sweater
- Choose the Sweater
Select an old sweater, preferably one made of soft, warm fabric. The larger the sweater, the bigger the bed will be. - Stuff the Sleeves
Sew the sleeves closed at the cuffs, then stuff them with fabric scraps, old pillows, or polyfill to create a cushiony edge. - Form the Base
Fill the body of the sweater with stuffing to create the bed’s base. Sew the neck and waist openings closed securely. - Attach the Shape
Bend the stuffed sleeves around the stuffed body in a U-shape to form the bed’s edge. Sew the sleeves in place to secure the circular shape.
Upcycled Sewing Ideas: Transform an Old Pillowcase into a Patchwork Tote Bag
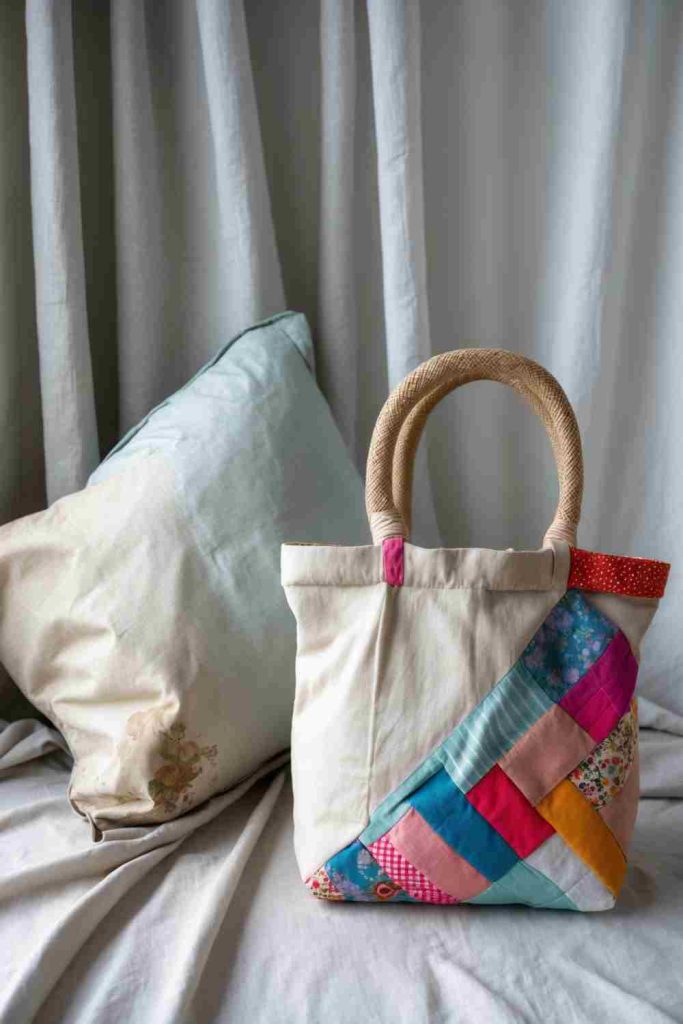
How to Make a Patchwork Tote Bag from an Old Pillowcase
- Prepare the Pillowcase
Wash and iron your old pillowcase. Cut it to the size and shape you’d like for your tote bag, leaving room for seams. - Create the Patchwork
Gather fabric scraps and cut them into small squares or shapes. Stitch the pieces onto the front of the pillowcase fabric to create a decorative patchwork panel. - Sew the Tote Bag
Fold the pillowcase fabric in half, right sides facing each other. Sew along the edges to create the main bag, leaving the top open. - Add Handles
Attach sturdy fabric or rope handles to the top of the bag. Secure them well with multiple stitches to ensure durability.
Upcycled Sewing Ideas: Turn Old T-Shirts into a Memory Quilt
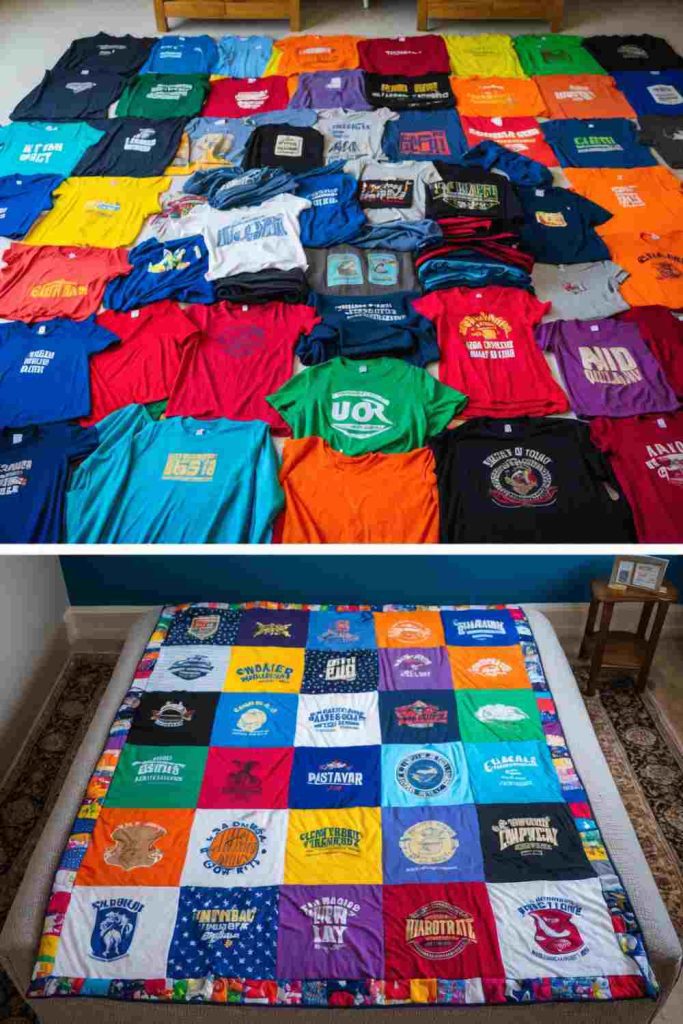
How to Make a Memory Quilt from Old T-Shirts
- Select and Prepare T-Shirts
Gather old T-shirts with meaningful logos or designs. Wash and iron them to ensure they’re clean and smooth for quilting. - Cut Quilt Squares
Cut out squares or rectangles from each T-shirt, focusing on the printed area. Use a consistent size for all patches to create a uniform look. - Arrange and Assemble
Lay the T-shirt pieces on the floor, arranging them in a grid pattern based on color or design. Sew the patches together row by row using a sewing machine. - Add Backing and Finish
Attach a fabric backing and batting to your quilt top. Sew the layers together, then finish the edges with binding for a clean and polished look.