Plastic containers and bottles have an awkward habit of becoming invisible once they are empty. They sit at the back of a cupboard, collect in a recycling bag, or wait on a utility shelf because they still look too useful to throw away but do not have a clear job anymore. That is exactly the point where a simple upcycling idea can help. A sturdy bottle, lid, tub, or food-safe container already has a shape, a surface, and some strength, so you are not starting from nothing.
I like projects that begin with materials people genuinely have at home. Plastic can be especially useful for small organizers, planters, lightweight hanging pieces, and simple decorative objects because it is easy to clean and often easy to cut or paint.
I don’t think every empty container needs to become a craft, though. The best upcycling plastic projects are the ones that give the material a clear second purpose and are still easy to use, clean, or maintain afterward.
Before choosing a project, look at the plastic you already have and match the idea to its shape. A wide tub may make more sense as storage, a clear bottle can become a vase or bird feeder, and small lids can work as lightweight ornaments. Starting with function usually leads to a result that feels intentional rather than cluttered.
Choose Plastic That Is Worth Reusing
Not every plastic item deserves another round of use. I would begin by checking the container itself before thinking about paint, fabric, or decoration. A good upcycling candidate should feel sturdy, reasonably clean, and suitable for the job you want it to do. Thin, brittle plastic that cracks when squeezed can become frustrating very quickly, especially if the project needs holes, hanging points, or a cut opening.
It also matters what the container held before it became empty. For household projects, I prefer ordinary food, drink, or non-hazardous household containers that can be washed thoroughly. Containers that previously held strong chemicals, pesticides, automotive fluids, or anything you would not want near hands, plants, food areas, or wildlife are better kept out of these projects.
· Choose bottles, tubs, lids, and containers that are not cracked, warped, or brittle.
· Prefer pieces that can be cleaned thoroughly and have no persistent odor or residue.
· Match the shape to the new job instead of forcing one container to suit every idea.
· Check that hanging projects have strong necks, rims, or walls where string can be secured.
· Keep clear bottles when you want to see contents, water level, or seed inside the finished project.
· Use wider containers for desk organization because they are less likely to tip when filled.
· Avoid reusing containers that previously held hazardous chemicals or unknown substances.
Clean, Dry, and Prepare Plastic Safely
Good preparation makes a surprisingly large difference on plastic. Dust, grease, label glue, and moisture can stop paint or adhesive from gripping properly, and they can make a finished organizer or planter look unfinished. Wash the item with warm soapy water, rinse it well, and let it dry completely before adding anything. If a label is stubborn, soak it rather than scraping aggressively and scratching the surface.
Any project that needs cutting deserves a little more care. Plastic edges can be sharp even when they do not look dramatic. I would rather trim slowly, check the edge with my fingers only after it has been smoothed, and let an adult handle craft knives or drilling. For children’s projects, keep their part focused on painting, arranging, or decorating after all cutting is finished.
· Wash containers inside and out with warm soapy water and rinse away all residue.
· Let plastic dry fully before painting, gluing, wrapping, or storing anything inside it.
· Remove labels and adhesive gently so the surface stays as smooth as possible.
· Mark cutting lines first instead of cutting freehand around a bottle or container.
· Use sturdy scissors only on plastic they can handle safely; use an adult for craft-knife work.
· Smooth or cover cut edges before the object is used, handled, or placed near wildlife.
· Protect the work surface when painting, drilling, or using strong adhesive.
Gather a Simple Plastic-Upcycling Toolkit
Most of these projects do not need specialist equipment. In fact, a small basic kit is usually more useful than buying a new tool for every idea. Scissors, a marker, a ruler, a small brush, string, and a suitable adhesive cover a lot of ground. If you plan to paint several pieces, it helps to keep a piece of scrap plastic nearby so you can test how a paint or primer behaves before coating the project itself.
The tool I pay most attention to is the one that makes the project safe. If a bottle needs a hole, use the method that gives you control rather than speed. If an ornament needs a hanging loop, choose cord that will not slip out. If a planter will hold wet soil, make sure the hanging straps and attachment points can support the weight after watering, not just when the container is empty.
· Scissors suitable for light craft work and an adult-use craft knife when needed.
· Permanent marker or washable marker for planning cut lines and placement.
· Ruler or flexible measuring tape for spacing openings and hanging points.
· Fine-grit sandpaper or another safe edge-smoothing method for rough cuts.
· Acrylic paint, plastic-compatible primer, or decorative paper and fabric as optional finishes.
· Strong craft adhesive, double-sided tape, or ties chosen for the specific project.
· String, twine, ribbon, or cord for hanging decorations, feeders, and planters.
· Small paintbrushes, sponge pieces, or cotton swabs for simple decorative details.
Transform Old Plastic Containers into Desk Organizers
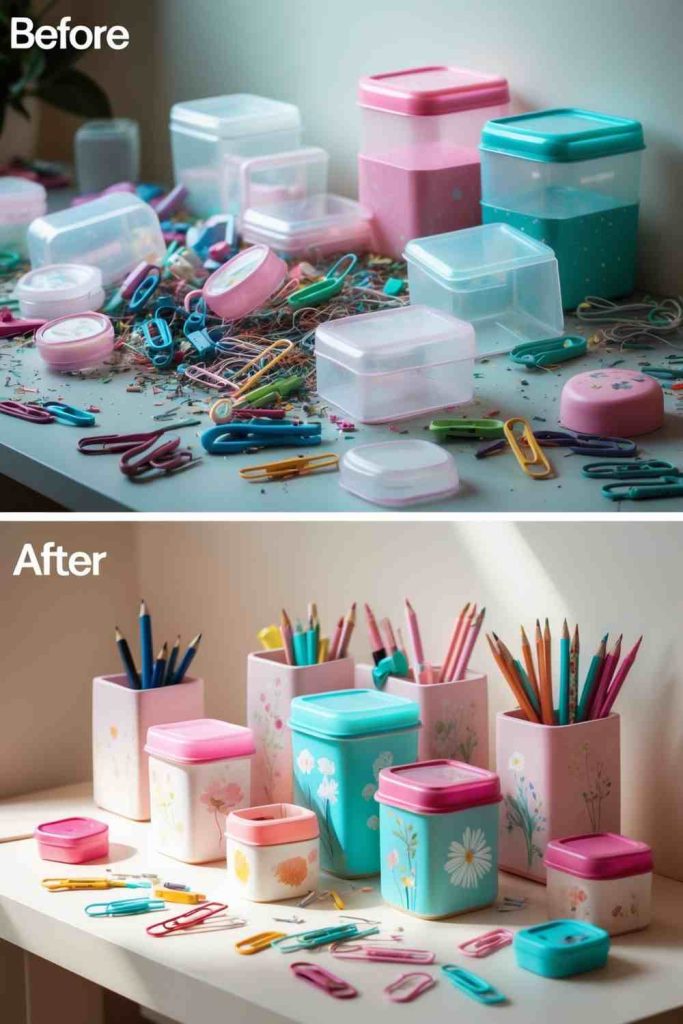
A wide plastic container can make a very practical desk organizer because the shape is already doing most of the work. Tall containers suit pencils and brushes, lower tubs are useful for sticky notes or clips, and medium containers can hold scissors, rulers, or charging cables. The goal is not to disguise every trace of the original item. A neat finish and a clear purpose matter more than making the plastic look expensive.
I like this idea most when several containers are treated as a small set. Repeating one color, one band of paper, or one simple pattern helps mismatched containers look connected. You can also place them on an old tray or shallow box so the organizer moves as one piece when you need to clear the desk.
Before decorating, think about how the organizer will be used. Pens create different weight from paper clips, and tall scissors can make a light container tip. If a piece feels unstable, use it for lighter supplies or place a little clean weight in the bottom rather than overfilling it.
Materials and Tools
· Clean plastic containers in two or three useful sizes
· Warm soapy water and a cloth for preparation
· Acrylic paint or decorative paper as an optional finish
· Plastic-compatible primer if your chosen paint needs better grip
· Paintbrush or sponge
· Strong double-sided tape or craft adhesive for paper details
· Optional tray or shallow box to group the organizers
Steps
1. Sort the containers by job. Set the clean containers on the desk before decorating them and test what each one will hold. Put pens and brushes in taller pieces, clips or erasers in smaller tubs, and wider tools in broader containers. This quick test tells you which pieces are useful and which shapes are likely to tip.
2. Prepare the surfaces. Remove labels and any sticky residue, then wash and dry the containers thoroughly. If the plastic is very glossy and you plan to paint it, test a small hidden area first or use a suitable primer. Keep the rim smooth because that is the part your hands will touch most often.
3. Add one simple visual theme. Paint the outside, wrap a section with leftover paper, or add a narrow band of washi tape. I know it can feel tempting to decorate every inch, but a simpler finish is usually easier to clean and looks calmer on a busy desk. Let each layer dry properly before handling the container.
4. Arrange and test the finished organizer. Fill the containers with their assigned supplies and place them where you naturally reach for those items. Then move the set around once or twice to see whether anything falls, tips, or blocks another container. Adjust the contents or place the group on a tray so the system works as one practical unit.
The part I would check carefully is access. A desk organizer can look tidy but still be annoying if the container is too deep for small items or too narrow for your hand. Use the deepest pieces for long tools and keep tiny supplies in shallow containers where you can see them.
Cleaning matters too. Paper wraps and heavy decoration can make the organizer harder to wipe, so keep the finish simple around the rim and inside. If you expect paint splashes, pencil dust, or glue drips, an unpainted interior is usually easier to maintain.
Variations and Alternatives
· Leave clear or translucent containers unpainted and add only a small label area.
· Use leftover wallpaper or gift-wrap strips instead of paint.
· Group three containers inside a reused shoebox lid for a movable desk station.
· Make a child-friendly version for crayons and washable markers after all edges are checked.
· Use the same idea in a bathroom for brushes and non-food grooming items.
Repurpose Small Plastic Containers for Desk Organization
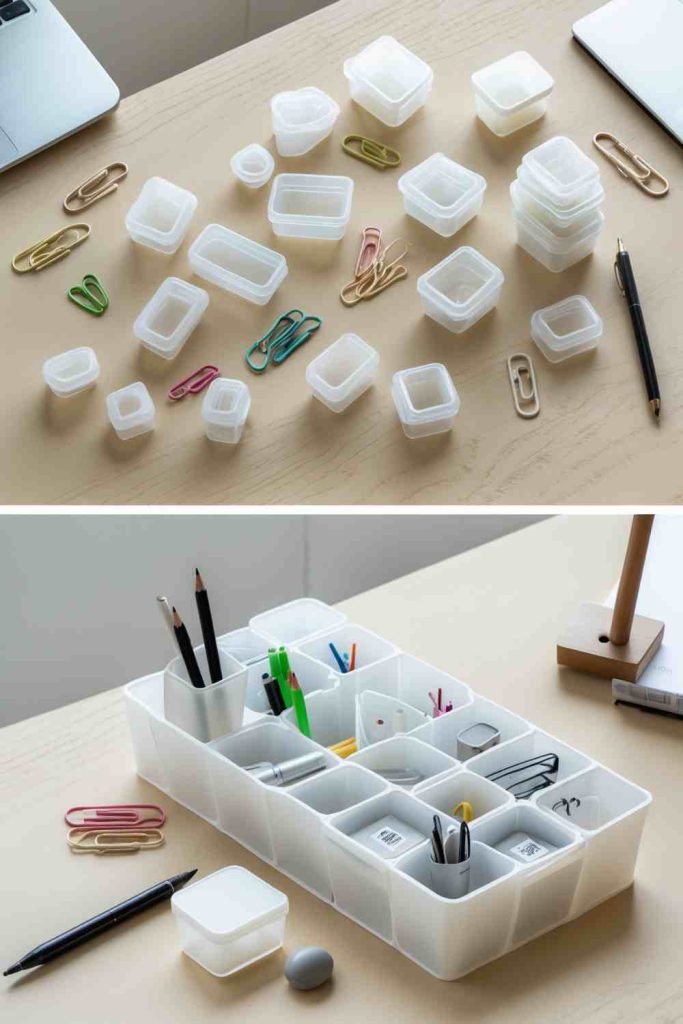
Small containers solve a different problem from tall desk cups: they stop tiny supplies from migrating into every drawer. Lids, mini tubs, sample-size jars, and small food containers can separate paper clips, pushpins, rubber bands, spare USB adapters, beads, or sewing notions. Because the pieces are low, they work especially well inside drawers or shallow storage boxes.
The useful part of this project is the sorting, not the decoration. I would decide on categories first, then keep only the containers that fit those categories comfortably. A drawer full of too many tiny tubs can become another form of clutter, so give each container one clear job and leave some empty space around it.
If the containers have lids, you can choose whether to keep them. Lidded storage is helpful for rarely used pieces or anything that spills easily. Open containers are faster for everyday clips, erasers, and small tools.
Materials and Tools
· Small clean plastic containers, lids, or shallow tubs
· Drawer, shallow box, or tray to hold the group
· Warm soapy water and cloth
· Small paper labels or masking tape if labels are useful
· Marker
· Optional decorative paper scraps
· Optional removable double-sided tape to stop lightweight tubs sliding
Steps
1. Empty and sort the small supplies. Take the tiny desk items out of their current drawer or container and group like with like. Keep frequently used items together and set aside anything that no longer belongs on the desk. This makes it easier to choose containers by actual need rather than by whatever happens to be available.
2. Match each category with a container. Place paper clips, rubber bands, erasers, spare leads, or similar items into separate clean containers. Choose shallow pieces for things you need to pinch out quickly and slightly deeper pieces for items that scatter. Do not fill them to the top; a little free space makes small supplies much easier to retrieve.
3. Create a stable layout. Arrange the containers inside a drawer, tray, or shallow box before adding labels. Move them around until there are no awkward gaps and the most-used categories sit near the front. If a very light tub slides whenever the drawer opens, use a small piece of removable tape underneath rather than permanently gluing the whole layout.
4. Label only where it helps. Add short labels if several containers hold similar-looking parts, but skip labels when the contents are already obvious. Then use the system for a few days and change any category that feels inconvenient. Good organization usually improves after use, not just during the first setup.
For me, the biggest mistake is trying to use every tiny container just because it exists. A drawer works better when your fingers can reach between the sections. If the layout feels packed, remove one or two tubs and combine categories that you rarely use.
This is also a nice no-paint project. Clear or pale containers let you see the contents immediately, which can be more useful than a decorative finish when the pieces are stored inside a drawer.
Variations and Alternatives
· Use small lidded containers for spare screws, sewing pieces, or craft findings.
· Arrange containers inside a reused biscuit tin or sturdy gift box.
· Keep one empty compartment as a temporary place for loose desk items.
· Use removable paper labels so categories can change later.
· Create a travel version inside a lidded box for small craft supplies.
Turn Turquoise Bottles into a Stunning Hanging Decoration
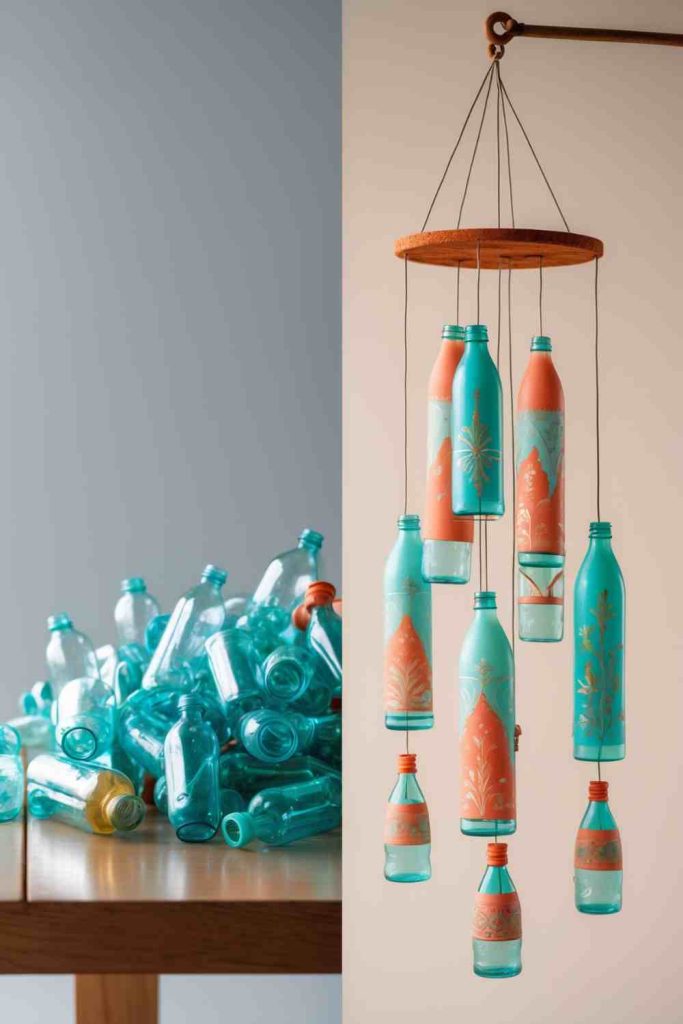
A group of colored bottles can become a lightweight hanging decoration without needing every bottle to be cut into complicated shapes. Turquoise or blue-green plastic already has visual interest, especially when light passes through it, so the project works best when that color remains visible. A few simple painted details or contrasting caps can add character without covering the bottle completely.
This kind of hanging piece is more successful when the bottles sit at different heights. The variation gives the decoration movement and keeps the group from looking like a row of containers on strings. I would keep the overall structure fairly open so the bottles have room to move without constantly hitting one another.
Because it is a hanging project, attachment points matter more than surface decoration. Use a strong neck, cap area, or carefully made hole, and keep the bottles empty so the final piece stays light. A sheltered indoor spot, covered porch, or calm balcony is safer than an exposed location with strong wind.
Materials and Tools
· Clean turquoise or similarly colored plastic bottles
· Strong cord, twine, or ribbon
· Sturdy ring, dowel, or reused hoop for the top support
· Marker and ruler for spacing
· Small paintbrush and acrylic paint for optional details
· Adult-use hole-making tool if holes are required
· Scissors for cutting cord
· Optional beads or lightweight bottle caps for small accents
Steps
1. Plan the hanging arrangement first. Lay the bottles on the floor or table and decide which ones should hang highest and lowest. Keep enough space between neighboring bottles so they will not collide constantly. Mark the order or take a quick reference photo before tying anything, because it is easier to adjust the composition while everything is still flat.
2. Prepare secure attachment points. Use the bottle neck or cap whenever possible because it is usually stronger than the thin middle wall. If you need to make holes, let an adult create small, neat openings and check them for rough edges. Thread the cord through and tie a secure knot, then pull firmly to test it before moving on.
3. Add restrained decoration. Paint small floral, dot, or geometric details while leaving plenty of turquoise plastic visible. You can also use contrasting caps or a few lightweight beads near the knots. Then let all painted areas dry fully so the cord and neighboring bottles do not rub wet paint during assembly.
4. Balance the bottles on the support. Tie each cord to the ring, dowel, or hoop at the planned length. Lift the support gradually and check whether it tilts to one side; move a knot or bottle until the weight feels balanced. Hang the finished piece from a secure hook and keep it away from strong wind or areas where people may walk into it.
The decorative effect comes from color, spacing, and movement, so there is no need to fill the bottles. Water, stones, or heavy embellishments would increase the strain on the cords and support. Empty bottles are easier to balance and safer to hang.
I’d also keep the sound in mind. Bottles that touch can knock together, which may be fine for a playful mobile but irritating in a quiet room. Give them enough distance that they move independently most of the time.
Variations and Alternatives
· Use clear bottles with transparent colored paint instead of naturally turquoise plastic.
· Hang the bottles from a reused embroidery hoop or smooth branch.
· Create a shorter version with three bottles for a small window corner.
· Add paper or fabric tassels below the bottles instead of extra plastic pieces.
· Use the same structure for a seasonal color palette while keeping the bottles lightweight.
Turn a Plastic Bottle into a Decorative Birdhouse or Plant Holder
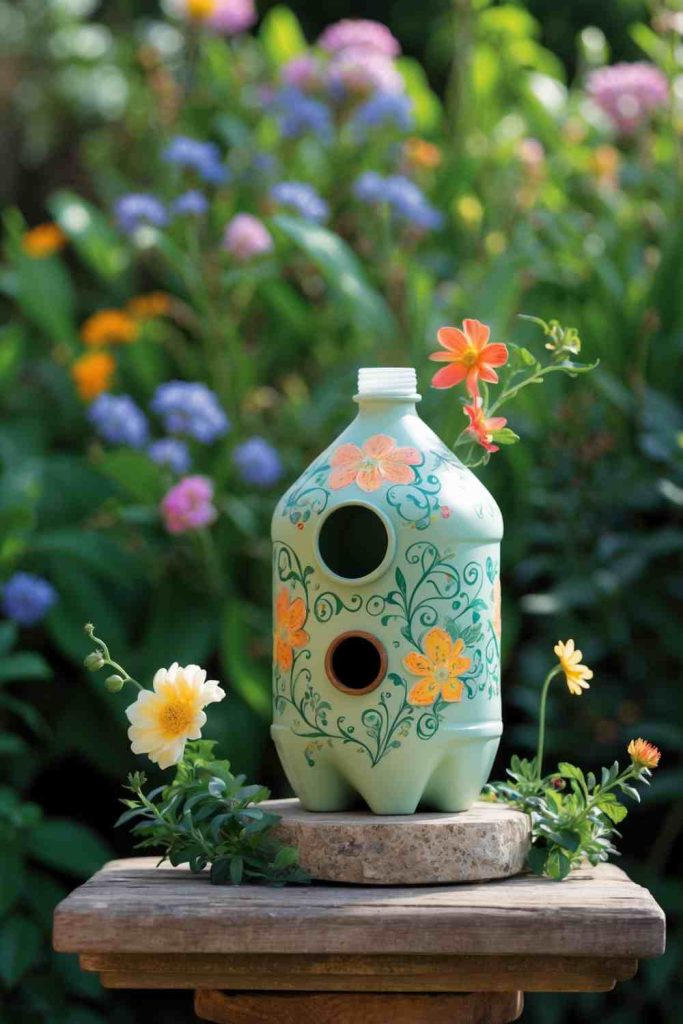
A bottle with a large side opening can become a birdhouse-style garden decoration or a small plant holder. The two versions look similar at first, but they need different thinking. A planter needs drainage and enough room for roots, while anything intended for actual birds should be approached more carefully because ventilation, safe openings, weather, and local species all matter.
For a straightforward home project, I prefer treating the bottle as a decorative birdhouse-style planter. You can create one or two openings, paint the outside, and set a small plant inside while keeping the structure light. If you want to use the bottle for birds rather than as decoration, research the needs of local species and make sure there are no sharp edges, trapped heat, or unstable hanging points.
The shape can still be playful. A painted roof line, leaves, flowers, or a simple perch-like stick can make the bottle read as a tiny house even when its main function is holding a plant.
Materials and Tools
· Clean sturdy plastic bottle with a broad body
· Marker for planning the opening
· Adult-use craft knife or sturdy scissors
· Fine-grit sandpaper or safe edge covering
· Acrylic paint and small brushes
· Strong cord if the piece will hang
· Small plant and lightweight potting mix for the planter version
· Optional short stick for a decorative perch detail
Steps
1. Choose the function before cutting. Decide whether the bottle will be a plant holder, a purely decorative birdhouse-style ornament, or a carefully researched bird-use project. Mark the opening according to that purpose. For a planter, make the access wide enough for soil and leaves; for decorative use, focus on a balanced shape rather than copying a real nest box.
2. Cut and smooth the opening. Let an adult cut along the marked line slowly so the bottle does not split. Trim any jagged pieces and smooth the edge before handling it further. Add small drainage holes in the bottom if the bottle will hold soil, because trapped water can make a planter messy and difficult to maintain.
3. Paint the outside without blocking function. Apply a light base coat if desired, then add flowers, leaves, simple house details, or another pattern. Keep drainage holes, the opening, and any hanging points clear. I don’t think heavy decoration helps here; the bottle shape and a few clear details are enough to make the transformation readable.
4. Finish for the intended location. For a planter, add a small amount of lightweight mix and a plant that suits the available light, then hang or place the bottle securely. For a decorative birdhouse-style piece, keep the interior empty and position it where rain will not collect. If it is meant for real birds, do not rely on decorative instructions alone; adapt it to safe local wildlife requirements.
This is one project where I would not treat appearance as the only goal. A cute opening and painted flowers are enough for a decorative garden object, but real birds need more than a pretty container. If the piece will be used by wildlife, function and safety come first.
For most beginners, the plant-holder version is easier to control. You can inspect the drainage, move it into shade or sun as needed, and replace the plant without affecting wildlife.
Variations and Alternatives
· Use the bottle as a wall-mounted succulent holder rather than a hanging planter.
· Leave the plastic partly clear so the soil level is visible.
· Paint only the upper half and keep the lower planter section plain.
· Create a decorative house shape without a perch if the piece is not intended for birds.
· Use faux greenery for an indoor version that does not need drainage.
Organize Your Desk with Semi-Transparent Plastic Containers
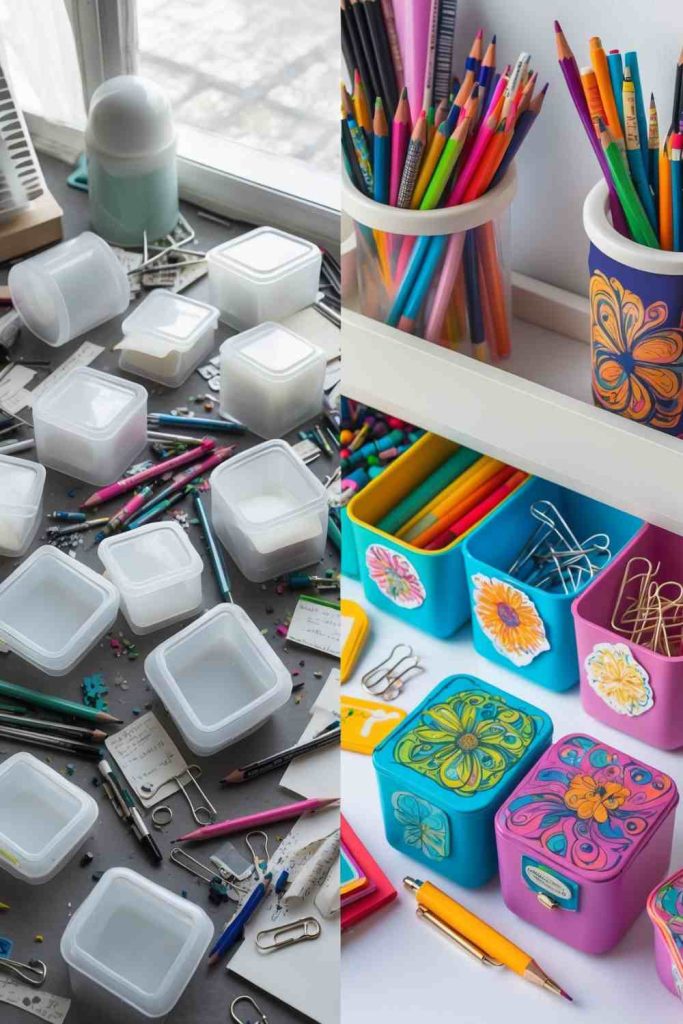
Semi-transparent containers have one advantage that painted organizers do not: you can see enough of the contents to find things quickly without the visual noise of a completely clear box. That makes them useful for markers, cables, sticky notes, small notebooks, craft tools, and other supplies that need to stay visible but contained.
This project works best as modular storage rather than a decorative pencil cup. Think in zones: one container for writing tools, one for technology accessories, one for paper supplies, and perhaps one lidded piece for items you use less often. If the containers stack safely, you can also use vertical space without turning the desk into a tower of mismatched boxes.
Because the plastic itself already has a soft, frosted look, I would keep decoration minimal. A narrow label strip, a small painted motif, or matching handles can be enough.
Materials and Tools
· Semi-transparent plastic containers, preferably with stable flat bases
· Lids where available
· Warm soapy water and cloth
· Removable labels or masking tape
· Marker
· Optional acrylic paint for small decorative areas
· Optional non-slip dots or removable tape for lightweight containers
Steps
1. Create desk zones. Look at the supplies you actually use during a normal work session and divide them into broad groups. Keep frequently used items in open containers and reserve lidded boxes for spare cables, refills, or small parts. This prevents the system from becoming a row of containers with no clear logic.
2. Match the container size to the contents. Use taller pieces for markers or brushes, medium boxes for chargers and cables, and shallow containers for sticky notes or clips. Leave enough empty room to remove items without digging. If a container is too large for its category, combine related supplies rather than filling the extra space with random objects.
3. Add simple identification. Use a small removable label or a narrow painted strip rather than covering the whole container. The semi-transparent surface is useful because it gives you a visual clue about the contents, so do not hide that advantage. Then return the supplies and check that the label is visible from your normal seated position.
4. Arrange for reach and stability. Place everyday items closest to your dominant hand and less-used boxes farther back. If you stack containers, keep heavier ones at the bottom and do not build higher than feels stable. Then open, close, and move the system as you would during a real day to see whether anything slides or blocks access.
The slightly cloudy plastic is useful because it reduces visual clutter without making you guess what is inside. I would avoid painting large opaque panels across the front unless the contents are private or genuinely unattractive.
This setup can also change with your work. Removable labels are better than permanent ones if you rotate between office supplies, craft materials, or school items during the year.
Variations and Alternatives
· Use matching paper label strips for a calmer look.
· Keep one lidded container as a charging-cable box with an opening only if the edges are safely prepared.
· Arrange the containers on a reused tray so the whole setup can be moved quickly.
· Use shallow semi-transparent tubs inside a deep desk drawer.
· Make a craft version for thread, tape, and small tools rather than office supplies.
Transform Transparent Bottles into Elegant Painted Vases
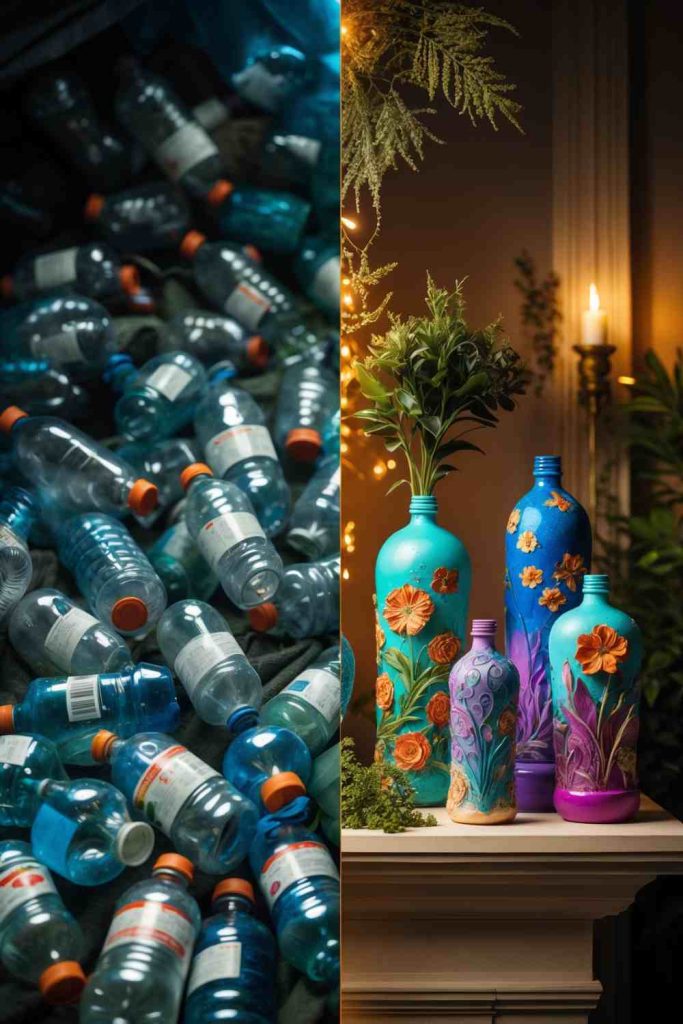
Clear plastic bottles are easy to overlook because their shape feels ordinary, but paint can change the way that shape reads. A bottle with a simple silhouette can become a lightweight vase for a shelf, mantel, or table, especially when several bottles are painted as a coordinated group. The clear starting surface also lets you control exactly how much opacity you want.
For a practical vase, I would paint the outside and keep the inside clean. That way, water does not sit against decorative paint, and the bottle can still be rinsed. If you are using dried or artificial stems, you have more freedom with finishes, but a stable base still matters because plastic bottles are much lighter than glass.
The most convincing versions usually use one strong color or a simple pattern rather than many unrelated details. A narrow neck and a clean painted body can already look deliberate.
Materials and Tools
· Clean transparent plastic bottles with stable bases
· Acrylic paint or another plastic-suitable decorative paint
· Optional plastic-compatible primer
· Small and medium paintbrushes or sponge
· Painter’s tape for simple bands or geometric areas
· Fine-grit sandpaper only if appropriate for the chosen finish
· Flowers, greenery, or dried stems
· Optional clean pebbles kept separate from painted surfaces if extra base weight is needed
Steps
1. Select bottles with balanced shapes. Choose bottles that stand flat and have neck openings suited to the stems you want to display. Remove labels, wash them thoroughly, and let them dry. Set them side by side before painting; a group often looks more intentional when the heights vary but the silhouettes still feel related.
2. Test and apply the base finish. Try the paint on a small scrap or hidden area first because smooth plastic can behave differently from paper or wood. Add a compatible primer if needed, then apply thin coats to the outside. Rotate the bottle as you work so paint does not gather heavily on one side or drip toward the base.
3. Add controlled decorative details. Use tape for a clean band, a small brush for leaves or dots, or leave part of the bottle clear. Then step back before adding more. For me, one repeated motif across several bottles looks calmer than giving every bottle a completely different design.
4. Prepare the vase for display. Let the finish cure according to the paint instructions before adding water or handling the bottle repeatedly. Keep water inside the unpainted bottle and wipe any spills from the painted exterior. Add a few stems rather than overfilling the neck, and place the vase where it is unlikely to be knocked over.
Plastic vases are easy to move, which is useful, but that same lightness can make tall stems top-heavy. Shorter arrangements are usually easier to manage. If the base needs extra stability, use a small amount of clean weight inside only when it does not interfere with water or cleaning.
I’d also avoid painting the inner surface. Keeping the inside plain makes the bottle easier to rinse and reduces the chance of decorative coatings mixing with the water.
Variations and Alternatives
· Paint only the lower third and leave the upper bottle clear.
· Use two related colors across a set of three bottles.
· Wrap the neck with a small amount of twine instead of painting it.
· Use the vases for dried stems if you want to avoid water completely.
· Create a matte look with a suitable finish while keeping the design simple.
Create Festive Ornaments with Colorful Plastic Lids
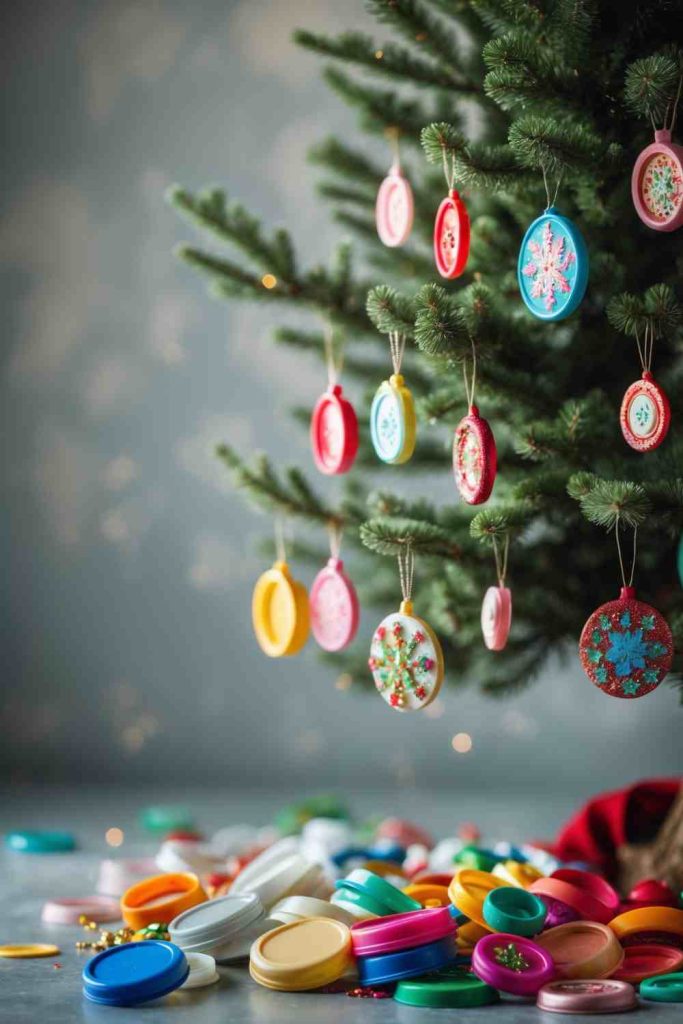
Plastic lids are naturally suited to ornaments because they are small, lightweight, and already have a neat circular shape. A collection of lids in different colors can become a set of tree decorations, gift tags, or hanging accents without much cutting. The main challenge is making a secure hanging hole and keeping the decoration light enough that the lid still hangs flat.
This is also a useful project for leftover craft supplies. Small paper stars, narrow ribbon, paint dots, or tiny fabric scraps can be added without covering the entire lid. I would treat the original lid color as part of the design instead of automatically painting every piece.
If children are helping, let them handle the decorating after an adult has created any holes. Small decorations and punched plastic pieces should stay away from very young children and pets.
Materials and Tools
· Clean plastic lids in assorted colors
· Ribbon, string, or thin cord
· Adult-use hole punch or drill method appropriate for the lid thickness
· Acrylic paint or paint markers for optional details
· Small paper or fabric scraps
· Craft adhesive
· Scissors
· Optional lightweight sequins or buttons for older-child/adult projects
Steps
1. Sort the lids into a color plan. Lay the clean lids out and decide whether you want a mixed set or a smaller palette. Turn each lid both ways because the front and back may have different textures. Choose the smoother or more interesting side as the visible face before adding any decoration.
2. Create the hanging point safely. Have an adult make a small hole near the edge, leaving enough plastic around it that the hole will not tear out. Check the edge and remove any rough fragments. Thread ribbon or cord through the hole and tie a loop, but leave the final knot loose until the decoration is finished.
3. Decorate without making the lid heavy. Add paint dots, simple stars, paper shapes, or a narrow fabric detail. Keep embellishments flat and lightweight so the ornament does not twist or pull downward. Let glue and paint dry fully before flipping the lid or stacking finished pieces together.
4. Finish and hang the set. Tighten the hanging loops and test each ornament by holding it from the ribbon. If a lid tilts badly, remove or reposition a heavy embellishment. Then place the ornaments on a tree, garland, gift package, or seasonal branch display where the reused material becomes part of the decoration rather than hidden.
A lid does not need much decoration to feel festive. The strong circular shape and existing color are already useful design elements. Adding too many thick objects can make the ornament difficult to hang and harder to store after the season.
I know small craft pieces can be tempting for children, so keep beads, sequins, and cut fragments away from anyone likely to put them in their mouth. A paint-only version is often just as effective.
Variations and Alternatives
· Turn lids into gift tags by writing on a removable paper circle attached to the front.
· Use white paint to add simple snowflake-style lines on darker lids.
· String several lids together as a short garland instead of individual ornaments.
· Use fabric scraps cut slightly smaller than the lid as flat inserts.
· Make a non-seasonal version for a child’s room mobile with age-appropriate safety precautions.
Turn a Plastic Bottle into a Festive Piggy Bank
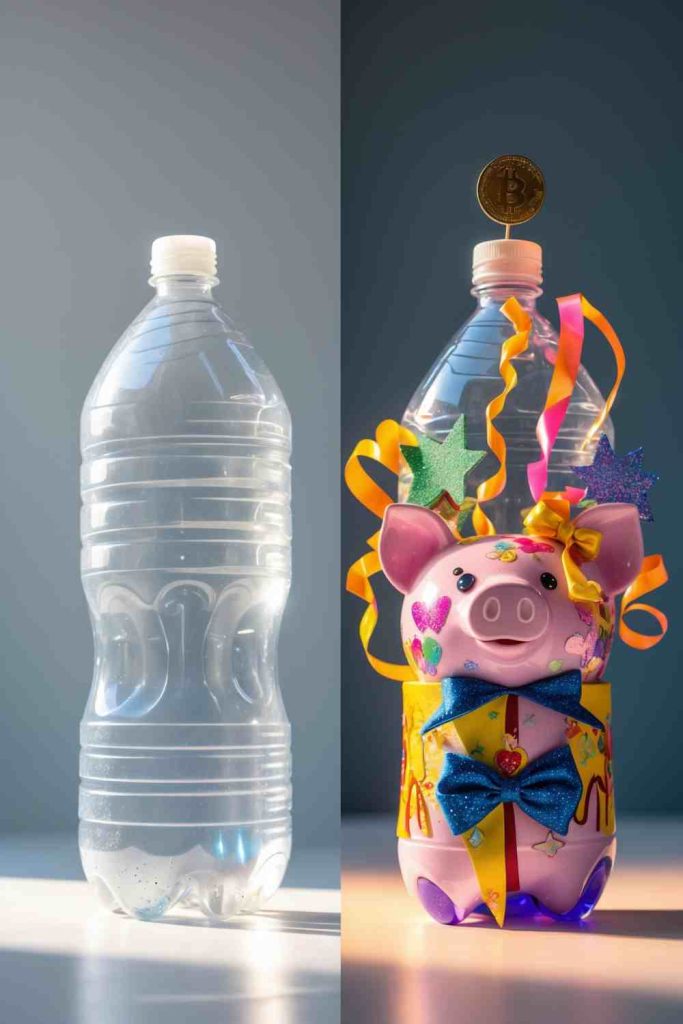
A plastic bottle makes a surprisingly practical piggy bank because the cap already gives you a way to empty it later. The main modification is the coin slot, and the rest can stay simple. A clear bottle lets you see savings grow, while an opaque or decorated bottle hides the coins and makes the object feel more like a finished craft.
The coin slot should be the first design decision because it affects safety and function. It needs to be long enough for the coins you expect to use but not so large that the bottle wall becomes weak. I would let an adult make that cut and smooth it before any child begins decorating.
Festive details can come from ribbon, painted stars, paper shapes, or a themed label. The bottle does not need to become a literal pig unless you want it to; the heading describes the function, and a simple holiday savings bottle can look cleaner and be easier to make.
Materials and Tools
· Clean plastic bottle with screw cap
· Marker and ruler
· Adult-use craft knife for the coin slot
· Fine-grit sandpaper or safe edge-finishing method
· Acrylic paint or paper decorations
· Ribbon or twine
· Craft adhesive
· Optional bottle caps or felt pieces for decorative feet or ears if securely attached
Steps
1. Mark a practical coin slot. Place the empty bottle on its side and choose a flat area where coins can drop in without catching on a seam. Mark a short slot that fits the largest coin you plan to use. Keep it away from the base and cap so the bottle stays structurally strong and can still stand or open normally.
2. Cut and finish the opening. Have an adult cut the marked slot carefully and remove any loose plastic. Smooth the edge or cover it with a secure finishing material so hands will not catch when coins are inserted. Test the slot with one coin before decorating, then adjust only if necessary.
3. Add the festive design. Decorate the outside with a simple color theme, stars, ribbon, or paper shapes. Keep decoration away from the cap threads and coin slot. If you add feet or ears, make them lightweight and firmly attached so they do not fall off every time the bottle is moved.
4. Test saving and emptying. Add a few coins, gently shake the bottle, and make sure nothing catches around the slot. Then unscrew the cap and confirm that the coins can be removed without damaging the decoration. Place the finished bank on a stable shelf where it can be used regularly without being dropped.
The practical opening is the one part that should stay visually and physically clear. Thick bows, layered paper, or loose glitter near the slot can catch coins and make the bank messy. I’d keep decoration concentrated on the ends or lower half of the bottle.
A clear bottle can be motivating because the contents remain visible, but it also shows dust and fingerprints. If you want a calmer look, paint part of the bottle while leaving a narrow clear window.
Variations and Alternatives
· Leave a clear strip down one side to show the coin level.
· Use removable paper bands so the theme can change after the holiday season.
· Create a simple animal face with paint instead of glued-on small pieces.
· Use a short, wide bottle for better stability on a child’s shelf.
· Add a paper savings label without covering the cap or slot.
Craft a Bird Feeder from a Plastic Bottle
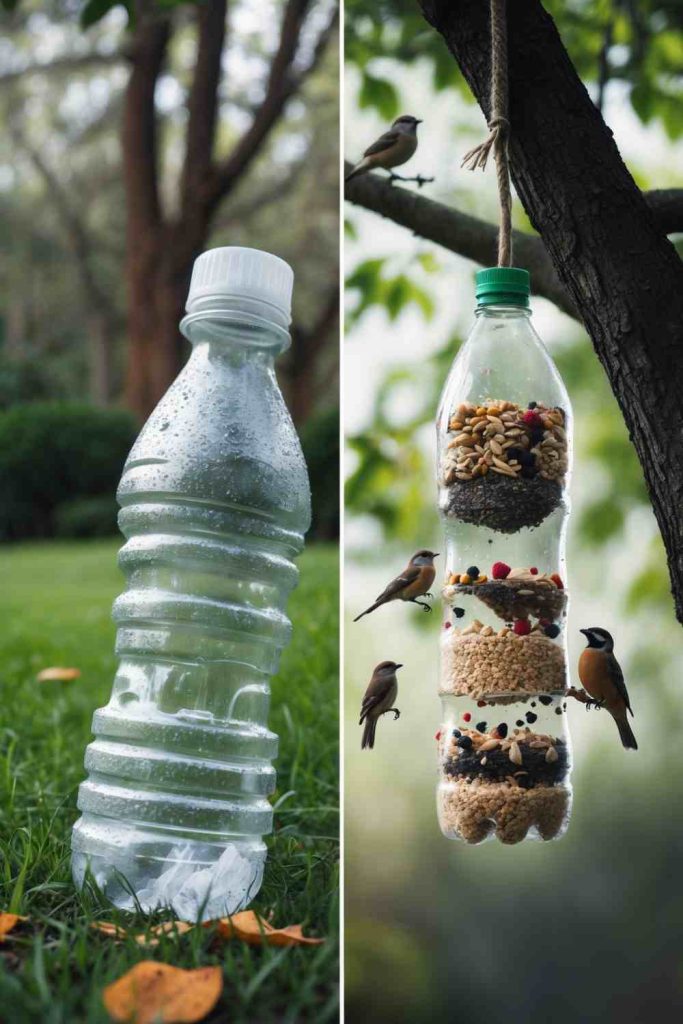
A plastic bottle can work as a simple bird feeder because it protects seed while allowing you to see when the supply is getting low. The design needs more care than a decorative bottle, though. Openings should be smooth, the feeder must hang securely, and the shape should allow you to clean out old seed rather than trapping damp material inside.
I would choose a sturdy clear bottle with a cap that still closes properly. Clear plastic makes it easier to monitor the contents, and the cap gives convenient access for refilling. Keep decoration minimal around feeding openings so birds are not forced to brush against paint, loose ribbon, or rough edges.
Placement matters too. A feeder should hang where you can reach it for cleaning and refilling, not only where it looks attractive from a window.
Materials and Tools
· Clean clear plastic bottle with secure cap
· Marker
· Adult-use scissors or craft knife
· Fine-grit sandpaper or safe edge-finishing method
· Strong weather-resistant cord or twine
· Optional smooth wooden spoon or dowel for a perch-style feeder design
· Bird seed appropriate for the birds you intend to feed
· Small funnel or folded paper for refilling
Steps
1. Plan the feeding openings. Mark one or two openings where seed can be reached without making the bottle wall too weak. Keep them above the lowest part of the bottle so seed does not pour out immediately. If you are using a spoon or dowel perch, mark its holes carefully so the perch sits level and does not leave a large gap around the plastic.
2. Cut and smooth every edge. Have an adult make the openings slowly, then remove any sharp fragments. Run a finger near the edge only after it has been sanded or safely covered. This is not a place to accept rough cuts, because the opening is exactly where birds will approach the feeder.
3. Add the hanging cord and test it empty. Secure cord around the neck or through strong upper attachment points and tie a reliable knot. Hang the empty feeder low over a soft surface and give it a gentle pull to make sure the knot and plastic hold. Adjust the balance before adding seed because extra weight will make weaknesses more obvious.
4. Fill, hang, and maintain the feeder. Add a modest amount of fresh seed and close the cap firmly. Hang the feeder where you can inspect it regularly and where rain does not constantly flood the openings. Empty and clean the bottle when seed becomes damp, dirty, or compacted, then let it dry before refilling.
A feeder that cannot be cleaned easily will be frustrating to use. The cap should stay accessible, and the openings should be large enough to remove old material without dismantling the entire project. That practical access matters more than decorative paint.
I’d also keep embellishment to a minimum. Loose fabric, string ends, or thick glued shapes near feeding areas are unnecessary. The bottle itself, clean seed, smooth openings, and a secure hanging point are the important parts.
Variations and Alternatives
· Use two opposite spoon-style perches if the bottle is strong enough for the holes.
· Create a small roof shield from a separate lightweight piece only if it does not trap moisture.
· Leave the bottle completely clear so seed level is easy to monitor.
· Hang the feeder from a reused metal hook rather than a decorative ribbon.
· Make a smaller feeder for a balcony while still allowing easy cleaning and secure hanging.
Craft Colorful Hanging Planters with Plastic Bottles

Plastic bottles are naturally lightweight, which makes them useful for small hanging planters. The lower half of a bottle can hold a modest amount of soil, while fabric, paint, or cord can soften the recycled look. The trick is to keep the planter small enough that the hanging points remain reliable after the soil is watered.
I prefer designing the suspension before planting. Once soil and water are added, it becomes harder to punch holes, tie straps, or adjust balance. Two or three evenly spaced hanging points usually keep a planter more level than one strap attached to only one side.
Drainage is another practical detail that should not be covered by decoration. Small holes at the bottom help excess water escape, and the planter should hang somewhere that occasional drips will not damage furniture or flooring.
Materials and Tools
· Clean plastic bottles with sturdy lower sections
· Marker and ruler
· Adult-use scissors or craft knife
· Fine-grit sandpaper or safe edge covering
· Strong cord, fabric strips, or plant hanger material
· Optional fabric scraps or acrylic paint for decoration
· Strong adhesive if fabric is wrapped around the bottle
· Lightweight potting mix and small suitable plants
· Tray or protected work surface for planting
Steps
1. Cut the planter section. Mark a level line around the bottle and have an adult cut the lower portion to the height you need. Smooth the rim carefully because hands will pass over it while planting. Add several small drainage holes in the base before wrapping or painting the outside so you do not accidentally cover them later.
2. Prepare balanced hanging points. Mark two, three, or four equally spaced points near the upper rim and create small holes with an adult-use tool. Thread the cord or fabric straps through and tie secure knots. Lift the empty planter by the straps and adjust them until the container hangs level before adding any weight.
3. Decorate without weakening the structure. Wrap the outside with fabric or add painted bands, but keep the hanging holes and drainage clear. If using fabric, secure the ends neatly so loose pieces do not catch when the planter moves. Then let adhesive or paint dry completely before soil is added.
4. Plant lightly and hang securely. Add a small amount of lightweight potting mix and a compact plant, leaving space below the rim for watering. Water gently and let excess moisture drain before hanging the planter. Use a secure hook or support rated for more than the wet planter weighs, and inspect the straps and plastic regularly for stretching or cracks.
An empty bottle can feel almost weightless, but soil and water change the load quickly. That is why I would test the straps and hanging points before planting and avoid filling the container too deeply. Smaller plants are easier to manage and put less stress on the plastic.
If you are wrapping the bottle in fabric, remember that fabric can stay damp after watering. Keep it away from the drainage holes and use the planter in a location where it can dry between waterings.
Variations and Alternatives
· Paint the bottle instead of wrapping it when you want an easier-to-wipe surface.
· Use a clear strip so you can see the moisture and root area.
· Create a vertical row of small planters with separate secure supports rather than one overloaded cord.
· Use faux plants for an indoor decorative version with no drainage or wet soil.
· Turn a bottle sideways for a trough-style planter only if the suspension supports both ends evenly.
Keep Plastic Upcycles Useful for Longer
A finished plastic project still needs occasional attention, especially if it hangs, holds water, sits in sunlight, or gets handled every day. I would treat maintenance as part of the design rather than something to think about later. A desk organizer that can be wiped clean, a planter with accessible drainage, and a feeder with an easy-to-remove cap are all more likely to stay useful because the basic care is simple.
Start by looking at the places where the material is under stress. Hanging holes, tight knots, cut rims, glued seams, and the base of a bottle all take more wear than a flat decorative surface. If the plastic starts whitening around a hole, bending permanently, or developing small cracks, that is a sign to reduce the load or retire the piece. I would rather replace one reused bottle than keep trusting a weakened hanging point.
Painted projects benefit from gentle handling too. Plastic can flex, and a hard decorative coating may not flex with it. When cleaning a painted vase or organizer, use a soft cloth instead of aggressive scrubbing. If a small chip appears, touch up that area rather than adding another heavy coat across the whole project. This keeps the surface lighter and avoids building thick layers that can peel.
· Inspect hanging holes, knots, and straps before adding fresh soil, seed, or other weight.
· Wipe desk organizers and vases regularly so dust does not build up around decorative edges.
· Keep outdoor pieces in a sheltered position when possible and check them after strong weather.
· Clear planter drainage holes whenever water begins to sit in the bottom of the container.
· Replace loose ribbon, cord, or fabric before it becomes a structural problem.
· Retire brittle or cracked plastic instead of adding more glue and decoration to a weakened piece.
Storage between seasons also matters for ornaments and hanging decorations. Wash or wipe the pieces, let them dry completely, and store them without crushing thin bottle walls. If cords are removable, coil them separately so they do not pull against the plastic during storage. Lids and small ornaments can sit flat in a box with paper between layers to prevent paint from sticking together.
Finally, keep the second life of the plastic realistic. Some projects will last for years, while others may only serve for a season or two. That does not make the upcycle unsuccessful. The useful part is that the material performed another job before disposal, and you learned which construction details made that second use easier, safer, and more practical.
Common Mistakes to Avoid When Upcycling Plastic
Plastic is forgiving in some ways, but a few shortcuts can make an otherwise simple project difficult to use. The biggest problems usually come from treating every container as if it behaves the same. A thin bottle flexes, a lid may be brittle, a food tub may have a waxy surface, and a hanging planter becomes much heavier once it is filled. Planning for those differences makes the finished object more reliable.
· Reusing containers that held hazardous or unknown substances. Choose clean household food, drink, or other clearly non-hazardous containers instead.
· Decorating before deciding the function. Test storage, balance, openings, and hanging points first so paint or fabric does not cover something important.
· Leaving cut plastic edges rough. Trim, smooth, or safely cover every cut edge before the object is handled or used near people or wildlife.
· Using too much paint on flexible plastic. Heavy coats can crack or peel when the bottle bends, so use thin layers and a finish suited to the surface.
· Ignoring drainage in planters. Water needs a way out, and decorative wraps should never block the drainage holes.
· Hanging a project before testing the knots and plastic. Pull-test the empty item first, then test again after adding any intended weight.
· Relying on weak glue for structural parts. Adhesive is useful for decoration, but hanging straps and weight-bearing elements often need knots, holes, ties, or another mechanical attachment.
· Overdecorating bird-use projects. Keep feeding openings, perches, and access for cleaning clear and free from loose decorative materials.
· Making desk organizers too crowded. Leave room for your fingers and for the system to change as your supplies change.
· Forgetting how the project will be cleaned. Keep interiors accessible, avoid unnecessary layers around rims, and make lids or caps easy to remove.
Another mistake is expecting every upcycled item to last forever. Plastic that has already spent time in sunlight or repeated use may eventually become brittle. I would inspect outdoor and hanging pieces regularly and retire them when the plastic cracks, stretches, or no longer feels secure. Reuse is useful when the second life is practical, not when keeping an unsafe object becomes the goal.
Frequently Asked Questions
Which plastic containers are best for upcycling projects?
Sturdy household bottles, tubs, lids, and containers that can be cleaned thoroughly are usually the easiest to work with. I prefer pieces that are not brittle, cracked, or heavily scratched. Avoid containers that held hazardous chemicals or anything with an unknown residue.
Do I need special paint for plastic?
Not always, but very smooth plastic can be difficult for ordinary paint to grip. Test a small area first and use a plastic-compatible primer or paint when the finish needs to be durable. Thin coats usually behave better than one thick coat on a flexible bottle.
How can I remove sticky labels without damaging the plastic?
Soak the container in warm soapy water first and peel the label slowly. For stubborn adhesive, rub gently rather than scraping with a sharp tool that can gouge the surface. Wash the container again afterward so no oily or sticky residue remains before painting or gluing.
Can children help with these upcycling plastic projects?
Children can help with sorting, painting, choosing colors, filling organizers, and other low-risk parts of the work. An adult should handle craft knives, drilling, tough cutting, and any step that creates sharp plastic edges. Small embellishments should also be kept away from very young children and pets.
How do I make a cut plastic edge safer?
Trim loose points carefully, then smooth the edge with an appropriate fine abrasive or cover it with a secure edge treatment. Check the whole opening rather than only the obvious corners. If the edge still feels sharp or unstable, do not use the item until it has been corrected.
Can painted plastic projects stay outdoors?
They can work outdoors, but sun, rain, temperature changes, and movement can wear the plastic and finish over time. A sheltered location usually helps. Inspect hanging planters, feeders, and decorations regularly, especially around holes, knots, and areas where the plastic flexes.
Can an upcycled plastic project be recycled later?
That depends on your local recycling rules and on what has been added to the plastic. Paint, fabric, glue, cord, and mixed materials may make recycling more complicated. If future recyclability matters to you, use removable decoration where possible and check the rules for your local collection service when the project is finally retired.
Let Plastic Earn One More Useful Job
The most useful upcycling plastic projects are not the ones with the most decoration. They are the ones that take a shape you already have and give it a second job that makes sense. A wide tub can organize a desk, a clear bottle can become a vase or feeder, a handful of lids can become lightweight ornaments, and the lower half of a bottle can hold a small plant. Each project starts with the same practical question: what can this object already do well?
I’d begin with the simplest item in your recycling pile and choose a project that needs very little cutting or hardware. Clean it, test the new function, and only then add paint, fabric, or other details. That order keeps the craft useful and makes it easier to change your mind before anything becomes permanent.
If you have one clean bottle or container waiting for a second use, pick the idea that fits its shape best and start there. A small, well-made reuse project is more satisfying than a complicated one that never quite works in everyday life.