Old T-shirts are unusually useful craft material because the fabric is already soft, washable, and familiar. A shirt may be too faded, stretched, stained, oversized, or simply forgotten in the back of a drawer, yet large areas of the knit can still be perfectly usable. I don’t think a worn tee has to stay a shirt to deserve another chance; sometimes the neckline, graphic, sleeves, or even a small patch of fabric is the part worth saving.
What I like most about T-shirt upcycling is how little waste the process can create when you plan the cuts first. One garment can become a wearable redesign, a pouch, a pillow, a quilt block, fringe, patches, or decorative details. The trick is to respect the stretch of jersey fabric instead of treating it like stiff woven cotton, because the way it moves affects cutting, stitching, glue, paint, and every finished edge.
These upcycling T-shirt ideas range from simple surface changes to projects that rebuild the garment entirely. Some need only scissors and careful placement, while others benefit from hand stitching or a sewing machine. I know it can feel tempting to start cutting as soon as an idea looks exciting, but a few minutes of checking the fabric and mapping the design usually gives you a cleaner result and leaves more useful scraps for the next project.
Sort T-Shirts by Fabric, Stretch, and Condition
Before deciding what a T-shirt should become, check what is still strong. Hold the fabric up to the light and look for thin patches, tiny holes, hardened stains, stretched necklines, weak underarms, or areas where the knit has become almost transparent. A damaged section does not automatically ruin the whole shirt, but it should not sit where a new seam, zipper, button, or high-stress join needs to carry weight.
Separate shirts that are best for wearing projects from shirts that are better as craft fabric. A tee that still fits comfortably can handle embroidery, patches, paint, ruffles, or buttons. A shirt with a damaged collar but a strong body may be better for pouches, quilt blocks, fringe, or a pillow. If the fabric contains a lot of stretch, remember that heavy embellishments and stiff inserts can pull it out of shape.
Plan the Layout Before You Cut, Stitch, or Paint
Jersey does not give you many chances to undo an ambitious cut, so I would sketch or pin the idea before removing fabric. Lay the shirt flat without stretching it, smooth the side seams, and mark any areas you need to preserve, especially graphics, hems, shoulder seams, and motifs you may want to reuse. When combining two shirts, compare their stretch direction and thickness before deciding where the join will sit.
For decoration, test the full composition while everything is still movable. Arrange bandana pieces, buttons, patches, denim, or ruffles first; put cardboard inside before painting or stamping; and check the position of a crop line on the body rather than judging it only on the table. Then step back. The first arrangement rarely has to be the final one, and moving a patch now is much easier than unpicking it later.
Match Tools, Adhesives, Heat, and Bleach to the Fabric Safely
Sharp fabric scissors, stretch-friendly needles, pins or clips, and thread suited to the fabric will make most of these projects easier. When a design uses glue, paint, ink, interfacing, or heat-activated materials, follow the product instructions and test a hidden scrap first. Some jersey fabrics react badly to too much heat, and some adhesives dry stiff enough to make a soft shirt uncomfortable.
Bleach needs extra care. Work with good ventilation, protect your skin and eyes, keep it away from children and pets, and never mix bleach with other household cleaners. I’d also reserve bleach work for fabric that can safely tolerate the treatment and use the smallest controlled amount needed for the design. The goal is a decorative change, not a weakened patch that later tears during washing or wear.
Upcycling T-Shirt Ideas with a Stylish Bandana Twist
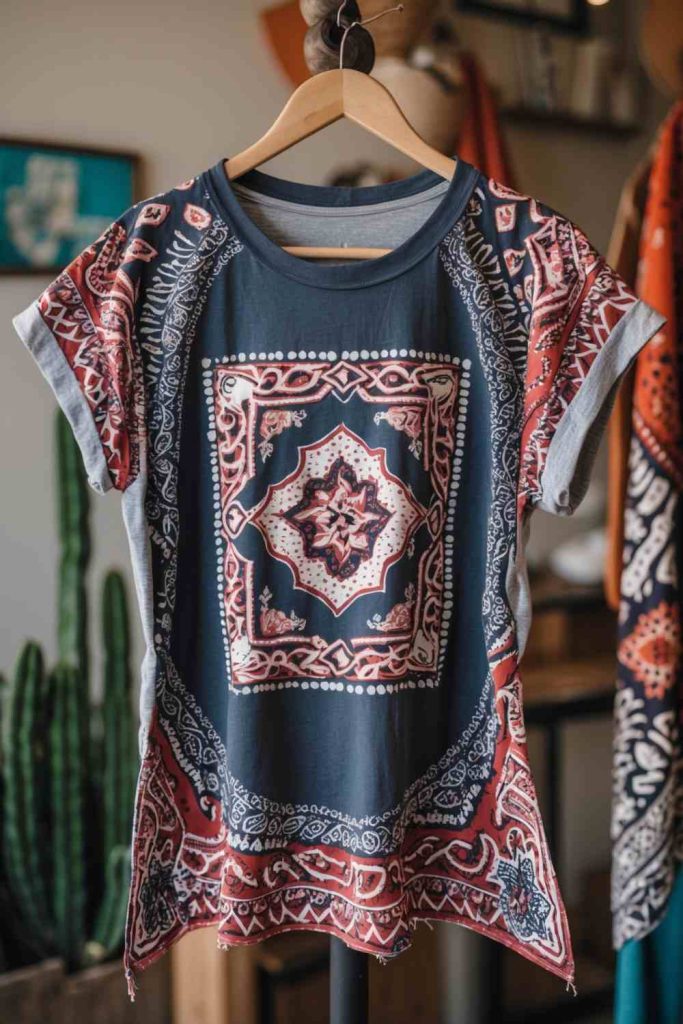
A bandana panel can rescue a plain or slightly marked T-shirt without covering the whole garment. The woven fabric gives the soft knit a sharper graphic area, so the contrast works best when the patch feels deliberate rather than like a repair that was added in a hurry. A central panel, pocket-sized accent, shoulder insert, or repeated small shapes can all work, depending on how much bandana fabric you have.
The important detail is the difference between the two fabrics. A bandana is usually less stretchy than jersey, which means a large patch can restrict movement if it crosses the chest or side seam. I would keep the design away from areas that need to stretch heavily, or attach it with enough ease that the T-shirt can still move naturally. This is also a useful way to reuse a damaged bandana whose strongest sections remain attractive.
Materials and Tools
· Old T-shirt in wearable condition
· Bandana or similar woven fabric scrap
· Fabric scissors
· Pins or sewing clips
· Needle and thread or sewing machine
· Washable fabric marker or chalk
· Optional fabric adhesive for temporary positioning
Steps for This T-Shirt Upcycling Project
1. Prepare both fabrics. Wash and dry the T-shirt and bandana so later shrinkage is less likely to distort the patch. Press the bandana if needed, then inspect both pieces for weak areas. Lay the shirt flat without stretching it.
2. Test the placement. Cut a paper template first if you are unsure about size, then use it to trim the bandana. Pin the piece where it looks balanced and try the shirt on carefully. Check that the patch does not pull across the chest, shoulder, or side seam.
3. Secure the bandana. Turn under a narrow edge if the woven fabric frays easily, then stitch around the perimeter with small, even stitches. Keep the jersey relaxed while sewing so it does not pucker. A stabilizer placed temporarily behind the area can help if the knit is very soft.
4. Finish the remaining scraps. Use small offcuts for a pocket accent, sleeve tab, neckline detail, or another project. Remove stray threads and check the attachment from the inside before wearing. The finished patch should lie flat without making the shirt feel stiff.
For me, the strongest version usually uses one clear bandana area rather than scattering tiny pieces everywhere. The contrast already has plenty of visual energy, so I’d let it do the work.
Variation: Use part of an old woven shirt, scarf, or cotton handkerchief instead of a bandana. For a removable approach, stitch the accent to a separate pocket or badge panel first and attach that panel with hand stitching.
Upcycling T-Shirt Ideas with Stunning DIY Bleach Art
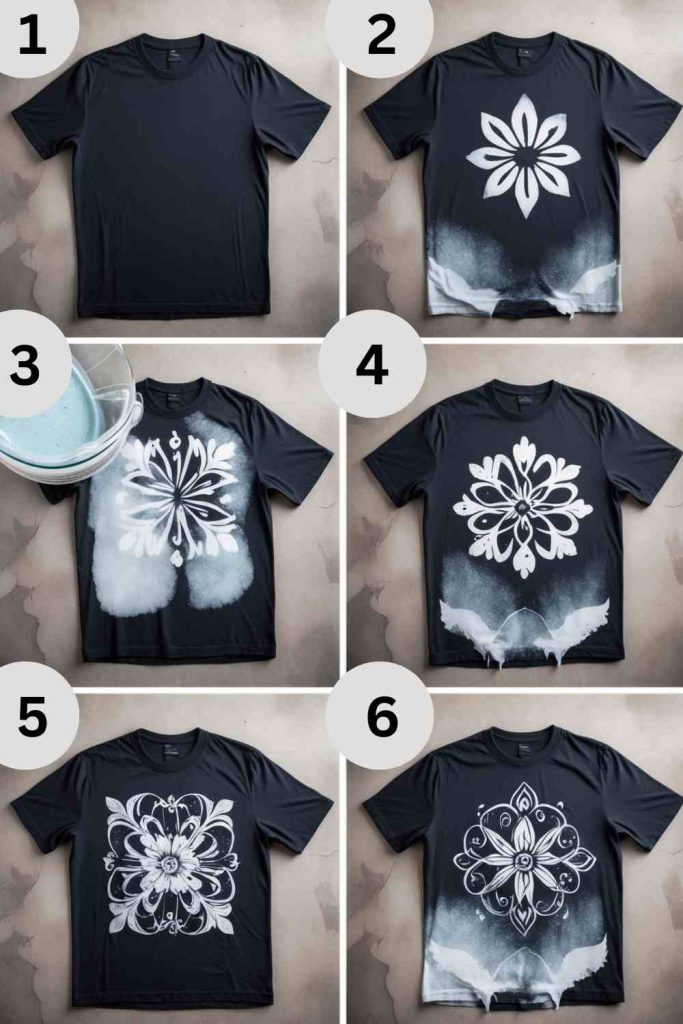
Bleach art changes the existing dye rather than layering new color on top, which makes it visually different from fabric paint. Dark cotton T-shirts often show the effect most clearly, but the final shade can vary widely because fabric dyes do not all react the same way. That uncertainty is part of the look, so I would plan a graphic that can tolerate irregular edges and uneven color shifts.
This is not a repair method for weak fabric. Bleach can damage fibers when used too aggressively, so begin with a structurally sound shirt and keep the treatment controlled. A stencil, taped geometric area, small brush application, or limited spray pattern can create contrast without soaking the entire garment. The back of the shirt should be protected so the treatment stays where you intend it.
Materials and Tools
· Dark, structurally sound T-shirt
· Household bleach used according to its label
· Protective gloves and eye protection
· Cardboard or plastic barrier for inside the shirt
· Stencil, tape, or applicator suitable for controlled placement
· Water access for rinsing
· Protective work surface
Steps for This T-Shirt Upcycling Project
1. Set up a safe work area. Work with strong ventilation and protect the surrounding surface. Put on suitable gloves and eye protection, keep other cleaners far away, and insert a barrier inside the shirt. Never combine bleach with other household chemicals.
2. Plan a small test. Use an unseen fabric area or a scrap from a similar shirt to see how the dye changes. This matters because black or dark dye may shift to brown, orange, pink, or another tone rather than a predictable pale shade. Adjust the design around the actual reaction you see.
3. Apply the design carefully. Position the stencil or masking and use the smallest controlled amount of bleach needed. Avoid saturating the knit, and watch the color change rather than walking away. Then rinse thoroughly according to safe handling guidance for the product you are using.
4. Wash and inspect the shirt. Launder the garment separately as appropriate before wearing it. Once dry, hold the treated area up to the light and check that the fibers still feel sound. If the fabric has become brittle or unusually thin, repurpose the shirt for a low-stress craft instead of wearing it.
I know dramatic bleach patterns can be tempting, but I’d rather leave more original fabric untouched. A smaller controlled motif usually keeps the shirt more wearable and gives the design clearer edges.
Variation: If you do not want to use bleach, create a similar high-contrast effect with opaque fabric paint on a dark tee. That option changes the surface rather than removing dye and can be easier to control for beginners.
DIY Chic Crop Top with a Stylish Tie Knot
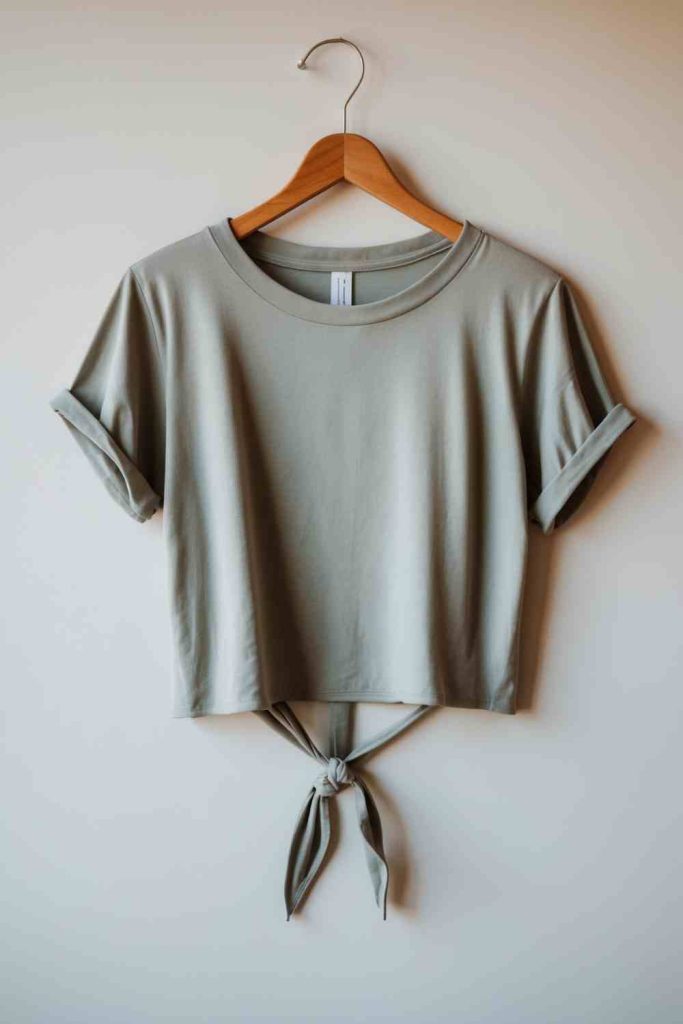
A tie-front crop top works especially well when an oversized or boxy T-shirt still has good fabric but no longer suits the way you dress. The front knot creates shape at the waist without needing complex pattern drafting, while the shortened body removes stained or stretched fabric near the hem. The design can feel casual or more finished depending on how carefully you shape the ties and edges.
The crop line needs to be judged on the person who will wear the shirt, because jersey can hang very differently from how it looks flat on a table. Leave more length than you think you need at first. You can always trim again, but you cannot put fabric back once the center has been cut into ties.
Materials and Tools
· Loose T-shirt with a strong upper body
· Fabric scissors
· Washable chalk or marker
· Ruler or measuring tape
· Pins
· Optional needle and thread or sewing machine for finishing
Steps for This T-Shirt Upcycling Project
1. Choose the finished length. Try the shirt on and mark the general crop point while standing naturally. Take it off and lay it flat, then compare the side seams so the line is even. Leave extra fabric at the center front where the ties will be formed.
2. Shape the hem and ties. Cut slowly across the marked area and create two front tabs for knotting. Keep the cuts smooth and avoid making the ties too narrow, because skinny jersey strips can curl and stretch excessively. Test the knot before removing more length.
3. Refine the fit. Try the shirt on again and adjust only where needed. If the raw hem rolls neatly, you can leave it unfinished; otherwise turn and stitch it with a stretch-friendly method. Check that the knot sits comfortably and does not distort the side seams.
4. Use the cut-off fabric. Save the removed hem for ties, headbands, patches, or later projects. Trim uneven fibers, press the garment lightly if suitable, and wash once before final judgment. Jersey often settles a little after handling and washing.
One detail I wouldn’t skip is the second try-on before final trimming. A crop top can change a lot once the front is tied, so the knot should be part of the fitting process, not an afterthought.
Variation: Keep the shirt full length and create only a small center-front tie for a less revealing version. You can also add a side tie or use a contrasting fabric tie stitched into the hem.
DIY Creative Pouches from Old Tees
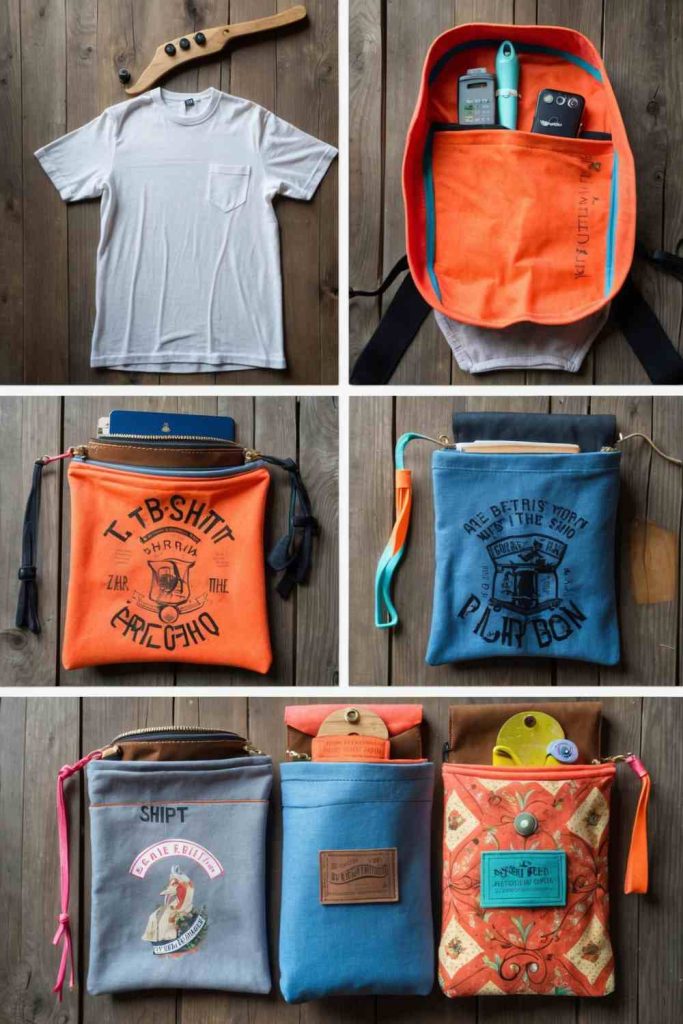
T-shirt fabric makes soft pouches that are useful for lightweight items such as craft supplies, cables, hair accessories, travel pieces, or small fabric scraps. This project is a good destination for shirts that are no longer wearable but still have strong printed areas or interesting color. A favorite graphic can become the front of the pouch rather than disappearing when the shirt leaves the wardrobe.
Because jersey stretches, the pouch needs more structure than the original shirt. A lining or lightweight stabilizer can stop the bag from sagging, especially if you add a zipper. I would avoid using a soft T-shirt pouch for sharp, heavy, or valuable objects unless the construction is reinforced appropriately.
Materials and Tools
· Old T-shirt or strong T-shirt sections
· Fabric scissors or rotary cutter
· Pins or clips
· Needle and thread or sewing machine
· Optional lining fabric
· Optional lightweight interfacing or stabilizer
· Zipper, hook-and-loop tape, drawstring, or snap
Steps for This T-Shirt Upcycling Project
1. Choose and stabilize the fabric. Select the strongest section of the shirt and decide whether a graphic should be centered. Cut two matching panels with enough allowance for seams. If the knit is very stretchy, attach a suitable stabilizer or pair it with a woven lining before assembly.
2. Prepare the closure. Install the zipper or other closure while the pieces are still easy to handle. Keep the jersey from stretching as you sew, and use clips instead of excessive pinning if the fabric distorts. Test the closure before closing the pouch body.
3. Sew the pouch shape. Place the panels with the right sides together and stitch the remaining edges. Reinforce the corners and any point where the closure meets the seam. Trim bulky allowances carefully without cutting into the stitches.
4. Turn and check the pouch. Turn the pouch right side out and gently shape the corners. Test it first with lightweight contents and inspect the seams for stretching. Add a lining, wrist loop, or small internal divider only if the base construction feels secure.
I’d rather make a slightly smaller, well-supported pouch than a large one that stretches under its own contents. Jersey is forgiving, but it still needs structure when it becomes a container.
Variation: Use a drawstring made from the shirt hem for a zipper-free version, or combine a T-shirt graphic with a sturdier denim back panel. Small sleeve sections can also become coin or earbud pouches.
Upcycling T-Shirt Ideas with Beautiful DIY Fabric Paint Designs

Fabric paint can cover faded graphics, disguise small permanent marks, or turn a plain shirt into a wearable surface for illustration. The best results usually come from designs that work with the drape of the shirt instead of creating one large stiff block. Small brushwork, loose scenic shapes, typography, line art, or layered motifs can all suit jersey when the paint remains flexible enough for clothing.
The shirt needs to be clean and free from fabric softener residue or surface oils that could interfere with adhesion. A barrier inside prevents bleed-through, and the fabric should sit flat without being stretched while you paint. I don’t think every faded area needs complete coverage; sometimes integrating a mark into a larger design looks more natural than trying to hide it under thick paint.
Materials and Tools
· Clean T-shirt
· Fabric paint suitable for washable clothing
· Brushes, sponges, or other applicators
· Cardboard or washable barrier for inside the shirt
· Washable chalk or fabric pencil
· Protective work surface
· Optional stencil or masking tape
Steps for This T-Shirt Upcycling Project
1. Prepare the shirt. Wash and dry the T-shirt, then lay it flat with a barrier inside. Smooth the fabric but do not pull it taut. Lightly mark the main design so you can check scale and placement before opening the paint.
2. Build the design in light layers. Apply paint according to its instructions and avoid flooding the knit. Let each area settle before adding heavier detail, especially where colors overlap. Thin controlled layers usually move better with the fabric than one thick coat.
3. Check flexibility and coverage. Once the surface is sufficiently dry to handle according to the product directions, flex the fabric gently and look for cracking, stiffness, or bare patches. Add only the corrections you need. Keep paint away from areas where it would feel uncomfortable against the skin.
4. Set and care for the design. Follow the specific paint manufacturer’s directions for curing or heat setting rather than guessing. Wash and care for the finished shirt as instructed for the medium. If the painted area becomes damaged later, repair small sections instead of coating the whole garment again.
For me, fabric paint works best when the shirt still behaves like a shirt. If the front becomes as stiff as a signboard, the design may look impressive on the table but feel awkward when worn.
Variation: Use fabric markers, block printing ink intended for textiles, or stitched appliqué instead of brushed paint. For a subtle version, place the artwork on a pocket, sleeve, or lower hem rather than across the whole front.
DIY Fringe Belt for a Boho-Chic Look
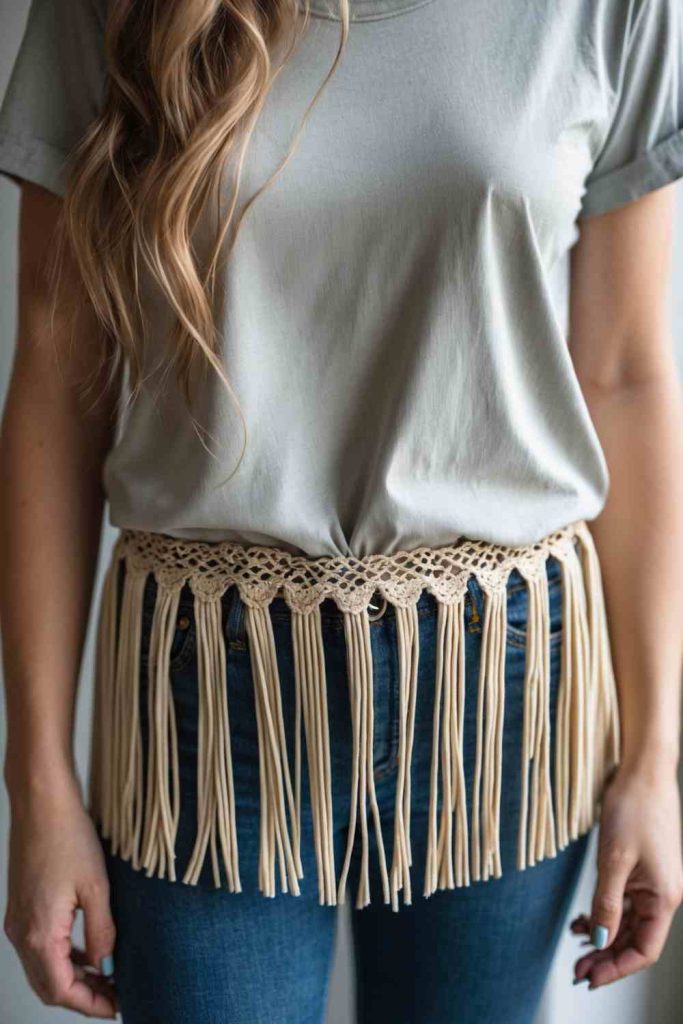
A fringe belt uses the natural stretch and curl of T-shirt jersey as the main design feature. Long strips can be knotted, looped, braided, or layered from a waistband made from the same shirt, turning fabric that might otherwise become scraps into an accessory. Because the finished piece is decorative rather than load-bearing, even irregular strips can add movement without needing perfect tailoring.
The waistband still needs to stay secure. Jersey stretches considerably, so a strip that looks like the right size while flat may loosen once worn. I would test the base around the waist before attaching all the fringe and avoid tying it so tightly that it rolls or digs into the body.
Materials and Tools
· Soft T-shirt or jersey scraps
· Fabric scissors
· Washable chalk
· Ruler or straight edge
· Needle and thread for reinforcing joins
· Optional beads or fabric scraps kept lightweight
Steps for This T-Shirt Upcycling Project
1. Cut the belt base. Choose a strong section of the shirt and cut a long band following the direction that gives useful stretch. Wrap it around the intended waist position and decide how it will close. Reinforce any joined sections before adding decorative weight.
2. Prepare the fringe. Cut long strips from the remaining jersey and stretch each one gently so the edges curl if that suits the look. Keep the strips similar enough to feel intentional, but small variations are fine. Remove any weak or torn pieces.
3. Attach the strips. Knot, loop, or stitch the fringe along the lower edge of the belt base. Work from the center outward so the distribution stays balanced. Then try the belt on and remove pieces that make one side noticeably heavier.
4. Finish for comfortable wear. Secure loose knots and trim any fringe that catches around the legs. Test sitting and walking before wearing it out. A decorative belt should move freely without tightening, twisting, or shedding strips.
The part I like here is that the fabric’s curl becomes an advantage instead of a problem. I’d keep added beads very light, because the fringe already gives plenty of movement.
Variation: Turn the same construction into a short festival sash, bag fringe, or decorative trim for a cushion. Braiding three jersey strips together creates a simpler belt with less movement.
DIY Graphic Patchwork for a Funky New Look
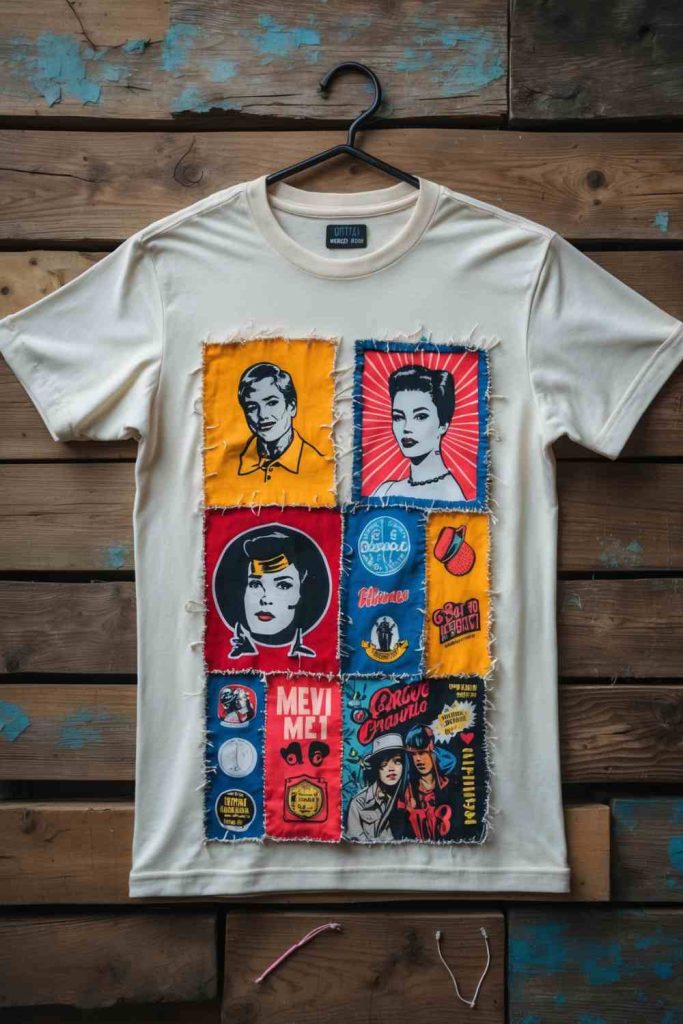
Graphic patchwork lets you save printed sections from T-shirts that are too damaged to keep as complete garments. Logos, illustrations, typography, concert graphics, and small motifs can become patches on another shirt, especially when the donor fabric holds a memory you do not want to discard. The new garment feels collected rather than matched, which is part of the appeal.
The patches should be placed where they will not distort the shirt’s stretch too much. A large stiff patch across the side or underarm can make the garment uncomfortable, while chest, back, pocket, or sleeve areas are usually easier to manage. The edges can be cleanly turned, left raw and reinforced, or outlined with visible stitching depending on the style.
Materials and Tools
· Base T-shirt in good condition
· Graphic sections cut from old tees
· Fabric scissors
· Pins or clips
· Needle and thread or sewing machine
· Optional lightweight stabilizer
· Optional washable fabric marker
Steps for This T-Shirt Upcycling Project
1. Harvest the graphics. Cut generously around the motifs you want to save rather than trimming right against the design immediately. Inspect the knit behind each graphic for thin areas. Stabilize weak but meaningful pieces before final shaping.
2. Arrange the patchwork. Lay the base shirt flat and move the pieces around until the composition feels balanced. Try the garment on with the patches pinned loosely or use temporary placement methods. Keep heavy clusters away from areas that need to stretch strongly.
3. Attach each patch securely. Sew around the edges with a stretch-aware stitch or hand stitching that allows the base garment to move. Work from larger pieces to smaller ones and smooth the shirt frequently. Avoid pulling the patch so tightly that the surrounding jersey puckers.
4. Refine the final layout. Trim stray threads and reinforce corners or sharp points that may lift during washing. Step back and remove any extra patch that makes the design crowded. Wash gently after construction and inspect the edges before regular wear.
I don’t think graphic patchwork needs every piece to be the same shape. The repeated idea of rescued T-shirt prints is enough to connect the design, even when the rectangles and curves vary.
Variation: Use patches only on a jacket, tote, cushion, or wall hanging if you prefer not to rebuild another T-shirt. A single favorite graphic can also become an oversized back patch.
DIY Hand Embroidery with Beautiful Floral Designs
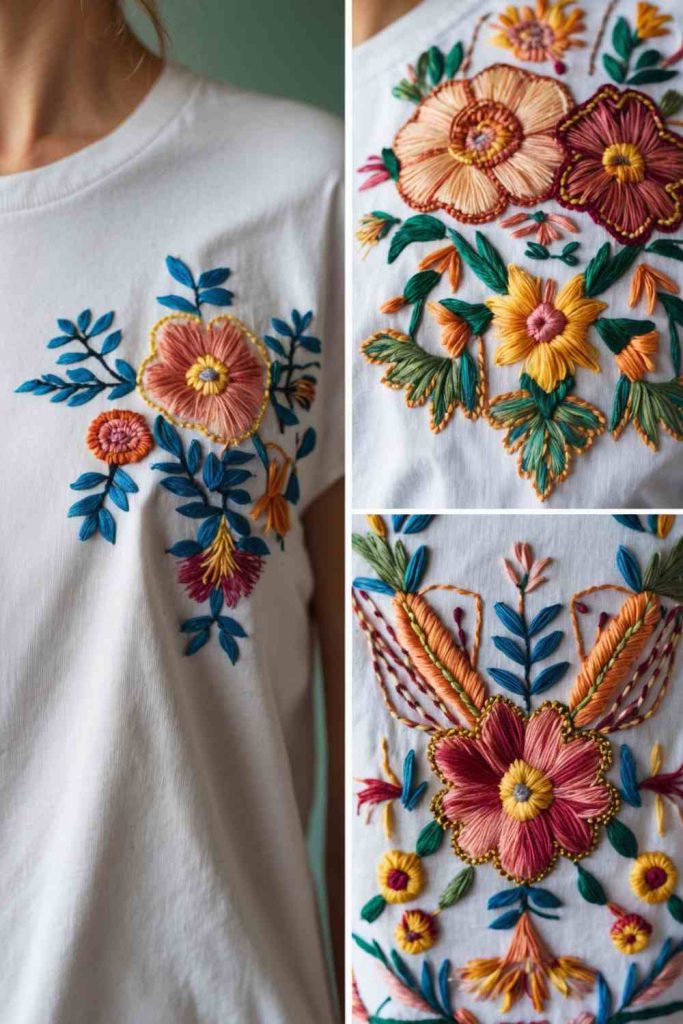
Hand embroidery adds texture without changing the basic shape of a T-shirt, which makes it a good option for a garment that still fits but feels plain. Floral motifs are especially forgiving because individual leaves, stems, and petals can follow the existing seams or curve around a small stain. The stitched surface also lets leftover embroidery thread earn a useful role.
Jersey stretches under tension, so embroidery needs a gentle hand. An embroidery hoop can help, but over-tightening the fabric may leave the finished area distorted once it is released. A removable stabilizer behind the motif can make the stitches more predictable, especially for beginners or for dense details.
Materials and Tools
· T-shirt with sound fabric
· Embroidery needle appropriate for knit fabric
· Embroidery thread or stranded cotton
· Embroidery hoop used without overstretching
· Washable marking tool
· Scissors
· Optional removable or wash-away stabilizer
Steps for This T-Shirt Upcycling Project
1. Plan the motif. Try the T-shirt on and choose an area where the embroidery will not rub uncomfortably or stretch excessively. Mark a simple floral layout with a washable tool. Keep the first design small enough that you can maintain even tension.
2. Stabilize the working area. Place suitable stabilizer behind the motif if needed and secure the fabric in the hoop without stretching the knit out of shape. Check that the shirt returns to its normal width when the hoop is relaxed. Thread the needle with a manageable length of floss.
3. Build the embroidery gradually. Use simple stitches for stems, leaves, petals, and small accents. Keep the thread firm enough to lie neatly but not so tight that the fabric puckers. Turn the work frequently and keep the back free from large knots or tangled loops.
4. Finish the inside carefully. Secure the threads, remove or rinse away stabilizer as appropriate, and erase washable markings according to their instructions. Check the back for scratchy knots and protect the area if needed. Wash gently and reshape the shirt before drying.
For me, a small cluster with breathing space often looks more considered than covering half the shirt. Jersey moves, so the embroidery should feel like part of the garment rather than a rigid badge.
Variation: Use visible mending stitches around a tiny hole, embroider only the pocket area, or add simple linework instead of dense flowers. You can also embroider a separate patch and sew that onto the shirt.
DIY Color-Blocked Denim and Fabric Design
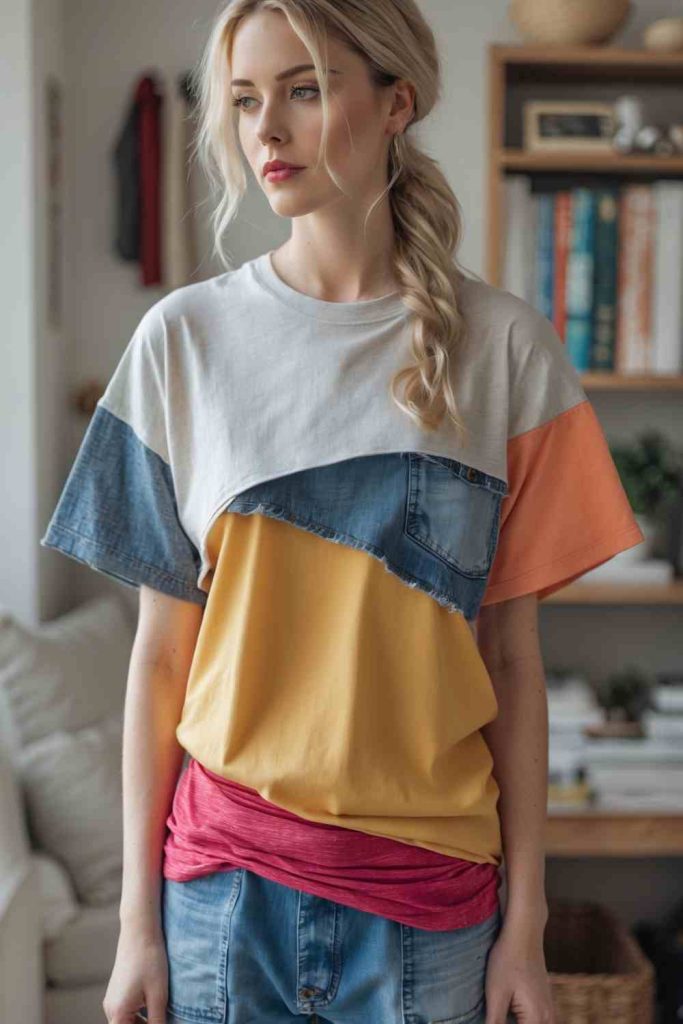
Color blocking combines T-shirt jersey with denim or other fabric scraps to rebuild sections rather than simply decorate the surface. It is useful when shoulders, hems, or panels are damaged but the rest of the shirt remains strong. The contrast can look intentional when the new fabric follows clear garment lines instead of being added as random rectangles.
Mixing denim with jersey requires attention because the materials behave very differently. Denim is heavier and less stretchy, so large inserts can pull the knit down or restrict movement. Smaller panels, pocket-style overlays, shoulder yokes, or hem bands are usually easier to control than replacing an entire high-stretch area with a stiff fabric.
Materials and Tools
· Base T-shirt
· Denim and/or woven fabric scraps
· Fabric scissors
· Pins or clips
· Sewing machine or sturdy hand-sewing setup
· Thread appropriate for the fabrics
· Optional stabilizer or lightweight interfacing
Steps for This T-Shirt Upcycling Project
1. Choose the panel locations. Put the shirt on and identify areas that can handle a less-stretchy insert. Mark the boundaries while the garment hangs naturally. Avoid placing stiff panels where the body needs the knit to expand significantly.
2. Prepare the scraps. Wash donor fabrics first and cut them with seam allowance. Finish edges that fray easily before joining them to the knit. If a denim piece feels too heavy, choose a smaller shape or a lighter woven alternative.
3. Join the fabrics slowly. Pin or clip without stretching the T-shirt, then sew the panel using a method that keeps the seam stable. Support the fabric on the machine bed so the denim does not drag the jersey. Check each section before adding the next one.
4. Test movement and refine. Try the shirt on and move your arms, bend, and sit to make sure the panels do not restrict the garment. Reinforce seam ends and trim internal bulk. Keep decorative topstitching light enough that the knit can still drape.
The part I would check most carefully is weight. A small denim accent can look crisp; a large heavy patch can make a soft T-shirt hang like it has a pocket full of tools.
Variation: Use chambray, lightweight canvas, woven cotton, or another T-shirt fabric instead of denim. Color blocking can also be done entirely with jersey scraps for a softer, stretchier result.
DIY Two-Tone Tie Design for a Chic Look
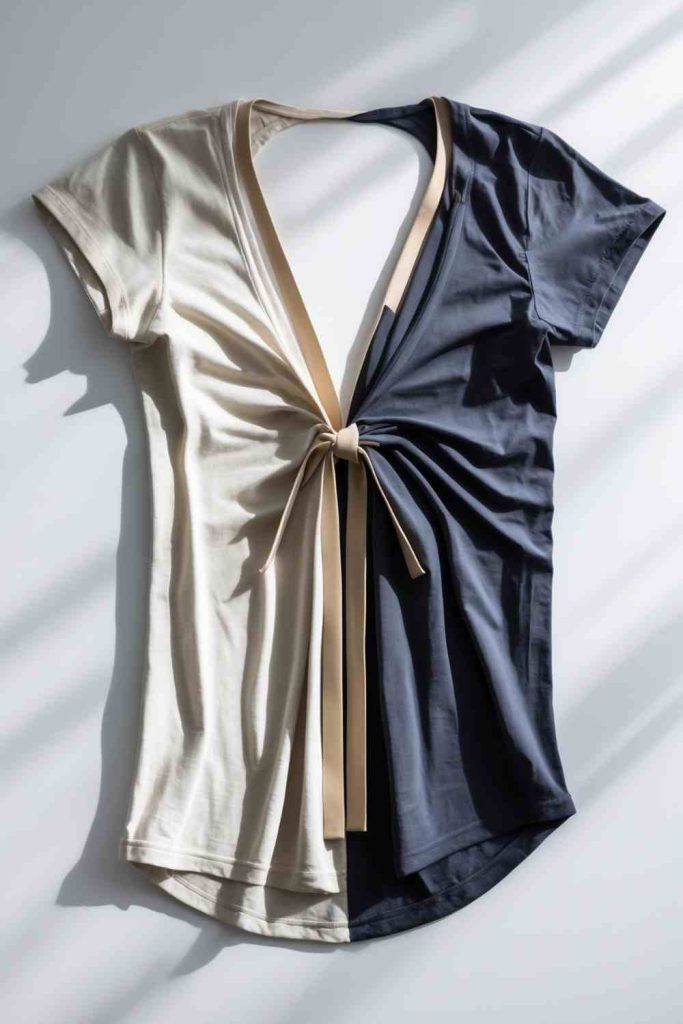
A two-tone T-shirt rebuild uses sections from two garments to create one new shirt with strong color contrast. It can be a practical way to save two tees that each have damage on opposite sides, provided the surviving sections are compatible in size, weight, and stretch. The central seam becomes a visible design feature, so straight alignment matters more than hiding the join.
The two shirts should behave similarly in the wash and on the body. If one fabric is much heavier, looser, or stretchier, the center seam may twist or drag. I would compare them by stretching small areas side by side before cutting, then preserve extra seam allowance until the first fitting confirms the shape.
Materials and Tools
· Two T-shirts of similar weight and stretch
· Fabric scissors
· Washable chalk
· Pins or clips
· Sewing machine or hand-sewing supplies
· Stretch-compatible thread and stitch choice
· Optional clear elastic or stabilizing tape for selected seams
Steps for This T-Shirt Upcycling Project
1. Match the donor shirts. Wash both garments and compare their size, knit weight, and stretch. Decide which half or panel of each shirt is worth saving. Mark the intended join while keeping necklines, shoulder points, and hems aligned as closely as possible.
2. Cut with room to adjust. Cut the selected sections with seam allowance rather than slicing exactly on the final line. Keep the halves flat and relaxed. If the shirts have graphics, check that the new center seam will not cut awkwardly through important text or imagery.
3. Sew the new body. Join the main sections with a stretch-friendly seam and avoid pulling either side. Press or flatten the seam as suitable for the fabric, then try the shirt on. Adjust the side balance before adding any decorative front tie.
4. Add the tie detail if desired. Use leftover jersey to form a front tie or small bow feature and secure it to a reinforced area. Make sure the tie is decorative rather than carrying structural tension. Save remaining scraps for patches, binding, or another project.
I’d choose compatibility over dramatic contrast. Two colors can look fantastic, but the shirt still needs to stretch and hang as one garment after the novelty of the seam wears off.
Variation: Instead of a 50/50 split, replace only one sleeve, one side panel, or the lower hem with the second color. That keeps the reconstruction simpler and uses smaller donor pieces.
DIY Patchwork Design for Vibrant Style
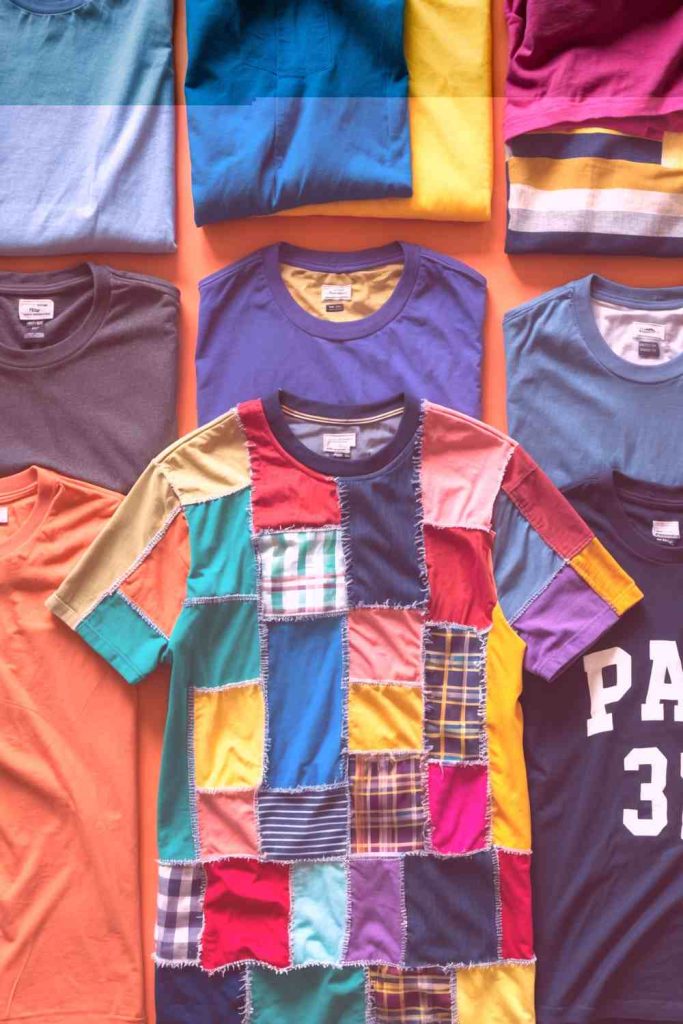
Patchwork can turn a collection of small T-shirt offcuts into a new surface instead of sending every irregular piece to the rag pile. Unlike graphic patchwork, this version can focus on color and texture rather than printed motifs. Squares, rectangles, and strips can be combined on a base shirt, or sewn into a larger panel first and then used as a yoke, pocket, back insert, or hem section.
The key is controlling stretch. If every scrap pulls in a different direction, the patchwork can ripple badly after washing. Arrange pieces with similar grain and stretch where possible, and stabilize the panel during assembly if the final section needs to hold a clean shape.
Materials and Tools
· T-shirt scraps in compatible weights
· Base T-shirt or backing fabric
· Fabric scissors or rotary cutter
· Pins or clips
· Sewing machine or needle and thread
· Optional lightweight stabilizer
· Iron used only if suitable for the fabrics
Steps for This T-Shirt Upcycling Project
1. Sort the scraps. Group pieces by weight, stretch, and condition before thinking about color. Remove thin or distorted sections. Trim useful scraps into shapes that are easy to join while keeping printed details you want to feature.
2. Build a panel first. Arrange the pieces on a flat surface and join them into rows or small units. Keep the seam allowances consistent and avoid stretching the jersey while sewing. Press only with a temperature appropriate for the fabric.
3. Place the patchwork on the garment. Use the finished panel as an overlay, insert, pocket, or replacement section. Pin it to the shirt and try the garment on if possible. Then sew it securely, supporting the knit so it does not grow under the machine foot.
4. Clean up the inside. Trim bulky seam intersections and cover scratchy areas if necessary. Reinforce the panel edges and wash gently to see how the mixed jersey settles. Make small corrections before wearing the shirt regularly.
A little variation actually helps this design, but I’d repeat at least one color or fabric more than once. That small repetition keeps the patchwork from feeling like every scrap in the basket landed on the shirt by accident.
Variation: Create the patchwork as a removable pocket, tote panel, cushion front, or quilt block instead of attaching it to a wearable shirt. Narrow strips can also become braided trim.
DIY Ruffled Sleeves with Striped Fabric for a Fun Twist
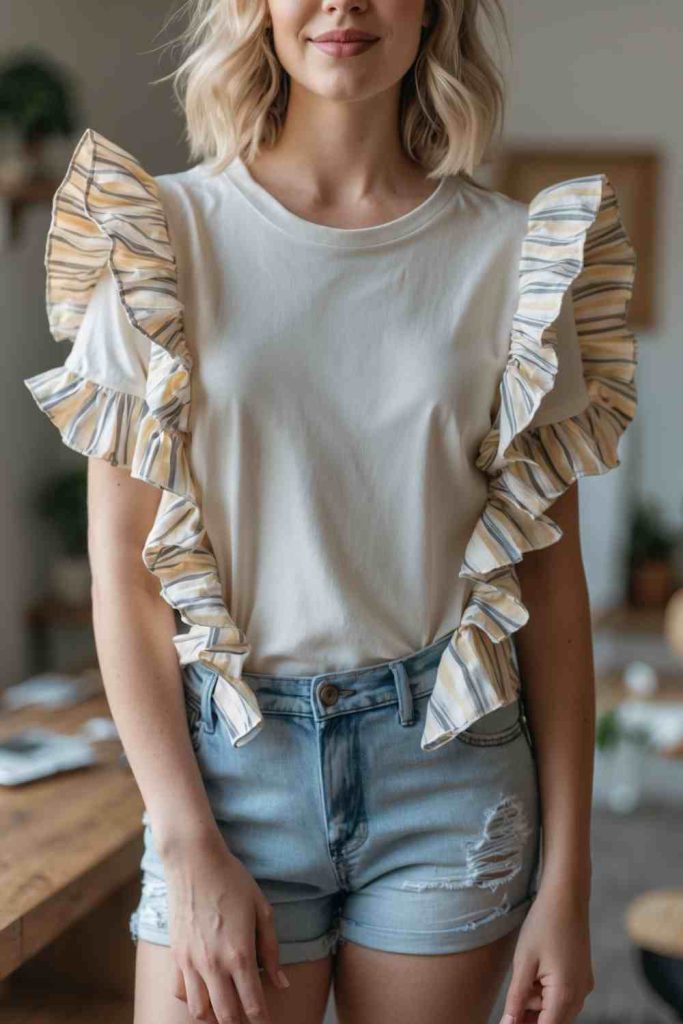
Ruffled sleeves are a useful redesign when the T-shirt body still fits but the original sleeves feel plain, tight, damaged, or too short. A contrasting striped woven fabric gives the sleeve more structure and movement than jersey alone. The ruffle can run around the sleeve opening, sit along the shoulder seam, or form a layered cap depending on the amount of fabric available.
The added fabric should not make the armhole heavy or restrictive. Woven ruffles do not stretch like the T-shirt, so the attachment needs enough ease for movement. I would test the pinned ruffle while the shirt is worn before sewing it permanently, especially if the design sits near the shoulder.
Materials and Tools
· T-shirt with a sound bodice
· Striped or other lightweight woven fabric scrap
· Fabric scissors
· Pins or clips
· Needle and thread or sewing machine
· Thread for gathering
· Washable marker
Steps for This T-Shirt Upcycling Project
1. Decide where the ruffle belongs. Try the shirt on and mark the sleeve or shoulder area you want to change. Measure the attachment line without stretching it. Choose a light donor fabric so the finished sleeve does not pull the jersey down.
2. Make the ruffle strip. Cut a long woven strip, finish the fraying edge as needed, and sew gathering stitches along the attachment side. Pull the thread gradually so the fullness is even. Do not over-gather until the strip becomes stiff or bulky.
3. Attach and test. Pin the ruffle to the shirt while the knit is relaxed, then try it on carefully. Raise your arms and check that the addition does not bind. Sew the strip securely, supporting the jersey so it stays flat.
4. Finish the seam. Remove gathering threads that are no longer needed, trim bulk, and cover scratchy allowances if necessary. Wash the shirt gently and reshape the ruffles by hand. The finished sleeve should feel light rather than weighted.
For me, movement is the reason to add a ruffle in the first place. If the sleeve becomes too heavy or stiff, I’d reduce the fullness rather than adding more trim.
Variation: Use another T-shirt for a softer jersey ruffle, add only a short ruffle at the shoulder, or create detachable sleeve bands that can be removed for washing.
DIY Stamped Patterns with Ink Pads for a Unique Look
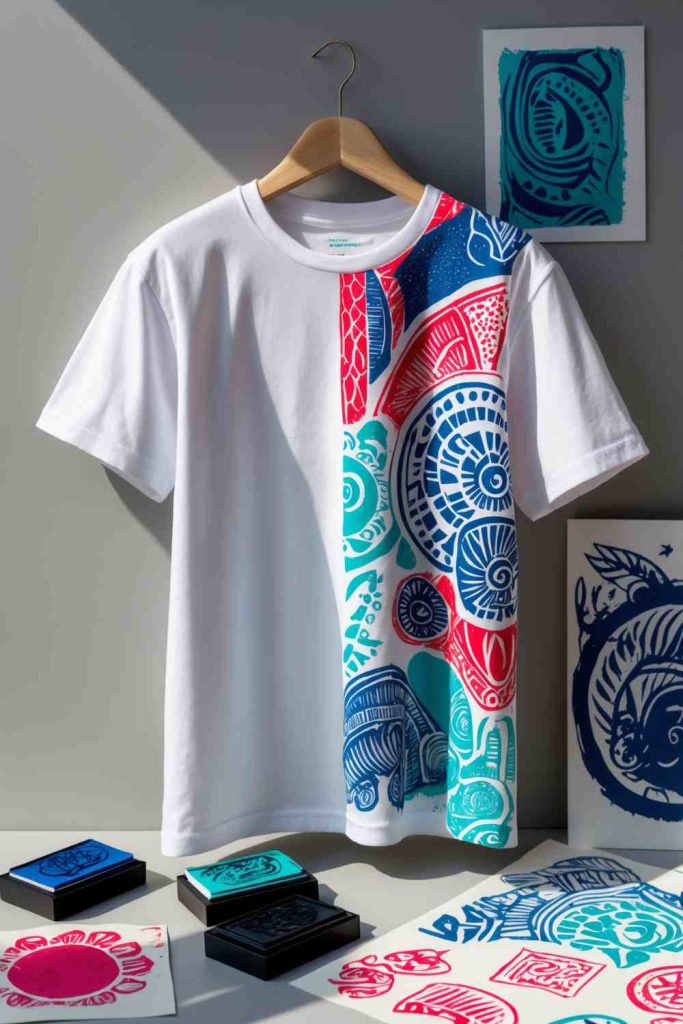
Stamped patterns create repetition without requiring drawing skills, and they can make a plain T-shirt feel completely different with only a few shapes. Bottle caps, simple foam stamps, carved blocks, or ready-made stamps can produce dots, leaves, geometric marks, or abstract repeats. The strongest designs usually leave some unprinted fabric so the shirt still feels wearable rather than completely coated.
Use a color medium intended for textiles rather than assuming every craft ink pad will survive washing or remain safe against clothing. A test scrap matters because knit can blur edges when too much liquid is applied. A barrier inside the shirt also keeps the print from transferring to the back layer.
Materials and Tools
· Plain T-shirt
· Textile ink or fabric paint suitable for stamping
· Stamp, foam shape, block, or other applicator
· Cardboard barrier
· Protective work surface
· Scrap fabric for testing
· Optional ruler or removable guide tape
Steps for This T-Shirt Upcycling Project
1. Test the stamp first. Try the stamp on scrap fabric using the same pressure you plan to use on the shirt. Adjust the amount of textile medium until the edges are readable without flooding the knit. This small test can save the whole garment from the first overly wet print.
2. Map the pattern. Insert cardboard and mark light guide points if the repeat needs alignment. Decide where the pattern should stop so it does not accidentally drift into the collar or side seam. Random patterns can still benefit from a few planned anchor points.
3. Stamp in stages. Work across the shirt with even pressure and reload the stamp lightly between impressions. Let areas settle before overlapping colors. Keep hands and tools clean so unwanted marks do not appear where you rest the fabric.
4. Set the design correctly. Follow the textile medium’s specific curing or heat-setting instructions. Once complete, remove the barrier and check the inside for bleed-through. Wash and care for the shirt according to the medium rather than relying on a generic temperature or time.
I’d rather have a few crisp stamps than a crowded field of blurry ones. Repetition looks intentional only when the individual marks still have enough space to be seen.
Variation: Stamp only the pocket, sleeve, or lower hem for a subtle treatment. You can also print a separate T-shirt scrap and use that fabric as an appliqué patch.
DIY T-Shirt Pillow for Cozy Home Decor
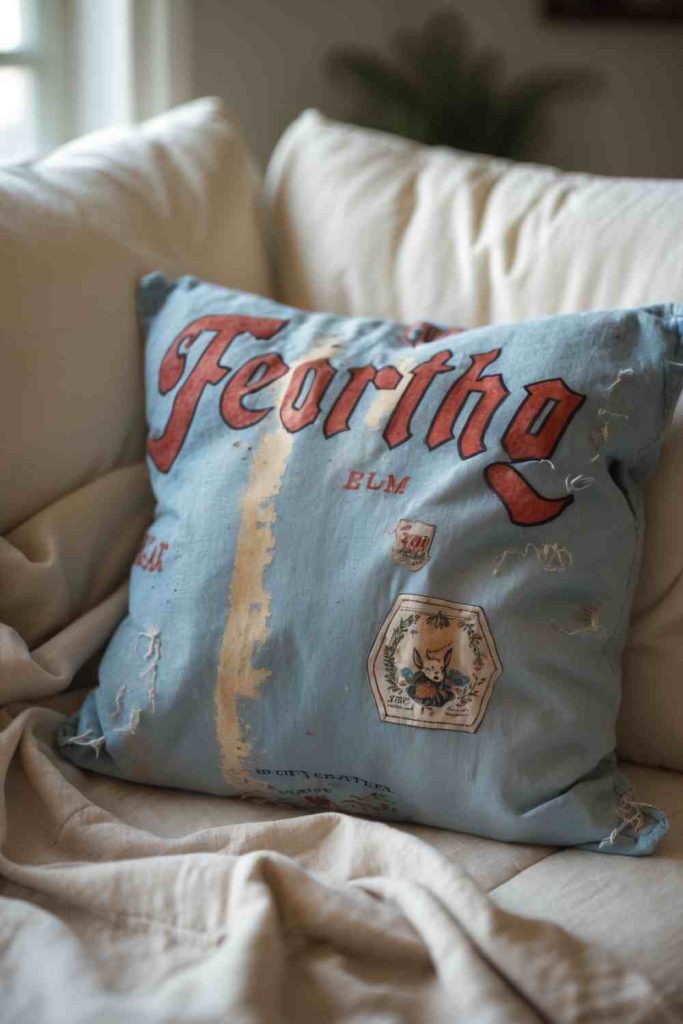
A T-shirt pillow keeps a favorite graphic visible even after the garment itself is too worn or the wrong size to wear. Concert shirts, sports tees, school graphics, travel shirts, and sentimental prints all work well because the meaningful part becomes the front of a useful home item. The project also lets you combine the soft jersey with an existing pillow insert rather than buying new filling.
The knit needs support so the pillow does not stretch out of shape. A woven backing or lightweight stabilizer can help, especially for large pillows. I would also avoid using severely degraded fabric for the front even if the graphic is meaningful; a fragile print panel can be stabilized or framed with stronger fabric first.
Materials and Tools
· T-shirt with a graphic or strong fabric area
· Pillow insert or clean reusable stuffing
· Fabric scissors
· Pins or clips
· Needle and thread or sewing machine
· Optional woven backing or stabilizer
· Optional zipper or envelope-style backing
Steps for This T-Shirt Upcycling Project
1. Center the section you want to save. Lay the T-shirt flat and position a paper template over the graphic or design. Leave enough fabric around it for seams. If the jersey is thin, stabilize the panel before cutting to reduce distortion.
2. Prepare the front and back. Cut a matching back from the T-shirt or use a sturdier woven fabric. Decide whether the cover will close with a zipper, envelope overlap, or stitched opening. A removable cover is easier to wash than a permanently stuffed pillow.
3. Sew the cover. Place the pieces with the right sides together and sew around the edges using a method suited to the fabric. Reinforce corners and closure points. Turn the cover right side out and check that the graphic remains centered.
4. Insert and finish. Add a reused pillow insert or clean stuffing without overfilling the stretchy jersey. Close the opening and shape the pillow evenly. Keep it away from rough surfaces that could abrade an old printed design.
This is one of those projects where the sentimental graphic should lead the dimensions. I’d size the pillow around the artwork rather than cutting through a memory just to hit a standard cushion measurement.
Variation: Use multiple small T-shirt graphics in a patchwork pillow front, create a bolster from a long print, or frame a fragile graphic as textile wall art instead of turning it into a pillow.
Upcycled T-Shirt Quilt: DIY Memory Keepsake
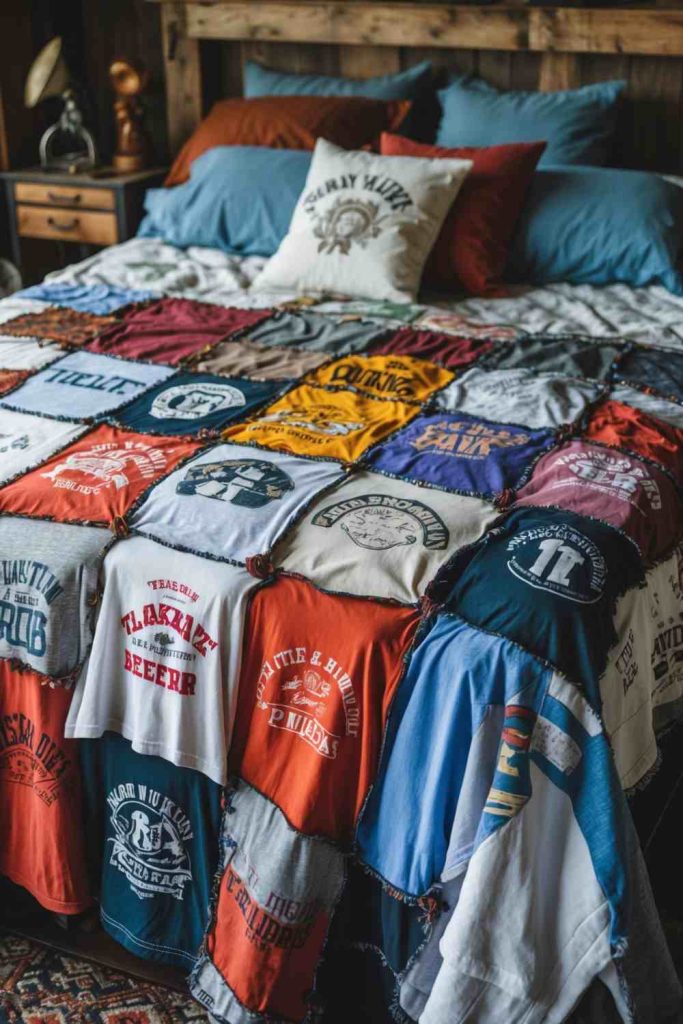
school years, sports, concerts, travel, family events, or children who have outgrown favorite tops. The quilt works because each graphic becomes a block, letting worn necklines and damaged sleeves disappear while the meaningful sections remain visible.
This project asks more from the fabric than a simple pillow because many stretchy panels must behave as one flat quilt top. Stabilizing the back of each T-shirt block can make assembly much easier and reduce waves around the seams. I would spend more time planning block size and layout than adding decorative stitching, because the structure is what keeps the finished quilt usable.
Materials and Tools
· Collection of clean T-shirts
· Fabric scissors and/or rotary cutter
· Quilting ruler and cutting mat if available
· Lightweight stabilizer suitable for knit fabric
· Sewing machine and thread
· Batting or a reusable blanket layer
· Backing fabric
· Binding fabric or prepared binding
Steps for This T-Shirt Upcycling Project
1. Select the memory sections. Wash the shirts and decide which graphics or fabric areas matter most. Cut generous rough blocks first rather than trimming to final size immediately. Stabilize the jersey according to the stabilizer instructions before precise cutting.
2. Standardize and arrange the blocks. Trim the stabilized pieces into compatible sizes or plan a deliberate mixed-size layout. Spread them out on the floor or a large table and photograph a few arrangements. Check color balance and make sure important graphics are not hidden in seam allowances.
3. Sew the quilt top. Join blocks into rows while keeping seams consistent and flat. Support the growing quilt so its weight does not stretch the jersey. Press carefully at a temperature suitable for the T-shirt prints and stabilizer.
4. Layer and finish the quilt. Combine the top with batting and backing, then quilt the layers using a method appropriate for your equipment and skill level. Add binding around the edge and inspect every seam. For a heavily sentimental collection, consider starting with a smaller lap quilt before committing all the shirts.
I know it can be hard to cut a shirt that carries a memory. Photographing each garment first helps, and I’d keep one or two favorites intact if cutting them still feels wrong.
Variation: Make a small wall quilt, table runner, cushion set, or framed textile panel from fewer shirts. You can also mix T-shirt blocks with strong woven fabric to reduce the amount of jersey in the finished piece.
Upcycled T-Shirt with Vintage Buttons – DIY Upcycling T-Shirt Ideas
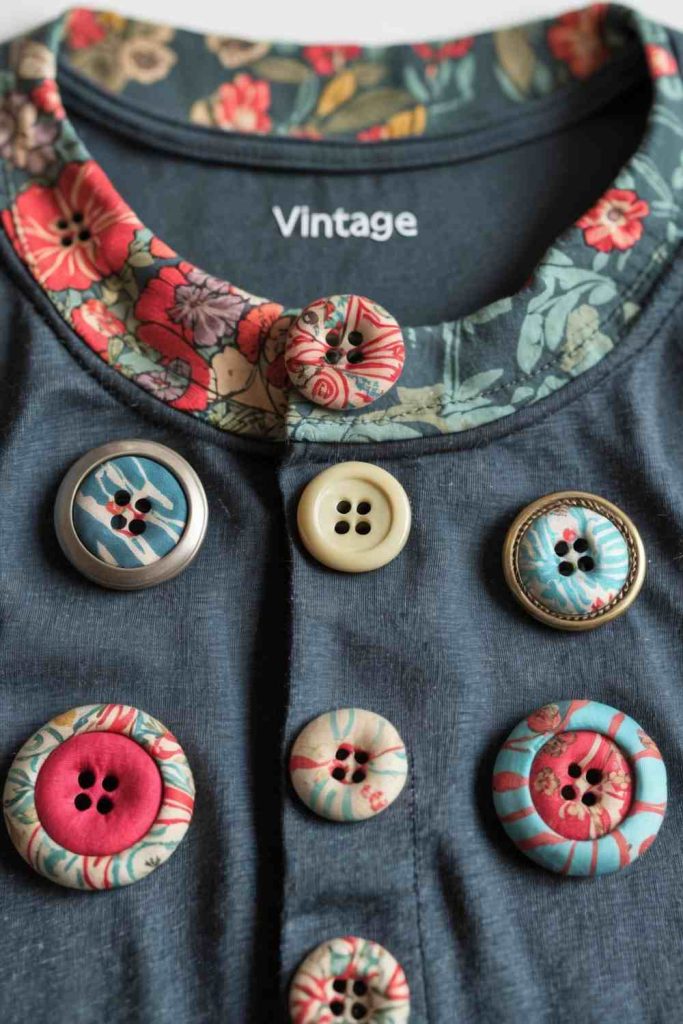
Vintage buttons can add texture to a plain T-shirt or create a decorative border around the neckline, pocket, shoulder, or graphic. They are especially useful when you already have a small mixed collection from old garments and do not want them sitting loose in a tin. Because the buttons differ in size and finish, the arrangement can feel collected and personal without requiring every piece to match.
Buttons add weight, so the strongest areas of the T-shirt should carry them. A dense cluster on thin jersey can sag or tear, and small buttons may present a hazard on garments worn around young children. I would keep the arrangement light, sew every button securely, and use stabilizer behind a heavier cluster if the knit needs support.
Materials and Tools
· T-shirt in good condition
· Assorted reused buttons
· Hand-sewing needle
· Strong thread suitable for the fabric
· Scissors
· Pins or washable marker for planning
· Optional small stabilizer patches behind heavier areas
Steps for This T-Shirt Upcycling Project
1. Sort and inspect the buttons. Check reused buttons for sharp edges, cracks, rust, or rough shanks that could damage the fabric. Wash or clean them appropriately if needed. Group the usable pieces by size so the heaviest buttons are not concentrated in one weak area.
2. Plan the arrangement. Lay the T-shirt flat and position the buttons before threading the needle. Keep them away from underarms and other areas where they may rub or catch. Try the shirt on carefully with the layout temporarily marked if you are decorating the neckline.
3. Sew each button securely. Support the jersey from behind and stitch through a stable area without pulling the fabric into a pucker. Tie off threads securely and check the inside frequently. Add a small backing patch where a larger button would otherwise pull directly on the knit.
4. Inspect before wearing and washing. Trim loose thread, tug each button gently, and make sure no sharp edges touch the skin. Recheck the attachments after washing. If the garment will be around babies or young children, avoid loose small embellishments altogether.
I’d stop before the whole neckline becomes a button collection. A little empty fabric between groups helps each reused button feel intentional and keeps the shirt lighter.
Variation: Use buttons to create one small motif, decorate a removable pocket panel, or stitch them onto a bag or cushion instead. Flat fabric circles can give a similar dotted effect without hard embellishments.
T-Shirt Upcycling Choices That Can Cause Stretching, Weak Seams, or Uneven Finishes
Cutting Jersey While It Is Stretched
A T-shirt can look perfectly flat while you are pulling it wider with your hands, then snap back into a shorter or narrower shape as soon as you let go. Cutting in that stretched state creates uneven hems, mismatched panels, and ties that curl differently. Smooth the garment naturally, align the seams, and let the knit relax before marking or cutting.
Treating Every T-Shirt Fabric the Same
A thick cotton tee, a lightweight jersey, and a very stretchy blended shirt will not behave the same under a needle, iron, glue, or paint. Test stretch and heat response on a hidden scrap. When two shirts are being joined, choose fabrics with reasonably compatible weight and recovery so one side does not drag the other out of shape.
Using Heavy Decorations on Thin Knit
Large denim panels, dense button clusters, beads, or thick paint can make soft jersey sag. Support a heavy area with appropriate stabilizer or choose a smaller design. The finished shirt should still hang from the shoulders rather than from the embellishment.
Skipping a Barrier During Paint or Stamp Work
Paint and textile ink can soak through the front of a T-shirt and mark the back layer. Insert cardboard or another suitable barrier before applying wet media. Keep the barrier smooth and remove it carefully so dried paint does not bond the shirt to it.
Using Glue as the Only Structural Seam
Fabric adhesive can be useful for some decorative work, but it is not automatically a substitute for a sewn seam on a pouch, quilt, garment reconstruction, or any area under repeated tension. Use attachment methods suited to the job. If a seam carries weight or movement, stitching is usually the safer foundation.
Over-Tightening Embroidery or Hand Stitching
Pulling thread too firmly draws jersey into puckers that may not relax after washing. Keep tension even and support the area while stitching. If the knit is very soft, use removable stabilizer so the stitches sit on a controlled surface.
Ignoring Chemical Safety with Bleach
Bleach should never be mixed with other household cleaners, and it should not be used casually in an enclosed room. Protect skin and eyes, ventilate the workspace, and keep the process controlled. If the treated fibers become weak or brittle, the shirt should not be trusted as a normal wearable garment.
Heat-Setting Without Checking the Medium and Fabric
Paints, inks, adhesives, and synthetic blends can all have different heat limitations. Follow the instructions for the specific textile medium and garment rather than using a guessed iron setting or timing. A test scrap can prevent scorching, melting, or damaging a printed graphic.
Forgetting Comfort on the Inside of the Shirt
A design can look neat outside while scratchy knots, bulky seams, zipper tape, button backs, or stabilizer rub against the skin. Turn the garment inside out before calling it finished. Trim, cover, or reposition anything that feels rough in a high-contact area.
Trying to Save Fabric That Has Lost Its Strength
Upcycling is most useful when the remaining material can handle its new purpose. Very thin, brittle, or perished jersey may still work for stuffing, practice swatches, or low-stress decorative layers, but it should not become a load-bearing pouch seam or a heavily embellished wearable area.
Frequently Asked Questions
Do I need a sewing machine for these T-shirt upcycling ideas?
No. Several ideas can be completed with hand stitching, careful cutting, fabric paint, stamping, or simple embroidery. A sewing machine becomes especially helpful for pouches, reconstructed two-tone shirts, quilts, and long seams where consistent stitching saves time and adds strength.
How do I stop T-shirt fabric from curling after I cut it?
Some jersey naturally rolls toward the cut edge, particularly when stretched. Cut while the fabric is relaxed, handle the edge gently, and decide whether the curl can become part of the design. If you need a stable edge, use a stretch-friendly hem, binding, or another finishing method suited to knit fabric.
What is the best way to keep jersey from stretching while I sew?
Support the fabric so it does not hang from the machine, avoid pulling it behind the presser foot, and use a needle and stitch suited to knits. Stabilizer can help around embroidery, patches, zippers, or mixed-fabric seams. Testing on a scrap from the same shirt is one of the easiest ways to catch problems early.
Can I use ordinary craft paint on a T-shirt?
A medium designed for textiles is the safer choice when you want the design to remain wearable and washable. General craft paint may become stiff, crack, or wash poorly depending on its formulation. Follow the instructions for the textile paint or ink you choose and test it on scrap fabric first.
Is bleach art safe for beginners?
It can be done carefully, but it requires more safety planning than cutting or sewing. Use good ventilation, protect skin and eyes, keep bleach away from children and pets, and never mix it with other cleaners. If you would rather avoid chemical treatment, opaque fabric paint can create a high-contrast design without removing dye.
Can I upcycle a T-shirt that has holes?
Yes, if enough strong fabric remains for the intended project. Small holes can be incorporated into embroidery, patchwork, or a redesign, while badly weakened areas should be cut away. For pouches, quilts, or seams under stress, use only fabric that still feels structurally sound.
How should I wash an upcycled T-shirt?
Care depends on the weakest or most sensitive addition, not just the original shirt. Check the instructions for fabric paint, textile ink, adhesive, stabilizer, zippers, or donor fabrics, and wash gently when in doubt. Inspect buttons, patches, embroidery, and reconstructed seams after washing so small problems can be repaired early.
Give Worn T-Shirts a Job Beyond the Drawer
The most useful T-shirt upcycling ideas begin with the part of the garment that is still worth keeping. Sometimes that is the whole shirt and all it needs is embroidery, a bandana panel, paint, or buttons. Other times the neckline has failed but the graphic can become a pillow, the body can become a pouch, or several meaningful shirts can be stabilized and joined into a quilt.
I’d start with one manageable change and let the fabric decide how ambitious the project should be. Reuse the strongest sections first, save the scraps, and choose the idea that makes you want to pull one forgotten T-shirt out of the drawer today.