Old furniture often gets written off for reasons that have very little to do with whether the material is still useful. A table may be the wrong height, a drawer unit may have lost its cabinet, or a surfboard may no longer belong in the water, yet each piece can still contain strong wood, useful hardware, or an interesting shape worth working with. I don’t think a makeover should begin with decoration, though. The first question is whether the object is sound enough for its new job.
Furniture upcycling is one of the areas where I’m happiest to slow down and inspect before changing anything. A reclaimed object can become storage, seating, wall decor, or a table, but it needs a structure that matches the load and the way people will use it. That matters more than a fashionable paint colour or a clever photograph.
I know it can feel tempting to start sanding, cutting, and attaching parts as soon as an idea clicks. I’d rather spend a few minutes checking joints, coatings, sharp edges, mounting points, and the intended location first. Then the creative work has a safer foundation, and the finished piece has a better chance of staying useful instead of becoming another project that needs rescuing later.
Check Structure, Stability, and Intended Load Before Decorating
Upcycled furniture succeeds when the original object can safely handle its new purpose. A wall rack, bench, swing, shelf, and coffee table all place very different demands on old materials, so inspect the structure before paint or upholstery hides important clues.
· Tighten loose screws, brackets, joints, and fasteners before deciding that decoration will make the piece feel finished.
· Check wood for deep splits, rot, soft areas, insect damage, and previous repairs that may no longer be reliable.
· Test tables, benches, shelves, and hanging pieces with light pressure first rather than assuming an old frame can take a new load.
· Do not use decorative glue alone for a structural joint that will carry body weight, heavy storage, or repeated pulling.
· Replace missing structural parts with suitable material rather than trying to disguise the gap with trim or fabric.
· If a project will become seating or a swing, treat the load path from the seat to the floor or overhead support as the main design problem.
Identify Old Finishes, Metal Edges, and Hidden Hazards
Older furniture and reclaimed objects can carry paint, grease, rust, fibres, adhesives, or sharp metal that deserve attention before sanding or cutting. The safest approach is to disturb unknown finishes as little as possible until you know what you are working with, especially on vintage pieces.
· Avoid aggressive dry sanding on unknown old paint or coatings; use a safer preparation method appropriate to the material and local guidance.
· Wear eye protection when drilling or cutting, and use suitable respiratory protection when creating wood, metal, or composite dust.
· Degrease bicycle chains, wheels, license plates, and other oily metal parts before attaching them to indoor furniture or decor.
· Fold, file, cover, or otherwise isolate sharp metal edges so they cannot catch skin, clothing, or cleaning cloths.
· Treat reclaimed children’s furniture cautiously; do not return an old crib to sleep use simply because it looks attractive after refinishing.
· Keep solvents, spray finishes, and strong adhesives in a ventilated work area and follow the product instructions for the material involved.
Plan Fasteners, Placement, and Weather Exposure Before Cutting
A good upcycled furniture idea should make sense in the room or outdoor area where it will live. Wall mounting, moisture, sunlight, floor contact, and repeated handling can all change which fasteners and finishes are appropriate, so decide those details before you make irreversible cuts.
· Match wall anchors and screws to the wall type and the total loaded weight, not just the empty project.
· Pre-drill where splitting is likely, especially near the ends of old timber or thin reclaimed boards.
· Use exterior-suitable hardware and finishes for pieces that will remain outside, and accept that weather exposure still requires maintenance.
· Keep drainage paths open around plant holders and avoid trapping wet pots directly against absorbent wood or fabric.
· Position coat hooks, shelves, table legs, and handles so normal use does not create leverage that loosens the original structure.
· Dry-fit major pieces before drilling permanent holes; a few minutes of checking can prevent a crooked shelf, unstable table, or misplaced bracket.
DIY Wooden Paddle Coat Rack
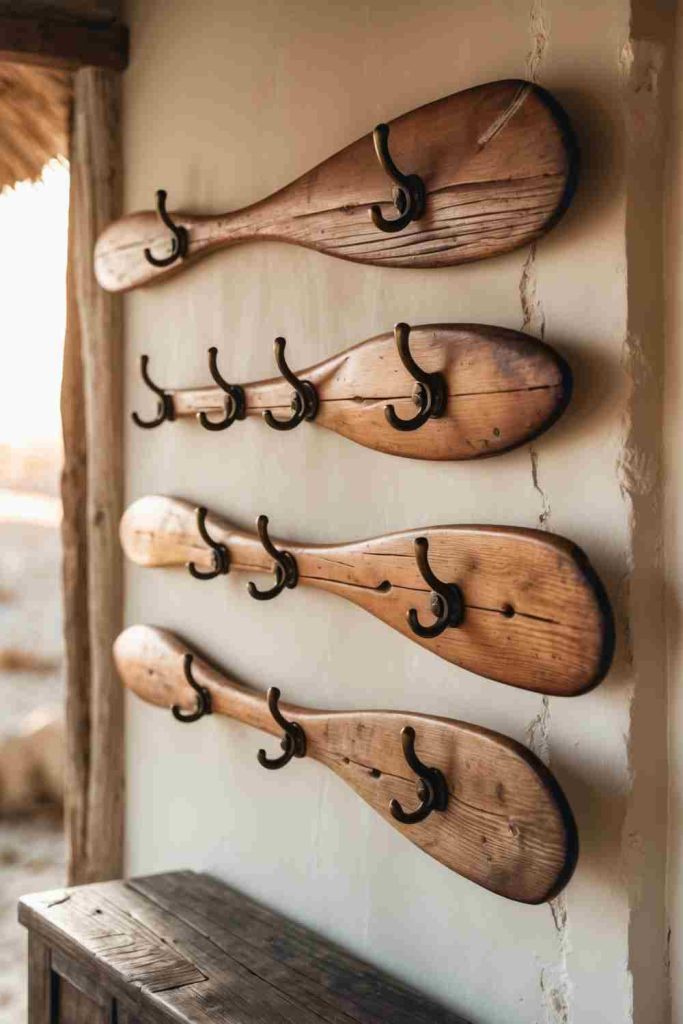
Old wooden paddles already have the long, narrow proportions of a wall-mounted rail, which makes them useful for a coat rack without forcing the material into an unfamiliar shape. The handle and blade also give the finished rack a clear visual rhythm, especially when two or more paddles are mounted parallel or slightly staggered.
The important part is the mounting, not the hooks. A paddle may look substantial while still being thin at the blade, so I would place hooks where the wood can take screws without splitting and make sure the wall fixings support the full weight of coats and bags rather than relying on the paddle alone.
Materials and Tools
· Old wooden paddle or paddles in sound condition
· Wall hooks with suitable screws
· Wall anchors or screws matched to the wall
· Drill and small pilot bit
· Screwdriver
· Level and tape measure
· Sandpaper or a safer surface-preparation method
· Optional compatible finish or paint
Steps for This Upcycled Furniture Project
1. Inspect and clean the paddle. Remove dirt and loose surface material, then check the full length for splits, soft wood, previous holes, and weak laminations. If the old finish is unknown, avoid aggressive sanding until you have chosen a safe preparation method.
2. Plan the hook positions. Lay the paddle flat and mark hooks where there is enough wood around each screw hole. Keep the hooks far enough apart for real coats or bags, then drill small pilot holes so the old wood is less likely to crack.
3. Attach the hooks and prepare the wall fixings. Fasten each hook firmly without over-tightening into thin timber. Mark the wall mounting points with a level, choosing anchors or screws that suit both the wall type and the expected loaded weight.
4. Mount and load gradually. Secure the paddle to the wall at more than one strong point so it cannot rotate. Test it first with light items, then add heavier coats one at a time while watching for flexing, loose hooks, or movement at the wall.
I’d keep the decorative finish fairly simple here. Once coats are hanging on it, the paddle shape and the row of hooks already create plenty of visual interest.
Variation: Use a pair of shorter paddle sections as separate racks for keys and light accessories, but do not cut a sound vintage paddle unless you are comfortable making that change permanent.
Upcycled Surfboard Storage Rack
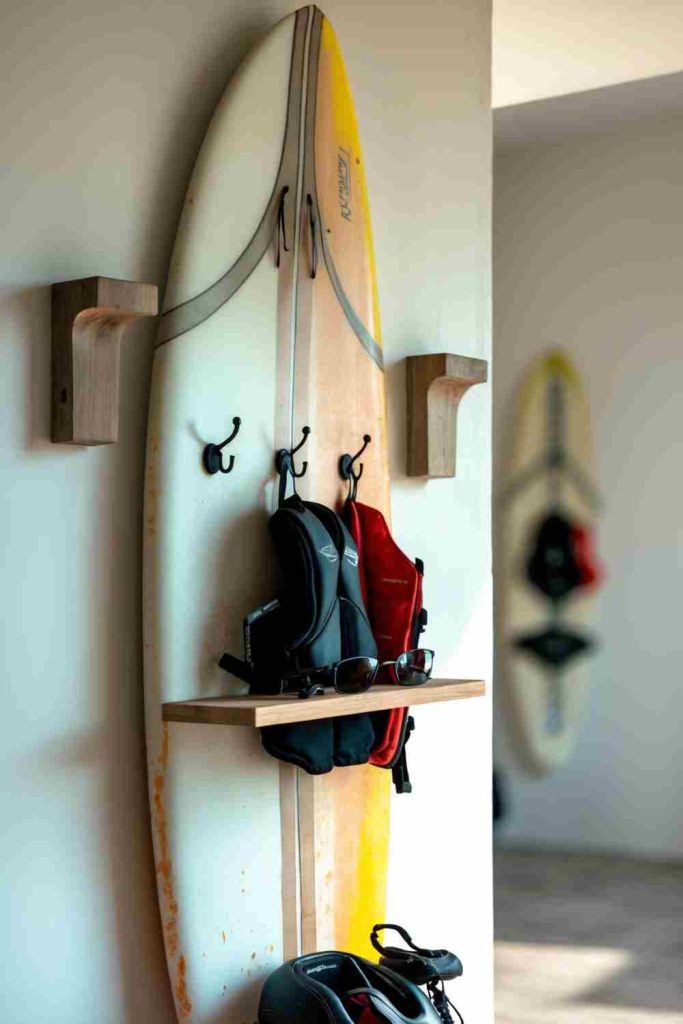
A retired surfboard can become a tall storage rack because its narrow outline uses wall height without taking much floor space. Hooks can hold hats, towels, light bags, or cords, while a small shelf can make use of the wider section if the board is strong enough to accept hardware.
Surfboards vary widely in construction, and that uncertainty matters. I would avoid assuming the board can hold heavy screw-mounted storage just because it feels rigid. The safer design lets a separate wall bracket or backing board carry most of the load while the surfboard acts as the visible face.
Materials and Tools
· Retired surfboard in stable condition
· Backing board or mounting brackets if needed
· Light-duty hooks
· Small shelf components if appropriate
· Drill and suitable bits
· Screws and wall anchors matched to the wall
· Level and tape measure
· Protective equipment for drilling composite materials
Steps for This Upcycled Furniture Project
1. Check the surfboard construction and condition. Clean the board and inspect for delamination, deep cracks, soft areas, or water damage. Decide which parts can safely accept fasteners and whether a separate backing board should carry the hardware instead.
2. Lay out the storage before drilling. Place hooks and any small shelf where they are easy to reach and where the board has enough support. Keep heavier items low and avoid concentrating several loads on one narrow section.
3. Attach hardware with the board supported. Drill only with a bit and method appropriate to the material, controlling dust and protecting the surface from cracking. If you are unsure about the board’s internal structure, attach the hardware to a backing board and fix the surfboard decoratively in front.
4. Mount the assembly securely. Use wall fixings suited to the wall and total load, check the rack with a level, and tighten everything before use. Load it with light items first and stop if the board flexes, hardware shifts, or the wall fixing moves.
The part I would resist is turning every empty patch into storage. Leaving some of the surfboard visible is what keeps the rack recognisable rather than making it feel crowded.
Variation: For a rental-friendly display, lean a securely based surfboard against a wall and use removable baskets or straps for very light items instead of drilling into the board or wall.
DIY Wooden Table to Cozy Bench
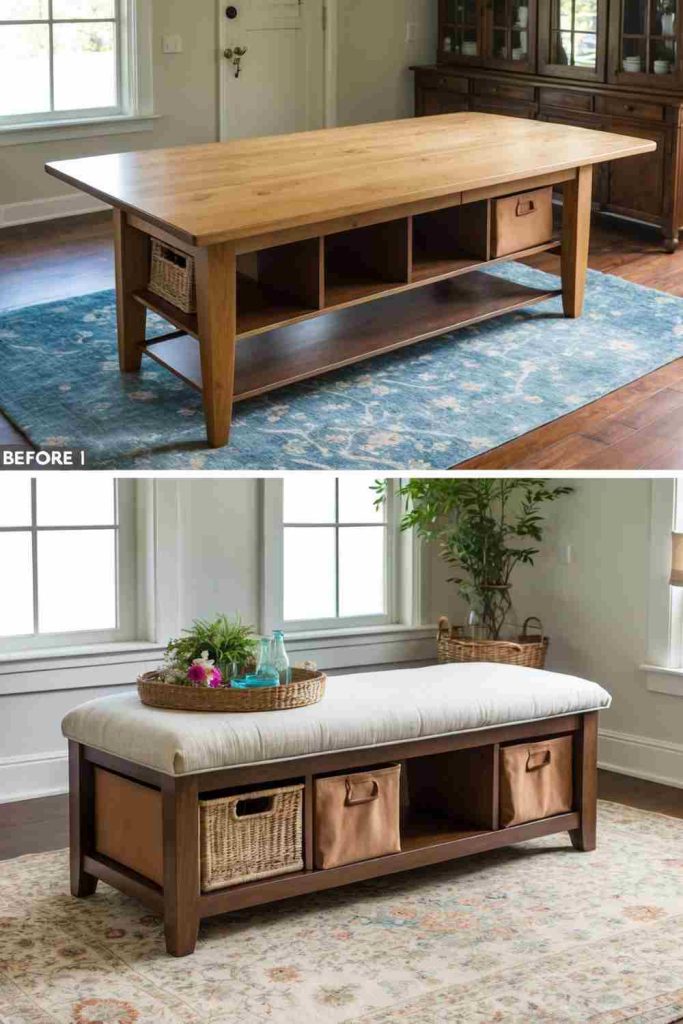
A low wooden table can sometimes become a bench when the frame already has the right width, strong legs, and useful storage below. Adding a cushion changes the way the top is used, while baskets or open compartments can keep shoes, throws, or light household items underneath.
This is one of the projects where a visual makeover should come second to structural testing. A table designed to hold objects is not automatically safe for people to sit on. I would inspect the joinery, reinforce the frame where needed, and only proceed if the top and legs can reliably handle seating loads without racking.
Materials and Tools
· Low wooden table with a sound frame
· Wood screws and structural brackets if reinforcement is needed
· Drill and screwdriver
· Firm seat board if the existing top is unsuitable
· Foam cushion
· Durable upholstery fabric
· Staple gun and staples for the removable cushion base
· Optional storage baskets
Steps for This Upcycled Furniture Project
1. Assess the table as a potential seat. Check the legs, aprons, top, and internal joints for movement, cracks, or weak fasteners. Push gently from different directions to see whether the frame racks, then reinforce it properly before any upholstery work begins.
2. Prepare the seating surface. If the original top is thin or decorative, add a suitable structural seat board supported by the frame rather than asking the old top to carry body weight. Round or smooth exposed edges and make sure fasteners cannot protrude into storage areas.
3. Make a separate cushion. Cut foam to the finished seat shape and wrap it with durable fabric over a removable board or cushion base. Staple the fabric underneath with even tension, folding corners neatly and keeping staples away from places where hands may reach.
4. Secure, test, and finish the bench. Attach the cushion so it cannot slide, then test the bench gradually on a level floor before normal use. Add baskets only after checking that they do not block structural braces or create sharp contact points below the seat.
I’d rather keep a sturdy bench visually simple than use a weak table just because the proportions look right. Seating is one place where the hidden structure matters more than the photograph.
Variation: If the table is attractive but not strong enough for seating, use the same cushion idea to turn it into a padded luggage stand or low display table instead.
DIY Wooden Barrel Coffee Table
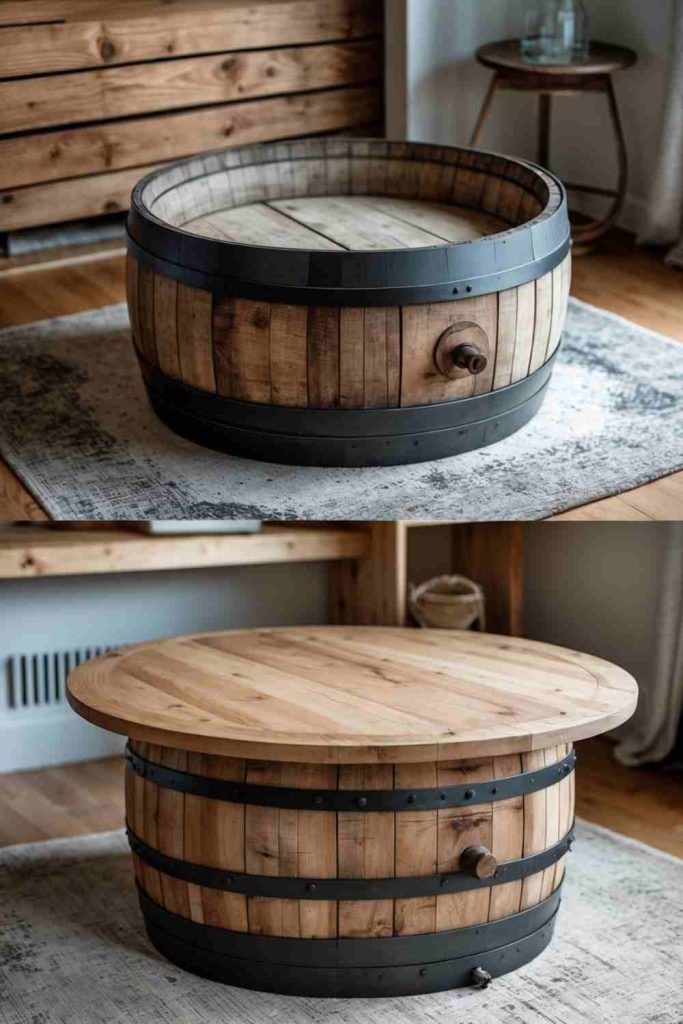
A wooden barrel already has the rounded base and visual weight of a coffee table, so adding a stable top can give it a useful new role without disguising its original character. The centre can sometimes provide enclosed storage, but only if opening the barrel does not weaken the hoops or staves.
Barrels can loosen as wood dries, and old metal hoops may have sharp rusted edges. I would check whether the body is still tight and whether the top sits level before spending time on a decorative finish. A coffee table needs to resist tipping when someone leans on one edge.
Materials and Tools
· Wooden barrel in sound condition
· Round or shaped wooden tabletop
· Non-slip pads, cleats, or suitable fasteners
· Drill and screwdriver if mechanical fixing is appropriate
· Level or straightedge
· Sandpaper or safe preparation materials
· Optional compatible wood finish
· Protective gloves for rough metal hoops
Steps for This Upcycled Furniture Project
1. Stabilise the barrel first. Clean it, inspect the staves and hoops, and make sure nothing is loose enough to shift under pressure. Smooth or cover sharp metal edges, then place the barrel on a flat floor and check that it does not rock.
2. Prepare the tabletop. Cut or select a top that gives useful surface area without creating so much overhang that the table becomes easy to tip. Smooth the edges, finish both faces as appropriate, and mark the centre so the top can be aligned accurately.
3. Choose a secure attachment method. Use cleats, brackets, or other suitable mechanical fixing if the construction allows it, rather than depending on a small bead of adhesive. Keep fixings away from fragile stave ends and make sure screws do not protrude into any usable storage space.
4. Check balance before styling. Place the completed table on its intended floor and press gently near several edges. If the top shifts or the base tips, correct the structure before adding decor, and use floor protectors if the hoops or base could mark the surface.
For me, the barrel shape is already the decoration. I’d spend more effort getting the top level and stable than trying to make the wood look newly manufactured.
Variation: Use a removable tray-style top held by underside cleats if you want access to the barrel without drilling permanent fasteners through the visible surface.
DIY Bicycle Wheel Clock
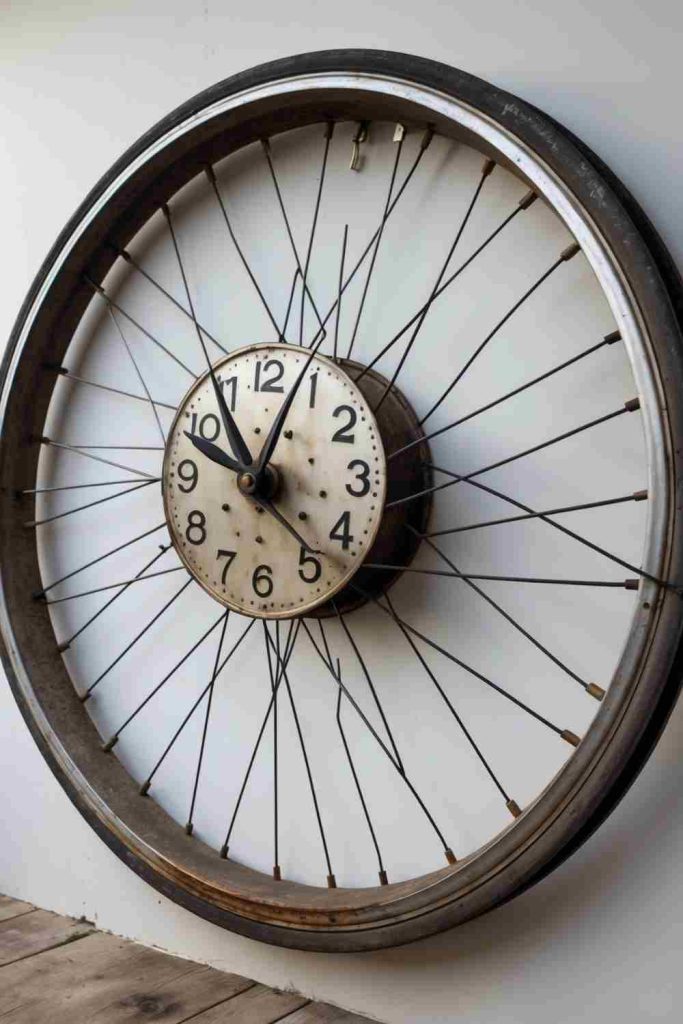
A bicycle wheel makes a strong visual clock face because the hub, rim, and spokes already create a centred radial pattern. Reusing the wheel also means the clock can stay visually light even at a large diameter, especially when hour markers are kept small.
The clock mechanism needs its own support. I would not ask thin spokes to carry a heavy movement or thick decorative numbers. The hub area should accept the movement securely, and every cut wire, spoke end, or sharp metal edge needs to be dealt with before the clock goes on a wall.
Materials and Tools
· Clean bicycle wheel with sound spokes
· Clock movement and hands sized for the wheel
· Mounting plate or hub adapter if needed
· Small hour markers if desired
· Degreaser and cloths
· Pliers and basic hand tools
· Wall hook or bracket rated for the finished weight
· Optional protective metal finish
Steps for This Upcycled Furniture Project
1. Clean and inspect the wheel. Remove grease from the rim and spokes, then check for loose spokes, sharp edges, and protruding wire. The wheel does not need to be roadworthy, but it should be structurally intact enough to hang without parts dropping away.
2. Fit the clock movement at the centre. Use the existing hub opening or a purpose-made support plate rather than forcing the mechanism between spokes. Make sure the shaft projects far enough for the hands to clear the hub and that the movement sits square to the wheel.
3. Add hands and restrained markers. Fit the hands according to the movement instructions and rotate them manually to confirm they do not catch. Add lightweight hour indicators only if they help readability, securing them so they cannot work loose above people or furniture.
4. Mount and test the clock. Hang the wheel from a strong wall fixing that suits the wall material and finished weight. Step back to check that it hangs level, then run the clock for a while before final positioning to confirm the hands clear the spokes throughout a full rotation.
I like this most when the wheel still looks like a wheel. Large numbers can be useful, but covering every spoke usually removes the part that made the object worth reusing.
Variation: Keep the rim bare and use small painted blocks or reused washers as hour markers for a more industrial version.
DIY Crib-to-Stylish Bench
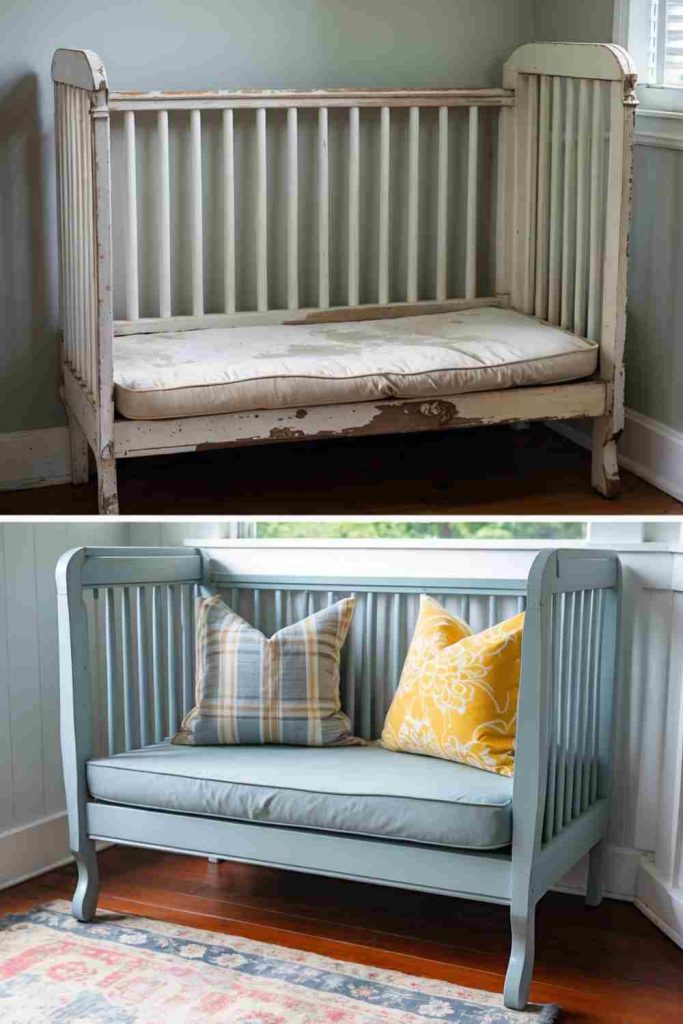
An old crib can provide slatted panels, rails, and a rectangular frame that lend themselves to a bench, particularly when one side panel becomes the backrest. The transformation works best when the piece is treated as reclaimed timber furniture rather than as a crib that has simply had one side removed.
Safety deserves extra care here. Older cribs may not meet current sleep-product standards, and old coatings or hardware can be unsuitable for children. I would never present this conversion as a way to return a questionable crib to infant use; the new bench needs its own structural design, secure seat, and safe finish.
Materials and Tools
· Old crib parts suitable for reuse, not sleep use
· Strong seat board or plywood
· Wood screws and structural brackets
· Drill and screwdriver
· Wood glue as a secondary join only
· Safe surface-preparation materials
· Optional paint or finish suitable for furniture
· Seat cushion if desired
Steps for This Upcycled Furniture Project
1. Disassemble and evaluate the crib parts. Remove hardware that will not be reused and inspect rails, slats, posts, and joints for damage. Set aside any split, chewed, weakened, or questionable components instead of building them into the bench.
2. Design a new bench frame. Decide which panel will form the back and where the seat will be supported. Add proper rails, blocking, or brackets so the seat load travels into strong posts and legs rather than depending on decorative slats.
3. Fit the seat and secure the frame. Cut a seat board to rest on structural supports, then screw it in place with no protruding fasteners. Tighten the whole frame, check for pinch points, and smooth edges before applying a compatible finish.
4. Test the bench as furniture. Put it on a level surface and test gradually for rocking, flexing, or joint movement. Add a removable cushion only after the frame is sound, and keep the finished piece clearly separate from any child sleep function.
The slatted back is the feature I’d preserve. It carries the history of the crib without asking the old frame to keep doing a job it was never designed to do in this new form.
Variation: If the crib frame is too weak for seating, reuse one sound side panel as a wall-mounted display rack or lightweight blanket rail instead.
DIY Tire Ottoman
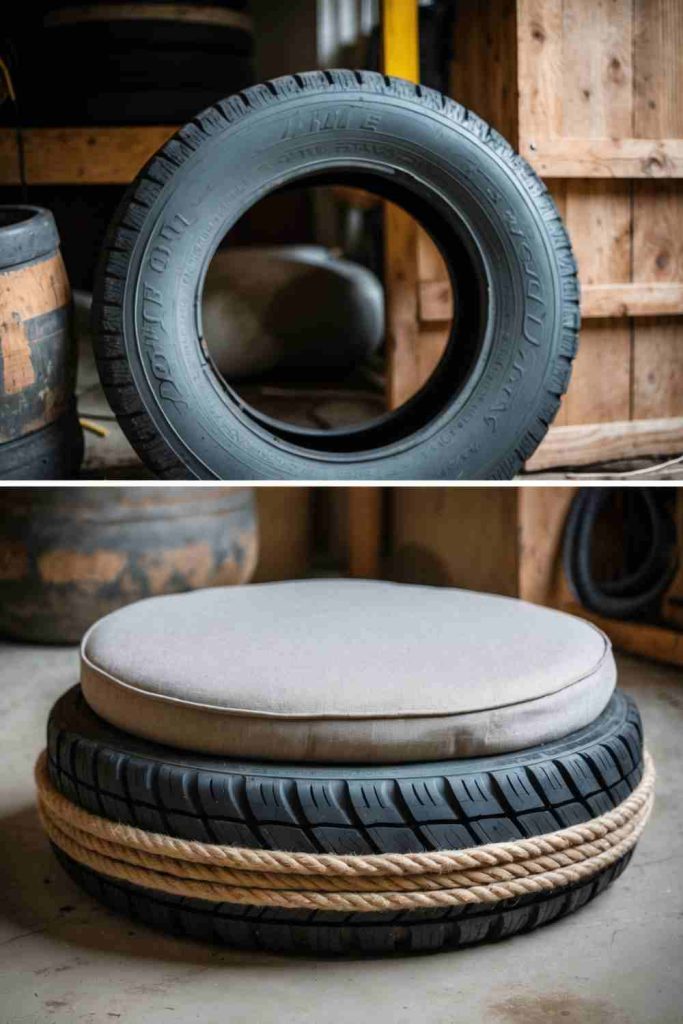
A clean discarded tire can form the core of a low ottoman because its round shape creates a ready-made base for rope wrapping and a cushioned top. The most successful versions hide the tire visually while still leaving the finished piece easy to move and inspect.
A tire is not a finished indoor furniture material by itself. I would clean and isolate it carefully, avoid using a damaged or contaminated tire, and make sure any cushion or top is mechanically supported rather than simply balanced on the opening. Keep the finished piece away from heat sources.
Materials and Tools
· Clean, dry tire in sound condition
· Round plywood discs for top and optional bottom
· Screws or bolts suited to the assembly
· Strong rope or cord
· Adhesive compatible with rope and the chosen substrate
· Foam cushion or padded top
· Fabric for upholstery if desired
· Non-slip feet or floor protectors
Steps for This Upcycled Furniture Project
1. Clean and assess the tire. Scrub away road residue and let the tire dry completely, then reject any piece with exposed wire, severe damage, strong contamination, or an odour you cannot comfortably manage indoors. Keep it away from flame and high heat throughout the project.
2. Create a supported top. Cut a round wood panel that covers the central opening and can be attached securely to the tire or to a simple internal frame. Add foam and fabric to this board if you want a cushioned seat, keeping staples and fasteners on the protected underside.
3. Wrap the visible body. Attach rope in controlled sections, keeping the coils tight enough to cover the tire without huge glue ridges. Work on a protected surface, follow adhesive ventilation instructions, and keep the rope clear of any moving or structural fasteners.
4. Finish the base and test it. Add a bottom panel or floor protectors if needed so the tire does not mark the floor. Test the ottoman for sliding, top movement, and tipping before use, and treat it as light casual seating only if the whole assembly is genuinely stable.
I’d rather see a little of the construction underneath than seal the tire so completely that it can never be inspected or cleaned. Upcycling should still leave room for maintenance.
Variation: For a lighter-use version, turn the wrapped tire into a low side table with a fixed wooden top instead of upholstered seating.
DIY Wooden Garden Chair Swing
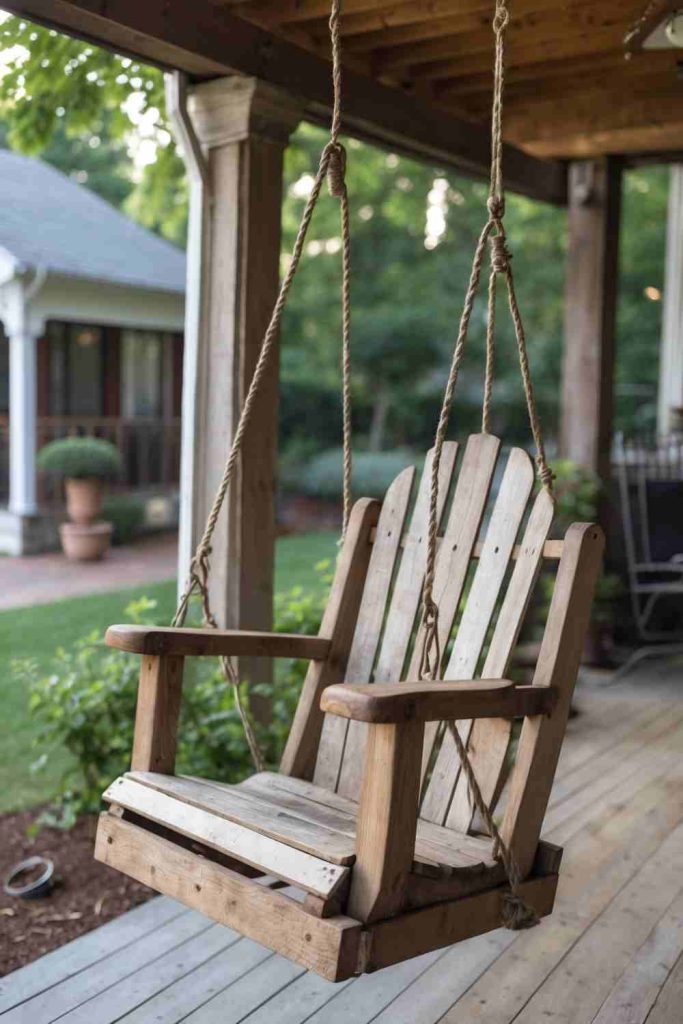
A wooden garden chair can become a swing when the seat and back are sound enough to be suspended and the hanging system is designed around real loads. Visually, it keeps the familiar comfort of a chair while removing the legs and giving the piece a more playful outdoor purpose.
This is the highest-risk project in the group because failure can cause a fall. I would not rely on old chair joints, decorative armrests, or unknown tree branches without proper assessment. The suspension points, rope, connectors, overhead structure, and chair frame all need to be appropriate for dynamic loading.
Materials and Tools
· Sound wooden chair suitable for structural reuse
· Weather-resistant rope or rated swing line
· Rated connectors, eye bolts, or hanging hardware
· Structural reinforcement timber or brackets as needed
· Drill and appropriate bits
· Wrenches and screwdrivers
· Exterior-suitable finish
· Professional assessment of the overhead support when needed
Steps for This Upcycled Furniture Project
1. Decide whether the chair is suitable at all. Remove weak parts and inspect every structural joint, especially where the seat meets the sides and back. Reinforce the frame with proper timber or brackets so the hanging load is carried by strong members rather than decorative rails.
2. Design balanced suspension points. Choose attachment locations that keep the seat level and spread the load across the frame. Drill and fit rated hardware according to its requirements, avoiding thin edges that could split under repeated movement.
3. Prepare a trustworthy overhead support. Use a structural beam, purpose-built swing frame, or other support that is known to handle the expected dynamic load. Do not guess about a branch, ceiling member, or decorative porch component; get qualified help if its capacity is uncertain.
4. Hang low and test cautiously. Install the swing close to the ground first, check rope lengths and all connectors, and apply load gradually before anyone sits on it. Reinspect fasteners, knots, wood, and overhead connections regularly because outdoor movement and weather can loosen a system that began securely.
I know the chair is the visible part, but the overhead connection is the part I would care about most. A pretty swing with an uncertain support is not a finished project.
Variation: If you love the suspended look but cannot verify a safe overhead support, mount the chair securely on a low fixed base and style it as a garden reading seat instead.
DIY Bicycle Chain Photo Frame
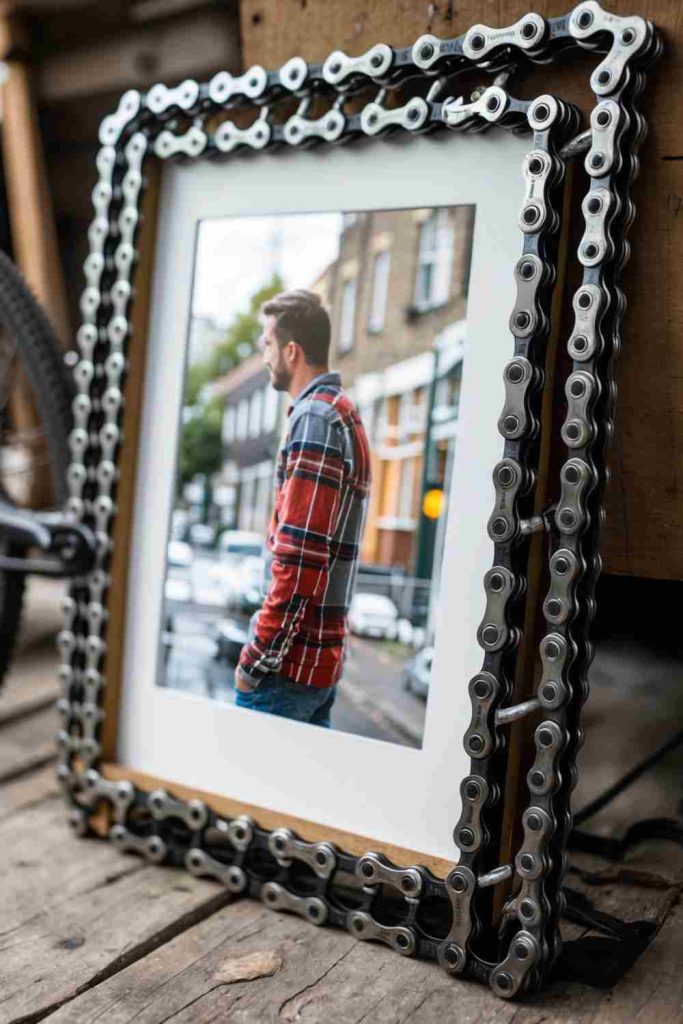
A cleaned bicycle chain can turn a plain frame into a textured border, with the repeated links creating a strong mechanical pattern around a photograph. It works especially well when the frame underneath is simple enough to support the chain without competing with it.
The preparation is less glamorous than the finished piece because old chains hold grease inside every link. I would degrease thoroughly and remove or cover any sharp cut ends before the chain comes near paper, walls, or hands. The frame should carry the chain; the chain should not become the only thing holding the frame together.
Materials and Tools
· Old bicycle chain
· Plain photo frame with a strong border
· Degreaser suitable for metal
· Brushes and cloths
· Chain tool or appropriate cutting tool
· Small mechanical clips, wire, or compatible adhesive
· Pliers
· Protective backing pads for the frame
Steps for This Upcycled Furniture Project
1. Clean the chain completely. Degrease it more than once if necessary, moving the links so trapped oil can escape. Dry it thoroughly and inspect every section for sharp damage, heavy rust, or links that will not lie flat enough for the design.
2. Plan the border on the frame. Arrange the chain around the outside without attaching it, deciding where the ends will meet and how corners will be handled. Keep the chain clear of the glass opening so the photograph remains easy to replace.
3. Cut and secure the chain safely. Use an appropriate chain tool or protected cutting method, then deal with the exposed end so it cannot scratch. Attach the chain to the sturdy frame border with small clips, wire, or a compatible adhesive in controlled amounts.
4. Check the finished frame before display. Make sure no oily residue reaches the glass or photograph and that the added weight has not made the stand or wall hook unstable. Add felt or pads where metal might touch a wall or shelf.
For me, one continuous chain border is stronger visually than lots of extra cycling parts. The links already give the frame plenty of texture.
Variation: Use only short chain sections at the corners of a wooden frame if you have a small leftover length rather than enough for a full border.
DIY Guitar Shelf
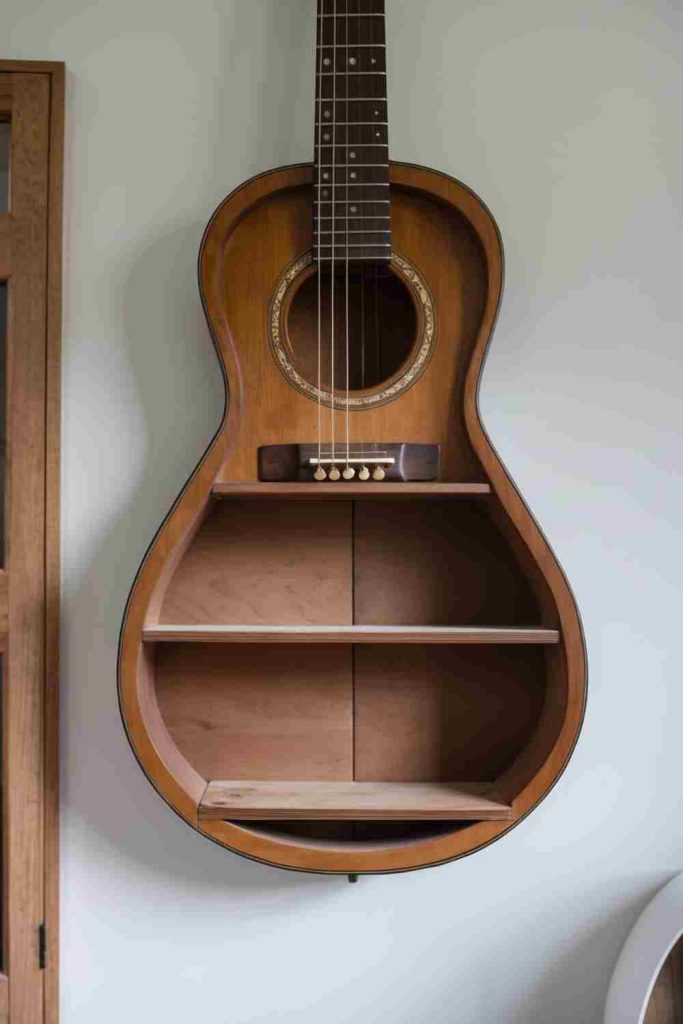
A damaged guitar body can become a shallow display shelf because the curved shell already forms an enclosed wall-mounted shape. Once the front is opened carefully, thin shelves can sit across the body and hold small objects without losing the recognisable outline of the instrument.
Cutting a guitar changes it permanently and can release dust from wood, finishes, adhesives, or composite parts. I would reserve this for an instrument that is genuinely beyond practical repair or has no meaningful musical use, then support the body during cutting so the thin sides are not cracked by the tool.
Materials and Tools
· Non-repairable guitar suitable for reuse
· Jigsaw or fine cutting tool appropriate to the material
· Eye and respiratory protection
· Fine sandpaper or edge files
· Thin shelf boards
· Wood glue plus small mechanical supports where possible
· Wall-mounting hardware
· Tape measure and template material
Steps for This Upcycled Furniture Project
1. Strip the guitar to a safe shell. Remove strings, loose hardware, and anything that could spring or catch during cutting. Inspect the body for hidden braces and decide whether the front can be opened without destroying the structural rim you need for mounting.
2. Mark and cut the opening carefully. Support the guitar on a padded work surface and mark a smooth opening that leaves enough material around the edges. Cut slowly with appropriate protection, then smooth every cut edge before reaching inside the body.
3. Fit light shelves. Make templates first, then cut thin boards to follow the interior curves. Support each shelf on small cleats or brackets attached to sound internal areas, keeping the intended contents light so the guitar shell is not asked to behave like a deep cabinet.
4. Prepare a secure wall mount. Attach hardware to a structural backing plate or strong part of the guitar rather than thin decorative wood. Use wall fixings suited to the finished weight, hang it level, and load the shelves gradually with small objects only.
I’d leave some empty space between the shelves. The curved inside of the guitar is part of the finished design, and filling every centimetre makes that disappear.
Variation: If you do not want to cut the instrument, mount a damaged guitar intact as wall decor and attach a separate shallow shelf below it using independent wall fixings.
DIY Vintage License Plate Cabinet
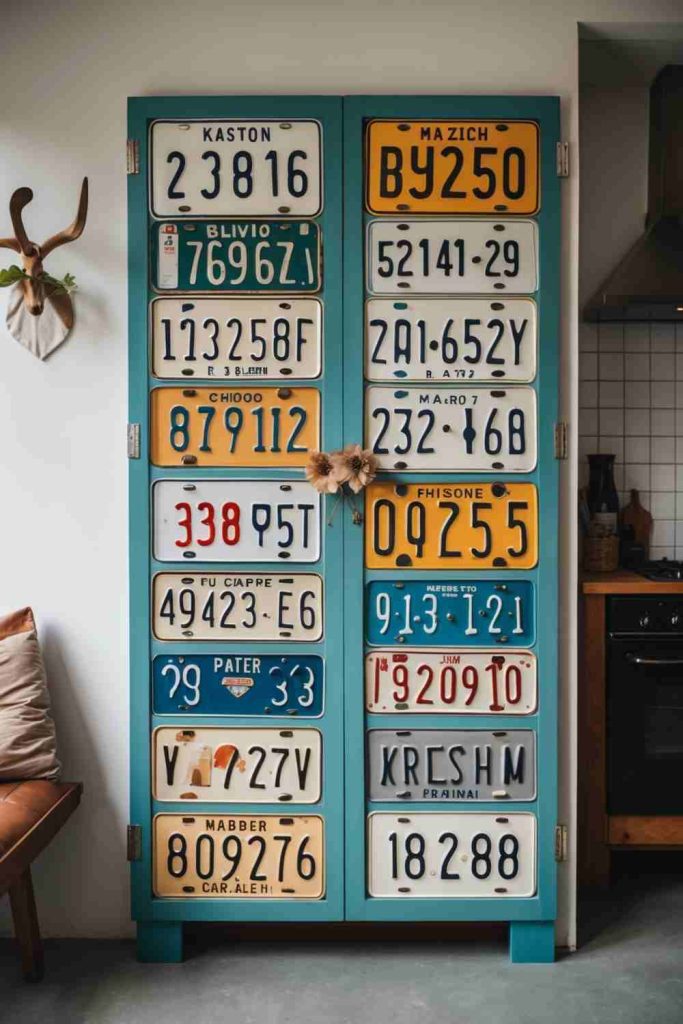
Vintage license plates can give a plain cabinet a patchwork metal skin, especially when different colours, numbers, and worn surfaces are arranged across drawer fronts or doors. The cabinet remains the structure, while the plates work as a durable decorative layer.
The challenge is the metal edge. Cut or bent plates can be sharp, and old surfaces may carry corrosion or residue. I would keep original rounded edges where possible, avoid trimming unless necessary, and make every exposed edge safe before the cabinet returns to daily use.
Materials and Tools
· Sound cabinet or drawer unit
· Clean vintage license plates
· Gloves for handling metal
· Tin snips only if cutting is unavoidable
· Files or edge trim for sharp metal
· Short screws with washers or another secure fixing method
· Drill and bits
· Optional protective clear finish compatible with the metal
Steps for This Upcycled Furniture Project
1. Prepare both cabinet and plates. Tighten the furniture first, then clean the metal without destroying markings you want to keep. Check for jagged corners, flaking corrosion, and raised fastener holes that could catch clothing or hands.
2. Arrange the layout before attaching anything. Place the plates on each face and decide where overlaps will fall so drawers and doors can still open. Keep metal clear of hinges, handles, and edges that rub against neighbouring parts.
3. Secure the plates to solid material. Use short screws with washers or another suitable mechanical fixing that cannot penetrate into drawer space. If any plate must be trimmed, control the cut edge with filing and protective trim rather than leaving thin sheet metal exposed.
4. Operate every moving part. Open each door and drawer fully, feeling for snags and listening for metal contact. Correct protrusions before loading the cabinet, then add protective pads where the newly covered fronts could strike another surface.
I’d let the plate colours stay mismatched. Trying to make them look newly coordinated can remove the aged character that made the material interesting in the first place.
Variation: Use one or two plates as drawer fronts or door panels instead of covering the whole cabinet, which is useful when your collection is small.
DIY Fan Blade Wall Art
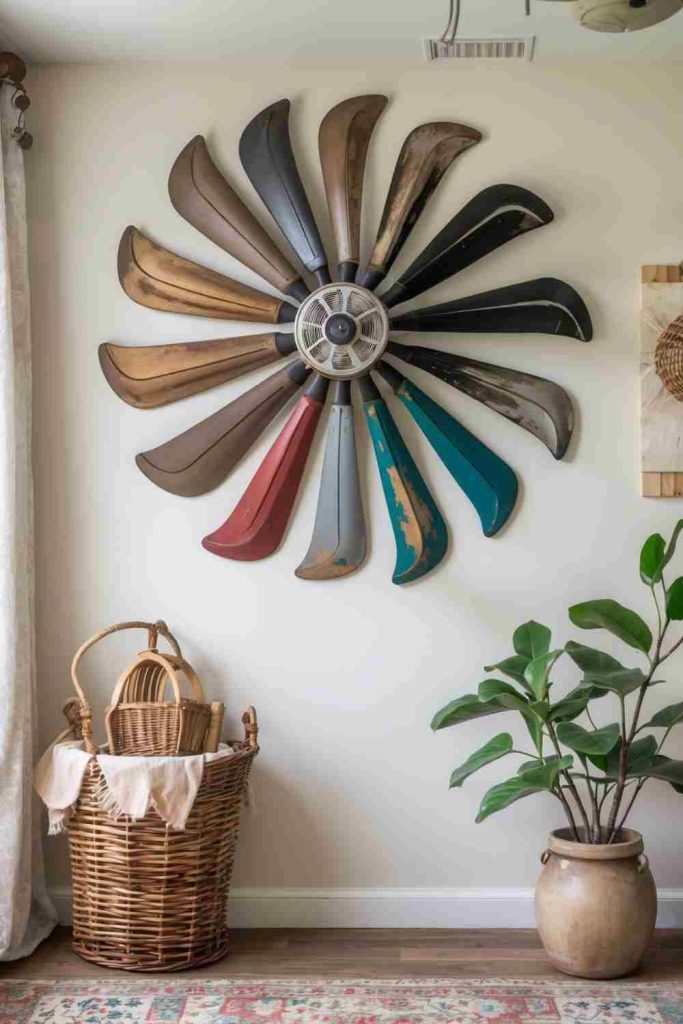
Old fan blades can form a large radial wall piece because their repeated shape naturally creates a flower, sunburst, or turbine-like pattern. Mounted around a central hub, they can turn bulky discarded parts into wall decor without trying to make the blades function again.
I would keep this strictly decorative. Fan blades that have reached the end of their appliance life should not be put back into rotation, and cut metal or plastic edges need to be smooth. The wall mounting also needs to support the entire assembly, not just the lightweight central cover.
Materials and Tools
· Old fan blades in stable condition
· Rigid central hub or backing disc
· Screws, bolts, or appropriate fasteners
· Drill and bits suited to the material
· Pliers and screwdrivers
· File or abrasive for rough edges
· Wall-hanging hardware rated for the finished weight
· Optional paint or protective finish
Steps for This Upcycled Furniture Project
1. Separate and clean the blades. Remove them from any motor or live electrical components and keep only the stable decorative parts. Wash away grease and dust, then inspect mounting holes and outer edges for cracks or sharp damage.
2. Arrange the radial pattern on the floor. Mark equal spacing around a rigid hub or backing disc and test the overall diameter against the intended wall. Rotate individual blades until the shape feels balanced before drilling any new holes.
3. Fasten the blades mechanically. Use screws or bolts where the materials allow it, keeping every connection tight and backed by enough material to resist tearing. Cover or smooth any protruding fastener ends and avoid depending on adhesive alone for a heavy wall piece.
4. Install strong hanging hardware. Fix the hanger to the central backing rather than one blade, then use a wall anchor appropriate for the surface and total weight. Hang the piece high enough that people cannot brush against blade edges in normal movement.
The spacing matters more than extra decoration here. A clean repeated pattern lets the old blade shape do the work without needing many added details.
Variation: Mix two compatible blade shapes around one backing disc for a more irregular pattern, but keep the weight balanced around the centre.
DIY Umbrella Stand Plant Holder
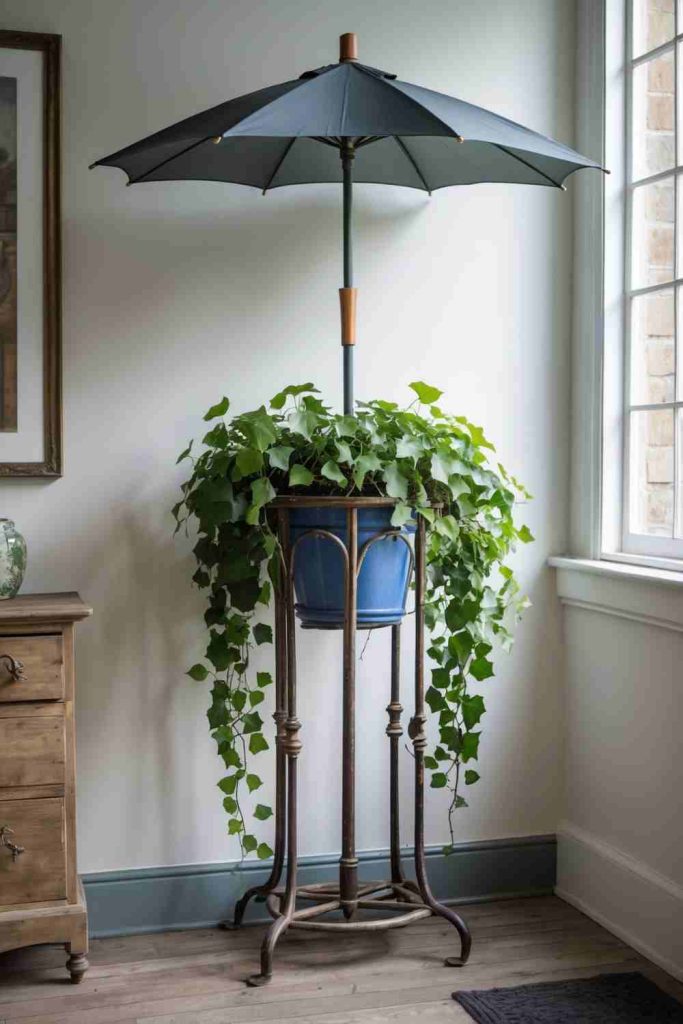
A tall umbrella stand can raise a plant to a useful viewing height and give a neglected container a new role without major construction. The open top can hold a separate plant pot, while the original stand provides a narrow footprint that suits corners and entryways.
Plants bring moisture, so I would keep the growing pot and drainage saucer independent from the upcycled stand. The metal, wood, or woven material should not be expected to act as a waterproof planter unless it was designed for that. Stability also matters because a tall plant creates leverage above a narrow base.
Materials and Tools
· Umbrella stand with a stable base
· Plant pot that fits without forcing
· Waterproof saucer or removable liner
· Non-slip or protective pads
· Rust-removal materials if appropriate
· Optional paint suitable for the stand material
· Foam or blocks for centring a lightweight pot
· Plant chosen to suit the available light
Steps for This Upcycled Furniture Project
1. Clean and stabilise the stand. Remove dirt and treat loose rust or rough areas appropriately, then set it on a level floor and check for rocking. Add discreet feet or pads if the base needs grip or floor protection.
2. Choose a separate pot and saucer. Select a pot that sits securely within or on top of the stand without wedging against fragile sides. Keep drainage fully contained in a removable saucer so water does not collect inside the umbrella stand.
3. Centre the plant safely. Use stable spacers only if needed to keep the pot level, avoiding soft material that could compress when wet. Check that the plant’s height does not make the whole piece easy to tip, particularly in a walkway or home with pets.
4. Use and maintain it as two components. Lift the pot out for heavy watering when practical, wipe spills promptly, and inspect the stand for rust, swelling, or loosened joints. Rotate or reposition the plant without dragging the base across the floor.
I’d choose the plant after checking the stand, not before. A top-heavy plant can make a narrow base feel much less stable than it looked while empty.
Variation: Use the stand for a lightweight faux arrangement or dried stems if moisture would be hard on the original material.
DIY Headboard Bench
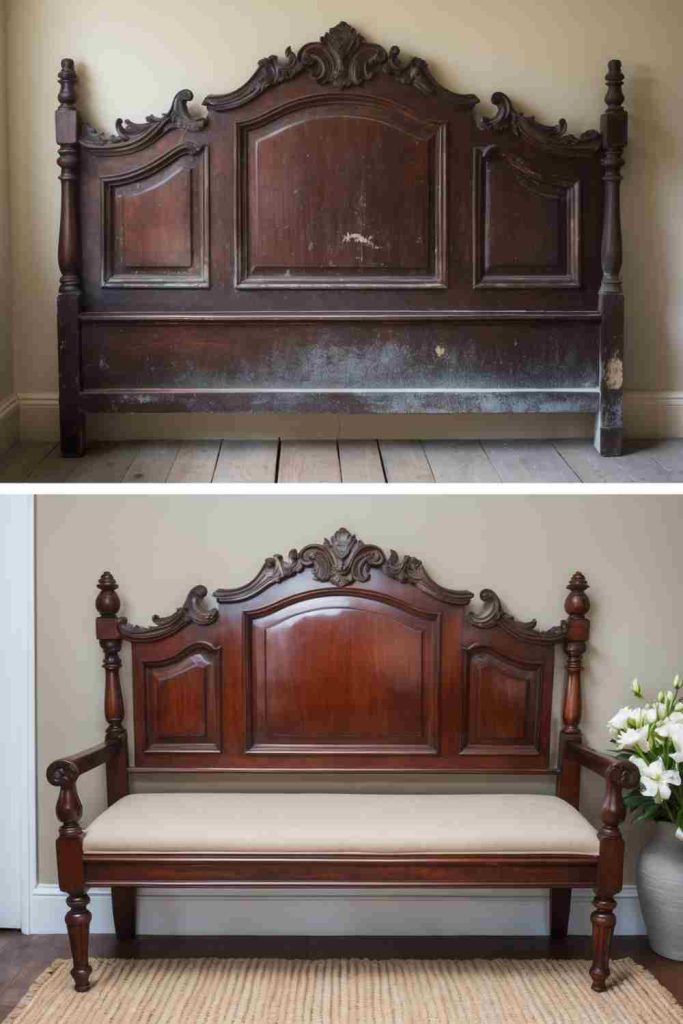
A solid headboard can become the back of a bench, keeping decorative carving, slats, or panel details that might otherwise be lost when a bed is dismantled. New side supports and a proper seat frame turn the headboard from a vertical decorative element into part of a usable piece of furniture.
The headboard should not be asked to carry the seat load by itself. I would build a separate bench frame that transfers weight into legs and rails, then connect the headboard as a supported back. That approach makes the upcycled feature visible without confusing decoration with structure.
Materials and Tools
· Solid headboard in reusable condition
· Structural timber for seat rails and legs
· Seat board or plywood
· Wood screws and appropriate brackets
· Drill and screwdriver
· Wood glue as a secondary joint aid
· Sandpaper or safe preparation materials
· Optional cushion, paint, stain, or finish
Steps for This Upcycled Furniture Project
1. Inspect the headboard and choose the useful section. Tighten loose joints and identify any decorative pieces that should not carry structural screws. Decide the finished seat height before cutting additional timber so the proportions work with the backrest.
2. Build a separate seat frame. Create a rectangle from structural rails and support it with properly joined legs, adding centre support if the span requires it. Test this frame for racking before attaching the headboard.
3. Join the headboard to the frame. Use multiple strong connection points into solid wood so the back cannot rock independently. Fit the seat board on top of the frame, keeping fasteners flush and smoothing any old bed-hardware holes or sharp edges.
4. Finish and test gradually. Apply the chosen finish after repairs, then place the bench on a level floor and check it under increasing load. Add a cushion only when the frame and back remain stable under normal movement.
The headboard is the visual reward, but I’d build the bench as though the headboard were not structural at all. That makes the finished piece much easier to trust.
Variation: Use a narrow headboard as the back of a hallway bench with shoe storage underneath, provided the new frame is designed independently for seating.
DIY Surfboard Outdoor Table
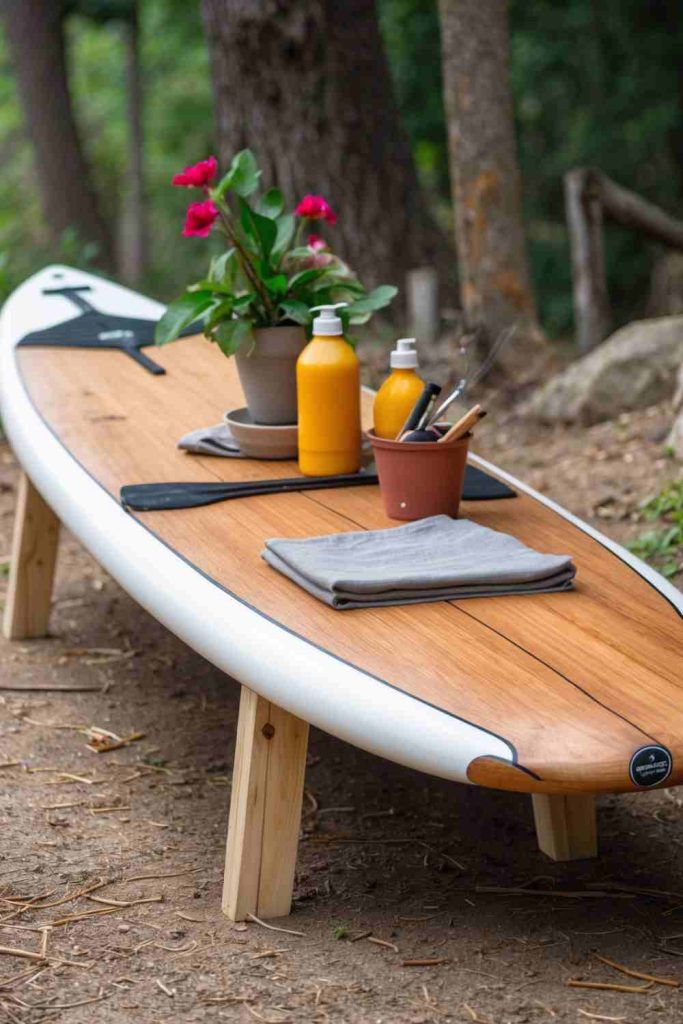
A retired surfboard has the long, smooth outline of a narrow outdoor table, making it useful as a serving surface or decorative side table when it is no longer suitable for the water. A simple leg frame can hold it without hiding the original rails and graphics.
The board itself may be foam, fibreglass, resin, wood, or a mixture, so I would avoid treating it like ordinary timber. Drilling or sanding composite materials can damage the board and create irritating dust. The safer construction often uses a separate leg frame and padded brackets that cradle the surfboard rather than puncturing it.
Materials and Tools
· Retired surfboard in stable condition
· Independent wooden or metal table base
· Padded brackets or cradle supports
· Exterior-rated screws for the base
· Drill and tools for the base material
· Non-slip pads
· Exterior-suitable protective finish for the base
· Protective equipment if any board surface must be worked
Steps for This Upcycled Furniture Project
1. Inspect the surfboard and decide how little alteration it needs. Clean it, check for delamination and soft areas, and avoid aggressive sanding into unknown composite layers. If the board is decorative but fragile, use it only as a lightly loaded top.
2. Build the support frame separately. Make a stable base with legs spread widely enough to resist tipping along the long board. Add cross-bracing where needed and finish the base for outdoor exposure before the surfboard is installed.
3. Cradle the board instead of forcing fasteners through it. Use shaped or padded supports that contact broad areas and prevent sliding, then secure the board with removable straps or brackets if appropriate. Keep pressure away from damaged rails and thin fins or fittings.
4. Test outdoors before styling. Put the table on level ground, press gently at several points, and make sure the long top does not rock or lift. Keep the intended load light and bring the table under cover if prolonged weather exposure could damage the board or base.
I’d preserve old graphics and repairs rather than trying to make the surfboard look new. The marks explain why the object feels different from a standard outdoor table.
Variation: Mount a small surfboard on a low independent trestle base as a drinks table, making the top removable so the board is not permanently altered.
DIY Drawer Shelves
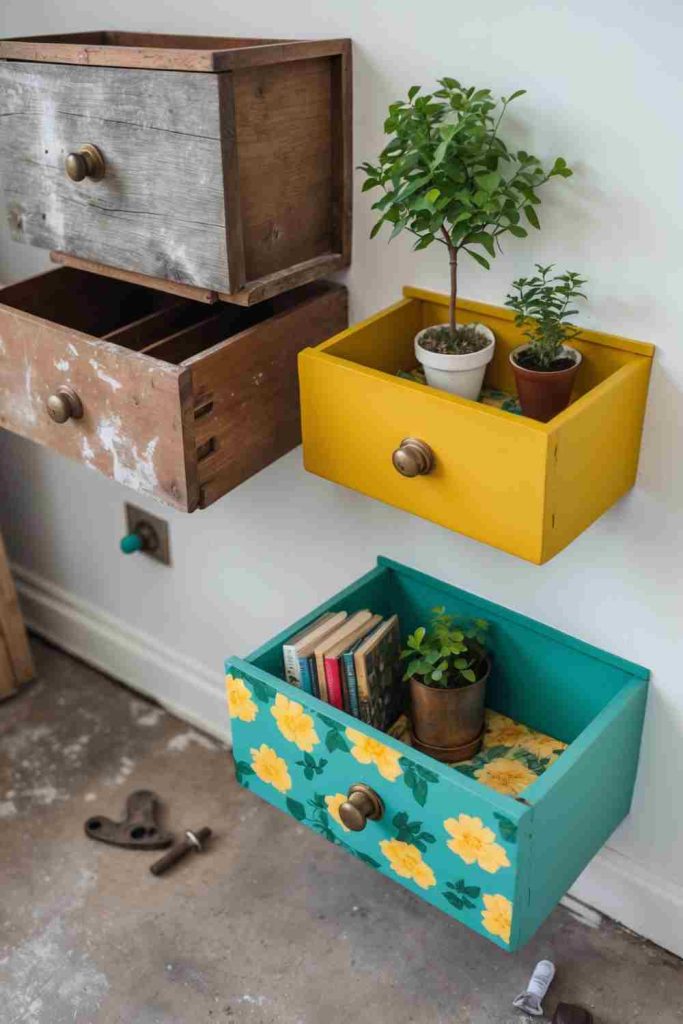
Old drawers can become shallow wall shelves because they already have a back, sides, and front edge. Hung horizontally, they frame small books, plants, or objects; mounted with the handle still visible, they keep a clear connection to the furniture they came from.
A drawer that once slid inside a cabinet was never designed to hang from its thin back panel. I would add a structural cleat or reinforced hanging rail so the loaded weight transfers into the drawer sides, then use wall anchors suited to the wall rather than relying on decorative hooks.
Materials and Tools
· Old drawers with sound sides and corners
· Timber cleat or reinforced hanging strip
· Wood screws
· Wall anchors appropriate for the wall
· Drill and screwdriver
· Level and tape measure
· Safe surface-preparation materials
· Optional paint, lining paper, or backing fabric
Steps for This Upcycled Furniture Project
1. Repair the drawer before decorating. Tighten loose corners, remove damaged runners, and inspect the back panel. If the back is thin hardboard or weak timber, do not use it as the only mounting surface.
2. Add a strong hanging point. Fix a cleat, rail, or other support across strong drawer sides so the wall hardware has substantial material to hold. Keep screws clear of the visible interior and pre-drill old timber where splitting is likely.
3. Finish the drawer and plan the wall layout. Paint or line the interior if desired, then arrange multiple drawers on the floor before transferring measurements to the wall. Leave enough space for objects to be placed and removed without striking neighbouring shelves.
4. Mount and load gradually. Use a level and wall anchors that match the wall and expected weight, then check every shelf for movement. Start with light decor and only add heavier books or pots if the drawer, cleat, and wall fixings remain completely stable.
I especially like leaving the original handle in place. It is a small detail, but it stops the shelf from feeling like a box that could have come from anywhere.
Variation: Mount one small drawer as an entryway shelf for keys and mail, keeping the load light and using the old handle as a hook only if it is securely fixed.
Furniture Upcycling Choices That Can Cause Wobble, Weak Joints, or Unsafe Loads
Decorating Before Checking the Structure
Paint, rope, upholstery, and trim can hide movement rather than fix it. Repair loose joints, splits, weak rails, and missing supports first, then decorate only after the piece behaves safely in its new role.
Assuming Every Old Table or Crib Can Become Seating
Furniture designed for objects or infant sleep does not automatically have the right structure for adult seating. Build a real seat frame, support the load through rails and legs, and treat reclaimed panels as components rather than proof of strength.
Using Adhesive as the Main Structural Fastener
Adhesive can be useful for trim, rope, and positioning, but it is a poor substitute for proper mechanical joints on benches, shelves, swings, table bases, and heavily loaded wall pieces. Use screws, bolts, brackets, cleats, or joinery appropriate to the load.
Mounting Heavy Pieces Through Thin Back Panels
Drawer backs, guitar shells, surfboards, and decorative boards may look substantial while offering very little screw-holding strength. Add a backing rail or cleat that connects to strong side material and use wall hardware matched to the wall itself.
Sanding Unknown Old Finishes Aggressively
Vintage paint, varnish, fillers, and composite surfaces should not be treated as harmless dust. Minimise unnecessary disturbance, use appropriate protection, and choose a preparation method suitable for the age and material of the object.
Leaving Sharp Metal Where Hands Can Reach
License plates, chains, fan blades, hoops, and bicycle parts can have edges or cut ends that remain dangerous after the piece looks finished. File, fold, cover, or isolate those areas before placing the project in normal household use.
Ignoring Dynamic Loads on Swings and Hanging Storage
A static object on the floor behaves differently from a swing, coat rack, or hanging pocket that is pulled repeatedly. Design for movement, spread the load across strong points, and inspect fasteners again after the project has been used.
Making Outdoor Pieces with Indoor Hardware
An attractive finish does not protect ordinary screws, glue, rope, or exposed wood from weather. Use materials suited to outdoor exposure, allow drainage and drying, and plan for inspection and maintenance rather than assuming one finish makes the piece permanent.
Blocking Drainage Around Plant Projects
A reused stand or shelf can fail quickly if a wet plant pot sits directly against absorbent wood or trapped metal. Keep the plant in a separate pot and saucer, clean spills promptly, and leave the upcycled furniture free to dry.
Overloading a Clever Conversion
A guitar shelf, drawer shelf, barrel table, or surfboard rack may be visually substantial without being designed for heavy loads. Decide what the piece should realistically hold, then keep the contents within that purpose instead of treating every surface as structural storage.
Forgetting Floor and Wall Protection
Metal hoops, chain, rough timber, and newly added brackets can scratch walls and floors. Add felt, rubber, or other suitable protective contact points once the structure is complete, and make sure those pads do not introduce wobble.
Copying the Look Without Preserving Function
The best furniture upcycling keeps the new object useful. A cup still needs a flat table, a bench needs a stable seat, a shelf needs a trustworthy mount, and a planter needs drainage; decoration should support those functions rather than compete with them.
Frequently Asked Questions
How do I know whether old furniture is strong enough to upcycle?
Look first for rot, splits, loose joints, severe corrosion, and previous repairs that move under light pressure. If the new use will carry people or significant weight, reinforce the structure deliberately or choose another project rather than relying on appearance.
Do I need to sand every piece before painting?
No. Preparation depends on the existing finish and material, and aggressive sanding may be inappropriate for unknown older coatings or composite surfaces. Clean first, identify what you can, and use a compatible preparation method that creates a sound surface without unnecessary dust.
Can I use glue instead of screws for upcycled furniture?
Glue can work for decorative layers, trim, rope, and some properly designed wood joints, but it should not be the only thing carrying a bench, swing, heavy shelf, or loaded table. Mechanical fasteners or real joinery are usually the safer choice for structural work.
What is the safest way to hang upcycled shelves or racks?
Build a strong mounting point into the project first, such as a cleat or backing rail connected to solid material. Then match the wall anchor to the wall type and total loaded weight, not just the empty shelf.
Can reclaimed furniture be used outdoors?
Sometimes, but the original material and hardware need to tolerate moisture, sunlight, and temperature changes. Use exterior-suitable finishes and fasteners where appropriate, keep water from becoming trapped, and plan to inspect and maintain the piece over time.
Should I keep original scratches and worn finishes?
You can, provided the surface is clean, stable, and safe to touch. I often prefer to preserve harmless wear because it shows the history of the object, while loose paint, splinters, sharp rust, and contaminated residue still need proper treatment.
Which upcycled furniture project is easiest for a beginner?
Drawer shelves, a paddle coat rack, or a carefully supported plant holder are generally easier than structural seating or a suspended swing because the loads are smaller and easier to understand. Start with an object that is already sound and choose a new use that does not demand major structural changes.
Let the Original Structure Decide the Second Life
The furniture upcycling ideas I trust most begin with an honest look at what the old object can still do well. A drawer already knows how to be a box, a paddle already has the proportions of a wall rail, and a headboard already offers a decorative back. Working with those strengths usually creates a better result than forcing a weak object into a demanding new job.
I don’t think every reclaimed piece needs to become seating, storage, or a statement item. Sometimes the most mindful choice is a smaller change that keeps the structure safe and useful. Pick one project that matches the materials you actually have, check the load and fixings carefully, then let the old shape stay visible enough to tell its story. Which forgotten piece of furniture would you most like to give a practical second use?