Kitchen cabinets often look tired long before their boxes stop being useful. Handles date, painted doors become marked, awkward corners collect forgotten jars, and deep cupboards hide more than they store. Replacing the complete run can feel like the obvious answer, yet many cabinets only need a better surface, a more useful interior, or one carefully planned structural change.
I prefer kitchen cabinet upcycling that solves an everyday irritation while respecting what is already sound. A writable door can hold the shopping list, a shallow spice rack can rescue wasted space, and a patterned insert can change the mood without sending sturdy cabinetry to waste.
The finish still has to tolerate cooking, cleaning, steam, and constant movement. That is why I would begin with inspection and measurement rather than colour, even when choosing the colour is clearly the more enjoyable part.
Inspect Cabinet Boxes, Doors, Hinges, and Old Finishes
Begin with the cabinet structure, not the decorative idea. Open every door and drawer, press gently on shelves, and look for sagging bases, split hinge areas, water-swollen boards, loose face frames, lifted veneer, cracked laminate, or peeling old coatings. A makeover should not hide a leak, unstable wall fixing, or door that is already pulling away from its screws.
Remove grease with a cleaner suited to the surface and rinse away residue before sanding or painting. Keep hardware labelled by door position, because small hinge adjustments often belong to one particular opening.
When the age or composition of an old finish is uncertain, avoid aggressive dry sanding until you know how it should be handled. I don’t think every worn mark needs repair, but anything affecting adhesion, movement, hygiene, or strength does.
Plan the Finish Around Heat, Moisture, Movement, and Cleaning
A cabinet beside a sink, hob, kettle, dishwasher, or oven faces different conditions from a tall pantry at the other side of the room. Paper, fabric, and decorative paint need protection from repeated wiping, while wood inserts require room for movement. Leave ventilation paths and appliance clearances unchanged, and do not cover manufacturer labels, vents, electrical access, or service panels.
Think through how hands use the cabinet. Paint around a handle receives less wear than a finish that becomes the new pull surface, and an inside-door rack adds weight to hinges every time it opens. Test cleaning methods on a sample rather than assuming a decorative topcoat can withstand strong degreasers. The most successful finish is one you can maintain without treating the kitchen like a museum.
Measure Hardware, Protect the Kitchen, and Test Materials First
Record each door, opening, hinge, handle spacing, shelf position, and interior obstruction before buying hardware or cutting inserts. Cardboard templates are especially useful for pull-outs, door racks, magnetic panels, and rotating shelves because they reveal collisions that a single width measurement misses. Mark the top and cabinet number on every removed component so the original layout can be restored accurately.
Set up a clean work area away from food and protect floors, worktops, and nearby appliances. Use eye protection for drilling or cutting, control dust, and provide ventilation for coatings and adhesives. Hardwired lighting and uncertain electrical work belong with a qualified electrician. I know preparation can feel slow, but one test board can prevent an entire row of doors from becoming the experiment.
Turn Your Kitchen Cabinets into Chalkboard Magic
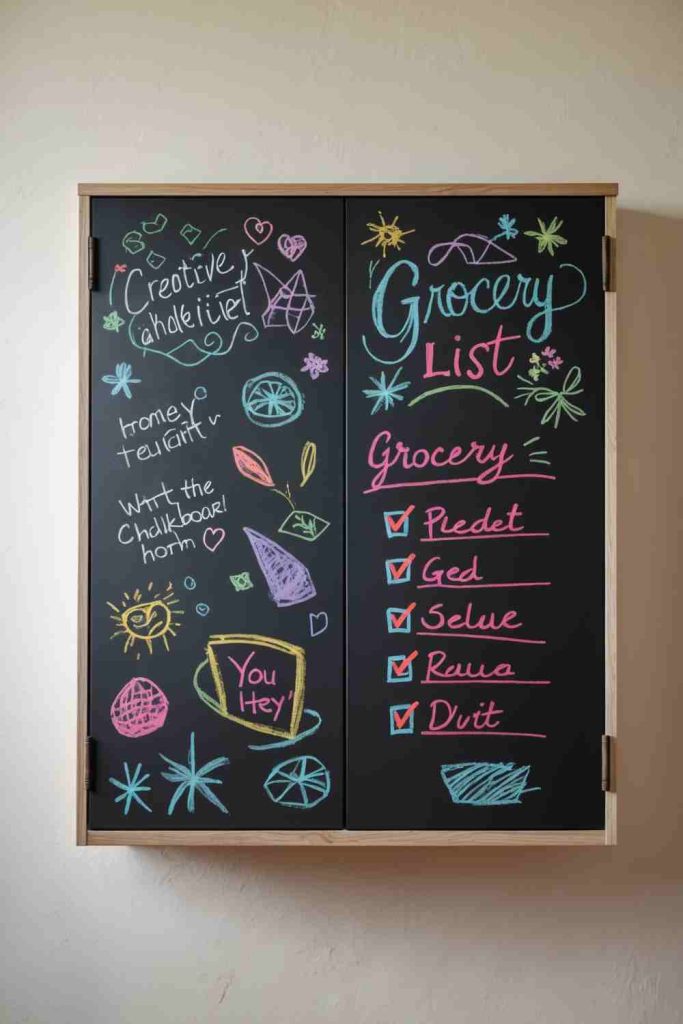
Chalkboard panels give an ordinary cabinet door a working purpose as well as a darker, more graphic finish. A small section can hold a shopping reminder or the week’s meal plan, while a larger door can become a shared message board. The strongest version keeps the writable area inside a clear frame so chalk dust and hand marks do not spread across every surrounding surface.
This treatment suits a door with a sound flat centre better than one with heavy carving or loose veneer. It is also worth deciding who will use it and how often. A cabinet beside the fridge may be convenient for lists, but a door directly above a food-preparation area can collect grease and become difficult to keep writable. I would choose one or two well-positioned doors rather than turning the whole kitchen into a blackboard.
Materials and Tools
· Sound cabinet doors with a reasonably flat panel
· Degreasing cleaner, clean cloths, and fine abrasive paper
· Primer recommended for the existing cabinet finish
· Chalkboard paint and a small foam roller or smooth brush
· Painter’s tape and masking paper
· Chalk or chalk markers approved for the finished surface
Steps for This Chalkboard Magic
1. Prepare and label the doors. Remove the chosen doors and mark each hinge position so everything returns to the correct cabinet. Clean away cooking grease, rinse off cleaner residue, and dull the existing finish lightly without cutting through thin veneer or laminate.
2. Define the writable panel. Use painter’s tape to create a clean border inside the door frame, pressing the edges down firmly. Prime the centre when the coating system requires it, then inspect the dry surface under side light for dust, ridges, or missed glossy patches.
3. Build the chalkboard finish gradually. Apply thin, even coats with the tool recommended for the paint, keeping the roller pressure consistent near the taped border. Allow the coating to cure according to its instructions before removing the tape; pulling it back on itself usually leaves a cleaner edge than lifting it straight upward.
4. Condition and reinstall the door. If the paint maker recommends seasoning the surface, rub chalk lightly across it and wipe it away before writing. Reattach the door, check hinge alignment, and keep a small cloth nearby so dust does not settle on worktops or inside open drawers.
The useful part is the contrast between a proper writing zone and the surrounding cabinet finish. I don’t think decorative borders need to be complicated here; a crisp edge and readable handwriting already give the door enough character.
Use a narrow chalkboard strip on the inside of a pantry door for a less visible version, or frame a removable painted panel so the original cabinet surface stays intact. A magnetic dry-erase sheet may suit households that prefer markers and less dust.
Transform Your Kitchen Cabinets with Vintage Map Decoupage
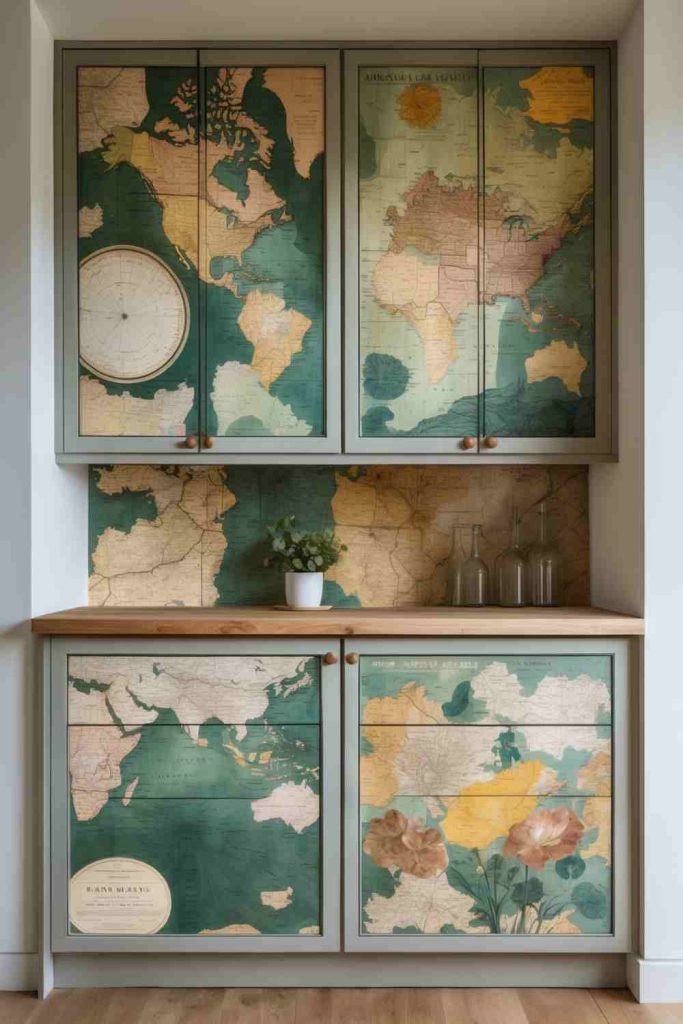
Map decoupage can turn recessed cabinet panels into framed paper landscapes without covering every line of the original joinery. Old atlases, damaged travel books, reproduction maps, or saved road maps all work differently: large map sections feel calm and continuous, while smaller pieces create a layered collage. The cabinet frame helps contain the detail and prevents the paper from taking over the whole room.
Paper near a kitchen work area must be sealed carefully and kept away from direct heat or heavy splashing. Thin paper also stretches as adhesive is applied, so the planning stage matters more than buying extra decoration. I would arrange the most recognisable place names and coastlines before cutting, then check how they look when the doors sit side by side rather than treating each panel as an isolated picture.
Materials and Tools
· Clean map pages, atlas sheets, or suitable reproduction paper
· Cabinet doors with stable inset panels
· Paper template or tracing paper
· Decoupage medium suitable for the cabinet surface
· Soft brush, brayer, or clean smoothing tool
· Craft knife, cutting mat, ruler, and protective topcoat where appropriate
Steps for This Vintage Map Decoupage
1. Prepare the doors and make templates. Remove hardware, clean the panels thoroughly, and repair lifted edges or loose moulding before adding paper. Trace each inset separately because doors that look identical can vary slightly after years of use and repainting.
2. Plan the map placement before cutting. Lay the paper beneath the templates and decide which details should remain visible around handles and panel edges. Leave a small trimming allowance, then cut on a protected surface with a sharp blade so the paper does not tear at corners.
3. Attach the paper in a controlled sequence. Apply a thin, even layer of medium to the panel and position one edge first, smoothing slowly across the surface. Work from the centre outward to release trapped air, and avoid scrubbing wet paper because the printed surface may soften or stretch.
4. Seal and reassemble only after the surface settles. Check for lifted corners, secure them carefully, and add compatible protective coats without flooding the paper. Refit the hardware after full curing, then wipe the finished panels with a lightly damp cloth rather than soaking or scouring them.
For me, the map should still be readable as a map. Cutting every page into tiny pieces can lose the roads, borders, and names that make the material interesting in the first place.
Use monochrome maps for a quieter kitchen, children’s atlas pages for a playful pantry, or one meaningful route across a single feature door. Removable wallpaper printed with map artwork can create a similar effect when permanent decoupage is not suitable.
Upcycle Kitchen Cabinets with Bold Fabric Panels
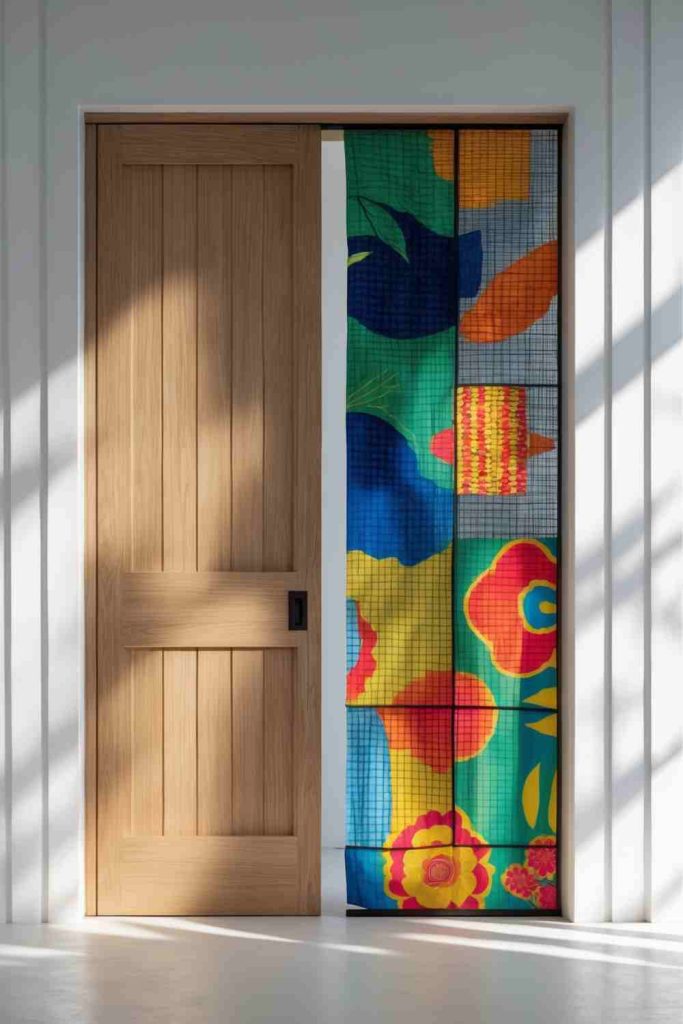
Fabric brings softness and pattern to cabinet doors that may otherwise feel flat or overly uniform. It works especially well inside recessed panels, where the surrounding timber acts like a built-in frame and protects the cut edge. A tightly woven print gives a cleaner surface than loose, textured cloth, while a repeated motif can connect several doors without requiring them to match perfectly.
Kitchen fabric panels need more support than a decorative swatch pinned to a wall. Grease, steam, handles, and repeated wiping can loosen fibres or stain an unprotected surface. One practical method is to wrap fabric around thin removable boards and fix those boards inside the door panels. That approach keeps the cloth taut, hides raw edges, and makes replacement far easier when the pattern eventually needs cleaning or changing.
Materials and Tools
· Durable, tightly woven fabric with enough repeat for the selected doors
· Thin backing boards or stable card suitable for removable inserts
· Paper templates, tape measure, ruler, and fabric scissors
· Fabric-safe adhesive, double-sided mounting film, or a staple method suited to the backing
· Small clips or removable fixings
· Optional clear fabric protector tested on a spare piece
Steps for This Bold Fabric Panels
1. Select the panels and test the cloth. Hold a generous sample against the cabinets at different times of day, then check whether the print competes with worktops, flooring, or splashback patterns. Pre-shrink washable fabric when appropriate and test any protector on an offcut before using the main piece.
2. Create accurate removable backings. Trace each recessed area, cut the backing slightly smaller, and test it inside the frame without forcing the corners. Mark the door number on the back because minor differences can make apparently identical inserts fit unevenly.
3. Wrap the fabric smoothly. Centre the motif, leave enough cloth to fold around the backing, and secure opposite sides in stages so the weave stays straight. Treat corners like small parcel folds, reducing bulk before fixing them on the back where they cannot rub the cabinet face.
4. Fit and check the finished panels. Attach the inserts with a reversible method strong enough to prevent slipping, then open and close every door. Keep fabric clear of hinges, catches, and handle screws, and remove a panel for cleaning rather than saturating it while attached.
I know it can feel tempting to choose the loudest print immediately, but scale matters. A pattern that looks balanced on one cushion can feel crowded when repeated across ten cabinet doors.
Use fabric only on an island or pantry bank, line glass-front cabinets from the inside, or frame leftover curtain material on two accent doors. Cork-backed cloth can also become a pinboard panel inside a utility cupboard.
Upcycle Kitchen Cabinets into a Hidden Spice Rack
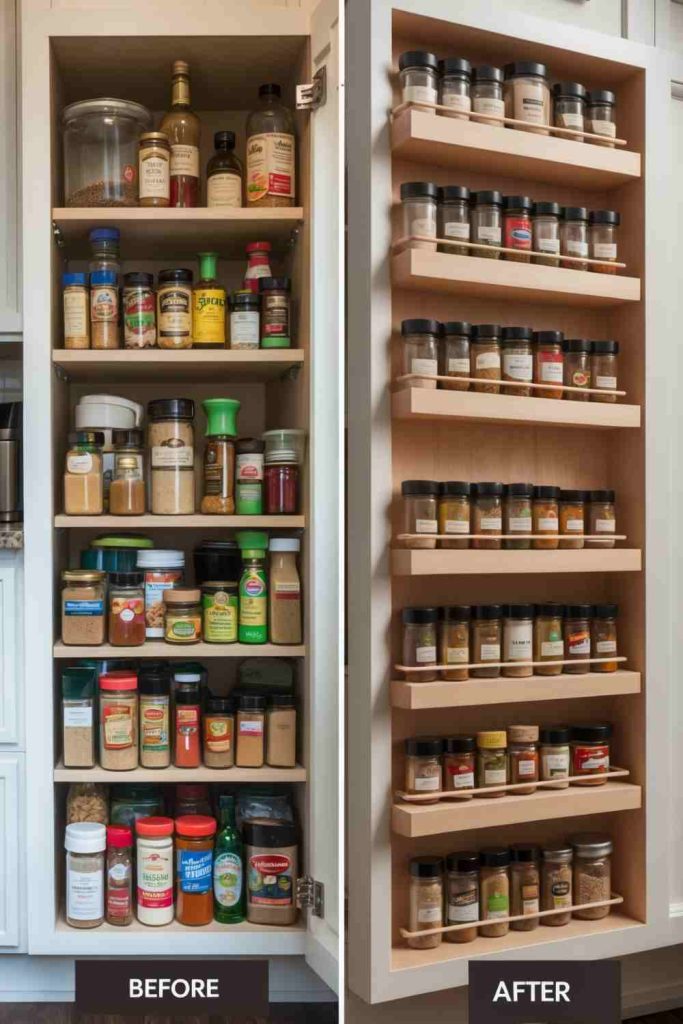
A hidden spice rack uses overlooked vertical space inside a cabinet or on the back of a door, keeping small jars visible without leaving them across the worktop. Shallow shelves are usually more useful than deep ones because every label remains readable and no jar disappears behind another. The cabinet still closes normally, so the storage feels integrated rather than added as an afterthought.
The critical measurement is not only the empty door area. Shelves, jars, hinges, face frames, and existing contents all move through the same space as the door closes. A rack that fits while the cabinet is empty may collide with a shelf edge once loaded. I would make a cardboard mock-up first, tape it temporarily in place, and test the full swing before drilling a single hole.
Materials and Tools
· Sound cabinet door or narrow unused cabinet wall
· Shallow spice racks, slim shelves, or reclaimed timber strips
· Tape measure, square, pencil, and cardboard for a mock-up
· Screws short enough for the door thickness or suitable interior fixings
· Drill, pilot bit, and screwdriver
· Spice jars with clear labels and optional non-slip shelf liner
Steps for This a Hidden Spice Rack
1. Map the available clearance. Measure the door, hinge position, shelves, and the tallest jar you plan to store. Build a cardboard version of the rack depth and tape it to the proposed location, then close the door slowly while watching every potential contact point.
2. Prepare the rack and mounting points. Cut or adjust shelves so they support the jars without covering the labels, and smooth all edges. Mark fixings across strong door areas rather than thin decorative panels, and confirm that no screw can emerge through the front.
3. Install and test the empty rack. Drill suitable pilot holes, secure the unit level, and move the door through its complete range several times. Add a low retaining rail or elastic restraint when jars could tip as the door changes direction.
4. Load the spices gradually. Place lighter and frequently used jars first, distribute weight evenly, and check that the hinges still hold alignment. Label the jar tops as well as the fronts when the rack sits below eye level, then review the fixings after regular use.
The best hidden rack is shallow enough to make every jar easy to reach. Adding a second row in front may increase capacity on paper, but it often brings back the exact searching problem the project was meant to solve.
Fit narrow wire baskets to a pantry wall, use magnetic tins on a separate metal panel, or add small shelf risers inside the cabinet when the door cannot carry extra weight. A removable over-door rack can suit rental kitchens if it clears the hinges and frame.
Upcycle Kitchen Cabinets with Stylish Lattice Inserts
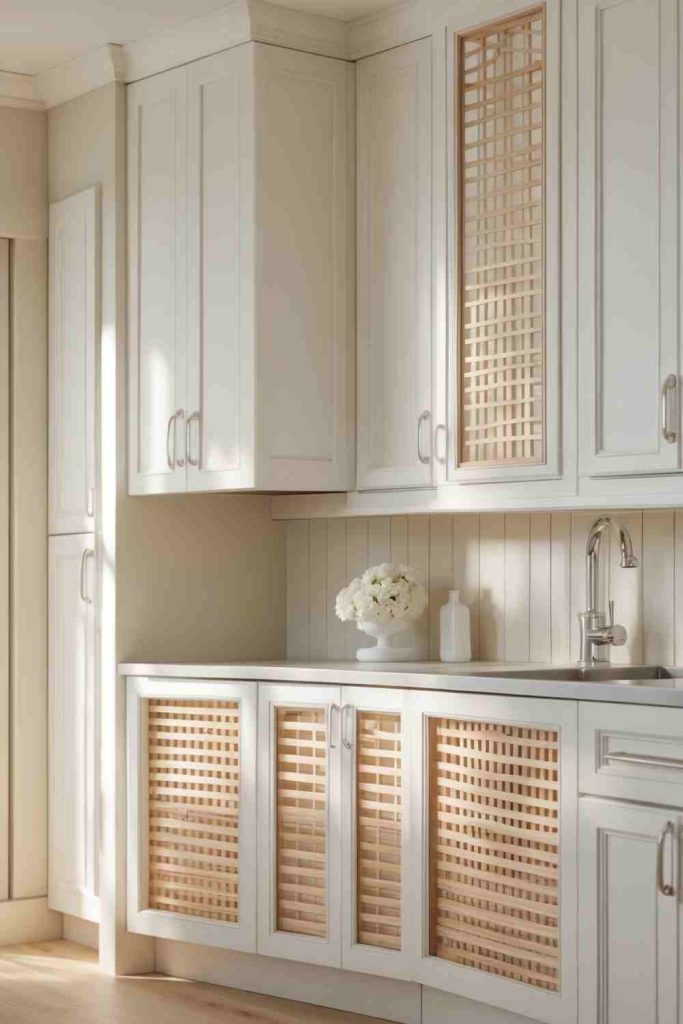
Lattice inserts replace a solid centre panel with an open geometric surface, allowing glimpses of stored dishes while keeping more visual structure than a fully open door. The repeated pattern can lighten a dark bank of cabinets, and it works with painted, stained, or natural frames. A backing of cane, perforated metal, or fine mesh can sit behind the lattice when the contents need more screening.
Removing a door panel changes the strength of the door, so this is not a purely decorative cut-and-glue project. The outer rails and stiles must remain sound, corners should stay square, and the insert needs enough support to avoid rattling. I would practise on a spare or less prominent door first, particularly when the existing door is veneered, routed, or made from composite material.
Materials and Tools
· Sound framed cabinet doors suitable for panel removal
· Wood lattice, cane webbing, perforated metal, or another lightweight insert
· Drill, jigsaw or suitable cutting tools, and eye protection
· Fine abrasive paper and edge files
· Small retaining strips, clips, adhesive, or discreet fasteners
· Paint or finish compatible with the door and insert
Steps for This Stylish Lattice Inserts
1. Assess the door construction before cutting. Remove the door, hardware, and any loose glazing beads, then inspect the rear for panel grooves or factory joints. Mark a safe opening that leaves the surrounding frame intact and provides a ledge or added trim for the insert.
2. Remove the centre carefully. Drill starter holes where appropriate and cut with controlled support beneath the door so the waste piece does not tear the final edge. Smooth the opening, square the corners only as much as the insert requires, and repair exposed composite edges before finishing.
3. Fit the lattice without forcing it. Cut the insert with a small allowance for seasonal movement where relevant, centre the pattern, and temporarily clamp it in place. Add a backing layer if needed, then secure the assembly with removable retaining strips or another method that spreads pressure around the perimeter.
4. Finish and reinstall the door. Paint or seal cut edges and attachment strips, allow every component to cure, and refit the hinges. Check that the door remains square, closes without vibration, and does not expose sharp wire or rough lattice ends inside the cabinet.
For me, the pattern should line up across neighbouring doors when they are viewed together. It does not need to be mathematically perfect, but a noticeably drifting diagonal can make the whole cabinet run look unsettled.
Use woven cane for a softer look, fine metal mesh for an industrial cabinet, or retain the solid panel and attach a shallow decorative lattice over it for a simpler, less permanent treatment. One feature door is enough when a full bank would feel too busy.
Upcycle Kitchen Cabinets into a Lazy Susan Corner
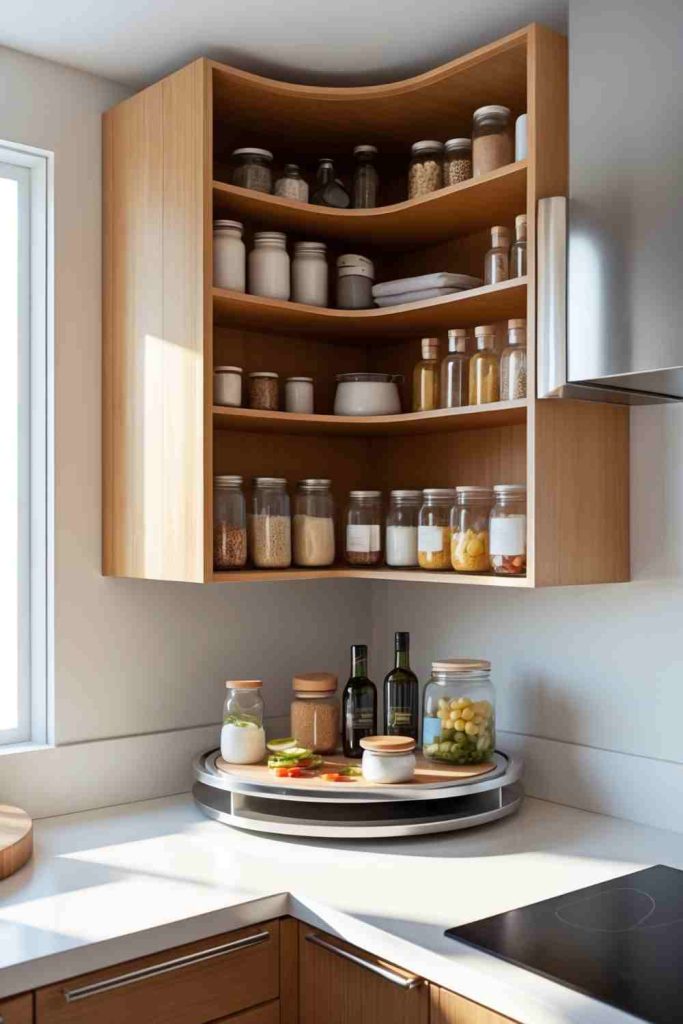
A corner cabinet often has generous volume but poor access, especially when the opening is narrow and items drift into the dark rear section. A rotating shelf brings jars, bowls, and everyday ingredients forward without requiring the user to reach behind several other objects. The improvement comes from matching the mechanism to the cabinet rather than simply placing a small turntable on an uneven pile of goods.
Corner shapes vary, and door hinges may occupy more space than expected. Full-circle trays, kidney-shaped shelves, and independent turntables all need different clearances. The base also has to be level and strong enough for the intended load. I would empty the cabinet completely, draw the usable footprint, and test a cardboard circle through the opening before ordering or cutting any rotating component.
Materials and Tools
· Empty corner cabinet with a sound, level base
· Lazy Susan mechanism or suitable rotating trays
· Cardboard, compass or string, pencil, and measuring tools
· Drill, pilot bits, screwdriver, and fixings specified for the mechanism
· Non-slip liner or low shelf rails
· Lightweight containers suited to rotating storage
Steps for This a Lazy Susan Corner
1. Measure the real access path. Record the cabinet width, depth, diagonal, shelf height, hinge projection, and door opening. Cut a cardboard template for the proposed tray and move it into position through the doorway to confirm that installation and later removal are both possible.
2. Prepare a stable mounting surface. Repair sagging shelves, tighten the cabinet frame, and level the base before adding hardware. Mark the rotation centre carefully; even a small offset can cause the tray to strike the cabinet wall or leave unusable gaps.
3. Install the mechanism according to its design. Fix the lower and upper supports where required, keeping screws away from plumbing or concealed services. Rotate the empty unit several times, listen for rubbing, and adjust alignment before attaching final shelves or loading any containers.
4. Organise by weight and frequency. Keep heavy items low and closer to the centre, use shallow containers that cannot topple over the tray edge, and avoid filling every gap. Turn the shelf gently during the first weeks and recheck the fasteners if the mechanism develops movement.
A Lazy Susan works best when there is space for it to turn. Packing the tray to the rim may look efficient, but one leaning bottle can stop the whole system and make the corner more frustrating than before.
Use two independent turntables on fixed shelves for a low-tool version, add pull-out corner baskets when the opening permits, or reserve the rotating tray for lightweight baking supplies. Shelf risers can improve a very small corner without changing the cabinet structure.
Upcycle Kitchen Cabinets into a Handy Magnetic Board
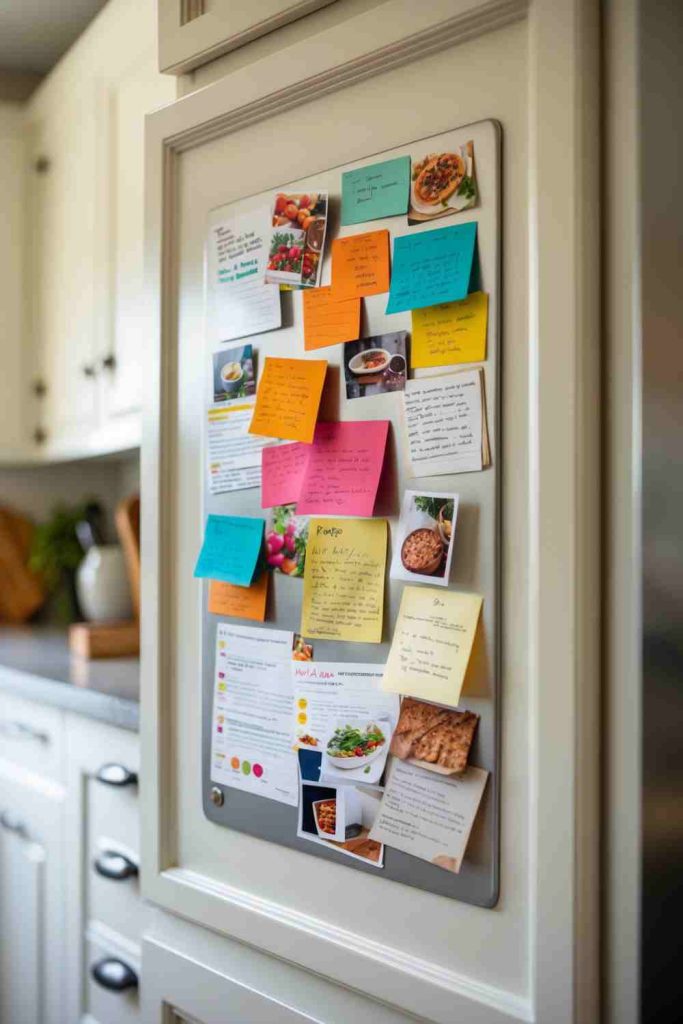
A magnetic cabinet panel can hold shopping lists, recipe cards, timers, small notes, and lightweight tools without covering the refrigerator. Placing the board on the inside of a door keeps the visual clutter hidden, while an exterior panel turns one cabinet into a practical family notice point. A framed metal sheet usually performs more reliably than relying on magnetic paint alone.
The added material must not interfere with the door swing, hinge screws, catches, or shelves. Sharp sheet-metal edges also need complete coverage. I would choose a thin panel and test it with the magnets that will actually be used; a surface may look metallic yet still provide weak holding power through paint, fabric, or a decorative covering.
Materials and Tools
· Thin ferrous metal sheet or a purpose-made magnetic panel
· Cabinet door with suitable flat space
· Cardboard template, ruler, square, and marker
· Metal snips or professional cutting service, plus gloves and eye protection
· Edge trim, thin frame, screws, clips, or suitable adhesive
· Magnets and optional compatible writable coating
Steps for This a Handy Magnetic Board
1. Choose the location and verify clearance. Make a full-size cardboard template, tape it to the door, and close the cabinet slowly. Check shelves, face frames, handles, and neighbouring doors, then mark any hinge or screw zones that the panel must avoid.
2. Prepare the metal safely. Have the sheet cut accurately or use appropriate tools while protecting hands and eyes. Deburr every edge and corner, then fit edge trim or a shallow frame so no unfinished metal remains exposed after installation.
3. Attach the panel without distorting the door. Use evenly spaced fixings or adhesive recommended for both surfaces, keeping the sheet flat as it bonds. If adding a writable finish, apply it before installation when possible and confirm that the final layers still allow the chosen magnets to hold.
4. Rehang and load lightly. Test the door empty, then add notes and small accessories one at a time. Keep heavy knives, glass containers, and objects that could fall near children off the board, and inspect the panel if repeated magnet movement begins to scratch the finish.
One strong magnet holding a useful list is better than a door covered with weak novelty magnets. The board should support the kitchen routine, not become another surface that needs decluttering every weekend.
Install the panel inside a pantry door, use magnetic primer beneath an ordinary topcoat for very light notes, or mount a removable framed sheet with command-style fixings where the door finish permits. Pegboard can provide a non-magnetic alternative for lightweight tools.
Upcycle Kitchen Cabinets with Vibrant Hand-Painted Patterns
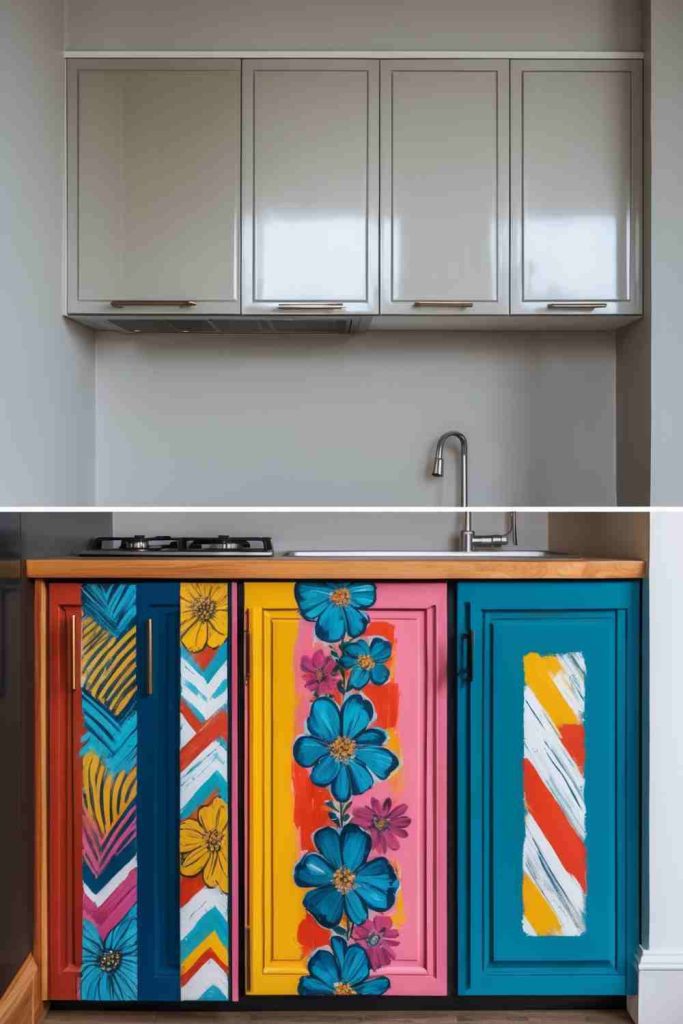
Hand-painted patterns let existing cabinet doors become individual pieces of artwork while keeping the original boxes, hinges, and storage. Large flowers, loose brush marks, stripes, checks, or folk-inspired motifs can all work, but the pattern should relate to the door shape. A central panel may suit one bold arrangement, whereas flat slab doors can carry a repeated design across several fronts.
The difficult part is consistency rather than artistic perfection. Doors sit close together, so mismatched scale, drifting baselines, and accidental changes in spacing become obvious once everything is rehung. I would sketch the complete cabinet run on paper first, decide where the pattern begins and ends, and leave some doors quieter so the painted sections have room to stand out.
Materials and Tools
· Clean cabinet doors with a stable finish
· Cleaner, fine abrasive paper, and suitable primer
· Cabinet-compatible base paint and detail paints
· Pencils, chalk, tracing paper, painter’s tape, or transfer paper
· A selection of fine and medium brushes
· Protective clear finish where recommended
Steps for This Vibrant Hand-Painted Patterns
1. Prepare a numbered set of doors. Remove handles and hinges, label every position, and clean all surfaces carefully. Repair dents or lifted edges, dull the old finish evenly, and apply a base coating system suited to the existing material.
2. Develop the pattern at full scale. Draw the design on paper or a spare board, then transfer key lines lightly to the doors. Lay neighbouring doors together in their final order so repeated elements cross gaps naturally and do not disappear beneath handles.
3. Paint from broad shapes to small details. Complete background areas first, allow them to settle, and then add outlines, accents, or layered colours. Keep a damp cloth and spare test board nearby, but resist repeatedly brushing partially set paint because that usually creates ridges rather than fixing them.
4. Protect, reassemble, and view the whole composition. Add a compatible protective finish if needed, refit the hardware, and hang the doors in their marked positions. Step back from several angles, then correct only genuine distractions instead of chasing every tiny difference made by the hand-painted process.
A little variation is part of the appeal. I’d rather see confident brushwork with a few human differences than a design that has been corrected so many times that the surface becomes thick and fussy.
Paint only the island cabinets, add a narrow border around plain doors, or use removable painted hardboard panels inside recessed frames. Beginners can repeat one simple leaf, dot, or stripe motif instead of planning a large mural.
Upcycle Kitchen Cabinets into a Functional Pull-Out Pantry
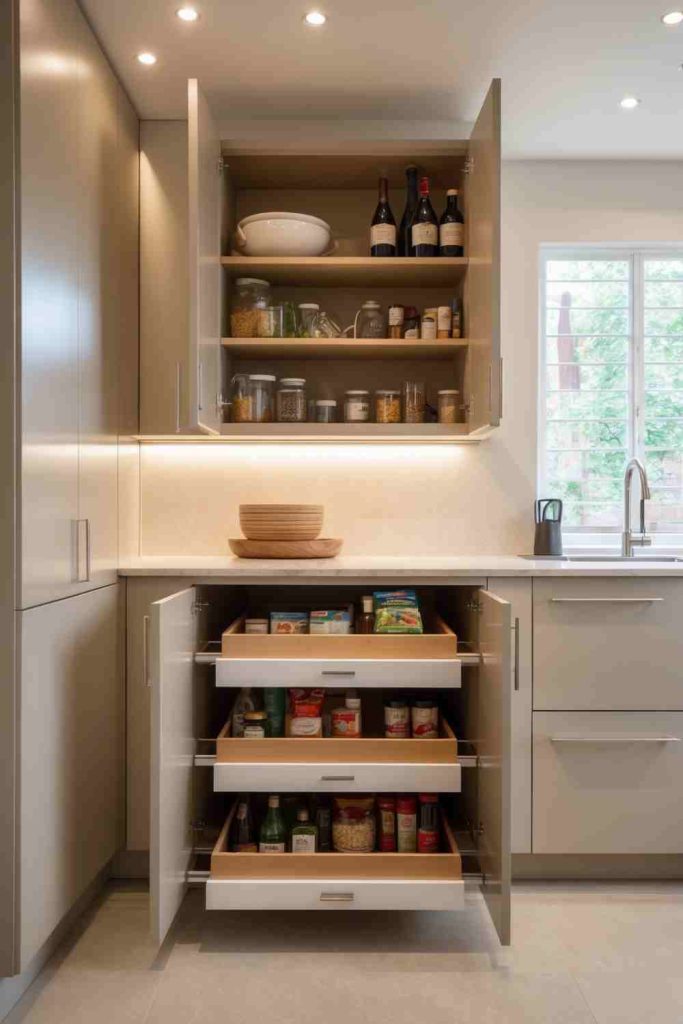
A narrow base cabinet can become far easier to use when fixed shelves are replaced or supplemented with pull-out trays. Bottles, packets, tins, and baking supplies move into view as one organised unit instead of forming several hidden rows. The upgrade keeps the existing cabinet shell but changes the way its depth is used, which can be more valuable than a purely cosmetic makeover.
Pull-outs need accurate measurements and strong hardware. Cabinet openings are often narrower than the internal box because hinges, face frames, and door edges reduce the path. Pipes, uneven floors, and bowed side panels can also affect the slides. I would measure at the front, middle, and back, then choose a system that fits the smallest usable dimension rather than assuming the cabinet is perfectly square.
Materials and Tools
· Sound base cabinet with suitable internal clearance
· Pull-out pantry frame, drawer slides, or full-extension tray hardware
· Tape measure, square, level, pencil, and spacers
· Drill, pilot bits, screwdriver, and manufacturer-specified fixings
· Shallow trays or baskets with retaining sides
· Optional door-mounting brackets and non-slip liners
Steps for This a Functional Pull-Out Pantry
1. Empty and survey the cabinet. Remove loose shelves, check the base and side panels for movement, and note every obstruction from hinges to pipes. Measure the opening and internal width at several heights, then compare those figures with the complete installed dimensions of the chosen hardware.
2. Establish level mounting lines. Repair or reinforce weak surfaces, use a square to mark slide positions, and add firm spacers where a face frame prevents the runners from sitting flush. Take time here; slides installed slightly out of parallel can bind even when each one appears level on its own.
3. Fit and test the pull-out empty. Install the fixed slide members first, attach the tray or frame, and move it through the full travel. Confirm that the cabinet door opens far enough, the unit clears the frame, and any soft-close or stop mechanism engages without twisting.
4. Load in stages and organise deliberately. Put heavier goods low, keep tall bottles within retaining rails, and avoid exceeding the hardware rating. Pull the unit out several times after loading, listen for rubbing, and tighten or realign the system before the new arrangement becomes permanent.
The pull-out does not have to hold every pantry item. It is often better to dedicate it to one category baking, oils, breakfast supplies, or snacks so the movement stays smooth and the contents remain easy to understand.
Add individual pull-out baskets to existing shelves, fit a narrow tray beside a bin cabinet, or use rolling crates in a floor-level cupboard when permanent slides are not practical. A countertop cabinet can take a lightweight pull-out shelf for small appliances.
Upcycle Kitchen Cabinets with Stylish Sliding Barn Doors
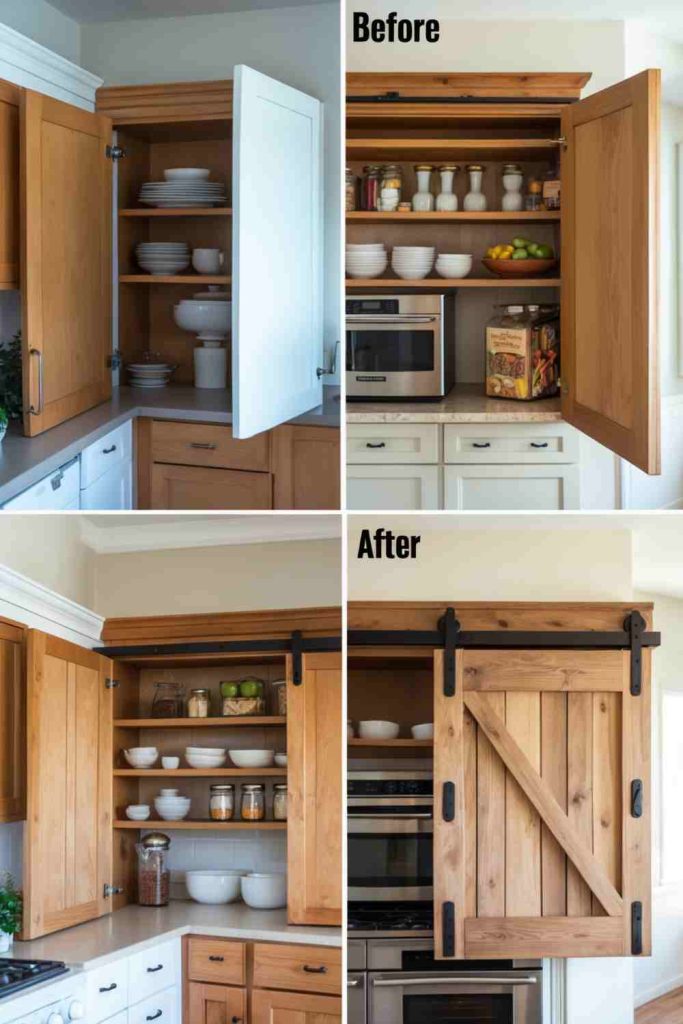
Sliding doors can give a wide cabinet or freestanding cupboard a different rhythm by moving panels across the front instead of swinging them into the room. Reclaimed boards, old cabinet doors, or newly framed lightweight panels can all create the barn-door effect. The visible track becomes part of the design, so alignment and proportion matter as much as the finish on the doors.
This conversion is best suited to a cabinet with enough clear width for each door to slide fully away from the opening. Handles, worktop overhangs, adjacent walls, and appliance doors may block that path. The track and cabinet top also need to carry the door weight safely. I would avoid fitting heavy decorative doors to a lightweight cabinet box unless the structure has been properly reinforced.
Materials and Tools
· Sound cabinet or freestanding cupboard with clear sliding space
· Lightweight doors sized for overlap and full access
· Cabinet-scale sliding-door track and compatible rollers
· Level, tape measure, square, pencil, and spacers
· Drill, pilot bits, screwdriver, and suitable fixings
· Door stops, anti-jump guides, bottom guide, and handles
Steps for This Stylish Sliding Barn Doors
1. Plan the movement before selecting hardware. Measure the complete cabinet front and the space to both sides, then draw the open and closed door positions. Include overlap between doors and check that handles can pass one another without striking the cabinet frame.
2. Reinforce and level the track area. Add a strong mounting rail where the cabinet top or face cannot hold the hardware directly, then mark a perfectly level line. Secure the track with fixings suited to the cabinet construction, not merely to the decorative surface layer.
3. Prepare and hang the doors. Repair, trim, and finish the panels before attaching rollers, keeping their weight within the hardware capacity. Lift each door into place with help when needed, fit anti-jump devices and end stops, and confirm that the panels cannot leave the track.
4. Install the lower guide and test access. Position the guide so doors remain vertical without scraping, then slide them repeatedly from end to end. Check that shelves remain reachable, fingers are not trapped between overlapping panels, and the cabinet stays stable under the repeated sideways movement.
Barn-style hardware can easily become oversized on a small kitchen cabinet. A slimmer track and lighter doors usually look more convincing than miniaturising every detail from a full-size room door.
Use simple bypass panels inside a shallow upper track, repurpose louvred doors for a ventilated pantry, or fit one sliding panel across open shelving. Curtains on a discreet rod offer a softer, lower-cost option where rigid doors would be too heavy.
Upcycle Kitchen Cabinets with Elegant Stenciled Patterns
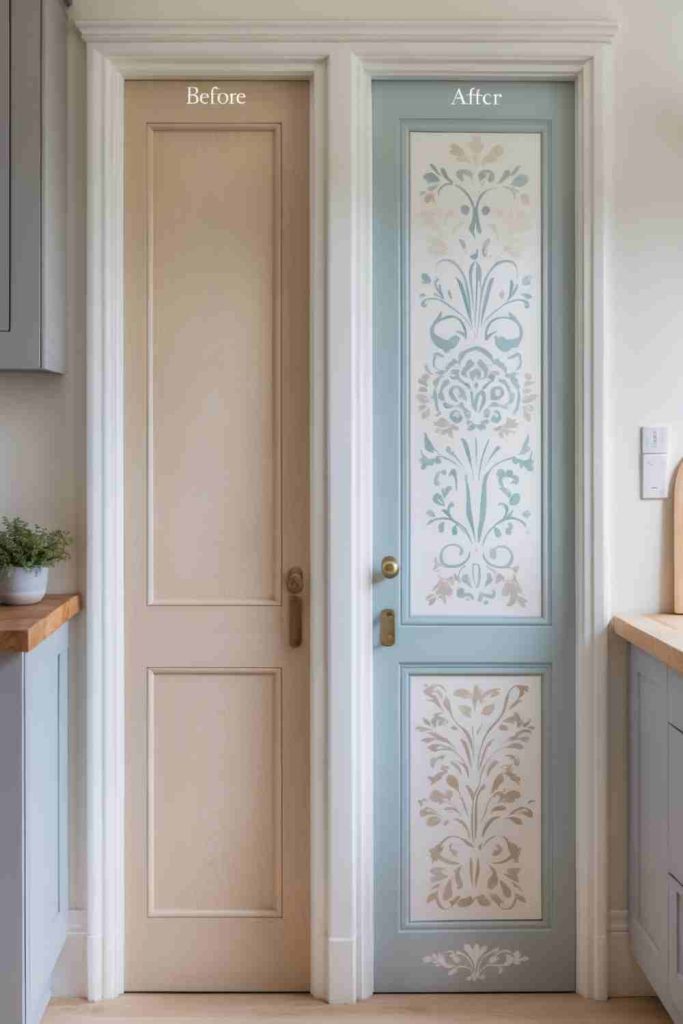
Stencilling gives cabinet doors a repeated decorative pattern without requiring freehand drawing. A restrained motif around the panel edge can feel almost like carved detail, while a larger geometric repeat changes a plain slab door more dramatically. The crispest results usually come from using very little paint and building the colour gradually rather than pressing a heavily loaded sponge through the openings.
Cabinet doors reveal alignment errors because they sit in rows. Before painting, decide whether each stencil should be centred on its own door or continue across the entire cabinet run. Handles can interrupt the repeat, and raised mouldings may prevent the stencil from lying flat. I would use the door shape as a boundary and test the complete layout with paper copies before touching the prepared finish.
Materials and Tools
· Prepared cabinet doors and a compatible base coating
· Reusable stencil suited to the door scale
· Low-tack stencil tape or repositionable spray used as directed
· Stencil brush, dense foam applicator, or small roller
· Cabinet-compatible detail paint and a blotting surface
· Measuring tools, registration marks, and optional protective topcoat
Steps for This Elegant Stenciled Patterns
1. Prepare a smooth, cured base. Clean, sand, prime, and paint the doors with the appropriate system, then wait until the base no longer feels vulnerable to tape. Test the stencil and removal method on a sample board coated in the same way.
2. Set the pattern with registration marks. Find the centre line or chosen border, position the stencil, and mark repeat points lightly. Lay adjacent doors together when the pattern should continue across them, and account for the visible gaps that will appear after rehanging.
3. Apply almost-dry paint. Load the brush or sponge, remove most of the excess on paper, and build the colour with light vertical taps or thin passes. Hold detailed areas flat, lift the stencil carefully, and clean its underside whenever paint begins to bridge narrow openings.
4. Complete repeats and protect the finish. Allow each section to settle before overlapping the stencil, correct small bleeds with the base colour, and stop before the surface becomes crowded. Add a compatible protective coat if the location requires it, then refit hardware after curing.
The most elegant stencil work often uses less contrast than expected. A pattern only a little lighter or darker than the base can show beautifully when the light moves across the cabinet fronts.
Stencil the inside of glass-front cabinets, add one motif to each corner, or use a narrow border along the kickboards. A removable stencil-painted panel can test the idea before committing to every door.
Upcycle Kitchen Cabinets with Stylish Under-Cabinet Lighting
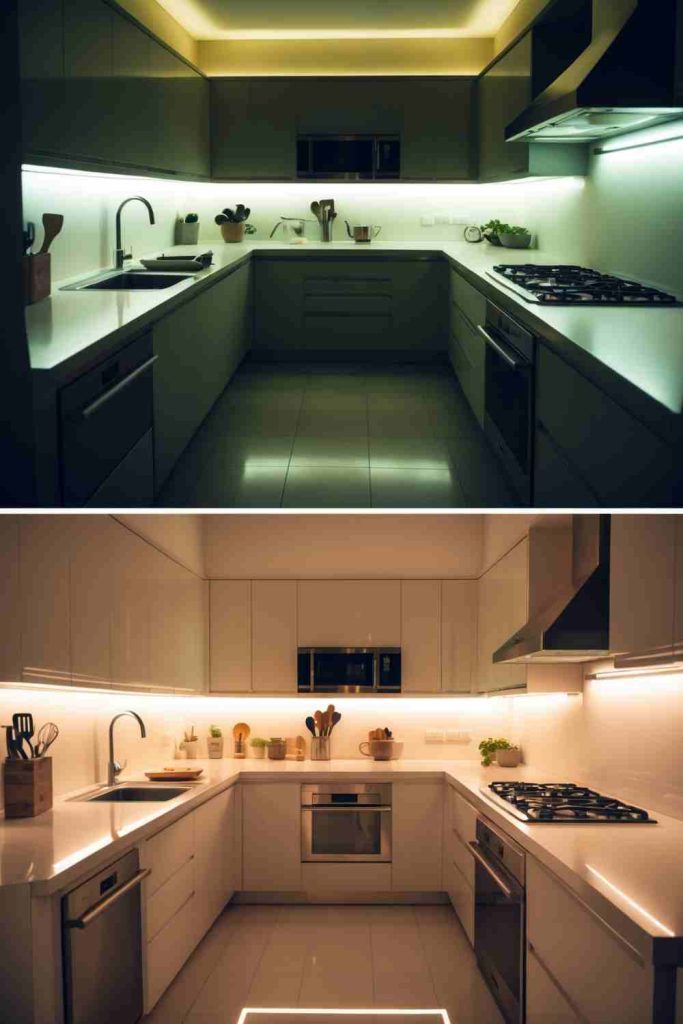
Under-cabinet lighting refreshes existing cabinets by making the work surface easier to use and by revealing details that overhead lighting can miss. A concealed strip creates an even line of light, while small puck-style fittings form separate pools. The result depends on hiding the source from normal eye level and choosing a position that lights the counter rather than producing glare on a glossy splashback.
Electrical work requires a clear boundary between simple fitting and fixed wiring. Battery-operated or plug-in kits may be manageable when installed exactly as directed, but hardwired systems should be handled by a qualified electrician. Heat, cable routes, cleaning access, and nearby sinks all matter. I would mock up the light position with removable tape and switch it on after dark before making the installation permanent.
Materials and Tools
· Low-profile under-cabinet light kit suitable for the location
· Manufacturer-supplied clips, channel, adhesive, or mounting hardware
· Tape measure, pencil, level, and removable tape for testing
· Cable clips or approved cable-management parts
· Cleaning cloth and surface cleaner compatible with the cabinet underside
· Qualified electrical help for any fixed wiring
Steps for This Stylish Under-Cabinet Lighting
1. Choose the light effect and power method. Decide whether you need task lighting, a soft evening glow, or both, then select a kit intended for that purpose. Check the location rating, control method, cable length, and route to a socket before attaching anything.
2. Test the position temporarily. Clean the underside, tape the lights or channel in place, and view them from standing and seated angles. Move the strip towards the front edge when the counter remains dark, or farther back when the light source is visible and uncomfortable.
3. Install only within the system instructions. Fit clips or channel securely, keep cables away from heat and moving doors, and avoid crushing connectors. Use a qualified electrician for hardwired connections or any situation involving uncertain wiring, moisture zones, or alterations to fixed circuits.
4. Check illumination and maintain access. Turn the system on, look for dark gaps or reflections, and confirm that switches and batteries remain reachable. Wipe the fittings only as recommended and inspect adhesive-mounted parts periodically because kitchen heat and grease can weaken a bond over time.
Good under-cabinet lighting should be noticed on the worktop more than on the cabinet itself. If the bright dots are the first thing you see, a diffuser or a slightly different mounting position will usually improve the result.
Use rechargeable magnetic light bars inside deep cupboards, add sensor lights to a pantry, or fit a removable plug-in strip beneath a freestanding hutch. Warm or neutral light may suit timber finishes better than a very cool, clinical tone.
Upcycle Kitchen Cabinets into a Chic Rustic-Style Cabinet
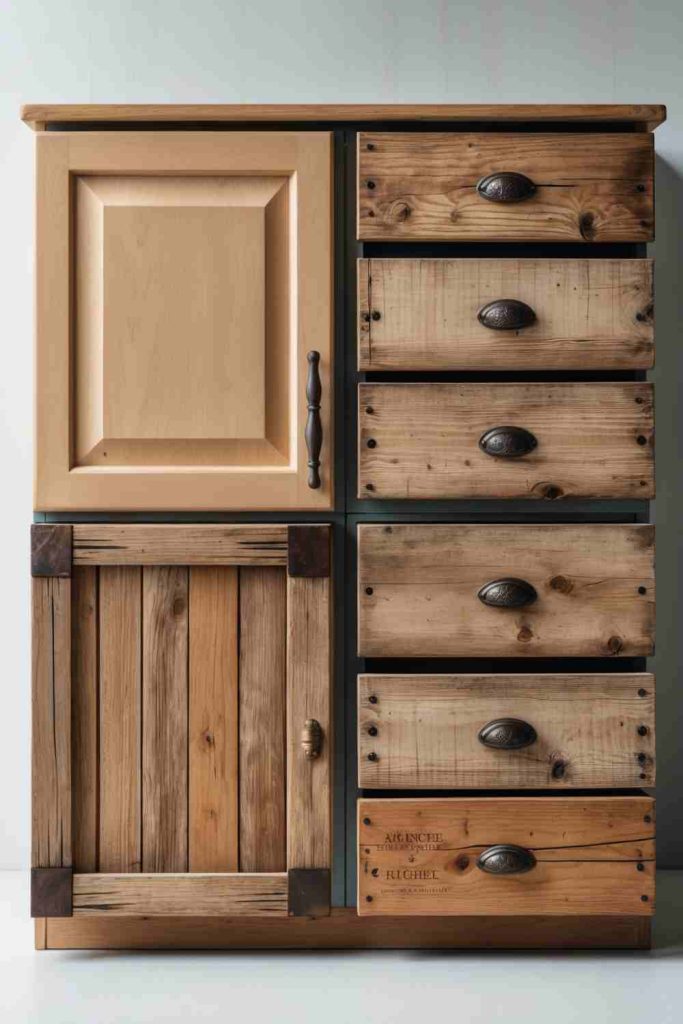
Old kitchen cabinets can become freestanding storage in a dining area, utility room, studio, or hallway once they are separated from the original run and given a finished top, base, and sides. Existing doors and drawers provide useful enclosed space, while worn timber, contrasting paint, and dark hardware can support a rustic character without pretending the piece is an antique.
A cabinet box designed to sit between other units may have unfinished sides or a lightweight back, so it cannot simply be placed in a room and loaded. Stability comes first. The base needs support, the top should be secured, and tall units may require wall restraint. I would preserve signs of age that are clean and sound, but repair every loose joint before deciding which scratches deserve to stay visible.
Materials and Tools
· Salvaged cabinet box, doors, drawers, or a combination of units
· Reclaimed timber or sheet material for finished sides, top, and base
· Cleaner, scraper, abrasive paper, and repair supplies
· Paint, stain, wax, or clear finish suited to the materials
· Handles, hinges, brackets, feet, and optional metal accents
· Drill, saw, square, clamps, screws, and wall-restraint hardware
Steps for This a Chic Rustic-Style Cabinet
1. Design the cabinet around the usable parts. Set the salvaged units together, check door and drawer operation, and decide which faces need covering. Draw the final width and height, including the top, feet, and any open shelves, before cutting new material.
2. Strengthen the structure. Repair joints, add a sound back or internal bracing, and connect multiple boxes through strong side panels. Build a level base that distributes weight, then test the empty cabinet for rocking and forward tipping.
3. Create the rustic finish with restraint. Strip only unstable coating, smooth dangerous edges, and use paint or stain to connect mismatched pieces. Add dark handles, corner plates, or simple trim where they serve the structure; too many false straps and bolts can make the cabinet feel more theatrical than useful.
4. Fit the top, anchor, and load gradually. Secure a durable top surface, attach the completed unit to the wall when its height or use requires restraint, and adjust doors. Place heavy items low, protect shelves from spills, and recheck fasteners after the cabinet has settled into use.
Rustic does not have to mean rough. A worn finish can look relaxed, but splinters, loose hinges, and an unstable base are repair jobs rather than decorative character.
Combine two upper cabinets into a low sideboard, turn one base unit into a coffee station, or add reclaimed timber shelves between separate cabinet boxes. A uniform paint colour can calm very mismatched doors while leaving the old hardware visible.
Upcycle Kitchen Cabinets into a Functional Vertical Herb Garden
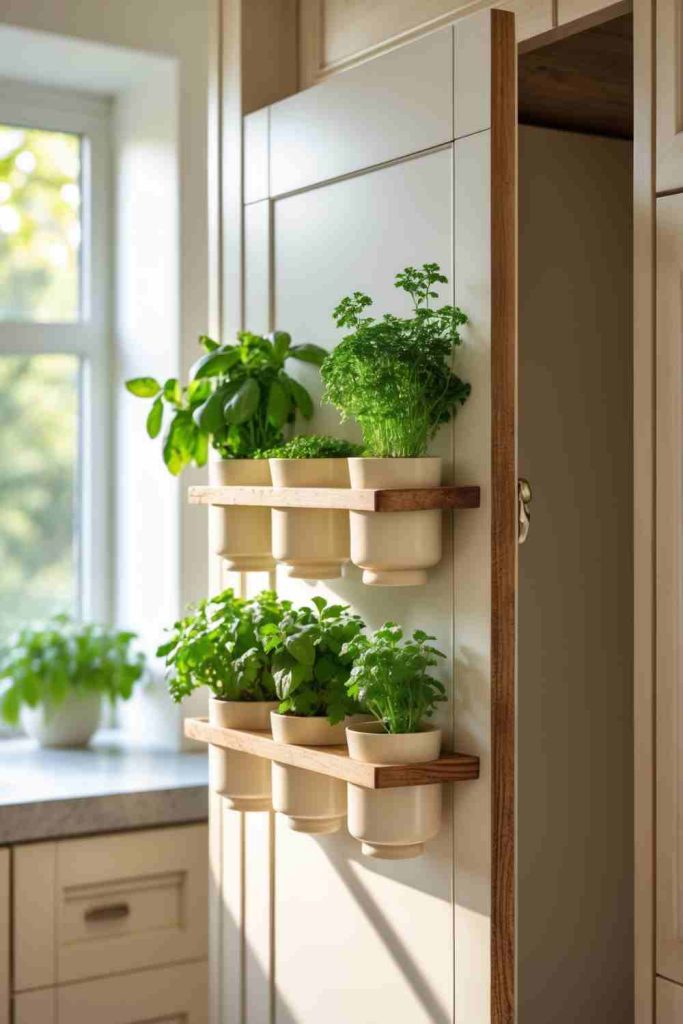
A narrow cabinet frame or removed door can support a vertical herb display where each plant sits in its own removable pot. Repeating containers keep the arrangement organised, while labels make the planting useful during cooking. The cabinet structure gives the display more depth and protection than a flat wall rack, but only when water is kept away from vulnerable timber and fittings.
Light is the deciding factor. A decorative herb cabinet placed in a dark corner will not become productive simply because the pots look tidy. Check the actual light at the proposed location, choose herbs that suit it, and plan how every pot will be removed for watering and drainage. I would avoid filling cabinet shelves directly with compost; individual waterproof containers are easier to manage and kinder to the reused unit.
Materials and Tools
· Sound cabinet frame, cabinet door, or shallow shelving unit
· Removable pots with drainage holes and matching saucers or waterproof sleeves
· Strong shelves, rails, brackets, or pot holders
· Exterior- or moisture-resistant finish where appropriate
· Potting mix and herbs suited to the available light
· Labels, drip tray, and wall fixings suitable for the loaded unit
Steps for This a Functional Vertical Herb Garden
1. Assess the location and cabinet condition. Check light, airflow, nearby heat, and access to water, then repair the frame and remove grease. Confirm that the unit can be anchored safely and that every shelf will remain reachable once plants begin to grow.
2. Create protected, load-bearing supports. Fit shelves or holders to strong structural points, seal vulnerable cut edges, and add a waterproof tray beneath each row. Space the pots so foliage can spread without blocking the cabinet door, window, or the plants below.
3. Plant in removable containers. Use pots with proper drainage, fill them with a suitable mix, and choose herbs with similar light needs for each level. Label the plants, place taller growers where they will not shade smaller ones, and keep leaves away from hot appliances.
4. Water away from the cabinet whenever possible. Lift each pot out, water it over a sink, allow excess moisture to drain, and wipe the outside before returning it. Inspect shelves, brackets, and the wall for damp marks, and rotate pots if growth leans strongly towards the light.
The cabinet is the organiser, not the planter. Keeping the soil inside removable pots makes the whole idea easier to clean, rearrange, and rescue when one herb decides not to cooperate.
Use the frame for artificial greenery in a dark room, display seed packets and small tools between a few living herbs, or mount pot rings on a single old cabinet door. A freestanding base cabinet can become a low herb station beneath a bright window.
Upcycle Kitchen Cabinets with Bold Wallpaper Inserts
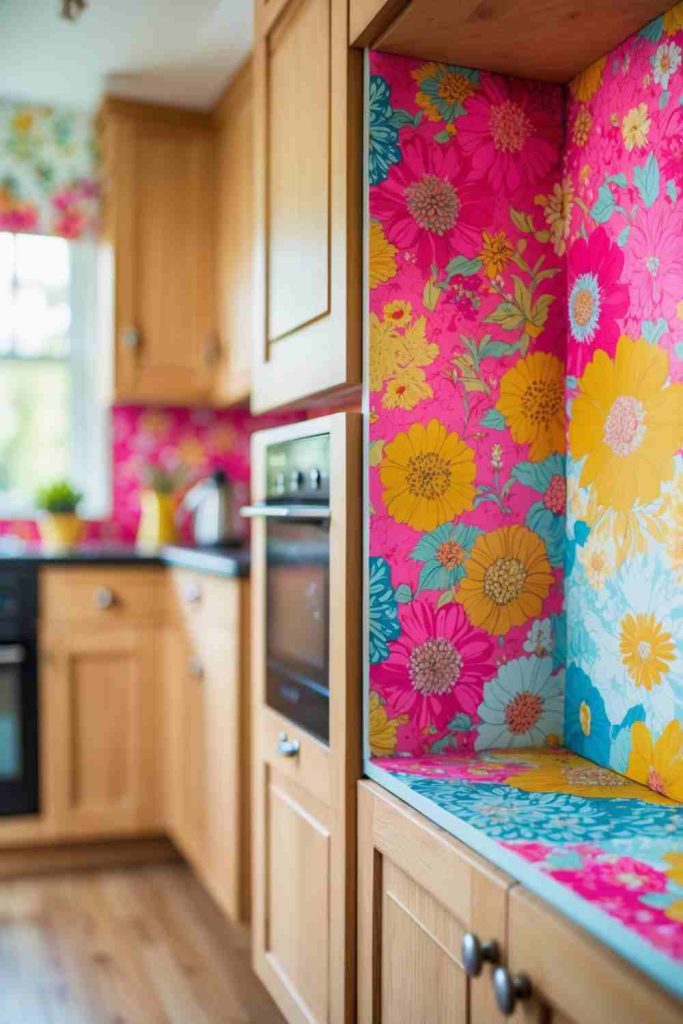
Wallpaper inserts bring pattern to recessed cabinet doors while allowing the surrounding paint or timber to remain visible. A large botanical print can turn one pantry door into a focal point, whereas a small geometric design can repeat neatly across several panels. Using inserts rather than covering the complete door helps protect edges and makes the pattern look intentional rather than like leftover wall treatment.
Kitchen wallpaper needs a sound, smooth surface and sensible placement. Steam, splashes, and repeated contact around handles can lift unsealed edges. Pattern matching also uses more paper than the visible panel area suggests. I would cut every piece before applying the first one, label the sequence on the back, and check the run from a distance so one upside-down repeat does not become a permanent conversation starter.
Materials and Tools
· Wallpaper or durable decorative paper with enough material for pattern matching
· Paper templates for each cabinet inset
· Smoothing tool, sharp knife, ruler, and cutting mat
· Adhesive compatible with both paper and cabinet surface
· Small artist’s brush for edges
· Optional protective topcoat or removable backing boards
Steps for This Bold Wallpaper Inserts
1. Prepare and template the panels. Remove doors or hardware as needed, clean away grease, and repair uneven surfaces. Trace each inset individually and note its door position, then test the template within the moulding without forcing the corners.
2. Plan the pattern across the whole set. Unroll the wallpaper, place the templates over the design, and decide how major flowers, lines, or shapes should repeat. Mark the back of every cut piece with its door number and top edge before the pieces are separated.
3. Apply the paper carefully. Spread the correct amount of adhesive, position the top edge, and smooth towards the sides with gentle pressure. Use a fine brush at moulded edges, remove adhesive residue promptly, and avoid stretching wet wallpaper to make an inaccurate cut fit.
4. Finish the edges and reinstall. Allow the paper to dry flat, secure any lifted corner, and add a compatible protective layer only after testing it on an offcut. Refit handles through clean openings and keep strong cleaners away from the decorated panels.
A bold print usually needs a quiet frame. Keeping the rails, handles, and neighbouring doors simple lets the wallpaper read as a deliberate panel rather than a pattern fighting for space.
Mount wallpaper on removable hardboard inserts, use peel-and-stick material on a test door, or place the design at the back of glass-front cabinets instead. Leftover wallpaper can line drawers or the inside of a pantry for a smaller change.
Additional Upcyclely Idea: Upcycle Kitchen Cabinets into Open Display Shelves
Removing selected cabinet doors can turn a closed, heavy-looking section into open display storage while keeping the existing shelves and cabinet box. Everyday bowls, glass jars, cookbooks, and serving pieces become part of the kitchen arrangement, and the open area can break up a long run of identical doors. The idea works best when it is selective; one or two open bays usually feel calmer than exposing every shelf.
A cabinet interior that was never meant to be seen may need more work than the doors. Hinge holes, shelf-pin marks, raw edges, and uneven paint become visible immediately. I would remove one door temporarily and live with the open cabinet for a few days before committing. That small trial reveals whether the storage can stay orderly and whether dust or visual clutter will become frustrating.
Materials and Tools
· Existing wall or base cabinet with sound shelves
· Screwdriver and containers for labelled hardware
· Filler suitable for hinge holes and surface repairs
· Cleaner, fine abrasive paper, primer, and paint or finish
· Optional shelf-edge trim, wallpaper backing, or lighting
· Non-slip shelf liner and a limited set of display items
Steps for This Open Display Shelves
1. Choose the right cabinet. Select a section that holds attractive, frequently used items and is not directly beside heavy grease or splashing. Remove the door carefully, label and store the hinges, and check whether neighbouring doors still open comfortably.
2. Repair the newly visible interior. Fill unused holes, secure loose shelves, smooth rough edges, and clean every surface. Decide whether the inside should match the outer cabinets or use a contrasting backing, then test the finish where shelves and supports meet.
3. Paint and refine the opening. Apply the appropriate coating system, finish shelf edges, and add discreet trim where the old door concealed gaps. If lighting is included, keep the source hidden and follow the same electrical safety boundaries as any under-cabinet installation.
4. Style for use rather than display alone. Group items by type, leave empty space around taller pieces, and keep heavy cookware on lower shelves. Rotate objects during cleaning and store the removed door safely so the cabinet can be returned to closed storage later if needed.
Open shelving becomes easier to maintain when it holds things that are used often. A row of beautiful dishes that never moves can turn into a surprisingly efficient dust collection system.
Remove only the upper half of doors with split panels, replace solid doors with glass, or create one open cubby at the end of a cabinet run. A curtain can soften the opening when completely exposed shelves feel too busy.
Additional Upcyclely Idea: Turn a Cabinet Door into a Fold-Down Kitchen Station
A sturdy cabinet door can become a compact fold-down surface for writing recipes, sorting mail, using a tablet, or preparing a light drink station. When closed, the panel returns to the cabinet front; when lowered, brackets or stays support it at a useful angle. This is a practical way to reuse an existing door in a small kitchen where a permanent shelf would obstruct movement.
The surface is only as safe as the cabinet structure and supporting hardware. A decorative door with thin panels may not carry concentrated load, and the cabinet itself must be anchored securely. This should remain a light-duty station rather than a substitute for a worktop. I would design around a specific modest task and keep hot appliances, heavy mixers, and anything involving vigorous cutting somewhere more stable.
Materials and Tools
· Sound cabinet door or reclaimed door panel
· Strong piano hinge or suitable continuous hinge
· Rated folding brackets, lid stays, or support cables
· Mounting rail or reinforced cabinet frame
· Drill, pilot bits, level, square, and appropriate fixings
· Durable cleanable surface finish and a simple handle or catch
Steps for This a Fold-Down Kitchen Station
1. Confirm that the cabinet can support the idea. Inspect the box, wall fixings, face frame, and door construction, then decide whether the existing door should be reused or replaced with a stronger lightweight panel. Mark the proposed open position and check that it will not block appliances, drawers, or a walkway.
2. Build a reliable hinge line. Add a reinforced mounting rail where needed, align the continuous hinge level, and use fixings that engage sound material. Open and close the unladen panel several times to make sure it does not twist or scrape the cabinet sides.
3. Fit matched supports on both sides. Install folding brackets, stays, or rated cables symmetrically so the panel stops at the intended angle and the load is shared. Test the supports gradually with light, non-breakable objects while watching the cabinet for movement.
4. Finish the surface and control the closed position. Apply a wipeable coating, add a catch that prevents accidental opening, and keep fingers clear of hinge and bracket pinch points. Use the station only for the light task it was designed to handle and inspect the fixings periodically.
A fold-down station earns its place when it has one clear job. Trying to make it a desk, breakfast bar, appliance shelf, and chopping board at the same time usually leads to hardware carrying more than it should.
Use a small panel inside a pantry as a recipe shelf, mount a narrow fold-down ledge beneath a wall cabinet, or convert a removed door into a separate wall-mounted message desk. A pull-out board may be more suitable when side supports would interfere with nearby doors.
Kitchen Cabinet Makeover Decisions That Can Cause Trouble Later
Decorating before repairing the cabinet. Paint and paper cannot stabilise a loose hinge, swollen base, or separating cabinet box. Repair structural problems, identify leaks, and confirm that the unit is securely fixed before adding a new surface.
Assuming every door is exactly the same size. Years of adjustment, repainting, and movement can leave small differences. Template and label each panel, insert, or wallpaper piece individually instead of cutting the complete set from one measurement.
Adding weight without checking hinges and fixings. Door-mounted racks, metal panels, and decorative inserts increase the load carried by screws and hinge cups. Use lightweight materials, spread fixings across strong areas, and recheck alignment after the door is loaded.
Using wall products as though cabinets never move. Wallpaper, fabric, and ordinary decorative paint may fail around handles and edges because cabinet doors flex and receive constant contact. Choose suitable materials, protect exposed edges, and test cleaning on a sample.
Cutting panels before testing the full movement. A rack, pull-out, rotating shelf, or sliding door may fit the empty opening but strike a hinge, frame, appliance, or neighbouring handle in use. Make a cardboard mock-up and test the complete path first.
Ignoring heat, steam, and water. Decorative paper can lift, timber can swell, and adhesive can soften near persistent moisture or heat. Keep projects out of unsuitable zones, preserve ventilation, and repair the source of dampness rather than sealing it beneath a makeover.
Overloading organisers once they are installed. A pull-out or door rack can operate smoothly when empty and bind after every gap is filled. Load gradually, keep heavy items low, respect hardware limits, and leave enough room for jars and trays to move without catching.
Making every cabinet the focal point. Chalkboard paint, maps, fabric, wallpaper, lattice, and hand painting all attract attention. Choose a limited feature area and allow plain cabinetry to balance it; otherwise several good ideas can compete until none of them reads clearly.
Frequently Asked Questions
Can kitchen cabinets be upcycled without removing every door?
Yes. Interior organisers, under-cabinet lighting, removable inserts, open shelves, and selected feature doors can change how the kitchen works without dismantling the entire run. Removing a door usually gives a cleaner finish for paint or paper, but the scope can remain limited to the area that needs improvement.
Do I need to sand cabinets before painting or adding inserts?
That depends on the existing material and the coating system. Glossy or damaged finishes often need cleaning and controlled abrasion, while some primers are designed for difficult surfaces. Thin veneer, laminate, and unknown old coatings should be treated cautiously, so test a hidden area and follow the product guidance.
What is the easiest kitchen cabinet upcycling idea for a beginner?
Changing handles, adding removable wallpaper panels, creating a small chalkboard insert, or removing one door for open shelving are manageable starting points. Projects involving cutting door panels, heavy pull-outs, or custom sliding hardware require more accurate construction and may be better after a simpler makeover.
Can fabric or wallpaper on cabinet doors be cleaned?
They can be maintained more easily when mounted on removable boards or protected with a compatible finish. Always test the coating because it may darken paper, change fabric colour, or reduce texture. Keep decorated doors away from heavy splashing and wipe gently rather than soaking the surface.
How can I avoid damaging cabinet doors with new hardware?
Measure the door thickness, mark hinge and panel locations, and use screws that cannot emerge through the front. Drill suitable pilot holes into strong sections and avoid placing heavy accessories on thin recessed panels. A cardboard template helps confirm both fixing points and movement before installation.
Is it safe to install under-cabinet lighting myself?
Battery or plug-in kits may be suitable when fitted exactly according to their instructions and kept in an appropriate location. Hardwired lighting, altered circuits, uncertain cables, and work near moisture should be handled by a qualified electrician. Do not conceal connections where they cannot be inspected or serviced.
Can I reverse these cabinet upcycling ideas later?
Removable fabric boards, wallpaper inserts, magnetic panels, stored doors, freestanding turntables, and non-permanent organisers offer the easiest route back. Keep original hardware labelled and avoid cutting sound doors when a surface-mounted or removable version can provide the same function.
Let the Existing Cabinets Earn Their Place Again
The most useful kitchen cabinet upcycling ideas begin with a specific problem rather than a decoration chosen in isolation. A dark worktop may need better light, a narrow door may hide spices, and a sound cabinet with tired fronts may only need carefully prepared panels. Once the structure, movement, moisture, and cleaning needs are understood, colour and pattern can do their work without making the kitchen harder to live with.
Choose one manageable cabinet and complete it properly before changing the whole room. A chalkboard panel, a removable wallpaper insert, or one organised pull-out can show which materials and details suit the space. Which cabinet in your kitchen could work harder with a thoughtful second use?