A Scandinavian dining room usually feels calm because the furniture has room to function. Chairs pull out without striking a wall, daylight reaches the table, and useful objects remain nearby without covering every available surface.
I don’t think achieving that feeling requires a new matching dining set. An old oak table can be stripped back to reveal its grain, loose vintage chairs can be repaired, and a thrifted bench can gain a washable cover. Even the lighting and table linen can begin with something already sitting unused elsewhere in the home.
The most appealing rooms rarely look as though everything arrived on the same afternoon. Slight differences in wood tone, chair shape, woven texture, and age help the space feel collected rather than staged.
Good Scandinavian dining room design begins with comfort and purpose. The table must suit the room, the seats must feel secure, and the lighting must support meals without producing harsh glare. Once those practical details work, a quiet palette and a few natural materials can connect the separate pieces.
Measure the Dining Zone Before Moving or Refinishing Anything
Clear the table and remove decorative objects that may distract you from the layout. Then measure the room, the table, the chairs, and any sideboard or bench you plan to keep.
Pull each chair into the position it occupies when someone is seated. Check whether people can pass behind it, reach the doorway, open nearby cupboards, and move around the table without turning sideways.
Look carefully at the furniture you already own:
- Is the table structurally sound?
- Do the legs wobble?
- Can every chair carry weight safely?
- Are upholstered seats sagging or torn?
- Does the bench fit beneath or beside the table?
- Is the sideboard deep enough for the room?
- Can drawers and doors open fully?
- Does tall furniture need securing?
- Are old finishes flaking, sticky, or heavily damaged?
- Which pieces could be repaired rather than replaced?
Inspect secondhand furniture before sanding. Older painted surfaces may contain hazardous materials, and sanding can release contaminated dust. The EPA recommends lead-safe working practices and additional caution when disturbing older painted finishes.
Repair weak joints before changing the colour. Paint and new fabric may improve appearance, but they cannot make an unstable chair safe.
Tall or top-heavy storage furniture should be secured appropriately, particularly where children live or visit. The U.S. Consumer Product Safety Commission advises anchoring furniture to reduce tip-over risks.
Useful Materials and Tools
- Measuring tape
- Pencil and paper
- Screwdrivers
- Wood glue
- Clamps
- Replacement screws
- Fine and medium abrasive paper
- Dust mask and eye protection
- Cleaning cloths
- Mild surface cleaner
- Paint or wood finish suited to the surface
- Brushes or small rollers
- Upholstery fabric
- Reused curtains, sheets, or tablecloths
- Sewing machine or hand-sewing needle
- Strong thread
- Furniture pads
- Approved pendant-light fitting
- Wire basket or woven basket
- Vintage or secondhand sideboard
- Woven storage baskets
- Cloth napkins
- Simple ceramics
- One or two plants
Do not begin by buying accessories. Fix the layout and furniture first. A room with a stable table, comfortable seating, and sensible storage needs far less decoration.
Refinish an Old Oak Table as the Natural Centrepiece
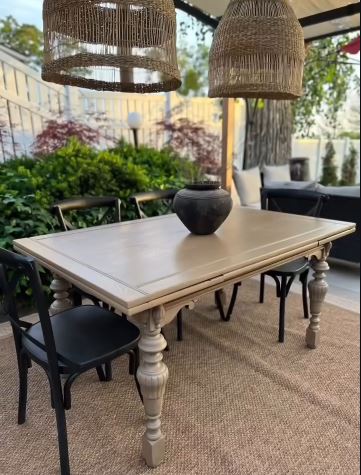
A solid table often deserves more attention than its existing finish suggests. Dark varnish, scratches, cloudy patches, and years of polish can make good timber feel heavier than it really is.
This restoration keeps the old oak table as a long-term family piece rather than replacing it with a lighter-looking modern table. That approach suits Scandinavian design particularly well because the wood itself provides warmth, variation, and visual character.
A successful result does not need to look newly manufactured. Small marks can remain when they do not affect hygiene or function. I’d rather preserve a few signs of use than remove so much material that the table loses its history.
Materials and Tools
- Structurally sound wooden table
- Screwdrivers and clamps
- Mild wood cleaner
- Abrasive paper
- Sanding block or suitable sander
- Dust extraction or vacuum
- Protective equipment
- Wood filler when necessary
- Pale stain, oil, or clear finish
- Brushes or lint-free cloths
- Furniture pads
Refresh the Table in Five Stages
- Check the structure before touching the finish. Tighten loose hardware and inspect the leg joints, apron, extension mechanism, and tabletop. Repair movement first so sanding does not hide a problem that will return as soon as the table is used.
- Identify the surface material. Solid timber can usually tolerate more refinishing than thin veneer. Test an inconspicuous area and stop if sanding reveals a different material, adhesive layer, or unexpected painted coating.
- Remove the damaged finish gradually. Clean the surface and work through the preparation method suited to the existing coating. Follow the grain and avoid concentrating the abrasive in one area, particularly around edges where the wood can become uneven quickly.
- Choose a restrained final tone. A clear finish, pale oil, or soft wash can preserve the grain while reducing the table’s visual weight. Test the product underneath first, then apply thin, even coats according to its instructions.
- Let the table remain useful. Protect the floor, check the legs again, and avoid covering the entire top with permanent decoration. A small tray, low vase, or folded piece of linen is usually enough.
For me, the table should remain the strongest material in the room. If its grain is lively, the chairs, rug, and lighting can be quieter.
A dark wooden table can still suit a Scandinavian dining room. Instead of stripping it, brighten the surrounding walls and textiles, then leave more open space around the table.
Give a Thrifted Bench a Washable Slipcover
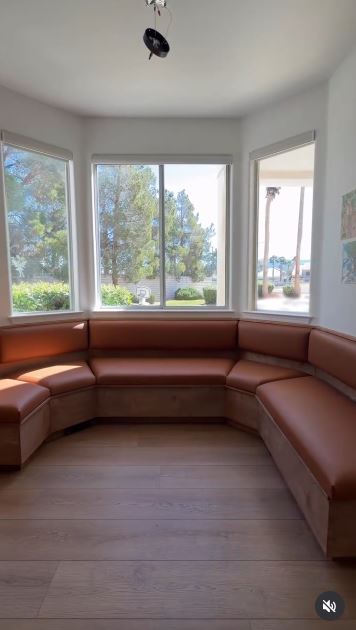
A bench can soften a dining set that otherwise contains many separate chair legs and backs. It is especially useful along a wall, where individual chairs may be awkward to pull in and out.
The thrifted bench behind this idea gains a slipcover that makes it look more connected to the room. The cover also provides a practical way to change the colour without permanently altering sound upholstery.
Use durable, washable fabric when the bench will receive regular family use. Loose, delicate material may twist or wrinkle every time someone stands up.
Materials and Tools
- Stable secondhand bench
- Measuring tape
- Reused curtain, tablecloth, or heavy sheet
- Washable lining fabric
- Scissors
- Sewing machine
- Strong thread
- Pins or sewing clips
- Hook-and-loop tape or ties
- Existing cushion or suitable padding
- Non-slip layer
Fit the Bench Cover
- Measure the bench in its dining position. Check the seat height against the table and make sure people can sit without striking the table apron. Measure the seat, sides, and any back section separately.
- Prepare the reused fabric. Wash it before cutting and inspect it for faded areas, weak folds, stains, and small holes. Position the strongest fabric over the seat and reserve thinner sections for the less stressed sides.
- Create a removable shape. Pin the fabric directly over the bench or use a paper pattern. Include an opening, ties, or hook-and-loop fastening so the cover can be removed without taking the bench apart.
- Control movement. Add a fitted inner panel, ties, or a non-slip layer beneath the seat. Then sit, stand, and slide along the bench to find areas where the cover pulls.
- Keep the finished line simple. Trim unnecessary fullness and press the main seams. A slightly relaxed cover works, but a large pile of fabric beneath the bench will collect dust and interfere with feet.
I’d keep the skirt short or omit it entirely. Showing part of the wooden frame helps the bench relate to the table and prevents the fabric from dominating the room.
An existing wooden bench can also remain uncovered with two removable seat pads made from leftover upholstery fabric.
Turn a Wire Basket Into a Scandinavian Pendant Shade
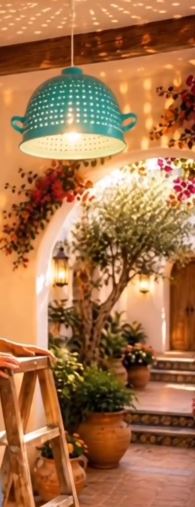
A wire basket already has the open structure needed for a lightweight pendant shade. Turned upside down, its shape can frame an existing lamp fitting while allowing light to move through the room.
This project works because the basket remains recognisable but gains a clear new purpose. Its lines can add contrast above a pale wooden table without creating the visual heaviness of a solid shade.
Treat the basket as a decorative shade only. Use an approved electrical pendant assembly, suitable bulb, secure ceiling support, and proper strain relief. Do not improvise or alter household wiring unless the work is completed by a qualified person.
Materials and Tools
- Sound wire basket
- Approved pendant-light fitting
- Suitable low-heat bulb
- Metal snips
- File
- Protective gloves
- Eye protection
- Correct shade ring or adaptor
- Paint suited to metal, if desired
- Ceiling hook or fitting installed correctly
Adapt the Basket Safely
- Inspect the basket. Check for rust, cracked welds, sharp wires, and weak handles. Choose a shape wide enough to surround the bulb without touching it.
- Plan the central opening. Mark the base while the basket sits upside down. Any opening must fit the approved shade holder or adaptor rather than relying on wire wrapped loosely around the electrical cord.
- Cut and smooth the metal. Wear gloves and eye protection, then remove only the material required for the fitting. File every sharp end and make sure no wire can damage the cord.
- Finish the surface separately. Clean and paint the basket before installation when a different colour is needed. Let the coating cure fully and keep paint away from the electrical components.
- Install the shade correctly. Attach it to the approved pendant fitting and check that the weight is supported properly. The shade should not hang from, pinch, or pull the electrical cable.
The dining table should sit beneath the light rather than chase it around the room. Centre the shade over the table’s usual position before fixing the cord length.
A woven basket can create a softer effect, but its material must remain well clear of the bulb and be used only with a suitable approved fitting.
Repurpose a Thrifted Bedsheet as Relaxed Table Linen

A good tablecloth does not have to begin in the linen department. A cotton bedsheet, curtain panel, or oversized fabric remnant may already provide enough material for a tablecloth and several napkins.
The table behind this idea uses a thrifted green-striped sheet as its cloth, paired with mismatched plates and napkins. The result feels relaxed because the separate pieces share a quiet palette without matching exactly.
Choose fabric that can be washed easily. Avoid heavily damaged, transparent, or stretchy sheets that move whenever a plate is lifted.
Materials and Tools
- Thrifted cotton or linen sheet
- Measuring tape
- Scissors
- Sewing machine or hand-sewing needle
- Matching or contrasting thread
- Iron
- Pins
- Existing cloth napkins
- Mismatched secondhand plates
- Simple vase or bowl
Turn the Sheet Into Dining Linen
- Wash and inspect the fabric. Check for stains, weak folds, tears, and sun damage. Hold it against the light so thin areas become visible before you position them over the centre of the table.
- Measure the required drop. Place the sheet over the table and adjust it from all sides. A relaxed cloth can hang unevenly by a small amount, but it should not gather around people’s knees or trail dangerously across the floor.
- Cut only when necessary. Preserve the original hem where possible and use the removed fabric for napkins or a narrow runner. Finish new raw edges so repeated washing does not produce loose threads.
- Build a simple table setting. Add existing plates, cloth napkins, and one low centre arrangement. Let the stripes or fabric texture remain visible instead of covering the table with several decorative layers.
- Check the table in use. Sit at every side and make sure the cloth does not pull beneath arms or chairs. Adjust the position before placing serving dishes.
I don’t think every plate needs to match here. Repeating one colour through the cloth, napkins, and two or three pieces of crockery can make a mixed collection feel connected.
A damaged sheet can still provide napkins, placemats, bread-basket liners, or a short runner when the central fabric remains strong.
Why Scandinavian Dining Rooms Feel Cold, Crowded, or Unfinished
Buying a Complete Matching Set
Matching furniture can make the room feel flat when every surface, leg, and finish is identical. Combine pieces through related materials instead of requiring them to be the same model.
Making Everything White
White walls and pale furniture need texture and contrast. Add wood grain, woven fabric, aged ceramics, greenery, or one darker element to give the room definition.
Ignoring Chair Comfort
A slender chair may suit the style but still feel unpleasant during a long meal. Repair the support, renew the seat, or choose another chair rather than prioritising its outline.
Choosing a Rug That Catches the Chairs
A small rug can bunch beneath chair legs whenever someone sits down. Use a properly proportioned rug or leave the floor uncovered.
Hanging the Pendant Without Testing the Table Position
Lighting centred on the room may not be centred over the table. Arrange the furniture first and place the fixture according to the dining zone.
Overfilling the Sideboard Top
A sideboard should provide temporary serving space as well as storage. Leave part of the surface clear instead of treating it as another crowded shelf.
Sanding Old Paint Without Checking It
Disturbing an unknown older coating can create hazardous dust. Identify the finish and use appropriate lead-safe precautions before sanding painted vintage furniture.
Adding Too Many “Natural” Materials
Wood, rattan, linen, jute, wool, stone, and several plants can still create visual clutter. Choose a few repeated materials and let them appear in different parts of the room.
Treating Minimalism as a Ban on Useful Objects
The dining room still needs serving dishes, napkins, lighting, and storage. Keep useful pieces nearby, but group or contain them so they do not compete visually.
Frequently Asked Questions
Do I need a light wooden table for a Scandinavian dining room?
No. A dark or medium-toned table can work when it has a simple shape and enough visual space around it. Lighter walls, textiles, and seating can balance its weight.
Can I mix different dining chairs?
Yes. Connect them through a repeated wood tone, upholstery colour, seat height, or general shape. Test every chair around the table before deciding the combination works.
How can I update the room without replacing furniture?
Repair loose joints, remove clutter, reposition the table, recover seats, refinish one wooden piece, and reuse existing fabric as table linen. Small functional changes often have more effect than new decoration.
Should I put a rug beneath the dining table?
A rug can add warmth and reduce visual echo, but it must be large enough for chairs to remain on it when pulled out. A bare wood or tile floor may be more practical in a small or frequently used dining area.
What colours suit Scandinavian dining-room design?
Warm white, pale grey, beige, muted green, dusty blue, clay, charcoal, and natural wood tones can work well. Choose colours that respond well to the room’s daylight rather than following a fixed formula.
Can a bench replace dining chairs?
A bench can work well along one side, especially beside a wall. Check its seat height, depth, stability, and the amount of room people need to enter and leave.
How much decoration should sit on the dining table?
Keep enough clear space for plates and serving dishes. One low arrangement, bowl, vase, or folded textile is usually easier to live with than several permanent objects.
Let the Dining Room Feel Collected, Useful, and Light
The most practical Scandinavian dining room design tips begin with the pieces already serving the room.
An old oak table may need careful refinishing rather than replacement. Vintage chairs can return to use after their joints are repaired, while a thrifted bench, sideboard, basket, and bedsheet can become seating, storage, lighting, and table linen.
Work on one functional problem first. Stabilise the chairs, improve the table position, or create a place for serving dishes. Once the room works comfortably, the neutral colours and natural textures will feel far more convincing.
Which existing piece would make the best starting point in your dining room: the table, chairs, bench, light fitting, sideboard, or table linen?