A chest of drawers can look finished long before it has actually reached the end of its useful life. A damaged top, missing drawer, dated finish, or awkward layout may make a piece feel wrong for its original job, yet the solid carcass, drawers, rails, timber, and hardware can still be useful. That is why chest of drawers upcycling projects interest me so much: one sturdy piece can become kitchen storage, a craft station, a dressing area, open shelving, or a completely different type of furniture without starting from new materials.
I tend to look at the structure before I look at the colour. Paint can make a dramatic difference, but it cannot repair a loose frame, unsafe caster, weak top, or drawer that no longer runs properly. I don’t think every dresser needs a complicated makeover either. Sometimes the best change is simply removing one tired feature, improving the useful parts, and giving the piece a job that suits its condition now.
The most successful transformations begin with honest assessment. A dresser that is strong enough for folded clothes may not automatically be strong enough for seating, heavy books, or a mobile kitchen station. Once the new use is clear, the finish, hardware, storage layout, and decorative details become much easier to choose.
Check the Carcass, Drawers, and Joints Before You Redesign Anything
Before sanding or reaching for paint, inspect the furniture as a structure. Drawer boxes can be repaired separately, but movement in the main frame, cracked side panels, loose feet, or a bowed top may affect whether the piece is suitable for a heavier new purpose. I would rather change the project idea than force a weak dresser into a job it cannot safely handle.
· Push gently on opposite corners to check whether the carcass racks or twists.
· Remove every drawer and inspect runners, stops, bottoms, and joints for looseness or splitting.
· Check the back panel and any internal rails that help keep the dresser square.
· Look underneath for damaged feet, loose plinths, old repairs, protruding fasteners, or insect damage.
· Repair structural problems before decorative work; paint should be the finish, not the repair method.
· If the piece may become seating, a mobile island, shelving, or another load-bearing item, plan extra reinforcement rather than relying on the original drawer construction.
Identify the Existing Finish Before You Sand, Paint, or Stain
Old dressers can carry wax, oil, varnish, shellac, paint, laminate, veneer, or several generations of finishes at once. The preparation method should match what is actually on the surface. Aggressive sanding can cut through thin veneer, while painting over grease or furniture polish can lead to poor adhesion even when the new colour looks fine at first.
· Clean first so dirt and polish are not ground into the surface during sanding.
· Test an inconspicuous area before using strong cleaners, strippers, or abrasives.
· Treat thin veneer gently and avoid sanding until the substrate appears.
· Scuff glossy sound finishes when appropriate rather than stripping automatically.
· Use good ventilation and suitable protective equipment for dust, solvents, spray products, and unknown old coatings.
· Keep decorative paint and non-food-safe finishes away from surfaces that will directly contact food.
Plan the New Function, Weight, and Hardware Before Making Cuts
A dresser conversion works best when the new function is decided before drawers are removed or panels are cut. Wheels, shelves, baskets, mirrors, hooks, upholstery, and new handles all change how the furniture is loaded and used. I know it can feel tempting to start dismantling immediately, but a quick layout plan often prevents the strongest part of the piece from being removed by accident.
· Measure the dresser, drawer openings, wall clearance, doors, and walking space around the finished piece.
· Choose casters, brackets, shelf supports, hinges, and wall restraints that suit the expected load.
· Mark which rails or dividers are structural before removing drawers or opening the front.
· Check how drawer fronts, baskets, or doors will open without colliding with nearby furniture.
· Plan cable access, mirror height, knee space, or countertop overhang when the new use requires them.
· Anchor tall or top-heavy furniture appropriately, especially in homes with children or pets.
Turn an Old Dresser into a Kitchen Island with Wheels and a Cutting Board
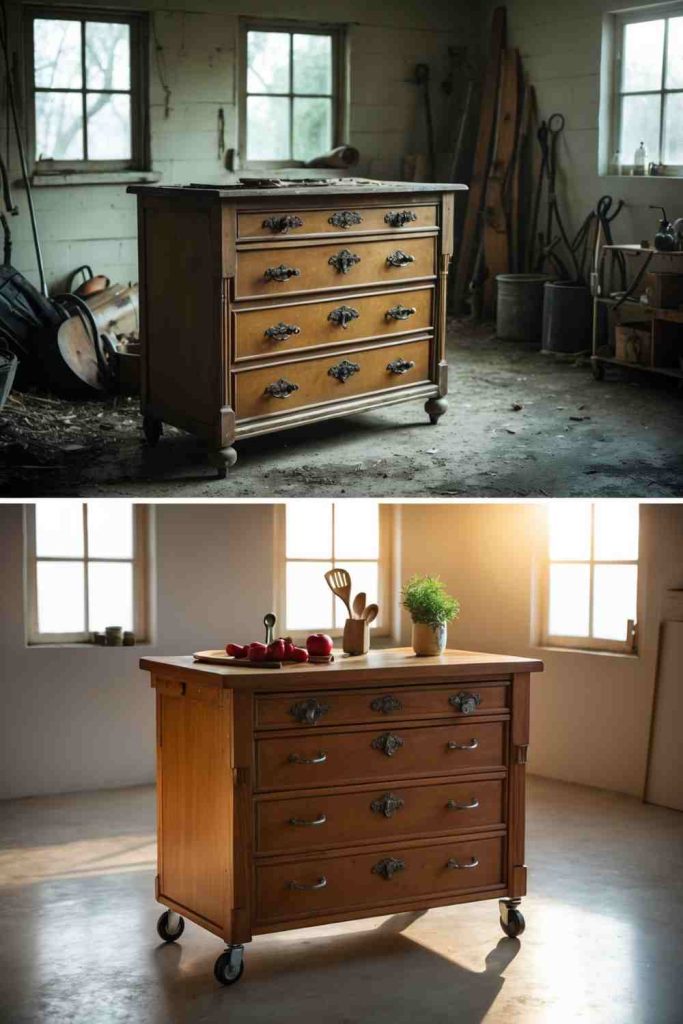
A low, sturdy dresser can make useful kitchen storage when its drawer layout already suits utensils, linens, jars, or serving pieces. Adding mobility and a separate work surface changes the role without erasing what the dresser does well. The key is treating the cutting surface, wheels, and overall stability as functional components rather than decorative add-ons.
I would keep any actual food preparation on a removable cutting board or another surface designed for food contact. That allows the painted or refinished dresser below to remain furniture while the top used for chopping can be washed or replaced independently. Locking casters also matter because a rolling island should stop behaving like a cart the moment you begin working at it.
Materials and Tools
· Structurally sound dresser
· Locking casters rated for the loaded furniture
· Fasteners or mounting plates suited to the base
· Removable food-safe cutting board or worktop
· Cleaner, sandpaper, and suitable furniture finish
· Drill/driver, measuring tape, and level
Steps for This Chest of Drawers Project
1. Assess the base and drawer function. Empty the dresser, remove the drawers, and inspect the bottom structure where casters would attach. Reinforce a weak plinth or thin base with properly fitted timber before adding wheels. Then decide which drawers will hold kitchen items so the heaviest contents can stay low.
2. Fit locking casters securely. Mark caster positions near strong corners or reinforced rails, keeping them symmetrical so the dresser remains level. Drill pilot holes where appropriate and attach the hardware with suitable fasteners. Test each wheel and lock before loading the furniture, then confirm the piece does not rock.
3. Prepare the furniture finish and top. Clean and scuff-sand the exterior, repair chips, and apply the chosen furniture finish away from food-contact areas. Keep the removable cutting board unfinished only if its manufacturer or material calls for that, or maintain it according to its own care instructions. Do not rely on decorative paint as a food-prep surface.
4. Load and test the island gradually. Return the drawers, add light kitchen items first, and roll the island across the intended floor. Check wheel clearance, drawer movement, and brake grip. Then increase the load gradually and make sure the dresser remains stable when a drawer is open and light pressure is applied to the worktop.
The part I would be strict about is movement. If the wheels do not lock firmly, I’d use the dresser as a stationary kitchen cabinet instead of pretending mobility is an improvement.
Variation: Keep the original feet and create a fixed coffee station or baking cabinet instead. A removable tray on top can provide a washable serving surface without changing the base.
Create a Vibrant Art Station with Paint and Supplies
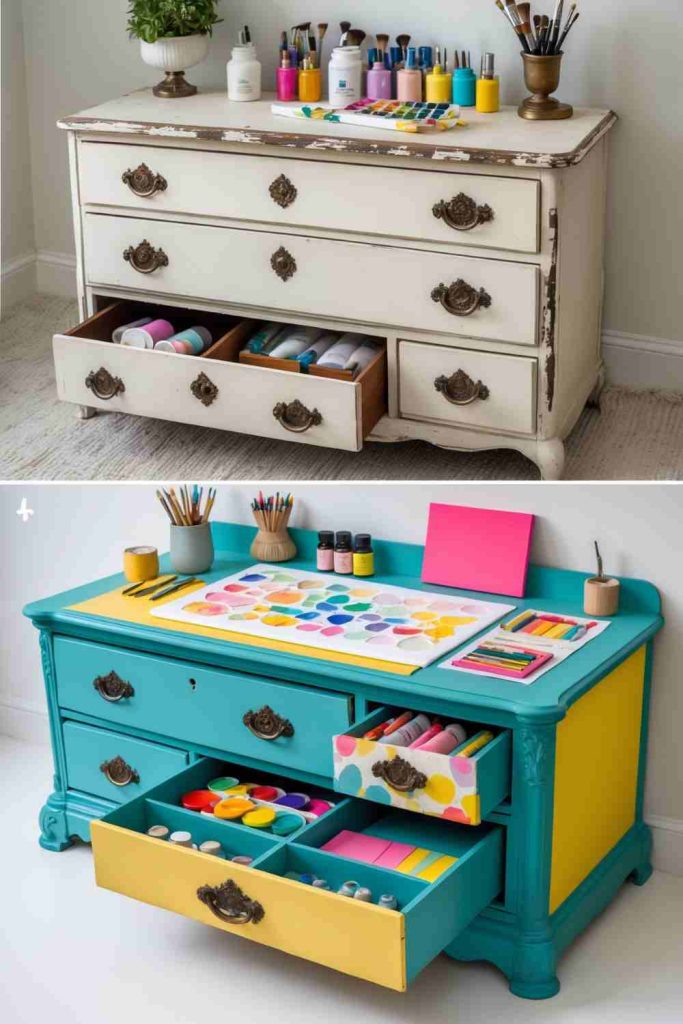
Deep drawers are naturally suited to art materials because they can separate paper, paint, brushes, cutting mats, fabric, and works in progress. A bright painted exterior can make the station feel energetic, but the more important improvement is organising supplies according to how often they are used and what needs to stay protected.
I like keeping messy materials low and frequently used tools near the top. That reduces the chance of a heavy paint bottle being stored above delicate paper, and it makes cleanup more realistic. If children will use the station, sharp tools, solvents, hot tools, and small parts should be stored separately and out of reach.
Materials and Tools
· Sound dresser with working drawers
· Furniture cleaner and surface-preparation supplies
· Paint or another appropriate furniture finish
· Drawer trays, boxes, jars, or reused containers
· Labels or removable dividers
· Brushes, roller, screwdrivers, and protective equipment
Steps for This Chest of Drawers Project
1. Sort supplies before designing the storage. Remove everything from the dresser and group the art materials by type and frequency of use. Measure the tallest bottles, widest paper, and longest tools. This tells you which drawers need dividers, which items belong on top, and whether one drawer should remain empty for unfinished work.
2. Prepare and refinish the dresser. Clean the surface thoroughly, remove loose finish, and repair damaged corners or drawer stops. Apply the new colour in a way that suits the existing surface, allowing the finish to cure according to its instructions. Keep drawer runners and contact areas free of thick paint that could make them bind.
3. Build practical drawer zones. Use washable trays or reused boxes for paint, pens, brushes, adhesives, and small pieces. Keep liquids upright and avoid overfilling drawers so the contents do not catch on the frame. Label only where it genuinely saves time; a drawer that is visually obvious does not need a tiny filing system.
4. Finish with a clean working top. Place only the tools used constantly on the top surface and keep enough empty space for actual making. Add a wipeable mat if messy work will happen there. Then open every drawer fully and check that containers, labels, and supplies stay clear of the runners.
For me, the best art station is the one that still has an empty patch of surface. If every centimetre is decorated with supplies, there is nowhere left to make anything.
Variation: Use one drawer as a portable project drawer. Place a shallow tray inside so the whole current project can be lifted out and carried to another table.
Turn Old Furniture into a Modern Storage Solution with Paint and Binders
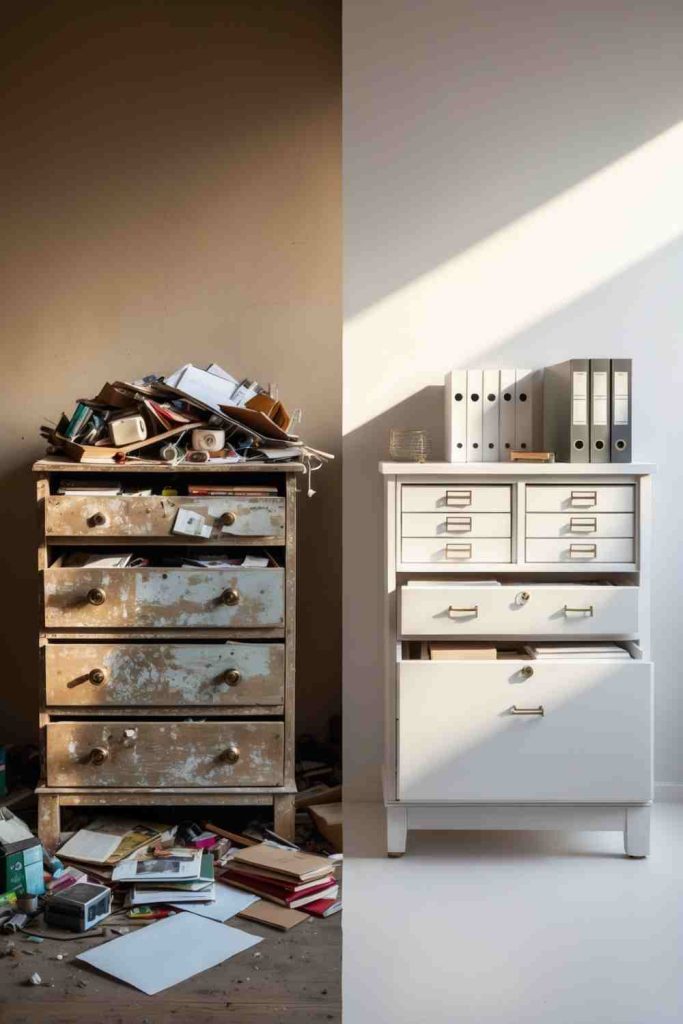
A dresser can become useful office or household storage without being dramatically rebuilt. The drawers handle loose papers, cables, stationery, and small supplies, while the top can hold frequently referenced binders or document boxes. A restrained finish helps the piece sit comfortably in a study, hallway, or family command area.
The main practical issue is paper weight. A stack of binders becomes heavy quickly, so I would avoid loading a thin or damaged top just because the styling looks tidy. It is also worth deciding whether sensitive paperwork belongs in open binders at all; closed drawers may be the better place for anything private or prone to dust.
Materials and Tools
· Dresser with a level, supported top
· Cleaner and light abrasive or deglosser as appropriate
· Furniture paint or finish
· Binders, magazine files, or document boxes
· Drawer dividers and labels
· Measuring tape and basic hand tools
Steps for This Chest of Drawers Project
1. Decide what belongs on top and what belongs inside. List the documents and supplies the dresser needs to hold. Keep heavy archives and rarely used material in lower drawers, and reserve the top for a small number of active binders. Measure the top so the files do not overhang or block a nearby wall switch, lamp, or drawer access.
2. Prepare a calm, durable finish. Remove hardware, clean the piece, and repair loose drawer fronts or stops. Scuff or prime the existing finish as required, then apply the new paint in thin even coats. Keep the inside of the drawer runners clean so the storage remains easier to use after the makeover.
3. Create simple categories. Use broad categories such as household, school, receipts, manuals, or current projects rather than dozens of tiny labels. Place loose items in shallow boxes so they cannot slide behind the drawers. If the dresser is shared, use labels that make sense to everyone who actually needs the storage.
4. Check weight and everyday access. Load the lowest drawers first and keep the heaviest paper near the bottom. Place active binders on the top and open the upper drawers to ensure the dresser does not become front-heavy. If the unit is tall, secure it appropriately so pulling out a loaded drawer cannot destabilise the piece.
I don’t think office storage has to look like office furniture. A good dresser already hides visual clutter, which is exactly what paper-heavy spaces often need.
Variation: Replace upright binders with reused lidded document boxes if you want a softer living-room look or need better dust protection.
Revamp with Paint, Tassels, and New Knobs
This is the kind of makeover that proves a dresser does not need a new function to deserve attention. Repainting the case, changing the knobs, and adding small textile details can shift the whole personality of the piece while preserving its original storage. Because the changes are mostly surface-level, the quality of the preparation becomes very visible.
Tassels work best as removable accents rather than substitutes for a secure handle. A drawer pull still needs a comfortable grip and a firm fixing. I would also keep hanging decoration short enough that it cannot catch in a lower drawer, vacuum head, child’s hand, or pet’s claw.
Materials and Tools
· Dresser with sound drawer fronts
· Cleaner, filler, and sandpaper
· Furniture paint and applicator
· Replacement knobs or pulls with compatible fixings
· Small removable tassels or cord accents
· Screwdriver, drill if new holes are required, and measuring tape
Steps for This Chest of Drawers Project
1. Remove hardware and repair the fronts. Take off the existing knobs and label any parts you may reuse. Clean the drawer fronts and case, fill unwanted holes or chips, and sand repairs flush. If new pulls use different hole spacing, decide whether to fill old holes or deliberately cover them before painting.
2. Paint without clogging moving edges. Apply the finish to the visible faces and case while keeping heavy paint build-up away from drawer edges and runners. Let each coat settle according to the product directions. Once the finish has hardened enough for handling, slide each drawer in gently and correct any new rubbing points.
3. Install new knobs evenly. Measure each drawer rather than assuming old holes are perfectly centred. Drill only where needed and support the back of the drawer front to reduce splintering. Tighten the hardware so it feels secure without crushing thin timber or fibreboard.
4. Add tassels as optional decoration. Tie or loop the tassels around the new pulls so they can be removed for cleaning. Open and close every drawer several times and shorten any accent that catches. Keep the decoration lightweight so it does not twist small knobs or mark the painted surface.
The tassel is the extra here, not the star. If the new knobs already give the dresser enough character, I’d happily stop before adding another detail.
Variation: Swap tassels for short leather tabs, braided fabric loops, or no hanging accent at all. The same painted base can suit very different rooms just by changing the hardware.
Turn an Antique Dresser into a Stylish Bench with Padding and Fabric
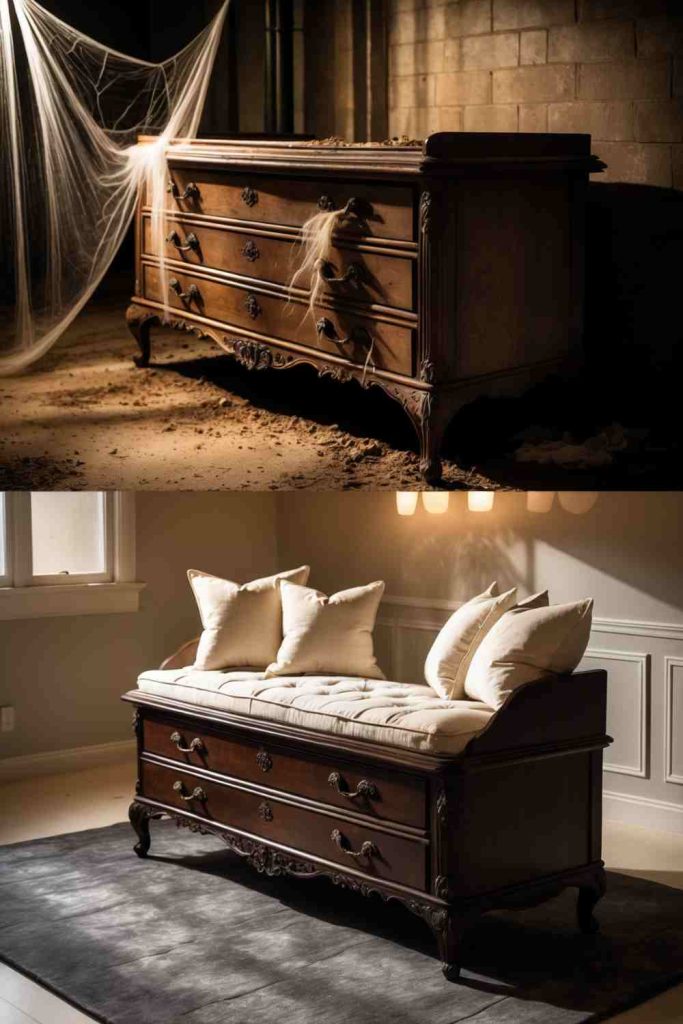
Turning a dresser into seating is a structural conversion, not simply an upholstery project. The original top may have been designed for lamps and folded clothes, not the concentrated weight of a person. A safe version needs a sound frame and a seat structure that transfers load into strong side panels, rails, or a purpose-built internal frame.
I would not sit on an unreinforced dresser just because a cushion fits on top. If there is any doubt about the timber, joints, repairs, or load path, keep the piece as storage and make a separate padded bench. When the structure is genuinely suitable, the upholstery can then be treated as the comfortable final layer rather than a disguise for weakness.
Materials and Tools
· Structurally sound dresser suitable for reinforcement
· Timber or sheet material for a properly supported seat base
· Appropriate screws, brackets, and structural reinforcement
· Upholstery foam and durable fabric
· Staple gun for fabric only, not structural assembly
· Drill/driver, saw, eye protection, and measuring tools
Steps for This Chest of Drawers Project
1. Evaluate whether the dresser should become seating. Remove the drawers and inspect the case from inside so you can see joints, rails, repairs, and side thickness. Decide how the seat load would transfer to the floor. If the top is thin, the carcass is loose, or the piece has uncertain damage, choose a non-seating makeover instead.
2. Build support before adding upholstery. Add a properly fitted seat platform and reinforcement that bears on strong parts of the frame, not only on the old top veneer or drawer rails. Use suitable mechanical fasteners and keep the structure square. Test for flex without climbing onto the piece, and correct movement before any fabric is attached.
3. Make a removable padded seat. Cut the foam and seat board to fit the supported area without blocking drawers or creating an unstable overhang. Wrap the fabric smoothly and staple it to the underside of the removable board. Keep corners neat so excess fabric does not interfere with the dresser or snag during use.
4. Finish and test conservatively. Refinish exposed timber as needed, reinstall only the drawers that remain functional, and place the cushion on the reinforced platform. Check the furniture for rocking and use the bench only within the limits of the structure you created. If movement appears later, stop using it as seating until repaired.
This is one project where I’d choose boringly strong over visually clever every time. Upholstery is easy to change; a weak seat structure is not a decorative problem.
Variation: For a safer beginner version, leave the dresser structurally unchanged and add a removable cushion only as a decorative top for a low storage unit that is not used for sitting.
Give New Life with Paint, Baskets, and Towels
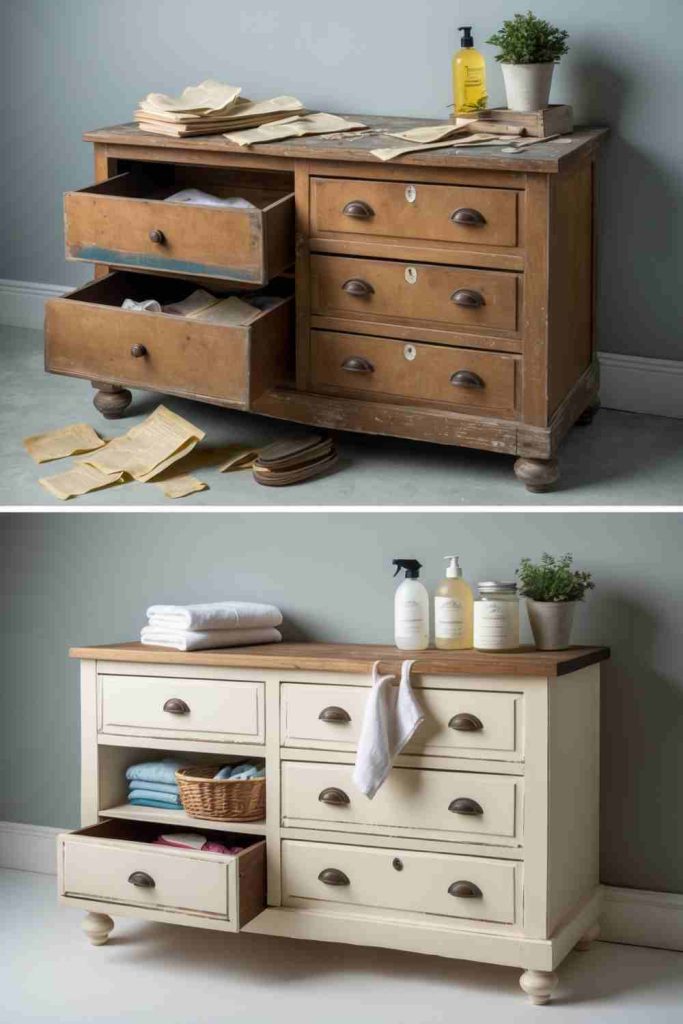
Removing one or more damaged drawers can turn a dresser into open bathroom, linen, or utility storage. Baskets hide small items, while towels use the deeper open spaces well. This works especially nicely when the drawer openings are already sound and do not require major reconstruction.
Bathrooms add moisture, so the dresser should not be treated as if it were still in a dry bedroom. I would keep timber away from constant splashes, allow airflow around baskets, and choose a finish that suits the room conditions. Damp towels should also dry before being folded into enclosed storage.
Materials and Tools
· Dresser suitable for a dry or well-ventilated bathroom area
· Baskets sized to the drawer openings
· Furniture finish appropriate for the location
· Shelf boards if damaged drawer runners are removed
· Fasteners and supports for new shelves
· Measuring tape, drill/driver, and basic finishing tools
Steps for This Chest of Drawers Project
1. Choose which drawers should stay. Test every drawer and keep the ones that operate well. Remove damaged drawers from areas that would work better as open cubbies, then inspect the remaining rails. Do not remove a divider simply because it looks unnecessary; first confirm that it is not helping hold the case square.
2. Create clean open compartments. If the old runners are awkward or sharp, remove only non-structural parts and add fitted shelf boards with proper support. Sand exposed edges smooth and seal the new surfaces. Check that baskets can slide in and out without scraping the paint or becoming wedged.
3. Refinish for the room conditions. Clean the dresser, prepare the old finish, and apply a suitable coating to exposed timber. Keep ventilation around the back and avoid positioning the piece where it will receive repeated direct splashes. Let the finish cure fully before filling the compartments with textiles.
4. Organise towels and small items. Fold dry towels into the open shelves and use baskets for smaller products that would otherwise look cluttered. Keep heavier bottles low and do not overload a lightweight basket. Periodically remove the baskets so dust and moisture cannot collect unseen behind them.
I especially like open drawers for towels because you can see whether the space is becoming overcrowded. Closed storage can hide dampness and clutter a little too successfully.
Variation: Use the same arrangement in a guest room for spare blankets, slippers, and toiletries, where moisture is less of a concern.
Turn a Dresser into a Velvet-Lined Jewelry Cabinet with Paint and Carvings
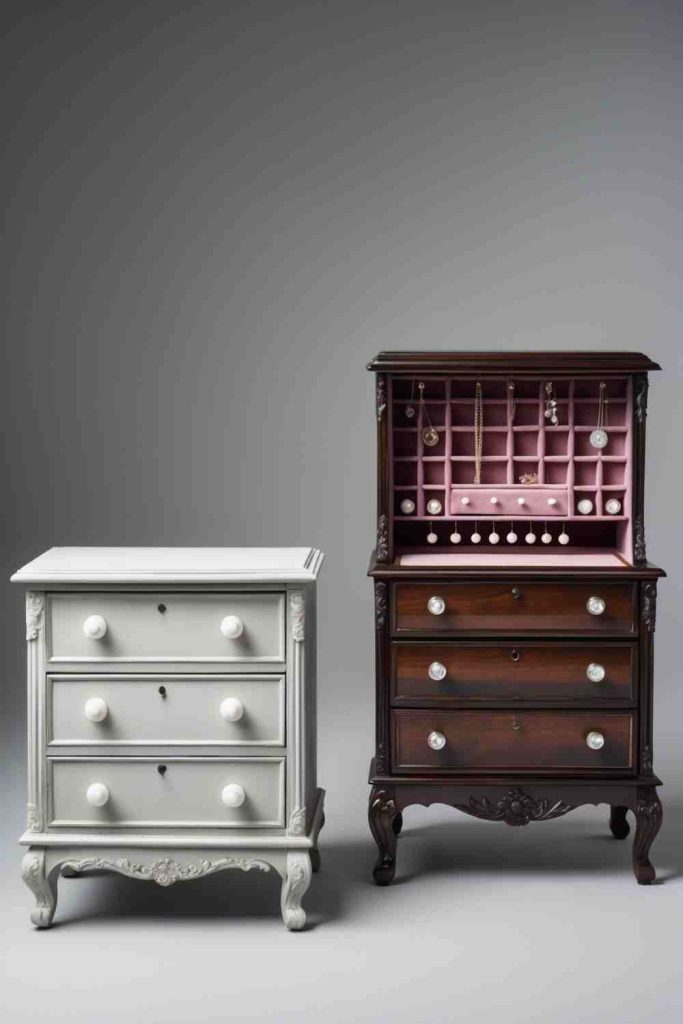
Shallow dresser drawers can become excellent jewellery storage because the wide footprint makes necklaces, bracelets, watches, and small boxes easier to separate. Lining the drawers protects delicate pieces from rough timber, while decorative appliques on the exterior can give a plain case more depth without changing its basic function.
The lining should stay smooth and removable where possible. Heavy adhesive can soak through velvet, create stiff patches, or make future cleaning difficult. I would also avoid loose hooks inside a drawer unless they are fixed where jewellery cannot catch when the drawer closes.
Materials and Tools
· Dresser with shallow or medium-depth drawers
· Velvet, felt, or another soft lining fabric
· Thin card or removable lining panels
· Small trays or jewellery dividers
· Decorative wood appliques if desired
· Furniture paint, hand tools, and compatible adhesive used sparingly
Steps for This Chest of Drawers Project
1. Plan the drawer layout around the jewellery. Measure the drawer interiors and group jewellery by type. Long necklaces need different storage from rings or earrings, so avoid making every drawer identical. Decide whether a soft flat lining, divided tray, or padded insert suits each category before cutting fabric.
2. Refinish the exterior first. Remove hardware, clean and prepare the dresser, then attach any decorative appliques to sound surfaces. Paint the case and details together if you want a unified look. Keep paint and glue away from drawer runners and allow the finish to harden before soft fabrics are placed inside.
3. Create clean removable liners. Cut thin card or board to fit each drawer base, then wrap it with velvet or felt, securing the fabric on the underside. This produces a smooth lining without gluing fabric directly to the furniture. Add small dividers or trays only where they help prevent tangling.
4. Set up jewellery without overfilling. Place heavier watches and boxes toward the centre of the drawer, keep chains separated, and make sure nothing sits high enough to catch the frame. Open and close each drawer slowly at first. If jewellery moves around, add shallow dividers rather than filling the space with more loose fabric.
A lined drawer feels luxurious mostly because it is quiet and organised. I’d rather have fewer compartments that fit the jewellery than a complicated insert full of tiny unusable spaces.
Variation: Use washed cotton, felted wool, or a removable scarf section instead of velvet for a softer recycled-material approach.
Transform with Paint, Mirrors, and Makeup Organizers
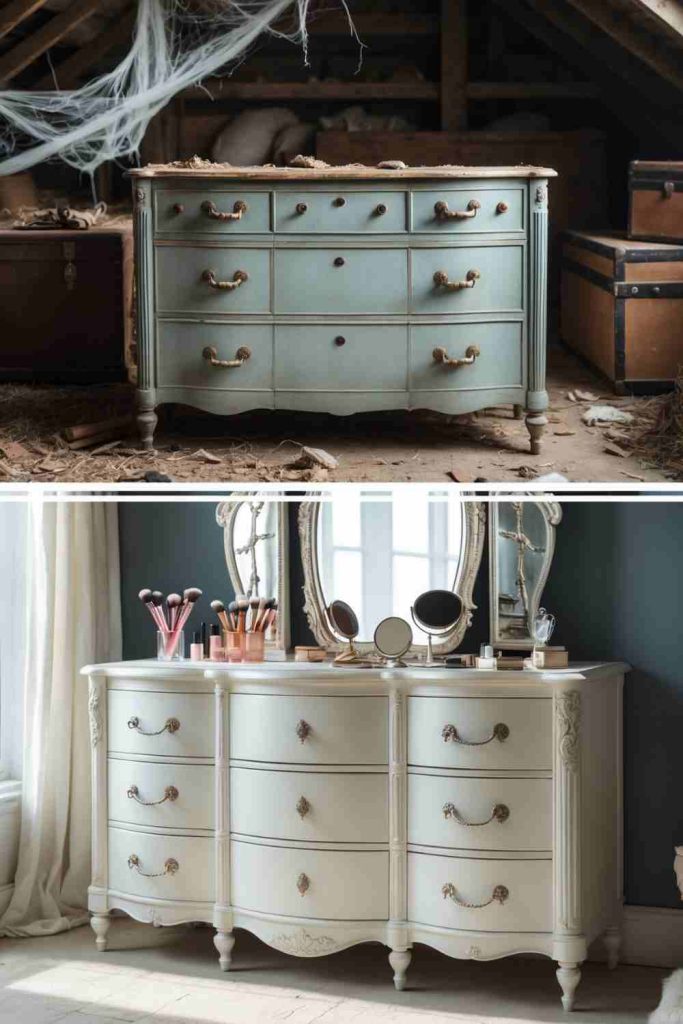
A dresser can become a practical dressing station because the drawers already store the less attractive essentials while the top keeps everyday items visible. Adding or pairing the piece with a mirror changes how the top is used, so height, lighting, and safe mirror mounting matter more than decorative symmetry.
Clear organisers are helpful only when they stop products from spreading across the surface. I would keep the centre area relatively open and store duplicates or rarely used items inside the drawers. Cosmetics can also leak, so removable trays protect the furniture better than placing bottles directly on a fresh painted top.
Materials and Tools
· Dresser with a comfortable working height
· Secure wall-mounted or dresser-mounted mirror system
· Furniture finish
· Removable makeup trays or reused small containers
· Drawer dividers
· Appropriate wall fixings, measuring tools, and basic hand tools
Steps for This Chest of Drawers Project
1. Decide the mirror position safely. Place the dresser where it will be used and check the sightline while sitting or standing. If the mirror is wall-mounted, choose fixings suitable for the wall and mirror weight rather than resting it loosely behind the dresser. Keep electrical cords and lighting clear of drawer movement.
2. Prepare and paint the furniture. Remove hardware, clean the surface, and repair scratches or loose drawer fronts. Apply the chosen finish without building thick paint on moving edges. Protect the top with a removable mat or tray if cosmetics, perfume, or hair products are likely to spill.
3. Organise by daily use. Keep everyday items in one or two shallow organisers and move backups into drawers. Use smaller boxes inside deep drawers so products cannot roll to the back. Avoid stacking glass containers where opening a drawer could cause them to collide.
4. Finish the station with clear working space. Return the mirror and organisers, then sit or stand at the dresser as you normally would. Check reach, lighting, and drawer clearance. Remove anything decorative that blocks the mirror, forces products to the edge, or makes the top difficult to wipe clean.
The top of a dressing table can become cluttered in about five minutes. I’d design the drawers to make putting things away easier than leaving them out.
Variation: Use a removable tabletop mirror instead of a mounted one if you rent or want the dresser to return to bedroom storage later.
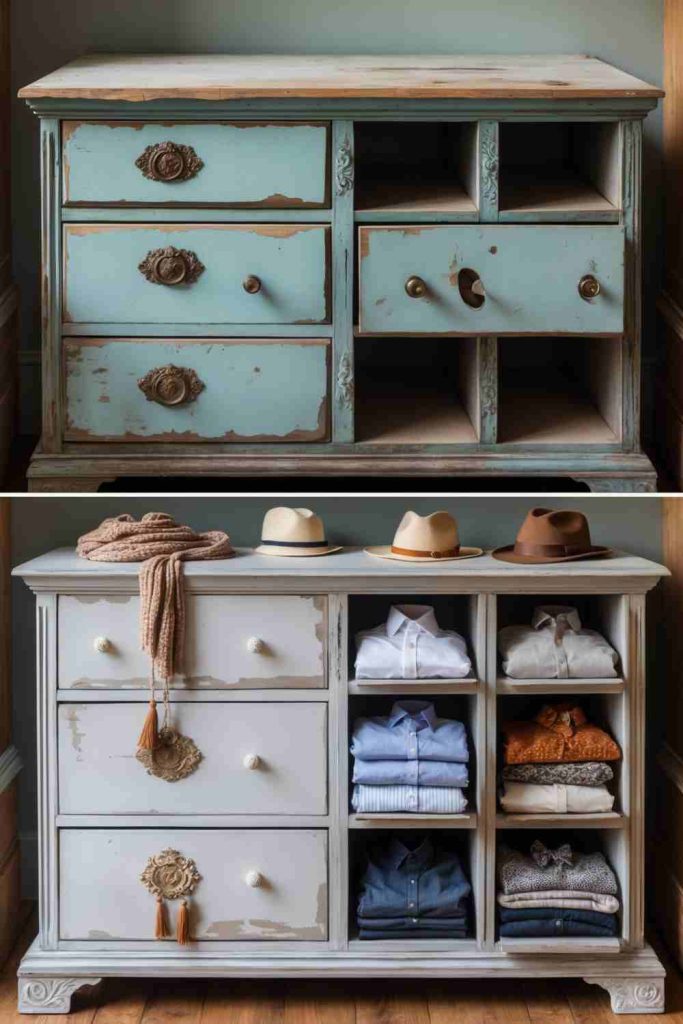
Modernize with Paint, Woven Baskets, and Chic Hangers
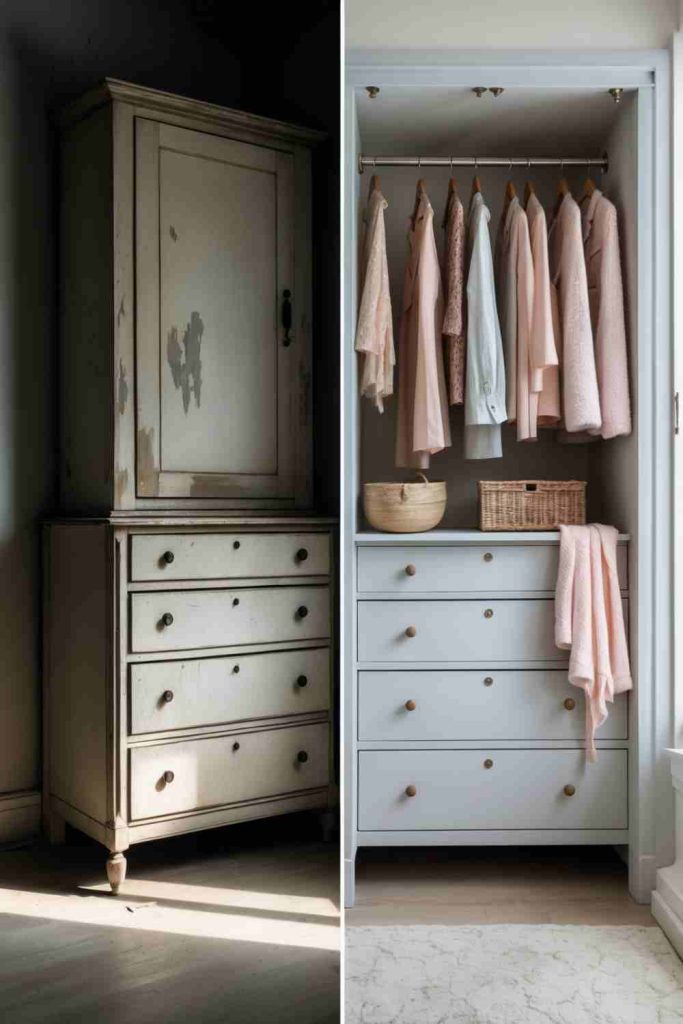
A tall dresser with missing or damaged drawers can be reworked into mixed open storage, especially for accessories, folded clothing, scarves, or lightweight hanging pieces. Woven baskets soften the open compartments, while a short internal rail can make use of a taller cavity if the frame provides enough depth and support.
This conversion should not involve removing structural rails casually. The front dividers that once framed the drawers may also keep the case square. I would preserve as much of the original framework as possible and add a hanging rail only where it can be fixed securely into strong side material.
Materials and Tools
· Tall dresser or drawer unit with suitable open cavities
· Woven baskets sized to the compartments
· Short rail or hooks for lightweight items if appropriate
· Furniture paint or finish
· Shelf boards and supports where needed
· Drill/driver, measuring tape, level, and wall restraint hardware
Steps for This Chest of Drawers Project
1. Map the structural rails before removing anything. Take out the drawers and inspect the interior. Identify which runners are removable hardware and which dividers are part of the frame. Keep structural elements in place, and choose only one taller opening for hanging storage if the furniture can support it without weakening the case.
2. Build stable shelves or a short rail. Fit shelves on proper supports so baskets do not rest on narrow drawer runners. If adding a rail, fasten it into solid side structure and keep it for lightweight garments or accessories rather than heavy coats. Test the rail before loading and check that the dresser remains square.
3. Refinish the exterior and exposed interior. Clean and prepare all visible surfaces, then apply the new finish. Sand exposed old runner marks or cut edges smooth and seal them. Do not paint basket contact areas so thickly that the baskets scrape or stick whenever they are removed.
4. Load the storage from low to high. Place heavier folded items and baskets in lower compartments, then use the upper area for lighter hanging pieces. Keep the dresser restrained to the wall if its height and use create a tipping risk. Pull baskets out one at a time and make sure the unit stays stable.
Open storage looks best when it is not full to the brim. Leaving a little breathing room around baskets and hangers makes the dresser easier to use as well as easier to look at.
Variation: Skip the hanging rail and use adjustable shelves throughout. That version is simpler, keeps the original case stronger, and works well for bags, hats, or folded knitwear.
Cozy Makeover with Fabric, Padding, and Wooden Handles
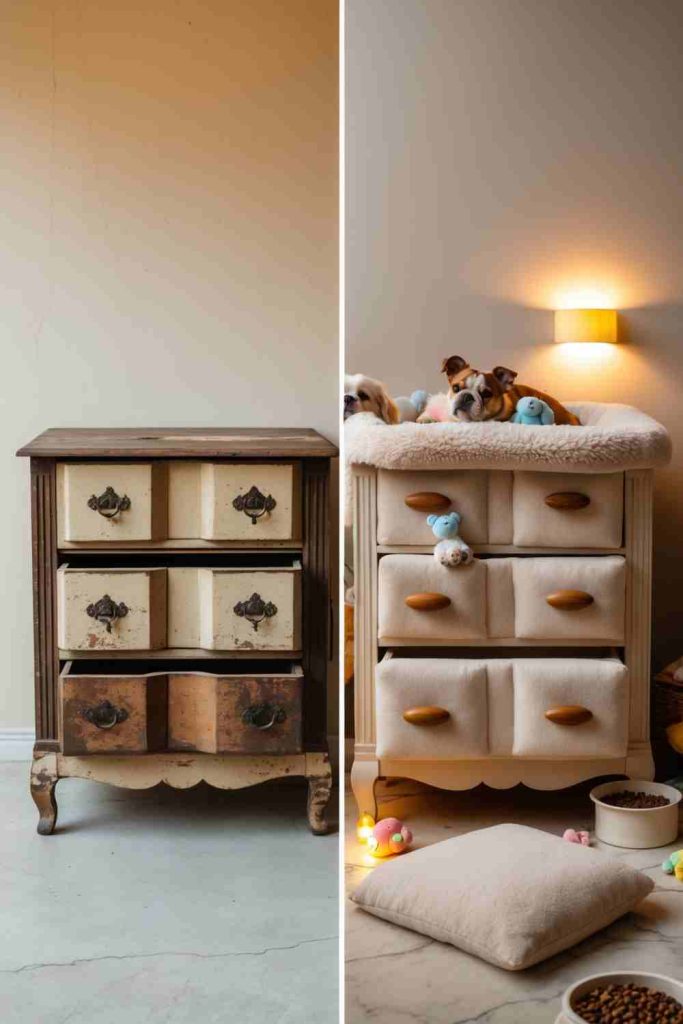
Upholstered drawer fronts can soften a dresser visually without converting the whole piece into seating. Thin padding beneath fabric gives the fronts a quilted look, while wooden handles bring back a firm grip that is easier to use than pulling directly on the textile. The important detail is keeping the padded layer clear of the drawer gaps.
Fabric on furniture needs to remain cleanable and mechanically secure. I would attach padding and fabric to removable panels or drawer fronts rather than using thick glue across the visible surface. If the dresser is used near pets, skip loose trim, tassels, or exposed staples that could become chew or snag hazards.
Materials and Tools
· Dresser with flat or suitable drawer fronts
· Thin upholstery foam or felt padding
· Durable fabric
· Wooden handles with appropriate bolts
· Stapler or upholstery tacks used on hidden reverse surfaces
· Scissors, measuring tape, screwdriver, and optional removable backing panels
Steps for This Chest of Drawers Project
1. Check drawer clearances first. Close every drawer and measure the gaps around the fronts. Padding and fabric add thickness, so a tight-fitting dresser may need a thinner approach or flat fabric only. Mark the safe area that can be upholstered without rubbing against adjacent fronts or the case.
2. Cut matched padding and fabric pieces. Use the drawer fronts as templates or create removable backing panels that fit inside their edges. Cut the padding slightly smaller than the fabric so the textile can wrap cleanly around the back. Keep corners flat rather than building bulky folds.
3. Secure upholstery on hidden surfaces. Wrap the fabric under even tension and staple or tack it only where fasteners cannot scratch the case or be touched during normal use. Check the front for ripples, then refit the panel or drawer. Open and close it several times before repeating the process on the remaining fronts.
4. Install wooden handles through solid backing. Mark handle positions through the upholstery and create neat openings without leaving loose threads. Bolt the handles through the drawer front or backing structure, not just through fabric and foam. Tighten them evenly and make sure no metal ends or staples remain exposed inside the drawer.
The drawer still has to feel like a drawer. If the padding makes it awkward to open, I’d reduce the thickness rather than accepting a fussy piece of furniture for the sake of softness.
Variation: Use flat reclaimed fabric panels with no foam for an easier version. You still get pattern and colour, but the drawer clearances remain almost unchanged.
Transform with Wood Stain, Books, and Decor
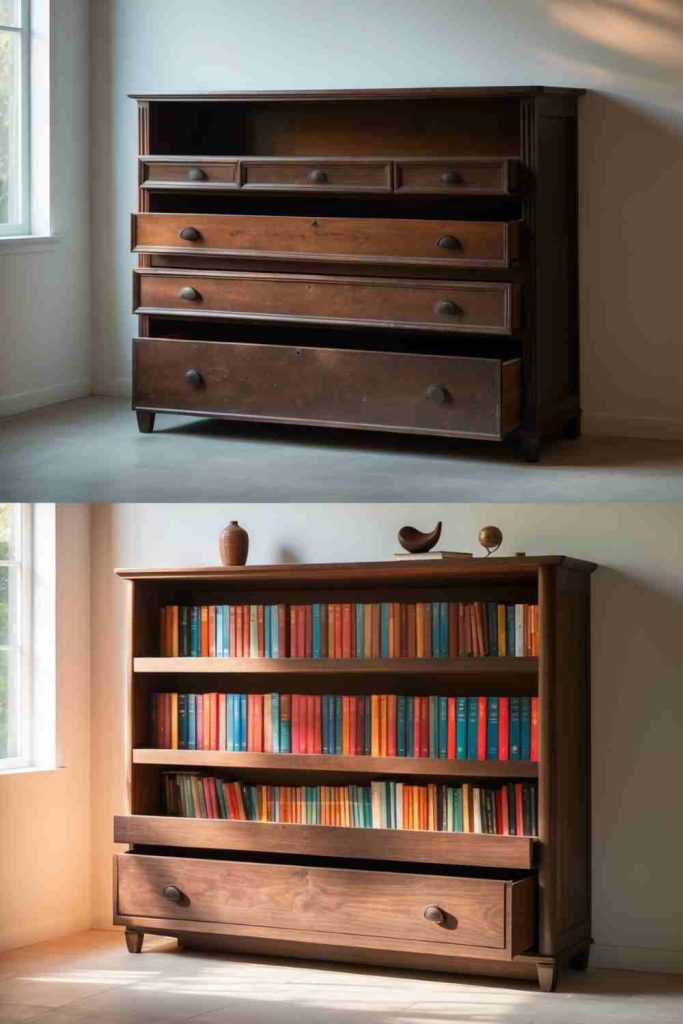
A dresser with missing drawers can become open shelving, but book storage introduces far more concentrated weight than folded clothing. The new shelves therefore need real support, and the case must remain square after any non-structural drawer hardware is removed. Wood stain can unify old and new boards when the exposed timber is suitable for staining.
I would keep the heaviest books low and avoid treating decorative drawer runners as shelf supports. If the dresser side panels are thin or the span is wide, add cleats or another proper support system. A wall restraint is also sensible for a tall bookshelf conversion because readers naturally pull weight in and out from the front.
Materials and Tools
· Structurally sound dresser carcass
· Shelf boards sized to the openings
· Timber cleats, brackets, or another suitable support method
· Wood stain or finish suited to the timber
· Screws and wall restraint hardware
· Saw, drill/driver, level, sanding tools, and eye protection
Steps for This Chest of Drawers Project
1. Strip the openings back carefully. Remove the drawers and take out only runner hardware that is not structural. Check the case for square and repair loose joints before measuring shelf openings. Sand sharp edges and old fastener holes so books cannot catch on rough timber.
2. Build supported shelves. Cut shelf boards to fit with enough clearance for installation, then support them on secure cleats or brackets attached to strong parts of the case. Check each shelf with a level and fasten it so it cannot tip when a book is removed from one side.
3. Unify the finish. Test stain on an inconspicuous area because old dresser timber and new shelf boards may absorb colour differently. Prepare both surfaces consistently and apply the finish in controlled coats. If matching proves impossible, a deliberate contrast can look better than layers of stain trying to hide different woods.
4. Load books gradually and secure the unit. Anchor the tall unit appropriately, then place heavier books on the bottom shelves and lighter decor higher up. Watch for shelf deflection as weight is added. If a shelf begins to bow, reduce the load or add support instead of waiting for the curve to become permanent.
Books are unforgiving storage. A shelf that looks strong while empty can tell a very different story after one row of hardbacks, so I’d test the load slowly.
Variation: Use the open compartments for baskets, board games, or folded linens instead of books if the dresser carcass is sound but not suited to concentrated shelf weight.
Modern Desk Makeover with Paint, Golden Knobs, and Style
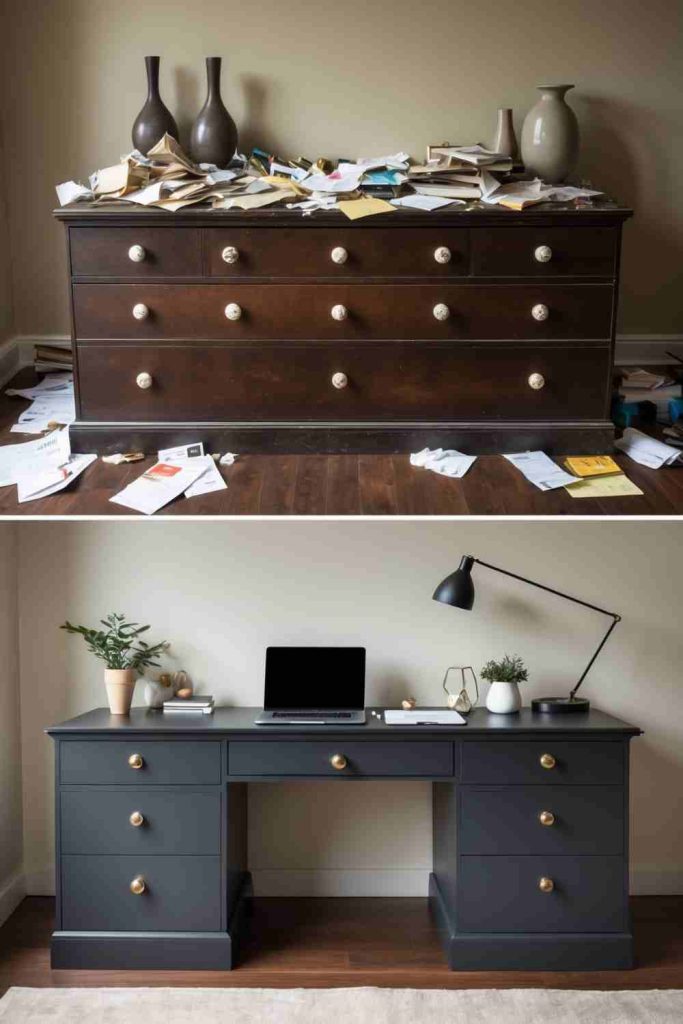
A wide dresser can sometimes become a desk or console workspace, especially when one central drawer or section can be removed to create knee space. The success of the conversion depends on comfortable height and clearance, not the colour of the knobs. A beautiful worktop is little use if a chair cannot fit underneath it.
I would test the sitting position before cutting anything. Sometimes the dresser works better as a standing laptop station, printer cabinet, or console because the original dimensions are too low or too deep for a comfortable desk. Hardware can modernise the look, but function should decide whether the project becomes a desk at all.
Materials and Tools
· Wide dresser with suitable height and structure
· Chair used for fit testing
· Furniture paint or stain
· Replacement knobs or pulls
· Timber and fasteners if a central opening needs reinforcement
· Measuring tape, drill/driver, saw if required, and cable-management accessories
Steps for This Chest of Drawers Project
1. Test the working height and knee space. Place the chair in front of the dresser and check where your knees, thighs, and elbows fall. Identify whether a drawer can be removed without weakening the frame. If there is not enough clearance, keep the dresser intact and use it as a standing or console-height workspace instead.
2. Create the opening without weakening the case. Remove only the central drawer or non-structural parts needed for legroom, and reinforce the surrounding frame if a rail or divider was essential to rigidity. Smooth exposed edges and make sure the remaining drawers still align before moving on to decorative work.
3. Refinish and update the hardware. Clean, prepare, and paint or stain the dresser. Replace knobs with new hardware that fits securely and does not project into the knee space. If the existing holes do not match, fill or redrill them carefully so the drawer fronts remain sound.
4. Set up a restrained work surface. Add the laptop, lamp, and only the accessories that need to stay on the desk. Route cables so they cannot catch a drawer or chair. Sit at the finished piece for a normal work period and adjust the chair or use before committing to it as a full-time desk.
A dresser-to-desk conversion is one of those ideas that looks obvious until you sit down. I’d let comfort veto the makeover if the original proportions are wrong.
Variation: Use the dresser as a standing craft station or hallway console with charging storage in the drawers. That preserves every drawer and avoids cutting the case.
Transform Vintage Furniture with Fabric and Paint
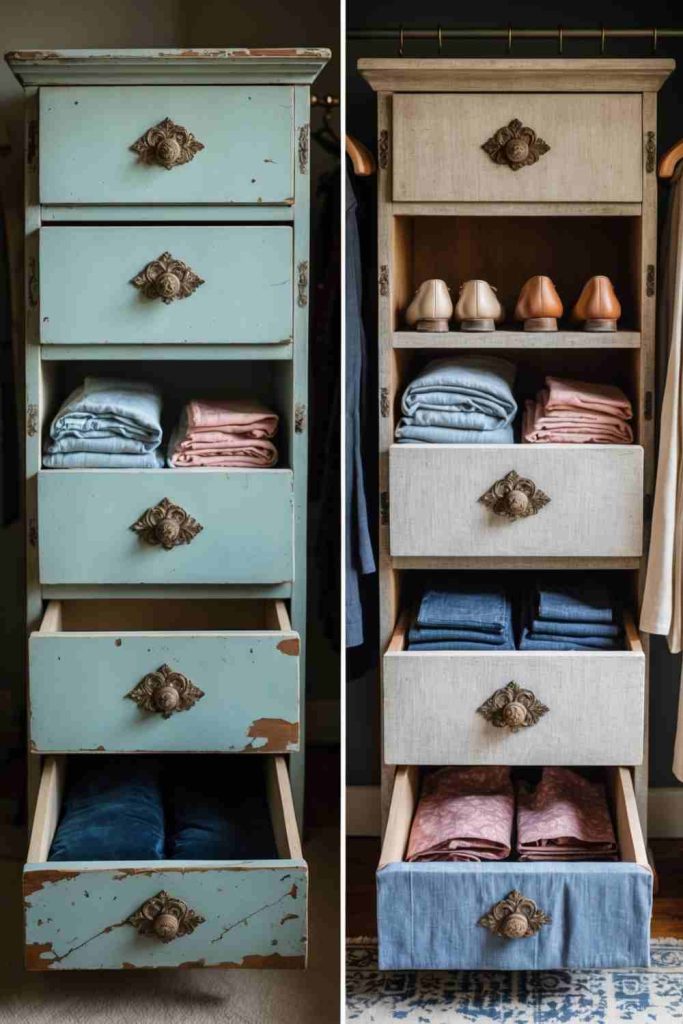
Fabric panels can bring pattern to a vintage dresser without requiring detailed hand-painting. They work especially well on flat drawer fronts, recessed panels, or selected open compartments where the textile can sit within a clear border. Painting the surrounding frame first creates a controlled background for the pattern rather than asking every old surface to match.
The most convincing result comes from careful edges. Frayed fabric, trapped bubbles, and misaligned repeats are much more noticeable on a drawer front than on a small craft object. I would test the fabric with the chosen adhesive or mounting method before committing, especially if the textile is thin enough for glue to soak through.
Materials and Tools
· Vintage dresser with sound drawer fronts
· Washed, pressed fabric or reclaimed textile panels
· Furniture paint and surface-preparation supplies
· Thin removable panel board or compatible adhesive
· Sharp fabric scissors or rotary cutter
· Measuring tape, straightedge, screwdriver, and smoothing tool
Steps for This Chest of Drawers Project
1. Choose where fabric will actually help. Remove the drawers and lay the fabric across one front before cutting. Decide whether every drawer needs pattern or whether alternating painted and fabric panels will look calmer. Check motif placement so a large flower, stripe, or geometric repeat does not land awkwardly on a handle hole.
2. Paint the case and exposed borders. Clean and prepare the furniture, then paint the frame and any areas that will remain visible around the fabric. Work on drawer fronts separately so edges stay neat. Let the finish harden before placing textile against it, since fresh paint can mark or stick to fabric.
3. Mount the fabric smoothly. For a reversible approach, wrap fabric around a thin removable panel fitted to the drawer front. If using adhesive directly, test first and apply only enough to hold the textile without soaking through. Smooth from the centre outward and keep the grain or pattern aligned across adjacent drawers.
4. Reinstall hardware and check movement. Create clean openings for knobs or pulls and secure the hardware through the solid drawer front, not through fabric alone. Trim hidden loose threads and reinstall each drawer. Open and close them repeatedly to make sure folded fabric edges do not scrape the case or unravel.
I’d rather use one really well-positioned fabric panel than cover every available surface. Pattern has more impact when the eye gets somewhere to rest.
Variation: Use removable wallpaper offcuts or paper decoupage panels instead of fabric if the drawer fronts are too shallow to accommodate wrapped textile edges.
Chest of Drawers Upcycling Mistakes That Can Cause Weak Structure, Sticking Drawers, or Unsafe Loads
Painting Before Repairing a Loose Carcass
A fresh finish can make a dresser look finished while the joints underneath are still moving. Repair the frame, feet, back, drawer fronts, and stops first so sanding and painting happen on a stable piece.
Removing Drawer Rails Without Checking Their Structural Role
Some rails are only hardware, while others help tie the front of the dresser together. Inspect the construction before cutting or prying anything out, and add reinforcement when an opening is enlarged.
Assuming the Top Can Handle a New Heavy Use
A dresser top built for clothing storage is not automatically a workbench, bookshelf, seat, or loaded kitchen surface. Match the load to the structure and add support where the new use changes how weight is carried.
Using Decorative Casters That Do Not Lock or Carry the Load
A mobile island or storage cart needs hardware chosen for the loaded weight and floor conditions. Use secure mounting points, test the brakes, and abandon mobility if the base cannot safely accept casters.
Sanding Through Thin Veneer
Aggressive sanding can expose the substrate beneath vintage veneer very quickly. Clean first, sand lightly when appropriate, and test a hidden area before assuming the surface can be stripped like solid timber.
Making Drawer Fronts Thicker Without Checking Clearance
Fabric, trim, mouldings, and appliques can cause drawers to scrape or stop closing. Test one drawer completely before repeating a decorative treatment across the whole dresser.
Loading Open Shelves Before Supporting Them Properly
Books, baskets, and bottles place different loads on converted drawer openings. Build real shelves on suitable supports and increase the load gradually instead of relying on old runners.
Treating Tall Furniture as Stable Just Because It Feels Heavy
Opening a loaded drawer moves weight forward. Secure tall or top-heavy furniture appropriately, especially after changing the internal layout or removing drawers that used to distribute weight.
Frequently Asked Questions
Do I need to strip all the old finish before painting a chest of drawers?
Not always. A sound, clean existing finish may only need suitable cleaning, scuffing, and preparation for the new coating. Peeling, contaminated, or incompatible finishes may need more work, so test a hidden area before deciding how aggressive the preparation should be.
Can I remove drawers and use the openings as shelves?
Yes, if the dresser remains structurally sound and the openings are given proper shelf support. Do not assume old drawer runners can carry books or heavy baskets, and avoid removing rails until you know whether they help keep the case square.
Is a dresser strong enough to turn into a bench?
Not automatically. Seating changes the load dramatically, so a safe conversion needs a sound carcass and a reinforced seat structure that transfers weight into strong parts of the frame. If the construction is uncertain, keep the dresser as storage and make a separate bench.
What is the easiest chest of drawers upcycling project for a beginner?
A surface refresh is usually the simplest: clean the dresser, repair small defects, prepare the finish, paint or refinish it, and replace the hardware. That keeps the original structure intact while still creating a noticeable change.
Can I use a dresser as a kitchen island?
A sturdy dresser can work as extra kitchen storage if its base, casters or feet, and top are suitable for the new use. Keep actual food preparation on a removable surface intended for food contact, and use locking casters if the unit is mobile.
How can I stop converted shelves from sagging?
Use shelf material and supports that suit the span and expected load, and keep heavier items low. If a shelf begins to bow during gradual loading, reduce the weight or add support rather than accepting the sag.
Should I keep the original dresser hardware?
Keep it if it is comfortable, secure, and suits the new design. Old knobs and pulls can also be cleaned, refinished, or reused elsewhere, but replace damaged hardware rather than forcing it back into weakened holes.
Let the Structure Decide What Your Old Dresser Becomes Next
The best chest of drawers upcycling projects begin with what the furniture can still do well. A sound dresser may need only a better finish and new hardware, while a piece with missing drawers can become open storage, a craft station, shelving, or another useful form. The goal is not the most dramatic makeover; it is a new job that fits the structure you already have.
I would start with the smallest change that solves the real problem. Repair the structure, plan the new load, then add paint, fabric, baskets, shelves, wheels, or hardware to support that use. Which role could the strongest parts of your old dresser handle next?