Shoes wear out unevenly. A pair may have a perfectly sound sole and comfortable fit while the upper looks scuffed, plain, faded, or simply no longer feels like something you reach for. That is the sweet spot for shoe upcycling: the footwear still works, but the surface gives you room to change the way it looks without pretending decoration can repair a structural problem.
I like shoe projects that begin with the pair you already own and the scraps already sitting in a sewing box, paint drawer, or old-clothes pile. Fabric offcuts, denim, lace, embroidery thread, small embellishments, and leftover decorative paper can all change a shoe dramatically. I don’t think the best result is always the busiest one. Shoes bend, rub, collect dust, and get knocked against curbs, so a restrained design placed on the right area often lasts better and feels more comfortable than covering every visible centimetre.
The practical question comes before the decorative one: can the shoe still be worn safely? If the sole is separating, the heel is unstable, the upper is torn through a load-bearing seam, or a strap is close to failing, fix that properly or retire the pair before decorating it. Once the structure is sound, then you can treat the upper as a small moving canvas and choose a finish that suits its material and flex.
Check Whether the Shoes Are Still Structurally Safe to Wear
Decoration should refresh a sound shoe, not disguise a failing one. Hold each shoe at the heel and toe, flex it gently, and inspect the sole bond, stitching, straps, eyelets, heel block, and any areas that carry body weight. A loose ornament can be repaired later; a separating sole or unstable heel is a different problem and needs appropriate footwear repair before the shoe returns to regular use.
Pay attention to the inside as well. Hard glue ridges, exposed fasteners, sharp embroidery knots, or a decoration placed over a pressure point can turn a visually successful project into a pair you never want to wear. I know it is tempting to judge the shoe only from the outside, but comfort is part of the finished design.
· Reject or professionally repair shoes with unstable heels, major sole separation, cracked structural components, or torn load-bearing straps before decorating.
· Check that the tread still provides appropriate grip and keep decorative materials away from the walking surface of the sole.
· Inspect the lining for tears or rough areas that may expose glue, thread ends, hardware, or stiff fabric against the foot.
· Flex the toe box and side panels to identify high-movement zones where thick embellishments or rigid coatings may crack or peel.
· Remove loose old decorations completely instead of gluing new material over a weak attachment.
· If the pair has sentimental value but is no longer wearable, consider a display or keepsake project rather than forcing it back into service.
Match Paint, Fabric, and Adhesive to the Shoe Material
Canvas, smooth leather, coated synthetic uppers, suede-like finishes, knit sneakers, and woven sandals do not behave the same way. Before choosing paint or glue, identify what you are actually decorating and look for products intended for that type of surface. A flexible canvas panel can accept stitches that would be awkward on thick leather, while a smooth synthetic surface may need careful cleaning and a compatible bonding method rather than the first craft glue on the shelf.
Test on a hidden edge whenever possible. The test should answer more than ‘does it stick?’ Flex the material after the sample has cured, rub it lightly with a cloth, and check whether the finish changes colour, becomes tacky, cracks, or lifts. That small test can save an entire pair from a decorative layer that never really suited the shoe.
· Choose paints, adhesives, sealers, and primers specifically compatible with the upper material and follow the manufacturer’s safety and curing directions.
· Use flexible decorative methods on areas that bend repeatedly, especially around the toe box and sidewalls.
· Keep strong adhesives and solvent-based products in a well-ventilated work area and protect skin and surfaces as directed.
· Avoid soaking shoe uppers with glue or paint; excess product can stiffen fabric, bleed through lining, or create hard internal ridges.
· Use stitching only where a needle can pass safely without damaging a waterproof membrane, structural reinforcement, or hidden hardware.
· Do not assume a clear topcoat will make an incompatible paint or weak adhesive suitable for footwear.
Clean, Dry, Mask, and Plan the Design Before Attaching Anything
Shoe surfaces collect skin oils, polish, road dust, lint, and old cleaning products, all of which can interfere with paint and glue. Clean according to the material, let the pair dry thoroughly, remove laces when they obstruct the work, and mask the sole edge, eyelets, lining, or hardware you want to keep untouched. A few minutes of preparation usually creates a cleaner border than trying to scrape dried paint from a rubber sole later.
Plan both shoes together. Mirrored pairs do not need to be identical, but they should look related when standing side by side. Arrange lace, patches, rhinestones, rope, flowers, or denim pieces without adhesive first and photograph the layout if it helps. Then you can work on one section at a time without forgetting the balance you liked.
· Remove laces and detachable accessories so you can reach seams and edges cleanly.
· Stuff the shoes lightly with clean paper or cloth to hold their natural shape while you plan and decorate.
· Mask sole edges, zips, buckles, eyelets, and openings that should remain free of paint or adhesive.
· Arrange both shoes together before attaching asymmetrical details so the pair feels intentional rather than accidentally mismatched.
· Trim fabric and paper pieces slightly oversized during the first fitting, then refine the edges after you understand the curve of the shoe.
· Keep a damp cloth, scrap material, and the correct cleanup method nearby before opening adhesive or paint.
Transform with Metallic Embellishments
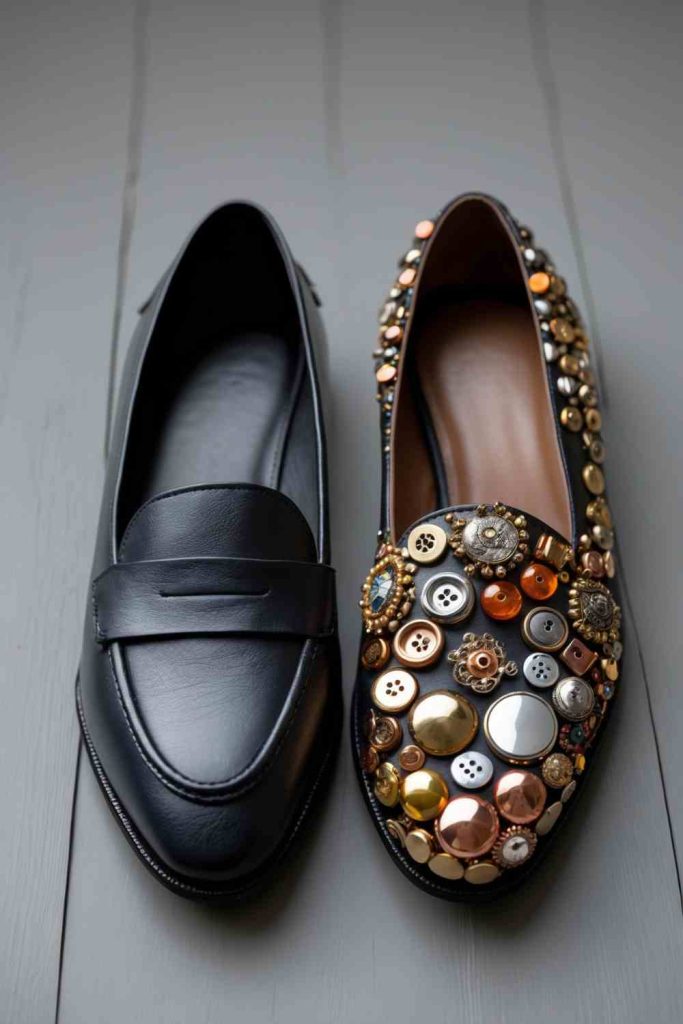
Small metallic pieces can turn plain loafers or sturdy slip-ons into something more architectural, especially when the base shoe has broad panels that do not flex dramatically. Buttons, washers, reclaimed jewellery parts, small gears, flat charms, and other lightweight metal details work best when they sit flush rather than projecting sharply from the upper.
The safest layout keeps hard pieces away from the toe crease, ankle edge, and any place where they could catch clothing or another shoe while walking. Before using reclaimed metal, smooth burrs and discard anything rusty, sharp, or heavy enough to pull on the upper. The visual effect comes from repetition and spacing, not from attaching every metal object you can find.
Materials and Tools
· Structurally sound loafers, flats, or similar shoes
· Lightweight flat metallic embellishments from old jewellery or craft leftovers
· Adhesive compatible with both the shoe upper and metal
· Tweezers or small pliers for placement
· Masking tape or removable layout marks
· Soft cloth for cleaning
· Optional compatible protective finish
Steps for This Shoe Upcycling Project
1. Map the weight and flex zones. Put the shoes on and bend your toes once so you can see where the upper creases naturally. Keep hard embellishments away from those lines. Arrange the largest pieces first on the outer side panels or other relatively stable areas, then fill smaller gaps without crowding the opening or sole edge.
2. Prepare each metal piece. Check the back and edges for burrs, broken loops, or sharp corners. Flatten or remove unsafe protrusions and clean away dust or oily residue. If a piece is too heavy to stay secure on a moving shoe, save it for a bag, frame, or other rigid project instead.
3. Attach in small groups. Use a compatible adhesive according to its directions and work with only a few pieces at a time. Press each embellishment flat so there is no raised glue ridge around it. Then compare both shoes before continuing, adjusting spacing while the design can still be corrected.
4. Cure and perform a snag test. Allow the adhesive to cure fully before flexing or wearing the pair. Run a soft cloth across the decorated area and around every edge; if the cloth catches, the embellishment may catch tights, trousers, or skin too. Rework any questionable piece rather than hoping it settles with wear.
For me, five well-placed metal details look more deliberate than a dense layer that makes the shoe stiff. The empty space lets the original shape of the footwear remain part of the design.
Variation: Use matching vintage buttons, flattened metal eyelets, lightweight chain laid in short sections, or one removable decorative shoe clip instead of permanently covering the upper.
Create Vibrant Designs with Colorful Paints
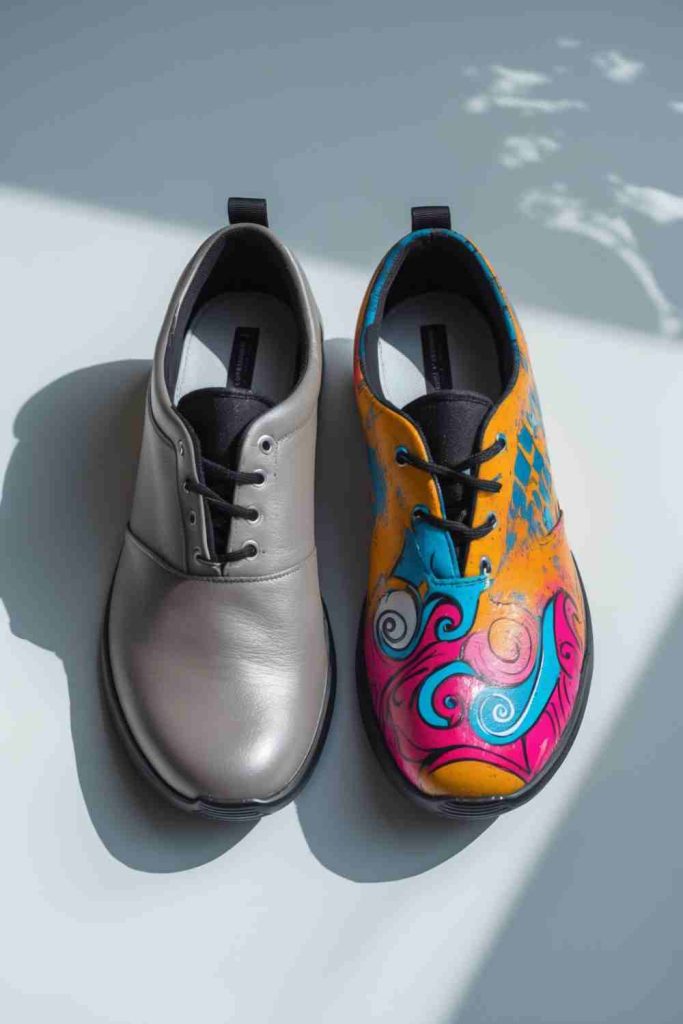
Paint is one of the easiest ways to refresh a plain pair because it changes colour without adding much bulk. It works especially well on canvas and other paint-friendly uppers, where stripes, abstract blocks, tiny florals, geometric motifs, or a simple two-tone toe can make a familiar shoe feel entirely different.
The important part is flexibility. Thick craft-paint layers can crack where the shoe bends, and heavily painted seams may become stiff. Choose a paint system intended for the surface, build colour gradually, and keep the tread and inner lining clean. If the base colour is dark, a test patch also shows whether the chosen shades need a compatible base layer.
Materials and Tools
· Clean shoes with a paint-compatible upper
· Flexible paint suitable for the specific shoe material
· Small flat and detail brushes
· Masking tape for crisp borders
· Washable pencil or removable marking tool if appropriate
· Palette or reusable lid
· Optional compatible finish recommended for the paint system
Steps for This Shoe Upcycling Project
1. Choose a design that follows the shoe. Sketch on paper first or mark only the main boundaries lightly on the upper. Let seams, panels, eye stays, and toe shapes act as natural guides. A design that follows construction lines usually looks cleaner and is easier to repeat across both shoes.
2. Mask and test the colour. Protect the sole edge, eyelets, and any hardware you want untouched. Apply a small test in a discreet area or on similar scrap material. Let it dry and flex the test before deciding whether the paint remains comfortable and adheres well.
3. Build thin layers rather than one heavy coat. Paint the broad shapes first and let each layer settle according to the product directions before adding detail. Keep paint out of deep folds and avoid flooding stitched seams. Then add small lines or accents only after the main areas look balanced.
4. Remove masking and inspect the pair together. Lift tape carefully so it does not tear the edge of the finish. Clean stray marks with a method safe for the shoe material, then place both shoes side by side. Apply any compatible protective finish only if the paint system calls for it, and wait for full curing before wear.
I know colourful shoes can make you want to keep adding one more shade, but a limited palette is often easier to wear and easier to repair later if a small area becomes scuffed.
Variation: Paint only the heel panel, create a narrow border around existing seams, add hand-painted dots to an old canvas pair, or use a monochrome design with different line weights instead of many colours.
Add Elegance with Lace Detailing
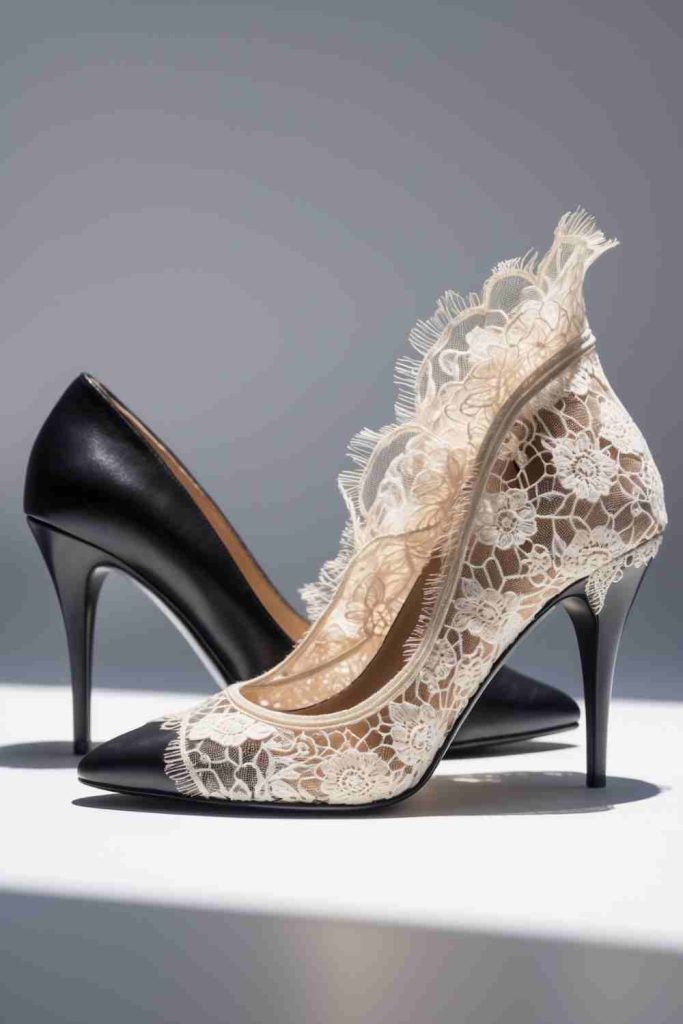
Lace softens a plain shoe without requiring a full colour change. A small panel over the heel counter, a narrow strip along the side, or a shaped piece over a stable toe area can add texture while leaving enough of the original upper visible to keep the pair practical.
Because lace has open areas, excess glue shows quickly. The best results come from a thin, even bond and very careful trimming around curved edges. Choose lace that is strong enough to handle movement; fragile vintage pieces are better saved for low-stress decoration or attached as removable clips rather than glued across a flexing panel.
Materials and Tools
· Plain heels, flats, or shoes with a relatively smooth upper
· Strong lace or lace offcuts
· Adhesive suitable for the lace and shoe material
· Small sharp scissors
· Paper for making curved templates
· Tweezers or a blunt tool for positioning edges
· Optional matching thread for reinforced hand stitches where appropriate
Steps for This Shoe Upcycling Project
1. Make paper templates for curved sections. Lay paper over the area you want to cover and crease it gently along the boundaries. Trim the template until it lies flat without bunching. Use that shape to cut the lace with a small margin, keeping the strongest part of the motif near edges that will receive the most handling.
2. Dry-fit both shoes. Place the lace on each shoe before adding adhesive and compare the motifs from the front, side, and back. Decide whether the pair will mirror each other or use related but different lace sections. Trim obvious excess only after you are happy with the position.
3. Bond the lace without saturating it. Apply a thin compatible adhesive layer to a small area and press the lace into place, smoothing from the centre outward. Avoid filling every open hole with glue. Work gradually around curves and use a blunt tool or tweezers to settle edges into the correct line.
4. Refine and test the edges. After the adhesive has cured, trim stray threads and inspect every boundary with your fingertip. Reinforce a lifting edge appropriately, then flex the shoe gently. If the lace pulls across a crease, remove or shorten that section before regular wear causes it to tear.
The part I would keep simple is the opening around the foot. A thick lace edge there can rub surprisingly quickly, even when it looks perfectly neat on the table.
Variation: Use narrow lace only around the heel, attach a lace bow as a removable shoe clip, or layer lace over a small reclaimed fabric patch instead of covering a whole panel.
Add Pop Art Flair with Comic Book Designs
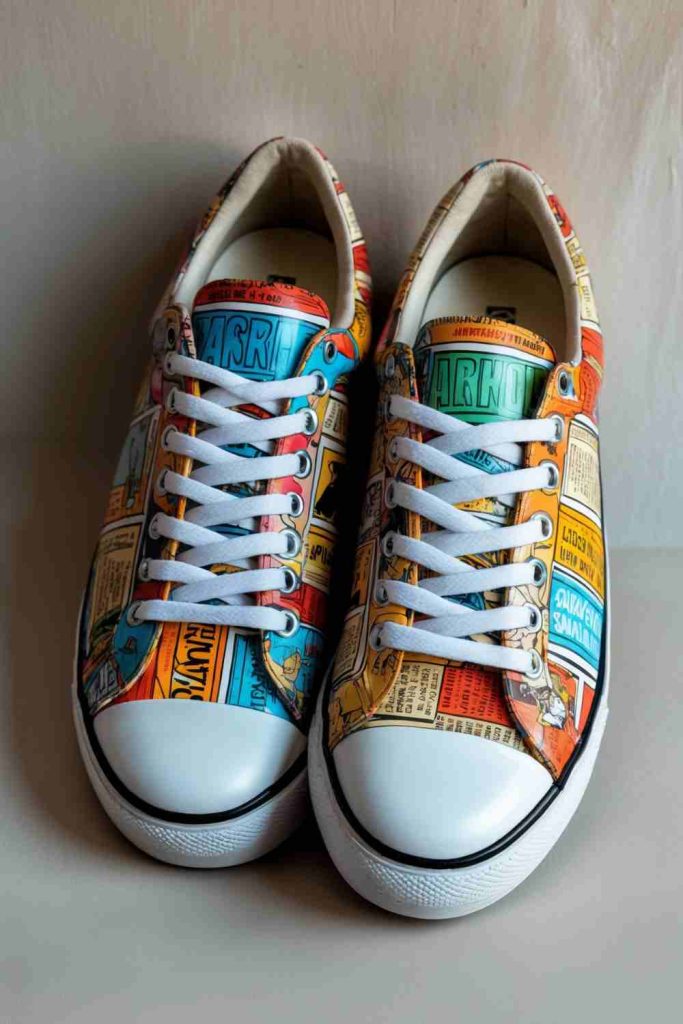
Printed graphics can turn a plain sneaker into a collage, but paper and footwear are an awkward partnership unless the layout respects movement. Small cutouts placed on relatively stable panels usually behave better than one large sheet wrapped across a toe crease.
Use pages you own and are comfortable altering, or original and appropriately licensed printed artwork rather than copying material you do not have permission to reproduce. Thin paper follows curves more easily, while heavier paper can feel bulky. Whatever you use, keep graphics away from the tread, lining, and high-friction edges.
Materials and Tools
· Plain shoes with a suitable surface for decoupage-style decoration
· Owned or appropriately licensed printed graphics
· Sharp small scissors
· Decoupage medium compatible with the shoe material
· Soft brush for adhesive
· Small smoothing tool or clean fingertip
· Optional compatible flexible protective top layer
Steps for This Shoe Upcycling Project
1. Break the design into small flexible pieces. Cut individual words, shapes, colour blocks, or panels rather than trying to wrap the shoe in one rigid sheet. Arrange the pieces around natural seams and leave small gaps over deep flex lines. Make the two shoes related without forcing every graphic into a mirrored position.
2. Test the paper and medium together. Apply a sample to similar material or a hidden area so you can see whether the ink runs, the paper darkens dramatically, or the medium dries too stiff. This matters especially with home-printed graphics, which may react differently from commercially printed paper.
3. Apply pieces from the centre outward. Brush on only enough medium to create an even bond, position one cutout, and smooth it carefully so no hard wrinkle sits under the foot’s movement. Overlap edges slightly if the design calls for collage, but avoid building thick stacks in one spot.
4. Seal only with a compatible flexible system. Let the decoration dry fully, then inspect corners and overlap points for lifting. Add a thin protective layer if the chosen medium is intended for that use on footwear. Flex the shoe gently before wearing; a section that immediately creases sharply should be simplified.
A collage gets stronger visually when you leave a few areas of the original shoe untouched. I don’t think every white patch needs to disappear under paper for the pop-art effect to read clearly.
Variation: Use old maps, your own doodles, ticket stubs you are happy to cut, or photocopies of personal sketches, keeping the pieces small and away from the deepest flex points.
Brighten Sandals with Braided Rope Accents
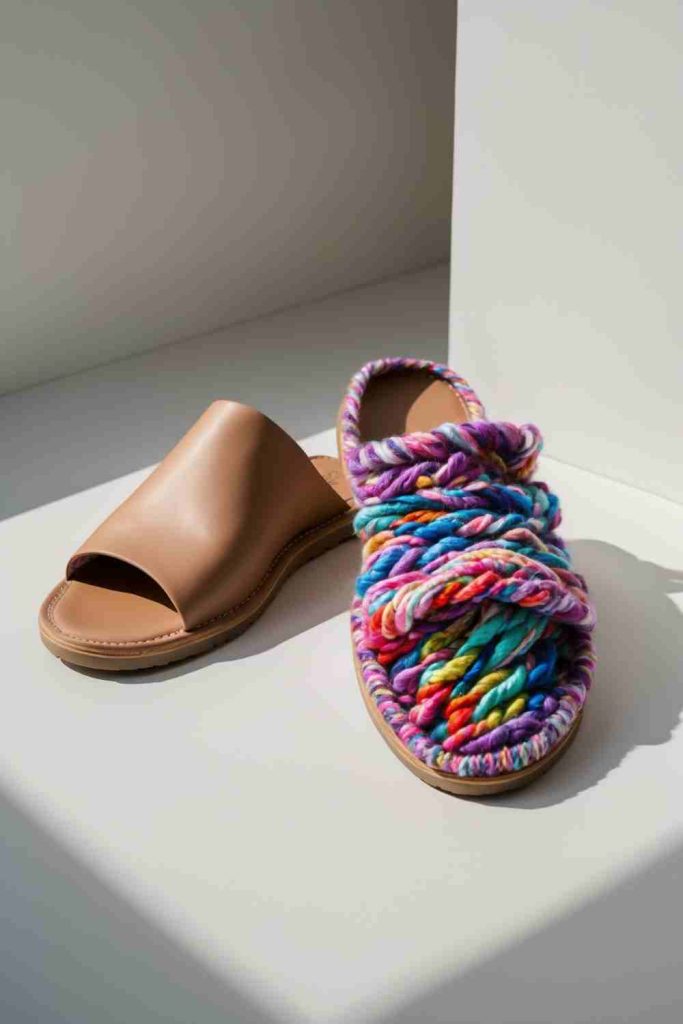
Braided cord or narrow rope can make plain sandal straps look more substantial while using leftover yarn, cord, or textile strips. The detail is most practical when it follows the existing strap rather than creating a new load-bearing structure. The original sandal should still provide all of the support.
Anything wrapped around a strap changes its thickness, so comfort needs checking as carefully as appearance. Avoid bulky knots where they could press against the top of the foot, and never cover a buckle, adjustable section, or strap anchor that you may need to inspect later.
Materials and Tools
· Structurally sound sandals with secure original straps
· Braided cord, yarn, or narrow reclaimed textile strips
· Adhesive compatible with the strap material and fibre
· Small scissors
· Clips or removable tape for temporary positioning
· Blunt needle or thread for decorative wrapping if useful
· Optional matching cord for neat end bindings
Steps for This Shoe Upcycling Project
1. Decide where the braid can sit without rubbing. Put the sandals on and mark the visible strap areas that do not press tightly against the foot. Avoid strap undersides and buckle paths. Lay the braid over those sections and check whether the added thickness changes the fit before cutting anything.
2. Prepare neat sealed ends. Cut the braid slightly longer than the decorative section and secure the ends in a way suitable for the fibre so they do not unravel. Keep end bindings slim. If the rope is coarse, test it against bare skin before attaching it anywhere near the foot.
3. Attach along the existing strap. Work from one anchor point and follow the strap’s natural curve, using a compatible adhesive or decorative stitching that does not weaken the original material. Press the braid flat rather than stacking it into a ridge. Then repeat the placement on the second sandal.
4. Check adjustment and walking movement. After curing, fasten the sandal normally and walk indoors for a short test. Make sure the braid does not slide toward the foot, block a buckle, or create a rubbing point. Trim and resecure any loose fibre before regular use.
The decorative braid should feel like a cover, not a new strap. If the sandal starts depending on the added cord for support, the project has moved into footwear repair and needs a stronger construction method.
Variation: Use braided strips cut from an old T-shirt, wrap only a central strap section with embroidery thread, or add a short removable braided sleeve that can be changed with different outfits.
Transform Flats with Colorful Fabric Patches
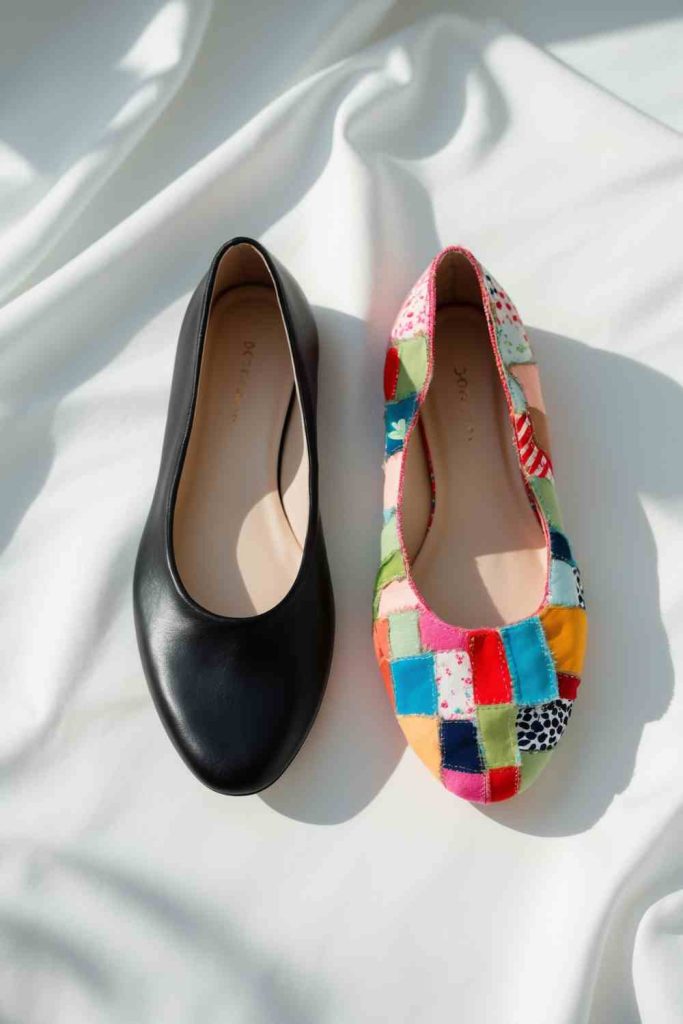
Fabric patches are useful for cosmetic scuffs because they can turn an awkward mark into part of a deliberate patchwork pattern. They should not be used to hide a hole that compromises the shoe’s structure, but on a sound upper they can add colour while giving small textile scraps one more purpose.
Soft woven fabric follows gentle curves better than thick upholstery offcuts. Cut pieces with smooth shapes, keep bulky overlaps away from flex lines, and pay attention to grain and fraying. A patch that looks charming when flat can become uncomfortable if a hard glued edge lands where the shoe bends against the foot.
Materials and Tools
· Sound flats with cosmetic wear only
· Small reclaimed fabric scraps
· Paper for templates
· Sharp fabric scissors
· Flexible adhesive compatible with the upper and textile
· Optional fray-control method appropriate for the fabric
· Small roller or blunt smoothing tool
Steps for This Shoe Upcycling Project
1. Turn the scuffed area into a planned composition. Place paper shapes over the cosmetic marks and extend the design beyond them so the patches look intentional rather than like emergency repairs. Test circles, leaves, irregular blocks, or simple geometric pieces. Arrange both shoes at the same time.
2. Cut and prepare the fabric. Use templates to cut clean shapes and remove loose threads. If the fabric frays heavily, finish the edge with an appropriate method before gluing. Keep patches thin and flexible, especially near the toe and side creases.
3. Attach from large pieces to small accents. Apply adhesive sparingly and smooth the first patch from the centre to the edge. Add neighbouring pieces with minimal overlap so the surface does not become stiff. Then clean away any adhesive that squeezes beyond the fabric before it hardens.
4. Flex-test every patch boundary. Once cured, bend the flats gently and watch the edges. A corner that lifts immediately will only worsen with walking, so trim it rounder or reinforce it appropriately. Check inside the shoe for any hardened glue ridge before wearing the pair.
I like patches most when at least one of them appears somewhere that was never damaged. That small repeat tells the eye the whole arrangement was a design choice from the start.
Variation: Use pieces from a worn cotton shirt, create matching heel patches only, or cut one larger fabric motif into two related shapes so each shoe carries half of the pattern.
Transform with Beautiful Floral Decorations
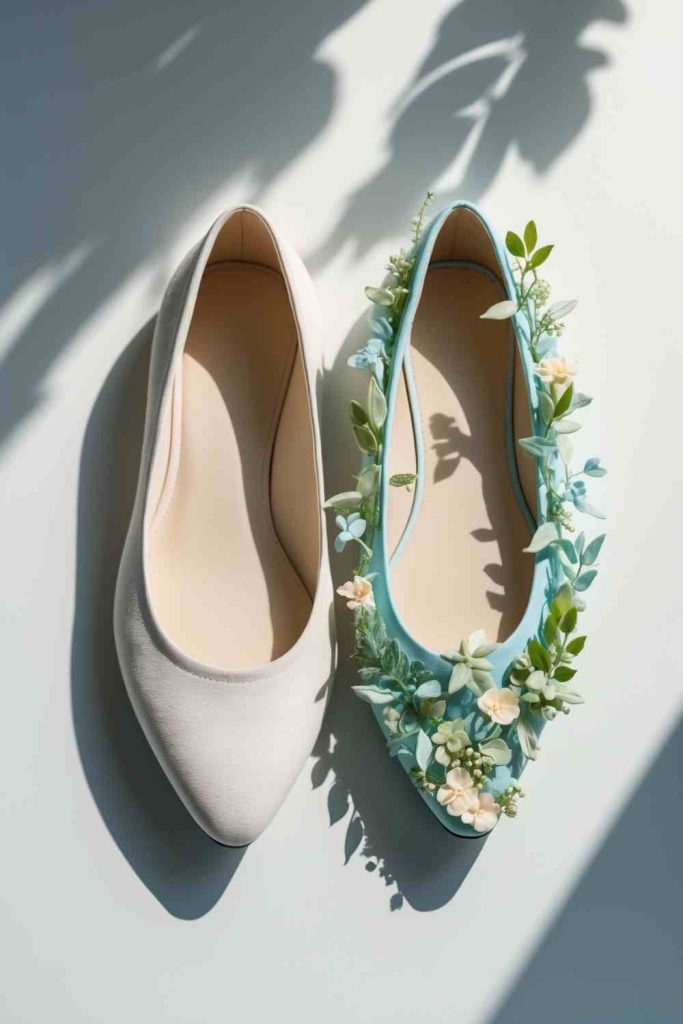
Fabric flowers, small leaves, and lightweight floral appliqués can make plain shoes feel softer and more seasonal. The key is scale. A flower that works on a handbag may feel enormous on a toe box, and tall petals can catch on hems or the opposite shoe while walking.
Keep dimensional flowers on stable outer panels, heel areas, or removable clips rather than dense flex zones. Check that every wire, plastic stem, or stiff backing has been removed or completely contained so nothing sharp reaches the foot or catches fabric.
Materials and Tools
· Plain shoes with sound uppers
· Lightweight fabric flowers, floral appliqués, or reclaimed decorative blooms
· Small scissors or flush cutters if stems must be removed
· Adhesive suitable for the shoe and flower backing
· Tweezers
· Optional felt circles for tidy backing
· Optional shoe-clip findings for a removable version
Steps for This Shoe Upcycling Project
1. Edit the flowers before arranging them. Remove bulky stems, sharp wire ends, and excessive plastic backing. Keep only lightweight pieces that can lie securely against the shoe. Group flowers by size so you can build a focal cluster without creating a heavy lump.
2. Choose low-stress positions. Put the shoes on and identify sections that do not fold sharply or rub the ankle. Arrange the flowers there, turning petals in different directions to see what catches. A cluster often works better on the outer side than directly across the central toe crease.
3. Attach the base, not just the petals. Apply compatible adhesive to the strongest backing area of each decoration and press it flat. Work from the largest flower outward, tucking smaller leaves into gaps. Avoid putting glue on moving petals because that can make them stiff and brittle-looking.
4. Test for snags from every direction. After curing, brush a soft cloth over the flowers and walk a few steps indoors. Check whether petals catch the opposite shoe or trouser hem. Trim or reposition anything that projects too far before taking the pair outside.
A floral cluster needs breathing room. I would rather use three secure flowers with visible space around them than twelve small pieces that turn the shoe into a surface you are afraid to touch.
Variation: Create detachable floral shoe clips, use flat embroidered flower appliqués instead of dimensional blooms, or place one small flower near each heel for a quieter finish.
Sparkle Up Flats with Rhinestones
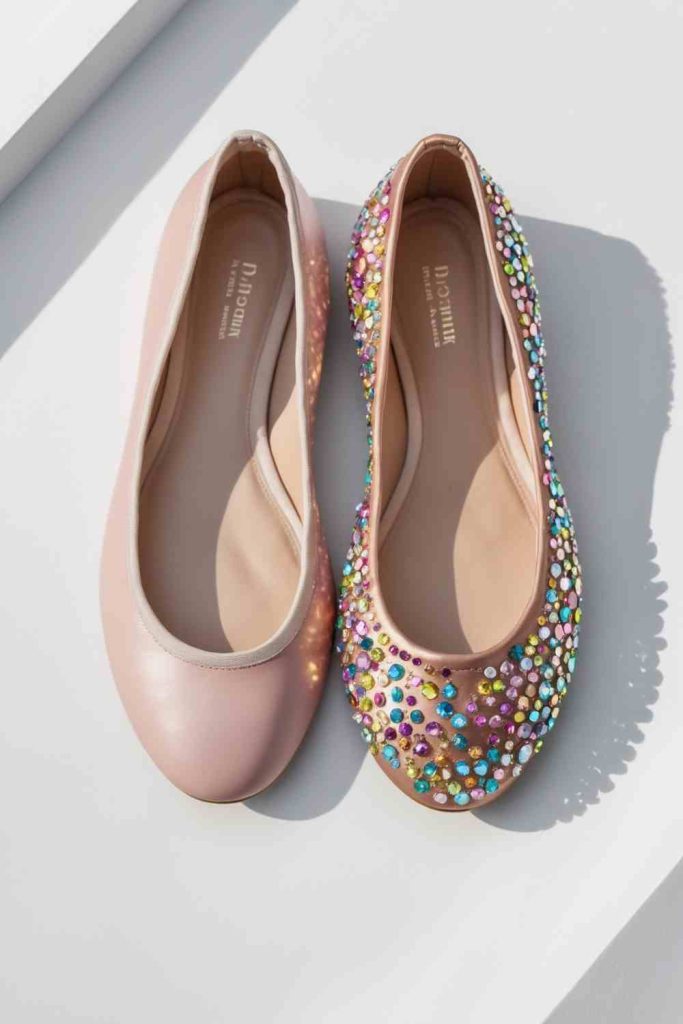
Rhinestones can revive plain flats with very little added material, especially when they are arranged as a border, gradient, or small focal motif. Their hard edges and concentrated weight make placement important, though. Dense stones across a bending toe can make the upper rigid and increase the chance of pieces popping off.
Choose flat-backed stones that are light enough for footwear and avoid sharp settings intended for rigid jewellery. The adhesive must suit both the stone backing and shoe material. Keep stones away from the inner edge where ankles rub and from any place the other foot repeatedly brushes during walking.
Materials and Tools
· Plain flats in good structural condition
· Lightweight flat-backed rhinestones
· Surface-compatible adhesive
· Tweezers or wax pickup tool
· Small removable spacing guide
· Soft cloth
· Optional shallow tray for sorting sizes
Steps for This Shoe Upcycling Project
1. Plan a low-bulk pattern. Arrange stones dry on one shoe or on a paper outline first. Borders along a stable side panel, a scattered heel gradient, or a small toe motif can look finished without making the upper rigid. Mark only a few anchor points rather than drawing heavy guidelines.
2. Sort and inspect the stones. Set aside pieces with chipped edges or irregular backs. Group by size if you want a controlled gradient. Wipe the shoe surface clean so dust does not become trapped under adhesive.
3. Attach one small section at a time. Apply the minimum adhesive needed for a secure bond and use tweezers to place each stone without sliding it through wet glue. Keep consistent spacing where the design calls for rows. Then pause and compare the second shoe before filling the next section.
4. Cure and test every edge. After full curing, press each stone lightly from different directions and run a cloth across the pattern. Replace any loose piece before wear. Flex the flat gently; if a line of stones prevents natural movement, simplify the pattern rather than forcing the shoe to bend around it.
The tiny gaps between stones are useful. They let the original material move and make individual sparkles easier to see, so there is no need to turn the whole upper into one solid sheet.
Variation: Use one colour in mixed sizes, create a narrow heel border, combine rhinestones with a few reclaimed beads on a removable clip, or decorate only the shoe vamp where the material stays relatively stable.
Transform Worn Sneakers with Knitted Fabric
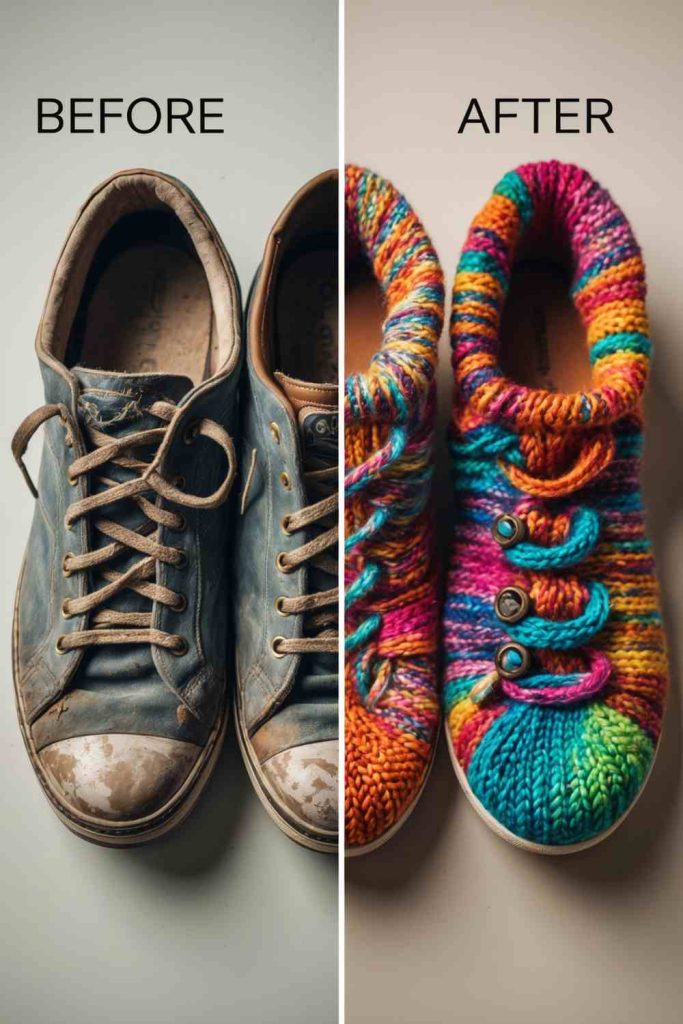
Knitted scraps can give cosmetically tired sneakers a soft textile surface, but stretchy fabric needs support. If it is pulled too tightly, it can distort the shoe; if it is attached loosely, bubbles and folds appear quickly. Small panels are easier to control than wrapping the entire sneaker.
Choose knit fabric that is still strong and not already thinning at the edges. A cuff from an old sweater, a small ribbed panel, or a stable piece of knitwear can cover a heel section or side panel while leaving high-flex zones exposed. Keep thick seams away from the foot opening and lacing path.
Materials and Tools
· Structurally sound sneakers with cosmetic surface wear
· Reclaimed knitted fabric in good condition
· Paper templates
· Sharp fabric scissors
· Flexible adhesive compatible with the sneaker and knit
· Pins or clips for fitting away from the shoe surface
· Optional matching thread for edge finishing
Steps for This Shoe Upcycling Project
1. Choose panels rather than a full wrap. Identify one or two stable areas such as the heel counter or side quarter. Make paper templates and test how the knit follows those curves without stretching. Mark the fabric while it is relaxed so the finished piece does not shrink away from the edge.
2. Stabilize and cut the knit carefully. Cut with sharp scissors and keep the piece slightly generous for the first fitting. Finish or secure any edge that wants to unravel. Avoid bulky sweater seams unless they are intentionally used as an external decorative line.
3. Bond without overstretching. Apply compatible adhesive in a thin, even layer and lay the knit down in its natural state. Smooth gently rather than pulling it tight. Work from the centre outward and trim the final edge only after the panel sits comfortably against the shoe.
4. Check the opening, laces, and flex. After curing, lace the sneaker and try it on indoors. Make sure the knit does not block eyelets, rub the ankle, or pull when the foot bends. Reinforce any loose border with an appropriate method before regular wear.
Stretch is helpful while fitting curves, but too much stretch is the trap. Once knitted fabric is glued under tension, it spends the rest of its life trying to pull back to its original shape.
Variation: Use a ribbed cuff only around a heel panel, add a small knitted tongue cover, or combine narrow knit strips with plain fabric patches instead of covering a large section.
Revamp Sneakers with Cozy Quilted Fabric
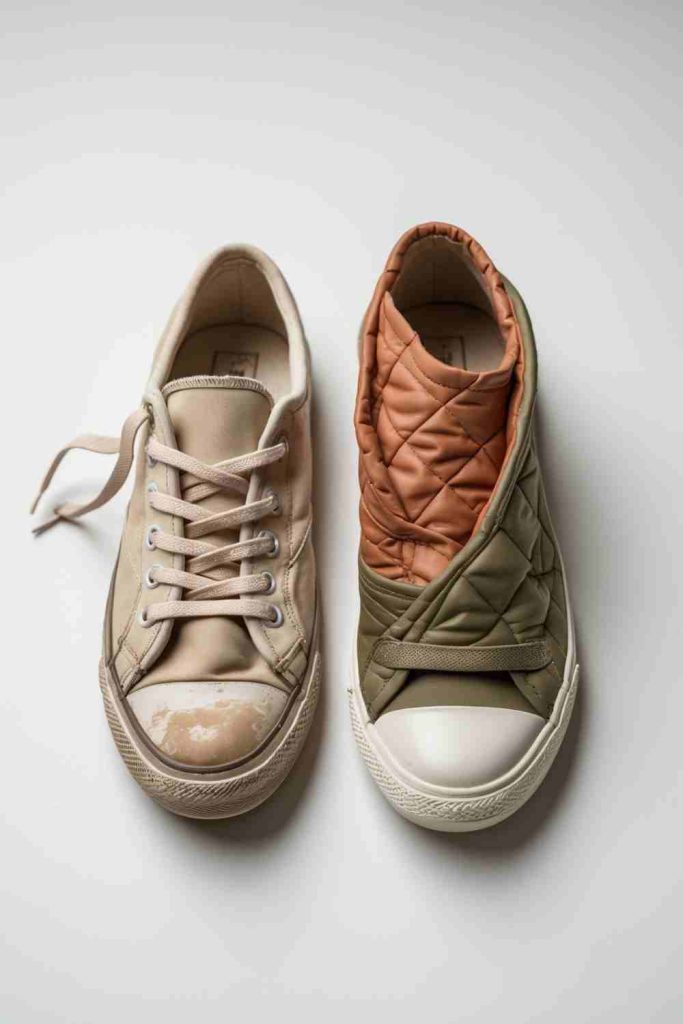
Quilted fabric gives sneakers a padded look and makes good use of small remnants from an old quilted jacket, bag, or sewing project. Because the material is thicker than ordinary cotton, the project works best on broad, relatively flat shoe panels where bulk does not interfere with laces or bending.
Do not place thick quilted fabric inside the shoe opening or over seams that already sit close to the foot. The decorative layer should remain external. If a quilted scrap contains loose batting or damaged stitching, stabilize it first so the layers do not separate after the shoe is worn.
Materials and Tools
· Sound lace-up or slip-on sneakers
· Reclaimed quilted fabric with intact stitching
· Paper or card for templates
· Sharp fabric scissors
· Flexible adhesive compatible with both materials
· Clips for temporary fitting
· Optional bias strip or thin fabric for neat exposed edges
Steps for This Shoe Upcycling Project
1. Select low-flex panels. Trace the heel quarter, outer side, or another stable area with paper. Avoid covering the deepest toe crease. Compare the template against both shoes because small manufacturing differences can affect the fit of a thick textile panel.
2. Cut along the quilted structure. Position the template so important quilting lines are not cut into tiny loose fragments. Cut the panel cleanly and secure any exposed batting. Dry-fit it while the shoe is stuffed to its normal shape.
3. Attach in stages. Bond the centre of the panel first, then work gradually toward edges so the thickness does not form a bubble. Use clips or gentle hand pressure only where they will not dent the upper. Trim small excess areas after the panel has settled into the curve.
4. Finish exposed borders and wear-test. Cover or neatly finish any raw quilted edge that could fray. Relace the shoe, flex it by hand, then wear it indoors briefly. If the added fabric presses the foot or restricts movement, reduce the panel before using the sneakers outside.
Quilting already has a lot of visual information, so I would not add heavy embellishments on top. Let the stitched texture do the work and keep the rest of the shoe quieter.
Variation: Use quilted fabric only on the heel counter, make matching quilted tongue covers, or cut two small panels from the same old padded garment so each shoe carries a related section.
Add Vibrant Floral Embroidery to Sneakers
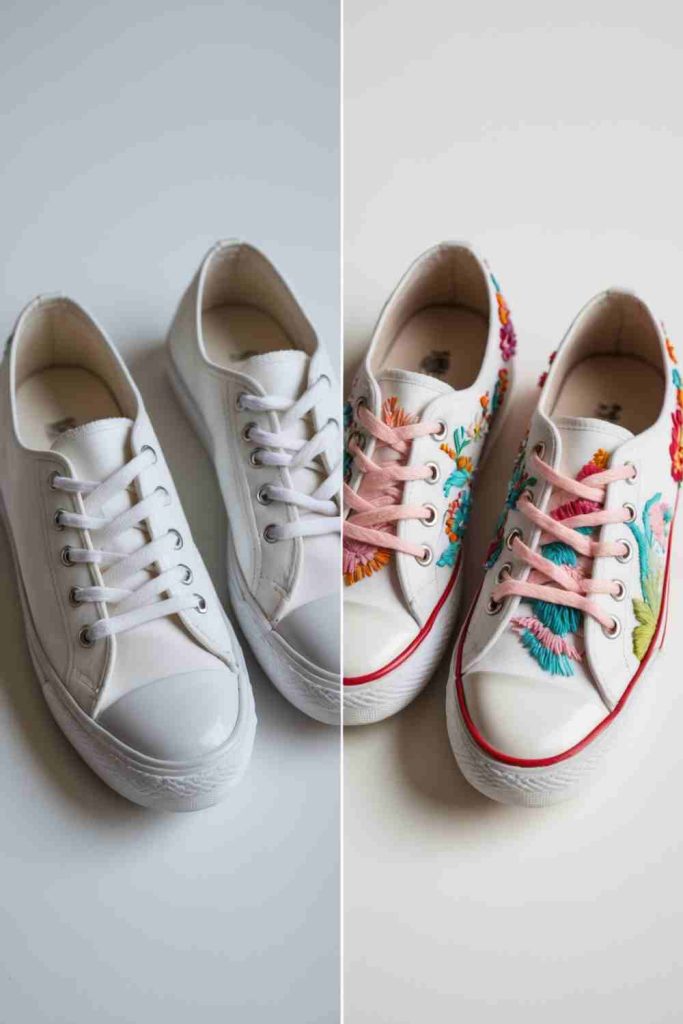
Embroidery is a satisfying way to refresh canvas sneakers because the decoration becomes part of the fabric instead of sitting on top as a rigid layer. Simple flowers, leaves, stars, initials, and scattered motifs can cover small stains or add interest to plain side panels without changing the shoe’s overall shape.
The inside matters. Knots and long thread floats can rub the foot, and forcing a needle through thick reinforced areas can damage the shoe or your hands. Choose stitchable fabric sections, use a thimble if helpful, and keep the back of the work neat and compact. Avoid stitching through hidden structural layers unless you understand how the shoe is built.
Materials and Tools
· Clean canvas or other safely stitchable sneakers
· Embroidery thread or reclaimed floss
· Embroidery needle suitable for the fabric
· Washable marking tool
· Small scissors
· Thimble or needle puller if useful
· Optional removable tissue or stabilizer suited to the project
Steps for This Shoe Upcycling Project
1. Choose stitchable areas while wearing the shoe. Mark broad fabric sections that do not contain eyelets, heavy seams, rubber overlays, or dense internal reinforcement. Sketch a simple motif lightly. Keep the design away from the inner ankle edge if knots or thread thickness could be felt against the foot.
2. Begin with the main stems and outlines. Use short, controlled stitches rather than long floats across the back. Work one colour family at a time and keep thread tension firm enough to lie flat without puckering the canvas. Then add leaves and flower centres after the structure of the design is clear.
3. Secure thread ends neatly. Tie off or weave ends in a compact area and trim them so nothing trails inside the shoe. Do not leave bulky knots directly under a pressure point. If needed, use an appropriate soft protective backing only if it does not alter fit or trap uncomfortable thickness.
4. Clean the markings and check comfort. Remove washable guide marks according to the marker instructions, let the shoe dry fully if moisture was used, and try the pair on indoors. Flex the embroidered area and make sure no stitch pulls tight or rubs the foot before regular wear.
Embroidery does not need to cover the whole sneaker to feel intentional. A small repeat – perhaps three flowers near the heel and one near the toe – can connect the design without turning every panel into a sampler.
Variation: Use simple stars, running-stitch lines, initials, visible-mending crosses over cosmetic scuffs, or a limited two-colour botanical design for a quieter pair.
Revamp with Bold Fabric Patches
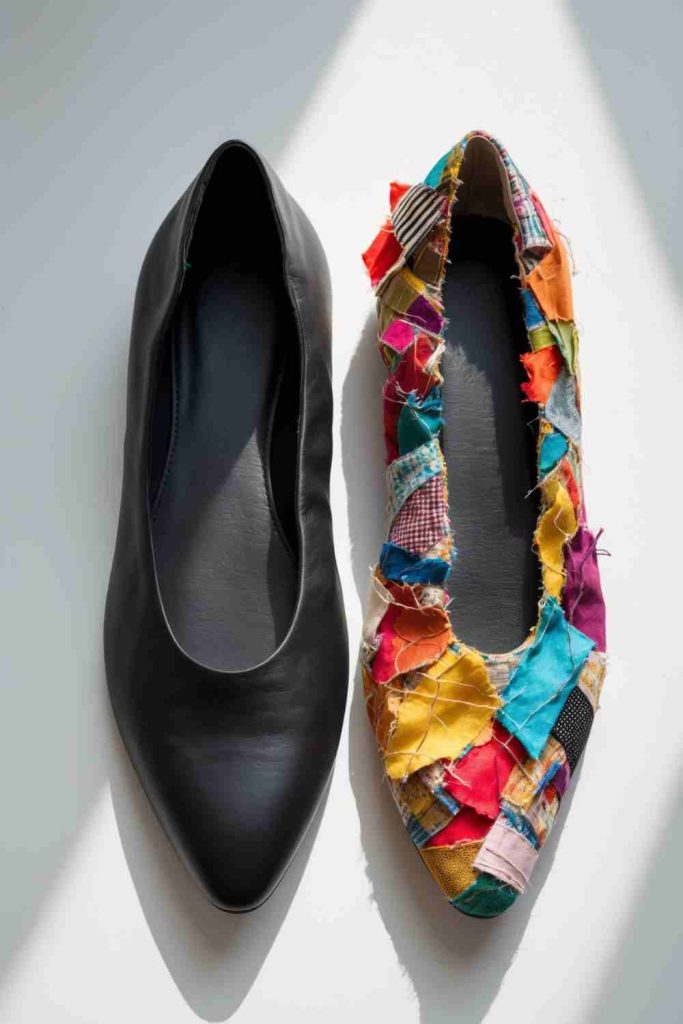
Bold patches work differently from the smaller patchwork approach because each shape becomes a graphic block. Large checks, stripes, florals, or abstract fabric sections can break up a dark shoe surface and make worn cosmetic areas feel deliberate, provided the patches do not bridge major flex lines.
Smooth-surface shoes need especially careful adhesive testing. A patch may seem secure while flat and then peel when the upper bends. Round the corners, avoid thick stacks, and treat each patch as an applied panel rather than a structural repair.
Materials and Tools
· Sound shoes with cosmetic wear
· Bold reclaimed fabric scraps
· Paper templates
· Sharp scissors
· Adhesive compatible with the shoe upper and textile
· Removable tape for trial placement
· Optional flexible edge finish appropriate for the fabric
Steps for This Shoe Upcycling Project
1. Build a strong two- or three-shape layout. Cut paper shapes first and place them on the shoe until the proportions feel balanced. One large panel and two smaller repeats usually create more impact than many unrelated pieces. Keep the central toe crease and shoe opening clear.
2. Prepare durable rounded patches. Transfer the templates to fabric, choose the strongest part of each scrap, and round sharp corners that are likely to lift. Finish fraying edges before attachment if the textile needs it. Dry-fit again on both shoes.
3. Bond from the centre toward each border. Apply a compatible adhesive evenly and press the patch into the curve without stretching it. Smooth the centre first, then edges. Add the next patch only after the first sits correctly so overlapping layers do not drift.
4. Inspect after full flexing. When cured, bend the shoe through its normal walking motion and watch every corner. Rework a lifting edge immediately. Check that no patch blocks laces, zips, or other functional parts of the footwear.
Bold fabric does not need a complicated shape. A simple rounded panel in a strong pattern often looks more finished than a clever cutout whose tiny points keep lifting.
Variation: Use one large tartan heel panel, a pair of matching floral side patches, or cut bold shapes from an old scarf, shirt, or tote that is already too damaged for its original use.
Add Trendy Denim to Your Sneakers
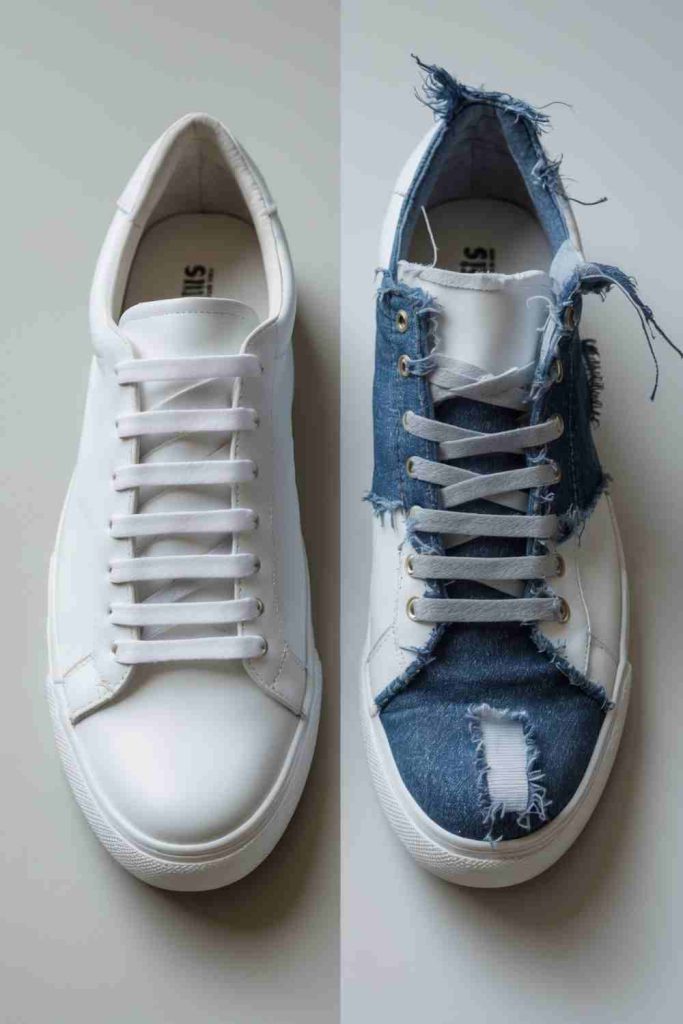
Old jeans are useful for shoe upcycling because denim is strong, familiar, and easy to coordinate with casual sneakers. Pocket edges, faded knees, seams, and frayed hems can all become design features, but the thicker parts of denim need careful placement so they do not interfere with flex or lacing.
Choose soft, worn-in denim rather than very stiff new fabric when covering curved shoe panels. Frayed edges can look intentional, but trim loose threads that could catch. A sneaker with denim on every surface can become heavy and rigid, so leaving original panels visible usually makes the pair easier to wear.
Materials and Tools
· Structurally sound sneakers
· Old denim jeans or other reclaimed denim
· Paper templates
· Sharp fabric scissors
· Flexible adhesive suited to denim and the shoe upper
· Optional matching thread for decorative edge stitches
· Clips or removable tape for fitting
Steps for This Shoe Upcycling Project
1. Harvest the right parts of the jeans. Look for clean, strong denim with an interesting fade or seam. Avoid areas weakened by holes unless the fraying is decorative and backed securely. Wash and dry the fabric before cutting if it is not already clean.
2. Template the stable sneaker panels. Trace heel counters, side quarters, or small toe accents with paper. Keep thick jean seams away from high-flex areas and the foot opening. Position the templates on the denim so fades and grain lines work intentionally across the pair.
3. Attach without building too much thickness. Cut the denim and dry-fit each piece. Bond a panel from the centre outward using a compatible flexible adhesive, then trim carefully around eyelets and seams. If adding decorative stitching, keep it external and away from structural layers you should not pierce.
4. Tidy frays and relace the shoes. After curing, trim only the loose threads that could snag while keeping any planned distressed edge. Relace the sneakers and flex them several times. Make sure the denim does not pull away from a crease or create a hard ridge under the lacing area.
Denim looks best here when it still looks like denim. I would keep a faded seam or a little controlled fraying rather than trying to make every cut edge disappear completely.
Variation: Use a former jeans pocket as a heel-panel detail, add only narrow denim stripes, combine two washes of old denim, or use chambray for a lighter version on flexible shoes.
Additional Upcyclely Idea: Add Removable Shoe Clips from Fabric Scraps
A removable shoe clip lets you change the look of flats or heels without permanently gluing decoration to the upper. That makes it especially useful when the shoes are still in good condition but you want to reuse small fabric scraps, broken brooch details, ribbon ends, or leftover appliqués for special occasions.
The clip itself must be smooth and designed for footwear so it does not damage the upper or press painfully against the foot. Keep the decoration lightweight and wide enough to distribute its weight. A removable approach also makes cleaning and storage much easier than attaching dimensional pieces permanently.
Materials and Tools
· Plain flats, heels, or shoes suitable for clip-on decoration
· Purpose-made smooth shoe-clip findings
· Small reclaimed fabric scraps or ribbon
· Lightweight appliqués, buttons, or fabric flowers
· Needle and thread or suitable adhesive for building the decoration
· Small felt circles for backing
· Sharp scissors
Steps for This Shoe Upcycling Project
1. Design the decoration off the shoe. Build the fabric flower, bow, rosette, or layered scrap motif on a table first. Keep the back flat and the overall piece lightweight. Hold it against the shoe in several positions to decide where it looks balanced without interfering with walking.
2. Create a smooth backed unit. Stitch or glue the decorative layers to a small felt base so raw edges and hard findings are contained. The backing should be slightly smaller than the visible decoration. Check that no wire, thread knot, or sharp component projects toward the shoe.
3. Attach the shoe-clip finding securely. Fix the clip to the backing using the method appropriate for the finding and decoration. Open and close it several times before putting it on the shoe. The clip should move freely without twisting the decorative unit.
4. Fit, walk-test, and remove for storage. Clip the decoration to a suitable part of the shoe and make sure it does not press against the foot. Walk indoors and check for movement or snagging. Remove the clips after wear and store them separately so they do not crush the upper or each other.
The removable part is what makes this idea practical for me. One pair of plain flats can carry several different scrap-fabric clips without committing the shoe to a single colour scheme.
Variation: Make matching clips from old neckties, lace offcuts, tiny fabric yo-yos, or rescued costume-jewellery centres set onto soft textile backings.
Additional Upcyclely Idea: Cover Scuffed Toe Caps with Reclaimed Canvas
A scuffed but structurally sound toe can become a deliberate contrast panel with a small piece of reclaimed canvas. This is a cosmetic refresh only: if the toe is torn through, the sole is separating, or the shoe has lost structural support, proper repair comes first.
Canvas is easier to control than thick upholstery fabric and can be painted, stamped, or left plain before attachment. The panel should end before the deepest flex line whenever possible. Rounded edges and a well-fitted template help the new toe cap look intentional instead of like a patch placed over an accident.
Materials and Tools
· Sound shoes with cosmetic toe scuffs
· Clean reclaimed canvas from a tote, workwear scrap, or similar textile
· Paper for a toe-cap template
· Sharp fabric scissors
· Flexible adhesive compatible with both materials
· Optional fabric paint or stamp for decorating the canvas before attachment
· Small smoothing tool
Steps for This Shoe Upcycling Project
1. Map the cosmetic damage and flex line. Put the shoes on and bend the toes gently so the main crease becomes visible. Make the new canvas panel large enough to cover the cosmetic scuffs but stop short of that crease if you can. Trace the proposed shape with paper first.
2. Cut and predecorate the canvas. Transfer the template to clean canvas and cut two related pieces. Round the corners and finish fraying edges. If you want paint, stamping, or embroidery, do it while the canvas lies flat and let the decoration settle fully before attaching it to the shoe.
3. Fit and bond the toe panel. Place the canvas on the shoe while it is lightly stuffed to hold shape. Apply compatible flexible adhesive in a thin layer and smooth the fabric from the centre outward, following the curve without stretching it. Keep the sole edge and interior clean.
4. Flex-test before outdoor wear. After full curing, remove the stuffing and bend the shoe through normal movement. Watch the canvas edge closest to the flex line. If it lifts or feels stiff, trim or rework the panel rather than relying on more adhesive to force an unsuitable shape to stay put.
A toe cap looks more intentional when its shape repeats something already on the shoe – a seam curve, a rounded sole line, or the width of the lace panel. That visual connection matters more than covering every tiny scuff.
Variation: Use reclaimed twill, lightweight denim, printed cotton backed with thin canvas, or a plain canvas panel that you decorate with a few hand-painted marks after fitting.
Shoe Upcycling Choices That Can Cause Peeling, Pressure Points, or Weak Attachments
Decorating a Shoe That Needs Structural Repair
A loose sole, unstable heel, torn strap anchor, or split load-bearing seam is not a decorative problem. Covering it with fabric, paint, or embellishments can hide warning signs without restoring strength. Repair the structure appropriately first or retire the footwear from wearable use.
Using One Adhesive for Every Material
Canvas, leather, coated synthetics, metal, rhinestones, lace, denim, and knit fabric all present different bonding surfaces. An adhesive that grips one combination may peel from another or dry too rigidly for repeated flexing. Test the exact material combination and follow the product instructions rather than assuming all craft glue behaves the same way.
Placing Rigid Decoration Across a Flex Line
Toe boxes and some side panels bend thousands of times during ordinary walking. Thick rhinestone bands, metal pieces, heavy paper layers, and stiff fabric stacks can crack, lift, or make the shoe uncomfortable when placed directly across those creases. Move hard decoration to more stable panels and leave movement room.
Letting Glue Build Up Against the Foot
Excess adhesive can soak through fabric or harden into ridges along openings and seams. That may not be visible from the outside, but the foot notices it quickly. Use thin controlled layers and inspect the lining with your fingers before wearing the finished pair.
Covering Buckles, Eyelets, Zips, or Adjustable Parts
A decorative layer should not prevent the footwear from functioning. Keep laces free, buckles accessible, zips unobstructed, and strap adjustments visible. You also need to be able to inspect original attachment points for wear later.
Ignoring the Weight of Embellishments
Metal pieces, dense rhinestone fields, layered flowers, and thick textile panels add weight. Too much mass can pull at the upper and change how the shoe moves. Choose lightweight decoration and spread visual interest through spacing rather than piling material into one heavy cluster.
Leaving Sharp, Rough, or Snagging Edges
Cut metal, stiff lace, frayed denim, rhinestone settings, and dried glue can catch skin, clothing, or the other shoe. Run a soft cloth over the finished decoration and check every edge by hand. If the cloth snags, fix the problem before wearing the shoes.
Treating a Sealer as a Structural Fix
A clear finish may protect a compatible decorative surface, but it does not repair a failing adhesive bond, strengthen torn fabric, or make an unsuitable paint flexible. Solve the underlying attachment or material problem first instead of trying to lock it under another coating.
Forgetting That Both Shoes Are Viewed Together
One shoe can look balanced on the worktable while the pair looks unrelated. Arrange and check both throughout the project. They do not need to mirror perfectly, but repeated colours, shapes, or placement zones help them read as a deliberate pair.
Wearing the Shoes Before the Materials Have Fully Cured
Flexing, rubbing, and lacing too early can shift fabric, lift paper corners, or loosen stones before the bond reaches its intended strength. Follow the curing directions for the products you actually used. Patience is less exciting than decoration, but it is much easier than repairing a half-attached design after the first walk.
Frequently Asked Questions
Can beginners try these upcycling shoes ideas?
Yes, especially projects that use paint, removable clips, small fabric panels, or simple cord wrapping. Begin with a structurally sound pair you can afford to experiment on, keep the design small, and test materials before decorating a large area. Projects involving difficult stitching, heavy hardware, or structural repair are better treated separately.
How do I know whether old shoes are worth upcycling?
The pair should still be comfortable enough for its intended use and structurally sound at the sole, heel, straps, seams, and closure points. Cosmetic scuffs, faded colour, or outdated styling are good reasons to upcycle. Major separation, unstable heels, deep cracking, or failed load-bearing parts need proper repair or retirement rather than decoration.
What is the best glue for decorating shoes?
There is no single best adhesive for every shoe. The right choice depends on the upper material and the decoration being attached, and it must tolerate the amount of flex the area receives. Choose a product specifically suitable for those materials, read its safety directions, and test the bond on a hidden area or comparable scrap first.
Can I paint leather or synthetic shoes?
Some paints and surface systems are designed for leather or synthetic materials, but the exact preparation and compatibility vary. Clean the material appropriately, test a discreet spot, and use a flexible product intended for that surface. Avoid heavy layers over deep creases because any coating can be stressed by repeated bending.
How can I stop fabric patches from lifting?
Round sharp corners, keep patches away from major flex lines, use thin compatible adhesive coverage, and smooth from the centre outward so no air pocket remains beneath the textile. The fabric should lie naturally rather than being stretched into position. After curing, flex the shoe gently and correct any lifting edge before regular wear.
Are rhinestones and metal embellishments practical for everyday shoes?
They can be, if the pieces are lightweight, smooth, securely attached, and positioned away from high-flex or high-friction areas. A small border or stable side-panel motif is generally more wearable than a dense rigid field. Check for snags and loose pieces regularly, especially on shoes that are worn often.
How should I clean upcycled shoes after decorating them?
Cleaning depends on the original shoe material and every decorative material added. Use the gentlest method that is compatible with the complete finished piece, avoid soaking areas joined with adhesive unless the product permits it, and spot-clean first. Removable shoe clips and detachable decorations are useful because they can be taken off before cleaning the footwear.
Refresh the Pair You Already Own Before Replacing It
The most useful upcycling shoes ideas start by respecting what footwear has to do. Shoes bend, carry weight, rub against clothing, meet wet pavements, and stay close to skin for hours. That is why a small well-placed denim panel, a neat embroidered motif, a removable flower clip, or a controlled paint design can be more successful than a dramatic makeover that ignores fit and movement.
I would begin with the pair that is structurally sound but visually forgotten. Clean it, identify the stable panels, choose one material you already have, and make the first change small enough to test properly. Then wear the shoes indoors, check every edge and attachment, and add more only if the first stage remains comfortable. Reusing what you own should make the item more useful to you, not simply more decorated.
If an old pair in your wardrobe still fits well, which part would you refresh first: the colour, the fabric, the stitching, or one small removable detail?