A chicken coop can look charming from the garden path and still fail at the details that matter most: dry bedding, fresh air, secure latches, easy cleaning, and enough room for the flock to move without crowding. The most useful designs begin with those daily needs and then shape the appearance around them. Reclaimed timber, leftover roofing, old shed panels, wheels, storage boxes, and solar lighting can all earn another purpose, but only after each piece has been checked for strength and safety.
I like coop projects that reuse what is already available without treating the birds’ shelter as a decorative experiment. I don’t think a clever roof or painted door can compensate for damp corners, sharp mesh, weak hinges, or poor ventilation. The strongest ideas make feeding, egg collection, cleaning, and night-time security simpler for the keeper while giving the chickens a calm place to roost, nest, and shelter from the weather.
Before choosing a style, look honestly at the site, the flock, and the maintenance you can manage. A compact coop may suit a small yard, a wheeled design may help rotate ground, and a larger structure may justify storage or a covered run. The best choice is the one you can inspect easily, keep dry, and close securely every day.
Check the Site, Local Rules, and Flock Needs
The building style should follow the conditions around it rather than forcing the same plan into every garden. Walk the proposed area at different times of day and note where water, wind, shade, noise, and foot traffic collect.
· Confirm local poultry rules, permit requirements, boundary distances, flock limits, and any restrictions on roosters before cutting materials.
· Choose ground that drains well and remains accessible for daily feeding, water changes, egg collection, cleaning, and emergency checks.
· Allow for the flock you realistically expect to keep, including safe roosting, nesting, sheltered floor space, and an outdoor area where appropriate.
· Notice summer sun, winter wind, roof runoff, and nearby branches or structures that could help predators reach the coop.
· Plan a secure night enclosure and a door arrangement that can be operated quickly without leaving gaps at corners or thresholds.
· Keep the coop close enough to supervise but far enough from living areas that routine dust, bedding, feed, and noise remain manageable.
Inspect and Sort Reclaimed Building Materials
Reuse works best when each salvaged item receives a new job that matches its condition. Structural pieces must remain sound; weaker boards can still become trim, removable panels, signs, or storage dividers.
· Reject timber with deep rot, active insect damage, persistent mould, strong chemical odours, crumbling edges, or unknown contamination.
· Remove old nails, staples, splinters, broken wire, loose paint, and sharp metal before materials enter the work area.
· Separate load-bearing lumber from decorative offcuts so thin or damaged pieces are never mistaken for structural supports.
· Check reclaimed roofing, hinges, wheels, latches, and handles for corrosion, stiffness, cracks, or movement under pressure.
· Avoid unknown coatings on surfaces chickens may peck, and cover any reused surface that cannot be cleaned safely.
· Use washable, moisture-resistant materials around water, feed, nesting areas, and places where droppings are likely to collect.
Gather Tools, Fasteners, and Protective Equipment
A complete tool check prevents the half-built coop from sitting open while you search for one missing hinge. I know it can feel tempting to begin with the boards already on the ground, but measuring, sorting, and preparing the hardware first usually saves far more time later.
· Tape measure, square, spirit level, pencil, straightedge, and a simple plan showing doors, vents, roosts, nests, roof fall, and cleaning access.
· Saw, drill or driver, suitable bits, clamps, sanding tools, and a stable work surface for cutting and assembly.
· Exterior-grade screws, washers, hinges, bolts, handles, and predator-resistant latches that cannot be lifted or pushed open easily.
· Small-opening welded mesh or hardware cloth suited to local predators, plus secure staples or screws with washers for attachment.
· Weather-resistant roofing, flashing or edge protection, exterior sealant, and finishes chosen for the material and outdoor conditions.
· Gloves, eye protection, hearing protection, dust control, and safe support for panels while drilling, cutting, or lifting.
· Rodent-resistant feed storage and a dry place for bedding, tools, and electrical components if the design includes them.
Backyard Chicken Coops
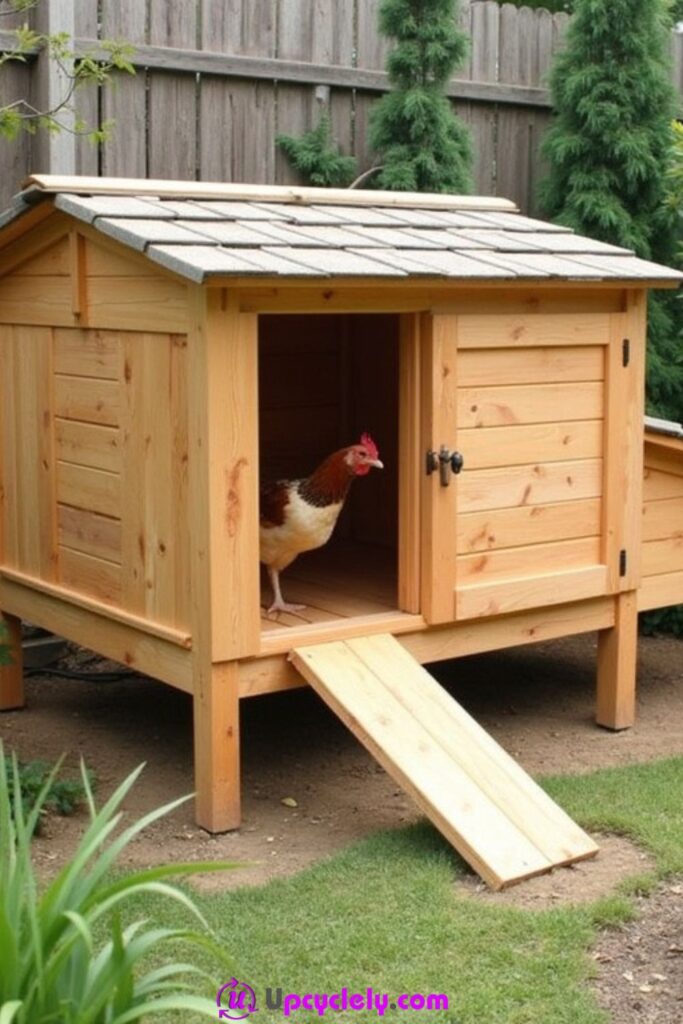
A backyard coop works best when it feels connected to the garden without disappearing into it. A raised timber house, a short ramp, shaded planting, and a simple enclosed doorway can make the structure look settled while still keeping the sleeping area away from damp ground.
The practical challenge is balancing access for the chickens with access for the person caring for them. The ramp should remain steady, the doorway should close securely at night, and the interior should be reachable without crawling through a bird-sized opening. Landscaping can soften the view, but it should not block ventilation, trap moisture, or create hidden routes for predators.
Materials and Tools
· Sound reclaimed timber or exterior plywood
· Weather-resistant roof covering and edge flashing
· Small-opening welded mesh for vents or an attached run
· Exterior screws, hinges, handles, and secure latches
· Removable floor liner or droppings board where suitable
· Ramp board with closely spaced grip strips
· Optional non-toxic exterior finish and garden edging
Steps for This Chicken Coop Project
1. Choose and prepare the position. Mark a level, well-drained area that remains easy to reach in poor weather. Trim back dense vegetation and check overhead branches, fences, and sheds that might provide predator access. Then set a stable base or supports so the timber does not sit directly in wet soil.
2. Build the dry sleeping house. Assemble the floor, walls, and roof with the cleaning door and ventilation openings planned before the panels are fixed. Keep joints tight, cover exposed edges, and allow the roof to shed water away from the entrance. Add roosting and nesting features without crowding the doorway.
3. Add the ramp and secure openings. Fix the ramp firmly at both ends and add shallow grip strips so wet feet do not slide. Cover vents with strong mesh, fit a latch that resists lifting or twisting, and inspect every corner from the outside as if you were a determined predator.
4. Finish the surrounding area. Create a dry path for the keeper and leave clear air space around walls and vents. Add shade with well-positioned planting or a separate cover rather than pressing foliage against the coop. Load bedding gradually and observe where rain or mud collects after the first wet day.
A practical detail I would not skip: I would keep the planting slightly away from the timber. That narrow maintenance gap makes it easier to notice rot, gnawing, loose mesh, and damp patches before they become larger problems.
Variation: A plain backyard version can use one exterior colour and a removable planter nearby rather than decorations attached directly to the coop.
Budget-Friendly Chicken Coop
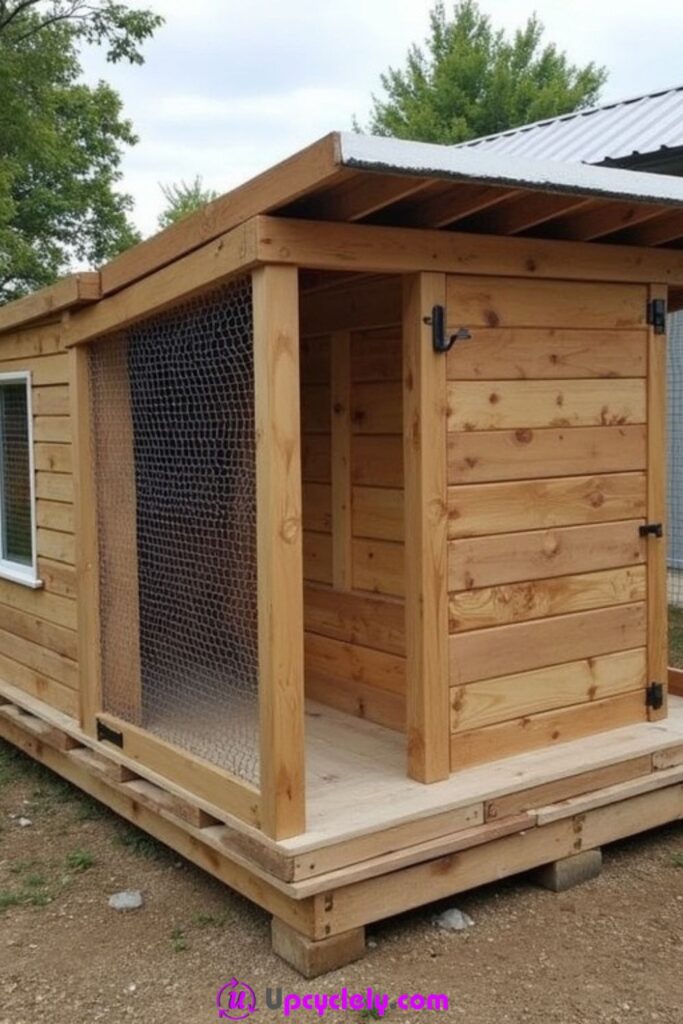
A budget coop does not need to look temporary. The strongest low-cost designs reduce complicated cuts, reuse straight timber, and spend money only where failure would matter: roofing, mesh, hinges, fasteners, and secure latches.
Saving begins with a realistic plan. A discarded shed panel may make a useful wall, but a soft pallet board should not support the roof. I would rather build a smaller, sound structure than stretch damaged material across a larger frame and hope the paint hides it.
Materials and Tools
· Reclaimed framing timber that remains straight and dry
· Exterior sheet material or sound salvaged wall panels
· Simple corrugated or sheet roofing in usable condition
· Predator-resistant mesh for vents and openings
· Exterior screws, washers, hinges, and two-action latches
· Offcuts for roosts, trim, and removable interior fittings
· Basic exterior primer or finish where needed
Steps for This Chicken Coop Project
1. Make a materials-first plan. Measure the usable salvaged pieces and design around their real sizes instead of buying extra boards to match an ideal sketch. Mark which parts can carry weight, which can form panels, and which should remain decorative. Keep the door, roof, and cleaning access simple.
2. Construct a square, braced frame. Build the base and wall frames on a flat surface, checking each corner before fastening. Add diagonal or panel bracing so the structure cannot rack when the door opens. Then raise the walls and secure them to a dry base rather than balancing them on loose blocks.
3. Spend carefully on vulnerable points. Use reliable roofing, strong mesh, exterior fasteners, and secure latches even if other pieces are reclaimed. Seal roof edges, protect end grain, and use washers where mesh is fixed so it cannot tear around a narrow staple. These are not the places for the weakest leftovers.
4. Test before decorating. Open every access panel, press on walls, lift the roof edge, and check the base for movement. Spray or observe light rain runoff before adding bedding. Once the structure stays dry and secure, use remaining offcuts for trim, a sign, or removable storage hooks.
A practical detail I would not skip: The cheapest coop is not the one with the lowest first cost; it is the one that does not need the roof, latch, or floor rebuilt after one season.
Variation: For a very simple build, use a rectangular box form with one sloping roof and one large cleaning door instead of decorative gables and several small openings.
Chicken Coop for Small Yard
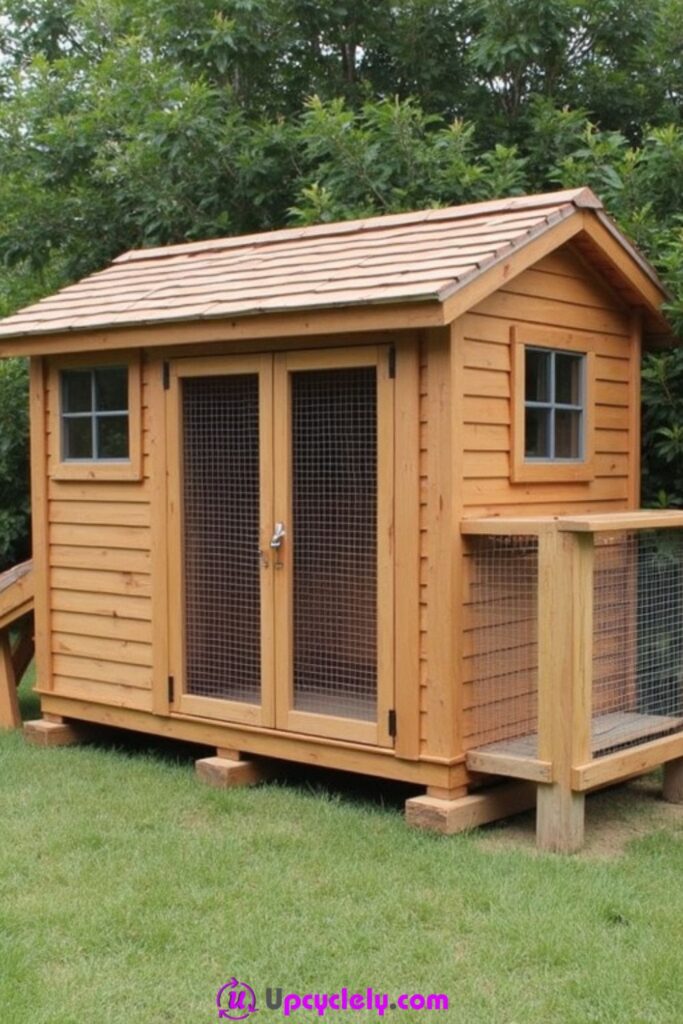
A small yard calls for careful organisation rather than a miniature version of a large farm coop. Vertical roosting, an exterior-access nesting area, a compact covered run, and doors that open into unused space can make daily care possible without the coop taking over the garden.
The danger is treating compact as cramped. Birds still need clean air, dry shelter, and enough room to move away from one another. The keeper also needs enough access to remove bedding and inspect corners, because tight spaces become difficult very quickly when the only opening is a small front door.
Materials and Tools
· Compact timber frame and exterior wall panels
· Sloped roof covering with controlled runoff
· Strong mesh for a narrow attached run
· Full-height or wide cleaning access panel
· Exterior-access nesting box or removable nest module
· Wall-mounted or removable roost supports
· Secure latches and a slim feed-storage container
Steps for This Chicken Coop Project
1. Map the footprint and door swing. Mark the coop, run, cleaning route, and door movement on the ground before building. Check that gates do not block paths or fences and that roof water will not discharge into a neighbour’s space or the chicken run. Leave room to stand while cleaning.
2. Use height without creating hazards. Place roosts above the floor but away from the nest entrance and ventilation path. Keep landing areas clear and avoid stacking fittings so closely that birds must jump into walls. Make internal pieces removable whenever possible so the small interior can be cleaned thoroughly.
3. Build a compact secure run. Frame the run as part of the coop rather than attaching a loose cage afterward. Fix mesh on the predator side of the frame, protect ground-level edges, and include a keeper-sized access door. Add a covered dry patch where feed and water can remain sheltered.
4. Simplify daily maintenance. Fit an external egg-collection lid, a removable floor tray or board, and accessible latches. Test every task with the coop empty: reaching nests, lifting water, removing bedding, catching a bird, and closing the night door. Change the layout before the flock moves in.
A practical detail I would not skip: For me, the cleaning door matters more than a decorative window in a small coop. If the interior is easy to reach, the whole design remains far more pleasant to manage.
Variation: A narrow side yard can use a longer, slimmer run with the sleeping house at one end, provided the full length remains visible and accessible.
Chicken Coop on Wheels
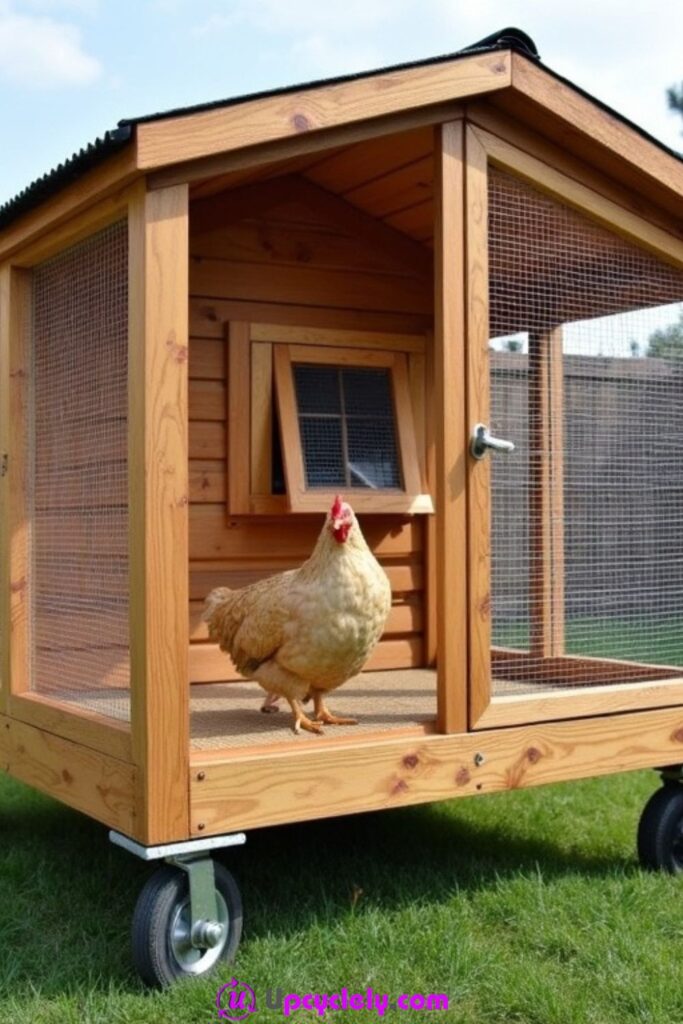
A wheeled coop can move birds onto fresh ground and keep one patch of grass from carrying all the wear. It also gives flexibility during heat, rain, or garden work, but mobility adds structural demands that a stationary coop does not have.
The frame must stay rigid while rolling, the wheels must handle uneven ground, and the coop must lock safely in place. I don’t recommend moving it with birds loose inside unless the design has been specifically made and managed for that purpose; unexpected jolts, ramps, and shifting fittings can cause injury.
Materials and Tools
· Light but structurally sound framing timber
· Weather-resistant wall and roof panels
· Large outdoor wheels with suitable axles or brackets
· Strong handle or tow points fixed across the frame
· Mesh panels and secure access doors
· Parking blocks, brakes, or stabilising legs
· Exterior screws, bolts, washers, and locking nuts
Steps for This Chicken Coop Project
1. Keep the frame light and square. Design the base around the wheel positions so weight is supported rather than hanging from thin side boards. Use bracing to prevent twisting as the coop crosses uneven ground. Avoid unnecessary decorative weight high on the structure, which can make it unstable.
2. Install wheels and lifting points. Attach wheel brackets through strong framing with bolts and washers, then fit handles or tow points across more than one member. Check that hands and feet remain clear of the wheels. Add stabilisers or parking blocks so the coop cannot roll once positioned.
3. Secure all interior fittings. Fix or remove roosts, nest parts, water containers, and trays before movement. Ensure doors latch in more than one direction and mesh cannot flex into the wheels. Then roll the empty coop slowly over the intended route while watching for frame movement.
4. Create a safe moving routine. Choose a clear, level path and move the coop only when conditions and flock management are appropriate. Set the structure down firmly, apply brakes or blocks, check the floor and door alignment, and inspect for gaps before allowing normal use again.
A practical detail I would not skip: I would test the wheels with the empty coop after rain, not only on dry level ground. Soft soil quickly reveals whether the wheel size and handle position are realistic.
Variation: A semi-mobile design can use skids and removable transport wheels, reducing the number of exposed moving parts during everyday use.
Chicken Coop with Nesting Boxes
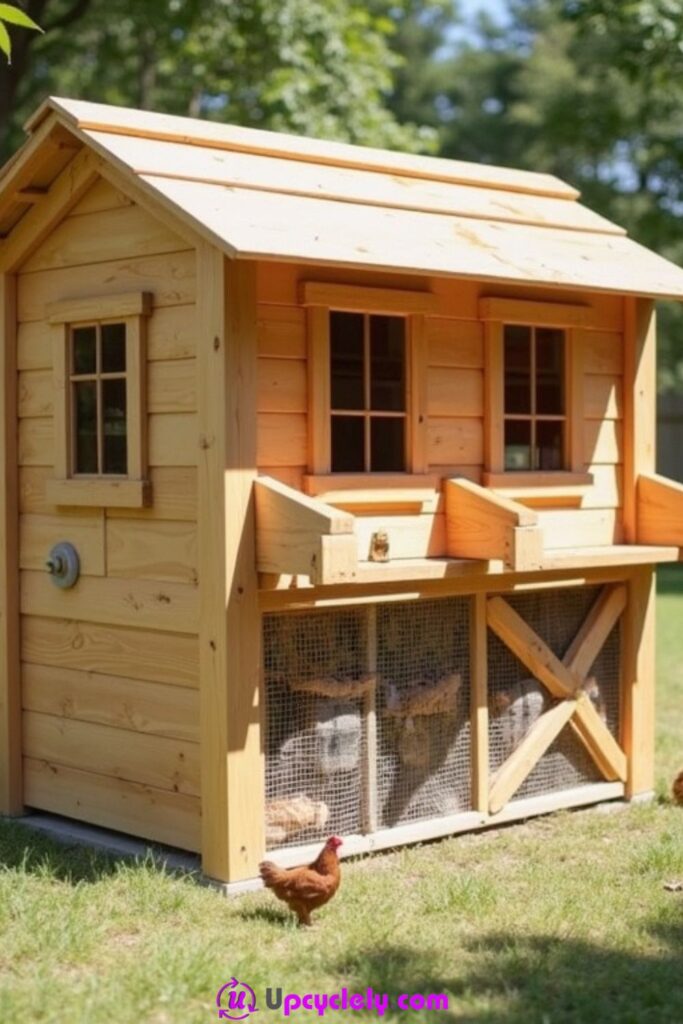
External-access nesting boxes can make egg collection quick while keeping the main coop door closed. Their success depends on privacy, dryness, comfortable access for the hens, and a lid that cannot leak or be lifted by wind or predators.
The nest area should not become the darkest, dampest corner simply because it sits outside the main wall. Smooth internal surfaces, replaceable bedding, a retaining lip, and access for cleaning are more important than decorative trim.
Materials and Tools
· Sound plywood or boards for the nest module
· Sloped hinged lid with waterproof covering
· Exterior hinges, handle, and secure latch
· Smooth removable nest dividers or liners
· Dry bedding and a front retaining strip
· Sealant or flashing for the wall joint
· Screws and edge trim to cover rough cuts
Steps for This Chicken Coop Project
1. Choose the nest position. Place the boxes where hens can enter from inside without crossing a busy doorway or roosting area. Keep them shaded, dry, and easy to reach from outside. Mark the wall opening only after confirming that the structure will remain braced around it.
2. Build a rigid box and sloped lid. Assemble the floor, sides, and dividers with smooth internal faces and no exposed screw points. Slope the lid so water runs away from the wall joint, then add flashing or a sealed overlap. Fit hinges across solid timber rather than thin panel edges.
3. Make cleaning and egg collection easy. Use removable liners, dividers, or a front strip that can be lifted for cleaning. Fit the lid with a stop or support so it cannot fall while eggs are collected. Add a secure latch and test that the lid closes evenly along the full edge.
4. Observe how the hens use it. Add clean bedding and introduce the boxes without forcing birds inside. Check for crowding, broken eggs, sleeping in nests, damp bedding, or a preferred corner. Adjust privacy and roost placement if the boxes are being used for the wrong purpose.
A practical detail I would not skip: One detail I would check carefully is the seam where the box meets the coop wall. A neat-looking lid is no help if water can track behind it into the bedding.
Variation: A removable internal nesting unit can suit renters or temporary coops, though it may take more floor space and must remain stable.
Chicken Coop with Ventilation
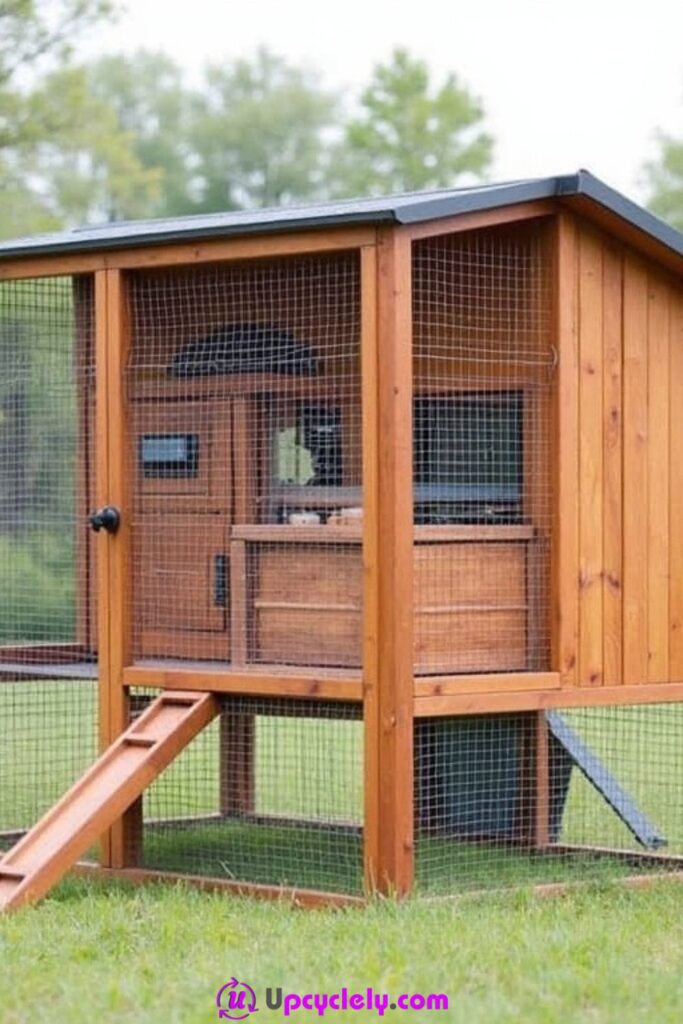
One of the first things I learned was how important ventilation is in a chicken coop. I saw a fantastic design featuring a wooden structure elevated slightly off the ground. It was neatly enclosed with wire mesh, ensuring optimal airflow. A small window added to the ventilation while providing a peek into the coop’s interior, and the slanted roof was just the perfect touch to keep rainwater from pooling.
What I loved about this design was how it gave the chickens a safe, breathable home while keeping things functional. If you’ve struggled with stuffy coops in the past or live in a humid area, this idea can make a world of difference. It minimizes moisture buildup, which keeps your flock healthy and reduces unpleasant smells. For anyone starting their poultry-keeping journey, this type of coop is ideal for keeping the experience smooth and pleasant.
Compact Chicken Coop Design
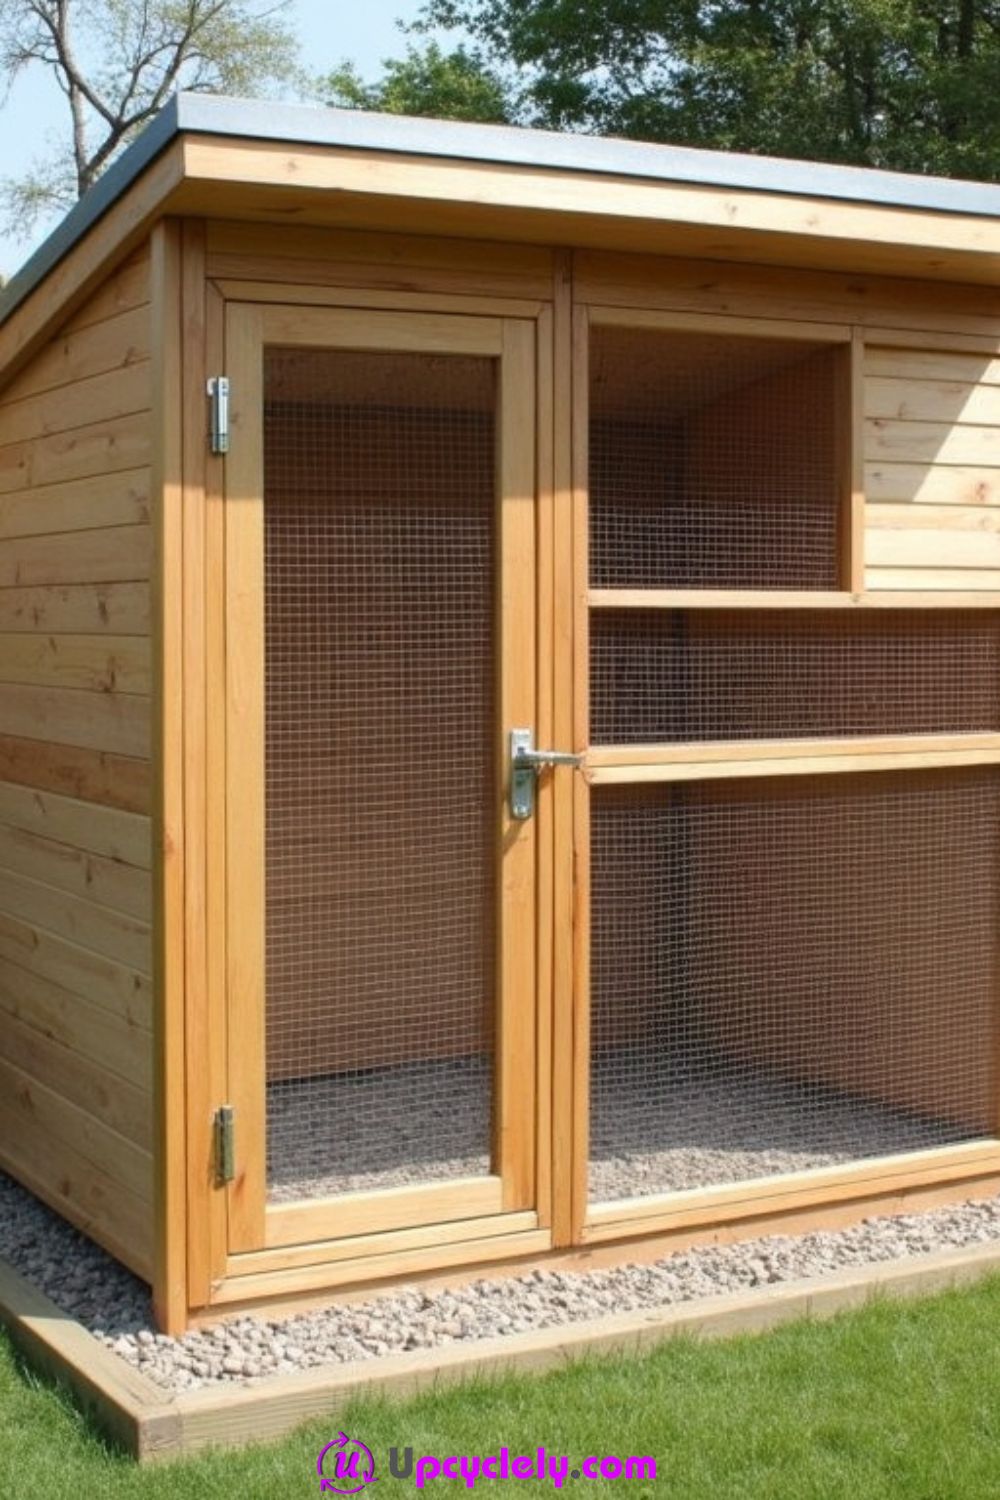
Fresh air should move through a coop without turning the roost into a cold wind tunnel. High-level openings, protected mesh, roof overhangs, and adjustable panels can release moisture and stale air while keeping rain and predators outside.
Ventilation is not the same as leaving a large unprotected gap. Openings must stay clear of bedding and dust, remain secure at night, and be easy to inspect. Climate and flock size change the amount of airflow needed, so the design should allow adjustment rather than relying on one permanently sealed arrangement.
Materials and Tools
· High-level vent frames or louvred openings
· Small-opening welded mesh or hardware cloth
· Roof overhang, flashing, or weather hood
· Adjustable shutters or sliding covers where suitable
· Exterior screws and washers for mesh attachment
· Removable dust screens only if they do not restrict airflow
· Thermometer or simple moisture observation routine
Steps for This Chicken Coop Project
1. Plan a cross-flow path. Mark openings on more than one side or use a high inlet and outlet that allow stale air to escape. Keep the main airflow above sleeping birds where possible. Avoid placing vents directly behind roosts or where roof runoff can blow inside.
2. Frame and protect each opening. Cut vents only after wall framing is complete, then reinforce the edges. Fix strong mesh with screws and washers rather than relying on a few light staples. Add an exterior hood, louvre, or overhang that blocks rain without sealing the air path.
3. Add seasonal adjustment. Fit shutters or covers that reduce driving rain and severe drafts while leaving some fresh-air exchange. Make controls operable from outside and secure them so wind cannot slam them shut. Do not cover vents with fabric or plastic that traps condensation.
4. Monitor the occupied coop. Check smell, damp bedding, window condensation, dust, and bird behaviour at different times and in different weather. Clean vent edges regularly and adjust openings gradually. If the air feels stale to you at head height, investigate the cause rather than masking the odour.
A practical detail I would not skip: For me, ventilation should be designed before the decorative windows. It is far easier to make a protected opening look neat than to cut safe airflow into a finished wall later.
Variation: A clerestory-style strip below the roof can provide continuous high ventilation while keeping the lower walls solid and sheltered.
Chicken Coop with Run
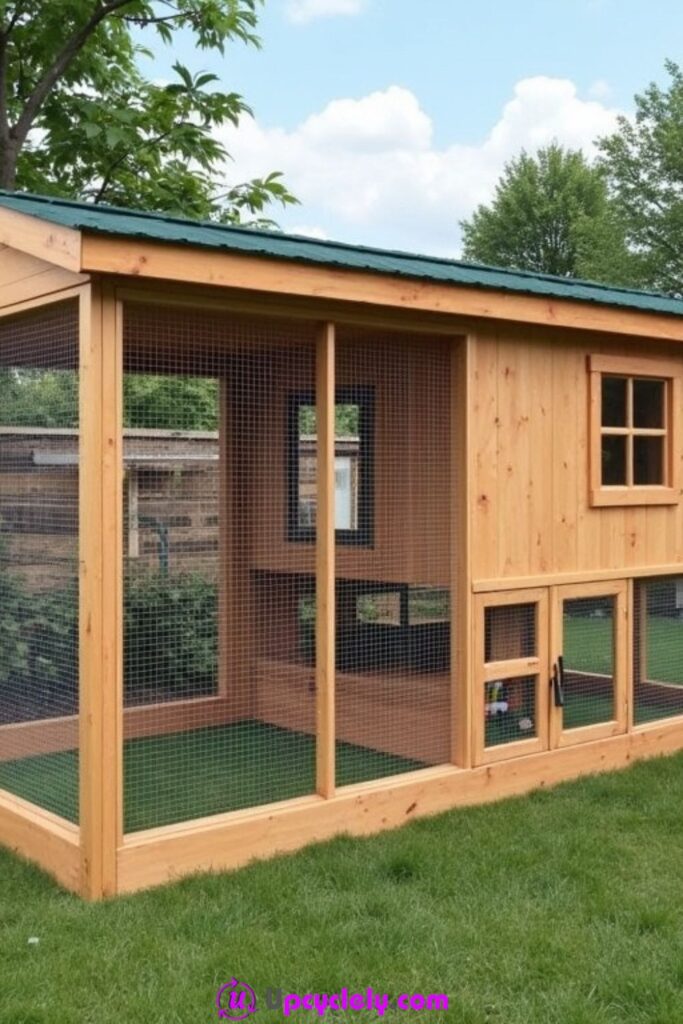
An attached run gives chickens a protected place to scratch, dust-bathe, and move outside the sleeping house. The run should be treated as a structural enclosure, not a loose mesh afterthought fastened to the coop at the end.
The weakest point is often the ground edge or the joint between run and house. Gates, corners, roof mesh, and buried or outward-facing barriers need the same attention as the coop door. A covered dry zone also makes feeding and bad-weather use more manageable.
Materials and Tools
· Timber or metal frame for the run
· Small-opening welded mesh suited to local predators
· Ground-edge barrier, apron, or secure base method
· Roof mesh or solid weather cover as appropriate
· Keeper-sized gate with predator-resistant latch
· Covered dry area for feed, water, and dust bathing
· Exterior screws, washers, brackets, and anchors
Steps for This Chicken Coop Project
1. Lay out a visible, accessible run. Choose a shape that can be seen from the house and reached with cleaning tools. Avoid narrow blind corners behind sheds or shrubs. Mark the gate, coop connection, and a dry covered section before setting posts or base rails.
2. Build and brace the frame. Set the frame square and add cross-bracing around gates and long panels. Keep mesh spans supported so they cannot bow under pressure. Connect the run to solid coop framing, closing the seam with overlapping mesh or timber rather than a bead of sealant alone.
3. Protect the perimeter and roof. Use a ground barrier appropriate to the site and local predators, checking drains and tree roots before digging. Cover overhead openings where necessary and secure every mesh edge with screws and washers. Fold or trim sharp cut ends away from birds and hands.
4. Add enrichment without hiding hazards. Provide dry litter, a dust-bathing area, low stable perches, and sheltered feed and water positions. Keep objects away from the boundary so they cannot become steps for escape or predator reach. Inspect the ground edge after storms and animal activity.
A practical detail I would not skip: I would choose a run gate large enough for a wheelbarrow or bedding container. Small gates look tidy until the first full clean-out.
Variation: A detachable extension can be moved between prepared connection points, provided every join locks securely and leaves no gap.
Chicken Coop with Solar Lights
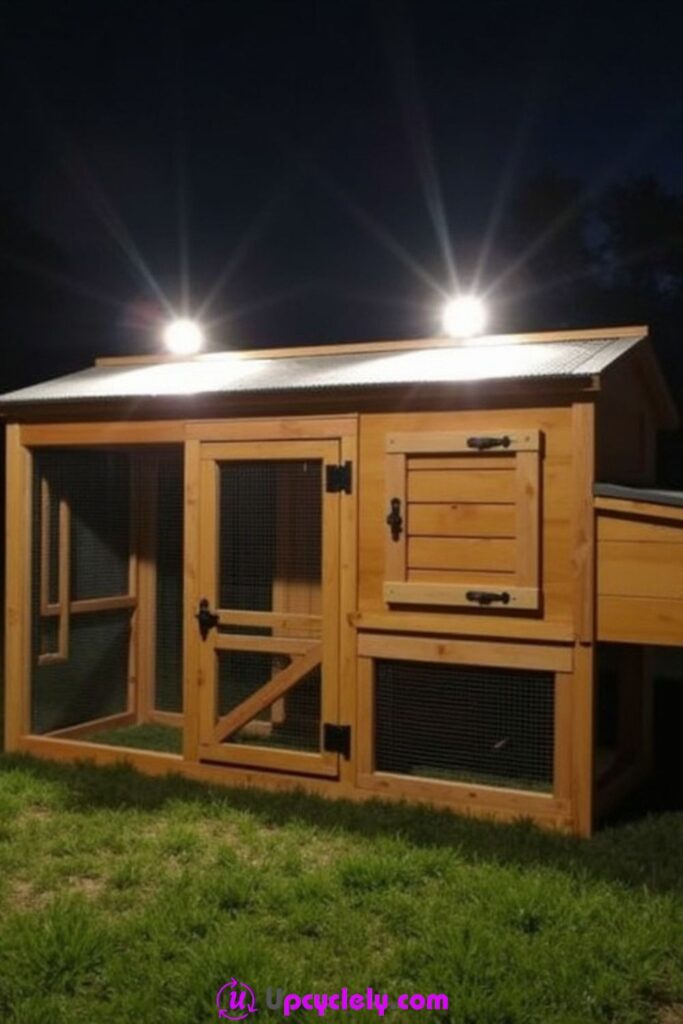
Solar lighting can make evening checks easier without running a cable across the garden. The most useful setup uses low-voltage components, protected wiring, and light aimed at the keeper’s path or service area rather than shining continuously into the birds’ sleeping space.
Lighting should support care, not replace proper daylight, ventilation, or safe electrical work. Batteries and controls need a dry enclosure, cables must stay beyond pecking reach, and any mains connection should be handled by a qualified person.
Materials and Tools
· Outdoor-rated low-voltage solar light kit
· Solar panel with secure mounting bracket
· Weather-resistant battery or controller enclosure
· Cable clips, conduit, or protective channel
· Manual switch or appropriate timer control
· Exterior screws and sealed cable entry point
· Optional shield to direct light away from roosts
Steps for This Chicken Coop Project
1. Choose a useful lighting purpose. Decide whether the light is for the path, nest access, storage, or short evening inspections. Avoid placing a bright fitting above roosts or leaving it on through the night. Then identify a panel position that receives suitable light without becoming a perch.
2. Mount the panel and enclosure. Fix the solar panel to solid framing with weather-resistant hardware and route water away from screw holes. Place batteries and controllers in a dry ventilated enclosure that birds cannot reach. Follow the equipment instructions rather than improvising connections.
3. Protect and route the cable. Use clips or conduit so cables cannot sag, rub against sharp edges, or enter the coop at pecking height. Seal the wall entry without blocking ventilation. Keep connectors accessible for inspection but sheltered from rain, bedding dust, and cleaning water.
4. Test the light and routine. Charge and test the system before relying on it. Check whether the beam creates glare, shadows, or disturbance inside the coop, then add a shield or move the fitting if needed. Inspect cables and mounts regularly, especially after wind or roof maintenance.
A practical detail I would not skip: I’d rather use a modest, well-directed light for ten minutes of care than make the whole coop glow all night. Darkness and a calm roosting routine still matter.
Variation: A solar path light mounted beside the coop can illuminate the approach without putting any electrical component inside the bird area.
Chicken Coop with Storage Space
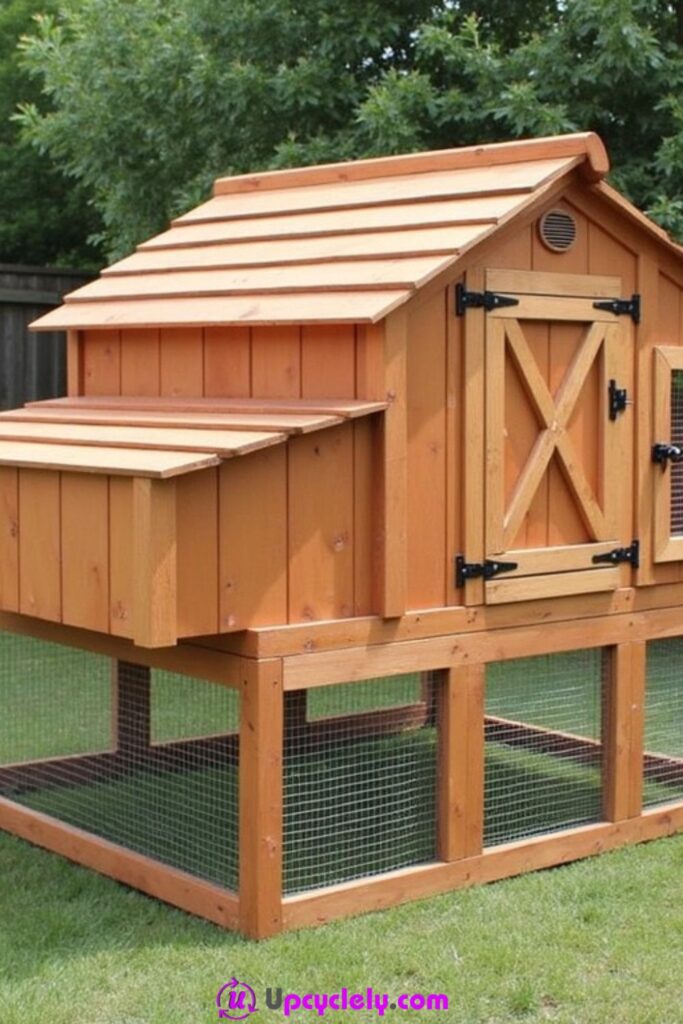
Built-in storage keeps bedding, tools, and daily supplies close to the flock, but feed and chemicals should never share an open cupboard with dust, droppings, or rodents. A separate sealed compartment is far more useful than a decorative shelf inside the coop.
Storage also adds weight and can reduce ventilation if it is squeezed into every wall. The best arrangement keeps the bird area simple while giving the keeper a dry exterior-access cabinet with washable surfaces and secure containers.
Materials and Tools
· Sound panel material for a sealed storage compartment
· Exterior-access door with weather strip or overlap
· Rodent-resistant lidded feed container
· Shelves or hooks fixed to structural framing
· Separate caddy for cleaning products and medicines
· Ventilated dry area for bedding where appropriate
· Hinges, handle, and lockable or secure latch
Steps for This Chicken Coop Project
1. Separate storage from bird space. Choose an exterior wall or end bay that can be enclosed fully without blocking vents or narrowing the coop. Keep feed, bedding, tools, and treatments in distinct zones. Do not design an open shelf where birds can roost above stored supplies.
2. Build a dry, cleanable compartment. Use a raised floor, overlapping door edges, and smooth internal panels. Seal roof and wall joints while allowing any necessary ventilation for dry bedding. Add a lip or tray so spilled feed can be removed rather than falling into inaccessible cracks.
3. Fit secure containers and supports. Store feed in a rodent-resistant container and mount shelves into solid framing. Use hooks with closed ends for tools and keep sharp items behind a door. Place heavy supplies low so the coop does not become top-heavy or the shelf pull away.
4. Create a restocking and cleaning routine. Label containers, remove old feed before adding new, and clean spills immediately. Keep medications and strong cleaning products separately according to their instructions. Check the compartment for condensation, chewing, insects, and roof leaks during normal coop inspections.
A practical detail I would not skip: The part I like most about external storage is that you can collect supplies without opening the chicken area. That small separation helps with tidiness and reduces escape opportunities.
Variation: A weatherproof freestanding storage box beside the coop may be safer than adding weight to a small or mobile structure.
Portable Chicken Coop Idea
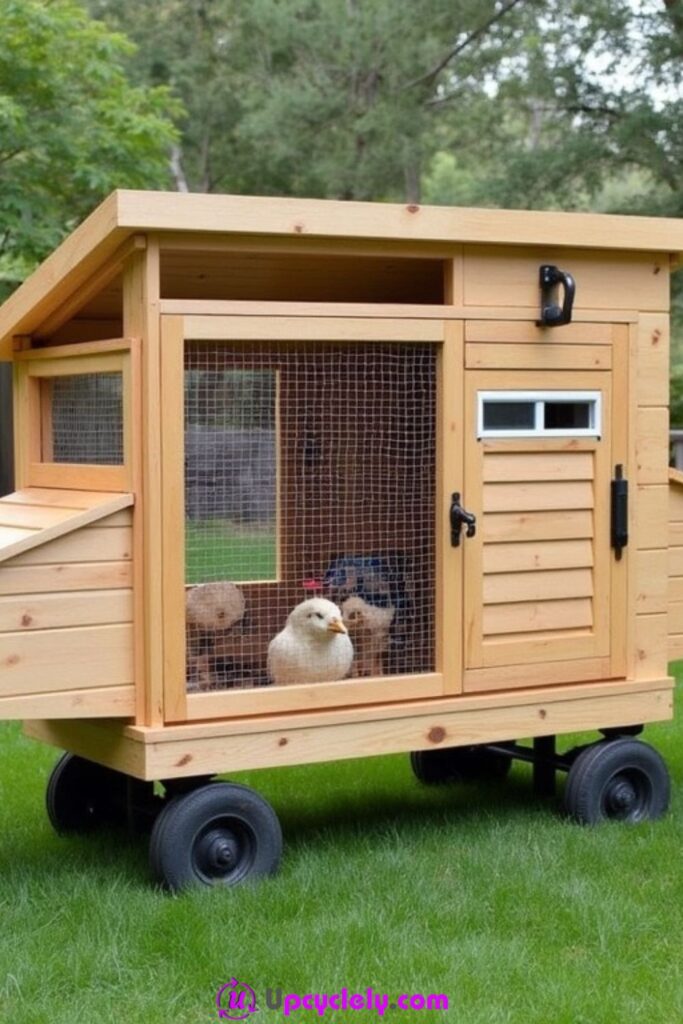
A portable coop may use wheels, skids, lift points, or modular panels, but it should have a clear movement method rather than simply being small enough to drag. The design needs rigid framing, low weight, stable parking, and doors that cannot spring open during handling.
Portability is useful for rotational grazing, temporary garden areas, or seasonal shade. It also means more frequent ground checks, because each new position can introduce holes, slopes, wet patches, toxic plants, or access points for predators.
Materials and Tools
· Lightweight structural frame with diagonal bracing
· Weather-resistant roof and wall panels
· Wheels, skids, or removable lifting handles
· Secure door latches and internal fitting retainers
· Strong mesh and protected ground edge
· Parking blocks, stakes, or stabilising legs
· Tow rope or handle only if designed for the load
Steps for This Chicken Coop Project
1. Choose one movement system. Decide whether the coop rolls, slides on skids, or separates into modules. Design the base and handles around that method instead of adding wheels after completion. Keep the centre of gravity low and the roof free from heavy decoration.
2. Build for repeated movement. Brace the base, corners, door frames, and roof connection so they do not loosen under vibration. Use bolts or exterior screws at removable parts and lock nuts where movement could undo hardware. Secure roosts, nests, and trays against shifting.
3. Prepare several safe positions. Level and inspect each location before moving the coop. Remove wire, holes, standing water, sharp stones, and plants that should not be accessible. Plan shade and weather protection instead of assuming the coop can be moved after conditions become severe.
4. Move, settle, and recheck. Use enough people or suitable equipment for the weight, keeping hands clear of pinch points. Once positioned, apply blocks, stakes, or stabilisers, then check doors, mesh, floor alignment, and ground gaps. Only return the coop to normal use after it is stable.
A practical detail I would not skip: Portable should mean controllable. If the coop requires a risky lift or an improvised tow every time, it is not genuinely portable for everyday use.
Variation: A small sleeping house can remain stationary while lightweight run panels move around it, reducing stress on the main structure.
Eco-Friendly Chicken Coop Idea
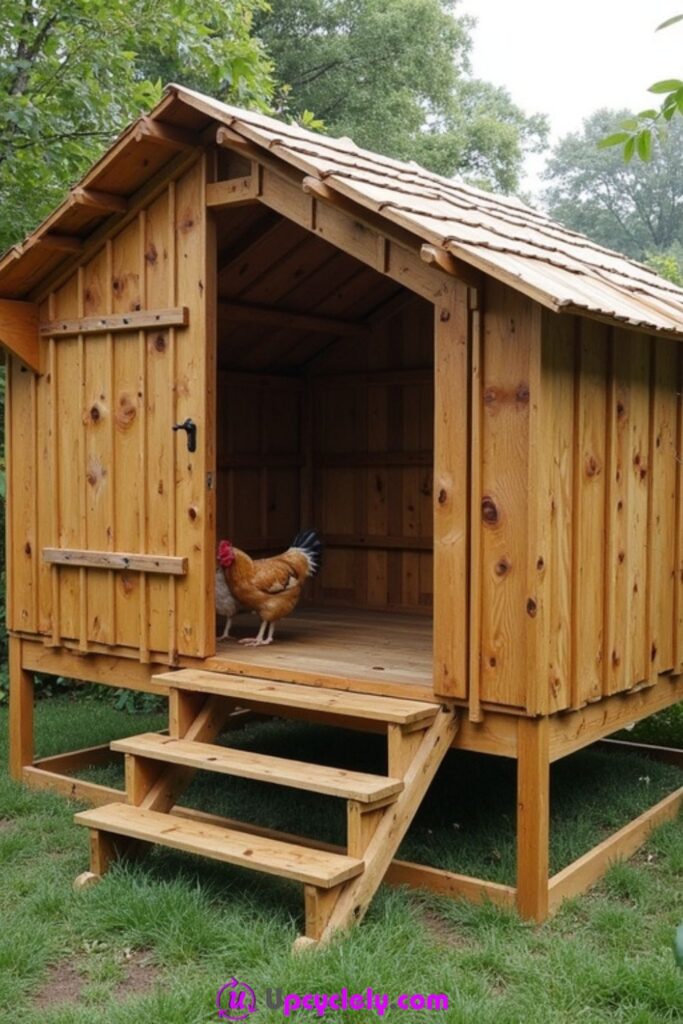
An eco-friendly coop starts with durable reuse, not a label. Salvaged timber, reclaimed roofing, repaired hardware, rain-conscious landscaping, and removable components can reduce waste when they remain safe and maintainable.
Natural-looking materials still need protection from moisture and predators. Untested pallets, old chemical containers, flaking paint, and rotting shingles are not sustainable choices simply because they are reclaimed. Good reuse keeps the useful life of sound materials going without transferring hidden problems to the flock.
Materials and Tools
· Verified clean reclaimed timber and panels
· Reused roofing in sound, watertight condition
· Repaired hinges, handles, and latches that operate reliably
· Strong new mesh where reclaimed mesh is uncertain
· Replaceable internal liners and removable fittings
· Low-odour exterior finish suited to the material
· Gravel, pavers, or reused edging for drainage control
Steps for This Chicken Coop Project
1. Audit every reclaimed item. Identify the previous use, current condition, and new job for each material. Reject pieces with unknown chemical exposure, structural decay, or sharp damage. Clean and dry the acceptable materials, then mark structural, panel, trim, and removable parts separately.
2. Design for repair and disassembly. Use screws and accessible brackets instead of permanently gluing every joint. Make nest liners, roosts, floor panels, and storage parts removable. Standardise repeated parts where possible so one damaged panel can be replaced without dismantling the entire coop.
3. Control water and ground contact. Add roof overhangs, flashing, raised supports, and a drained base. Protect timber end grain and keep soil from accumulating against walls. Reuse gravel or pavers only after checking they are clean and stable under the coop’s weight.
4. Maintain the material cycle. Store offcuts for future repairs, label spare hardware, and inspect reused components more often during the first season. Repair small splits and loose edges promptly. At the end of a component’s life, separate metal, timber, and coverings so they can be handled appropriately.
A practical detail I would not skip: For me, the most sustainable feature is a coop that can be opened, cleaned, repaired, and adapted. A sealed decorative object is much harder to keep useful.
Variation: Use reclaimed material for walls and trim while purchasing new roofing, mesh, and latches—the parts where unknown wear creates the greatest risk.
Homemade Chicken Coop Design
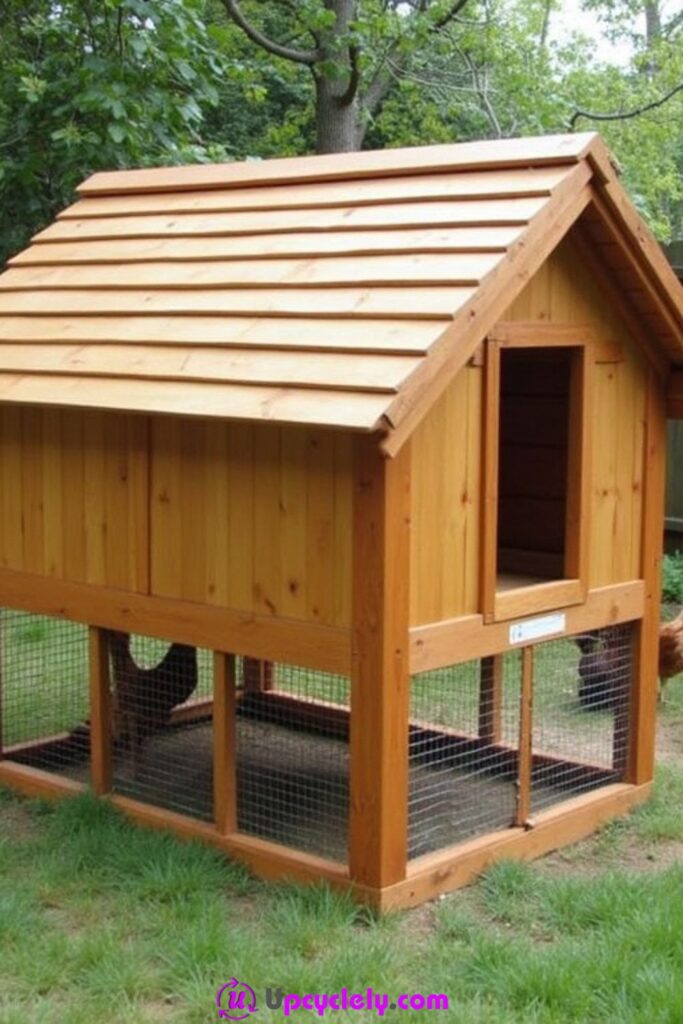
A homemade coop gives you control over doors, height, nest access, run connections, and the materials already available. That freedom is valuable, but it also means the plan must solve structural and animal-care needs that a decorative sketch may overlook.
Build the routine into the design: where you stand to clean, how you reach a sick bird, where water is carried, how bedding leaves the coop, and what closes at dusk. Once those movements work, the roofline and colour can take on more personality.
Materials and Tools
· Measured plan and cut list based on available materials
· Structural timber, exterior panels, and roof covering
· Exterior screws, brackets, hinges, handles, and latches
· Predator-resistant mesh for openings and run areas
· Removable roosts, nest liners, and cleaning panels
· Exterior sealant and suitable finish
· Clamps, square, level, saw, drill, and protective equipment
Steps for This Chicken Coop Project
1. Draw the care routine first. Sketch the coop from the keeper’s side, marking full access doors, nest collection, feed and water routes, vents, roosts, and bedding removal. Then add the flock entrance and run connection. Check the plan against the actual tools and materials available.
2. Build in manageable panels. Construct the base, wall frames, and roof sections on a flat surface. Check square before adding solid sheathing, then pre-fit doors and removable panels. Panel construction makes it easier to correct errors before lifting the whole structure into place.
3. Assemble and weatherproof. Raise the structure safely with help, brace it, and secure it to a stable base. Fit roofing, flashing, vents, and mesh before interior fittings. Seal joints that face rain while keeping designed airflow open. Smooth all internal edges and cover fastener points.
4. Test every task before occupancy. Open doors with one hand, remove the roosts, reach nest corners, sweep the floor, fill water, and close the night entrance. Shake gates and press mesh. Correct awkward or weak details now, then add bedding and observe the empty coop through rain and wind.
A practical detail I would not skip: I know it can feel tempting to finish the paint before testing the doors, but hardware alignment and water runoff deserve the first full inspection.
Variation: A homemade coop can begin as a strong basic shell, with removable nest boxes, storage, or run modules added after the daily routine becomes clear.
Modern Chicken Coop Idea
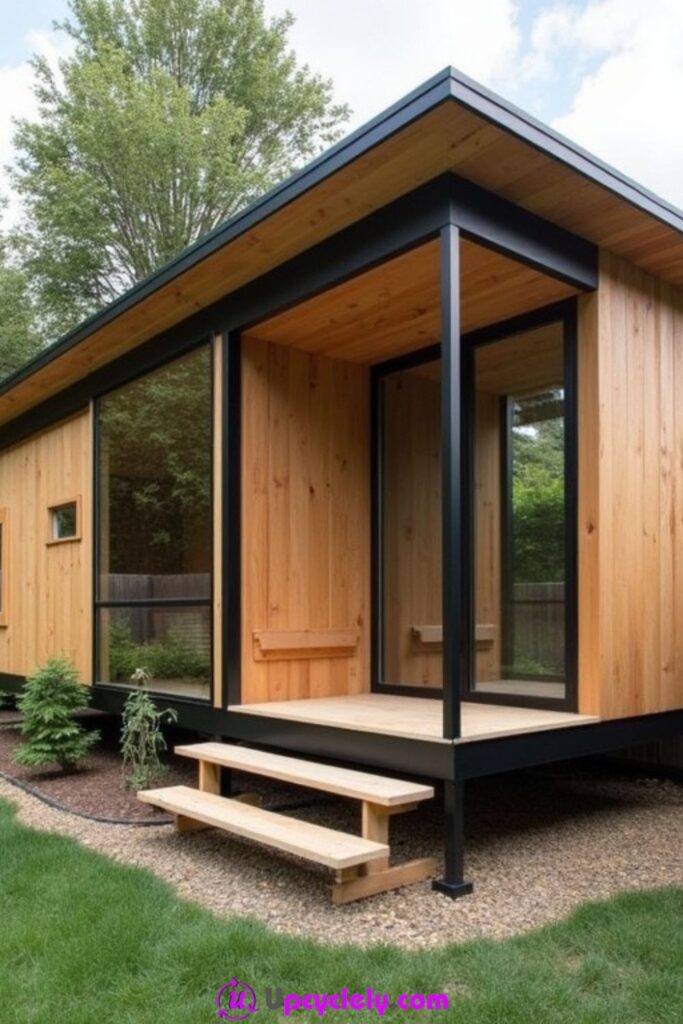
A modern coop can use clean lines, dark framing, broad panels, and carefully placed glazing or translucent sections. The restrained appearance works only if the interior avoids heat build-up, glare, condensation, and sharp or fragile surfaces.
Large clear panels are not automatically suitable for a bird house. They may need shading, protection, ventilation, and a durable material chosen for outdoor use. The easiest modern look often comes from neat proportions and consistent detailing rather than turning the coop into a glass box.
Materials and Tools
· Straight timber or metal framing with clean joints
· Exterior panels in a limited finish palette
· Durable outdoor glazing or translucent panel where appropriate
· Protected high-level ventilation openings
· Simple roof with concealed or neat drainage edges
· Dark hardware, secure latches, and flush handles
· Shade screen or overhang for exposed transparent areas
Steps for This Chicken Coop Project
1. Set a simple proportion system. Choose consistent panel widths, door lines, and roof edges before cutting. Keep the bird entrance, keeper door, and nest lid aligned where practical. Limit decorative breaks so the frame remains strong and the surfaces stay easy to clean.
2. Control light and heat. Place glazing away from intense exposure or protect it with an overhang, shade, or removable screen. Pair any transparent area with real ventilation rather than relying on the window alone. Avoid brittle glass or exposed edges in places birds or tools may strike.
3. Build neat but accessible panels. Use removable interior liners, concealed backing strips, and full-size service doors. Keep screws and hinges accessible for future repair even if their appearance is discreet. Add drainage gaps and flashing where the clean exterior lines might otherwise trap water.
4. Finish with restrained details. Use one or two compatible finishes and allow them to cure fully before occupancy. Test glare, internal temperature, condensation, and airflow through changing weather. Add planting or gravel outside without blocking vents or hiding the base from inspection.
A practical detail I would not skip: I don’t think a modern coop needs many expensive materials. Straight cuts, repeated spacing, tidy edges, and a limited colour palette usually create the effect more convincingly.
Variation: Use a solid timber coop with one small protected translucent panel and black hardware for a modern look with less heat and cleaning risk.
Sustainable Chicken Coop
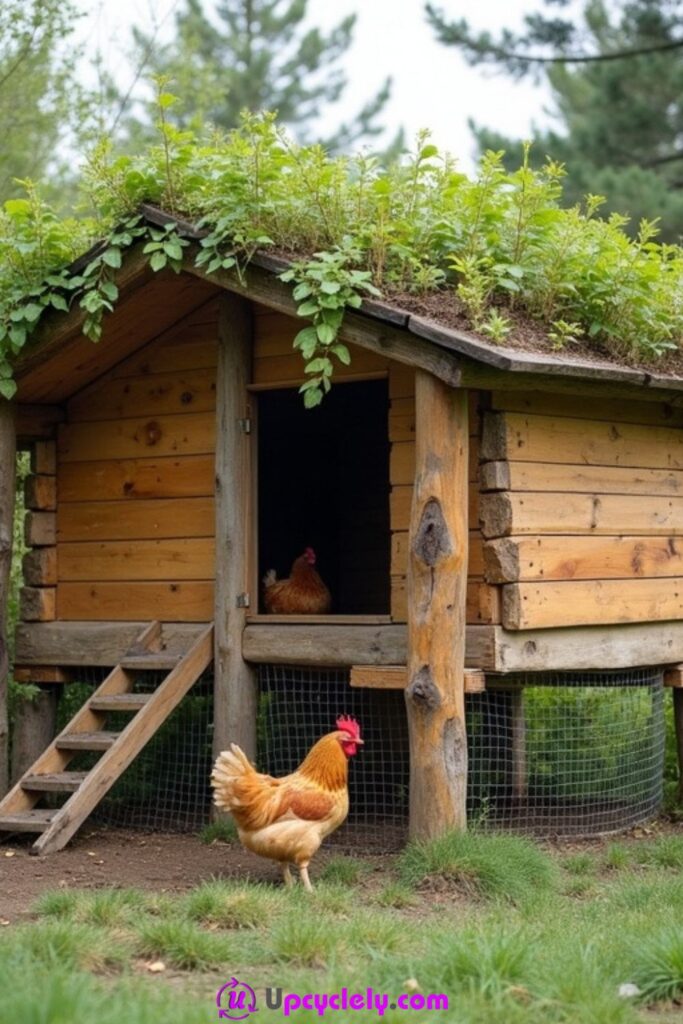
A sustainable coop may include a planted roof, reclaimed timber, rain-managed landscaping, solar accessories, or components designed for repair. Each feature should improve the long-term use of the structure rather than add maintenance the keeper cannot safely manage.
Green roofs are especially demanding. Soil, plants, retained water, and drainage layers add considerable load, so the roof structure and waterproofing must be designed for it. Chickens should not have access to roofing plants or edges unless every species and surface is appropriate and secure.
Materials and Tools
· Structural frame assessed for the intended roof load
· Continuous waterproof roof membrane and protected edges
· Drainage layer and contained lightweight planting system if used
· Clean reclaimed wall materials
· Accessible gutters or controlled runoff route
· Removable interior components for repair and cleaning
· Low-voltage solar accessory only where useful
Steps for This Chicken Coop Project
1. Choose one sustainable feature to do well. Decide whether the priority is reclaimed materials, repairable construction, shade, water control, solar lighting, or a planted roof. Avoid combining several complicated systems in the first build. Match the feature to your climate, skills, and maintenance routine.
2. Strengthen and waterproof the shell. Build the roof and walls for the actual loads and weather exposure. For any planted roof, use appropriate structural advice, a continuous waterproof layer, protected drainage, and contained growing material. Keep roots and moisture away from timber joints and vents.
3. Design ongoing access. Make gutters, roof edges, solar mounts, and removable panels reachable without standing on the coop. Provide safe points for inspection and repair. Keep vegetation from covering vents or creating bridges to the roof for predators.
4. Monitor rather than assume. Check the roof after heavy rain, heat, frost, and plant growth. Watch for sagging, leaks, blocked drainage, insects, or roots at edges. Remove any feature that compromises the bird space; sustainability depends on a durable, healthy shelter, not maintaining a failing idea.
A practical detail I would not skip: A green roof can be appealing, but I would never treat it as a light decorative layer. The wet load and waterproofing deserve proper structural planning.
Variation: A separate planted shade canopy beside the coop can provide greenery without placing soil and water directly on the poultry house.
Simple DIY Chicken Coop
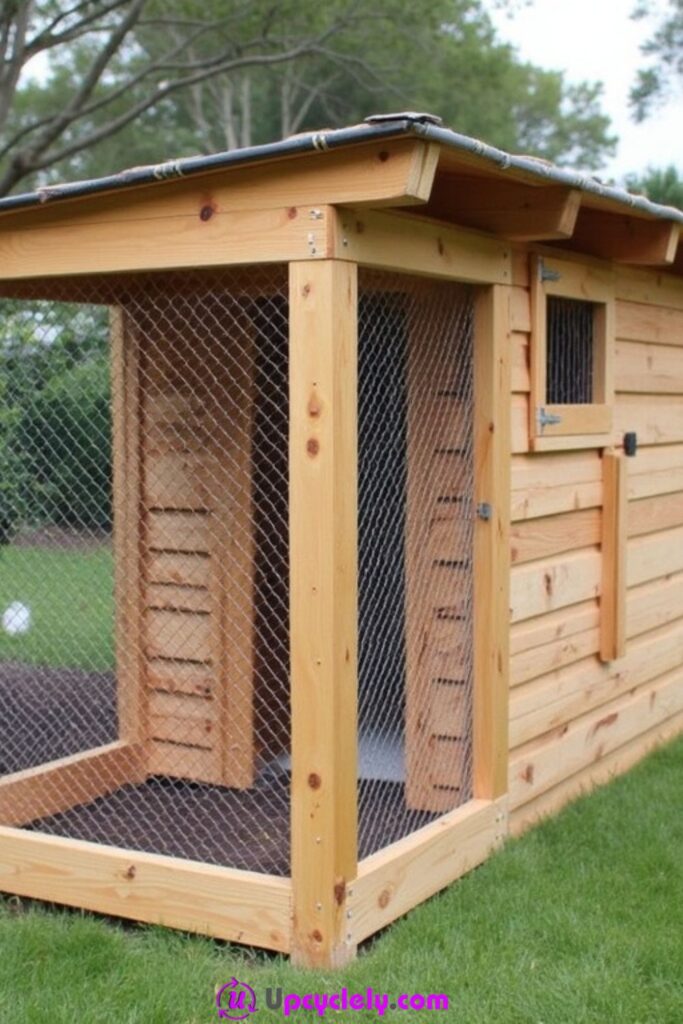
A simple DIY coop uses a straightforward frame, one sloping roof, protected vents, a secure door, and removable interior fittings. Fewer joints and roof valleys mean fewer places for water and predators to find weakness.
Simple does not mean rushed. Squareness, roof overhang, mesh attachment, and cleaning access still need care. The advantage is that each part is visible and understandable, which makes maintenance easier for a first-time builder.
Materials and Tools
· Straight framing timber
· Exterior plywood or weather-resistant boards
· Single-slope roof sheet and edge flashing
· Strong mesh for vents and run opening
· One large cleaning door and smaller bird door
· Exterior screws, hinges, handle, and secure latch
· Removable roost and nest tray
Steps for This Chicken Coop Project
1. Build a rectangular base and walls. Cut matching pieces, assemble on a flat surface, and check diagonals before fastening fully. Raise the frame on a stable dry base and brace the corners. Keep the floor and lower wall edges protected from splash and ground moisture.
2. Add one reliable roof. Slope the roof away from doors and run connections, leaving an overhang. Fix the covering according to its material and protect exposed edges. Test water flow before installing interior fittings, then correct any drip line that lands at the entrance.
3. Fit access, vents, and mesh. Hang the cleaning door square and use a latch that cannot be nudged open. Add high protected vents covered with strong mesh and a small bird entrance that closes securely. Smooth cuts and cover exposed screw ends inside.
4. Install removable basics. Add a stable roost, simple nest tray or box, and a removable floor liner or droppings board where suitable. Keep the centre clear for movement and cleaning. Load bedding, close the coop, and inspect light, airflow, and gaps from both sides.
A practical detail I would not skip: That’s the part I would keep simple: one dependable roof plane and one generous cleaning door solve more problems than several decorative little sections.
Variation: A basic coop shell can later connect to a larger run or external nest module without changing the original sleeping space.
Small Chicken Coop Design
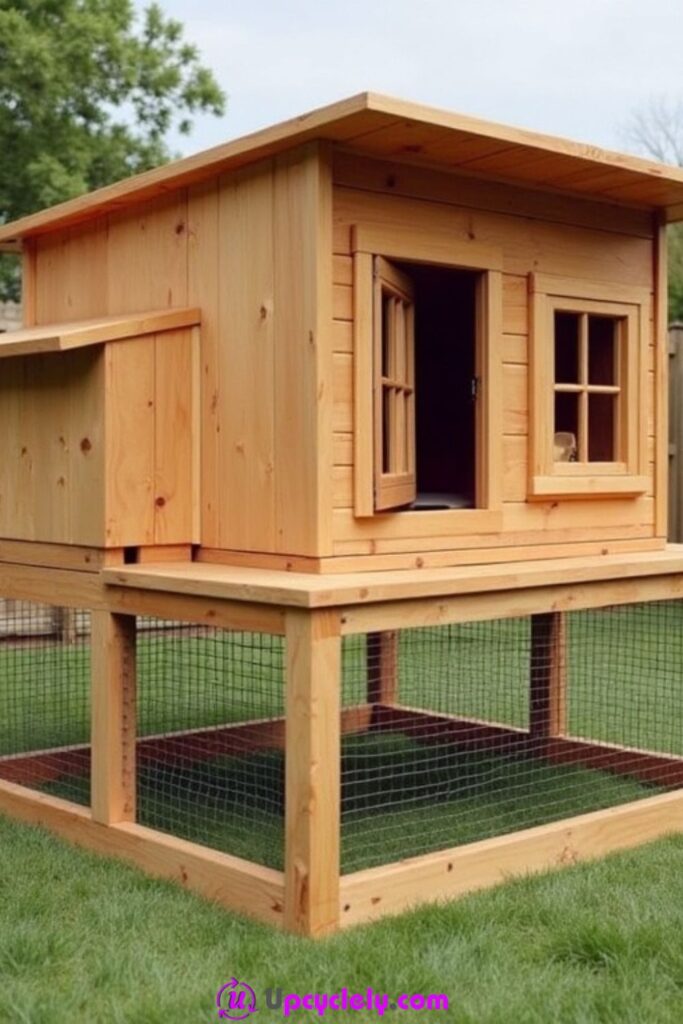
A small coop is most successful when it is designed for a genuinely small flock and not used as an excuse to squeeze in more birds. Raised construction, an accessible side nest, high ventilation, and a protected lower run can make good use of limited space.
The design should still allow birds to pass, roost, and rest without one dominant hen controlling the only route. The keeper must be able to reach the entire interior. A pretty small coop with inaccessible corners soon becomes harder to clean than a plain larger one.
Materials and Tools
· Compact but strong timber frame
· Weather-resistant raised floor and feet
· Sloping roof with protected high vents
· Mesh-enclosed space below or beside the house
· Wide side cleaning panel
· Small external nest module or removable tray
· Secure ramp, doors, hinges, and latches
Steps for This Chicken Coop Project
1. Confirm the flock and maintenance limit. Choose the design only after deciding how many birds the site and routine can support under local guidance. Mark the interior layout and ensure no fitting blocks the only path. Leave enough access to remove a bird safely when needed.
2. Raise the house on a stable base. Support the floor evenly and brace the legs against sideways movement. If chickens use the space below, keep it visible, dry, and protected with strong mesh. Add a ramp that stays firm and does not obstruct the keeper door.
3. Use external and removable features. Place the nest lid outside, make roosts removable, and add a wide cleaning panel. Protect vents at high level and keep them clear of roof leaks. Test that every fitting can leave through the door without dismantling the coop.
4. Review the occupied layout frequently. Watch for blocked doorways, crowding at roosts, damp bedding, bullying around food or nests, and unused dead space. Adjust removable parts rather than adding more birds or decorations. Keep the ground and lower enclosure clean and dry.
A practical detail I would not skip: A small coop needs more honest observation, not less. Minor moisture, crowding, or access problems become noticeable quickly in a compact space.
Variation: A small sleeping coop can connect to a larger secure daytime run, keeping the house compact without making the flock’s whole environment tight.
Chicken Coop Building Choices That Can Create Damp, Weak, or Unsafe Housing
Building before checking rules and location. A finished coop can become unusable if it breaks local restrictions, blocks drainage, or sits where neighbours and predators become an immediate problem. Confirm the rules and walk the site in different weather before buying or cutting material.
Using chicken wire as the only predator barrier. Light poultry netting may contain birds but can be too flexible or open for determined predators. Use strong small-opening welded mesh suited to local risks, attach it with washers or secure battens, and inspect all ground edges and roof joins.
Closing the coop tightly to keep it warm. A sealed box traps moisture, dust, odour, and stale air. Protect high-level ventilation from rain and drafts while maintaining fresh-air exchange, then monitor the occupied coop instead of covering every opening in cold weather.
Making the bird door the only cleaning access. A small entrance forces the keeper to reach blindly into corners and makes bedding removal difficult. Include a wide door or removable panel that exposes the floor, roost supports, nest area, and wall edges.
Reusing damaged or unknown materials. Rotten wood, corroded hardware, contaminated containers, sharp mesh, and flaking coatings can create structural and health risks. Reuse only materials whose condition and previous purpose are understood, and give weaker pieces decorative rather than load-bearing jobs.
Ignoring water paths. Roof runoff, splashback, blocked drainage, and soil pressed against timber can keep bedding and framing damp. Slope roofs away from entrances, raise vulnerable edges, protect end grain, and inspect the coop after real rain.
Adding storage, solar equipment, or a planted roof without structural planning. Useful extras add weight, wiring, moisture, and maintenance. Keep storage separate, use outdoor-rated low-voltage equipment correctly, and obtain proper structural advice before placing soil and retained water on a roof.
Designing for the photograph instead of the daily routine. Tiny doors, hidden latches, crowded decorations, and inaccessible corners look neat until feeding, cleaning, catching a bird, or repairing the roof becomes necessary. Test every daily task with the empty coop before occupancy.
Frequently Asked Questions
Can a beginner build a chicken coop?
A beginner can manage a simple rectangular design with a single-slope roof, generous cleaning door, protected vents, and removable fittings. Choose a plan that matches your tools, ask for help with heavy panels, and do not improvise structural or electrical details beyond your ability.
Can I build a coop entirely from pallets?
Pallet timber may provide useful boards, but it varies greatly in treatment, cleanliness, thickness, and strength. Use only verified clean, sound pieces, remove every fastener, and purchase reliable structural timber, mesh, roofing, and latches where reclaimed material is uncertain.
How do I know whether the coop has enough ventilation?
Look for fresh air without a direct draft across resting birds, and check for damp bedding, condensation, strong odour, dust, and stale air. Ventilation needs change with climate, weather, flock size, and design, so use protected adjustable openings and consult local poultry guidance.
What should I use to make a coop predator-resistant?
Use a rigid frame, strong small-opening welded mesh or hardware cloth appropriate to local predators, secure fasteners with washers or battens, and latches that resist lifting or twisting. Inspect roof edges, door thresholds, corners, ground barriers, and the joint between coop and run regularly.
Should a chicken coop be raised off the ground?
Raising the coop can reduce direct ground moisture and create sheltered space, but the supports must be stable and braced. The area underneath should remain visible, accessible, and protected rather than becoming a narrow hidden space that cannot be cleaned or inspected.
Can I add electricity or solar lighting to the coop?
Outdoor-rated low-voltage solar lighting can help with short inspections when it is installed according to the equipment instructions and protected from moisture and pecking. Do not improvise mains wiring; use a qualified electrician, and avoid lighting the roost continuously through the night.
Is a green roof suitable for every chicken coop?
No. Soil, plants, drainage layers, and retained rain add substantial load and require reliable waterproofing and maintenance. A planted shade canopy beside the coop is often a simpler alternative when the structure was not designed for a living roof.
How can I make the coop easier to clean?
Include a keeper-sized door or removable wall panel, lift-out roosts, accessible nest liners, smooth internal surfaces, and a floor arrangement that lets bedding move straight into a container. Keep storage and fixed decorations away from floor corners where debris collects.
Build the Coop Around the Care It Must Make Easier
The most dependable chicken coop ideas are not defined by a roof shape, paint colour, or fashionable material. They work because water runs away, fresh air can move, doors close securely, bedding comes out easily, and every corner can be inspected. Reclaimed boards, repaired hardware, wheels, storage, solar lights, or a planted feature can all be useful, but they should support those basics rather than compete with them.
Begin with one manageable design and build the dry, secure shell before adding extra features. Test the doors, mesh, roof, vents, ramp, nest access, and cleaning route while the structure is empty. Then watch how the flock actually uses the space and be willing to adjust removable fittings. That patient final stage usually improves a homemade coop more than another decorative trim board.
Which of these 17 chicken coop ideas best matches the space, materials, and daily care routine you can realistically maintain?