Accessories are often the first things to feel dated even when the material itself is still perfectly usable. A T-shirt can be too stretched to wear but still strong enough to carry groceries, a jar lid can become a small photo magnet, and a box of mismatched buttons can hold far more personality than a new packet bought only for one project. That is the part of upcycling accessories I enjoy most: the original object does not need to stay recognizable to remain useful.
I tend to look at small household pieces by asking what is still sound before deciding what they should become. Handles, rims, closures, magnets, frames, fabric panels, and sturdy containers often survive long after their original purpose has stopped being useful. I don’t think every transformation needs extra decoration either. Sometimes a clean cut, a secure join, and one repeated detail are enough to make the finished piece feel deliberate.
The best results usually come from matching the new job to the material. Soft jersey works differently from metal, a wearable accessory needs different finishing from a planter, and anything that holds weight deserves more attention at the join points. A little planning at the beginning keeps these projects practical instead of turning them into objects that look interesting but are awkward to use.
Check Materials, Edges, and Hardware Before Reusing Them
Small upcycling projects can hide surprisingly important safety details. A bottle cap may have a sharp crimped edge, an old pair of glasses may have a loose hinge, and a tin can may feel smooth until you run a finger around the cut rim. I would inspect every piece before decorating it, because paint and embellishment should never be used to disguise a weak or hazardous base.
· Wash and dry fabric, lids, cans, bottles, shoes, and other reused items before measuring or attaching new materials.
· Check metal edges for burrs, sharp points, rust, loose rivets, or thin areas that could bend during use.
· Reject cracked glass, chipped lenses, brittle plastic, and hardware that cannot be secured reliably.
· Test old buttons, clasps, jump rings, magnets, straps, and hinges before building the design around them.
· Keep small magnets, beads, buttons, and loose metal findings away from young children and pets.
· For any project involving a bulb shape, use a purpose-made hollow craft vessel rather than dismantling a real household light bulb.
Match Attachment Methods to How the Accessory Will Be Handled
A decorative join and a structural join are not the same thing. A photo inside a jar lid can be held with a thin adhesive layer, while the base of a tote bag needs stitching or another genuinely strong construction method because it will be pulled and loaded repeatedly. I know it can be tempting to reach for one glue for everything, but the expected movement should decide how the pieces are connected.
· Use stitching for fabric seams, handles, and other areas that will flex, stretch, or carry weight.
· Choose adhesive only when it is compatible with both surfaces and the finished object will not rely on that bond for heavy loading.
· Spread stress across several stitches or attachment points rather than concentrating it on one small spot.
· Close jewelry loops completely so thread, wire, or cord cannot slip through a gap during wear.
· Keep magnets centered and fully bonded so the decorative face does not twist or pull away from the backing.
· Let finishes and adhesives cure according to their own instructions before testing the finished accessory.
Plan Comfort, Weight, Cleaning, and Safe Display Before Decorating
Finishing details should support the way an item will actually be used. Jewelry should not scratch skin, a tote should not become so decorated that it is heavy before anything goes inside, and a planter needs drainage rather than a sealed decorative base. Thinking about cleaning and storage early also helps you avoid attaching materials that cannot cope with moisture or repeated handling.
· Keep raised beads, hard knots, rough wire ends, and stiff glue away from surfaces that touch skin or hands.
· Avoid adding heavy embellishments to soft fabric handles, thin plastic, or delicate jewelry bases.
· Choose washable or wipeable finishes for totes, magnets, planters, and frequently handled accessories.
· Keep drainage holes open in reused planters and place saucers beneath indoor versions where needed.
· Use LED tealights in decorative metal holders when possible, especially where reused coatings or unknown finishes are present.
· Test hanging, carrying, magnet strength, and balance before treating the project as finished.
Transform Old T-Shirts into Chic Tote Bags
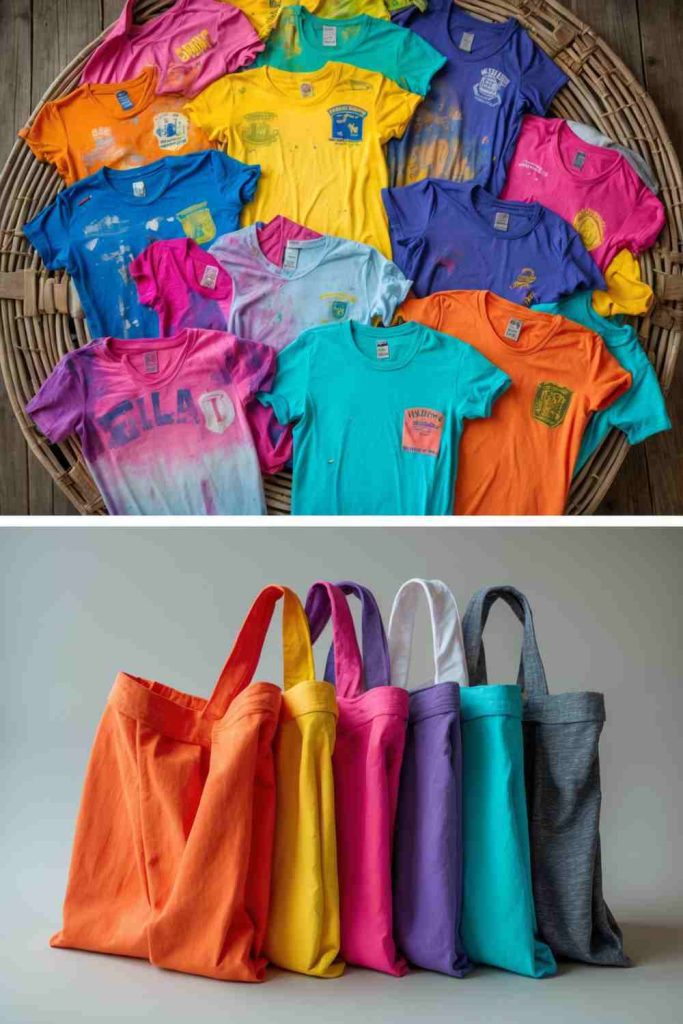
A T-shirt tote works best when the shirt is no longer useful as clothing but the body fabric and shoulder area are still strong. Jersey naturally stretches, so the finished bag can fold into a small space and expand around awkward groceries or craft supplies. The trade-off is that weak hems and thin fabric can sag quickly if the base is not reinforced.
I would choose a shirt with enough intact fabric around the side seams and neckline to form comfortable handles. Printed graphics can become the feature on the front, while stains near the hem can often disappear into the seam allowance. A tote like this does not need complicated shaping; the strength of the bottom join and the width of the handles matter far more than decorative extras.
Materials and Tools
· Old T-shirt with sound body fabric
· Fabric scissors
· Pins or clips
· Sewing machine or hand-sewing needle
· Strong thread
· Ruler or washable fabric marker
· Optional fabric patch for reinforcing the base
Steps for This Accessory Project
1. Lay the washed shirt flat and check which areas are still strong. Mark a smooth opening around the neckline and remove the sleeves without cutting too close to weakened seams. Keep the shoulder sections wide enough to become handles; narrow jersey strips can roll and dig into the hand once the bag is loaded.
2. Turn the shirt inside out and align the lower edges. Stitch the hem closed with a secure seam, then add a second line of stitching or a narrow reinforcing strip if the fabric is soft. If the original hem is bulky, sew just above it rather than forcing several thick layers through one line of stitches.
3. Shape the opening and handles by trimming only after the main bag is closed. Round sharp corners in the neckline cut and check that both handles are similar in width. Then stretch the opening gently with your hands to see whether any cut edge curls or runs into a weak point that needs a small reinforcing stitch.
4. Turn the tote right side out and test it with light items first. Watch the bottom seam and handle joins before adding more weight. If the jersey stretches more than expected, use the bag for soft, bulky contents or add an internal fabric panel rather than asking a thin shirt to behave like canvas.
The handle width is the detail I would protect. A bag can look neat on the table and still become uncomfortable the moment a narrow strip of jersey starts carrying weight.
Variation: Use two worn shirts together: one for the outer bag and one for a simple lining. The second layer helps control stretch and gives you a place to hide reinforced seams.
Upcycle a Light Bulb into a Gorgeous Terrarium
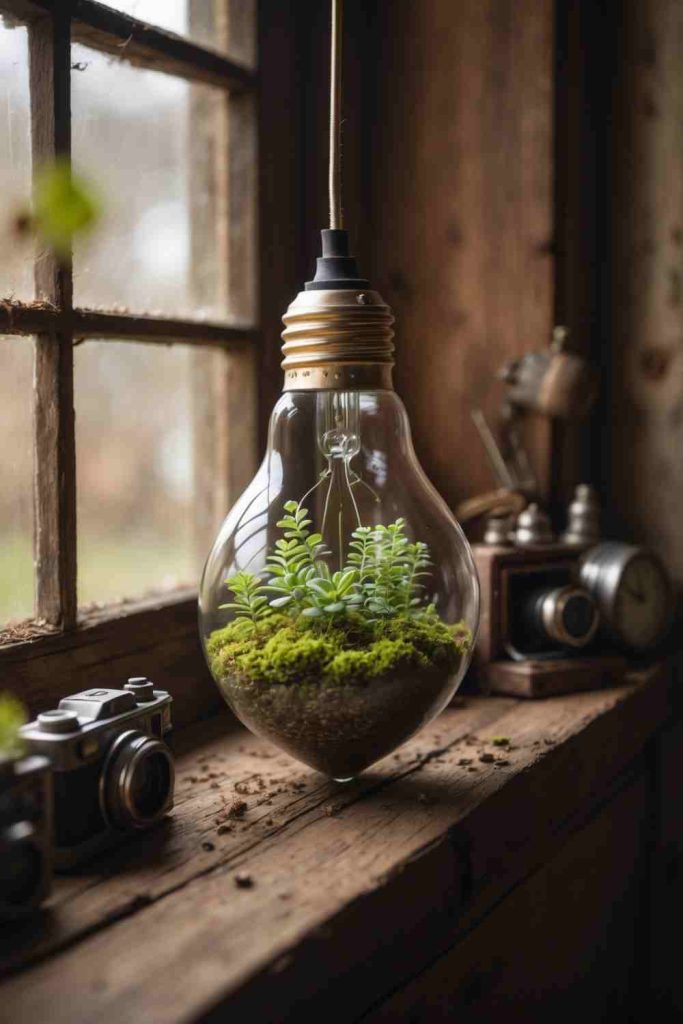
The bulb shape makes a tiny terrarium visually interesting because the narrow neck and rounded body frame a small landscape. For a safe home project, though, I would not dismantle a real household bulb. Thin glass, sharp internal components, and unknown coatings make that an unnecessary risk when hollow bulb-shaped craft vessels are readily used for decorative projects.
Treat the piece as a miniature display rather than a sealed plant system. Air plants, preserved moss, pebbles, or a dry botanical arrangement are easier to manage than soil packed into a narrow vessel. The finished object can sit in a wire stand, hang from a secure loop designed for the vessel, or rest in a small cradle where it cannot roll.
Materials and Tools
· Purpose-made hollow bulb-shaped craft vessel
· Small pebbles, clean sand, or decorative gravel
· Air plant, preserved moss, or dry botanical material
· Long tweezers
· Small paper funnel
· Soft brush
· Stable stand or hanger designed for the vessel
Steps for This Upcycling Project
1. Wash or wipe the craft vessel according to its material and let it dry completely. Inspect the opening and body for chips, cracks, or sharp edges before putting your hands near it. Decide how it will stand or hang before filling it, because adding materials first makes balance harder to judge.
2. Use a paper funnel to add a shallow base of dry pebbles or sand. Keep the layer light; a tiny vessel becomes surprisingly heavy when overfilled. Tap the side gently rather than pushing tools against the wall, and use a soft brush or tweezers to move stray particles away from the neck.
3. Add one small focal element, such as an air plant or a little preserved moss, using long tweezers. Avoid packing the vessel tightly. Then rotate it in your hand and check the composition from the angle where it will normally be displayed, moving the elements until the shape feels balanced rather than crowded.
4. Place the finished vessel in its stand or secure hanger and test stability over a protected surface. If using a living air plant, remove it for care when practical rather than pouring water into the vessel. Keep the display away from edges where it can be knocked down and replace the contents if moisture begins to collect.
For me, the empty space inside the bulb shape is part of the design. Filling every centimetre makes the tiny display harder to read and much more difficult to maintain.
Variation: Skip living material entirely and use pressed flower fragments, tiny paper stars, or a little colored sand for a maintenance-free version.
Turn Old Eyeglasses into Artistic Accessories
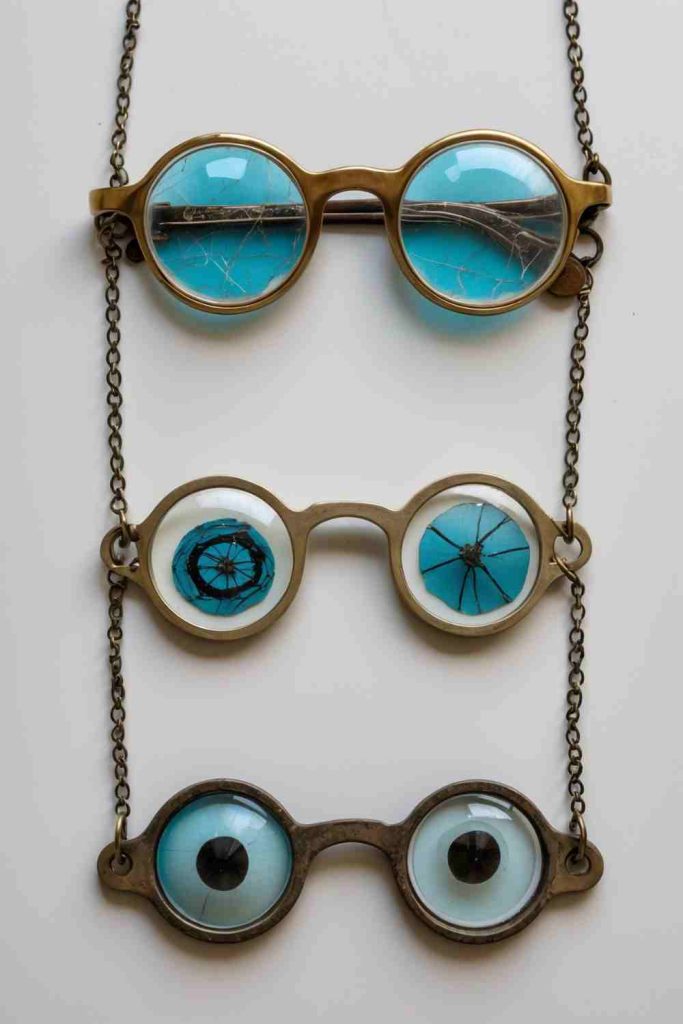
Old eyeglass frames have strong graphic shapes even when the prescription is no longer useful. A pair with intact hinges can become a costume accessory, photo prop, brooch-like decorative piece, or pendant-style frame without needing to cut the metal or plastic. The safest approach is to work with frames that are structurally sound and leave cracked lenses out of the project.
The design works best when the frame remains recognizable. Wrapping the temples with thread, adding a lightweight chain, or placing a small decorative insert behind an empty lens opening can change the character without burying the original shape. I would keep additions light so the hinges and nose bridge are not asked to carry more weight than they were designed for.
Materials and Tools
· Old eyeglass frames in sound condition
· Soft cleaning cloth
· Fine cord, embroidery thread, or lightweight chain
· Small jump rings if compatible with the frame
· Jewelry pliers
· Lightweight decorative paper or fabric inserts
· Optional removable adhesive dots
Steps for This Accessory Project
1. Clean the frames and operate both hinges several times. Remove only lenses that can be taken out safely without cracking or forcing the frame; otherwise leave intact lenses in place. Reject frames with sharp breaks, exposed wire, or brittle plastic because decoration will not make those areas safe.
2. Choose one role for the frame before adding anything. For a wearable decorative piece, keep the temples functional. For a pendant or wall accessory, identify a strong attachment point near the hinge or bridge and test a temporary loop there to see how the frame hangs.
3. Add lightweight details in controlled areas. Wrap thread around part of a temple, suspend a small chain from a secure loop, or place a paper insert behind one lens opening. Keep glue away from moving hinges and avoid hard embellishments at the nose pads or ear pieces if the frame may still be worn.
4. Inspect every connection and move the hinges again after decorating. If the frame is worn, check that nothing scratches the face or catches hair. If it is displayed, hang it by a balanced attachment rather than one delicate arm so the frame does not twist over time.
I would let the frame shape do most of the work here. Once every surface is covered with beads or paint, the most interesting part of the reused object can disappear.
Variation: Turn one intact frame into a tiny photo holder by placing removable printed images behind the lenses, keeping the hinges free so the piece can still fold for storage.
Turn Bottle Caps into Fun Magnets
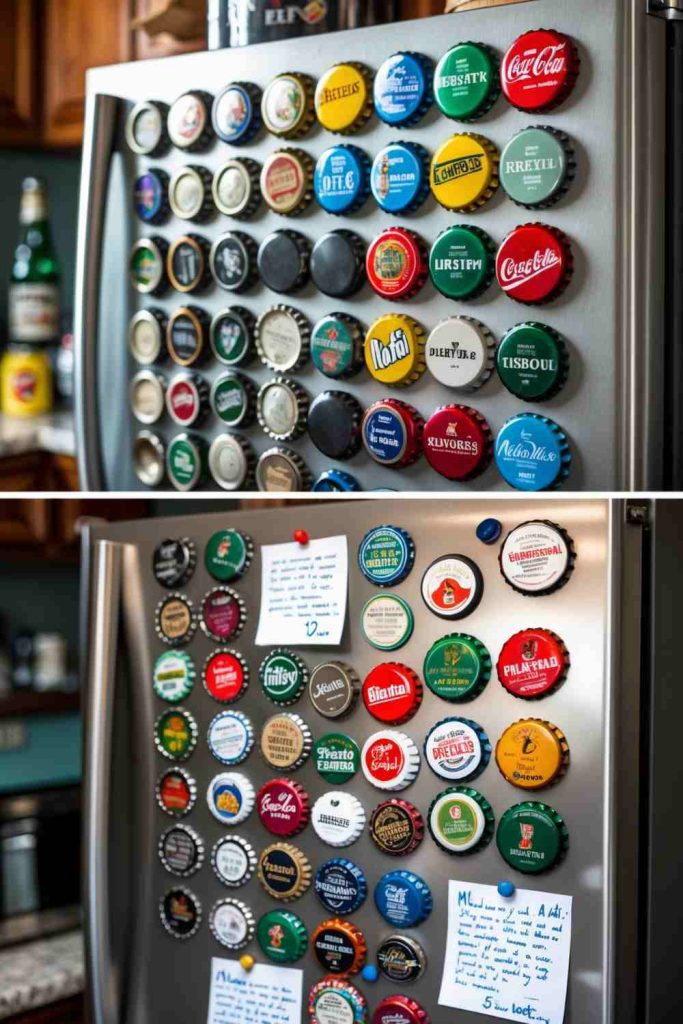
Bottle caps are small enough to save by accident and sturdy enough to become useful little magnets. Their circular face creates a natural frame for paint, paper scraps, tiny initials, or patterned fabric. The important part is not the decoration but the back: the magnet needs broad, flat contact so the cap sits securely against a metal surface.
Crimped metal edges deserve a careful check before handling. I would choose caps that are not bent, rusty, or sharply distorted, then keep the decoration shallow so it does not make the magnet top-heavy. This is also one of those projects where the finished pieces should stay well away from young children and pets because loose magnets are hazardous if swallowed.
Materials and Tools
· Clean bottle caps with smooth edges
· Small flat magnets sized to fit the cap backs
· Adhesive compatible with metal and magnet material
· Paper scraps, paint, or thin fabric for decoration
· Small scissors or paper punch
· Tweezers
· Optional clear protective finish suited to the decoration
Steps for This Accessory Project
1. Wash and dry the caps, then inspect the rim with care. Set aside any cap with rust, a sharp burr, or a crushed edge. If the face is printed, decide whether to keep that original design or cover it; keeping a few original graphics can make a mixed set feel more genuinely upcycled.
2. Prepare the decorative face before attaching the magnet. Cut paper or fabric slightly smaller than the cap top, or paint a simple motif and let the finish cure as directed. Keep layers thin so the finished cap remains light and does not wobble when it is attached vertically.
3. Center the magnet on the back and attach it with a controlled amount of compatible adhesive. Too much glue can create a raised pad that reduces magnetic contact. Press the pieces together as required by the adhesive, then leave them undisturbed rather than testing the bond early.
4. Once the bond is fully set, test the magnet low on a metal board with a lightweight note. Check that the cap does not rotate or pull away from the magnet when removed. If the backing separates, clean off failed adhesive and reattach properly instead of adding another layer over a weak bond.
A magnet that looks good but stays on the fridge when the cap comes away is not finished. I’d test the pull from the cap itself, because that is how people naturally remove it.
Variation: Make a matching set from caps of different colors and add the same tiny paper initial or symbol to each one. Repetition ties together mismatched originals without hiding them completely.
Turn Buttons into Beautiful DIY Jewelry
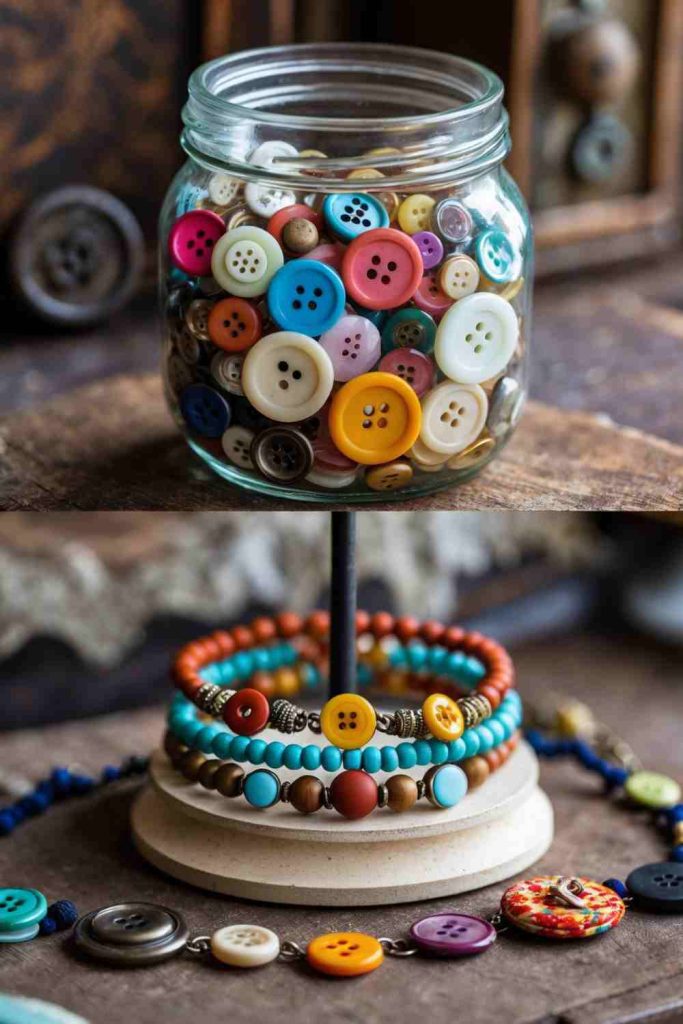
Buttons already come with holes, shanks, color variation, and surface texture, which makes them unusually cooperative for jewelry. A small group can become a bracelet, pendant, brooch, or pair of lightweight earrings without needing to reshape the button itself. The best pieces usually combine buttons with similar weight even if the colors and sizes differ.
Old buttons should be treated as hardware as well as decoration. Brittle plastic can crack around the holes, metal shanks can have rough edges, and thread left from an old garment may be too weak for a new wearable. I would sort first, then build the design around the strongest pieces rather than trying to use every button in the box.
Materials and Tools
· Assorted reusable buttons in sound condition
· Jewelry cord, waxed thread, or suitable wire
· Clasps or jump rings as needed
· Jewelry pliers
· Needle for threadable button holes
· Scissors or wire cutters appropriate to the material
· Optional small beads used sparingly
Steps for This Accessory Project
1. Sort the buttons by condition and weight. Tug gently at shanks, inspect holes for cracks, and feel metal backs for rough points. Lay the strongest pieces on a flat surface and remove any button that feels unusually heavy compared with the rest if the design will be worn on the ears or wrist.
2. Arrange the pattern before threading. Try overlapping two-hole and four-hole buttons, alternating sizes, or using one larger button as a focal point. Then measure the cord or wire around the intended body area with enough allowance for the clasp and movement, without making the finished piece excessively loose.
3. Thread or wire the buttons so each one is supported through sound holes or a stable shank. Keep knots and wire wraps tidy on the back, and close jump rings completely with pliers. If the piece flexes, make sure the connection method allows that movement instead of forcing rigid wire against brittle plastic.
4. Try the finished jewelry briefly and check comfort before trimming every tail. Look for buttons that flip awkwardly, scratchy wire ends, or concentrated weight near the clasp. Reinforce weak joins now, then trim and tuck the remaining thread or wire so nothing catches clothing or skin.
I don’t think button jewelry needs perfect matching. What matters more is keeping the weight and spacing consistent enough that the piece hangs naturally instead of twisting toward one heavy button.
Variation: Use a single vintage button as the center of a simple cord pendant rather than turning a whole collection into one piece. It gives an unusual button more attention and keeps the project beginner-friendly.
Upcycle Tin Cans into Elegant Candle Holders
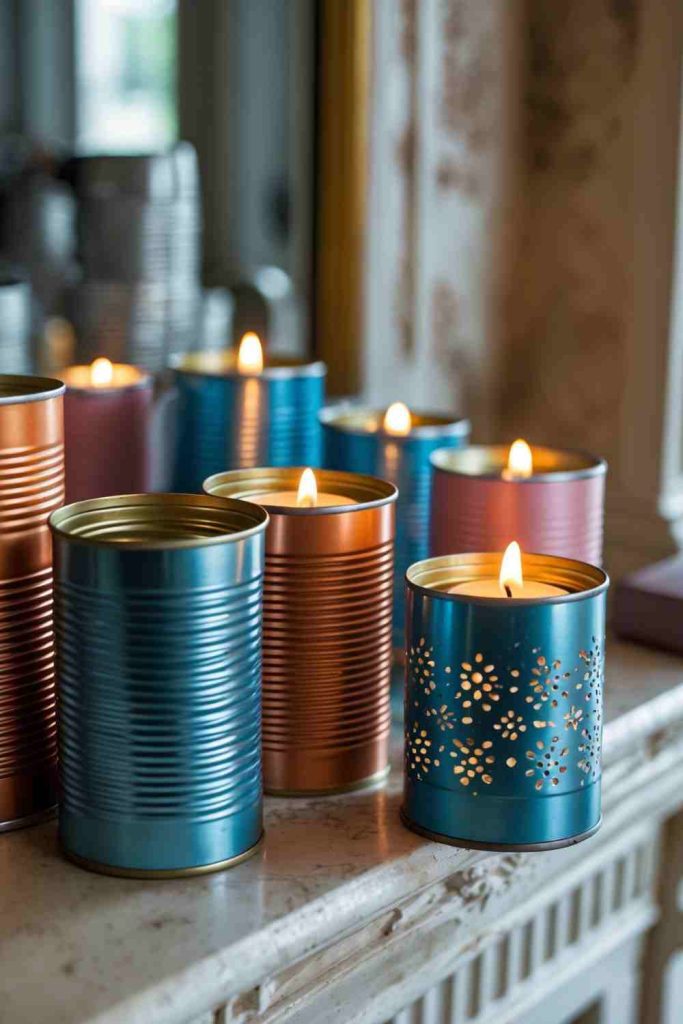
A cleaned tin can can become a patterned light holder because the metal already forms a sturdy cylinder. Punched openings create dots of light and paint can soften the industrial look, but the safest version uses an LED tealight rather than an open flame. Reused cans may have unknown coatings, labels, adhesives, or sharp seams that I would rather not heat indoors.
The pattern does not need to be complicated. A few evenly spaced holes, a simple stripe, or a loose constellation can look more intentional than a very dense design. The rim and base should remain stable, and any pierced metal needs to be checked from both sides so a decorative lantern does not become something that snags fingers.
Materials and Tools
· Clean empty tin cans with intact sides
· Protective gloves
· Marker and paper template
· Nail punch or metal awl used with an appropriate work surface
· Hammer if using a punch method
· File or abrasive tool suitable for smoothing small burrs
· Paint suitable for the can exterior if desired
· Battery-operated LED tealights
Steps for This Upcycling Project
1. Remove labels and adhesive, wash the can, and inspect the rim carefully. Use only a can with a safe edge or one that can be fully covered and smoothed. Mark a simple pattern on paper first, then transfer spaced dots to the outside so you are not improvising hole placement while holding a tool.
2. Support the can securely on a suitable work surface and wear eye protection and gloves while making the openings. Punch one hole at a time with controlled force, keeping hands away from the tool path. Afterward, inspect the inside and outside for raised burrs and smooth them with an appropriate metal-safe tool.
3. Clean away metal dust and test the pattern with an LED light before painting. If adding color, keep paint out of the battery light itself and follow the coating instructions for ventilation and curing. A thin finish preserves the punched texture better than heavy layers that partly fill the openings.
4. Place a battery-operated LED tealight inside and check that the can sits flat. Feel the exterior edges one more time before handling it regularly. Arrange the finished holders where they cannot be knocked over, and keep the project as a decorative light rather than converting it back to an open-flame candle vessel.
The light pattern is usually clearer with fewer clean holes. I’d rather punch a simple design neatly than make the metal so busy that every edge needs extra correction afterward.
Variation: Skip punching altogether and wrap the outside with perforated paper or lace over a painted can, then use an LED tealight inside for a softer, tool-free version.
Upcycle Jar Lids into Adorable Picture Magnets
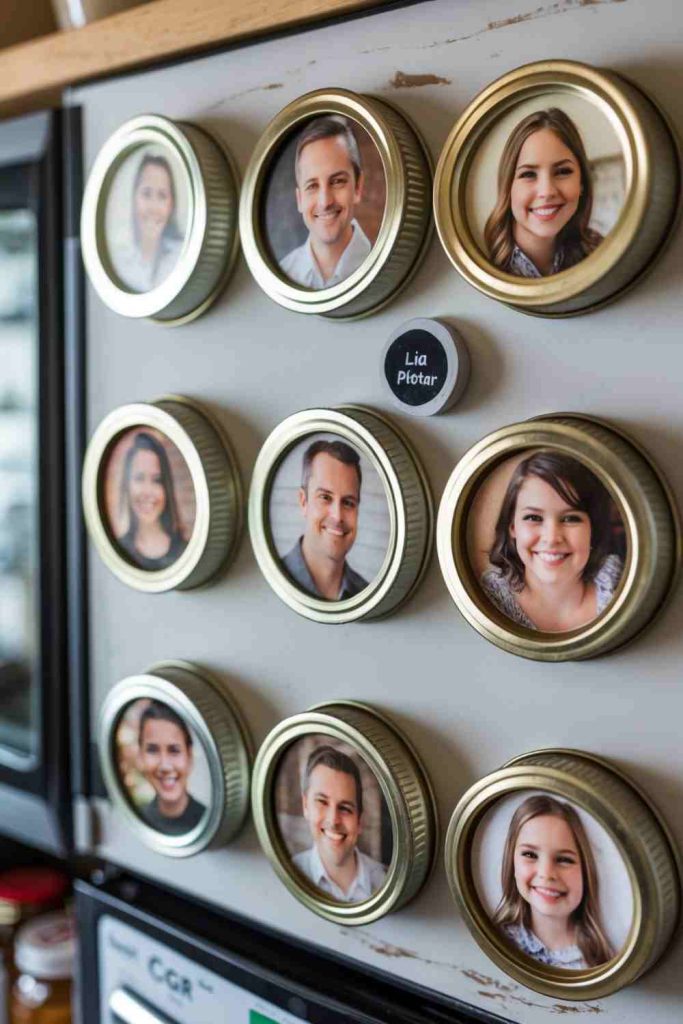
Jar lids make natural miniature frames because the raised rim already defines where the image belongs. A family photo, a scrap of old wrapping paper, a child’s drawing, or a tiny piece of map can sit inside the recess while a magnet on the back turns the lid into something useful rather than another loose metal part in a drawer.
The main challenge is keeping moisture and adhesive from wrinkling the image. I would prepare the photo separately, test the fit dry, and use only enough adhesive to hold it flat. Lids with rust, bent rims, or flaking internal coatings should be left out of the project because a decorative paper circle will not fix the underlying metal.
Materials and Tools
· Clean jar lids in sound condition
· Printed photos or decorative paper
· Pencil and small scissors
· Thin card circle for a backing if needed
· Paper-safe adhesive or double-sided tape
· Small flat magnets
· Adhesive compatible with the magnet and lid
· Optional clear protective film over the image
Steps for This Accessory Project
1. Clean and dry the lid, then trace the inner recess onto scrap paper to make a template. Trim the template until it lies flat without buckling at the rim. Use that final shape to cut the photo or decorative insert, keeping important faces or details away from the edge that may be hidden by the lid lip.
2. Test the image inside the lid before using adhesive. If the metal surface is uneven, add a thin card circle underneath to create a flat base. Attach the image with a small amount of paper-safe adhesive or tape, pressing from the center outward so air pockets do not become permanent wrinkles.
3. Turn the lid over and position the magnet near the center of the back. Attach it with a compatible adhesive and leave the piece flat until the bond has set according to the product instructions. Avoid stacking finished magnets while curing because they can slide and pull the backing out of position.
4. Test the finished piece on a metal board before placing it on an appliance. Remove it by gripping the lid rather than the paper insert. If condensation or kitchen splashes are likely, cover the picture with a removable clear protective layer rather than sealing the whole lid with a thick coating.
The little metal rim is already doing the framing, so I wouldn’t add much more around the picture. Keeping the image clean and centered usually looks more polished than adding several tiny embellishments.
Variation: Use fabric scraps, old postage stamps, or small handwritten recipe labels instead of photographs to create themed sets for a sewing room, office, or kitchen.
Transform Plastic Bottles into Beautiful Planters
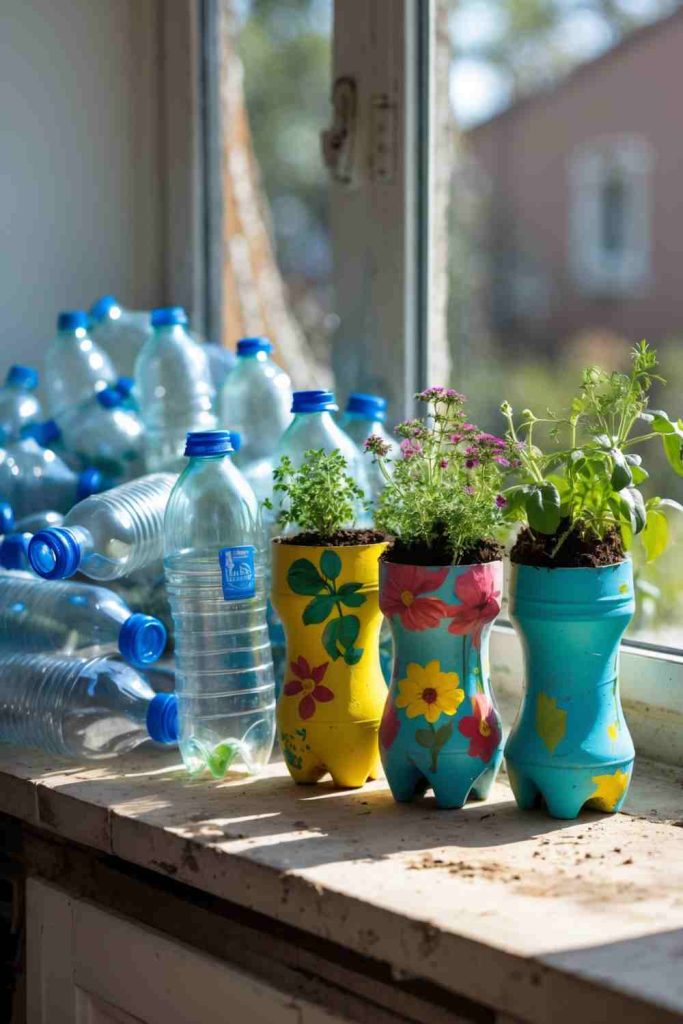
Plastic bottles can become lightweight planters when the strongest part of the container is kept intact and the cut edge is finished carefully. Their small scale suits herbs, cuttings, and compact plants, while the clear or colored plastic can be painted, wrapped, or partly left visible. The main practical requirement is drainage; decoration should never block the holes that keep excess water from sitting around the roots.
I would choose a bottle that held a non-hazardous household drink or food product and clean it thoroughly before cutting. Thin plastic can crack if squeezed while being trimmed, so a simple horizontal cut is often safer and neater than a complicated animal shape. Indoors, the planter should sit inside a saucer or cover pot so drainage does not become a furniture problem.
Materials and Tools
· Clean plastic bottle from a non-hazardous product
· Marker
· Scissors or craft knife appropriate for the plastic
· Fine abrasive pad for smoothing cut edges if suitable
· Awl or drill bit used carefully for drainage holes
· Potting mix appropriate to the chosen plant
· Small plant or cutting
· Optional paint or wrap for the exterior
· Saucer or waterproof tray
Steps for This Upcycling Project
1. Wash the bottle and remove the label, then mark a simple cut line that leaves enough depth for roots and soil. Keep the cap and lower body only if they support the chosen design. Cut slowly on a stable surface, rotating the bottle rather than twisting the cutting tool around your hand.
2. Smooth or cover the cut rim and create several drainage holes in the base. Make the holes before decorating so you can see whether the plastic splits. Place the empty planter in its saucer and add a little water to confirm that it drains rather than pooling above one blocked opening.
3. Decorate only the exterior areas that will stay reasonably dry. Leave a strip of clear plastic if you want to monitor soil level, or use a simple painted band rather than coating the whole container. Then add suitable potting mix without packing it hard against the thin sides.
4. Plant the cutting or small plant at the same depth it was growing previously and water lightly. Let excess moisture drain fully before placing the planter on a windowsill or shelf. Check the plastic occasionally for cracks or distortion, especially if the container receives strong sun or is moved frequently.
The cut edge deserves more attention than the painted face. A planter is handled every time it is watered or moved, so I’d finish the rim first and decorate second.
Variation: Cut several matching bottles to different heights and group them in one long waterproof tray for a small herb collection without pretending the containers need to match perfectly.
Repurpose Old Shoes into Whimsical Planters
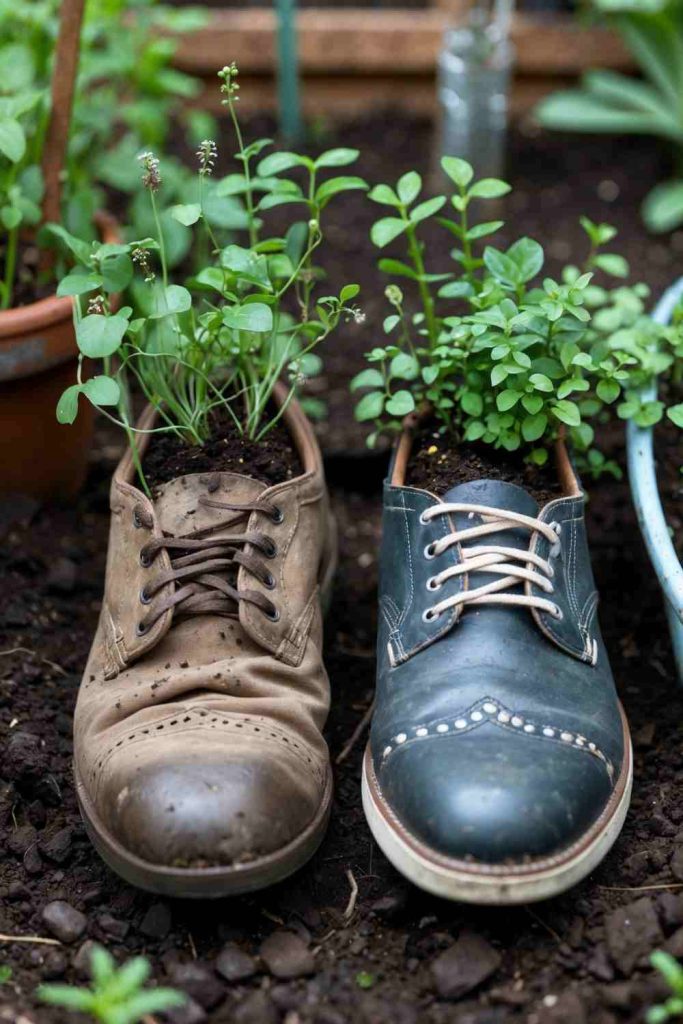
An old shoe can make an amusing planter because the shape already has a built-in opening, structure, and personality. Boots give deeper root space, while worn trainers and children’s shoes suit smaller seasonal plants. The project works best with footwear that is no longer comfortable or repairable but is still physically intact enough to hold soil without collapsing.
Drainage and cleanliness matter more than novelty. I would remove loose insoles, dirt, and anything that traps water, then decide whether the shoe will sit directly outdoors or inside a separate container. Some synthetic shoes break down quickly in sun and moisture, so a removable plant pot tucked inside can be a better option than filling the shoe itself.
Materials and Tools
· Old shoe or boot in structurally sound condition
· Brush and mild cleaning supplies
· Small inner nursery pot if using a removable insert
· Awl or suitable tool for drainage holes when appropriate
· Pebbles only if needed to stabilize an inner pot
· Potting mix appropriate to the plant
· Compact plant, herb, or seasonal flowers
· Waterproof tray for indoor display
Steps for This Upcycling Project
1. Clean the shoe thoroughly and let it dry. Remove loose liners, torn foam, and debris, then inspect the sole and upper for areas that may split once damp soil adds weight. If the shoe has sentimental value or fragile decoration, use a removable nursery pot rather than modifying the footwear itself.
2. Choose between direct planting and an inserted pot. For direct planting, create drainage only where the shoe material can be pierced safely without unraveling or cracking. For an insert, find the largest small pot that fits comfortably inside and keeps the plant upright without forcing the shoe out of shape.
3. Add potting mix and plant with the root crown at an appropriate level for the species. Keep the soil below fabric eyelets and decorative seams where constant moisture can accelerate damage. If using an insert, hide the rim with a little moss or a loose fabric scrap rather than packing wet soil around the outside.
4. Place the planter where the plant receives suitable light and where drainage will not damage the surface below. Water carefully and watch how the shoe reacts over the first few uses. If the sole softens, the upper collapses, or moisture remains trapped, move the plant to an inner pot or retire the shoe from active planting.
I like shoe planters most when the original wear is still visible. Scuffs and faded laces explain what the object used to be, which is more interesting than trying to make an old boot look newly manufactured.
Variation: Use a removable pot inside the shoe and change the plant seasonally. The footwear stays drier, and you can refresh the display without repeatedly disturbing roots.
Accessory Upcycling Choices That Can Create Weak Joins, Sharp Edges, or Awkward Results
Decorating before checking the base material
Paint, paper, and trim can hide cracks, rust, weak seams, or sharp metal without actually solving them. Inspect first, repair what can be repaired, and reject anything whose new use would make a hidden defect more dangerous.
Using one adhesive for every material
Fabric, metal, plastic, glass-like craft vessels, magnets, and paper behave differently. A bond that works on a flat lid may fail on a flexible tote or smooth plastic. Match the attachment method to both surfaces and to the movement the finished piece will experience.
Making wearable pieces too heavy
Buttons, metal frames, chains, beads, and layered fabric can accumulate weight quickly. Keep earrings and necklaces light, distribute weight across strong points, and remove one decorative layer if the accessory twists or pulls during a short wear test.
Leaving sharp edges hidden under decoration
A painted tin rim or wrapped plastic cut can still be sharp underneath. Smooth, cover, or redesign the edge before use, and run a careful final hand-check around every area that will be touched during carrying, watering, or display.
Ignoring how the item will be cleaned
A tote, magnet, planter, or wearable accessory will eventually collect dirt. Avoid combining washable fabric with decorations that cannot tolerate moisture unless they are removable, and keep paper inserts protected in locations where splashes are likely.
Blocking drainage in reused planters
A pretty painted base does not help a plant if water cannot leave the container. Make drainage part of the design before adding soil, then test it with water while the planter is still empty and easy to adjust.
Testing magnets or handles with too much weight at once
A newly glued magnet or freshly sewn handle should be tested gradually. Begin with light loads and inspect the join before increasing weight so a small weakness becomes visible before it causes a drop or tear.
Using real flame where an LED light does the same visual job
Reused metal containers may have unknown coatings or residues, and open flames add unnecessary risk. A battery LED creates the light pattern without heating the can, surrounding paint, or nearby decorations.
Frequently Asked Questions
What are the easiest upcycling accessories for beginners?
T-shirt totes, jar-lid picture magnets, and simple button pendants are good starting points because the original material already provides most of the shape. Keep the first version simple and focus on clean edges and secure joins before adding decoration.
How do I know whether an old item is safe enough to reuse?
Check for cracks, rust, sharp edges, brittle plastic, weak fabric, loose hardware, and previous exposure to substances you would not want around skin or plants. If the base cannot be cleaned or made structurally sound, choose a different object rather than hiding the problem.
Can I use hot glue for all of these projects?
No. Hot glue can be useful for some lightweight decorative bonds, but it is not a universal structural fastener. Fabric handles, jewelry connections, magnets, and flexible materials may need stitching, mechanical findings, or an adhesive specifically suited to the two surfaces.
How can I make upcycled jewelry more comfortable to wear?
Keep the overall weight low, place smooth surfaces against skin, close every metal loop fully, and trim or tuck wire and thread ends. Wear the finished piece briefly before final trimming so you can catch twisting, scratching, or pressure points.
Do plastic bottle and shoe planters need drainage?
Yes, if soil and a living plant are placed directly inside them. Add drainage where the material can be modified safely, or place a separate nursery pot inside the reused container so water can leave the root area without damaging the outer piece.
Is it safe to make a terrarium from a real used light bulb?
I would avoid dismantling a real household bulb. A purpose-made hollow bulb-shaped craft vessel gives the same visual effect without asking you to break, cut, or remove internal glass and electrical components.
How do I keep upcycled accessories from looking cluttered?
Repeat one element instead of adding many unrelated details. A shared border, one color family, consistent button spacing, or a single paper pattern can tie mismatched reused materials together while still letting their original character show.
Let Small Everyday Objects Earn a Useful New Role
The strongest upcycling accessories ideas usually begin with a small practical question: what part of this object is still worth using? A shirt may still have strong jersey, a jar lid already has a frame shape, buttons arrive with built-in holes, and an old shoe can hold a removable plant pot without pretending to become something completely unrecognizable.
I would start with the project that requires the least new material and the fewest irreversible changes. Clean it, check the edges and joins, make the useful part work first, and only then decide whether it needs decoration. That order keeps reuse at the center of the project rather than turning an old object into an excuse to buy a new pile of craft supplies.
Which small object in your home could take on a better job next: a shirt, a lid, a handful of buttons, or something you have been keeping simply because it felt too useful to throw away?