Old plates often remain in cupboards long after they stop being useful as a matching dinner set. One may have a small chip, another may belong to an incomplete vintage collection, and several may simply feel too decorative for everyday meals but too interesting to discard.
I like plate upcycling because the original shape has already done much of the design work. A plate can become a wall feature, the base of a trinket stand, part of a tiered display, or a source of patterned ceramic pieces for mosaics and jewellery.
The best project depends on the condition of the plate. An intact plate with a strong pattern deserves a different treatment from one that has already cracked. I don’t think a sentimental plate should be drilled, painted, or broken simply because a tutorial makes the process look quick. A removable wall hanger may preserve it more carefully.
Food safety also matters. Once a plate has been painted, glued, drilled, or combined with decorative materials, it should usually be treated as a decorative object unless every material and finish has been confirmed as suitable for direct food contact. Some decorative or older pottery may contain glazes that are unsuitable for serving food.
Sort the Plates by Condition and Future Use
Wash the plates and inspect them under good light before choosing a project. Remove old price labels and sticky residue, but avoid harsh scrubbing on delicate hand-painted patterns or metallic edging.
Check each plate for:
- Hairline cracks
- Sharp chips
- Loose glaze
- Crazing
- Stains
- Raised decorative paint
- Metallic borders
- Maker’s marks
- Previous repairs
- Uneven bases
- Sentimental or collectible value
- Labels warning that the plate is decorative only
Set intact plates aside for wall art, painted décor, trays, or tiered stands. Plates that are already broken may work for mosaics or jewellery, provided the pieces remain thick enough to handle safely.
Do not drill a valuable heirloom as your first attempt. Practise on an inexpensive plate made from similar material, because porcelain, stoneware, earthenware, and glass can react differently to drilling and cutting.
Use a bit designed for ceramic, glass, or tile rather than an ordinary wood or metal drill bit. Manufacturers produce specialist ceramic and diamond-coated bits for this type of work, and the exact cooling and drilling method depends on the selected tool.
When breaking, drilling, cutting, or sanding ceramic, wear eye protection and suitable gloves. Keep fragments contained, clean the work area thoroughly, and follow the safety instructions supplied with every power tool.
Useful Materials and Tools
- Old, thrifted, or mismatched plates
- Mild cleaner
- Soft cloths
- Measuring tape
- Removable marker
- Painter’s tape
- Ceramic, glass, or tile drill bit
- Drill or rotary tool
- Eye protection
- Cut-resistant work gloves
- Tile nippers
- Fine abrasive tool for ceramic edges
- Strong adhesive suited to ceramic
- Tiered-stand hardware
- Plate hangers
- Wood trays or boards
- Mosaic adhesive
- Grout and grout tools
- Jewellery findings
- Small diamond drill bit
- Acrylic or decorative paint
- Suitable primer
- Fabric or decorative paper
- Decoupage medium
- Small plant pot, candlestick, or pedestal base
Keep broken ceramic, small jewellery parts, adhesives, and power tools away from children and pets. Do not leave sharp fragments loose in household rubbish where they could injure someone handling the bag.
Build a Three-Tier Stand From Vintage Plates
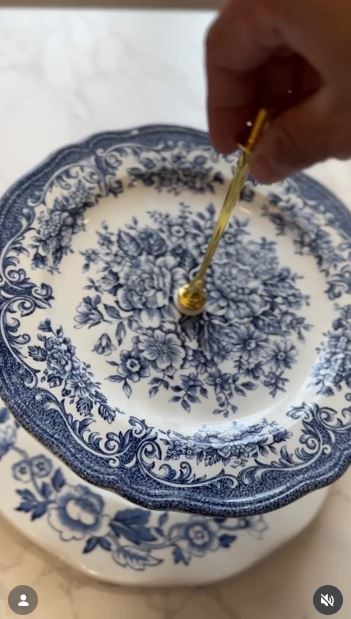
A tiered stand gives three unrelated plates a shared purpose. The selected project uses vintage plates in graduated sizes, a tiered-stand hardware kit, painter’s tape, water, and a tile drill bit to create the central holes.
The finished stand could hold jewellery, perfume bottles, wrapped sweets, craft supplies, or small decorative objects. Treat unknown vintage plates cautiously around food, particularly after drilling or adding hardware.
Materials and Tools
- Three plates in different sizes
- Tiered-stand hardware kit
- Measuring tape
- Removable marker
- Painter’s tape
- Ceramic or tile drill bit
- Drill
- Water or another cooling method when required by the bit
- Protective board
- Eye protection and gloves
Assemble the Stand in Five Steps
- Choose plates that sit well together. Stack them loosely to compare their sizes and patterns. The bottom plate should provide a stable base, while the upper plate needs enough room around the centre fitting to remain useful.
- Mark every centre accurately. Measure the diameter in several directions and mark where the lines cross. Apply painter’s tape over the drilling point when that method suits the plate and drill-bit instructions.
- Drill each hole carefully. Support the plate on a flat protective surface and use the ceramic-drilling method specified for your bit. Do not force the drill, and stop if the plate begins cracking beyond the intended hole.
- Smooth and assemble the hardware. Check each drilled opening for sharp fragments, then install the fittings in the correct order. Tighten them enough to hold the plates without placing excessive pressure on the ceramic.
- Test the completed stand. Place it on a level surface and add lightweight objects gradually. Retighten loose fittings by supporting the plate rather than twisting the whole stand.
The part I would check most carefully is the centre measurement. A slightly off-centre hole may not seem serious until the top plate leans like it has developed a strong opinion about gravity.
A two-tier stand is easier for a beginner and places less strain on the lower plate. You could also use one plate and a sturdy pedestal base to create a simpler raised display.
Arrange Thrifted Porcelain Plates as Wall Art
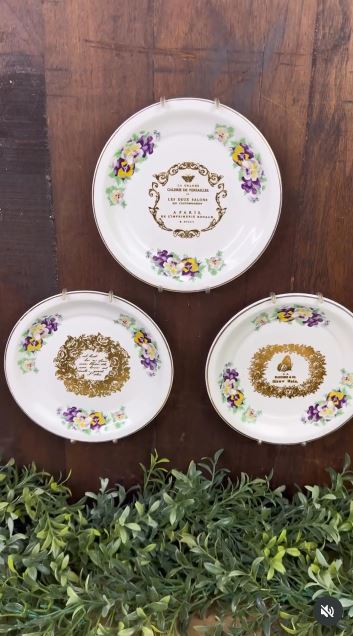
Small porcelain plates can form a wall display without being permanently altered. The selected project uses thrifted decorative plates as wall art, making it especially suitable for plates that remain intact and have attractive printed details.
The arrangement can feel collected rather than matched. A repeated colour, similar border, or consistent spacing is usually enough to connect plates from different sets.
Materials and Tools
- Intact decorative plates
- Plate hangers suited to their size and weight
- Kraft paper or scrap paper
- Pencil
- Scissors
- Painter’s tape
- Measuring tape
- Wall hooks or fixings suited to the wall
- Level
Create the Wall Arrangement in Four Steps
- Make paper templates of the plates. Trace each plate onto paper, cut out the shapes, and label them on the back. This allows you to test the full arrangement without repeatedly lifting ceramic pieces against the wall.
- Arrange the templates first. Tape them to the wall and move them until the gaps feel balanced. I know it can be tempting to centre everything immediately, but a slightly irregular arrangement often suits mismatched vintage plates better.
- Fit secure plate hangers. Choose a hanger intended for the dimensions and weight of each plate. Follow its installation instructions and avoid relying on a decorative ribbon or weak adhesive for a heavy piece.
- Install and inspect the display. Use fixings suited to your wall construction and hang the largest plates first. Step back, check the spacing, and make sure none of the plates can be knocked easily by doors, chairs, or regular foot traffic.
For me, the layout should leave room around the individual patterns. Packing every plate close together can make delicate details disappear into one busy shape.
A single plate can be framed inside a shadow box. Another rental-friendly option is to display plates upright on a deep picture ledge rather than fastening each one directly to the wall.
Turn Broken Thrifted Plates Into a Mosaic Tray
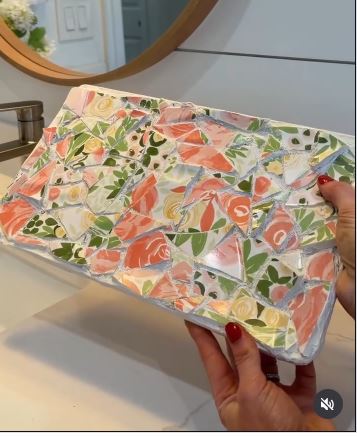
A mosaic tray gives cracked or inexpensive plates a new role without requiring every piece to match. The selected craft combines thrifted plates with a wooden tray, adhesive, and grout to create a decorative bathroom or vanity tray.
The fragments should be arranged so that no sharp corners remain exposed above the finished grout. This project is best used for candles, perfume bottles, jewellery dishes, or other dry decorative objects rather than direct food service.
Materials and Tools
- Broken or thrifted plates
- Wooden tray
- Tile nippers
- Eye protection and gloves
- Mosaic adhesive
- Grout
- Grout float or flexible applicator
- Sponge
- Small containers
- Protective cloth
- Suitable grout sealer, if required
Make the Mosaic Tray in Five Steps
- Plan the colour and pattern. Place the intact plates beside the tray and decide which decorative sections are worth preserving. A floral centre, coloured border, or small repeated motif can become the focus of the mosaic.
- Create controlled pieces. Wear eye and hand protection and use a suitable ceramic tool in a contained work area. Keep larger pattern sections intact where possible and discard pieces that are too thin, unstable, or sharply splintered.
- Arrange the full mosaic without adhesive. Leave narrow, fairly consistent spaces for grout and keep sharp points away from the tray edges. Move the pieces until the composition feels balanced.
- Attach and grout the surface. Glue each fragment securely and let the adhesive set according to its instructions. Apply grout into the spaces, then clean the ceramic faces carefully without pulling material from the joints.
- Inspect the finished tray. Check for raised edges, loose fragments, cracks, or rough grout. Seal the surface when the chosen materials require it and use the tray only after everything has cured fully.
I’d keep one thing in mind here: a recognisable flower or border may be more effective than breaking every plate into tiny anonymous pieces. Let the original decoration do some of the work.
The same technique can cover a picture frame, plant-pot saucer, small tabletop, or wooden box lid. Beginners can use pre-broken decorative tiles alongside only a few meaningful plate fragments.
Combine an Old Plate and Planter Into a Pedestal Tray
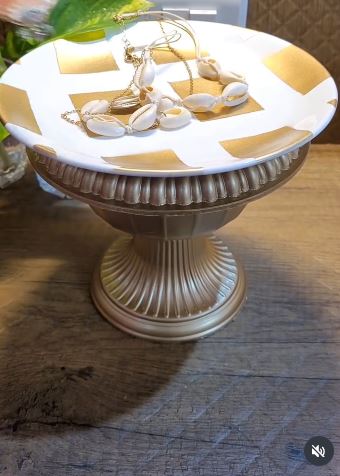
A small plate and an old planter can become a raised trinket tray with very little cutting. The selected project turns these simple objects into a vintage-style display suitable for rings, earrings, keys, or small decorative pieces.
The pedestal must sit flat, and the joint between the plate and planter needs enough contact area to remain secure. A narrow or uneven planter rim may require another base.
Materials and Tools
- Old plate
- Small planter, bowl, candlestick, or pedestal
- Suitable cleaner
- Fine sanding material when required
- Strong adhesive compatible with both surfaces
- Measuring tape
- Removable marker
- Painter’s tape
- Paint or decorative finish, if desired
- Felt pads
Build the Pedestal Tray in Four Steps
- Test the two pieces together. Turn the planter upside down and place the plate over it without glue. Check that the plate sits level and that the base is wide enough to resist tipping.
- Prepare the joining surfaces. Clean both contact areas thoroughly and follow the adhesive instructions for smooth ceramic surfaces. Mark the plate’s centre on the underside so the pedestal does not shift off balance.
- Glue and support the joint. Apply the adhesive in the recommended amount and place the pieces together. Use tape or another gentle support to prevent movement while the connection cures.
- Finish the base and test it. Add felt pads to protect furniture and place light objects on the tray first. Stop using it if the joint moves, the plate tilts, or the pedestal begins cracking.
The good thing is that the plate can keep its original decoration. There’s no need to paint both parts one colour unless their existing finishes compete strongly.
A teacup, wooden candlestick, small vase, or sturdy glass can replace the planter. Use the finished stand for jewellery or décor unless all components and adhesives have been verified for food contact.
Paint Old Plates as Bohemian Wall Décor
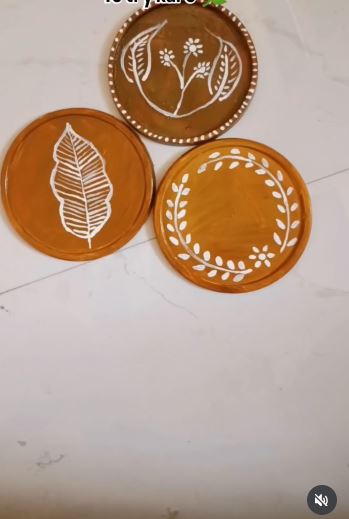
Plain plates can become decorative wall panels when their original pattern is damaged or uninteresting. The selected project applies boho-style art to old plates, creating a coordinated group intended for wall display.
This method is decorative rather than food-safe. Once craft paint, dimensional paste, mirrors, glue, or other embellishments have been added, keep the plate out of the kitchen serving rotation.
Materials and Tools
- Plain old plates
- Cleaner
- Fine abrasive material
- Primer suited to glazed ceramic
- Decorative paint
- Dimensional paste or suitable craft medium
- Small mirrors or embellishments
- Strong craft adhesive
- Paintbrushes
- Pencil or template
- Plate hangers
Decorate the Plates in Five Steps
- Choose a shared design direction. Arrange several plates together and decide which colours, shapes, or motifs will repeat. A coordinated set does not need identical designs, but one repeated detail helps the group feel connected.
- Prepare the glazed surface. Clean away grease and residue, then use the preparation method required by the ceramic primer or paint. Test adhesion on the back or on an inexpensive plate first.
- Sketch the main pattern. Mark circles, arches, leaves, sunbursts, or geometric divisions lightly. Keep the centre and border balanced without filling every section.
- Add paint and raised details. Build the design in separate stages so colours and dimensional materials do not merge accidentally. Attach mirrors or decorative pieces only after the relevant surface is ready.
- Hang the plates securely. Let every coating and adhesive cure, then use plate hangers suited to the finished weight. Arrange the plates with enough space for their individual patterns to remain visible.
I’d rather repeat one small motif across three plates than force every plate to carry the same complicated design. A little variation makes the group feel collected rather than mass-produced.
You could replace mirrors with painted dots, beads, pieces of reclaimed jewellery, or textured clay details. A single large plate can also become a central wall medallion.
Where Plate Projects Crack, Slip, or Become Unsafe
Drilling Without the Right Bit
Ordinary drill bits may skid or damage glazed ceramic. Use equipment intended for ceramic, glass, or tile and follow the manufacturer’s cooling and operating instructions.
Forcing the Drill Through the Plate
Heavy pressure can create sudden cracks. Support the plate properly and let the specialist bit work gradually rather than pushing it through.
Using Sharp Shards Without Finishing the Edges
Broken ceramic can cut skin and damage furniture. Smooth or fully enclose every exposed edge before using fragments in trays, jewellery, or wall art.
Hanging Plates With Weak Fixings
The hanger must suit both the plate’s weight and the wall material. Decorative ribbon alone should not be trusted to hold a heavy ceramic plate overhead.
Treating Decorated Plates as Food-Safe
Craft paint, glue, grout, metal hardware, and unknown vintage glazes may not be suitable for food contact. Keep altered plates decorative unless every component has been confirmed safe for the intended use.
Making a Pedestal Too Narrow
A small base beneath a wide plate can tip easily. Test the proportions before gluing and use the completed tray only for lightweight objects.
Grouting Over Loose Mosaic Pieces
Grout fills spaces but does not replace proper adhesive. Attach every plate fragment securely before spreading grout.
Painting Over a Greasy Glaze
Kitchen residue can interfere with primer and paint adhesion. Clean the ceramic thoroughly and use products intended for smooth glazed surfaces.
Upcycling Valuable Plates Without Checking Them
A rare, sentimental, or collectible plate may be worth preserving intact. Use removable display methods when you are uncertain about its value or family importance.
Frequently Asked Questions
Can chipped plates still be upcycled?
Yes, when the remaining plate is stable and the chipped area can be made safe. A small chip may be hidden inside a mosaic or positioned away from contact, but a spreading crack may make the plate unsuitable for drilling or carrying weight.
Can I use an upcycled plate for food?
Only when the original plate and every added material have been confirmed suitable for the intended food contact. Paint, adhesive, grout, unknown glazes, and decorative finishes can make a plate better suited to display or wrapped items.
How do I drill a hole without cracking the plate?
Use a specialist ceramic, glass, or tile bit, support the plate, and follow the bit manufacturer’s instructions. Practise on an inexpensive plate first because materials and glazes vary.
What can I make without drilling the plate?
Try a wall display with a suitable plate hanger, decoupage trinket dish, painted wall plate, mosaic made from an already broken plate, or a pedestal tray joined with compatible adhesive.
Can I put an upcycled plate outdoors?
Some mosaic and wall projects can be adapted for sheltered outdoor use, but the adhesive, grout, paint, hanger, and plate must tolerate the conditions. Water entering cracks can damage both ceramic and supporting materials.
What is the easiest plate project for a beginner?
A wall display or painted decorative plate is usually simpler than drilling, jewellery making, or mosaics. Begin with an inexpensive plate and a reversible or low-risk method.
How should I dispose of unusable ceramic fragments?
Wrap or contain sharp pieces securely and follow your local waste rules. Do not leave loose shards in a thin bag where they could injure someone.
Let Unused Plates Leave the Cupboard
Learning how to upcycle plates begins with matching the project to the condition of the ceramic. Intact vintage pieces can become wall displays or tiered stands, while cracked and mismatched plates can supply patterns for mosaic trays and jewellery.
A plain plate may need only paint and a secure hanger. Another can sit on an old planter as a raised trinket tray. The plate does not need to return to the dining table to become useful again.
Begin with one inexpensive piece and choose the least destructive method that achieves the result. Measure before drilling, arrange before gluing, and make every sharp edge safe before the finished item enters your home.
Which plate would you reuse first: a floral vintage plate, a plain white dinner plate, or a colourful piece that has already cracked?