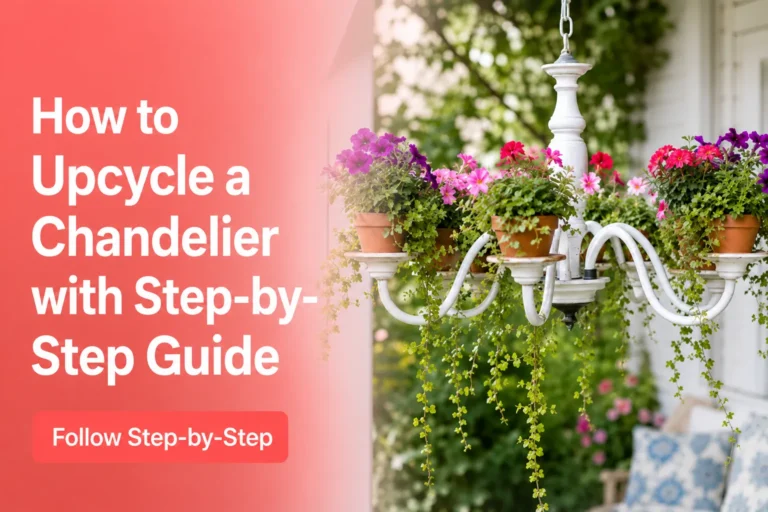
The things we call rubbish are often simply objects that have lost their first job. A pasta jar no longer needs to hold sauce, a picture frame does not have to stay on the wall, and an old chair can be useful even when nobody should sit on it again. The useful part is learning to notice shape, strength, and material before deciding what an item could become.
I prefer upcycling projects that solve a real problem or give a forgotten object a clear place in the home. I don’t think every scrap needs layers of decoration. A careful clean, one secure repair, and a sensible new purpose often make a stronger project than adding embellishments simply because they are nearby.
These creative upcycling tips use ordinary containers, furniture, cardboard, glass, and vintage pieces. Some are quick enough for an afternoon, while others need tools and patience. What matters is choosing sound materials, respecting their limits, and stopping when an object is unsafe. Trash becomes treasure only when the finished item is useful, stable, and pleasant to live with.
Sort, Clean, and Check Every Item First
Before cutting or painting anything, decide whether the item is actually suitable for reuse. Grease, rust, mould, cracks, sharp edges, and weak joints do not disappear under paint. A project may look tidy on the outside while still being unpleasant or unsafe to handle.
Check discarded items for:
· Cracks that spread when the material is flexed
· Sharp metal rims, broken glass, or exposed staples
· Rust that has eaten through thin metal
· Loose furniture joints or damaged structural parts
· Strong chemical, food, smoke, or damp odours
· Flaking coatings of unknown age or composition
· Plastic that has become brittle, cloudy, or sticky
· Cardboard that has absorbed moisture or grease
· Ceramics with hairline cracks near areas that will be drilled
Wash containers thoroughly and remove labels before measuring them. Sand only where it helps, and wear suitable eye protection, gloves, or a dust mask when cutting, drilling, filing, or sanding. If an item once held chemicals or anything unsafe, do not reuse it for food, plants, children’s storage, or pet supplies.
1. Turn a Used Film Canister Into a Tiny Planter
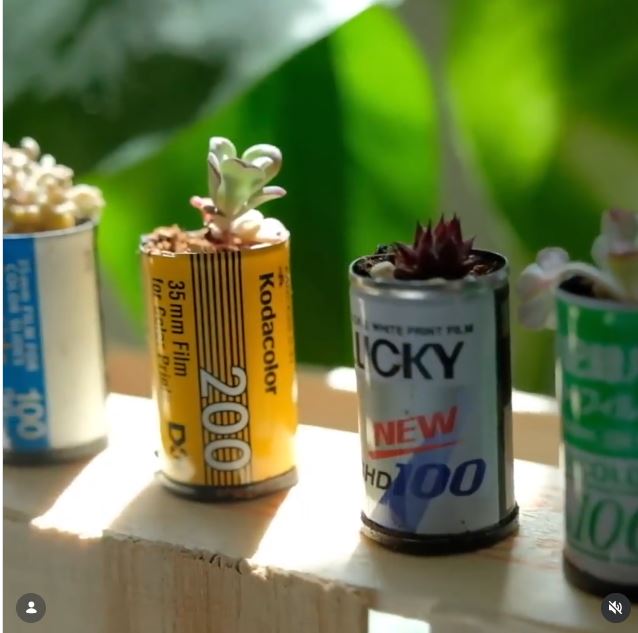
A metal film canister is already shaped like a tiny plant pot. Once the top is removed and the inside is cleared, the original opening can hold a small succulent or cutting. The existing hole in the base may also help excess water escape, although it still needs checking before soil is added.
This project works because the new purpose matches the canister’s size. It is not trying to become a large planter or carry a heavy plant. A small rooted cutting, compact succulent, or air plant keeps the weight manageable and makes the unusual container easy to notice.
Materials and Tools
· Empty metal film canister
· Work gloves and eye protection
· Pliers and a bottle opener or suitable hand tool
· Small file for rough edges
· Tiny stones or a small mesh scrap
· Suitable potting mix
· Small succulent, cutting, or air plant
Open and Plant the Canister Safely
1. Inspect the metal. Reject a badly corroded canister or one with a crushed rim. Check the base and top for sharp points before holding it firmly with gloved hands.
2. Remove the top section. Use pliers and an appropriate opener to lift the cap gradually rather than forcing it in one movement. File any sharp edge until it feels smooth from every direction.
3. Prepare the drainage area. Check whether the lower opening is clear. Cover it lightly with a small mesh scrap or a few stones so soil does not fall through while water can still escape.
4. Add the plant. Fill the canister with a small amount of suitable potting mix, then settle the plant without crushing its roots. Water sparingly and place the planter where excess water cannot damage the surface beneath it.
The part I would not rush is the rim. A tiny hidden burr can catch skin every time the planter is moved. If the edge cannot be made safely smooth, keep the canister as display storage for dry objects rather than using it as a pot.
For an easier version, use the opened canister as a holder for an air plant, which removes the need for soil. Several canisters can also hold labelled seed packets, spare camera screws, or small craft findings.
2. Wrap a Glass Jar With a Vintage Doily
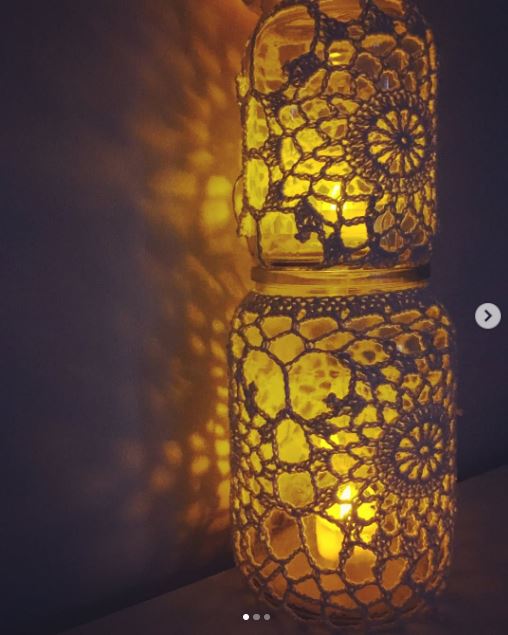
A clear jar and an old crochet doily make a natural pair. The glass gives the soft textile a firm shape, while the open stitches allow light to pass through. It is a useful way to display a doily that is too worn for a table but still has sound sections worth keeping.
I would use a battery-operated tea light here. Fabric, paper, adhesive, and open flame do not belong close together. The LED version still creates the patterned glow without heating the jar or leaving soot around the rim.
Materials and Tools
· Clean glass jar with a smooth exterior
· Vintage crochet doily or sturdy lace scrap
· Washable craft adhesive or decoupage medium
· Small brush
· Scissors for trimming only when necessary
· Newspaper or a reusable work mat
· Battery-operated tea light
Fit the Textile Around the Jar
1. Prepare both materials. Wash and dry the jar, then gently clean the doily according to its fibre and condition. Repair loose threads before applying adhesive so the openwork does not spread.
2. Plan the placement. Roll the dry jar across the doily and choose the strongest, most balanced section. Mark the overlap lightly and avoid cutting through connecting stitches until you know exactly where the edges will meet.
3. Attach the doily. Brush a thin layer of adhesive onto the jar or the back of the textile, then press the doily in place. Smooth it with clean fingers without stretching the crochet out of shape.
4. Finish the overlap. Trim only what is necessary and secure the meeting edges neatly. Let the adhesive cure according to its instructions before adding the battery light.
I know it can feel tempting to cover every inch of glass, but a little clear space near the top makes the jar easier to clean and keeps the design from looking crowded.
Paper doilies can create a temporary party version, while narrow lace ribbon suits smaller jars. The same method can turn a jar into dry bathroom storage, but avoid placing adhesive-covered jars where they will be soaked repeatedly.
3. Cover a Pasta Jar With Small Stones
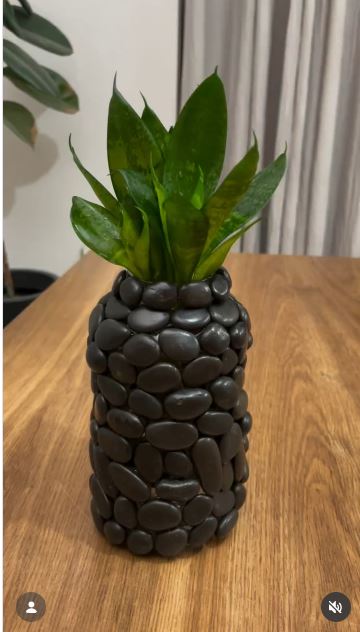
A tall pasta jar already holds water well, so the main change here is on the outside. Small stones hide the original food-container appearance and give the glass a heavier, more grounded look. The result works well with a few sturdy stems rather than a very wide bouquet.
Stone adds surprising weight. Before covering the complete jar, check that the base remains level and that the shelf or table can support it once water and flowers are added. I would also keep the lower row slightly above the base so the stones do not make the jar wobble.
Materials and Tools
· Clean pasta or preserve jar
· Small flat stones, pebbles, or glass mosaic pieces
· Adhesive suitable for glass and the chosen decoration
· Cleaning alcohol or glass cleaner
· Protective work mat
· Optional grout or clear finish suited to the materials
Build an Even Stone Surface
1. Clean the bonding surfaces. Remove the label and every trace of grease from the jar. Wash the stones as well, then let both materials dry fully before testing the adhesive.
2. Sort the stones. Group them by thickness and shape. Flatter pieces sit more securely against glass, while unusually thick stones are better saved for another project.
3. Attach one row at a time. Begin near the top or bottom and keep checking that the pattern stays level. Use only enough adhesive to hold each stone, because large blobs can squeeze into visible gaps.
4. Check the base and cure. Set the jar upright before the final row is fixed and confirm that it does not rock. Let the adhesive cure completely, then fill the jar with water over a protected sink to check for unnoticed cracks.
For me, irregular gaps are not a problem as long as the rows feel balanced. Trying to force every pebble into a perfect grid often creates more adhesive mess than improvement.
Glass beads, broken tile pieces with smoothed edges, or small wooden discs can replace stones. Choose waterproof materials if the vase will be wiped or rinsed often.
4. Make a Hanging Planter From a Plastic Container
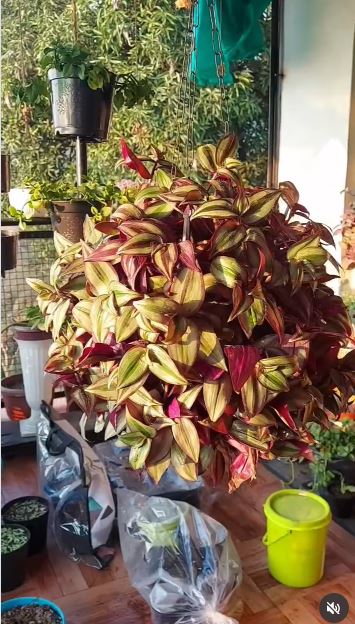
A large plastic container can hold a surprising amount of trailing greenery without adding the weight of a ceramic pot. Openings cut around the sides allow stems to emerge at different levels, which gradually hides much of the container.
This is a more involved project because the hanging points, drainage, plant choice, and total wet weight all matter. The plastic must remain flexible but not brittle. A container that cracks when squeezed lightly is not suitable for cutting or hanging above people.
Materials and Tools
· Large clean plastic container with a secure shape
· Marker and measuring tape
· Craft knife or strong scissors
· Eye protection and cut-resistant gloves
· Cable ties or weather-resistant cord
· Hanging chain or secure hook system
· Potting mix and a suitable trailing plant
Cut, Fill, and Hang the Planter
1. Mark the openings. Plan evenly spaced holes around the sides, keeping them away from the top hanging points and the base. Smaller openings are easier to enlarge than oversized cuts that weaken the container.
2. Cut and smooth the plastic. Work slowly on a stable surface and keep hands away from the blade path. Round every corner because sharp internal cuts are more likely to split when the planter is loaded.
3. Add drainage and hanging points. Make several small holes in the base and reinforce the upper attachment areas if the plastic is thin. Connect three or four evenly spaced ties so the planter hangs level.
4. Fill in stages. Add a layer of potting mix, guide plant sections through the lowest openings, then continue upward. Do not pack the soil so tightly that water cannot move through it.
5. Test close to the ground. Water the planter and hang it from a low, secure support first. Check for stretching, cracking, uneven weight, and water flow before moving it to its final position.
The good thing about plastic is its low empty weight. The difficult part is remembering how heavy wet soil becomes. I would rather use a smaller container securely than a large one that strains every tie.
A simpler version uses half a bottle as a wall-mounted planter. For indoor use, place a removable nursery pot inside the container so watering and cleaning stay manageable.
5. Add Reused Straps to Jar Lids for Storage
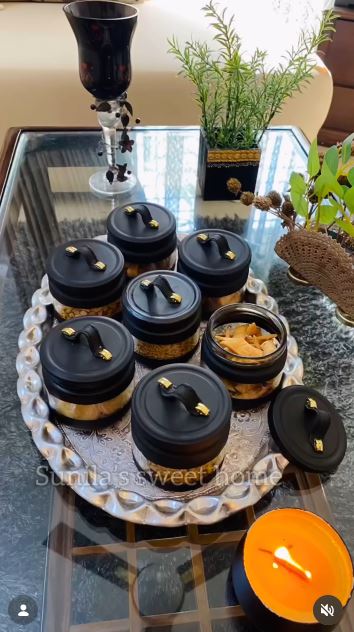
@sunilassweethome @cosmospaintsindia
Glass jars are practical storage, but a plain metal lid can be awkward to grip. A short strap made from an old belt, bag handle, or strong webbing gives the lid a clear lifting point and introduces a second reused material into the project.
Treat the strap as a lid handle, not as permission to carry a heavy glass jar through the house. Adhesive can fail, and glass can break. Support the jar from underneath whenever it contains anything with real weight.
Materials and Tools
· Clean jars with matching sound lids
· Short strips from an old belt, bag strap, or strong webbing
· Strong adhesive suitable for metal and the strap material
· Ruler and scissors or a craft knife
· Optional paint suitable for glass and metal
· Painter tape for leaving a clear viewing strip
Create Neat Lid Handles
1. Prepare the jars and lids. Remove labels and residue, wash everything, and let it dry. Check that each lid still closes correctly before adding paint or a handle.
2. Decorate before attaching the strap. Mask a clear section if you want to see the contents, then paint only the exterior. Keep paint away from lid threads and the inside surfaces that contact stored items.
3. Cut matching straps. Measure short lengths that arch comfortably over each lid. Round or seal fraying ends where appropriate, and check that the material is clean and free from cracks.
4. Bond and cure. Glue both strap ends firmly to the lid, keeping them centred. Leave the lids untouched for the full curing period stated by the adhesive maker, then test them with an empty jar first.
The part I like is the small clear window through the paint. It saves opening three jars to find one packet of buttons, which is the sort of tiny annoyance a storage project should actually fix.
Wooden drawer knobs can replace straps when fixed properly to a lid, although drilling metal needs care. For a no-glue version, tie a fabric tab through two safely drilled holes and cover every sharp edge.
6. Convert an Old File Cabinet Into a Garden Planter
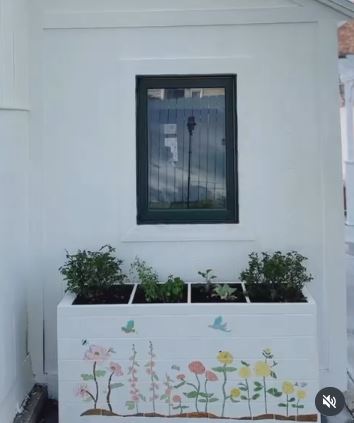
A metal filing cabinet has the depth and rigid walls of a raised planter once its drawers are removed and the cabinet is turned onto its back. It can hold shrubs, herbs, or flowers while giving a bulky office item a completely different outdoor role.
This is not a lightweight craft. The cabinet becomes extremely heavy after soil and water are added, so choose its final position before filling it. Rust protection, drainage, sharp internal hardware, and local weather all need attention.
Materials and Tools
· Empty metal filing cabinet
· Screwdrivers and pliers for removing runners
· Drill and metal-rated bits
· Eye protection, gloves, and hearing protection
· Rust treatment and exterior metal coating
· Optional waterproof liner with drainage openings
· Lightweight filler material and suitable garden soil
· Optional tiles, paint, or exterior decoration
Prepare the Cabinet for Outdoor Planting
1. Strip the interior safely. Remove drawers, glides, screws, and sharp metal fittings. File or cover any edge that could cut hands while planting or damage a liner.
2. Choose the location and drainage. Set the empty cabinet on a firm, level surface where water can escape. Drill several drainage holes in the new base and confirm that they do not weaken an already corroded area.
3. Protect the metal. Clean away loose rust, use a suitable treatment, and coat exposed surfaces with an exterior product designed for metal. Pay particular attention to drilled holes and seams.
4. Reduce unnecessary soil weight. Use an appropriate lightweight base layer or false bottom when the plants do not need the full depth, then add suitable soil. Avoid materials that trap polluted water or collapse quickly.
5. Plant and monitor. Add plants with similar watering needs and water gradually. Check the cabinet regularly for rust, blocked drainage, bowing sides, or settling beneath the base.
I would keep the decoration secondary until drainage and corrosion protection are solved. Tiles and colour are satisfying, but they cannot rescue a cabinet that holds water around its seams.
A single filing drawer can become a smaller planter with less soil and weight. In a damp climate, a removable internal trough may be easier to maintain than planting directly into the cabinet.
7. Turn a Picture Frame Into a Decorative Tray
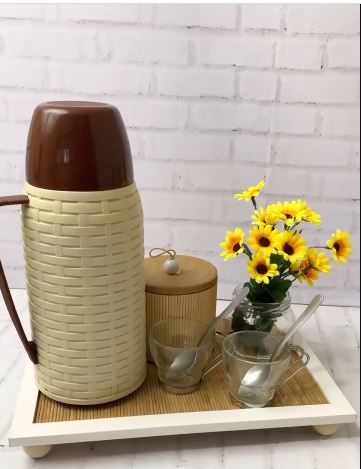
A picture frame already has a finished border, a flat centre, and a removable backing. Add a piece of leftover paper or fabric beneath the glass and small feet underneath, and it becomes a display tray for candles, perfume bottles, jewellery, or desk items.
Keep the word display in mind. Ordinary frame glass and glued feet are not designed for carrying hot drinks across a room. The project works best as a stationary organiser placed on a stable surface.
Materials and Tools
· Sound picture frame with secure backing
· Wallpaper scrap, placemat, fabric, old map, or decorative paper
· Four wooden balls, blocks, or reused furniture feet
· Strong adhesive suitable for the frame material
· Ruler, pencil, and scissors
· Optional paint and two small drawer pulls
Assemble a Flat Display Tray
1. Inspect the frame and glass. Reject cracked glass and tighten loose corner joints. Clean both sides carefully because dust trapped beneath the glass will remain visible after assembly.
2. Cut the insert. Use the backing board as a template and cut the chosen paper or fabric slightly smaller. Arrange any pattern before closing the frame so the main detail sits where you want it.
3. Reassemble the centre. Place the insert behind the glass, replace the backing, and secure every tab. If the frame will hold scratch-prone objects, consider replacing glass with a solid covered board.
4. Add stable feet. Attach one foot near each corner and check the tray on a flat surface before the adhesive cures. Adjust any uneven foot so the tray does not rock.
5. Finish for its real use. Add handles only for appearance or very light repositioning unless they are mechanically fixed. Place felt pads beneath the feet to protect furniture.
I don’t think a complicated insert is necessary. A piece of packaging paper, an old calendar illustration, or one section of a worn scarf can look more personal than a newly purchased sheet.
Remove the glass for a child-friendly desk tray and replace it with sealed cardboard or thin plywood. A deep shadow-box frame can also organise keys or jewellery when it stays in one place.
8. Rework a Wooden Chair as a Planter Stand
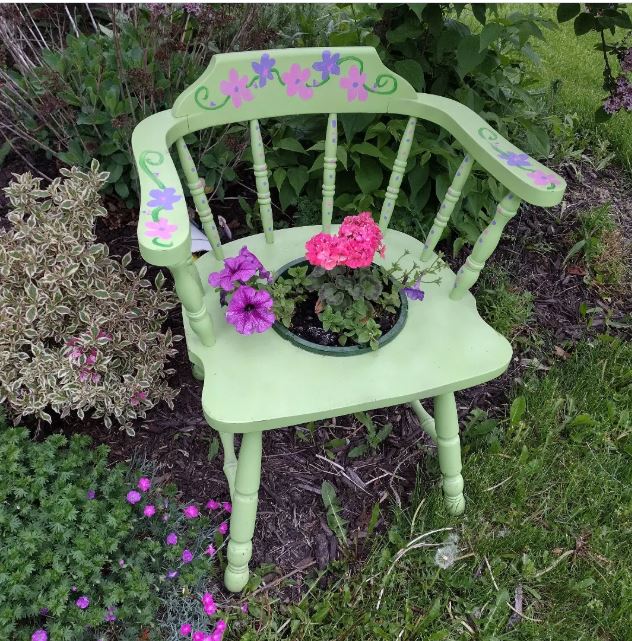
A wooden chair with a sound frame but a damaged seat can still support a flower pot. The planter sits through an opening and rests on its upper lip, allowing the back and legs of the chair to remain visible as part of the garden display.
The chair must be retired from seating permanently. Once the seat is cut, do not leave it where someone might mistake it for a usable chair. A bright finish, obvious planter, and sensible garden position help make its new role clear.
Materials and Tools
· Wooden chair with stable legs and joints
· Plant pot with a strong outer rim
· Measuring tape, compass, or paper template
· Drill and jigsaw or suitable hand saw
· Eye and hearing protection
· Sandpaper
· Exterior primer, paint, or wood sealer
Fit the Pot Into the Seat
1. Repair the frame first. Tighten or reglue sound joints and reject a chair with rot in the legs or rails. The structure still needs to hold the pot, wet soil, and wind movement.
2. Measure beneath the rim. Trace a circle smaller than the pot’s widest lip but large enough for its body to pass through. Make a cardboard test template before marking the chair seat.
3. Cut the opening. Drill a starter hole, then cut slowly with the chair clamped or held securely. Keep the blade away from rails and fasteners hidden beneath the seat.
4. Seal every exposed edge. Sand the cut smooth and coat bare wood, joints, and feet with an exterior finish. Let it cure fully before placing the pot.
5. Test the planter. Set the empty pot into the opening, confirm that the rim sits evenly, and then add the plant. Position the chair on firm ground where it cannot tip into a path.
For me, the fit matters more than the paint pattern. A slightly plain chair with a secure pot is far better than a decorated one that lets the planter slide through after watering.
A chair with no solid seat can support a fitted basket or metal bowl instead. For a reversible version, place a broad planter on the intact seat and secure it against tipping without cutting the chair.
9. Build a Dry Vase From Paper Towel Rolls
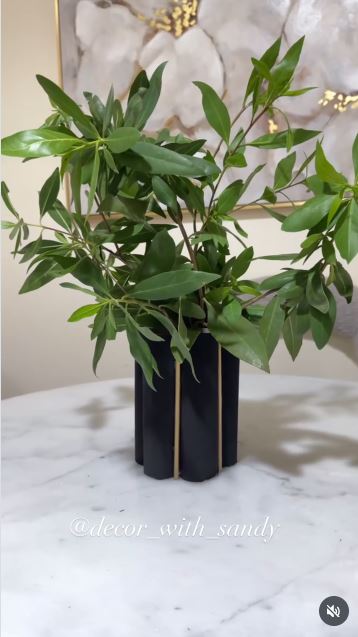
Cardboard tubes can create a surprisingly structured vase shape when several are grouped around a centre. Paint hides the printed paper surface, while narrow straws or trims placed between the tubes make the joins look deliberate.
This remains a dry vase. Cardboard should not hold water, damp stems, or freshly cut flowers unless a separate waterproof bottle sits inside the centre. That limitation is easy to manage and worth stating clearly before anyone waters the table.
Materials and Tools
· Six clean paper towel tubes or sturdy mailing-tube sections
· Ruler, pencil, and strong scissors or craft knife
· Craft glue or low-temperature hot glue
· Acrylic paint and brush
· Paper straws, thin dowels, or rolled paper strips
· Optional narrow glass bottle for fresh flowers
· Artificial or dried stems
Create the Clustered Vase Shape
1. Choose sound cardboard. Use tubes that are dry, clean, and firm. Remove loose paper and flattening at the ends, then cut every tube to the same height or plan a deliberate stepped arrangement.
2. Paint before assembly. Coat the outer surfaces in thin layers and let them dry. Painting separate tubes is easier than trying to reach narrow gaps after they are joined.
3. Build around the centre. Stand one tube upright and arrange the others evenly around it. Glue one tube at a time, checking the base on a flat surface so the finished vase does not lean.
4. Cover the joins. Add painted straws, narrow dowels, or rolled paper strips where the tubes meet. These details can strengthen the visual rhythm without carrying structural weight.
5. Add suitable stems. Use artificial or thoroughly dried flowers, or slide a waterproof bottle into the centre for fresh stems. Keep water completely separate from the cardboard.
The first arrangement rarely looks balanced straight away. Turn the dry tubes several times before gluing; a few millimetres of movement can make the cluster feel much neater.
Toilet-roll tubes create a shorter pencil cup, while strong mailing tubes suit a floor-height display for lightweight dried grasses. Leftover wrapping paper can replace paint and reduce drying time.
10. Turn a Vintage Teapot Into a Flower Frog
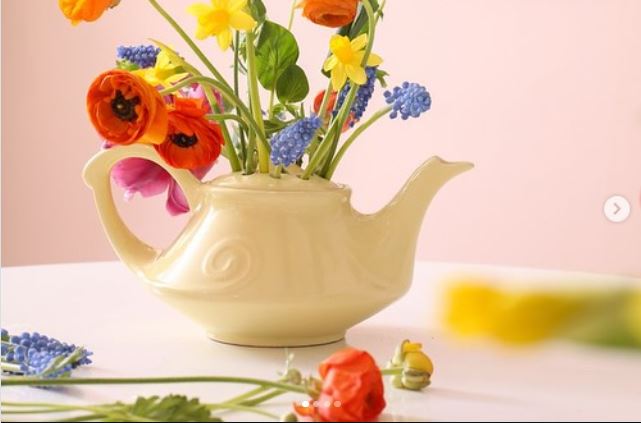
A teapot lid can work like a flower frog when small holes are drilled through it. Each opening supports one or two stems, allowing a loose arrangement to spread across the top while the pot below holds water.
Only use a teapot you are willing to alter. Valuable, sentimental, cracked, or very thin ceramics should stay away from the drill. Even a suitable lid can break, so this project calls for a steady setup, the correct bit, water cooling, and patience.
Materials and Tools
· Sound teapot with a removable ceramic lid
· Painter tape and marker
· Drill with a bit suitable for ceramic or tile
· Spray bottle of water
· Folded towel and scrap wood support
· Eye protection and dust mask
· Small file or abrasive pad suited to ceramic edges
· Cut flowers
Drill the Lid With Care
1. Check the lid closely. Hold it under good light and look for hairline cracks, repairs, crazing, or weak areas around the handle. Choose another pot if the ceramic seems fragile.
2. Plan the hole pattern. Apply painter tape and mark a few well-spaced openings, keeping them away from the handle and outer rim. Begin with fewer holes; more can be added later if the lid remains sound.
3. Support and cool the ceramic. Place the lid on a folded towel over scrap wood so it cannot roll. Keep the drilling area damp and use gentle pressure rather than forcing the bit.
4. Drill gradually. Start at a slight angle to create a shallow grip, then bring the drill upright as the hole develops. Stop regularly to cool the surface and inspect for cracks.
5. Clean and arrange. Smooth any rough edge carefully, wash away dust, and fill the teapot with water. Insert stems one at a time and keep the arrangement light enough that it does not strain the lid.
This is where patience matters more than adding another tool. One clean hole is useful; ten rushed holes and a broken lid are simply a sad afternoon.
For a no-drill version, remove the lid and stretch coated wire mesh or reusable floral netting across the opening. Artificial stems can also pass through holes made in a fitted cardboard insert that never touches water.
Match the Material to the New Purpose
Glass
Glass suits vases, lanterns with battery lights, and dry storage because it cleans easily and does not absorb colour or odour. Avoid sudden temperature changes, hidden chips, and handles that encourage people to carry a heavy jar by glued decoration alone.
Metal
Metal containers and furniture can work outdoors after sharp edges, drainage, and rust protection are addressed. Thin cans need careful rim treatment, while large cabinets need a stable base and a plan for their final weight.
Plastic
Plastic is lightweight and easy to cut, but age changes it. Whitening, cracking, stickiness, or a brittle feel are signs to stop. Rounded cuts and reinforced hanging points help prevent tears from spreading.
Cardboard
Cardboard is useful for dry organisers, temporary decor, templates, and display vessels. Keep it away from water, flames, damp rooms, and heavy loads. A hidden jar or bottle insert can extend what a cardboard outer shell can safely hold.
Furniture and Ceramics
Old furniture should remain structurally sound for its new load even when it no longer serves its original purpose. Ceramics need inspection before drilling, and sentimental pieces are rarely the best first attempt.
Common Mistakes to Avoid
Starting With an Unsafe Object
A cracked jar, rusted canister, rotten chair leg, or brittle container does not become safer because the final idea is clever. Reject weak materials before spending time on paint, soil, or decoration.
Choosing Decoration Before Function
Colour and texture should come after drainage, balance, weight, and cleaning. A planter needs a safe way for water to leave; a tray needs a level base; a storage jar still needs a lid that closes.
Trusting Glue With Too Much Weight
Glued straps, feet, stones, and handles all have limits. Follow curing instructions and test gradually. Carry glass from underneath and use mechanical fixings when a part must support a meaningful load.
Ignoring Sharp Edges
Opened metal, cut plastic, drilled ceramic, and sawn wood can all hide rough points. File, sand, cover, or reject them before the finished item enters normal household use.
Using Indoor Materials Outside
Ordinary paint, untreated wood, absorbent fabric, and unprotected steel may fail quickly outdoors. Choose finishes for the real location and accept that exterior projects need inspection and maintenance.
Adding Water to the Wrong Project
Cardboard vases, fabric-covered lanterns, and glued decorative jars each have moisture limits. Use removable waterproof inserts and battery lights rather than asking the outer material to do a job it cannot safely manage.
Making Ten Projects at Once
A pile of half-finished crafts is still clutter. Complete one useful object, test it in the room, and decide what you learned before cutting the next container.
Frequently Asked Questions
Which upcycling project is easiest for a beginner?
The picture-frame tray or painted storage jars are manageable starting points because they use familiar tools and little structural alteration. Keep the finished items light and stationary while you learn how the materials and adhesive behave.
How do I know whether an item is worth saving?
It should be cleanable, structurally sound, and suited to a clear new purpose. If repair costs more effort than the item is worth, or the material remains unsafe after cleaning, responsible recycling or disposal is the better choice.
Do I need to buy special paint for every material?
Paint needs to suit the surface and location. Glass, plastic, metal, wood, and cardboard behave differently, so read the product guidance and test a small hidden area rather than assuming one leftover paint will suit everything.
Can children help with these projects?
Children can help with washing safe containers, choosing paper, arranging dry decorations, or painting simple surfaces under supervision. Cutting, drilling, filing metal, strong adhesive, and broken or heavy objects should remain adult tasks.
How can I make an upcycled item look less homemade?
Measure carefully, keep edges clean, limit the colour palette, and remove excess adhesive before it cures. One repeated detail, such as matching labels or even spacing, usually looks calmer than several unrelated decorations.
Can upcycled planters be used indoors?
Yes, but use a waterproof inner pot or saucer and test drainage before placing them near furniture. Hanging planters need secure anchors, while metal and wooden containers should be checked regularly for moisture damage.
What should I do with leftover offcuts?
Keep only pieces that have a likely use and store them by material. Small leather straps, sound wood blocks, clean paper, and hardware can help with later projects, but damaged scraps and unidentified fragments should not become permanent craft-room residents.
Let One Discarded Object Earn Its Place Back
The best creative upcycling tips begin with attention rather than decoration. A film canister has the size for one small plant. A frame already provides a border for a tray. A chair can support a pot only after its structure and new load are understood. Each successful project works because the old object’s useful qualities are carried into its next job.
Start with one item that is clean, sound, and already waiting in your home. Decide what problem it could solve, gather only the tools needed for that purpose, and test the finished piece before making another. That is how trash becomes treasure without simply becoming better-looking clutter.
Which object would you rescue first: the glass jar, the worn chair, the cardboard tubes, or the forgotten teapot?