Kitchen cupboards have a habit of collecting objects that are still perfectly usable but no longer earn their space. A spare mason jar, an old teacup, a scratched colander, a cutting board that has seen better days, a muffin tin you rarely bake with, or a glass bottle saved because it felt too nice to throw away can all become useful again with a little thought. I don’t think every old kitchen item needs a dramatic makeover. Quite often, the best upcycle simply notices what the object already does well and gives that shape a new job.
This is the kind of reuse I enjoy most: practical, approachable, and easy to adapt to an ordinary home. Kitchen pieces are especially good for beginner upcycling because they are already designed to hold, support, separate, pour, or display things. That means you can often work with the original form instead of rebuilding it. The ideas here focus on simple changes that still feel intentional, useful, and worth keeping.
Before You Start: Clean, Inspect, and Separate Food-Use Items
Before turning any kitchen object into a craft project, decide whether it is leaving food service permanently. Once a jar has held potting soil, a teacup has contained candle wax, or a tray has been painted with a decorative coating, I would treat it as a non-food item from then on. Keeping that boundary clear makes the finished project easier to use safely and avoids the awkward question of whether a decorative material belongs near food.
Wash glass, ceramic, and metal pieces with warm soapy water and let them dry fully. Grease is easy to miss on kitchen objects because it can sit as a thin film rather than an obvious stain. That film matters if you plan to add adhesive, twine, a wick tab, paint, or another material. For wooden items, avoid soaking them. Wipe them clean instead, then check for splinters, deep cracks, or loose joints.
Look closely at chipped ceramic and cracked glass. A tiny cosmetic mark may be harmless for a vase, but a sharp edge is not something I would leave exposed. Metal colanders and muffin tins deserve the same check. Surface discoloration is one thing; flaking rust, sharp burrs, or weakened handles are different. If an item is no longer structurally sound, choose a lower-stress decorative use or retire it rather than forcing a project.
It also helps to remove old labels and sticky residue before you begin. On bottles and jars, soak the label area and lift the paper gradually rather than scraping aggressively. Any remaining adhesive can usually be worked away with an appropriate household cleaner. Keep the final surface simple and clean; that gives you more options later.
Choose a New Purpose That Fits the Original Shape
A good kitchen upcycle usually feels obvious after you see it. Jars are already upright containers, so they make excellent holders. A colander already has drainage holes, which makes it a natural candidate for planting. A cutting board is flat, sturdy, and easy to lean at an angle, so it can support a tablet or recipe book. The closer the new purpose is to the object’s original strengths, the less extra material you need to add.
I know it can feel tempting to choose the most decorative idea first, but function is what makes an upcycle stay in use. Ask where the item will live, what it needs to hold, how often you will touch it, and whether it needs to be washable. A vase on a dining table has different demands from a seedling tray on a sunny windowsill. A candle needs heat-safe ceramic and sensible placement, while a utensil holder needs stability more than decoration.
Scale matters too. A deep mason jar is useful for long wooden spoons but may swallow short teaspoons. A very shallow colander may suit succulents or low herbs better than a large mint plant. A small cutting board can hold a phone, while a larger one is better for a tablet or cookbook. Rather than making the object behave unnaturally, choose a use that respects its size.
This is also where style becomes easier. If the shape and purpose already make sense, you often need fewer decorative extras. Clear glass can stay clear. A worn cutting board can keep its patina. An old floral teapot can remain exactly as it is. I would rather preserve one interesting feature than cover the whole piece in paint simply because it is an upcycling project.
Gather Simple Supplies and Protect the Work Area
Most of these projects can be completed with basic household or craft supplies. Keeping the setup simple makes them easier to repeat and reduces the chance that a low-cost reuse project quietly turns into a shopping trip. Start with what you already own, then add only what the project genuinely needs.
Useful supplies may include:
· Mild dish soap and clean cloths
· Scissors and a craft knife for light trimming work
· Strong craft adhesive or hot glue for non-food decorative attachments
· Jute twine or cord
· Fine sandpaper for rough wooden edges
· Potting mix, small stones, and herbs or seedlings
· Candle wax, a suitable wick, and a wick tab for the teacup candle
· A shallow tray or old towel to protect the work surface
· Small felt pads or non-slip material for stands and holders
· Clean water and a narrow bottle brush for bottle-vase projects
When cutting wood or modifying a board, protect your hands and eyes and work on a stable surface. If a project needs stronger adhesives, use them with good ventilation and follow the product instructions. With candle-making, keep melted wax away from children, pets, open flames, and unstable surfaces. I would also keep gardening soil and craft tools away from areas where you prepare food until cleanup is complete.
There is no prize for using every supply on the table. These projects look strongest when the original kitchen item remains recognizable. The goal is not to disguise the object completely; it is to give it a convincing second purpose.
Turn Mason Jars Into an Everyday Utensil Station
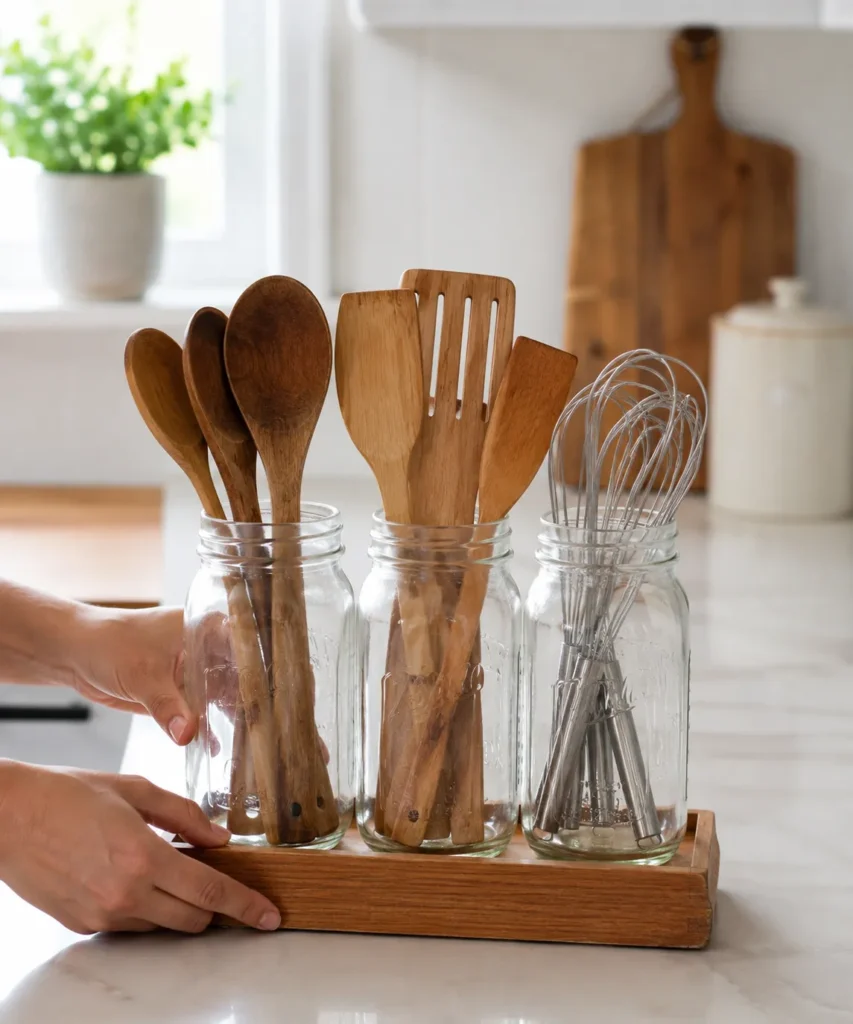
Loose kitchen tools can make a countertop feel untidy even when every item is useful. Mason jars solve that problem without asking you to buy a purpose-made organizer. Their straight sides, wide openings, and stable bases make them especially good for utensils that you reach for often.
The important detail is grouping. One jar by itself can look like temporary storage; three jars arranged on a small wooden tray feel more deliberate. You can sort by tool type – wooden spoons in one, spatulas in another, whisks or small tools in the third – or organize by height. The tray also gives the jars a visual boundary and makes the whole set easier to move when you clean the counter.
Materials and tools
· Two or three clean mason jars or similar wide-mouth jars
· A shallow wooden tray, old cutting board, or narrow serving board
· Wooden spoons, spatulas, whisks, or other suitable tools
· Optional jute twine, felt pads, or non-slip dots
· Mild soap and a bottle brush
· Optional adhesive only if you want to secure decorative details
A practical way to assemble it
1. Clean and sort the jars. Wash the jars thoroughly and check the rims for chips. Remove old labels and residue, then let the glass dry completely. Decide which jar will hold which type of utensil before adding any decoration, because the tool height may affect the best arrangement.
2. Test the balance on your tray. Place the empty jars on the tray and move them around until the grouping looks even. Leave enough space that one jar can be lifted without knocking the others. Then add a few utensils to each jar and check whether any container becomes top-heavy.
3. Add stability before decoration. If the tray is slippery, place small felt or non-slip pads beneath the jars rather than gluing them permanently. That keeps the set easier to wash. I don’t think fixed jars are necessary here unless the organizer will be moved constantly.
4. Sort tools by use and height. Keep the longest, heaviest utensils in the widest or most stable jar. Shorter tools can share a separate jar so they do not disappear behind large spatulas. Then step back and remove anything you rarely use; an organizer works better when it is not packed solid.
What makes this version work
Clear glass is visually light, which matters on a busy kitchen counter. The jars contain a lot without looking like a large block of storage. The wooden tray also connects naturally with wooden utensils, so the group feels cohesive even if the jars are mismatched.
If your jars are different heights, that can actually help. Place the tallest at the back and the shortest at the front. A little variation makes the arrangement easier to use and keeps the tools visible. You could also use one jar for reusable straws, pastry brushes, or long-handled measuring spoons if those are what you reach for most.
For a smaller kitchen, use only one or two jars and place them beside the stove rather than across the main preparation area. If you prefer hidden storage, this same method can organize a deep pantry shelf or open cabinet. The principle stays the same: reuse containers you already have and group like tools together.
Easy variations
A plain jar usually needs no decoration, but you can add a narrow band of twine around the upper section if you want a warmer look. Avoid wrapping the whole jar if you still want to see what is inside. Another easy variation is to reuse an old narrow serving board as the base and add small rubber feet underneath it so the station stays steady.
For me, the best part of this project is that it remains washable and flexible. If you change how you cook, you can simply change what each jar holds. That is a much more useful kind of upcycling than creating something so specific that it stops working the moment your routine changes.
Make a Teacup Candle From a Cup You No Longer Use
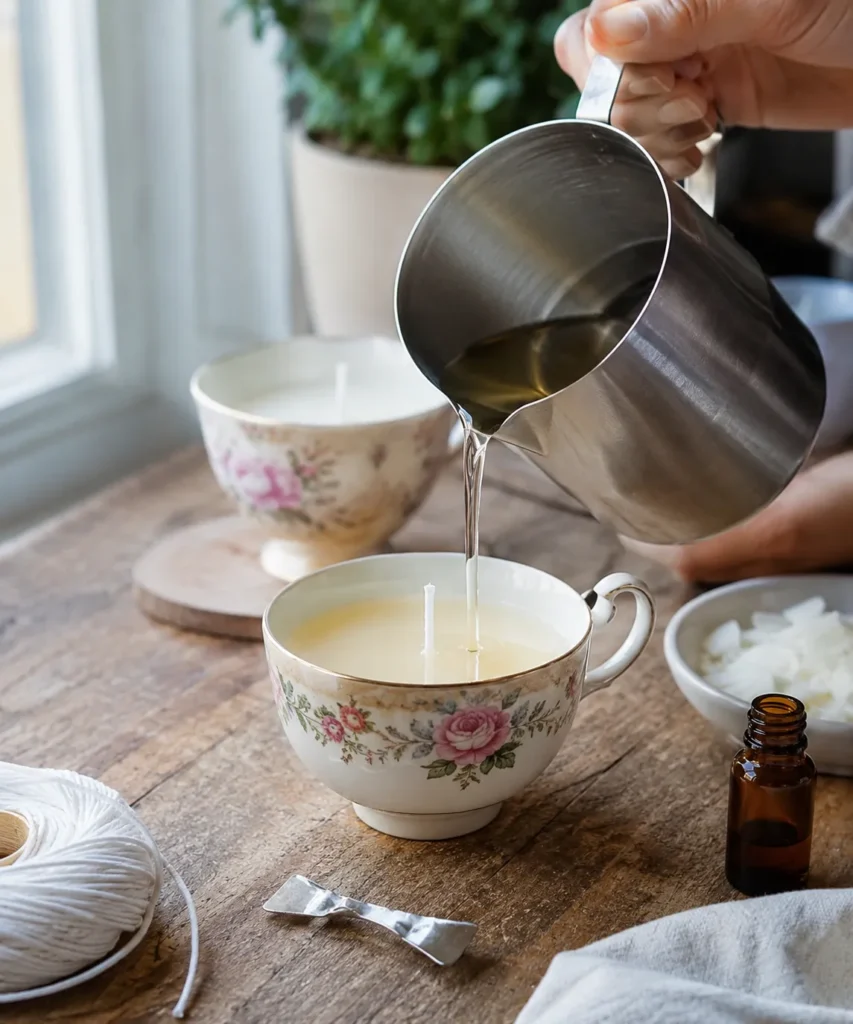
A lone teacup is easy to keep because it feels too pretty to discard, yet it may spend years unused because the rest of the set is gone. Turning it into a candle gives the cup a purpose that still shows off its pattern. This idea suits cups that are sound, heat-resistant ceramic and free from cracks.
The cup itself does most of the decorative work. Floral patterns, fine rims, and small handles already give it character, so there is no need to add ribbons, labels, or extra embellishment. A clean wax surface and a centered wick are enough.
Materials and safety supplies
· One clean, intact ceramic teacup
· Candle wax suitable for container candles
· A suitable candle wick and wick tab
· A heat-safe pouring container
· A double-boiler setup or another safe wax-melting method recommended for your wax
· Wick-centering support such as a holder or two sticks
· Heat-resistant gloves or protection as needed
· Optional candle-safe fragrance used according to its directions
Use a cup that is structurally sound and intended to tolerate hot liquids. Do not use cracked, crazed, or visibly weakened ceramic. Keep melted wax away from water, children, pets, and open flames, and follow the instructions for the wax and wick you choose.
How to create a similar candle
1. Prepare the cup and wick. Wash and dry the teacup, then inspect it under good light. Fix the wick tab at the center of the base using an appropriate method for candle containers. Keep the wick upright and centered before you begin pouring.
2. Melt the wax carefully. Use a controlled, heat-safe method and follow the wax manufacturer’s guidance rather than guessing at temperatures. If you are adding a candle-safe fragrance, use only an amount appropriate for the wax. Keep the work surface protected because wax is much easier to prevent than to scrape from a table later.
3. Pour slowly and keep the wick straight. Pour the melted wax into the cup without filling right to the rim. A little empty space at the top looks neater and gives the finished candle a safer margin. Check the wick immediately and adjust it before the wax begins to firm.
4. Let the candle settle undisturbed. Keep the cup on a level, heat-resistant surface while the wax sets according to the wax instructions. Once it is fully ready, trim the wick to the recommended length for your wick type before use. Never leave a burning candle unattended.
Why a teacup works so well
A teacup has an intimate scale. It makes a candle that feels appropriate for a bedside table, desk, bathroom shelf, or small reading corner rather than a large centerpiece. The handle also makes the vessel visually distinct from a standard candle jar, although you should never use the handle to move the cup while the candle is lit or the wax is hot.
I know it can be tempting to rescue any chipped cup this way, but candle-making is not the place to ignore structural damage. If the cup is cracked or questionable, use it for a non-heated project instead. A small desk cup for clips or a dry flower holder is a better second life for fragile ceramic.
Variations that keep the idea simple
You can use plain white cups, mismatched vintage cups, or a small handled bowl if it is suitable for the purpose. Keep the exterior as it is. If the pattern is already decorative, more ornament rarely improves the result.
If you want to give the candle as a gift, add a removable paper tag to the handle rather than gluing something to the ceramic. That keeps the cup reusable after the candle is finished. Once the wax has been safely removed and the cup has been properly cleaned, you could use it for non-food storage or another decorative role, but I would not return a craft-used cup to food service.
Turn a Metal Colander Into a Hanging Herb Planter
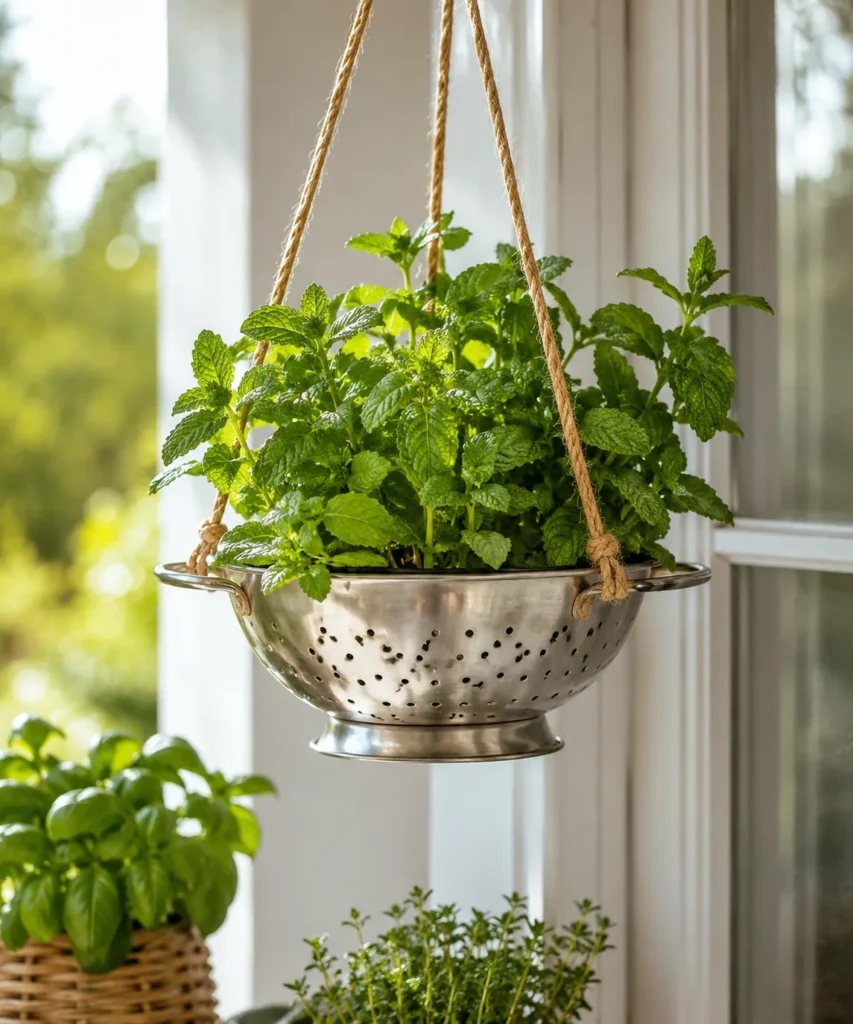
A colander is almost halfway to being a planter before you do anything to it. The drainage holes are already there, the bowl shape holds soil, and the side handles give you convenient points for support. That makes this one of the most natural examples of upcycling kitchen items.
The main challenge is not drainage but soil retention. Large perforations can let fine potting mix wash out, especially during the first few waterings. You need a lining or a coarse lower layer that keeps soil in place without blocking water completely.
Materials and tools
· A sturdy metal colander with secure handles
· Potting mix appropriate for the herbs you choose
· Herb plants or seedlings such as mint, parsley, thyme, or basil
· A breathable liner, coconut fiber, or another planter-safe material if the holes are large
· Jute cord or stronger hanging cord rated for the finished weight
· Scissors
· A secure ceiling, wall, or bracket hook appropriate for the load
· A tray or outdoor work surface for planting
Build the planter in four stages
1. Check the colander and hanging points. Make sure the handles are firmly attached and the metal is not weakened by heavy rust. If you plan to hang it, remember that wet soil is much heavier than an empty colander. Choose cord and hardware for the loaded planter, not just the container itself.
2. Line the bowl without sealing it. Fit a breathable liner inside the colander if the holes are large enough to lose soil. Keep the drainage path open; the point is to hold the potting mix in, not to make the colander waterproof. Then add your growing medium and leave a little space below the rim.
3. Plant with mature size in mind. Position one larger herb or a few compatible smaller herbs rather than packing the bowl tightly. Spread the roots gently, add soil around them, and firm it lightly. Water once and watch where excess water exits so you know how the planter behaves.
4. Hang and monitor the first week carefully. Tie the support cords evenly so the colander sits level, then attach them to a secure hook. Place the planter where the herbs receive suitable light and where dripping water will not damage flooring or furniture. Check the knots after watering because the weight changes noticeably.
The detail I would not skip
Drainage water needs somewhere to go. A hanging planter directly over a wooden floor or upholstered chair is not a practical setup, even if it looks good for a photograph. Position it over an easy-clean surface, a sink area, an outdoor space, or use a removable catch tray if the design allows.
I also would not overload a hanging colander with heavy soil and too many plants. A lighter planting is easier on the handles and gives the herbs room to grow. Mint can become vigorous, for example, so a single healthy mint plant may be enough for a medium colander.
Other ways to use the same idea
If hanging feels inconvenient, set the colander on a sturdy plant stand or over a shallow saucer. You still benefit from the drainage holes without needing overhead hardware. This is a good option for renters or anyone who would rather not install a hook.
A smaller colander can become a windowsill herb pot. An enamel colander can work too if the surface remains sound. Keep the finish natural unless there is a good reason to change it. The perforated metal already gives the planter plenty of visual texture.
Repurpose an Old Cutting Board as a Tablet or Recipe Stand
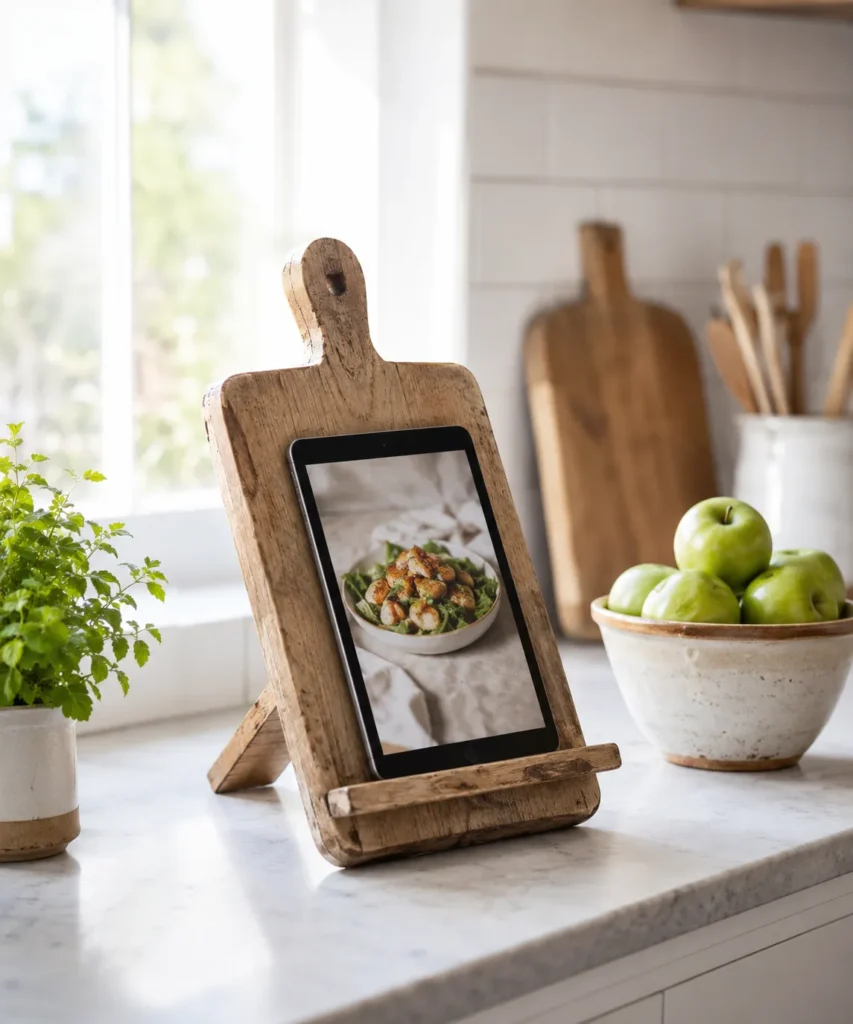
A wooden cutting board can reach the point where you no longer want to prepare food on it but the board itself is still strong. Deep knife marks, staining, or a worn surface may retire it from kitchen prep without making it useless. As a tablet or recipe stand, those marks can become part of its character.
This project needs a little more construction than the jar or bottle ideas, but the basic design is simple: a vertical or slightly angled board, a narrow ledge at the front, and a support at the back. The board should hold the device securely without covering too much of the screen.
Materials and tools
· A retired wooden cutting board in solid condition
· A narrow strip of wood for the front ledge
· A small rear support piece or sturdy hinge arrangement
· Wood glue and/or small screws appropriate for the board
· Sandpaper
· Measuring tape and pencil
· Screwdriver or drill if your chosen design uses screws
· Optional felt or non-slip material for contact points
Wear eye protection when drilling or cutting wood, and clamp pieces securely rather than holding them in your hand. If the board is badly split or warped, choose another one. A device stand should be stable enough that a bump on the counter does not send your tablet forward.
A beginner-friendly construction method
1. Clean and sand the retired board. Wipe away kitchen residue and let the board dry. Sand rough edges and splinters, especially around the handle and any worn corners. There is no need to erase every knife mark; you only need a surface that is comfortable to handle.
2. Plan the viewing angle first. Place your tablet or cookbook against the board and test a few angles before attaching anything. Mark where the bottom edge naturally rests. Then decide how wide and deep the front ledge should be so it supports the device without covering controls or pages.
3. Attach the front ledge securely. Fix a narrow strip of wood across the lower front using a method suitable for the board and the weight it must hold. Keep it level. If you use screws, pre-drilling can reduce the risk of splitting the wood, particularly near thin edges.
4. Add a stable rear support. Use a fixed triangular support, folding stand, or another secure arrangement that keeps the board at the chosen angle. Then test the stand with the device before finishing any decorative work. Stability matters more than making the back look complicated.
5. Protect the device contact points. Add small felt pads or non-slip strips where the tablet touches the wood if needed. Check that the stand sits flat on the counter and that the device cannot slide sideways. Then keep it away from direct splashes and hot cookware during actual kitchen use.
Why the old surface can be an advantage
A worn cutting board often has a warmer, more relaxed appearance than new craft wood. If the marks are clean and the board is sound, I would keep some of them rather than sanding the piece until it looks factory-new. The point is to repurpose the board, not pretend it never had a previous job.
This stand also works for printed recipes, a small cookbook, or a phone. If you mostly use paper recipes, make the ledge a little deeper. If you use a tablet, prioritize a shallow ledge and non-slip surface.
Simpler alternatives
If you do not want to drill or build a folding support, a strong plate stand can sometimes hold a retired cutting board, turning it into a layered stand without permanent modification. You can also attach only the front ledge and lean the board against a stable backsplash when in use, although a self-supporting version is more convenient.
I would keep decorative paint away from the device contact area and avoid thick embellishments that interfere with cleaning. A recipe stand lives in a practical workspace, so a simple finish usually lasts better.
Reuse a Muffin Tin as a Compact Seed-Starting Tray
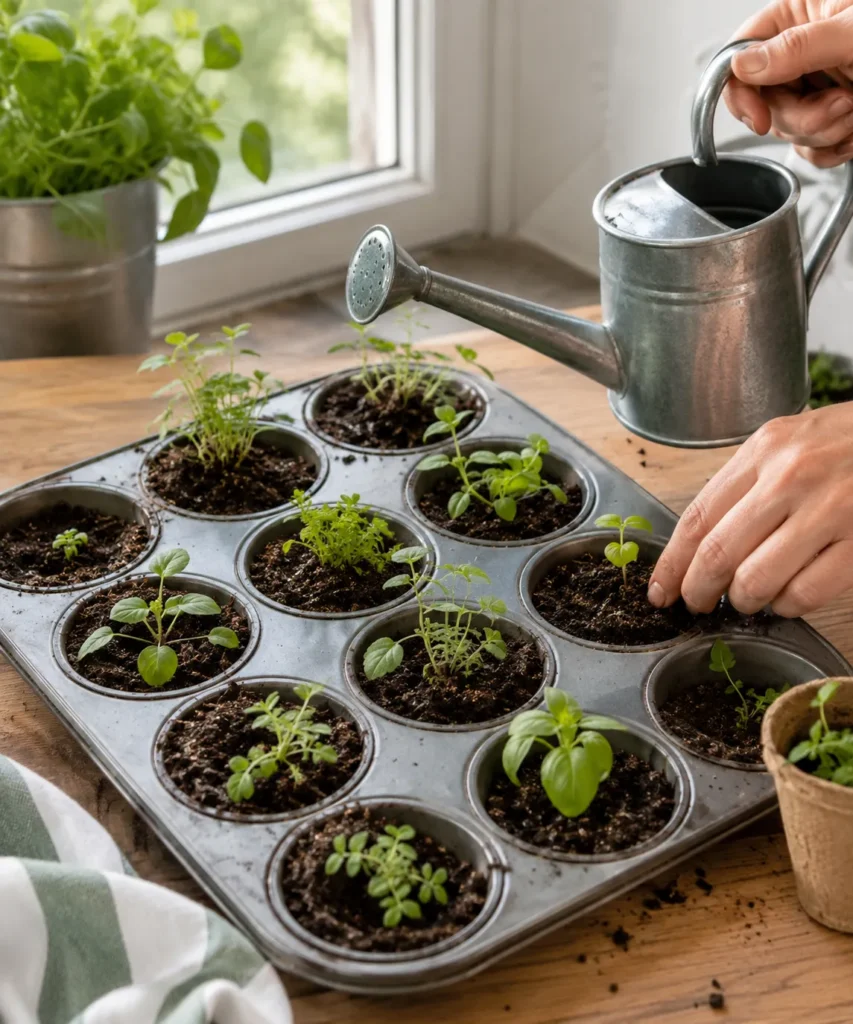
An old muffin tin gives you ready-made planting cells in one portable tray. For seed starting, that can be genuinely useful because you can keep several small plantings together without collecting a pile of separate pots. This is best for a tin you are permanently retiring from food use.
The main consideration is drainage. Muffin cups are usually solid, so water can sit at the bottom if you treat them like ordinary plant pots. You can either add suitable drainage holes with the correct tools and safety precautions or use the tin as a temporary outer tray for small biodegradable starter pots that fit inside the cups. The second method is easier if you do not want to modify metal.
What you may need
· One old muffin tin no longer used for baking
· Seed-starting mix or suitable potting mix
· Herb, flower, or vegetable seeds
· Small biodegradable starter cups if you prefer not to drill the tin
· A small watering can, bottle, or spoon for controlled watering
· Plant labels if you are growing several varieties
· A tray or mat beneath the tin to protect the windowsill
· Appropriate drill bit and eye protection only if you choose to add drainage holes
Two sensible ways to set it up
1. Decide whether the tin will be drilled or used as a holder. If the metal is sound and you have the right tools, small drainage holes can make each cup act more like a tiny pot. If you would rather avoid drilling, place small paper or biodegradable starter cups inside the muffin spaces and let the tin function as the carrier.
2. Fill lightly rather than packing the cells. Add seed-starting mix and leave a little room at the top. Compacting the soil heavily can make it harder to manage moisture. If you are sowing different plants, label them now; once several green seedlings appear, your memory may suddenly become less reliable than you expected.
3. Sow according to the seed requirements. Place the seeds at a suitable depth for the variety rather than burying everything the same way. Moisten the mix gently so small seeds do not wash into one corner. Then place the tin in light appropriate for the plants you are starting.
4. Watch moisture closely. Small cells dry more quickly than large pots, but solid muffin cups can also stay too wet if drainage is poor. Check the soil before adding more water. The goal is consistent moisture, not a miniature pond in each cup.
5. Move seedlings before they become crowded. Once roots and leaves begin to outgrow the small space, transplant the seedlings into larger containers or their final growing place. A muffin tin is a starting station, not a long-term planter for most herbs and vegetables.
Where beginners often go wrong
Overwatering is the easiest mistake here. The cells look tiny, so it feels harmless to add a little extra water, but there is nowhere for excess moisture to disappear if the tin has no drainage. Controlled watering matters more than quantity.
I also would not use a heavily rusted tin. A little cosmetic wear may be fine for an outer holder, but flaking metal is not something I want mixed into damp potting soil. Choose a tray that is still structurally sound.
Adapt the idea to the plants you actually grow
Large seeds may need more space than a muffin cell can provide for long, so use the tin mainly for small starts. Herbs, small flowers, and quick seedlings can work well. If you prefer a reusable system with no soil touching the metal, use small compostable pots or folded paper starters in the cups.
After transplanting, clean and dry the tin thoroughly before storing it for the next planting round. Keeping it dry between uses will help preserve it longer.
Turn Glass Bottles Into Simple Single-Stem Vases
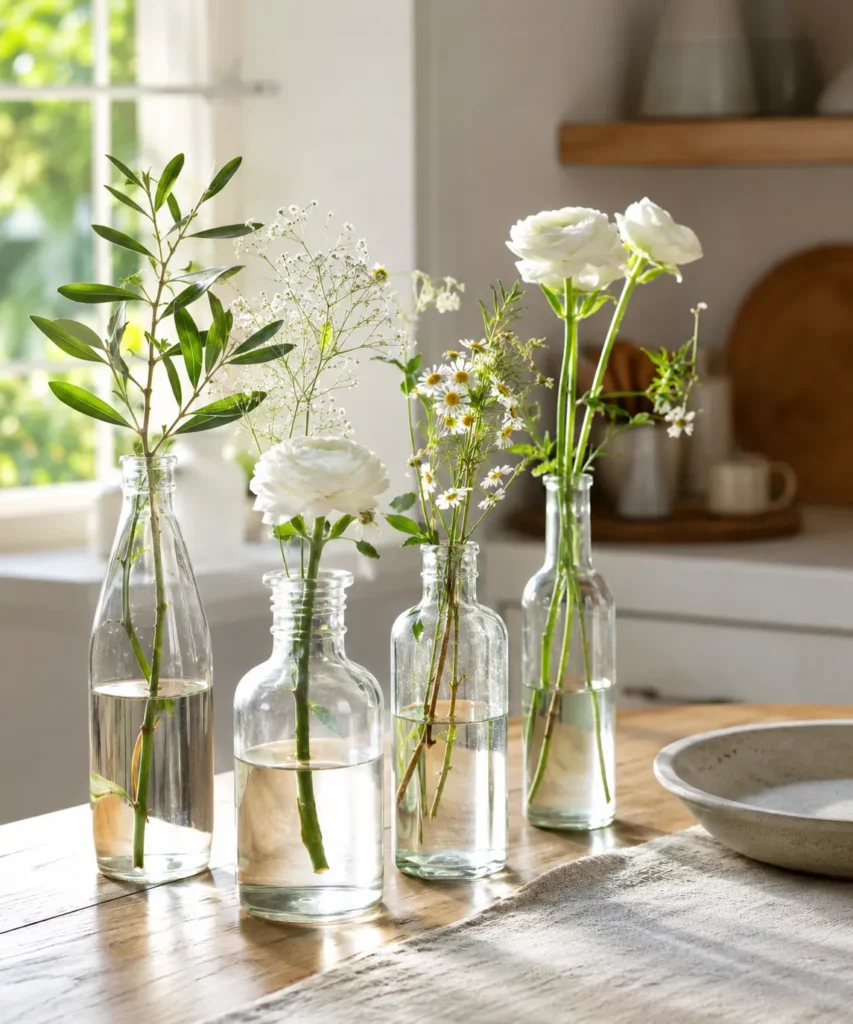
Some upcycling projects barely need tools, and that is not a weakness. A clear glass bottle has a narrow neck, enough weight to stand steadily, and a shape that naturally supports one or two stems. Once the label is removed and the glass is clean, it already works as a vase.
This idea is especially useful for small garden cuttings that would disappear inside a large bouquet vase. A sprig of greenery, a single flower, or a few delicate stems can look intentional when each has its own bottle. Grouping several bottles also lets you create a fuller arrangement without needing a large bunch of flowers.
Materials
· Clean glass bottles in one or several heights
· Bottle brush
· Warm soapy water
· Label-removal supplies if needed
· Fresh or dried flowers, herb stems, or greenery
· Clean water for fresh flowers
· Optional small tray or wooden board for grouping
Prepare and style the bottles
1. Remove labels and clean the inside. Soak the bottle as needed, peel away the paper, and remove sticky residue. Use a bottle brush to clean the inside thoroughly. Rinse until the water runs clear, then inspect the rim for chips before using the bottle.
2. Choose stems that fit the neck. Narrow bottles work best with one strong stem or a small loose cluster. Trim leaves that would sit below the water line. Then test the height before cutting too much from the stem; it is easier to shorten a flower than to put length back.
3. Vary height across a group. Arrange three or four bottles together and place the tallest stems toward the back or center. Mix one fuller flower with lighter greenery if you want contrast. Keep enough empty space that the bottles still read as individual pieces.
4. Refresh the water and clean regularly. Fresh flower water can become cloudy, particularly in narrow bottles. Change it as needed and rinse the glass so the arrangement stays clean. For dried stems, keep the bottles dry and dust them occasionally.
The styling lesson here is restraint
I don’t think every bottle needs paint, twine, lace, or a label. Clear glass catches light beautifully on its own, and the shape of the stem becomes part of the composition. If the bottle has a small embossed detail or a slightly different tone of glass, that can be enough character.
A group also lets you reuse mismatched bottles without making them look accidental. Similar proportions or repeated clear glass connect them visually even if the exact shapes differ. If one bottle is much taller, make it the anchor rather than trying to hide the difference.
Other useful ways to repurpose bottles
The same bottles can hold dried lavender, rosemary cuttings, small branches, or seasonal greenery. A single bottle on a bathroom shelf can feel calmer than a full arrangement. A row of small bottles along a kitchen window can hold herb cuttings in water while they root, provided the plant type suits that method.
For a more practical display, place the bottles on a small tray. That makes them easier to move for cleaning and catches the occasional drip when you refill them.
Use an Old Teapot as a Tabletop Flower Arrangement
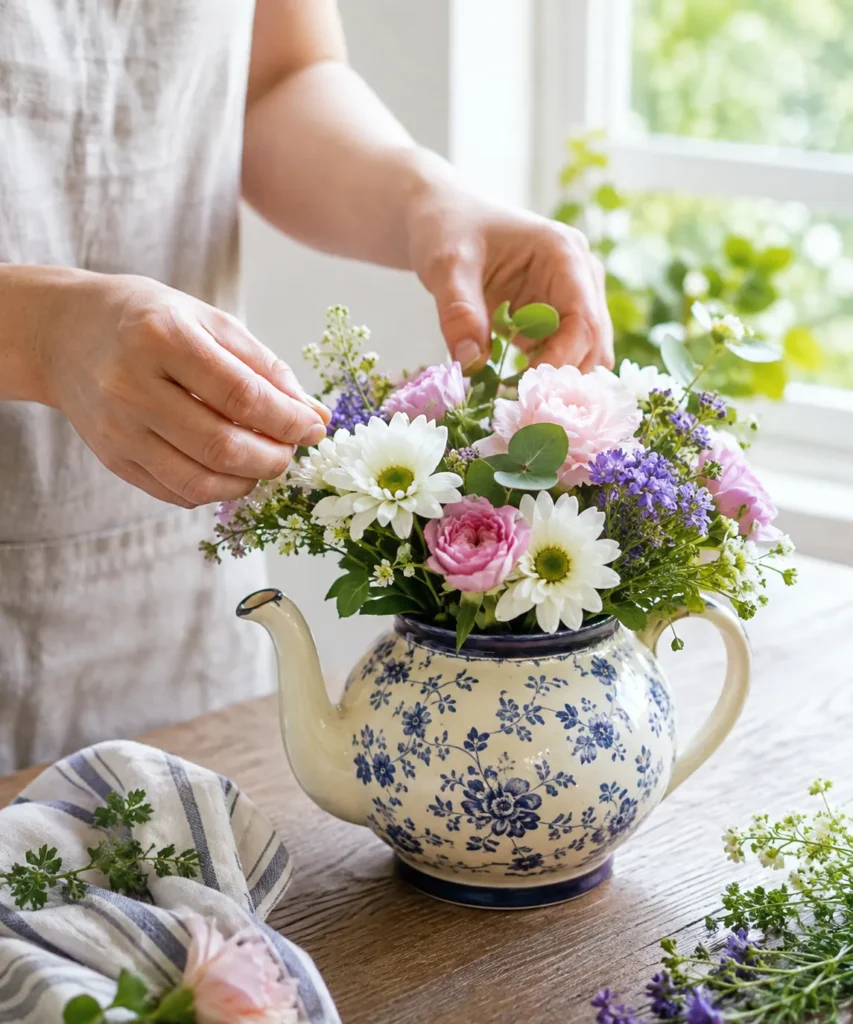
A teapot has a completely different presence from a standard vase. The handle and spout make it immediately recognizable, and the wide body gives you enough room for a fuller arrangement. This works especially well for a teapot that is still attractive but no longer used because the lid is missing, the set is incomplete, or you simply have more teapots than you need.
The project is simple, but arranging flowers in a teapot is slightly different from using a tall vase. The wide opening can let stems spread too far unless you build the arrangement from the center outward. Shorter, fuller flowers usually suit the proportions better than very tall stems.
Materials and tools
· One clean teapot in sound condition
· Fresh or dried flowers
· Greenery or filler stems
· Clean water for fresh arrangements
· Floral snips or clean scissors
· Optional small jar or watertight insert that fits inside the teapot
· Towel for protecting the work surface
Arrange the flowers without overcrowding the pot
1. Check whether the teapot holds water reliably. Fill it briefly over a sink and watch for seepage, hairline cracks, or leaks around the base. If you are unsure about the glaze or the pot leaks, place a small watertight jar inside and arrange the flowers in that instead.
2. Build a low framework with greenery. Trim a few greenery stems and place them so they spread gently around the opening. This creates structure and helps support the flowers. Keep the overall width in proportion to the teapot rather than making the arrangement so broad that the vessel disappears.
3. Add the main flowers at varied heights. Place the largest blooms first, keeping some slightly higher and others lower. Turn the teapot as you work so the arrangement looks balanced from more than one side. Then fill gaps with smaller flowers rather than pushing every stem into the center.
4. Refine the shape and maintain the water. Step back, remove any stem that feels crowded, and make sure the spout and handle remain visible. For fresh flowers, refresh the water as needed and remove leaves below the water line. Clean the outside of the teapot so soil, pollen, or water marks do not build up.
Why this makes a convincing second life
The teapot still behaves like a vessel, so the new function feels natural. You are not drilling, cutting, or covering it. That makes this a particularly good option for sentimental pieces you want to preserve without putting them back into food service.
The shape is also easy to style seasonally. Soft flowers suit spring, herbs and greenery can feel relaxed in summer, seed heads and dried grasses work later in the year, and simple evergreen cuttings can suit winter. You can change the contents without changing the object itself.
I would resist the urge to hide the spout with flowers. That is the detail that tells the story of the original item. Leaving it visible is what makes the arrangement feel like an upcycle rather than an ordinary vase.
A beginner shortcut
If flower arranging feels intimidating, use one type of flower plus greenery. Repeating the same bloom creates cohesion without needing much design experience. Another easy option is a loose bunch of garden flowers trimmed to similar lengths and placed into a small jar inside the teapot. The hidden jar makes water changes simple and protects the teapot if you are unsure about its interior.
Keep Finished Kitchen Upcycles Practical and Easy to Maintain
A project is much more likely to stay in use when it is easy to clean. Kitchen spaces collect dust, cooking residue, splashes, and moisture faster than many other rooms, so I would think about maintenance before adding decorative details. Smooth glass, sealed wood, plain ceramic, and removable trays are easier to wipe down than layers of fabric, rope, or embellishment. That is another reason I prefer simple finishes for kitchen upcycles.
For the mason jar utensil station, keep the jars removable from the tray so you can wash them individually. Wipe the base whenever you clean the counter rather than waiting for crumbs and dust to build up underneath. If you use felt pads, check them occasionally because moisture around a sink or cooking area can loosen adhesive-backed pads over time.
Planter projects need their own routine. Empty standing water from saucers, wipe the outside of the colander, and sweep away loose potting mix before it becomes part of the windowsill. If the muffin tin is used for seedlings, clean and dry it after transplanting rather than leaving damp soil residue in the cells. Storing metal dry between planting sessions helps keep the project usable.
The cutting-board tablet stand should stay away from direct splashes, steam, and hot cookware. Because it is no longer a food-preparation surface, you can treat it as a small piece of wooden furniture: dust it, wipe it gently, and check the ledge and rear support for looseness. If a screw or glued joint starts moving, repair it before placing a device back on the stand.
Fresh-flower projects benefit from simple water care. Rinse bottle vases regularly, remove leaves below the water line, and clean the teapot or its hidden insert between arrangements. Narrow-neck bottles can look clean from the outside while residue remains inside, so a bottle brush is worth using. If you switch to dried stems, let the vessel dry fully first.
For the teacup candle, keep the outside free from wax drips and stop using the candle if the vessel becomes damaged. Never use decorative materials around the rim that could interfere with the flame. The finished object may be an upcycle, but it still needs the same sensible care as any other candle.
What matters here is making the new purpose easy to live with. If you find yourself avoiding a project because it is difficult to clean or move, simplify it. Remove unnecessary trim, use a removable insert, or change the location. A second life should make the object more useful, not more demanding.
Kitchen Upcycling Mistakes That Can Ruin a Good Project
Upcycling kitchen items is usually forgiving, but a few choices can turn an easy project into something awkward or unsafe. The first is using an item that is damaged beyond what the new purpose can tolerate. A cracked teacup should not become a candle. A colander with weak handles should not become a hanging planter. A split cutting board should not be trusted to hold a tablet. The new purpose still depends on the strength of the original object.
Another common mistake is forgetting the change in hygiene category. Once a muffin tin has held soil or a teacup has held craft wax, label it mentally as a craft or décor item. Do not keep moving it between food and non-food uses. This is especially important when adhesives, paint, soil, candle materials, or plant treatments have been involved.
Overdecorating is another easy trap. Clear bottles, patterned teacups, aged cutting boards, and metal colanders already have visual character. If you cover every surface with paint, rope, decals, and extra trim, the object can become harder to clean and less recognizable. I would choose one small decorative treatment at most, then let the original form do the rest.
Poor stability causes practical problems too. Tall utensils can tip narrow jars. A recipe stand at the wrong angle can slide. A hanging planter can become unexpectedly heavy after watering. Test each project in the condition in which it will actually be used, not only when it is empty.
Cutting too soon can also create trouble. This matters most for the tablet stand and floral projects. Test the device angle before fixing the ledge. Hold flower stems against the vessel before trimming them short. Arrange jars on the tray before adding permanent details. The first layout is rarely the only workable one.
With planters, the mistake is often water management. A colander drains freely, while a muffin tin may not drain at all. Treating both the same way will cause problems. Think about where water goes before adding soil. Protect indoor surfaces and avoid placing dripping planters above furniture.
Finally, do not force every old kitchen item into a project just because you want to reuse it. Sometimes an object is too damaged, too awkward, or simply not useful in a new role. Mindful reuse also means knowing when a material is better recycled, donated, or responsibly discarded. A successful upcycle earns its place in your home because it works.
Frequently Asked Questions
What kitchen items are easiest for beginners to upcycle?
Glass jars, glass bottles, teapots, and simple trays are some of the easiest because they can be reused with very little modification. You can often clean them, change what they hold, and start using them immediately. Projects that involve cutting, drilling, melted wax, or hanging hardware need more preparation.
Can I use an upcycled kitchen item for food again later?
If the object has been used with soil, candle wax, paint, strong adhesive, or other craft materials, I would keep it out of food service afterward. That keeps the new purpose clear and avoids uncertainty about residues or coatings. It is easier to dedicate the item permanently to décor, storage, planting, or crafting.
Do I need to paint old kitchen items before reusing them?
No. Many items look better when the original glass, ceramic, wood, or metal remains visible. Paint is useful only when it solves a real problem or suits the new purpose. Avoid decorative coatings on surfaces that will touch food, and follow product guidance if you do choose to paint.
How can I make a kitchen upcycle look intentional instead of improvised?
Grouping and proportion make a big difference. Put mason jars on a shared tray, keep flower stems in proportion to the vessel, and choose a tablet stand angle that looks deliberate. Repeating one material or color is usually more effective than adding several unrelated decorations.
Is it safe to turn any teacup into a candle?
No. Use only a sound, heat-resistant ceramic cup with no cracks, chips that affect the structure, or obvious weakness. Follow the safety guidance for the wax and wick you select, and never leave a candle burning unattended. If the cup is questionable, choose a non-heated use instead.
What should I do if an upcycled planter has poor drainage?
Change the planting method rather than simply watering less and hoping for the best. You may be able to add appropriate drainage holes, use a breathable liner, place a smaller nursery pot inside the container, or use the object as an outer decorative holder. The right solution depends on the material and whether you can modify it safely.
How do I clean glass bottle vases with narrow openings?
A bottle brush is the simplest tool for regular cleaning. Rinse out old flower water promptly so residue does not build up, then wash with warm soapy water and rinse thoroughly. Let the bottle dry before storing it, especially if you plan to use dried stems later.
Give Everyday Kitchen Pieces a Useful Second Role
The best tips for upcycling kitchen items are usually the simplest ones: choose an object that is still sound, notice what its shape already does well, and give it a new purpose that feels natural. A jar already wants to hold something. A colander already drains. A bottle already supports a narrow stem. A cutting board already offers a strong, flat surface. Working with those qualities keeps a project practical and reduces the amount of new material you need.
You also do not have to transform everything beyond recognition. I like projects that still show where they came from. The old teapot is more interesting because you can still see the spout. The worn cutting board tells its story through the wood. The mason jars stay unmistakably jars, just better organized.
If you want to begin, choose one item that has been sitting unused and give it the easiest suitable second role. You can always try something more involved later. The point is not to fill your home with crafts; it is to keep useful materials in circulation and make everyday objects earn their space again.