Old chandeliers are often removed because the wiring is outdated, the finish no longer suits the room, or several glass pieces have gone missing. Even then, the frame may still have strong curved arms, useful hooks, decorative cups, and a hanging chain that can support an entirely different purpose. Throwing away all of that structure can feel unnecessary when the most interesting parts are still intact.
I especially enjoy upcycling ideas that keep the original shape easy to recognise. A chandelier is ideal for that approach because its balanced arms already create places to hold pots, jewellery, seed dishes, candles, or lightweight kitchen items.
The important part is to remove the electrical risk first, check the frame carefully, and match the new use to the chandelier’s real strength. I don’t think every piece needs a complicated makeover. Sometimes a thorough clean, a few secure attachments, and a sensible new location are enough to turn an unwanted fitting into something the home can use again.
Prepare the Chandelier Before Giving It a New Purpose
A chandelier that is no longer being used as a light should be treated as an old electrical fitting before it becomes a craft material. The decorative frame may look harmless, but hidden wires, sharp metal edges, loose glass, and weak ceiling hardware can create problems if they are ignored.
· Have the chandelier disconnected from the electrical supply safely. When it is still ceiling-mounted or you are uncertain about the wiring, use a qualified electrician rather than pulling it down yourself.
· Remove bulbs, loose shades, damaged sockets, brittle wire, and unnecessary electrical parts only after the fitting has been made safe.
· Photograph the chandelier before dismantling it so you can remember where chains, cups, crystals, washers, and decorative pieces originally sat.
· Test the central stem, every arm, each hook, and the hanging loop for movement. Tighten threaded joints and replace missing nuts or washers before adding weight.
· Clean dust and grease with a method suited to the material. Avoid soaking electrical remnants, glued decoration, or delicate antique finishes.
· Smooth sharp edges and close unused holes with suitable caps, plugs, or neat fittings where fingers, fabric, pets, or birds could reach them.
· Decide whether the finished piece will hang or sit on a surface. Hanging versions need chain, hooks, anchors, and overhead support rated for the complete loaded weight.
· Work in a ventilated area when using spray paint, metal primer, strong adhesive, or protective finishes, and follow the product instructions rather than guessing drying times.
I know it can feel tempting to start painting as soon as the chandelier is on the workbench, but the structural check matters more than the colour. Paint can make a loose joint look finished without making it any stronger.
Turn a Chandelier Into a Hanging Flower Planter
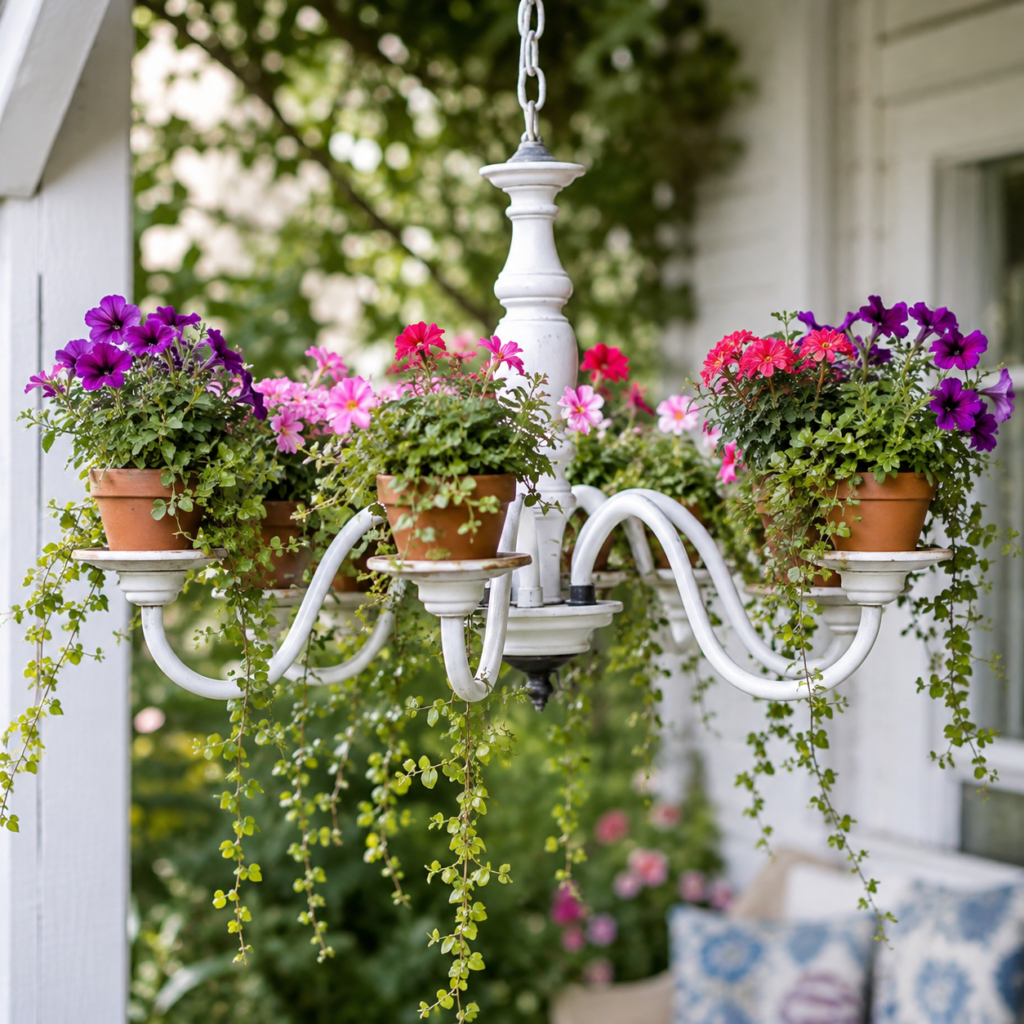
A multi-arm chandelier already has the spread and symmetry needed for a hanging planter. Small pots can sit where shades or bulb cups once rested, while trailing plants soften the metal frame and make the old fitting feel at home on a porch, under a pergola, or in a bright sheltered garden corner.
The easiest version keeps the pots removable. That makes watering, pruning, and seasonal replacement much simpler than permanently gluing containers to the frame. It also allows you to reduce the weight before moving or rehanging the chandelier.
Materials and Tools
· A sturdy chandelier frame with several balanced arms
· Small lightweight pots or metal plant cups sized to the existing holders
· Matching saucers or discreet drainage liners where needed
· Fine chain, coated wire, small brackets, or mechanical fasteners suitable for securing the containers
· Metal cleaner, rust treatment, primer, and outdoor-suitable paint when refinishing is required
· Potting mix and compact flowering or trailing plants
· Pliers, screwdriver, adjustable spanner, measuring tape, and protective gloves
· A strong hanging hook and support rated for the filled planter
Steps for the Hanging Planter
1. Strip the frame back to a safe structure. Remove the bulbs, shades, sockets, brittle wire, and any glass pieces that will not be reused. Keep decorative cups that can help centre the pots, then clean the whole frame and tighten each arm so the chandelier hangs level before any soil is added.
2. Test the pots without planting them. Place an empty container on every arm and check that each one sits securely without forcing the metal out of shape. Move the chandelier gently to see whether the pots slide, then add wire loops, small brackets, or another mechanical restraint that still allows each pot to be lifted out.
3. Refinish and protect the metal. Treat active rust, smooth peeling paint, and apply a finish suited to the chandelier’s material and sheltered outdoor use. Protect threaded joints and moving parts from thick layers of paint, then allow the finish to harden according to its instructions before reassembling the holders.
4. Plant with weight and watering in mind. Use modest amounts of potting mix and choose compact plants rather than large root-heavy specimens. Arrange the pots while they are still on a table, placing similar weights opposite each other; then add trailing plants near the outside so their growth can fall freely without covering every decorative detail.
5. Hang, water, and monitor the finished planter. Install the chandelier from a suitable overhead fixing and add the planted pots only after the empty frame is secure. Water the containers individually and allow excess water to drain away from seating, doors, and electrical fittings below. Recheck the chain and arm joints after the first few waterings because wet soil is much heavier than dry soil.
One detail I would keep simple is the planting mix. Too many large flowers can make the arrangement top-heavy and hide the chandelier completely. A few upright blooms with lighter trailing greenery usually show both the plants and the original frame more clearly.
For a beginner-friendly variation, use faux greenery or very small removable nursery pots inside decorative cups. A tabletop version can also work when the chandelier has a stable central base and hanging it is impractical.
Reuse a Chandelier as a Hanging Jewellery Organizer
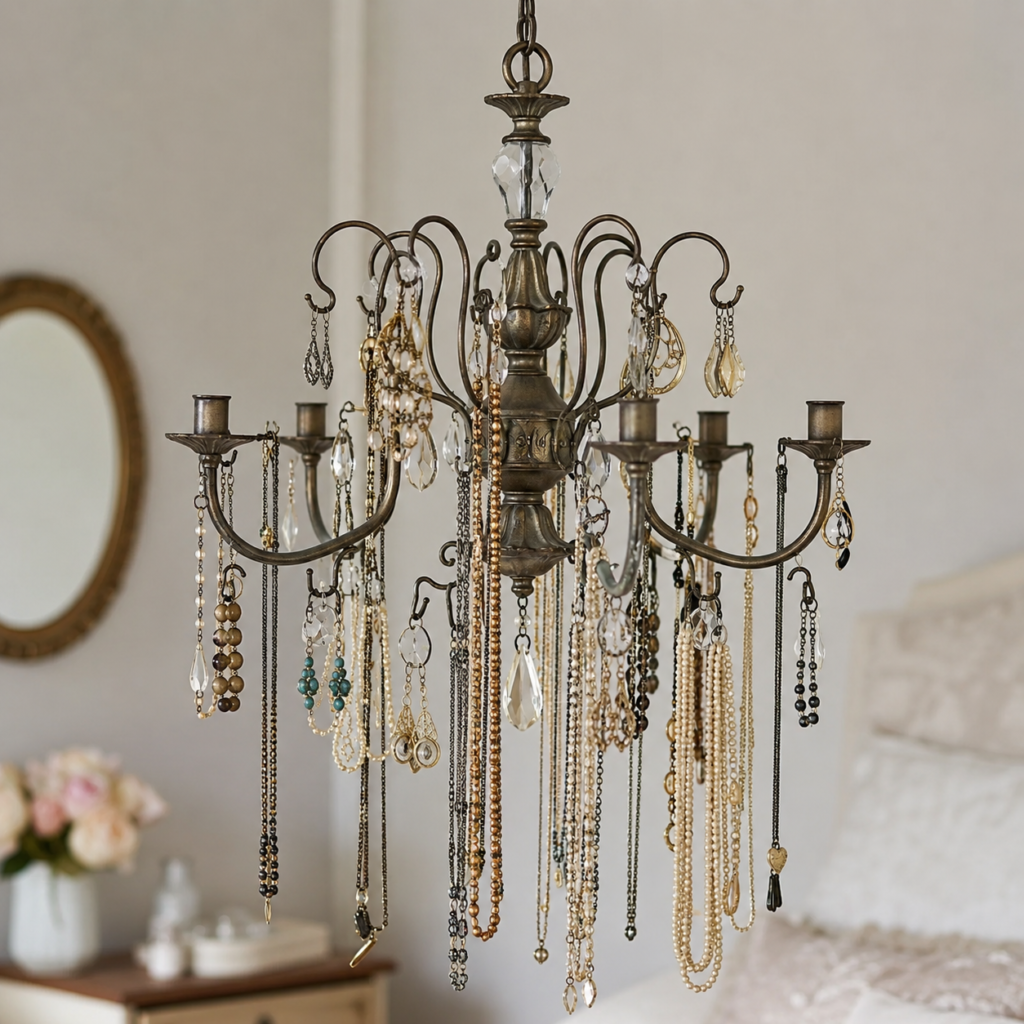
The hooks, loops, crystal holes, and sweeping arms of an old chandelier can separate jewellery more effectively than a crowded drawer. Long necklaces hang without being folded, earrings can pair up on small loops, and bracelets remain visible instead of disappearing beneath other accessories.
This project works best with a chandelier that has many open curves but is not extremely large. It can hang from a secure ceiling hook, a wall bracket, or a freestanding display support. Because jewellery adds up in weight, the frame still needs proper fastening even though the individual pieces feel light.
Materials and Tools
· A small or medium chandelier frame with secure arms and decorative loops
· Small S-hooks, earring wires, split rings, or short jewellery chain for extra hanging points
· Felt, silicone sleeves, clear tubing, or smooth coating for any rough contact areas
· Metal polish or a suitable decorative finish
· Pliers, screwdriver, soft cloths, and a small brush
· A ceiling hook, wall bracket, or display stand rated for the loaded organizer
· Optional shallow dishes for rings or brooches
Steps for the Jewellery Display
1. Remove parts that could damage jewellery. Take away sockets, exposed wire ends, sharp clips, and broken crystal pins. Run a soft cloth along every arm and hook; if the cloth catches, smooth or cover that area before allowing chains, pearls, or fabric cords to touch it.
2. Plan separate zones for different pieces. Use the outer arms for long necklaces, the upper curls for earrings, and smaller central loops for bracelets or shorter chains. Lay the chandelier on a protected surface and test the arrangement with a few inexpensive pieces first, making sure clasps do not slide into gaps where they will be difficult to retrieve.
3. Add only the hooks you genuinely need. Fit small S-hooks, rings, or short chains to strong existing openings instead of drilling many new holes. Close each hook enough that jewellery cannot fall off during movement, but leave enough space to remove pieces without pulling on delicate links.
4. Finish and mount the organizer securely. Clean or refinish the frame, keeping the surface smooth around all contact points. Attach the chandelier to a solid hook, bracket, or display stand and test it with gradual weight before loading the full collection. Keep it away from a route where shoulders, doors, or clothing could catch the hanging necklaces.
5. Load the jewellery without overcrowding. Hang heavier pieces nearer the central support and lighter necklaces toward the outer arms. Leave visible gaps so chains do not knot together, then pair earrings on the same loop or small ring. Rotate rarely worn pieces occasionally so dust does not settle unnoticed.
For me, visibility is the real advantage here, so I wouldn’t cover every inch of metal. If the organizer becomes a dense curtain of chains, it may look impressive for a day but become frustrating whenever you need one necklace from the middle.
A smaller chandelier can sit on a dressing table when its base is stable. You could also reserve one arm for hair accessories, lightweight scarves, or fabric headbands, provided they do not snag on crystals or rough metal.
Convert an Old Chandelier Into a Garden Bird Feeder
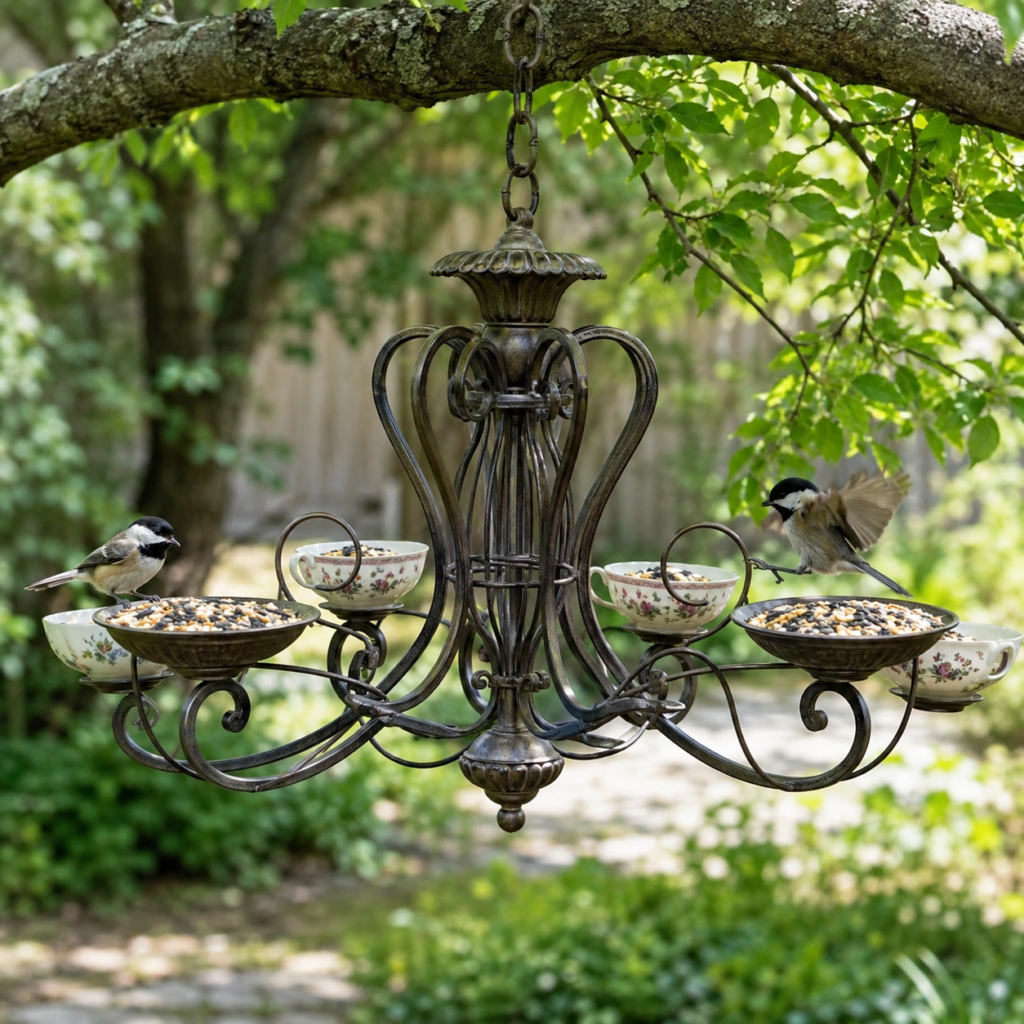
A chandelier makes an unusual bird-feeding station because its arms naturally spread several small dishes around one central hanging point. Shallow bowls can hold seed, while old teacups or saucers add perching edges and keep the project connected to household reuse rather than looking like ordinary garden hardware.
Outdoor exposure changes the requirements. The frame needs a secure hanging point, the dishes must drain or remain easy to empty, and every attachment should survive wind and regular cleaning. Decorative parts that trap wet seed may need to be removed even when they look attractive.
Materials and Tools
· A metal chandelier frame with sound arms and a strong hanging loop
· Shallow bowls, saucers, or teacups with stable rims
· Stainless or weather-resistant wire, small bolts, clamps, or brackets
· A drill and suitable ceramic or metal bit only when mechanical holes are genuinely required
· Exterior-suitable metal primer and finish where appropriate
· Pliers, screwdriver, spanner, gloves, and eye protection
· Bird seed suited to local garden birds
· A strong chain and branch hook or outdoor support rated for the full load
Steps for the Bird Feeder
1. Simplify the chandelier for outdoor use. Remove all electrical components, loose crystals, thin decorative chains, and sharp pieces that could injure a bird. Tighten the frame, clean away grease, and check whether old paint is flaking. Do not leave small detachable decorations where birds could peck them loose.
2. Choose and balance the feeding dishes. Set empty bowls or cups on the chandelier arms and compare their depth and weight. Shallow dishes are easier to clean and allow birds to see their surroundings. Arrange matching or similarly weighted containers opposite each other so the feeder does not tilt when birds land on one side.
3. Secure every container mechanically. Use wire loops, clamps, small bolts, or fitted brackets that hold each dish without relying only on glue outdoors. When drilling ceramic, wear eye protection and support the piece carefully; a simpler option is to use existing handles, saucer rims, or fitted metal holders rather than drilling at all.
4. Finish, hang, and test the empty feeder. Protect suitable metal surfaces with an outdoor finish and allow them to cure fully before adding food. Hang the feeder from a strong branch or fixed garden support, away from busy doors and areas where a fall could hurt someone. Push gently on each dish and watch for twisting, swinging, or loose fasteners.
5. Add seed and establish a cleaning routine. Fill the dishes lightly instead of piling seed above the rim. Empty wet or spoiled food promptly, wash the bowls regularly, and let them dry before refilling. Recheck the frame after strong wind and move the feeder if falling debris, persistent moisture, or predators make the location unsuitable.
The part I would check most often is trapped water. A decorative cup may look ideal until rain turns the seed into a wet layer at the bottom. Removable dishes are easier to clean, and a feeder that is easy to maintain is far more useful than one that only photographs well.
For a lighter version, use only two or three dishes and remove unused arms or fittings without weakening the centre. A covered porch location can also reduce weather exposure, provided birds still have a clear flight path.
Make a Chandelier Candle Centrepiece for a Table or Patio
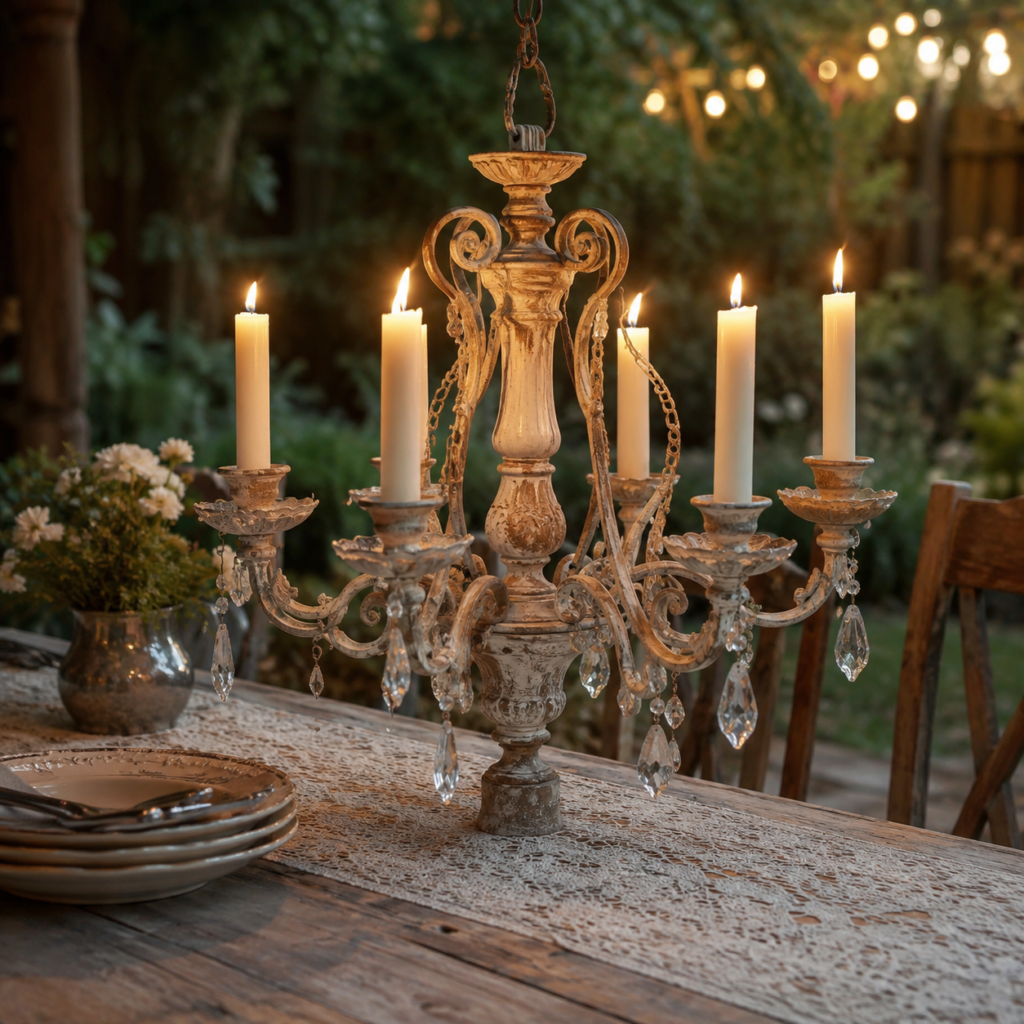
Once the wiring is removed, candle cups can give a chandelier a second role without changing its appearance very much. Placed on a stable table or low pedestal, the frame becomes a layered candle centrepiece for a dining room, covered patio, wedding table, or seasonal display.
Open flames make this version less forgiving than the others. The chandelier must stand firmly, the candles need proper holders, and nearby flowers, fabric, paper, dry leaves, and hanging crystals must remain clear of heat and flame. Battery-operated candles are the easiest alternative when the frame is crowded or the event space has restrictions.
Materials and Tools
· An unwired chandelier with a stable base or a secure removable stand
· Candle cups or inserts sized to hold the chosen candles upright
· Taper candles, short pillar candles, or realistic battery-operated candles
· Heat-resistant metal drip cups where real candles are used
· Replacement crystals or short decorative chains, if desired
· Metal cleaner, primer, paint, or clear finish suited to the frame
· Pliers, screwdriver, spanner, level, and non-slip pads
· A flame-resistant surface or protective tray beneath the centrepiece
Steps for the Candle Centrepiece
1. Create a stable tabletop structure. Remove the electrical parts and any hanging chain that makes the chandelier awkward on the table. Fit or build a wide, rigid base beneath the central stem, then test the frame from several directions. It should not rock when an outer arm is touched.
2. Inspect the candle positions carefully. Check that every cup faces upward and sits far enough from the central column, crystals, and neighbouring arms. Replace bent cups and add proper candle inserts rather than balancing candles in old bulb sockets. Set the empty holders on a level surface before deciding which arms will be used.
3. Refinish without blocking fittings. Clean the frame and apply the chosen distressed, painted, or metallic finish while keeping candle openings clear. Reattach only secure decorative drops and shorten any chain that could swing into a flame. Once the finish has cured, add non-slip pads under the base or protective tray.
4. Fit and test the candles. Place each candle firmly into its holder and compare their height so flames will not sit beneath another arm. For real candles, light one at a time during the first test and watch how the heat rises. Battery candles can be used throughout when clearances are tight or the centrepiece will be near children, pets, foliage, or fabric.
5. Style and supervise the finished display. Keep decorations low and outside the flame area, then position the centrepiece where diners can see across the table. Never leave burning candles unattended, and extinguish them before moving the chandelier. Remove softened wax only after the holders have cooled.
I know taller candles can look dramatic, but height is not the only thing that matters. Shorter candles often keep the frame better balanced and prevent flames from sitting close to old paint or decorative chains.
A no-flame version can use battery candles, tiny glass vases, or seasonal ornaments in the holders. For a simpler beginner project, keep only three or four candle positions and leave the remaining arms decorative.
Repurpose a Sturdy Chandelier as a Kitchen Pot Rack
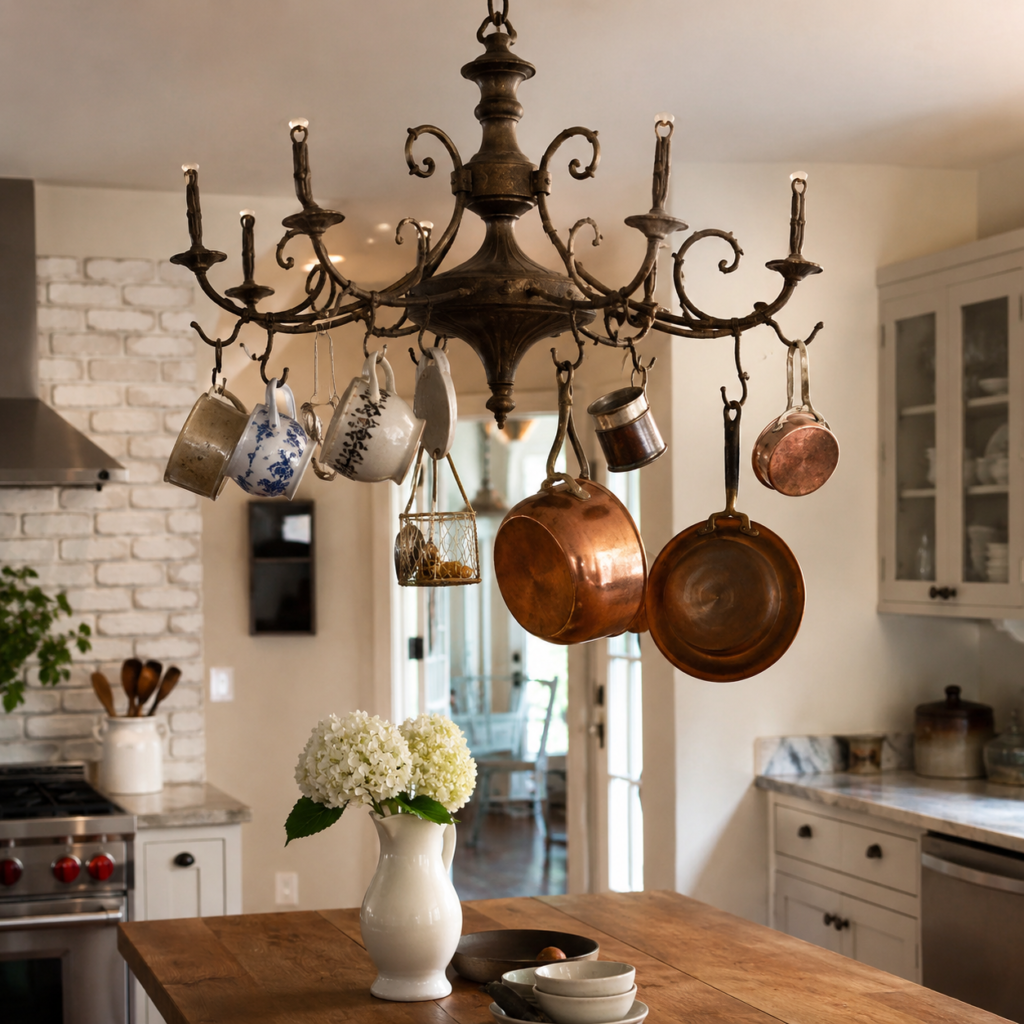
A broad metal chandelier can become overhead kitchen storage when its frame and ceiling support are strong enough. The curved arms provide hanging points for mugs, small pans, strainers, or utensils, while the central body keeps the arrangement visually balanced above an island or preparation table.
This is not the place to guess about strength. Cookware can be much heavier than chandelier shades, and the load increases when several pieces hang from the outer arms. Use the rack only for lightweight items unless a knowledgeable installer confirms that the frame, chain, hook, and ceiling structure can carry more.
Materials and Tools
· A substantial metal chandelier frame with securely joined arms
· Rated ceiling hook, chain, connector, and suitable structural fixing
· Strong S-hooks or closed utility hooks sized for the cookware handles
· Small retaining rings or clips to stop hooks jumping free
· Metal cleaner, rust treatment, and a durable wipeable finish
· Pliers, screwdriver, spanner, measuring tape, level, and step ladder
· Lightweight mugs, utensils, strainers, or small pans
· Professional installation help when the ceiling structure or load capacity is uncertain
Steps for the Kitchen Rack
1. Inspect the frame as a load-bearing object. Remove all wiring and decorative parts that do not contribute to the structure. Tighten threaded arms, check welded or brazed joints for cracks, and reject any frame that twists easily. A chandelier that was adequate for bulbs and glass may still be unsuitable for cookware.
2. Plan the height and hanging pattern. Measure above the island and make sure the finished rack will not block sightlines or create a head-strike risk. Arrange the intended items on a table first, placing the heaviest pieces near the centre and lighter mugs or utensils on the outer arms. Leave space between items so they do not knock together whenever one is removed.
3. Add secure hooks and a washable finish. Fit hooks only to strong parts of the frame and close or clip them so they cannot lift off accidentally. Clean and refinish the metal with a surface that can be wiped free of kitchen grease. Avoid dangling crystals and fragile decorations above food-preparation areas.
4. Install the overhead support correctly. Fix the rack into appropriate ceiling structure rather than a decorative ceiling surface alone. Use rated chain and connectors, then hang the empty chandelier and check that it remains level. When the ceiling construction is uncertain, have the support installed professionally before loading anything.
5. Load gradually and review everyday clearance. Add one item at a time, beginning near the centre, and observe any bending, tilting, or movement. Keep frequently used items within easy reach but not so low that they swing into someone’s face. Remove cookware that feels too heavy and recheck the ceiling connection and arm joints regularly.
One thing I wouldn’t do is fill every hook simply because it is available. Open space makes the rack easier to use and reduces the chance of pulling several pans down while reaching for one mug.
A lower-risk variation holds only wooden utensils, lightweight baskets, tea towels, or a few mugs. The chandelier can also hang as a decorative rack in a pantry, where it is away from the main cooking and walking area.
Chandelier Upcycling Problems That Can Undo Good Work
The most serious mistake is treating an old chandelier as ordinary craft material before the electrical parts have been made safe. Disconnecting it from the ceiling, removing wiring, and dealing with old sockets are not decorative tasks. Use professional help whenever the fitting is still connected or the installation is unclear.
Another problem is adding weight without testing the central stem and arms. Soil, wet plants, ceramic dishes, jewellery collections, candles, and cookware all load the frame differently. Test the empty structure first, add weight gradually, and keep heavier items close to the centre whenever possible.
Permanent adhesive can also make a practical project difficult to clean. Glued plant pots trap moisture, fixed bird dishes collect old seed, and attached jewellery trays become dusty. Mechanical fasteners or removable inserts usually make maintenance easier and allow damaged pieces to be replaced.
Ignoring balance causes hanging chandeliers to tilt and tabletop versions to rock. Match the weight across opposite arms rather than judging by appearance alone. Then test the finished object in its real location, because a frame that feels stable on the floor may behave differently when suspended.
Decorating before repairing the structure wastes time. Thick paint, crystals, ribbon, or plants can hide loose joints and sharp edges without solving them. Complete repairs first, then refinish, attach containers, and add decorative details in that order.
Finally, copying the look without considering the setting can make the finished piece impractical. Outdoor feeders need cleaning and drainage, candle displays need heat clearance, and kitchen racks need safe overhead support. The new purpose should guide every attachment and material choice.
Frequently Asked Questions
Can a beginner upcycle a chandelier?
Yes, especially when the project uses a small unwired frame and removable attachments. A jewellery organizer or simple planter is easier than a ceiling-mounted pot rack because the loads are lighter. The electrical disconnection and any uncertain overhead installation should still be handled by a qualified person.
Do I have to remove all the wiring?
For a chandelier that will no longer function as a light, unused wiring and sockets should generally be removed or safely enclosed so they cannot snag, corrode, or confuse someone later. Do not dismantle live or uncertain wiring yourself. Keep decorative sleeves or cups only when they are secure and useful to the new design.
What type of paint works on an old chandelier frame?
The correct system depends on whether the frame is steel, aluminium, brass, another metal, wood, or a mixed material. Clean the surface, treat rust where present, and choose primer and finish designed for that material and location. Outdoor projects need a finish intended for exterior exposure.
How do I stop a hanging upcycled chandelier from tilting?
Balance similar weights on opposite arms and keep heavy items closer to the centre. Test the chandelier with empty containers first, then add the contents gradually. A level frame can still tilt when one pot is watered or one pan is removed, so everyday use needs to be considered.
Can I use real candles in an old chandelier?
Only when the chandelier is stable, the candles fit proper holders, and flames have generous clearance from paint, crystals, plants, fabric, and other decorations. Never leave them unattended. Battery-operated candles are a safer choice for crowded designs, events, homes with children or pets, and locations where open flames are restricted.
How should I clean a chandelier bird feeder?
Use removable shallow dishes whenever possible, discard wet or spoiled seed, and wash the containers regularly before allowing them to dry fully. Check the metal frame and fasteners while the dishes are removed. Avoid decorative gaps that collect old seed and remain difficult to reach.
How much weight can an upcycled chandelier hold?
There is no safe universal figure because frames, joints, chains, ceiling structures, age, and materials vary widely. Treat the original chandelier’s strength as unknown until it has been inspected. For cookware, large plants, or any heavy suspended use, seek knowledgeable installation advice and keep the load conservative.
Give an Old Chandelier a Useful Role Beyond Lighting
Learning how to upcycle a chandelier starts with noticing what the old fitting still does well. Its arms can carry small pots or seed dishes, its hooks can organize jewellery, its candle cups can support a carefully planned centrepiece, and a strong metal frame can provide lightweight hanging storage.
Begin with the idea that matches the chandelier’s condition and your own tools. Make the electrical parts safe, repair the structure, keep loads balanced, and choose removable attachments where cleaning matters. Once those practical decisions are settled, colour and decoration can support the new use instead of hiding weak construction.
For me, the best chandelier upcycle is not necessarily the most elaborate one. It is the version that remains secure, easy to maintain, and genuinely useful after the first excitement of the makeover has passed. Which forgotten chandelier would you rather turn into next: a planter, a jewellery display, a bird feeder, a candle centrepiece, or practical kitchen storage?