Old crochet blankets often remain folded away because they feel too meaningful to discard but too worn, damaged, or dated to use on a bed. Their colours may no longer suit the room, several squares may have loosened, or one section may be stained while the rest of the blanket remains strong.
I don’t think a damaged corner should decide the future of an entire handmade blanket. The sound sections can become clothing, bags, accessories, or decorative details without hiding the stitches that made the original piece worth saving.
Crochet behaves differently from ordinary woven fabric. Cutting through it without preparation can release loops and allow the surrounding stitches to unravel. That doesn’t mean the blanket cannot be reshaped. It simply means the cutting lines need to be planned, secured, and handled patiently.
A large blanket may provide enough material for a cardigan or dress, while a smaller throw can become a vest, tote bag, hat, or set of garment panels. Even uneven remnants remain useful. Sometimes the most interesting finished detail begins with the section that was left over.
Before You Cut an Old Crochet Blanket
Begin by examining the blanket in good natural light. Spread it flat and identify the strongest areas, damaged sections, loose joins, stains, stretched squares, and previous repairs.
Gently pull around the edges of individual motifs. A blanket may look intact while the thread joining two squares has already weakened. Repair loose seams before cutting so the surrounding areas remain easier to control.
Wash the blanket only when its fibre and condition allow it. Follow any existing care information and avoid aggressive washing when the yarn feels fragile, loosely spun, or likely to felt. Let the blanket dry completely and reshape the motifs while they are still slightly damp when appropriate.
Measure the usable areas rather than relying on the blanket’s total dimensions. A large blanket with a damaged centre may provide fewer continuous panels than a smaller blanket in sound condition.
Before cutting, mark the intended line and secure the stitches on both sides. A narrow zigzag, repeated straight stitching, hand backstitching, or a fabric backing can help stabilise the crochet. One upcycling process specifically demonstrates sewing across the crochet before cutting so the surrounding work does not unravel.
Useful Materials and Tools
- Clean crochet blanket
- Fabric scissors
- Measuring tape
- Tailor’s chalk or removable marker
- Paper for pattern pieces
- Pins, clips, or safety pins
- Hand-sewing needle
- Strong coordinating thread
- Sewing machine with suitable needle and stitch settings
- Lightweight fabric backing or stabiliser
- Bias binding or fabric strips
- Lining fabric
- Buttons, snaps, or a zip
- Reclaimed denim or other firm fabric
- Seam ripper
- Yarn for repairs
- Crochet hook matching the blanket yarn when possible
Keep scissors, needles, pins, and small fasteners away from children and pets. Test machine stitching on a damaged offcut before working across a valuable section of the blanket.
Turn a Thrifted Crochet Blanket Into a Cardigan
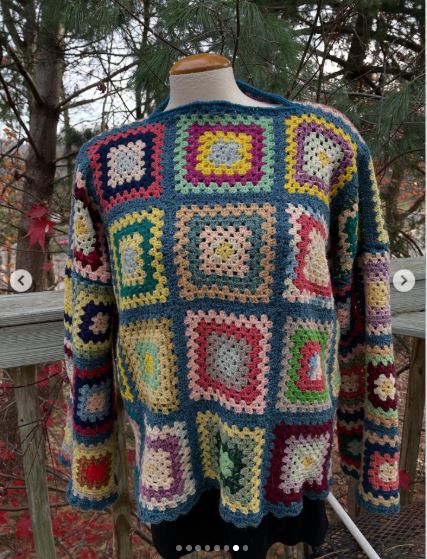
A cardigan is one of the clearest ways to preserve a blanket’s original character because large sections can remain intact. This project turns a thrifted crochet blanket into a wearable layer, allowing the granny squares and existing colour combinations to become the main surface of the garment.
The simplest cardigan shape uses a back panel, two fronts, and sleeves. A blanket with a finished border can be especially useful because that border may become the cardigan hem, front opening, or sleeve cuffs.
The difficulty lies in placing the pattern without cutting through more motifs than necessary. Use the existing square grid as part of the design rather than forcing every garment piece to match a conventional fabric pattern exactly.
Materials and Tools
- Large crochet blanket in sound condition
- Loose cardigan or simple jacket pattern
- Large paper sheets
- Fabric scissors
- Clips or safety pins
- Sewing machine or hand-sewing needle
- Strong thread
- Fabric stabiliser
- Bias binding or matching fabric strips
- Optional buttons or ties
- Yarn and crochet hook for finishing edges
Make the Cardigan in Five Steps
- Plan the garment around the blanket motifs. Lay a loose cardigan on top as a rough size reference or trace a simple pattern. Move the pieces until the strongest squares form the shoulders, upper back, and front panels, avoiding weak joins in high-stress areas.
- Secure every proposed cutting line. Mark the outline and stitch just inside and outside each line before cutting. Work slowly across open crochet sections and check that the securing stitches have caught the yarn loops rather than passing only through empty spaces.
- Cut and stabilise the garment pieces. Separate the back, fronts, and sleeves one piece at a time. Bind the raw edges immediately with fabric strips, a close zigzag, hand stitching, or another suitable finish so they cannot begin opening while you handle the remaining pieces.
- Join the main seams. Clip the shoulder and side seams together without stretching the crochet, then stitch through stable areas of the motifs. Attach the sleeves gradually and support the garment on the table instead of letting its weight hang from the machine.
- Finish and test the cardigan. Bind the front opening, neckline, and cuffs or add a crochet border with compatible yarn. Try the garment on, move your arms, and reinforce any point where the blanket pulls or the motifs begin separating.
For me, the original blanket border is worth planning around. Reusing it as the cardigan hem can save finishing work and keep a familiar part of the blanket clearly visible.
A beginner could make a sleeveless open cardigan by using one large back section and two narrower fronts. You could also line the shoulders with soft woven fabric to reduce stretching.
Transform a Crochet Blanket Into a Tote Bag and Small Pouch
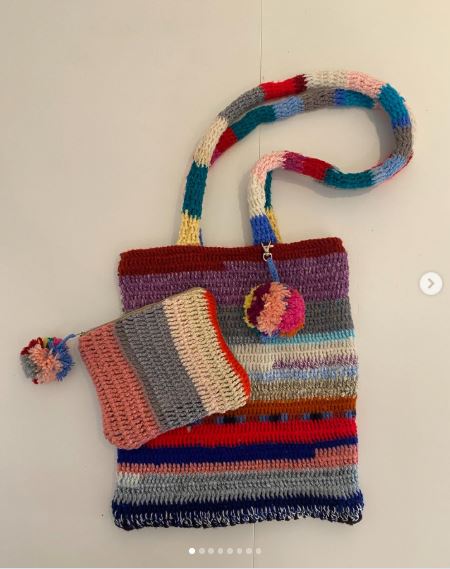
A tote bag suits blanket sections that remain colourful and attractive but are too small for a full garment. This project turns rescued crochet into a bag and matching pouch, keeping the soft handmade surface while adding enough structure for everyday use.
Crochet alone may stretch under the weight of books, groceries, or personal items. A firm lining and reinforced handles help carry the load so the original stitches are not expected to provide all the support.
Materials and Tools
- Strong crochet blanket section
- Firm cotton, canvas, or reclaimed denim for lining
- Fabric scissors
- Sewing machine
- Strong thread
- Clips
- Interfacing, if needed
- Webbing or fabric handles
- Magnetic snap, button, or zip
- Fabric strip for binding
- Optional pocket fabric
Sew the Bag in Five Steps
- Choose a balanced section of the blanket. Look for a group of strong motifs with enough space for the front and back. Repair loose yarn ends and avoid positioning a weak join directly beneath the handles.
- Stabilise and cut the crochet panels. Stitch around the planned rectangles before cutting them from the blanket. Place each crochet panel over a fabric backing and secure the layers together around the edges so the motifs cannot stretch independently.
- Prepare the lining. Cut matching fabric panels and add any internal pockets before assembling the bag. Use interfacing when the lining fabric is very soft or when you want the tote to stand more upright.
- Join the bag and add the handles. Sew the outer panels together, keeping the crochet supported as you work. Attach the handles through the backing and lining layers rather than stitching them only to the crochet surface.
- Insert and finish the lining. Place the lining inside, conceal the raw upper edge with binding or a turned facing, and add the closure. Check the corners and handle joins before placing anything heavy in the finished tote.
The part I would reinforce most carefully is the handle attachment. A bag may look secure while empty, then behave quite differently once it contains three books and the collection of small objects that somehow lives in every handbag.
Small leftover motifs can become a zipped pouch, external pocket, key holder, or patch on a plain fabric bag. A denim base is a practical alternative when only one decorative crochet panel remains.
Add Crochet Blanket Sleeves to a Denim Jacket
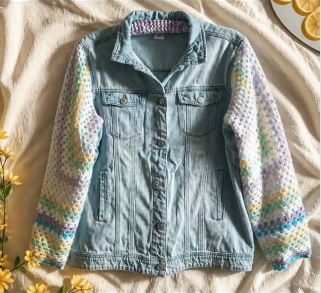
A denim jacket provides the support that crochet fabric often lacks. This makeover replaces or covers the original sleeves with sections of a crochet blanket, combining a strong garment body with colourful handmade texture.
This is a useful approach when the blanket is not large enough for a complete jacket. It also reduces the number of structural garment pieces you need to create because the denim body, collar, pockets, button band, and hem remain intact.
Materials and Tools
- Denim jacket
- Strong crochet blanket sections
- Seam ripper
- Fabric scissors
- Sewing machine
- Heavy-duty and stretch-compatible needles
- Strong thread
- Fabric backing
- Clips
- Bias binding
- Yarn and crochet hook for repairs
- Optional embroidery thread or patches
Replace the Sleeves in Five Steps
- Remove one original sleeve carefully. Use a seam ripper rather than cutting it away, keeping the removed sleeve intact as a pattern. Mark which edge joined the front of the armhole so the replacement sleeve will not be inserted backwards.
- Create the crochet sleeve panels. Place the original sleeve over the blanket and arrange the motifs around it. Add room for seam allowances, secure the cutting lines with stitching, then cut and back the crochet with lightweight fabric.
- Form each replacement sleeve. Stitch the underarm seam without stretching the crochet and bind the raw edges. Use the original cuff or create a fabric cuff when the blanket edge feels too delicate for repeated wear.
- Attach the sleeves to the denim body. Clip the sleeve into the armhole, distribute the fullness evenly, and stitch through the denim and reinforced crochet layers. Support the jacket’s weight so it does not pull against the section already under the needle.
- Check the movement and finishing. Put the jacket on and raise your arms slowly. Reinforce the underarm, shoulder, and cuff areas, then repair any motif that has become distorted during construction.
One detail I wouldn’t skip is backing the upper sleeve. The shoulder and underarm receive much more pulling than the middle of a blanket, so those areas need extra support.
Instead of replacing both sleeves, you could add crochet only across the back yoke, pockets, cuffs, or one sleeve. Smaller scraps also work as patches over worn denim.
Common Mistakes to Avoid
Cutting Before Securing the Crochet
Open stitches can unravel as soon as they are cut. Mark and sew around every cutting line first, then stabilise or bind the edge immediately.
Using Weak Motifs at Stress Points
Shoulders, underarms, handles, waistlines, and closures receive repeated pulling. Place strong blanket sections there and add fabric support behind them.
Letting the Blanket Hang While Sewing
The weight of a large crochet piece can stretch the section under the needle. Keep the project supported on the table or another nearby surface.
Choosing a Pattern That Is Too Fitted
Crochet motifs may stretch differently in several directions. Begin with a relaxed cardigan, vest, tote, or loose dress rather than a tightly shaped garment.
Assuming Every Blanket Can Be Machine Washed
Old yarn may shrink, felt, fade, or weaken. Identify the fibre when possible and use the gentlest appropriate cleaning method.
Attaching Handles Directly to Crochet
Bag handles can pull through open stitches. Anchor them through backing fabric, lining, or reinforced tabs.
Using Heavy Closures Without Reinforcement
Large buttons, metal zips, and heavy snaps can distort the blanket. Support each closure with fabric and choose lightweight alternatives when possible.
Hiding Damage Instead of Repairing It
A lining may conceal a loose motif, but the damage can continue spreading underneath. Repair weak joins and secure yarn ends before construction.
Throwing Away the Smaller Scraps Too Soon
Small motifs can become pockets, hat panels, patches, flowers, cuffs, or button covers. Finish the main project before deciding which remnants are unusable.
Frequently Asked Questions
Can beginners upcycle a crochet blanket?
Yes, but begin with a project that uses simple rectangular panels, such as a tote bag or open vest. A fitted dress or fully tailored jacket requires more pattern work and careful reinforcement.
How do I cut crochet without it unravelling?
Stitch around the intended line before cutting and catch the yarn loops securely. Cut between the stitched lines, then bind, back, or finish the raw edge immediately.
Should I line every crochet-blanket project?
Wearable garments and bags usually benefit from lining or partial backing because it supports the open stitches. Decorative patches or loose cardigans may need reinforcement only around the seams and stress points.
Can I use a damaged crochet blanket?
Yes, when enough strong material remains. Remove or work around stained, felted, threadbare, or badly stretched areas and repair loose joins before cutting.
Can crochet blanket pieces be sewn with a regular sewing machine?
Many can, provided you test the needle, thread, stitch, and stabiliser first. Use clips instead of forcing thick areas under pins, and prevent the crochet from stretching as it feeds through the machine.
What can I make from a small crochet blanket?
A baby blanket or lap blanket may provide enough material for a vest, bag, hat, cushion front, garment panel, or set of pockets. Combine it with denim or other reclaimed fabric when more structure or area is needed.
How should upcycled crochet clothing be washed?
Use a method suitable for the original yarn, lining, and added fabrics. Hand washing or a gentle protected cycle may be appropriate for some pieces, but always consider the most delicate material in the finished item.
Let the Handmade Stitches Continue in Another Form
Learning how to upcycle crochet blankets begins with respecting the way they were constructed. The blanket is not ordinary yardage, and the spaces between stitches are part of its character. Secure the loops before cutting, support areas that will carry weight, and let the existing motifs influence the shape of the new project.
A tote bag or open vest makes a manageable first attempt. Once you understand how the crochet behaves beside lining, denim, binding, and machine stitching, a cardigan or more detailed garment becomes easier to plan.
The blanket does not need to remain completely intact for its story to remain visible. A familiar border can become a cardigan hem, a row of granny squares can form a bag front, and the smallest colourful pieces can finish a hat.
Which part of your old crochet blanket would you save first: the strongest squares for a vest, the border for a cardigan, or the smaller motifs for a tote bag?