Christmas ornaments are often the last decorations people want to throw away. Even when a bauble has lost its original box, a felt star looks a little plain, or a pile of mixed ornaments no longer suits the tree, the materials still have plenty of life in them. Glass, paper, felt, sequins, ribbon, twine, and painted finishes are all useful starting points for something new.
I’ve always liked projects that keep the memory of a seasonal object while giving it a fresh job. I don’t think every ornament has to return to the storage bin in exactly the same form year after year. Sometimes it works better as wall décor, a wreath, or a handmade display piece that still feels festive without repeating the same old arrangement.
What matters here is choosing a project that respects the material. A fragile ornament needs gentle handling, a plain surface may need light decoration rather than heavy layers, and older pieces should be checked for chips, loose tops, or weak hanging loops before you begin. Once that’s done, these repurposing ideas can turn spare ornaments into decorations you’ll actually want to use again.
Before You Start
Sort your ornaments by material before planning anything. Painted plastic or wood ornaments can usually handle light decorating, while thin glass baubles, old mercury-style finishes, or vintage pieces need a gentler approach. If an ornament has a cracked body, sharp edge, or loose hanging cap, repair it first or use it only in a project where it will be firmly supported.
Clean dust, glitter residue, and storage grime away with a soft cloth. For paper and felt ornaments, avoid soaking them. For glass or hard ornaments, handle them over a towel so they won’t roll or chip. I know it can feel tempting to start decorating straight away, but a quick inspection saves a lot of frustration later.
Gather your adhesives, thread, paint, twine, and hanging hardware before you begin. Work on a protected surface, and keep fragile ornaments, beads, sequins, and wire away from young children and pets while you make the projects.
Put Damaged or Unsafe Ornaments Aside
Before beginning a decorative project, separate ornaments that could be unsafe to handle or unsuitable for reuse.
Set aside ornaments that have:
- Broken glass, sharp edges or deep cracks
- Loose metal caps, hooks or hanging wires
- Chipped surfaces that continue to flake
- Mould, mildew or serious water damage
- Strong odours that remain after cleaning
- Unknown paint, glitter or surface coatings
- Damage caused by candles, fire or excessive heat
- Leaking liquid, damaged batteries or corroded electronic parts
- Small loose pieces that could be dangerous around children or pets
Do not use cracked glass ornaments for jewellery, gift tags, wreaths or arrangements that people may touch. Broken ornaments should be wrapped carefully before disposal to prevent cuts.
Ornaments with sentimental value but minor surface damage can sometimes be displayed safely inside a closed shadow box instead of being handled regularly.
Examine Each Ornament Before Choosing a Project
For ordinary, clean Christmas ornaments, inspect:
- Cracks, chips and sharp areas
- Loose caps, hooks, ribbons and decorative pieces
- Peeling paint, glitter or artificial snow
- Dust, stains and residue from storage
- Rust or corrosion on metal components
- Weak hanging loops and damaged strings
- The ornament’s weight, shape and size
- Whether it is made from glass, plastic, wood, ceramic, fabric or metal
- Whether the surface can safely accept glue, paint or permanent marker
- Whether the colours and designs suit the intended project
Clean each ornament according to its material. Use a soft, dry cloth for delicate, glittered or hand-painted pieces, as water and cleaning products may damage the finish.
Before attaching ornaments to wreaths, frames or centrepieces, check that the chosen base can support their weight. Secure every piece properly so it does not fall, break or create sharp fragments.
Avoid placing plastic, paper, glittered or unknown materials close to open flames. Battery-operated LED lights provide a safer decorative option for bowls, vases and centrepieces.
Helpful Materials and Tools for Ornament Projects
The exact supplies will depend on the project, but these materials are useful for most Christmas ornament crafts:
- Soft microfibre cloths and small cleaning brushes
- Mild, material-safe cleaning solution
- Protective gloves and safety glasses
- Craft mat or protective table covering
- Hot-glue gun and compatible glue sticks
- Strong craft adhesive suitable for the ornament material
- Floral wire, jewellery wire and wire cutters
- Ribbon, string, twine and replacement ornament hooks
- Scissors and small pliers
- Permanent markers and paint pens
- Acrylic paint and fine craft brushes
- Beads, charms and other decorative details
- Jewellery chains, clasps and earring hooks
- Clear vases, decorative bowls and shadow boxes
- Foam or wire wreath frames
- Faux greenery, dried flowers and moss
- Battery-operated fairy lights or LED candles
- Cardboard boxes, dividers and tissue paper for safe storage
Choose adhesives that are suitable for glass, plastic, wood, ceramic or metal. Test paint, markers and glue on a hidden area first to ensure they do not damage the ornament’s colour or finish.
Arrange all materials before starting and work over a protected surface, especially when handling glass or ceramic ornaments.
Repurpose Old Christmas Baubles with Hand-Painted Folk Designs
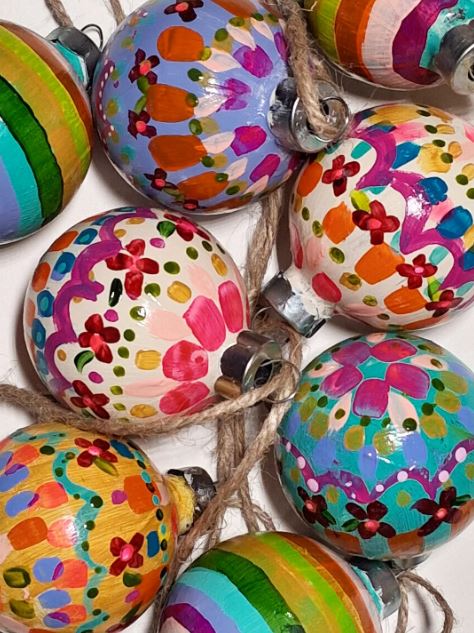
A box of plain ornaments can feel dated even when the shapes are still perfectly usable. This idea keeps the original bauble form but changes the surface completely with cheerful hand-painted patterns. Some ornaments use rainbow stripes, while others are covered in petal shapes, dots, and small flowers that give them a folk-art feel.
The good thing is that you don’t need advanced painting skills to create a similar result. Repeating shapes matter more than tiny perfection here. A slightly uneven flower or dot often makes the ornament feel more handmade and relaxed. These painted baubles would work on a tree, in a bowl, or tied onto wrapped gifts as reusable toppers.
Materials and Tools
· Old plain or faded baubles with sound hanging caps
· Acrylic craft paint or another paint suitable for the ornament surface
· Small round and flat paintbrushes
· Twine, ribbon, or replacement hanging loops
· A soft cloth for cleaning
· Optional clear protective topcoat for handled ornaments
A Practical Way to Recreate the Look
1. Prepare the ornament surfaces. Wipe each bauble clean and remove any loose glitter, dust, or greasy residue. If the original loop is frayed, replace it before painting so you can hang the ornament to dry later without touching the fresh design.
2. Choose a simple pattern family. Decide whether each bauble will use stripes, petals, flowers, or dots, then repeat that idea around the whole shape. Start with larger painted shapes first so the ornament doesn’t become crowded too quickly.
3. Build the design in layers. Add medium details after the first shapes dry, then use tiny dots or little leaf-like marks to fill awkward gaps. Turn the bauble as you work so the pattern feels balanced from all sides.
4. Let the paint dry fully, then check for thin spots. You can strengthen the design with a second coat in a few areas rather than repainting everything. If the ornaments will be handled often, finish with a light protective coating that suits the paint and base material.
5. Replace the final hanging loop and style the ornaments. Twine gives them a rustic look, while ribbon feels softer and more traditional. Then you can mix them with plain ornaments or use them on their own as a brighter set.
For me, the strongest painted baubles repeat two or three colours across the whole group. I don’t think every ornament needs the same pattern, but a shared palette helps them sit together beautifully.
If freehand painting feels intimidating, use a cotton bud for dots or simple petal marks. You could also paint just the top half of each bauble and leave the rest plain for a quieter version.
Turn Paper Christmas Star Ornaments into a Rustic Branch Display
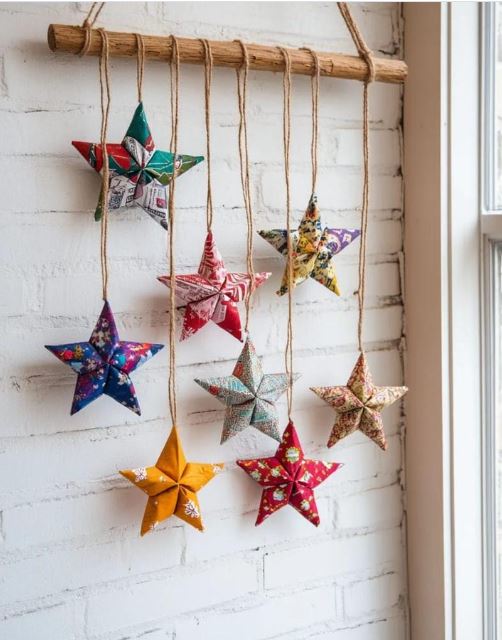
These five-point paper stars already look decorative on their own, but grouping them on a suspended branch turns them into a proper seasonal display rather than a few scattered ornaments. The rustic stick and long twine lines make the colours stand out, and the different papers stop the arrangement from feeling stiff.
This is a smart way to repurpose old paper ornaments you’ve saved from previous Christmases, especially if they no longer suit the tree or need a new setting. It also works well in small homes where wall space matters more than another table decoration.
Materials and Tools
· Existing paper star ornaments or folded paper stars
· A sturdy dry branch or smooth wooden dowel
· Twine or string
· Scissors
· Strong knotting thread or light adhesive if any stars need repair
· Wall hook or hanging hardware suitable for the finished weight
How to Assemble a Similar Display
1. Check each star ornament before hanging it. Paper points can open up over time, so repair any loose folds or seams first. Then choose a branch that feels strong and dry enough to hold several suspended ornaments without bending.
2. Cut the hanging lengths of twine. Vary the lengths slightly so the stars don’t all stop at exactly the same height. Before tying anything permanently, lay the branch on the floor and test the spacing to avoid one heavy cluster on one side.
3. Attach the stars securely. Tie or thread the twine through the top of each ornament, keeping the knot neat and hidden where possible. Then fasten the upper ends to the branch, adjusting the drop lengths until the arrangement looks relaxed but balanced.
4. Add the wall hanger and test the display. Use twine or another simple hanger at both ends of the branch, then lift it carefully to check the weight. If the branch tilts, move the hanging points rather than forcing the stars closer together.
5. Hang the finished piece and make small final adjustments. Spread the ornaments slightly so they don’t knock into each other too much. After that, the display can stay simple or sit alongside fairy lights, a wreath, or a festive window corner.
One detail I’d keep simple is the branch itself. A natural stick already does the job, and I don’t think it needs extra paint or decoration when the stars are this colourful.
You could hang the stars in one long vertical line for a narrower wall, or group only three or five stars for a smaller version. If you don’t have a branch, a plain dowel or old wooden ruler can work just as well.
Repurpose a Plain Felt Star Ornament with Beaded Embroidery
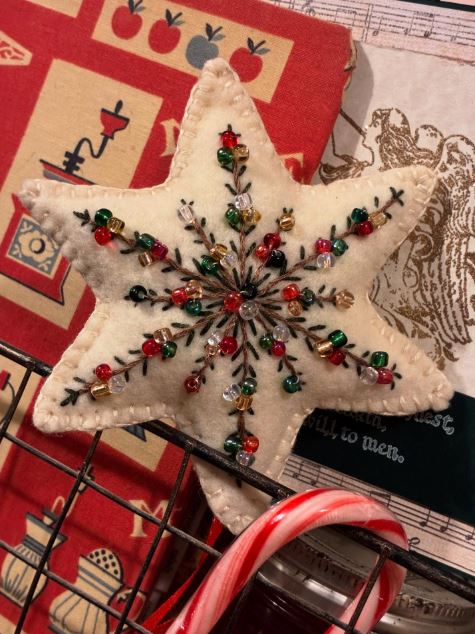
A plain felt ornament can sometimes look unfinished rather than charming, which is exactly why this makeover works so well. The simple cream star keeps its soft shape, but bead embroidery adds sparkle, colour, and structure without burying the felt completely. The branching stitched lines make the centre feel like a snowflake or firework burst.
This is a lovely way to repurpose a basic felt ornament that feels too plain for the rest of your Christmas décor. It’s also useful for using up beads from old craft kits or broken jewellery. What matters most is keeping the bead layout balanced from the centre outward.
Materials and Tools
· A plain felt star ornament or a homemade felt star
· Embroidery needle and sewing thread
· Small beads in festive colours
· Pencil or removable fabric marker for a light guide
· Small scissors
· Optional extra felt backing if the ornament feels thin
How to Add a Similar Beaded Design
1. Inspect the ornament and strengthen it if needed. If the felt feels thin or floppy, add a second backing layer before decorating. Then lightly mark the centre point and a few radiating guide lines so the beadwork stays organised.
2. Stitch the main branching lines first. Use thread in a dark or contrasting shade if you want the stitched structure to remain visible. Work outward from the centre so the design develops evenly instead of drifting to one side.
3. Add beads gradually along the stitched branches. Mix a few bead shapes and colours, but repeat them enough that the pattern feels intentional. I know it can feel tempting to fill every gap, but leaving some felt visible helps the ornament breathe.
4. Check the weight and the hanging loop. Beads can add more pull than expected on a soft ornament, so reinforce the top loop if necessary. Trim loose threads on the back and make sure knots are secure before displaying it.
5. Use the finished star where the detail can be seen. It would suit a tree, a wrapped gift, or a small hook in a festive display. If you make several, vary the colour order rather than changing the whole embroidery pattern each time.
For me, the layout matters more than expensive beads. Even simple mixed beads can look lovely when the stitched branches are clear and the ornament still keeps some open space.
Try pearl-like beads for a softer look, or use only one colour family for a quieter ornament. A heart, tree, or round felt ornament could use the same stitched approach.
Repurpose Plain Christmas Baubles with Layered Sequins

@annyrodriguez1128
These baubles use layered sequins to create a bold reflective finish that catches the light far more strongly than a plain painted surface. Because the sequins overlap slightly, the ornament gains both sparkle and texture. The gold and blue versions show how the same method can look dramatic in different colour schemes.
This is a useful project for plain baubles that are still structurally sound but a bit boring, scuffed, or mismatched. It suits party-style Christmas décor, but it could also work for New Year decorations or a glam gift topper set.
Materials and Tools
· Plain baubles with secure caps
· Large flat sequins or paillettes
· Strong glue suitable for the ornament surface
· Tweezers or fingertips for placing sequins
· Beaded string, chain, or ribbon for hanging
· A soft cloth and protected work surface
A Simple Way to Create the Sequin Finish
1. Clean the bauble and plan the direction of the sequins. It helps to decide whether you’ll start from the bottom and overlap upward like scales, or work in rings around the ornament. Then you can keep the coverage more even.
2. Attach the first row carefully. Apply small amounts of glue rather than coating the whole bauble at once. Place the sequins close together so the base surface doesn’t show through too much, but don’t press them so tightly that they buckle.
3. Continue layering the sequins upward. Slight overlap creates the best texture and helps disguise little gaps. Rotate the ornament often, because it’s very easy for one side to become denser than the other.
4. Let the glue cure properly before handling the ornament. This is where patience matters more than speed, because one rushed touch can shift a whole section. After that, replace or add a decorative hanging loop that suits the shine of the finished bauble.
5. Check the cap and use the ornament in a safe place. A sequin-covered bauble will often feel heavier than before, so the cap must remain secure. Then it can go on a tree, wreath, garland, or decorative bowl.
I’d rather leave a tiny hidden gap on the back than overload the front with too many sequins. A smoother layered finish nearly always looks better than cramming in extra pieces at the last minute.
Use one colour for a cleaner look, or mix two sequin colours in a repeating stripe. Smaller sequins can create a subtler texture if the larger discs feel too bold.
Repurpose Old Christmas Ornaments into a Colourful Bauble Wreath

A wreath is one of the best ways to repurpose old Christmas ornaments, especially when you have mixed baubles that don’t make a coordinated tree set anymore. Here, different sizes and finishes are packed closely together on a circular base, creating a rich full shape with plenty of colour and shine.
The idea works because the smaller ornaments fill the awkward spaces between larger ones, while a shared pastel-and-metallic palette keeps everything connected. It’s a good option for using vintage ornaments, spare baubles, or those odd singles that seem too nice to throw away.
Materials and Tools
· Old ornaments in mixed sizes
· A sturdy wreath base such as foam, vine, or wrapped cardboard
· Strong adhesive or floral wire
· Ribbon or hanging loop for display
· Optional filler ornaments or beads for tiny gaps
· Work gloves if using fragile older glass pieces
How to Build a Similar Ornament Wreath
1. Sort the ornaments by size and check them for damage. Set aside any with dangerous cracks or very loose tops. Then choose the wreath base and test a few larger ornaments around it so you can judge the scale before attaching anything.
2. Place the largest ornaments first. Spread them evenly around the wreath to create the overall shape and stop one area from becoming too bulky. Once that outline feels balanced, begin filling the spaces with medium ornaments.
3. Use smaller ornaments to close gaps and create depth. Tuck them slightly between the larger baubles rather than lining everything up on one flat surface. Then step back often, because wreaths can look balanced close-up but oddly heavy from a distance.
4. Secure the whole arrangement carefully. Strong adhesive works for many modern ornaments, while wire may feel safer for heavier or older pieces. Let the wreath rest flat until everything is firmly set and the weight is properly supported.
5. Add the final hanging loop and choose the display spot. A bauble wreath can go on a door, wall, or mantel, but it needs a secure hook. If it uses fragile glass ornaments, hang it somewhere it won’t be bumped every time someone walks past.
The part I would check carefully is the weight distribution. I don’t think a wreath ever looks right when all the biggest ornaments cluster at the bottom, even if the colours are lovely.
You could make a one-colour wreath for a calmer look or use only vintage metallics for something more nostalgic. A smaller version also works beautifully around a candle-free centrepiece or as a cupboard-door decoration.
Common Mistakes to Avoid
Using damaged ornaments without checking them first
A cracked glass bauble, weak cap, or torn paper seam can fail during the makeover. Repair the ornament before decorating it, or move it into a fully supported display such as a wreath where the fragile piece does not need to hang by itself.
Adding too much weight to delicate ornament bases
Heavy beads, thick glue, or too many sequins can pull a cap loose or distort a soft ornament. Choose lighter embellishments when the original piece feels delicate, and reinforce loops before the decoration stage.
Skipping a dry layout
Wreaths, painted pattern groups, and hanging displays nearly always benefit from planning first. Then you can adjust spacing, colour balance, and ornament placement before anything becomes permanent.
Using the wrong adhesive for the material
Paper stars, glass ornaments, felt shapes, and plastic baubles do not all behave the same way. Test the adhesive on a hidden area when you can, and don’t assume one glue will suit every surface.
Forgetting where the finished piece will be displayed
A heavy bauble wreath needs a strong hook, a sequin bauble needs a secure cap, and a branch display needs wall support. Copying the look without considering where it will live usually creates unnecessary problems later.
Overdecorating a simple ornament
It can feel tempting to use every bead, sequin, and paint colour at once. I know the craft table can get a bit carried away, but some visible background usually helps the repurposed ornament look more deliberate.
Frequently Asked Questions
Can beginners repurpose Christmas ornaments easily?
Yes, many of these ideas are beginner-friendly. Hand-painted baubles and the branch display are especially approachable, while a dense bauble wreath or detailed bead embroidery may need a little more patience and planning.
What should I do with fragile old glass ornaments?
Use them only if they are stable and free from dangerous cracks. If a piece feels too delicate to hang alone, it may still work in a wreath or display where it can be supported more securely.
Is it better to glue or wire ornaments onto a wreath?
That depends on the ornament material and weight. Glue can work well for lighter modern ornaments, while wire may feel safer for heavier pieces or ornaments you don’t fully trust to stay attached with adhesive alone.
Can I repaint shiny plastic baubles?
Usually, yes, as long as the surface is cleaned first and the paint suits that material. A hidden test area is helpful because some glossy finishes resist paint more than expected.
How do I make repurposed ornaments look coordinated?
Choose a limited palette, repeat a few shapes, or keep one shared material such as twine, gold accents, or matching beads. I don’t think everything needs to match exactly, but a repeated visual thread helps a lot.
Can these projects stay up after Christmas?
Some can, especially wreaths, painted baubles used in bowls, or branch displays made in softer colours. If you want them to feel less seasonal, avoid very obvious festive motifs and focus on texture or colour instead.
Give Spare Ornaments a New Place to Shine
Learning how to repurpose Christmas ornaments is really about noticing what still makes them useful. A plain bauble may just need paint, a basic felt star may need extra detail, and a pile of mixed ornaments may work better as a wreath than they ever did inside a box. Once you stop expecting every piece to return to the tree in its original role, far more possibilities open up.
I’d start with one manageable project and work with the ornaments you already own. Then you can see which colours, materials, and display styles actually suit your home. If you try one of these Christmas ornament ideas, I’d love to know which old decoration you’d give a second life first.