An outdated mirror frame can affect the whole room even when the mirror itself remains clear and useful. A glossy plastic border may look too harsh, an ornate frame may have lost its colour, or a plain wooden edge may no longer suit the furniture around it.
Replacing the mirror is not always necessary. Paint, rope, fabric, tile scraps, moulding, and textured finishes can all change the frame while allowing the original reflective glass to remain in use.
I don’t think every mirror needs a dramatic makeover. Some frames only need a calmer colour and cleaner surface. Others have enough width or detail to support a more involved treatment, especially when the existing border is structurally sound but visually tired.
The mirror must remain safe throughout the project. Cracked glass, loose backing, unstable hanging wire, or separating corners need attention before decoration begins. A layer of gold paint may distract the eye for a moment, but it will not persuade a loose mirror to stay inside its frame.
Inspect the Mirror Before Working on the Frame
Lay the mirror flat on a padded, stable surface and examine the front, back, corners, and hanging hardware.
Check for:
- Cracks or chips in the glass
- Loose mirror panels
- Separating corner joints
- Rusty or stretched hanging wire
- Weak D-rings
- Missing backing clips
- Water damage
- Swollen engineered wood
- Loose decorative moulding
- Flaking paint
- Brittle plastic
- Sharp metal tabs
- Old adhesive around the glass
- Signs that the frame is twisting
Do not continue with a cracked or unstable mirror. Glass can break further while the frame is being moved, sanded, drilled, or turned over. Arrange suitable repair, replacement, or safe disposal instead.
Large mirrors can be heavier and more awkward than they appear. Ask another capable adult to help move them, wear protective footwear and gloves, and clear the route before lifting.
If the mirror can be removed safely, label the backing pieces and hardware so everything returns to the correct position. If it cannot be removed, protect the reflective surface carefully before cleaning, painting, or attaching new material.
Identify What the Frame Is Made From
Mirror frames can be made from solid wood, veneer, MDF, plastic, resin, plaster, metal, or a combination of materials. The surface determines how much cleaning, sanding, priming, and repair it can tolerate.
Solid Wood
Wood can usually be cleaned, repaired, lightly sanded, stained, painted, waxed, or covered. Open corner joints should be glued and clamped before the decorative work begins.
Veneer
Veneer is a thin decorative wood layer. Sand gently because aggressive preparation can pass through the surface and expose the material underneath.
MDF and Engineered Wood
These frames often have smooth faces and absorbent cut edges. Avoid soaking them during cleaning and seal exposed areas before painting.
Plastic and Resin
Plastic frames may contain moulded details that imitate carved wood or metal. Test the paint and primer because smooth plastic can resist adhesion, while older resin may become brittle.
Plaster or Composition Decoration
Raised ornament may chip if scrubbed, knocked, or sanded too heavily. Clean it with a soft brush and secure loose pieces before refinishing.
Metal
Metal frames need inspection for rust, sharp edges, and failing coatings. Use preparation and paint systems suited to the specific metal.
Protect the Reflective Glass
When the mirror remains inside the frame, cover it completely before sanding or painting.
Use low-tack painter’s tape around the inner edge, then add paper, reusable plastic sheeting, or another protective covering across the centre. Press the tape down carefully without forcing it beneath old seals or into damaged silvering.
Avoid placing tools directly on the mirror surface. A metal ruler, paint tin, or pair of scissors can scratch or chip the glass surprisingly quickly.
Clean paint splashes while they are still removable according to the product instructions. Scraping dried material from a mirror risks scratching the glass or damaging the frame edge.
Prepare the Existing Finish
Dust the frame with a soft brush, paying attention to carved corners and recessed details. Then clean the surface with a method suited to the frame material.
Old furniture polish, grease, skin oils, and cleaning residue can interfere with paint and adhesive. Change cloths as they become dirty rather than moving the same residue around the frame.
Preparation may include:
- Removing loose paint
- Repairing open corners
- Securing decorative pieces
- Filling unwanted holes
- Lightly dulling glossy surfaces
- Smoothing rough repairs
- Applying a bonding primer
- Applying a stain-blocking primer
- Replacing weak hanging hardware
- Masking the mirror
- Testing paint on the back
- Testing adhesive on a concealed area
Older painted frames may contain coatings that should not be dry-sanded casually. When the age or content of an old finish is uncertain, use an appropriate safe assessment and preparation method rather than creating uncontrolled dust.
Work in a ventilated area when using spray paint, strong adhesive, solvents, gilding products, or specialist coatings. Follow the manufacturer’s instructions and keep children and pets away from the workspace.
Gather the Main Materials and Tools
- Old framed mirror
- Protective gloves
- Protective eyewear
- Dust protection
- Drop cloth
- Screwdriver
- Small pliers
- Soft cleaning brush
- Clean cloths
- Fine abrasive pads
- Suitable filler
- Compatible primer
- Paint
- Synthetic brushes
- Small foam roller
- Low-tack painter’s tape
- Paper for masking
- Measuring tape
- Straightedge
- Craft knife
- Cutting mat
- Plastic-compatible adhesive
- Wood adhesive
- Jute or cotton rope
- Fabric scraps
- Batting or thin foam
- Scrap tiles
- Tile adhesive
- Grout
- Decorative moulding
- Gilding adhesive
- Gold leaf or metallic finish
- Replacement hanging wire or D-rings
Gather only the materials needed for the chosen finish. A simple painted frame does not become better merely because the craft cupboard was feeling left out.
Give a Plastic Frame an Aged Patina Finish
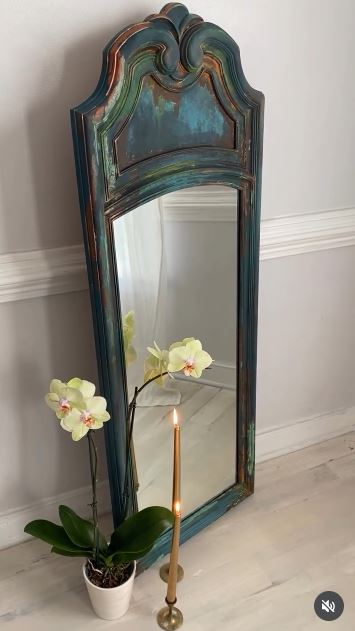
A moulded plastic frame can carry plenty of useful shape while still looking too shiny or artificial. Layered clay-like colours and a controlled patina finish can make the raised details easier to see.
The effect works because darker and lighter tones settle differently across the moulding. A flat single colour may hide the frame’s shape, while several restrained layers bring forward the ridges, curves, and recessed areas.
Materials and Tools
- Sound plastic or resin mirror frame
- Surface cleaner
- Fine abrasive pad
- Plastic-compatible bonding primer
- Earth-toned paint
- Small synthetic brushes
- Sponge
- Patina product compatible with the paint
- Clean cloths
- Protective gloves
- Painter’s tape
Create the Patina Finish
- Clean and test the plastic. Remove polish, dust, and greasy residue from the entire frame. Apply the planned primer and paint to a hidden section, then check that the coating grips rather than peeling away.
- Build the base colour. Apply a compatible primer where needed, followed by a thin earthy background colour. Work the brush into moulded details without allowing thick paint to collect in the deepest grooves.
- Add the secondary tones. Use a sponge or nearly dry brush to place lighter and darker colours across selected ridges. Keep some of the base layer visible so the finish develops depth rather than becoming one muddy shade.
- Introduce the patina carefully. Apply the compatible ageing product to small areas and soften it with a cloth before moving on. Concentrate the darker effect around corners and recessed decoration where natural wear might appear.
- Inspect and rehang the mirror. Remove the masking, clean the glass, and check the backing hardware. Let the finish reach the stage recommended by the product before handling or hanging.
For me, the patina should emphasise the moulding rather than cover every centimetre equally. A little unevenness makes the frame feel more convincing.
A beginner can use one base colour and a darker dry-brushed layer. Soft stone, aged bronze, terracotta, and weathered grey can all work without imitating heavy rust.
Refresh an Ornate Frame With a Thin Gold Finish
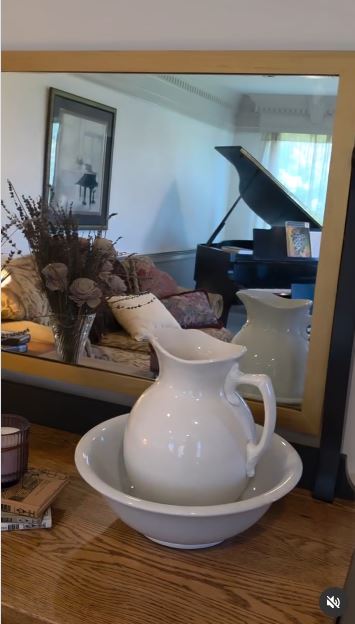
An ornate frame may not need a complete colour change. A thin metallic wax, paste, or suitable paint can lift the raised details while leaving the darker background visible.
Preparation matters because metallic products highlight texture. Dust, brush marks, rough filler, and peeling old finish can become more noticeable once the light begins reflecting from the surface.
Materials and Tools
- Ornate mirror frame
- Soft cleaning brush
- Fine abrasive pad
- Primer, if required
- Dark base paint, if useful
- Metallic wax, paste, or compatible paint
- Small brush or soft application tool
- Clean cloth
- Painter’s tape
- Protective gloves
Apply the Metallic Detail
- Prepare the ornament gently. Remove dust from carved areas and repair loose decorative sections. Lightly smooth only the surfaces that can tolerate it without erasing fine moulding.
- Establish the background. Keep the existing dark finish when it is sound, or apply a compatible base colour. Allow the recesses to remain deeper than the raised ornament.
- Apply the metallic product sparingly. Use a small amount on a soft brush or cloth and touch it across the highest points. Build the colour gradually rather than filling every groove with gold.
- Balance the frame. Step back after completing each side and compare the brightness. Add small highlights where the ornament disappears, then soften any area that looks too solid.
- Finish the backing and glass. Clean the mirror, inspect the hanging wire, and remove every loose fibre from the carved surface. Protect the finish only with a compatible product when required.
I know it can feel tempting to keep adding gold because the first few highlights look so effective. Stop before the darker recesses disappear, since that contrast is what gives the frame depth.
Silver, warm brass, copper, or a pale champagne finish can create a similar effect. A soft white base with restrained gold edges also suits carved frames that feel too dark.
Wrap a Plain Round Mirror With Rope
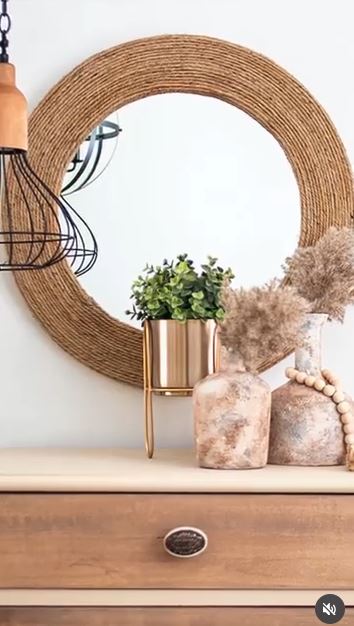
Rope can add texture to a plain circular mirror, particularly when the existing edge feels too thin for the wall. The repeated rings create a wider border while keeping the finished object relatively light.
The backing must support both the mirror and the rope. Do not attach a heavy border directly to an unsupported mirror edge or rely on decorative rope as the hanging structure.
Materials and Tools
- Plain round mirror
- Strong backing board
- Jute or cotton rope
- Adhesive compatible with the materials
- Measuring tape
- Pencil
- Strong scissors
- Painter’s tape
- Hanging hardware
- Protective gloves
Build the Rope Border
- Create a secure backing. Cut or reuse a board that supports the mirror and provides enough width for the rope. Check that the board and hanging hardware can carry the completed weight.
- Position the mirror. Centre the mirror on the backing and mark its placement. Secure it using a method appropriate for mirrors and allow the attachment to settle fully.
- Begin the rope close to the glass. Apply adhesive in short sections and press the rope into a neat circle. Keep the first ring consistent because every later row will follow it.
- Add the remaining rows. Continue coiling the rope without pulling so tightly that it shifts the earlier sections. Stagger the final join where possible and trim the rope cleanly.
- Check the back and hanger. Remove loose fibres and hardened adhesive, then inspect the wall hardware. Hang the mirror only after the full assembly feels secure.
I’d keep the number of rope rows in proportion to the mirror. A narrow mirror can disappear inside a border that becomes too wide and heavy.
Cotton cord gives a softer finish, while braided fabric strips can reuse old clothing. A beginner can add only two or three rings rather than building a large sunburst border.
Build a Mosaic Border From Scrap Tiles
A mosaic frame gives small tile scraps a purpose without requiring every piece to match. The gaps between fragments become part of the design, especially when the colours are repeated around the border rather than concentrated on one side.
The base must be rigid enough to support the tile and grout. A thin decorative frame may need a wider plywood or tile-compatible backing before the mosaic is added.
Materials and Tools
- Thrifted or reused mirror
- Rigid backing board
- Scrap tiles
- Tile nippers
- Protective eyewear
- Work gloves
- Tile adhesive
- Grout
- Grout float or spreading tool
- Sponge
- Sealer, when suitable
- Strong wall hardware
Make the Mosaic Frame
- Prepare a strong base. Check the frame and backing for movement, then add a rigid border where needed. Mark the mirror edge and keep adhesive away from the reflective surface.
- Sort and arrange the tile pieces. Group the scraps by thickness and colour before attaching them. Lay out the full pattern dry, keeping the gaps reasonably consistent and sharp points away from the outer edge.
- Attach the mosaic. Apply tile adhesive in manageable sections and press each piece into place. Keep checking that the surface remains reasonably even and that no tile projects dangerously.
- Grout the finished border. Once the adhesive is ready, work grout into the spaces and remove the excess with a damp sponge. Clean the mirror edge carefully without flooding the backing.
- Seal and hang the mirror. Use a suitable sealer when the materials require it, then inspect the added weight. Upgrade the hanging hardware and wall fixings before installation.
One detail I wouldn’t skip is sorting the tile by thickness. A single tall fragment can catch clothing or make the border uncomfortable to clean.
Broken plates, ceramic offcuts, and small glass tiles can create different effects, but every edge must be made safe. A beginner can use evenly sized square tiles rather than irregular fragments.
Soften a Hard Frame With Fabric and Light Padding
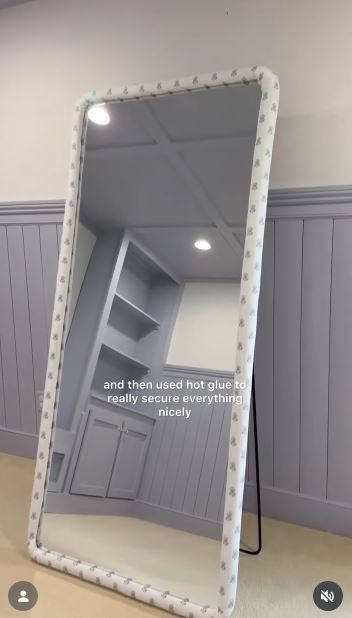
Fabric can change the texture of a plain mirror frame without adding hard trim. A thin layer of batting or foam creates a gently padded border, while the chosen fabric connects the mirror with curtains, cushions, or upholstered furniture.
The fabric must be fitted neatly around corners and the inner mirror edge. Thick folds can interfere with the backing or create uneven lumps.
Materials and Tools
- Plain mirror frame
- Cotton, linen, or upholstery fabric
- Thin batting or foam
- Fabric scissors
- Measuring tape
- Spray adhesive or suitable fabric adhesive
- Staple gun, when appropriate
- Pins or clips
- Painter’s tape
- Strong hanging hardware
Upholster the Frame
- Plan the fabric direction. Measure every side and decide where the pattern should begin. Cut strips with enough extra fabric to wrap around the frame edges and hide the raw ends.
- Add light padding. Attach a thin, even layer of batting or foam where the frame shape allows it. Keep the padding away from the mirror channel and hanging hardware.
- Wrap the straight sections. Apply adhesive according to its instructions and smooth the fabric across each side. Work from the centre towards the corners so wrinkles do not collect in one place.
- Shape the corners and inner edge. Trim excess fabric gradually and fold the corners neatly. Secure the hidden edges on the back without covering clips, screws, or the mirror backing.
- Inspect the finished frame. Remove stray threads, clean the mirror, and test the hanging hardware. Keep the upholstered border away from damp areas where fabric may absorb moisture.
For me, plain or lightly textured fabric is easier to handle than a large directional print. Matching a complicated pattern across four corners can become an entirely separate hobby.
Old curtains, a sound tablecloth, or leftover upholstery fabric can reduce the need for new material. A no-padding version also works when the original frame already has enough depth.
Add Lightweight Decorative Moulding for a Vintage Look

Lightweight appliqués, flexible trim, or shallow moulding can change a plain frame into something more decorative. The added pieces should follow the frame’s proportions rather than covering every available surface.
This method works well when the original frame is broad enough to support the trim. Narrow frames may not provide enough bonding area and can look crowded once the details are attached.
Materials and Tools
- Plain sound mirror frame
- Lightweight moulding or appliqués
- Measuring tape
- Ruler
- Fine cutting tool
- Adhesive compatible with both materials
- Low-tack tape
- Primer
- Paint
- Metallic wax or leaf, if desired
- Small detail brush
Apply the Decorative Details
- Design the layout before cutting. Measure each side and arrange the moulding without adhesive. Keep the pattern balanced and leave clear space around the mirror edge.
- Prepare the frame and appliqués. Clean both surfaces and prime difficult materials when needed. Cut matching pieces carefully, especially where decorative patterns need to meet at the corners.
- Attach the details gradually. Apply a controlled amount of adhesive and hold each piece with low-tack tape. Check the alignment from a distance before the adhesive settles.
- Blend the added pieces. Fill only small gaps that should disappear, then prime the assembled frame. Apply a consistent base colour so the original border and new decoration read as one structure.
- Add the final finish. Highlight selected ridges with metallic wax, leaf, or a lighter paint colour. Remove the masking, clean the glass, and inspect the frame before rehanging it.
I don’t think the decoration needs to be symmetrical in every tiny detail, but the visual weight should feel balanced from side to side.
A single central appliqué on each edge can be enough. Paintable rope, wooden half-round trim, or saved decorative pieces from damaged furniture may also work when they remain lightweight.
Mirror-Frame Makeover Choices That Are Hard to Undo
Decorating Before Checking the Glass
A cracked or loose mirror should not be moved repeatedly or hidden beneath new trim. Inspect the glass, backing, and clips before beginning the makeover.
Painting Over Furniture Polish
Polish and oily residue can prevent primer or paint from gripping properly. Clean the entire frame, including the inner edge and carved recesses.
Sanding Plastic or Plaster Too Aggressively
Plastic moulding, veneer, resin, and plaster decoration can lose detail quickly. Test a concealed area and use the least aggressive preparation that works.
Using Heavy Material on a Weak Frame
Tile, thick wood, rope, and added backing increase the finished weight. Strengthen the frame and upgrade the hanging hardware rather than relying on the original wire.
Attaching Decorations to Loose Paint
New adhesive is only as secure as the layer beneath it. Remove unstable paint and repair the base before adding rope, tiles, moulding, or fabric.
Allowing Adhesive to Reach the Mirror Edge
Some adhesives may affect mirror backing or become visible through the glass. Use products intended for the materials and keep them within the frame structure.
Making a Rope Border Without a Rigid Base
Rope should not become the only support around a frameless mirror. Mount the mirror and border to a suitable backing with dependable hanging hardware.
Grouting Against an Unprotected Mirror
Grout residue can scratch the surface and collect around the edge. Mask the mirror carefully and clean the border with controlled moisture.
Choosing Fabric That Frays Heavily
Loose threads can appear around corners and inner edges. Choose manageable fabric, finish the raw edges, and test the corner folds before applying adhesive.
Filling Every Carved Recess With Metallic Paint
A solid metallic coating can flatten ornate detail. Leave some darker background visible and build highlights gradually.
Covering Hanging Hardware
Fabric, padding, trim, and backing can block screws, clips, and wire attachments. Plan around the hardware so the mirror remains serviceable.
Reusing Weak Hanging Wire
The finished mirror may be heavier than the original. Replace worn wire, D-rings, screws, and wall fixings with hardware suited to the completed weight.
Frequently Asked Questions
What is the easiest way to upcycle a mirror frame?
Repainting a sound frame is usually the simplest option. Clean the surface, repair loose sections, test a compatible primer and paint, then protect the mirror carefully.
Can a plastic mirror frame be painted?
Yes, provided the plastic remains strong and the paint system is suitable for it. Smooth plastic often needs thorough cleaning and a compatible bonding primer.
Do I need to remove the mirror before painting?
Removing it can make preparation easier, but only when the construction allows safe removal and reinstallation. Otherwise, mask the mirror completely and keep paint away from the backing and clips.
Can I use ordinary wall paint on a mirror frame?
Wall paint may not adhere or withstand handling on every frame material. Use a coating suited to woodwork, furniture, plastic, metal, or the specific frame surface.
How can I make an ornate frame look aged?
Keep a darker base in the recessed areas and apply lighter or metallic colour to raised details. Build the effect gradually so the decoration retains its depth.
Is hot glue suitable for mirror-frame decorations?
It may hold some lightweight temporary materials, but it is not automatically suitable for heavy tile, structural backing, or high-value mirrors. Choose an adhesive compatible with both surfaces and the expected weight.
How should I clean an upholstered mirror frame?
Dust it gently with a soft brush or upholstery attachment. Avoid soaking the fabric, and treat marks according to the fabric and adhesive used.
Let the Existing Frame Suggest the Finish
Learning how to upcycle mirror frame surfaces begins with noticing what the original piece already offers.
A moulded plastic border may suit layered patina, while carved details can become clearer with restrained metallic highlights. A plain circular mirror can take a rope surround, and a wide rigid frame may support mosaic, fabric, or lightweight decorative trim.
Begin with the condition of the glass, frame, backing, and hanging hardware. Repair what is loose, test the chosen finish, and add only materials the structure can support. Then step back before adding one more layer, because mirrors already reflect plenty without the frame competing for every bit of attention.
Which forgotten mirror would you work on first: the glossy plastic one for a patina finish, the plain round mirror for rope, or the ornate frame waiting for a quieter layer of gold?