Coffee mugs are one of those household items that quietly multiply. A favourite chipped mug gets pushed to the back of the cupboard, a mismatched one loses its set, a novelty mug no longer suits the kitchen, and a sturdy ceramic cup ends up stored away simply because it is no longer used for drinking. That is exactly why coffee mugs are such good candidates for upcycling. Their shape is already useful, the handle gives you an easy grip or hanging point, and the ceramic body usually feels substantial enough to support a second purpose.
I like mug upcycling best when the finished idea still feels simple enough for an ordinary person to make at home. A good upcycled project does not need to be overly clever. It just needs to give an old mug a practical new use while still looking attractive on a shelf, wall, windowsill, craft table, or garden corner. The ideas I’ve focused on here are the ones that feel realistic, useful, and easy to recreate without specialist equipment.
The selected ideas show five especially workable directions: turning a mug into a candle, making a sewing-room pincushion, creating a wall-mounted planter, using a mug as the base of a small bee bath, and hanging a planted mug in a rope sling. Each one keeps the mug recognisable, which I think is part of the charm. The cup is not hidden. It simply takes on a new role.
Choose Mugs That Are Safe and Structurally Sound
Before starting any of these projects, check the mug carefully. Hairline cracks, badly chipped rims, and unstable bases matter much more once the mug is repurposed. A cracked mug may leak wax, shed soil, fail under weight, or become awkward to handle. I would also avoid mugs with damage around the handle if the handle will be used as part of the final design.
Wash each mug thoroughly and remove any tea stains, grease, or adhesive residue from old labels. If the mug will hold a candle, it needs a clean interior. If it will hold soil, the inside should still be washed so salts and residue do not stay trapped under the compost. A little preparation at the beginning usually makes the finished project look much more intentional.
Match the Upcycle Idea to the Shape of the Mug
Not every mug suits every project equally well. Broad, heavy mugs work nicely for candles because they look balanced and offer a wide wax surface. Taller mugs are often better for pincushions because the cushion sits neatly above the rim. Decorative mugs with a pretty printed pattern work especially well as wall planters or hanging planters because the outside remains visible after planting.
I always find it easier to decide on the project after looking at the mug’s proportions. A straight-sided ceramic cup may look elegant as a candle, while a floral mug with a prominent handle may be far more successful hanging beside a window. Let the mug guide the idea rather than forcing every cup into the same treatment.
Keep the Finished Project Practical, Not Overworked
One of the easiest mistakes in upcycling is over-decorating the original object until it loses its usefulness. With mugs, that usually means adding too many trims, gluing on unnecessary embellishments, or choosing a setup that makes the project harder to clean, hang, or refill. The strongest upcycled mug ideas are often the simplest ones.
For that reason, the projects below focus on realistic materials and straightforward construction. If you want to personalise them, do it in a restrained way: choose a nice wick, a fabric that suits your sewing corner, a plant that complements the mug, or a cord colour that fits your room. The original ceramic cup already brings enough character on its own.
Make a Coffee Mug Candle
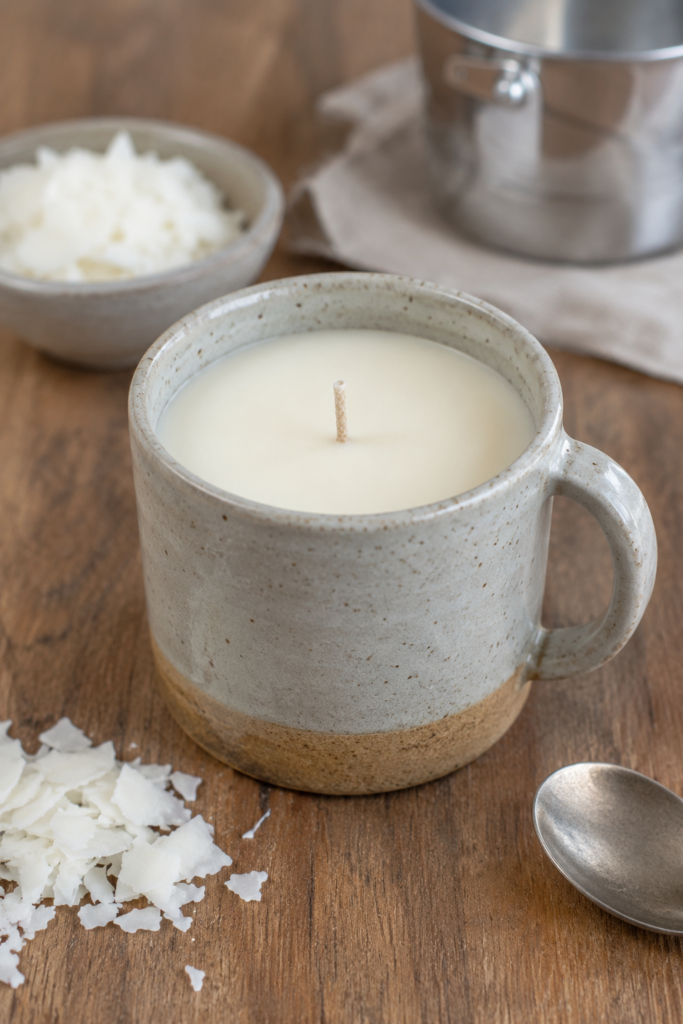
A mug candle is one of the most natural coffee mug upcycles because the cup already behaves like a neat, heat-resistant vessel. The wide opening gives you plenty of surface area for a clean-looking wax pour, and the handle makes the finished candle easy to move from a bedside table to a bathroom shelf or reading corner. It feels decorative, useful, and completely believable as a homemade project.
This idea works best with a mug that has a smooth interior and a level base. Speckled stoneware, neutral ceramics, and simple handmade-looking cups are especially effective because they already have that calm, giftable look. If you want a beginner-friendly first project, this is the one I would start with.
Materials and Tools
· Clean ceramic mug
· Candle wax
· Wick and wick sticker or glue dot
· Heat-safe pouring container
· Fragrance oil if desired
· Wooden stick or peg to hold the wick centred
Steps
- Clean and dry the mug completely, then attach the wick to the centre of the base. Keeping the wick central matters because a slightly off-centre wick becomes very obvious once the wax sets.
- Melt the wax in a heat-safe container and add fragrance if you want the candle to feel more personalised. I would keep the scent gentle rather than overly strong, especially if the mug itself has a calm handmade look.
- Pour the melted wax slowly into the mug and secure the wick upright with a stick, peg, or wick bar laid across the rim. Leave a small gap at the top so the candle does not look overfilled.
- Let the wax cool fully before trimming the wick. Once set, the mug candle can be used as a gift, a small self-care project, or a simple way to turn an unused cup into something people actually enjoy seeing out on display.
A candle mug also leaves the possibility of reuse later. Once the candle is fully burned, the mug can often be cleaned again and repurposed once more, which I think makes this idea especially satisfying.
Turn a Coffee Mug into a Pincushion Holder
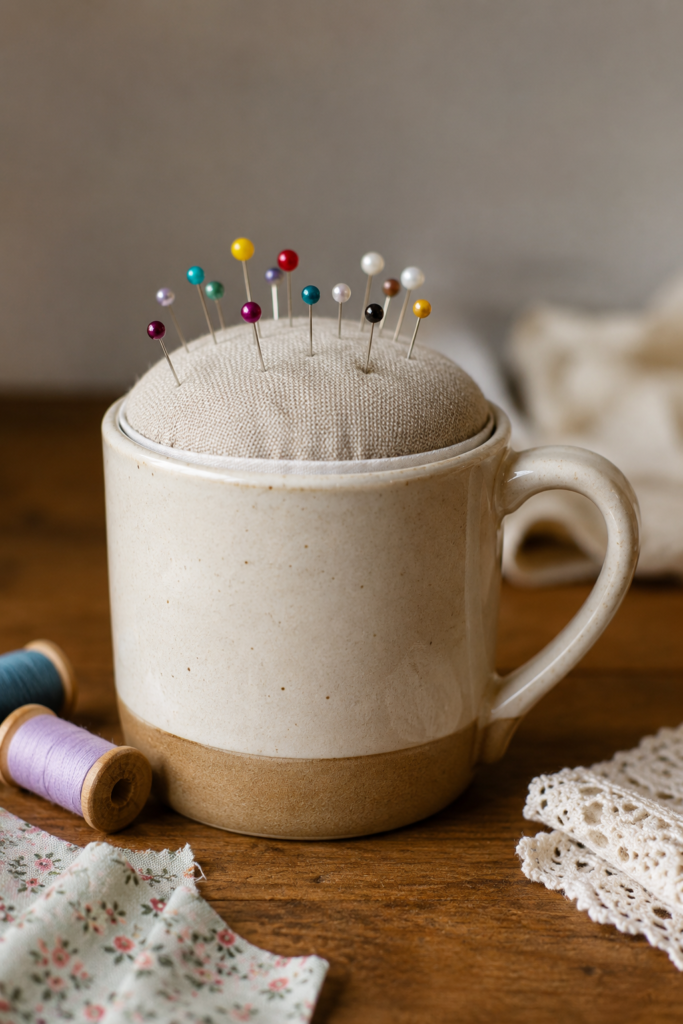
A mug pincushion is one of those upcycles that feels both charming and genuinely useful. The cup becomes a built-in base for storing loose thread snips, buttons, tape measures, or small sewing notions, while the padded cushion sits neatly at the top where it is easy to access. It gives an old mug a clear purpose rather than making it purely decorative.
The best version uses a cushion that sits snugly into the mug opening without wobbling. Neutral linen, floral cotton, or leftover dressmaking scraps all work nicely. I also like this project because it is easy to customise to suit the tone of a craft room without requiring complicated sewing.
Materials and Tools
· Clean mug
· Fabric scrap
· Stuffing or fibre fill
· Needle and thread
· Circle of cardboard or felt if needed for support
· Optional small sewing notions to store inside the mug
Steps
- Cut a fabric circle large enough to gather into a soft dome. Stitch a running thread around the edge, add stuffing, and pull the thread until the cushion feels full but still soft enough to hold pins comfortably.
- Test the cushion in the mug opening before finishing it. The padded dome should sit securely without sinking too far inside or balancing so high that it topples when touched.
- Tuck or stitch the underside neatly, then place the cushion into the mug. Some people prefer to glue it lightly in place, but if the fit is already snug, I think a removable cushion can be more practical for cleaning or adjusting later.
- Fill the mug body with small sewing tools or keep it empty if you prefer a cleaner look. Once finished, the project turns a redundant mug into a useful desk companion that looks far more thoughtful than a standard plastic pincushion.
This is also an excellent gift idea for someone who sews, embroiders, quilts, or keeps a small mending basket close at hand.
Create a Wall-Mounted Mug Planter

A wall-mounted mug planter is a lovely choice when you want the mug to become part of the room’s visual style. The cup remains clearly visible, but instead of holding coffee, it cradles soil and a trailing plant. Mounted against a simple timber backboard, it feels rustic, tidy, and much more like a considered décor piece than a spare mug stored on a shelf.
This idea works best with small trailing plants or compact succulents that do not become too heavy. You do not need to overcomplicate the planting. The strength of the finished look comes from the mug angle, the wooden backing, and the plant’s soft spill over the rim.
Materials and Tools
· Strong ceramic mug
· Small wooden backboard
· Wall fixing hardware
· Secure bracket, clamp, or heavy-duty mounting method suited to the mug
· Potting mix
· Small trailing plant or succulent
· Optional moss or liner if needed
Steps
- Prepare the wooden backboard first. Sand it lightly if necessary and add wall fixings before attaching the mug. It is much easier to handle the board properly before the plant and soil are involved.
- Fix the mug securely at a slightly upward angle so the contents stay contained but the planting still spills attractively forward. The mug must be held by a reliable mounting method rather than decoration glue alone. A planted mug becomes much heavier than it first appears.
- Add a small amount of potting mix and place the plant carefully so the fuller part sits near the back and the trailing stems fall naturally over the lip. I would avoid overfilling the mug because crowded compost makes watering messy.
- Hang the finished piece where it receives the right light for the plant you have chosen. Then water sparingly and check occasionally that the mug remains firm on the board. The result is a compact wall feature that gives an old mug a completely different personality.
I especially like this idea for kitchens, utility rooms, porches, or small spaces where you want greenery without using table or shelf space.
Use a Mug as the Base for a Small Bee Bath

This is one of the simplest outdoor ideas and one of the most believable. Instead of trying to make the mug itself hold the water, the mug becomes the pedestal base for a shallow dish. That small change makes the setup much more practical for pollinators. The dish can hold water safely, and the stones give bees or other tiny visitors somewhere to land without slipping.
A garden bee bath feels especially useful because it gives purpose to a mug while also supporting the garden. It does not require a large outdoor space either. A sunny patio table, stone ledge, or raised bed edge can be enough.
Materials and Tools
· Sturdy mug
· Shallow dish or saucer wider than the mug opening
· Outdoor-safe adhesive if needed
· Small smooth stones or pebbles
· Water
Steps
- Choose a stable mug and a shallow dish that sits comfortably on top. In some cases the dish may balance securely by shape alone, but if you want a permanent setup, use a suitable outdoor adhesive and let it cure fully before moving on.
- Place the finished stand in the garden on a level surface where it will not be knocked easily. A slightly sheltered position usually helps keep the water cleaner for longer.
- Fill the dish with smooth pebbles, then add just enough water so the tops of the stones remain visible. That detail matters because the stones give bees a safe landing place instead of leaving them to struggle on a flat water surface.
- Refresh the water regularly and rinse the dish now and then. Once maintained, the upcycled mug becomes a small but genuinely useful part of the garden rather than just another decorative object.
What I like here is the balance between beauty and function. The stacked mug-and-dish form still looks pretty, but it also serves a clear outdoor purpose.
Hang a Mug Planter in a Rope Sling
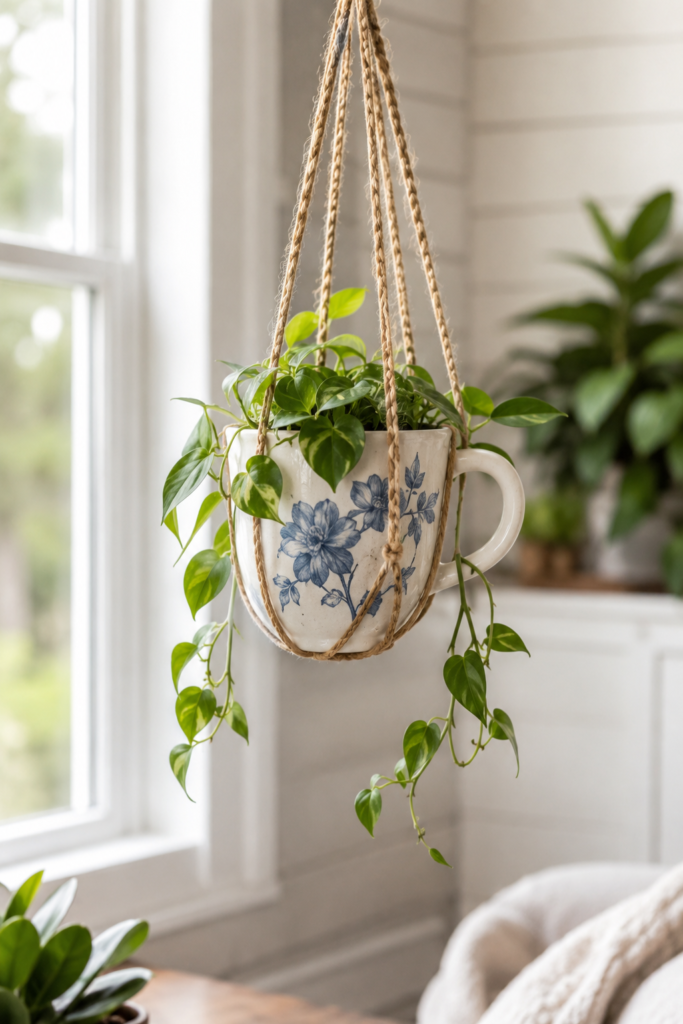
A hanging mug planter gives a cup an entirely different kind of presence. Instead of sitting on a shelf, the mug becomes part of the vertical space near a window, bright corner, or sheltered porch. The rope sling keeps the project approachable because you do not need to drill through the mug or force it into a rigid holder. The cord does most of the support work.
This idea suits mugs with attractive patterns or a slightly vintage look because the exterior remains visible from several angles. A trailing houseplant softens the shape beautifully and makes the whole piece feel more alive than a static decorative object.
Materials and Tools
· Coffee mug
· Strong rope, jute, or macramé cord
· Potting mix
· Small trailing plant such as pothos or philodendron
· Hook or secure hanging point
· Optional liner or moss layer
Steps
- Create or assemble a simple rope sling that cradles the mug from underneath and supports it around the sides. The mug should sit level and feel secure before any soil is added. Test the support first while the cup is empty.
- Add a modest amount of potting mix and place the plant so the fuller leaves sit near the top and the trailing stems can fall freely over the rim. I would avoid choosing a plant that becomes very heavy too quickly.
- Hang the planted mug from a secure hook in a bright position suited to the plant’s needs. Then step back and check that the handle, rope lines, and plant growth all face in a visually pleasing direction.
- Water carefully in small amounts and let excess moisture drain appropriately before rehanging if needed. With the right plant and a sensible amount of soil, the finished piece feels airy, decorative, and very achievable for someone who wants a simple upcycled planter without woodworking.
For me, this is one of the prettiest mug ideas because it keeps the cup visible while adding a sense of movement through the rope and trailing foliage.
Common Coffee Mug Upcycling Mistakes That Are Easy to Avoid
One common mistake is choosing a damaged mug simply because it is available. A pretty crack can quickly become a practical problem once the mug holds wax, soil, or weight. If the cup is badly compromised, use a different one and save yourself the disappointment of remaking the project later.
Another issue is using the wrong type of adhesive or fixing method. A mug planter mounted on a board, or a dish balanced on a mug outdoors, needs more than decorative craft glue. If a project carries weight, moisture, or movement, the joining method needs to match that reality.
People also tend to overfill mug planters. Too much soil makes watering awkward and leaves plants looking crowded rather than graceful. With small containers, restraint usually looks better and functions better.
Frequently Asked Questions
What can I do with old coffee mugs that I no longer drink from?
You can repurpose them into candles, pincushions, planters, small garden features, desk organisers, or hanging décor. The best option depends on the condition and shape of the mug, but simple functional upcycles usually work better than overly complicated ones.
Can I plant directly into a coffee mug?
Yes, but it is best for small plants and careful watering. Because most mugs do not have drainage holes, you need to avoid overwatering and choose plants that tolerate a more controlled watering routine. Some people also use an inner liner to make the setup easier to manage.
Are mug candles safe to make at home?
They can be, as long as you use a sound ceramic mug, a suitable wick, and proper candle-making materials. The mug should be clean, heat-safe, and free from cracks. As with any candle, it should always be burned responsibly and never left unattended.
Which upcycled coffee mug idea is easiest for beginners?
A candle or a pincushion is usually the easiest starting point. Both are straightforward, require relatively few materials, and do not need complicated mounting or hanging hardware.
Can I use chipped mugs for these projects?
Only if the damage is minor and does not affect safety or structure. I would not use mugs with sharp chips on the rim, cracks running through the body, or weakened handles, especially for hanging or mounted projects.
A Simple Mug Can Still Be Useful in a New Way
What I like most about these coffee mug upcycles is that none of them asks the mug to become unrecognisable. The cup remains a cup in shape, but its purpose shifts in a way that feels practical and visually appealing. That makes the finished projects easy to live with, which is often the real test of whether an upcycle has worked.
If you have a few old mugs at home, start with the one that already suggests a second life. A wide stoneware mug may want to become a candle. A pretty patterned cup may suit a hanging planter. A plain sturdy mug might make the perfect base for a garden bee bath. Once you begin looking at them that way, it becomes much easier to choose an idea that is both realistic and satisfying to make.