Empty soda cans are easy to overlook because they feel so temporary. You finish the drink, rinse the can, and it is usually headed straight for the recycling bin. Yet the lightweight metal, simple cylinder shape, and smooth surface can be surprisingly useful when a can is clean and in good condition. With a careful approach, an ordinary container can become storage, a small planter, a wall feature, or even a gentle outdoor decoration rather than being treated as a one-use object.
I prefer soda-can upcycles that still make sense after the craft table has been cleared. I don’t think a project is successful simply because it looks clever for a photograph. It should be stable, easy to maintain, and realistic for someone to make with basic supplies. That is why these ideas stay fairly simple: they use the can’s existing shape instead of asking you to rebuild it into something overly complicated.
The most important part is handling the metal sensibly. A factory-finished drinking rim is usually smooth, but any cutting or reshaping can create sharp edges. I’d rather keep the cutting to a minimum and use covers, liners, brackets, or prepared edges wherever possible. Once that practical side is sorted, soda cans become much easier to work with.
Clean and Check Every Soda Can Before Reusing It
A clean can is easier to decorate, plant, or place near household items, but condition matters just as much as cleanliness. I know it can feel tempting to save every can for a future project, though badly dented or damaged ones are rarely worth the trouble.
· Rinse the can thoroughly and wash away sticky drink residue before it dries inside.
· Let the can dry completely so moisture is not trapped under paper wraps, twine, or adhesive.
· Check the rim, base, and sides for splits, deep dents, corrosion, or sharp damage.
· Remove loose labels, glue marks, or dirt from the outside before decorating.
· Keep cans with a smooth factory opening for projects that do not require cutting.
· Recycle any can that feels unstable or has metal damage you cannot make safely smooth.
Match the Can to Its New Job Before Decorating
The simplest way to avoid wasted effort is to decide what the can needs to do before you start wrapping or attaching anything. A planter needs moisture protection, a desk organizer needs a comfortable top edge, and a wall planter needs far more support than a can sitting on a shelf.
· Choose straight, undented cans for organizers so they sit flat and line up neatly.
· Use a can with a clean open top for a planter or plant-propagation holder.
· Keep heavier wall projects small and use a proper bracket or clamp rather than decorative glue alone.
· Choose lightweight decoration for hanging projects so the finished piece does not pull awkwardly.
· Plan whether the original aluminum will stay visible or whether paper, twine, or fabric will cover it.
· Test the finished position first – desktop, windowsill, wall, or porch – before making permanent attachments.
Protect Hands, Surfaces, and Moisture-Sensitive Materials
Soda cans are easy to work with when most of the original structure stays intact. Problems usually begin when sharp metal is exposed or wet soil is allowed to sit directly against decorative paper. A few small precautions make the finished project more comfortable to use and easier to maintain.
· Use edge trim, folded covering material, or a removable inner cup if the top edge feels rough.
· Wear gloves and eye protection if an adult needs to cut, pierce, or reshape metal.
· Keep sharp metal tools and unfinished cut cans away from children and pets.
· Use a liner or inner nursery pot for plants when you do not want wet soil touching a decorated can.
· Protect tables with felt, cork, or a tray if the metal base might scratch a surface.
· Let adhesives cure fully before adding tools, plants, water, or hanging weight.
Turn Soda Cans into a Kitchen Utensil Organizer
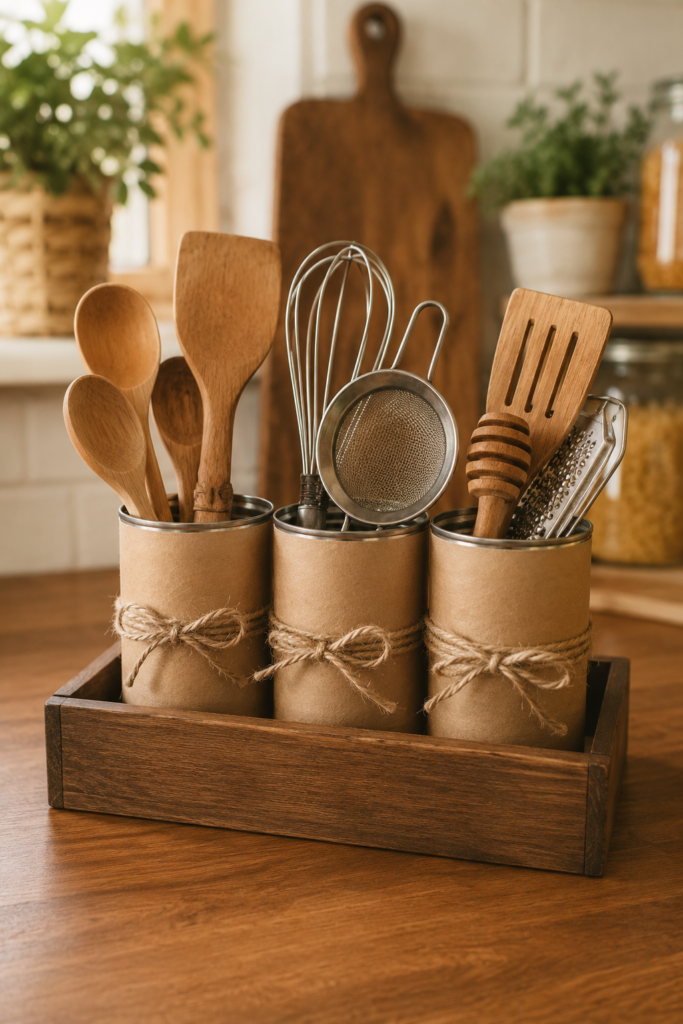
A group of soda cans makes surprisingly useful kitchen storage because the narrow shape keeps long utensils upright instead of letting them collapse into a crowded drawer. The idea works best as a set rather than as one isolated can. Grouping several containers allows wooden spoons, whisks, strainers, and smaller tools to be separated by type, while a shallow tray underneath keeps everything visually connected.
The paper-and-twine finish is doing useful work here as well as decorative work. It hides branding, softens the reflective metal, and makes several mismatched cans look like one coordinated organizer. I’d keep the wrapping fairly plain because kitchen tools already bring different shapes and materials into the display. There’s no need to decorate every inch.
Materials and Tools
· Three or more clean soda cans
· Kraft paper, leftover wrapping paper, or fabric scraps
· Jute twine or cotton cord
· Strong craft glue or double-sided adhesive
· Scissors
· Shallow tray or small wooden box
· Optional felt circles for the can bases
Steps
1. Prepare the cans and top edges. Wash and dry each can, then run a finger carefully around the factory opening to confirm it feels smooth. If one rim feels uncomfortable, cover the upper edge with a neat strip of sturdy material or use another can rather than ignoring the problem.
2. Wrap the outside neatly. Measure enough paper or fabric to go around each can with a small overlap. Attach it smoothly, keeping the seam toward the back, then add a simple twine band or bow if you want the containers to look more coordinated.
3. Arrange the cans in a stable base. Place the finished cans in a shallow tray or box so they cannot slide apart when you remove a heavy utensil. If the metal bases are likely to scratch the tray, add small felt circles underneath before loading them.
4. Sort utensils by weight and height. Keep heavier wooden tools in one can and lighter whisks or strainers in another so the containers stay balanced. Then position the organizer away from direct splashes and wipe the outside with a dry or barely damp cloth when needed.
For me, the tray is the detail that makes this look finished. Without it, three cans can feel temporary; grouped together, they read as one deliberate piece of kitchen storage.
Variation: For a more washable version, skip paper and use removable fabric sleeves or leave the cans plain with only a narrow cord band.
Use a Soda Can as a Small Basil Planter
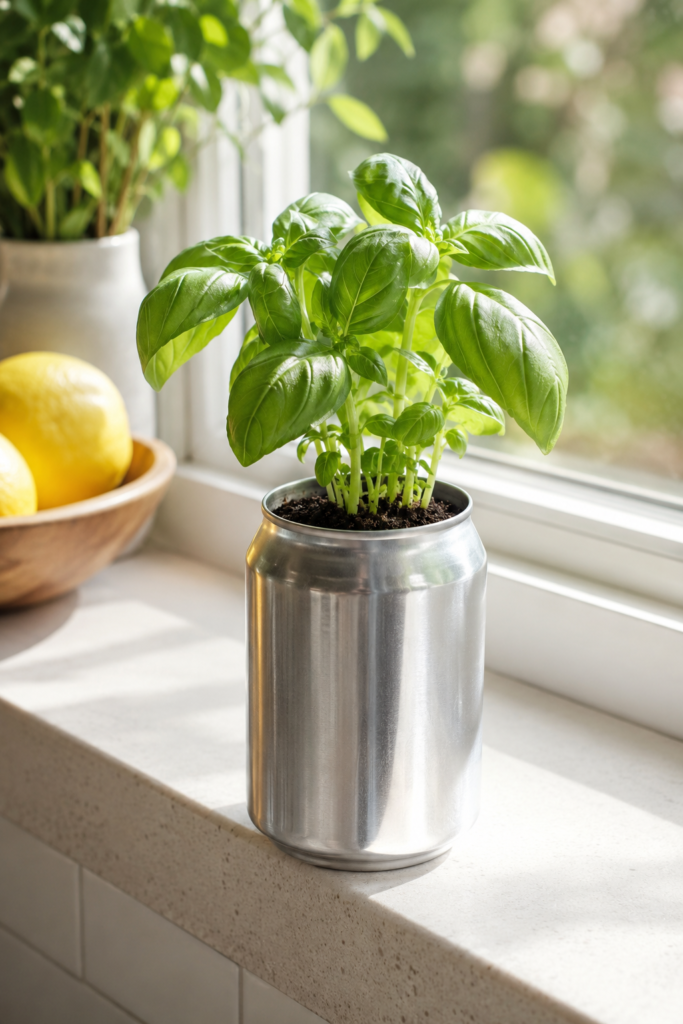
A small herb planter is one of the most natural uses for a soda can because the size suits young basil, mint, parsley, or other compact herbs. The plain silver can also looks surprisingly tidy on a windowsill when the branding is removed or covered. The important part is not to treat the can like a full-size plant pot. It holds a small amount of soil, so watering and root space need more attention.
I like this idea best for a young herb that can later be moved into a larger container. You could also place a small nursery pot inside the can rather than filling the metal container directly. That removable-pot approach is easier for drainage and means the outer can can stay clean.
Materials and Tools
· Clean soda can with a smooth opening
· Small herb plant or seedling
· Small nursery pot or liner that fits inside the can, if available
· Potting mix
· Small saucer or waterproof tray
· Optional paper sleeve or simple exterior decoration
Steps
1. Decide whether to plant directly or use an insert. A removable inner pot is the easiest option because excess water can drain separately. If you plant directly in the can, an adult would need to create drainage carefully and make sure every pierced edge is turned away from hands and protected.
2. Add the herb without overcrowding it. Use only enough potting mix to support the roots and leave a little space below the rim. Set the basil upright, then press the soil lightly around the root ball rather than packing it tightly.
3. Place the can where the herb gets suitable light. A bright kitchen windowsill is convenient because the plant stays close to where you cook, but check the actual light needs of the herb you choose. Rotate the can occasionally if the stems begin leaning strongly toward one side.
4. Water in small amounts and watch the container. A soda can holds much less soil than a normal herb pot, so it can dry out quickly but can also become waterlogged if drainage is poor. Check the soil before watering and empty any standing water from the outer container or tray.
I’d keep the outside simple here. Fresh green basil already gives the project plenty of colour, and the clean aluminum surface makes a nice contrast.
Variation: If soil feels messy, use the can as a cover pot for a small herb in its original nursery container so the plant can be lifted out for watering.
Make a Desk Organizer from Wrapped Soda Cans
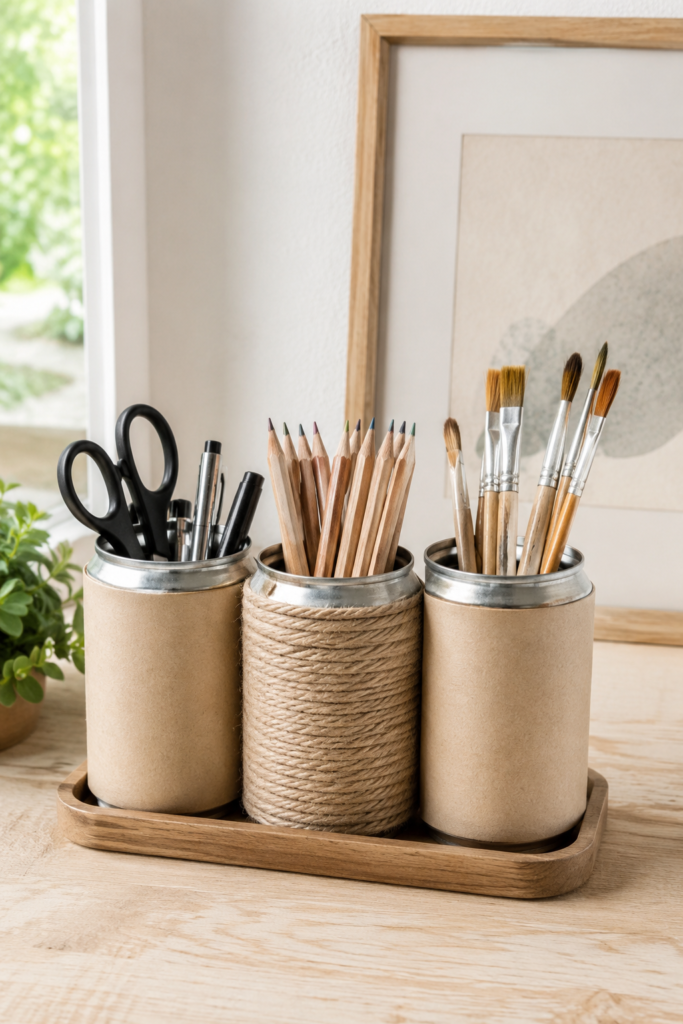
Pens, pencils, scissors, and paintbrushes are exactly the sort of small items that disappear into drawers when they do not have a clear home. Soda cans solve that problem with almost no structural work. Their height suits most drawing tools, and several cans together make it easy to separate writing, cutting, and painting supplies.
This version feels calmer than leaving the printed cans exposed because neutral paper and twine tie the containers together. It is also a good use for scraps left from gift wrapping or other crafts. I know it can feel tempting to add labels, lace, buttons, and more decoration once you start, but the organizer becomes easier to live with when the finish stays fairly restrained.
Materials and Tools
· Three clean soda cans
· Kraft paper, book-page offcuts, fabric, or other lightweight covering
· Twine or cotton cord
· Craft glue or double-sided tape
· Scissors
· Small tray
· Optional cork or felt for the bases
Steps
1. Prepare a smooth and comfortable opening. Clean the cans and inspect each rim before using them for tools you reach for frequently. Cover or replace any can with a rough edge, because a desk organizer should be comfortable to use without thinking about the metal every time you grab a pen.
2. Choose one simple wrapping style. Cut paper or fabric to the height of the main can body and wrap it around with a small overlap at the back. Then add twine to one can or all three, depending on how much texture you want.
3. Group the organizers before filling them. Set the cans inside a tray or close together on a protective mat. Keeping the group contained stops light cans from being knocked over when scissors or a bundle of pencils are removed quickly.
4. Give each can one main purpose. Store pens and scissors in one, pencils in another, and brushes in the third. Separating tools makes the organizer genuinely useful rather than simply moving the same clutter from a drawer onto the desk.
The part I like here is that the project can grow slowly. You can make one holder today and add another matching can later when your supplies need more space.
Variation: For a child’s art table, use bright paper sleeves and keep only age-appropriate supplies inside; the adult should still handle all can preparation.
Mount a Soda Can on Wood as a Trailing Plant Holder
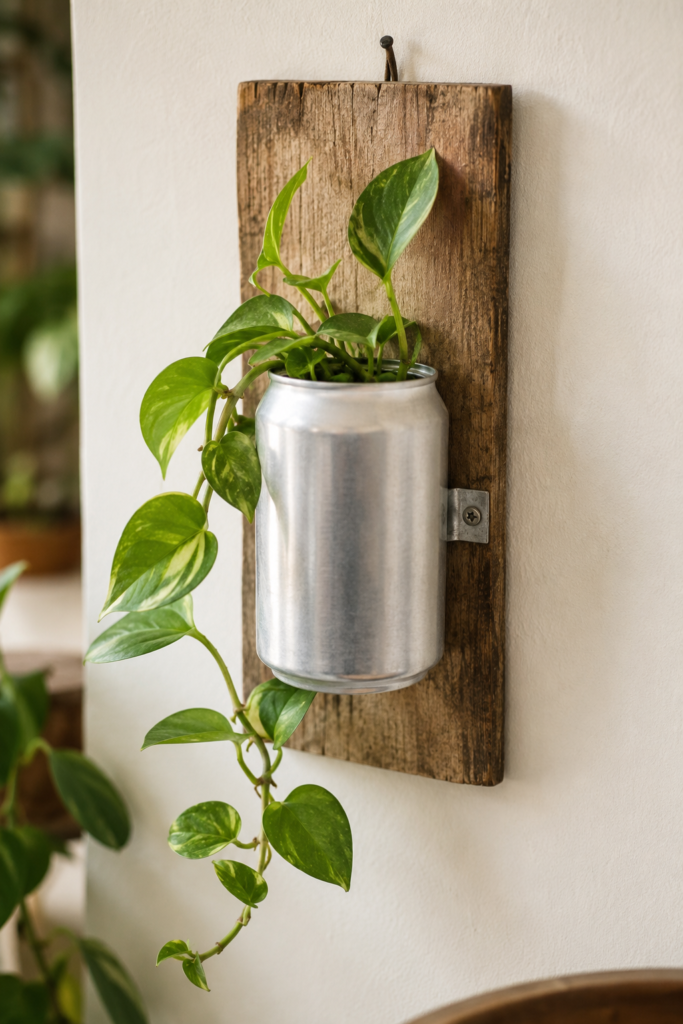
Mounting a soda can to a piece of reclaimed wood turns a small planter into a wall feature without hiding the original material. The contrast is what makes the idea work: warm, weathered timber sits behind cool aluminum, while trailing greenery softens both surfaces. It feels more deliberate than simply hanging a can from string, and the board spreads the visual weight over a larger area.
This project needs stronger construction than the desktop ideas because wet soil and a growing plant add weight. Decorative glue alone is not enough. A small metal strap, pipe clip, or other suitable bracket should hold the can firmly to the board, and the board itself needs a dependable wall fixing.
Materials and Tools
· Clean soda can or a similarly sized lightweight metal container
· Small reclaimed wood board
· Metal strap, clip, or bracket sized to hold the can
· Screws suitable for the board
· Wall hanging hardware suitable for the wall type
· Small trailing plant
· Inner nursery pot or liner if possible
· Screwdriver or drill for adult use
Steps
1. Prepare the wooden backing first. Sand splinters and check that the board is sound enough to hold the planter. Attach the wall hardware before adding the can so you can work on the board while it is still flat and easy to handle.
2. Secure the can with a mechanical fixing. Position the can where the foliage will have room to trail, then use a proper metal strap or bracket to hold it against the wood. Tighten it enough to prevent movement without crushing the lightweight aluminum.
3. Add the plant with moisture control in mind. A small removable nursery pot is the most practical option because you can lift it out for watering. If the can is used as the direct container, moisture and drainage need to be handled carefully so water does not sit against the wood.
4. Hang and test the finished planter. Use a wall fixing appropriate for the combined weight of wood, can, soil, and plant. Once mounted, gently check for movement before letting the vines trail down the front and side.
One detail I wouldn’t skip is the removable inner pot. It makes watering much less awkward and protects the wooden backing from repeated splashes.
Variation: Renters could recreate the same look as a freestanding shelf piece by fixing the can to a short board that simply leans securely against the wall instead of hanging it.
Create a Light Soda Can Wind Chime for a Covered Porch
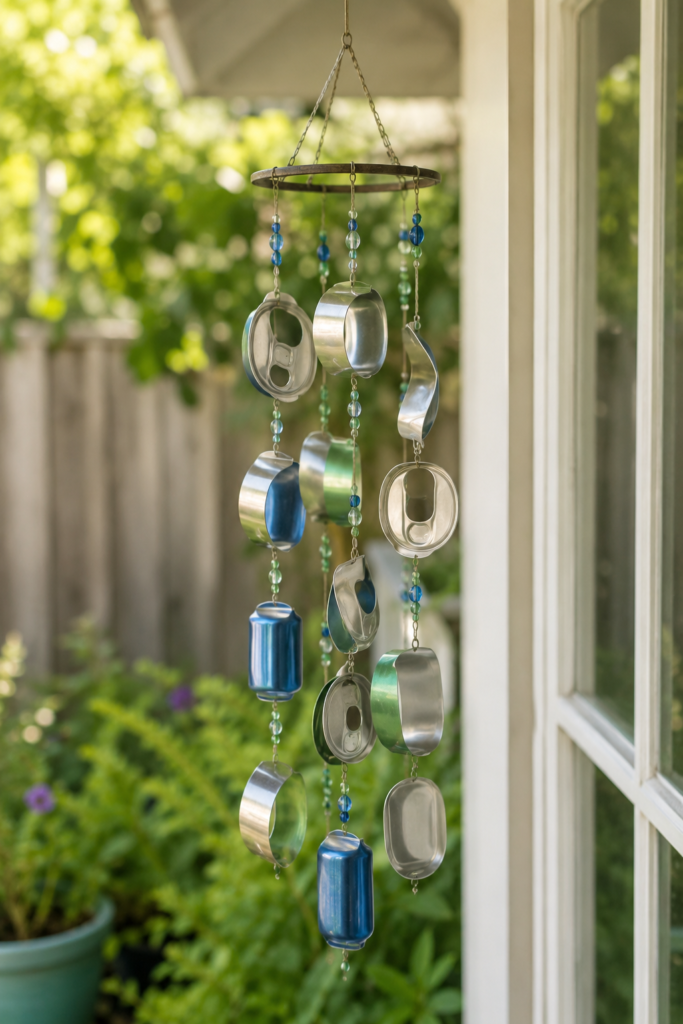
A wind chime uses one quality soda cans have in abundance: they are extremely light. Small aluminum pieces move with a gentle breeze, and a few beads add colour without making the hanging decoration too heavy. The selected look is more restrained than a large clattering mobile, which is important if you want something that feels pleasant on a porch rather than noisy every time the air moves.
This is the one project where edge preparation matters most. Cutting aluminum can create very sharp metal, so the shaping stage should be handled only by an adult wearing suitable protection. I’d keep the pieces broad and rounded, smooth or fold every cut edge, and reject anything that still feels sharp. If you do not want to cut cans at all, the safer beginner version can use smooth pull tabs, unopened can ends prepared with the right tools, or other pre-finished lightweight metal pieces.
Materials and Tools
· Clean soda cans or safe pre-finished soda-can components
· Small circular frame, metal ring, or sturdy embroidery hoop
· Strong cord, chain, or fishing line
· Lightweight beads
· Small connecting rings or suitable knots
· Pliers
· Gloves and eye protection for adult metal preparation
· Optional small file or edge-finishing tool
Steps
1. Plan the chime before preparing any metal. Decide how many hanging strands you want and keep the design light. A few pieces at different lengths usually move more freely and sound softer than a crowded bundle of metal.
2. Prepare every metal component safely. An adult should handle all cutting, piercing, folding, and smoothing while wearing protection. Round corners, turn sharp edges inward where practical, and run a protected hand around each finished piece before it is allowed onto the hanging strands.
3. Build the hanging strands on the table. Alternate a metal piece with one or two lightweight beads, leaving enough space for movement. Then attach each strand securely to the circular top frame and vary the lengths slightly so the pieces can move without sitting directly on top of one another.
4. Hang it in a sheltered location and recheck it. Use a secure hook on a covered porch or protected outdoor area, then watch how the chime moves in a normal breeze. Remove or adjust any component that tangles, hits too aggressively, or develops a rough edge over time.
I’d rather make a smaller chime with five secure strands than a huge one that becomes noisy and difficult to inspect. Lightweight materials do not need much movement to create interest.
Variation: For a no-cut version, build the hanging strands from cleaned pull tabs and beads instead of pieces cut from the can body.
Soda Can Upcycling Mistakes That Make Simple Projects Harder Than They Need to Be
Using damaged cans because they are already available.
A deep crease, split rim, or crushed side can turn a straightforward project into a safety or stability problem. Reusing something does not mean every damaged object must be saved. Choose the cans that are still structurally sound and recycle the rest.
Decorating before deciding how the item will be used.
Paper wrapping looks lovely on an organizer, but it is a poor choice where soil or regular splashes will soak it. Plan the practical use first, then choose the finish. This is where a liner, removable pot, tray, or washable sleeve can save the project.
Trusting glue with weight it was never meant to carry.
A can sitting on a desk can rely on simple adhesive for decoration. A can filled with soil and mounted on a wall needs a proper bracket and wall fixing. I don’t think there is any benefit in making the attachment invisible if the result is less secure.
Leaving a rough edge because it is only slightly sharp.
Small metal burrs are easy to ignore during construction and annoying every time the finished item is used. If a rim or cut piece cannot be made reliably smooth, replace it or choose a no-cut version of the idea.
Adding too many materials to a very simple object.
The can already has a strong shape. Paper, twine, wood, plants, or beads should support the new function rather than burying it. A simple finish also makes the upcycled object easier to clean and repair later.
Frequently Asked Questions
What is the easiest way to upcycle a soda can?
A desk organizer or kitchen utensil holder is usually the easiest because the can can stay almost completely intact. Clean it, check the rim, add a simple wrap if you want to hide the branding, and use a tray or base to keep several cans stable.
Can I grow herbs directly in an aluminum soda can?
You can use a can as a small plant container, but drainage and moisture need attention. A removable nursery pot or liner is often easier because you can lift the plant out for watering and avoid leaving wet soil permanently against the decorated can.
How can I cover the printed design on a soda can?
Kraft paper, fabric scraps, removable sleeves, twine, or a simple painted finish can all disguise branding. Choose the covering based on the final use; paper is good for dry organizers, while a more moisture-resistant finish is better near plants or kitchen splashes.
Is it safe to cut soda cans for crafts?
Cut aluminum can be very sharp. Any cutting or piercing should be handled carefully by an adult with appropriate eye and hand protection, and every finished edge must be smoothed, folded, covered, or otherwise made safe. For beginners, projects that keep the can intact are usually the better choice.
How do I stop a soda-can organizer from tipping over?
Use several cans together in a tray, add non-slip backing underneath, and distribute heavy tools rather than placing every large item in one container. A shallow box or wooden tray also makes the individual cans feel like one stable organizer.
Can these soda-can ideas be used outdoors?
Some can, especially a carefully made wind chime or a protected planter. Outdoor projects need secure hanging points and materials that tolerate moisture. Check them from time to time because weather can loosen cords, affect adhesives, or expose rough metal edges.
Give the Can a Job You Will Actually Keep Using
A soda can does not need a complicated transformation to earn a second use. Its simple cylinder shape already works for storage, small plants, and lightweight hanging projects, which means most of the effort can go into making the new purpose safe, stable, and pleasant to live with. For me, that is much more satisfying than adding decoration simply because a surface is empty.
If you are trying soda-can upcycling for the first time, begin with an organizer or small cover pot and leave the cutting tools out of it. Then, once you are comfortable with the material, you can move toward a mounted planter or carefully prepared outdoor hanging piece. The best project is the one that fits your home and continues to be useful after the novelty of making it has worn off.