Metallic acrylic paint changes dramatically as you move around it. A gold area that looks softly ochre from one angle may catch the light and become much brighter from another. That shifting finish is what makes the paint useful, but it also explains why covering an entire object in one heavy coat rarely produces the most convincing result.
Metallic acrylics contain reflective pigments suspended in an acrylic binder. Depending on the colour and formulation, those pigments may use materials such as treated aluminium or mica to create their light-catching appearance.
I find metallic paint most effective when it highlights something the object already has: carved furniture details, the rim of a planter, raised texture on a canvas, or the worn edges of an old frame. I don’t think every surface needs to shine equally.
A plain base colour often makes the metallic layer easier to control. Then you can decide whether the project needs a solid reflective finish, a thin glaze, a dry-brushed highlight, or only a few precise accents.
Prepare the Surface and Decide Where the Shine Should Sit
Clean the object before opening the paint. Dust, furniture polish, grease, soap residue, and loose coatings may prevent acrylic paint from forming a reliable bond.
Preparation depends on the material:
- Remove dust and grease from wood.
- Repair loose furniture joints before painting.
- Wash and dry glass thoroughly.
- Remove rust and unstable coatings from metal.
- Brush loose soil from terracotta.
- Clean frames around corners and decorative moulding.
- Prime absorbent or uneven surfaces when the paint system requires it.
- Test smooth plastic before committing to the complete object.
- Check old painted furniture before sanding unknown coatings.
- Let texture paste or filler dry throughout before painting it.
Metal, glass, and many plastics are nonabsorbent surfaces. GOLDEN advises abrading nonabsorbent materials when increased acrylic adhesion is needed, although you should test first because scratching may permanently alter glass, plated metal, or delicate finishes.
Place the object under the lighting in which it will normally be seen. A copper finish may look warm beside a window but much darker beneath cool artificial light. Testing the colour on an offcut or hidden area is more useful than judging it only inside the container.
Choose a Base Colour Deliberately
Metallic paint does not always need to form the background. A base coat can influence the finished appearance and help disguise small gaps between reflective brushstrokes.
Possible combinations include:
- Black beneath gold for stronger contrast
- Deep brown beneath bronze for an aged effect
- Warm cream beneath champagne gold
- Navy beneath silver for a cooler finish
- Rust or terracotta beneath copper
- Dark green beneath antique gold
- A matching flat acrylic beneath a metallic colour
A dark base usually makes the reflected highlights feel stronger. A lighter base creates a softer result and may suit frames, jars, planters, and decorative objects that should not dominate the room.
Gather the Right Tools
- Metallic acrylic paint
- Compatible base paint or primer
- Flat synthetic brush
- Small detail brush
- Stencil brush
- Soft rounded brush
- Cosmetic sponge or sea sponge
- Palette knife
- Paint palette
- Clean water
- Lint-free cloths
- Paper towels
- Low-tack masking tape
- Fine abrasive material
- Protective gloves
- Eye protection when sanding
- Suitable acrylic medium
- Compatible varnish or topcoat
- Scrap material for testing
Stir the paint gently before use so the colour and reflective particles appear consistent. Avoid whipping air into it, especially when you want a smooth finish.
Keep the palette manageable. Metallic paint begins forming a film as it dries, and half-dried paint dragged back across the object can create rough patches. Clean water-based acrylic from brushes promptly with soap and water rather than allowing it to harden between the bristles.
Give a Small Furniture Piece a Controlled Metallic Finish
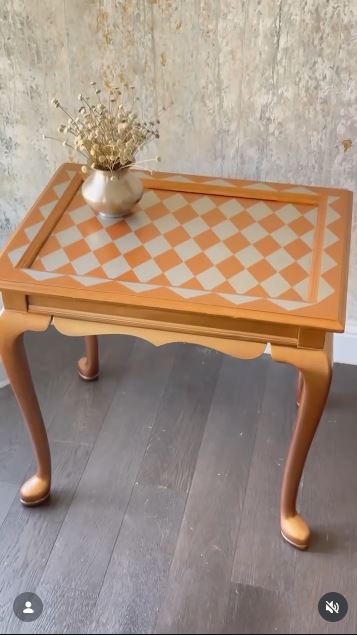
Covering part of a table, cabinet, or drawer unit with metallic acrylic paint can create a strong focal point without replacing the furniture. The important decision is where the reflective colour will stop.
A complete metallic top may work with plain legs. Metallic drawer fronts can sit beside a matte painted frame. Another option is to reserve the finish for one door, inset panel, or section of moulding.
Materials and Tools
- Structurally sound furniture
- Mild cleaner
- Screwdriver and repair supplies
- Fine abrasive material
- Compatible primer
- Matte base paint
- Metallic acrylic paint
- Flat synthetic brush or small roller
- Detail brush
- Protective finish suited to the object
Apply the Furniture Finish
- Repair and clean the furniture. Tighten loose hardware and stabilise moving joints before painting. Wash away grease and furniture polish, then let every surface dry fully before further preparation.
- Test the complete paint system. Apply primer, base colour, metallic paint, and the intended topcoat to a hidden area or separate sample. This reveals adhesion problems and shows how the topcoat may change the shine.
- Create an even base. Apply the compatible primer when required, followed by a smooth base colour. Keep thick ridges away from corners and decorative edges because metallic paint may emphasise them rather than hide them.
- Build the metallic layer gradually. Use long strokes in one direction across broad surfaces and avoid returning repeatedly to areas that are beginning to dry. Then apply another thin layer only after the previous one has dried according to the product directions.
- Protect the working surfaces. Let the paint dry fully before adding a compatible finish. Pay particular attention to tabletops, drawer fronts, and handles that will receive frequent contact.
For me, one metallic section is usually enough on a small piece of furniture. When the top, legs, drawers, hardware, and decorative details all compete for attention, the reflective finish loses its purpose.
A beginner can paint only the drawer fronts or removable knobs. That allows you to understand the paint before committing to a large tabletop.
Dry-Brush Raised Furniture Details With Silver or Gold
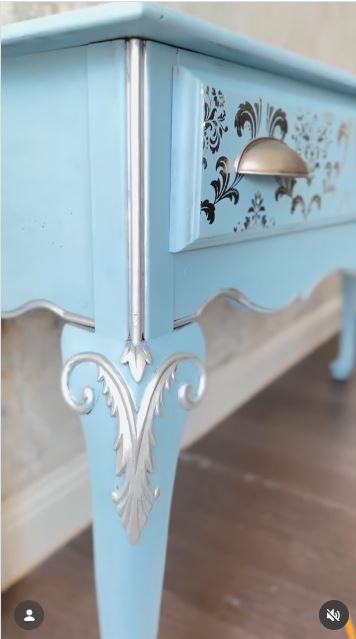
Dry brushing is useful on carved legs, moulding, drawer edges, decorative appliqués, and textured hardware. Rather than covering the complete surface, the brush touches the highest details and leaves the deeper areas mostly unchanged.
This produces more depth than painting every ridge and hollow with the same metallic colour. The technique can also make an uneven old object feel more intentional because it works with existing wear rather than trying to erase it.
Materials and Tools
- Prepared furniture or decorative object
- Matte base colour
- Metallic acrylic paint
- Small flat or rounded brush
- Scrap cardboard
- Soft cloth
- Detail brush
- Optional compatible glaze
- Suitable protective finish
Highlight the Raised Areas
- Create a dry, stable background. Paint and cure the base colour before adding metallic highlights. Dark brown, charcoal, deep blue, or muted green can help gold, silver, bronze, and copper remain visible.
- Load and unload the brush. Pick up a small amount of metallic paint, then wipe most of it onto cardboard or a cloth. The brush should appear almost empty before it touches the furniture.
- Skim across the texture. Move the brush lightly over the raised areas without pushing paint into the recesses. Work from several directions when the carving has curved details, but keep the pressure gentle.
- Build the brightest points. Let the first pass settle, then add a little more paint to the corners and ridges that would naturally catch light. Remove an overly bright mark with the base colour rather than rubbing it while wet.
- Check it from across the room. Metallic detail can look subtle at arm’s length and much stronger from a distance. Seal it only after the balance feels right under the room’s normal lighting.
I know it can feel as though nothing is happening during the first few passes. That is usually a good sign. Dry brushing should build slowly rather than producing one obvious silver stripe across every edge.
The same technique works on an old mirror frame, wooden box, lamp base, embossed panel, or decorative plaster piece.
Give an Empty Glass Jar an Antique-Metal Appearance
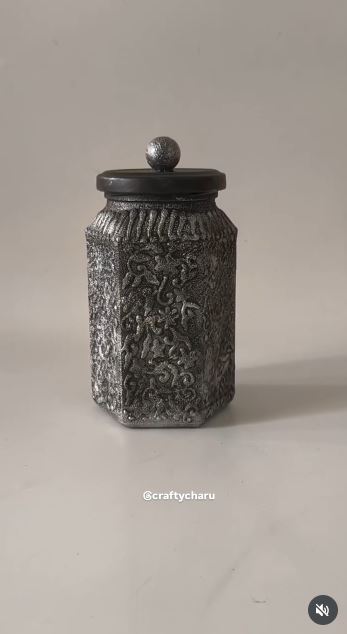
An empty jar offers a useful test surface because it combines smooth glass with curves, edges, and reflected light. Rather than applying one solid gold coat, an antique effect uses a dark background with metallic colour concentrated on texture and raised lines.
Use the finished jar for dried flowers, wrapped objects, brushes, or decorative storage. Ordinary craft paint and varnish should not be assumed suitable for food-contact areas.
Materials and Tools
- Undamaged glass jar
- Dish soap
- Suitable degreasing cleaner
- Compatible glass primer or bonding base
- Dark acrylic base colour
- Metallic gold, bronze, or copper acrylic paint
- Sponge
- Detail brush
- Texture medium or decorative outline, if desired
- Compatible protective finish
- Protective work covering
Paint the Jar
- Inspect and wash the glass. Do not reuse a jar with chips or cracks. Remove the label and adhesive, wash the surface thoroughly, and avoid touching the prepared glass with oily fingers.
- Test the base coat. Use a compatible bonding product when required by the paint system. Apply it to a small area first and check whether it scratches away easily after drying.
- Build the dark background. Apply thin coats with a sponge or brush, turning the jar as you work. Let each layer settle before adding another so the surface does not become lumpy.
- Add metallic accents. Use a nearly dry brush to catch raised texture, decorative outlines, the shoulder, and selected edges. Then deepen a few areas with a second metallic colour if the jar needs more variation.
- Finish it for decorative use. Apply only a compatible coating and keep the rim and interior free from unverified decorative materials. Let the complete finish cure before placing objects inside.
The antique effect becomes more convincing when the metallic layer remains uneven. A jar covered in identical bright gold from top to bottom may look flatter than one with dark recesses and worn-looking highlights.
A small spice jar can become a place for paper clips or dried seed heads. Larger jars can hold paintbrushes, knitting needles, or a removable inner container for fresh flowers.
Add Gold Highlights to Textured Canvas Art
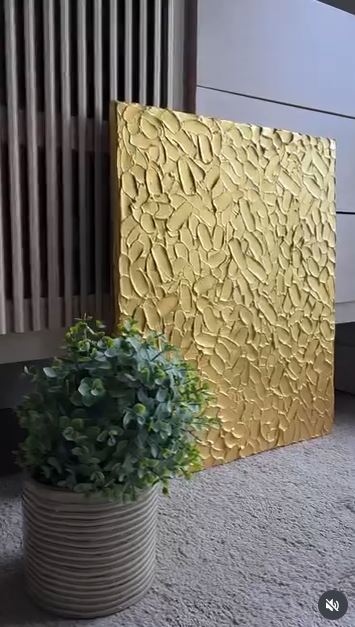
Textured art makes metallic paint more noticeable because every raised section reflects light differently. You can reuse an unwanted canvas when its frame and fabric remain sound, covering the previous design with a suitable ground before adding new texture.
The texture should dry completely before painting. A thick surface can feel dry outside while remaining soft beneath, and pressing metallic colour over it too early may damage the raised shapes.
Materials and Tools
- Sound old or new canvas
- Suitable acrylic ground
- Texture paste
- Palette knife
- Stencil or simple shaping tool
- Matte base acrylic
- Metallic acrylic paint
- Flat brush
- Dry brush
- Masking tape
- Compatible varnish
Build the Textured Artwork
- Prepare the canvas. Check that the fabric remains tight and the frame sits squarely. Cover the earlier artwork with a suitable ground if necessary and let the surface dry.
- Plan the textured areas. Mark a simple composition rather than applying paste everywhere. Use a palette knife, stencil, or repeated tool marks to create sections with raised and flatter areas.
- Let the texture harden fully. Follow the product instructions and avoid force-drying a thick layer. Repair cracks or loose peaks before applying colour.
- Add a matte background. Paint the canvas with a restrained base tone and make sure the recesses receive enough coverage. Then dry-brush metallic paint across the highest areas.
- Adjust the balance under different light. Turn the canvas or move the lamp before adding more gold. Apply a compatible varnish only after testing how its sheen affects the contrast.
The metallic colour should reveal the texture, not bury it. I’d rather add three light passes than one heavy layer that fills the fine ridges.
Small canvases, unwanted framed panels, cardboard relief pieces, or old wooden boards can provide lower-cost alternatives.
Why Metallic Paint Looks Streaky, Flat, or Too Shiny
Skipping the Base Coat
Metallic pigments may not disguise an uneven surface. A stable, related base colour creates visual depth and reduces the pressure to apply one thick metallic coat.
Loading the Brush Too Heavily
Excess paint creates ridges, visible starts and stops, and reflective patches that dry differently. Use thin layers and keep the brush moving consistently.
Brushing Back Into Partly Dry Paint
Acrylic begins forming a film quickly. Returning to a tacky area may lift the surface or create rough texture, so complete a manageable section and leave it alone.
Using Water as the Only Thinner
Too much water may reduce binder strength and alter the way the paint forms a film. Use a compatible acrylic medium when you need a controlled glaze or extended transparency.
Ignoring the Direction of the Light
Metallic paint depends on reflected light. Check the project from several angles and under the lighting used in the room before deciding it needs another coat.
Painting Smooth Glass, Metal, or Plastic Without Testing Adhesion
Nonabsorbent surfaces often need specialised preparation. Clean them carefully and test abrasion, primer, paint, and finish together before painting the complete object.
Making Every Detail Equally Bright
Metallic accents need quieter areas around them. Reserve the brightest colour for selected edges, peaks, and focal points.
Applying Varnish Without a Sample
A topcoat may increase, soften, or unevenly change the metallic sheen. Liquitex recommends testing varnish first and applying appropriate thin coats rather than building a cloudy layer.
Sealing Paint That Has Not Dried Fully
A surface may feel dry before the deeper paint film has settled. Follow the drying and varnishing instructions for the exact products rather than judging only by touch.
Using Decorative Acrylic Paint on Food-Contact Surfaces
Keep ordinary metallic craft coatings away from plate centres, cup rims, cutting boards, and other areas that touch food unless the complete product system is explicitly approved for that use.
Frequently Asked Questions
Does metallic acrylic paint need a primer?
It depends on the surface and the paint system. Absorbent wood or canvas, smooth glass, plastic, glazed ceramic, and metal may all require different preparation, so test the recommended primer with the paint and final coating.
Why does my metallic paint look transparent?
Some metallic colours provide less hiding power than a flat opaque paint. Apply a related base colour first, then build the metallic finish with thin, even layers.
Can I mix metallic acrylic paint with ordinary acrylic?
Yes, compatible acrylic colours can generally be mixed, although the ordinary paint will soften the reflective effect. Mix a small sample and let it dry before judging the final colour.
Which brush is best for metallic acrylic paint?
Use a flat synthetic brush for broad, smooth layers and a small rounded or stencil brush for dry-brushed details. A sponge can create a softer broken finish on jars, planters, and textured surfaces.
Should metallic acrylic paint always be varnished?
Not every decorative object needs the same protection. Frequently handled furniture, frames, and containers may benefit from a compatible finish, while fine artwork requires a varnishing system suited to the paint and support.
Can metallic acrylic paint be used outdoors?
Only when the paint, preparation, and protective system are appropriate for exterior exposure. Check the exact manufacturer guidance and remember that moisture, sunlight, and temperature changes affect the complete project, not just the metallic layer.
How do I clean brushes after using metallic acrylic?
Rinse water-based acrylic from brushes promptly and clean them with soap and water before the paint dries. Work the soap gently through the bristles, reshape the brush, and let it dry without resting on its tip.
Let the Light Decide Where the Metallic Finish Belongs
Learning how to use metallic acrylic paint is mostly about restraint, surface preparation, and observation.
A solid metallic panel can update small furniture, but a nearly dry brush may be better for carved details. A glass jar can carry an antique-brass effect, while a planter needs only a thin reflective wash. Frames and textured canvases work especially well because their raised areas already tell you where the light should land.
Begin with one small object and one metallic colour. Prepare the surface properly, apply a suitable base, and add the shine gradually. Then step away, change the lighting, and decide whether the project genuinely needs more paint.
Which surface would you try first: an old frame, a glass jar, a planter, textured canvas, or a small piece of furniture?