Old tank tops often remain in the wardrobe long after they stop being worn. One may feel too long for workouts, another may have an awkward neckline, and a favourite summer top may simply look too plain beside newer clothes.
The good thing is that tank tops usually provide soft, stretchy fabric without complicated sleeves or collars. That simple shape makes them easier to cut, tie, decorate, or rebuild into something with a different purpose.
I don’t think every tank top needs a dramatic transformation. Shortening the body, changing the straps, adding a few studs, or turning an unworn top into a useful bag can be enough to keep the fabric in use.
Before cutting anything, check the condition of the material. Small stains and uneven fading can become part of a new design, but brittle fabric, stretched armholes, and thinning seams may need reinforcement. A pair of scissors can change the shape quickly, although it is considerably less talented at putting fabric back.
Understand the Fabric Before Choosing a Project
Tank tops can be made from cotton jersey, rib knit, athletic fabric, polyester blends, rayon, or fabric containing elastane. These materials do not behave in exactly the same way.
Cotton jersey often curls slightly at a raw cut edge, which can make it suitable for casual cropped tops and tied designs. Ribbed fabric stretches more strongly and may become wider than expected after cutting.
Athletic fabric can be smooth, slippery, and highly elastic. It may need stretch-friendly stitches when you are creating new seams. A thick needle or ordinary rigid stitch can damage the material or break when the top is pulled over the body.
A loosely woven or delicate tank top may fray rather than curl. Those edges may need hand stitching, narrow binding, fabric adhesive, or another suitable finishing method.
Before choosing the project, ask:
- Does the fabric stretch across its width?
- Does it stretch vertically as well?
- Does a cut test curl, fray, or remain flat?
- Is the original hem still strong?
- Are the straps stretched or damaged?
- Does the fabric recover after being pulled?
- Is the top large enough for the intended change?
- Will a printed design remain visible after cutting?
- Does the material tolerate ironing?
- Can the altered garment still move comfortably?
Make a tiny test cut inside an unwanted hem or on a removed scrap. That will tell you much more than guessing from the fabric’s appearance.
Prepare the Tank Top Properly
Wash and dry the tank top before measuring it. Fabric that changes size after the makeover can alter the finished length and fit.
Try the top on and identify the actual problem. It may be too long, too loose around the waist, too high at the neckline, or simply too plain. Changing only the part that prevents you from wearing it usually produces a more practical result.
Preparation may include:
- Washing without fabric softener
- Drying the tank top fully
- Removing lint
- Repairing small holes
- Reinforcing weak straps
- Checking the side seams
- Trying the top on
- Marking the desired length
- Measuring both sides
- Protecting printed graphics
- Testing fabric adhesive
- Testing an iron setting
- Placing cardboard inside the top
- Preparing matching thread
- Covering the work surface
Use tailor’s chalk or a washable fabric marker rather than a permanent pen. Mark the garment while it lies flat, then compare both sides before cutting.
Always make the first cut smaller than the final change you have in mind. Stretch fabric can drop lower, open wider, or curl more after the cut edge is released.
Gather the Basic Tools
- Sharp fabric scissors
- Small thread scissors
- Flexible measuring tape
- Ruler
- Tailor’s chalk
- Washable fabric marker
- Straight pins
- Fabric clips
- Safety pins
- Hand-sewing needles
- Stretch-friendly thread
- Embroidery thread
- Seam ripper
- Thimble
- Fabric adhesive
- Fusible web, if suitable
- Iron and pressing cloth
- Studs or small embellishments
- Stud-setting tool
- Yarn or narrow fabric cord
- Scrap fabric
- Cardboard
- Paper for templates
Keep the fabric scissors away from paper and packaging. Sharp scissors produce a smoother cut, especially across stretchy ribbed material that tends to move while you work.
Turn a Basic Tank Top Into a Cropped Bralette With Waist Ties
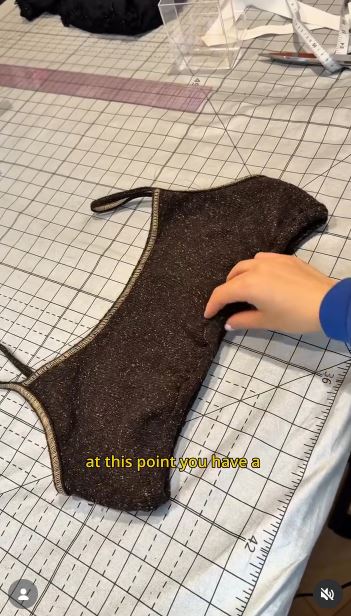
A fitted tank top can be reshaped into a shorter bralette-style top when the upper section already sits comfortably around the chest. The lower fabric provides enough material for ties that wrap around the waist.
This project needs secure stitching because the new side seams and ties will be pulled while dressing. Hand sewing can work, although the stitches must suit stretch fabric and remain closely spaced.
Materials and Tools
- Stretch tank top
- A fitted top for reference
- Fabric scissors
- Tailor’s chalk
- Measuring tape
- Straight pins or clips
- Hand-sewing needle
- Stretch-friendly thread
- Small safety pin
Reshape the Tank Top
- Choose the finished depth. Try the tank top on and mark where the cropped section should end. Make sure the upper portion remains deep enough for comfortable coverage before cutting.
- Use a fitted top as a guide. Turn the tank inside out and lay it flat. Place the reference top over it, then mark the new side shape without making the body excessively tight.
- Cut the body and preserve tie fabric. Remove the unwanted side sections while leaving long strips from the lower portion. Keep the strips wide enough to remain strong after their edges curl or are folded.
- Pin and hand sew the new seams. Try the pinned top on carefully before stitching. Use secure, closely spaced stitches that can tolerate stretch, then reinforce the places where the waist ties meet the body.
- Shape and test the ties. Trim the strips evenly and finish the edges when the fabric frays. Wrap them without pulling harshly, and check that the attachment points remain flat rather than twisting.
I’d keep the ties simple. Extra beads or heavy decorations near their ends may look interesting on the table but become rather enthusiastic little pendulums while walking.
A beginner-friendly alternative is to crop the tank and add one short front tie instead of rebuilding the side seams.
Change a Plain Tank Into a Hand-Worked Halter Top
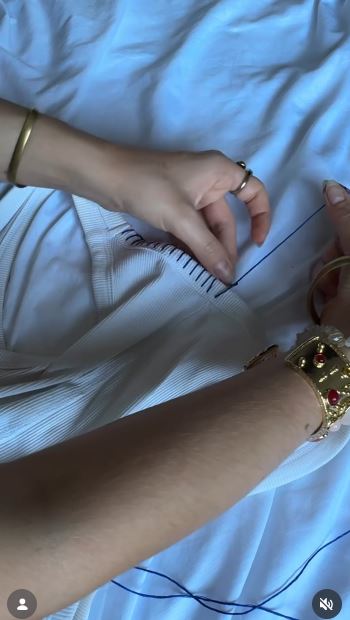
A halter alteration draws attention towards the neckline and shoulders. It can help a tank top with stretched straps or an unflattering square neck feel more intentional.
Decorative yarn or fabric cord can be worked through reinforced openings, but it should not carry the full weight of the garment unless the attachment is secure. The original fabric around the new neckline needs enough strength to resist pulling.
Materials and Tools
- Basic tank top
- Fabric scissors
- Tailor’s chalk
- Hand-sewing needle
- Strong thread
- Yarn or soft fabric cord
- Small crochet hook, if useful
- Pins or clips
- Thimble
- Scrap fabric for reinforcement
Create the Halter Shape
- Plan the neckline on the body. Try the top on and mark where the halter should begin near each shoulder. Check the front coverage and make sure the new line will not expose more than intended.
- Remove or reshape the straps. Lay the tank flat and cut cautiously around the marked areas. Preserve extra fabric near the neckline so it can be folded, reinforced, or used to hold the cord.
- Strengthen the working edge. Fold the raw edge inward or add a narrow scrap behind it. Secure the area with hand stitches before inserting yarn through any opening.
- Add the decorative yarn. Work the yarn through reinforced loops or hand-stitched channels, keeping the tension even. Then test how the neckline sits before tying permanent knots or trimming the ends.
- Check comfort and support. Move the arms, shoulders, and neck while wearing the top. Reinforce any point that stretches, curls, or pulls the front out of shape.
The part I would watch carefully is the back of the neck. A thick knot can become uncomfortable quite quickly, so a flatter tie or wider fabric cord may work better.
You could use ribbon, braided jersey strips, soft shoelace-style cord, or narrow strips cut from another old tank top.
Turn an Unworn Tank Top Into a Yoga Bag
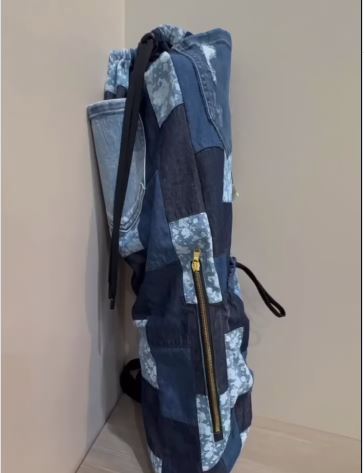
A tank top with sturdy fabric can become the starting point for a lightweight yoga carrier. This is especially useful when the garment is no longer suitable for wearing but still has an undamaged body and straps.
A bag must bear more weight than a top. The seams, strap attachments, and bottom need reinforcement rather than relying on the original light stitching alone.
Materials and Tools
- Strong old tank top
- Rolled yoga mat for measuring
- Fabric scissors
- Hand-sewing needle
- Strong thread
- Pins or clips
- Measuring tape
- Fabric scraps for reinforcement
- Zip or drawstring, if desired
- Old belt or webbing for a stronger strap
- Optional pocket fabric
Build the Yoga Carrier
- Measure the tank around the mat. Roll the yoga mat and place it over the tank top. Check whether the fabric body is wide and long enough to form a comfortable carrier without stretching severely.
- Plan the bag opening and base. Decide whether the mat will slide in from the top or side. Trim only after leaving enough fabric for folded edges and reinforced seams.
- Close and reinforce the bottom. Turn the fabric inside out and pin the base. Hand sew it with strong backstitches, then add a second line or a fabric reinforcement strip so the mat does not pull directly against one narrow seam.
- Create a dependable strap. Reuse the original tank straps only when they remain strong and wide enough. An old belt, webbing strap, or several layered jersey strips may provide better support.
- Add the finishing details. Attach a small pocket for keys, a tie for the opening, or a lightweight pouch. Test the bag indoors with the mat before carrying additional items.
For me, the strap attachment deserves more attention than the decorative details. A lovely pocket will not be much comfort when the main strap parts company with the bag halfway down the street.
A simpler carrier can use two wide fabric loops joined by one shoulder strap, leaving most of the mat visible. Small tank-top scraps can become ties or a soft pouch for keys.
Common Mistakes to Avoid
Cutting Before Trying the Tank Top On
Tank tops stretch and hang differently on the body than they do on a table. Mark the intended neckline, hem, or side opening while wearing the garment before making the first cut.
Removing Too Much Fabric
A neckline may widen and a cropped hem may rise after cutting. Begin with a smaller change, try the garment on, and trim again only when necessary.
Ignoring the Fabric Type
Jersey may curl neatly, while woven fabric can fray. Athletic fabric, rib knit, and thin blends also need different edge-finishing methods.
Pulling Stretch Fabric While Cutting
Stretching the fabric creates an uneven edge once it relaxes. Smooth the top gently and let the material remain in its natural shape beneath the scissors.
Trusting the Original Seams for a Bag
Tank-top seams were designed to hold clothing, not a yoga mat, groceries, or books. Reinforce weight-bearing areas with strong stitches and additional fabric.
Placing Hard Embellishments Against the Skin
Studs, beads, and knots can rub beneath the arms or around the neckline. Check the inside of every decorated area before wearing the top.
Using Fabric Adhesive on a High-Stress Seam
Adhesive may work for decoration or a light folded edge, but heavily stretched side seams and straps often need secure stitching. Test the chosen product before depending on it.
Making Waist Ties Too Narrow
Thin jersey strips can stretch, curl tightly, and weaken where they join the garment. Leave enough width for comfortable, dependable ties.
Skipping the Fit Test
Try the altered top or skirt on at several stages. Pins and clips allow changes before the fabric is cut or stitched permanently.
Adding Too Many Details
Studs, yarn, cut-outs, ties, and paint do not all need to appear on one tank top. Choose one main change and let the original fabric support it.
Forgetting About Fabric Sheerness
Stretching a tank top into a fitted skirt or bralette can make the material more transparent. Check it in strong light before wearing the finished garment.
Throwing Away the Offcuts
Straps, hems, and body strips can become ties, headbands, cleaning cloths, repair patches, or stuffing for another textile project.
Frequently Asked Questions
Can every tank top be upcycled?
Most tank tops offer at least one reuse option, but the fabric needs to remain reasonably strong. A badly stretched or brittle top may be more suitable for cleaning cloths, stuffing, or small craft pieces than another wearable garment.
What is the easiest tank-top upcycle?
Shortening a cotton jersey tank or adding a simple tied hem is usually easier than reconstructing seams. Begin with a top you do not mind practising on.
Do I need a sewing machine?
No. Many tank tops can be cut, tied, embellished, or hand sewn. A machine is useful for long seams, but it is not essential for small alterations and simple accessories.
How do I stop the raw edge from fraying?
The method depends on the fabric. Jersey may curl without heavy fraying, while woven material may need hand stitching, fusible tape, binding, or a compatible fabric adhesive.
Can a tank top really become a bag?
Yes, provided the fabric and seams are reinforced for the intended weight. A thin fashion tank should only carry light items, while a sturdier knit can support a more structured bag.
How can I make a cropped tank less revealing?
Leave more length at the back, wear it over a fitted layer, or add a wide band made from leftover fabric. Always check the length while moving, not only while standing still.
Can ribbed tank tops be cut?
They can, but rib fabric may stretch and narrow differently after cutting. Test a small offcut and make conservative changes first.
What should I do with very small scraps?
Use them as ties, soft hair bands, repair patches, tassels, stuffing, or cleaning pieces. Even narrow strips can be braided into cord.
Let the Original Tank Top Suggest the Next Use
Learning how to upcycle tank tops begins with noticing what still works.
A workout tank may only need a shorter hem. A fitted top can become a bralette with adjustable ties, while a plain neckline can carry studs or hand-worked yarn. Longer stretch tops may become simple skirts, and stronger fabric can move out of the wardrobe entirely as a yoga bag.
Begin with one tank top and one clear reason it is no longer being worn. Change that part first, then try the result on before adding another cut, tie, or decoration. The simplest alteration is often the one that keeps the fabric useful for the longest time.
Which forgotten tank top would you work on first: the oversized workout top, the plain ribbed tank, the long fitted one, or the sturdy top that could become a bag?