A bridesmaid dress can hold far more potential than its place at the back of a wardrobe suggests. The colour may still feel special, the satin may remain smooth, and the lace or pleated details may be too carefully made to discard, even when the complete dress no longer suits another occasion.
I like to look at a formal dress as a collection of useful materials rather than one garment that must remain intact forever. The skirt may provide broad fabric panels for cushions, while the bodice can supply structured pieces for a clutch or small keepsake bag. Narrow offcuts can become headbands, and the most recognisable sections can be placed carefully across a memory bear.
These projects are particularly useful for dresses with sentimental value. You don’t have to hide the fabric in storage to preserve the memory attached to it. Turning the material into something you can display, carry, or give to another person can make it part of everyday life again.
Work slowly and make a complete fabric plan before cutting. Formal dresses often contain several layers, and one carefully removed ruffle or satin panel may become the feature that holds the entire new design together.
Examine the Dress and Map the Usable Fabric
Spread the bridesmaid dress across a clean table and inspect both the outside and lining. Look beyond the complete garment shape and identify which individual sections remain strong enough to reuse.
Check:
- The front and back skirt panels
- The bodice fabric
- The lining
- Ruffles and pleats
- Lace or embroidered sections
- Straps and waistbands
- Covered buttons
- The zip
- Boning
- Side seams
- Stains and snagged threads
- Areas altered for the original wedding
- Fabric hidden inside the hem
Photograph the dress before opening any seams. Then take pictures of the inside construction, especially around the zip, waist, lining, and boning. Once several layers are separated, those images can help you remember where everything originally sat.
Clean the dress according to its care label before turning it into a new object. Test heat on a hidden offcut because satin, chiffon, and synthetic lining may mark or change under a hot iron.
Decide which project will need the largest uninterrupted fabric panels. Cut those pieces first on paper, not on the dress. Smaller accessories can usually be arranged around the remaining sections afterward.
I know it can feel tempting to remove every decorative detail at once, but save the ruffles, covered buttons, lace, straps, and larger scraps until the final project is finished. The oddly shaped piece that looks useless today may become tomorrow’s perfect clutch flap.
Useful Materials and Tools
- Clean bridesmaid dress
- Fabric scissors
- Seam ripper
- Fine hand-sewing needles
- Sewing-machine needles suited to the fabric
- Strong polyester thread
- Measuring tape
- Tailor’s chalk or washable marker
- Pattern paper
- Fine pins or sewing clips
- Pressing cloth
- Cotton backing fabric
- Lightweight interfacing
- Firm bag stabiliser
- Lining fabric
- Zip, magnetic closure, or snap
- Pillow inserts
- Polyester filling
- Headband bases or elastic
- Embroidery thread
- Bias binding
- Optional original lace, ruffles, buttons, or ribbon
Keep pins, needles, buttons, beads, boning, and sharp fasteners away from children and pets. Remove loose embellishments from anything intended for a baby or young child.
Make a Satin Clutch With the Original Ruffle
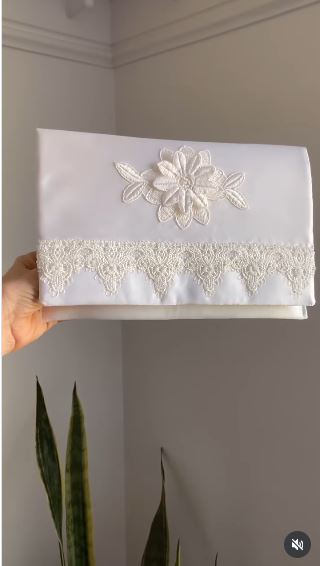
A small clutch can preserve some of the most decorative parts of a bridesmaid dress without requiring a large amount of fabric. The selected keepsake design uses formal-gown material, satin piping, and a substantial ruffle to create a structured accessory.
This approach works especially well when the original dress includes gathered trim, pleating, a flounced neckline, or a ruffled skirt layer. Instead of removing that detail and replacing it with something new, let it become the front feature of the bag.
Formal satin normally needs support because it may collapse, wrinkle, or show every seam allowance when used alone. A firm backing and smooth lining help the clutch keep its shape while allowing the original fabric to remain visible.
Materials and Tools
- Satin or smooth bridesmaid-dress fabric
- Original ruffle or pleated section
- Cotton backing fabric
- Firm interfacing or bag stabiliser
- Lining fabric
- Fabric scissors
- Fine pins or clips
- Sewing machine
- Strong coordinating thread
- Piping cord or premade piping
- Zip, magnetic snap, or other suitable closure
- Hand-sewing needle
- Pressing cloth
Sew the Clutch in Five Steps
- Choose and support the main fabric. Select a smooth section from the skirt or bodice and attach it to cotton backing or interfacing. Keep the satin relaxed while basting so it does not develop ripples before construction begins.
- Prepare the ruffled feature. Remove the original ruffle carefully or gather a long strip cut from the dress. Arrange it across the front panel and secure the folds with basting stitches before trimming the excess.
- Add piping or a clean border. Place satin piping around the ruffle or along the edge of the clutch flap. Work slowly around corners and keep checking that the ruffle has not folded into the stitching line.
- Construct and line the bag. Sew the supported outer panels and prepare the lining separately. Add the closure while the relevant sections remain easy to reach, then join the lining so the raw edges stay hidden.
- Shape and inspect the finished clutch. Turn the bag carefully, smooth the corners, and press only through a cloth at a suitable temperature. Check the ruffle, piping, and closure before placing anything inside.
For me, the ruffle should remain the clear feature. I don’t think extra beads, bows, flowers, and lace would improve a clutch that already has strong texture across the front.
A simpler version could use one pleated panel instead of a large gathered ruffle. You could also create a flat envelope clutch and add only a narrow strip of original dress trim along the flap.
Sew a Small Knot Bag or Jewellery Clutch
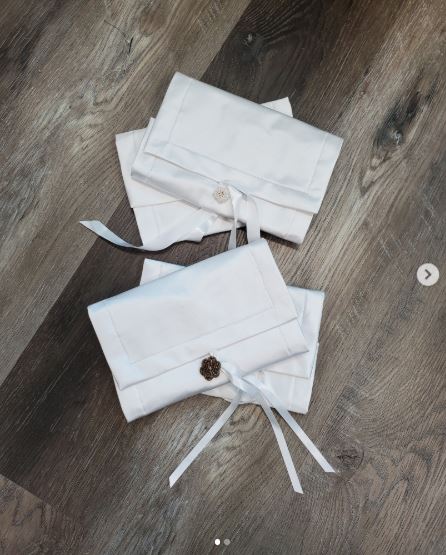
A small knot bag or jewellery clutch suits the bodice, train, or remaining skirt sections after a larger project has been cut. The selected keepsake project turns formal-gown fabric into several compact bags and matching accessories, showing how one garment can provide enough material for multiple gifts.
This bag style works because the handles are part of the pattern. One longer handle passes through the shorter one, closing the opening without requiring complicated hardware.
Slippery bridesmaid fabric should not carry the full weight of the bag. Back every outer piece with cotton or stabiliser, and let the lining support the smaller contents.
Materials and Tools
- Bridesmaid-dress fabric
- Cotton backing
- Lightweight or medium interfacing
- Lining fabric
- Knot-bag pattern
- Pattern paper
- Fabric scissors
- Fine pins or clips
- Sewing machine
- Strong thread
- Hand-sewing needle
- Optional internal pocket
- Original lace or trim
Make the Knot Bag in Five Steps
- Test the bag pattern in plain fabric. Check the size of the handles and opening before cutting the bridesmaid dress. Make any changes to the paper pattern while the sentimental material remains untouched.
- Back and cut the formal fabric. Attach each usable section to cotton or interfacing, then place the pattern pieces carefully. Position embroidery, seams, or lace where they will remain visible without falling inside a handle join.
- Construct the outer bag. Sew the side and lower seams, keeping the supported fabric flat. Clip curved seam allowances carefully so the finished shape turns without bunching.
- Prepare and insert the lining. Add a small jewellery pocket if it would be useful, then sew the lining and attach it around the opening and handles. Leave a turning gap in an accessible lining seam.
- Turn and complete the handles. Pull the bag through the opening slowly, close the lining by hand, and press gently. Pass the longer handle through the shorter one to confirm that the bag closes comfortably.
One detail I’d keep in mind is the opening size. A knot bag can look neat and still be frustrating if the handles leave too little room to reach the contents.
For a jewellery clutch, make the bag smaller and add padded lining or divided pockets. A plain cotton reverse can reduce the amount of formal fabric needed while keeping the dress material on the visible side.
Create Companion Memory Pillows From Two Dresses
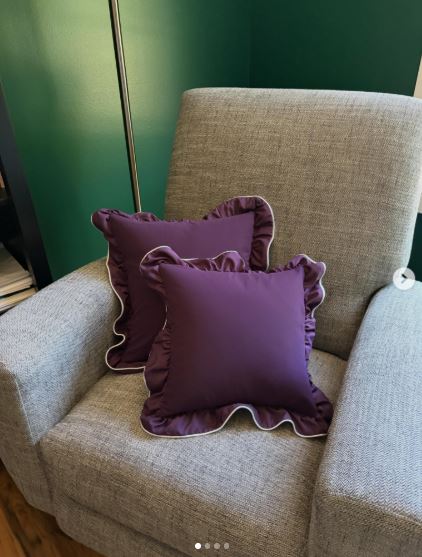
Memory pillows use the broad skirt panels while keeping the fabric’s colour, sheen, and decorative features visible. The selected project combines green satin and lighter purple formal fabric to produce several companion pillows, with ruffled details creating a clear connection to the original dresses.
This project is useful when several family members would like a keepsake from the same event. One dress may provide enough material for more than one cushion, particularly when plain backing fabric is used on the reverse.
Satin can show every uneven corner, while chiffon and lightweight polyester may need a complete supporting layer. The pillow insert should fill the cover without placing so much pressure on the seams that the fabric puckers or splits.
Materials and Tools
- One or two bridesmaid dresses
- Pillow inserts
- Cotton backing fabric
- Lightweight interfacing
- Lining or plain reverse fabric
- Fabric scissors
- Measuring tape
- Fine pins or clips
- Sewing machine
- Strong thread
- Original ruffles or pleats
- Piping, if desired
- Zip, envelope back, or hidden closure
- Pressing cloth
Sew the Memory Pillows in Five Steps
- Assign the dress details to each pillow. Decide whether the ruffle, bodice, pleats, waistband, or lace will become the main feature. Sketch the complete set so the cushions relate to one another without looking identical.
- Prepare the fabric panels. Back satin, chiffon, and lightweight sections before cutting. Keep original seams only when they add useful structure and do not create a hard ridge across the cushion.
- Attach the decorative elements. Baste ruffles, piping, lace, or colour-blocked pieces to the front panels. Check the full arrangement with the pillow insert underneath before stitching permanently.
- Construct the covers. Add a zip, envelope back, or another removable closure, then sew the outer edges. Reinforce corners and any seam carrying several formal-fabric layers.
- Insert and balance the cushions. Add the inserts gradually and smooth the decorative fronts. If one pillow feels overfilled, use a slightly smaller insert rather than forcing the original fabric to stretch.
The part I like here is that companion pillows can share the same story without using the same design. One may carry the ruffle, another the smooth satin, and a third the lace or waistband.
A rectangular cushion can preserve a long pleated section, while a square pillow suits a central bodice panel. You could also add a small plain-fabric label on the back with the wedding date.
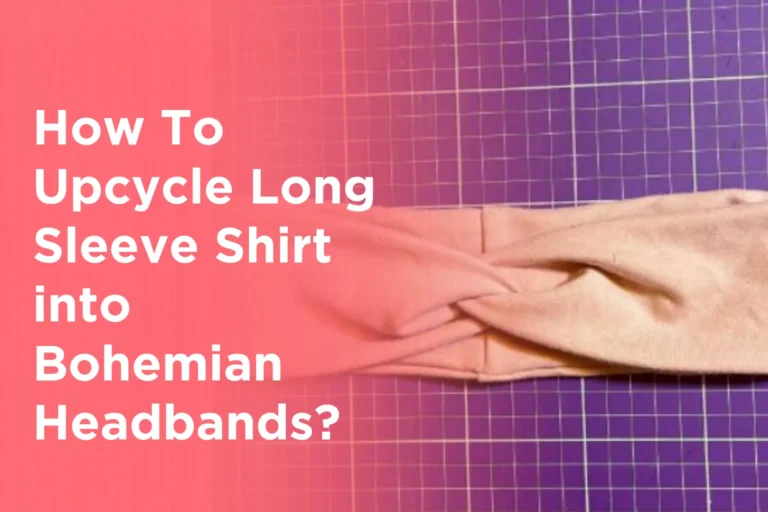
Make Sentimental Headbands From Smaller Offcuts
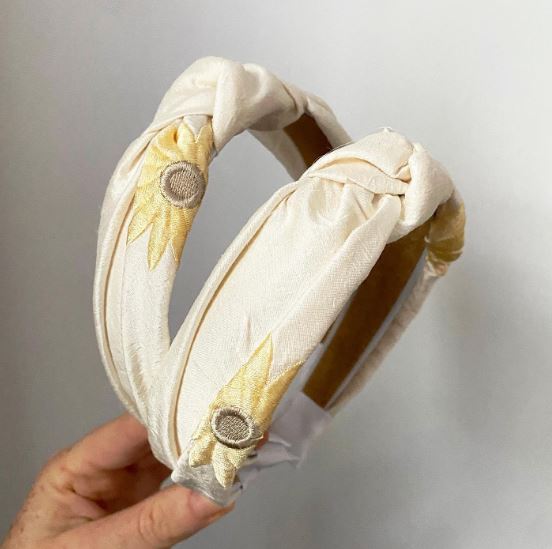
Headbands are useful after the clutch, cushions, or memory bear have taken the larger pieces. The existing project turns bridesmaid-dress fabric into two sentimental knotted headbands while preserving the original colour in an accessory that can be worn regularly.
Satin and chiffon behave differently from ordinary cotton headband fabric. They may slide, crease, or lose their shape, so a soft backing or firm base is usually helpful.
Materials and Tools
- Bridesmaid-dress offcuts
- Cotton backing fabric
- Lightweight interfacing
- Narrow headband bases or elastic
- Fabric scissors
- Measuring tape
- Sewing machine or hand needle
- Matching thread
- Clips
- Small amount of suitable fabric adhesive, if required
Make the Headbands in Four Steps
- Select strong narrow sections. Avoid fabric with old needle holes, pulled threads, stains, or weakened seams. Back slippery material with interfacing before trimming the final strips.
- Create the band covering. Sew the dress fabric to soft cotton backing and turn the strip right side out. Smooth it around the headband base without pulling the satin too tightly.
- Form the centre knot or twist. Arrange the folds several times until the front looks balanced. Then secure the shape with hidden stitches so the fabric cannot rotate while worn.
- Finish the lower ends. Wrap the ends neatly around the base and cover any hard edge behind the ears. Try the headband on before closing the final stitches and remove unnecessary bulk.
For me, this is one of the easiest ways to use a meaningful fabric frequently. The finished accessory remains connected to the dress without feeling like formal wedding clothing.
The same strips could become fabric-covered clips, hair bows, narrow tie-on bands, or matching scrunchies. Several small accessories may also be made for different family members.
Turn the Bridesmaid Dress Into a Memory Bear
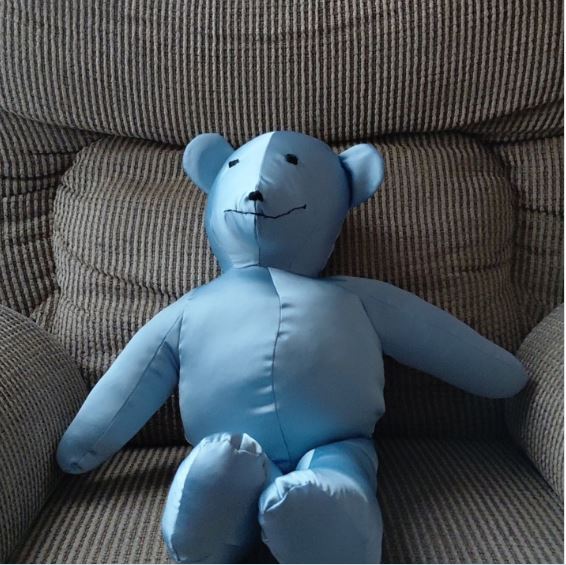
A memory bear gives smaller bodice and skirt sections a three-dimensional form. The existing project uses bridesmaid-dress fabric to create a keepsake bear associated with a new baby.
The finished bear can include lace on the ears, a waistband across the body, or the original dress fabric on the paws. Delicate satin and lightweight formal fabric need backing because firm stuffing places pressure on every curved seam.
Decide whether the bear is a display keepsake or a toy before choosing the construction. A display bear may preserve delicate details, while an item intended for a child needs stronger washable fabric, safe facial features, and no loose embellishments.
Materials and Tools
- Bridesmaid-dress fabric
- Memory-bear sewing pattern
- Cotton backing fabric
- Lightweight interfacing
- Fabric scissors
- Fine pins or clips
- Sewing machine
- Strong thread
- Polyester filling
- Hand-sewing needle
- Embroidery thread
- Optional original lace, straps, or ribbon
Sew the Memory Bear in Five Steps
- Choose the bear’s purpose. Decide who will receive it and whether it will be displayed or handled. Remove beads, hooks, loose sequins, and unsuitable decorations from anything intended for a child.
- Support the bridesmaid fabric. Attach the formal material to cotton backing or interfacing before cutting the pattern. Keep the layers smooth so the visible satin does not develop wrinkles.
- Plan the meaningful details. Place lace, a waist seam, embroidery, or a recognisable colour section across the ears, paws, or body. Avoid positioning thick trim directly inside narrow curved seams.
- Assemble and stuff gradually. Sew the pieces according to the pattern, clip the curved allowances, and turn them carefully. Add small amounts of filling at a time so the seams remain smooth rather than strained.
- Close and examine the bear. Hand-sew the final opening securely and use embroidered facial features when appropriate. Check every join and remove any loose thread or decoration.
I’d rather use less stuffing than force delicate satin into a very firm shape. A slightly softer bear can still display the fabric clearly while placing less pressure on the seams.
When the remaining fabric is limited, make only the ears, paws, or front body panel from the bridesmaid dress and use plain cotton for the rest. A heart-shaped keepsake is another simpler alternative.
Common Mistakes to Avoid
Cutting the Largest Panels Without a Complete Plan
Cushions and bags need broad uninterrupted sections, while headbands and bear details can use smaller scraps. Allocate the large pattern pieces first so you do not accidentally divide the only suitable skirt panel.
Treating Satin Like Ordinary Cotton
Satin can slip, mark, pucker, and reveal uneven seams. Back it, use fine pins or clips, and test the machine tension on an offcut.
Removing the Original Details Too Quickly
Ruffles, waistbands, lace, straps, and covered buttons can become the strongest features of the new objects. Unpick them carefully and keep them until the projects are finished.
Using Delicate Fabric Without Reinforcement
A clutch, knot bag, cushion, or stuffed bear places strain on the fabric. Add interfacing, cotton backing, or stabiliser rather than relying on the formal outer layer alone.
Overfilling Pillows and Bears
Too much filling can pull seams open and distort satin. Add the insert or stuffing gradually and stop when the object holds its shape comfortably.
Placing Bulky Decoration in Difficult Seams
Ruffles and lace may become trapped or uneven around corners. Baste them first and keep unnecessary thickness away from narrow curves.
Forgetting the Finished Object’s Purpose
A display bear can preserve delicate trim, but a child’s toy needs safe construction. A decorative jewellery clutch may use fine satin, while an everyday handbag requires stronger support.
Pressing Formal Fabric Carelessly
High heat may mark or damage synthetic dress material. Use a pressing cloth, test a hidden scrap, and follow the fabric’s care information.
Frequently Asked Questions
Can one bridesmaid dress provide enough fabric for all five projects?
A large full-length dress may provide enough material for several small projects, but completing all five from one garment is not guaranteed. Measure the skirt and bodice panels, then prioritise the projects that matter most.
Which project is easiest for a beginner?
A backed headband or simple square memory pillow is generally more manageable than a structured clutch or memory bear. Begin with straight seams and save the curved construction for later.
Can I use chiffon for a clutch?
Chiffon can work as a decorative outer layer, but it needs a firm backing and lining. Avoid expecting a single sheer layer to provide structure.
Do I need to keep the original dress lining?
Not always. Reuse it when it remains strong and suits the new object, or replace it with cotton or another practical lining when more support is needed.
How can I prevent satin from puckering?
Use the correct needle, test the tension, support the fabric, and avoid pulling it through the machine. Interfacing or cotton backing can also make the material easier to control.
Can these projects be made from two bridesmaid dresses?
Yes. Two coordinated dresses can create companion pillows, matching headbands, or contrasting sections across bags and bears. Plan the colour balance before cutting.
What should I do with the smallest leftover pieces?
Use them for covered buttons, small bows, fabric labels, bear paws, tassel tops, patchwork details, or a framed keepsake. Even narrow strips can remain useful.
Let the Bridesmaid Fabric Become Part of Everyday Life
Learning how to upcycle bridesmaid dress fabric is less about forcing the complete gown into another outfit and more about recognising what each section can become.
The broad skirt panels can create memory pillows. Satin and structured sections can become a clutch or knot bag. Narrow offcuts suit headbands, while meaningful lace, waistbands, and colour details can continue through a memory bear.
Begin with the project that matters most and protect its fabric first. Then place the smaller pattern pieces around what remains. This order makes it easier to use the dress thoughtfully rather than cutting it into scraps without a plan.
Which piece would you make first: the ruffled clutch, knot bag, memory pillows, headbands, or keepsake bear?