Bathroom cabinets often look tired long before the cabinet boxes stop being useful. Hand cream, water splashes, cleaning products, damp towels, and constant opening leave marks around handles and along the lower edges, yet the underlying joinery may still be perfectly serviceable. A careful painted finish can keep that vanity in place and make the whole room feel calmer without replacing every door, drawer, and hinge.
I don’t think a bathroom cabinet makeover should begin with a paint colour. It should begin with a close look at the surface. Solid wood, veneer, factory-coated MDF, and previously painted doors all need slightly different preparation. The room also matters: a finish that behaves well on a bedroom chest may struggle beside a sink if the surface was not cleaned, primed, and allowed to cure properly.
The most convincing updates tend to respect the cabinet’s shape. Shaker doors suit restrained colours and clean hardware, carved furniture can keep its decorative detail, and a wood-grain finish can be softened rather than hidden completely.
Before You Open the Paint
Empty the vanity and inspect it in good light. Swollen board, loose hinges, split rails, lifting veneer, and soft areas around plumbing need attention before decoration. Paint can disguise colour differences, but it cannot make water-damaged material strong again.
Remove doors, drawer fronts, knobs, pulls, and hinges where practical. Label every part with painter’s tape so each door returns to the same opening. Bathroom cabinets can look symmetrical while still having small fitting differences, and discovering that after several coats is nobody’s idea of a pleasant afternoon.
Clean the surfaces with a method suitable for the existing finish, paying particular attention to the areas around handles and the lower edge beneath the sink. Rinse or wipe away cleaner residue, let the cabinet dry, then dull glossy areas gently. Use a compatible bonding primer where the surface is slick, repaired, stain-prone, or uncertain.
Work with ventilation and follow the instructions for the cleaner, filler, primer, paint, and protective finish you choose. Protect the sink, countertop, floor, walls, and plumbing. If sanding may disturb an old coating of unknown age, stop and seek appropriate advice rather than creating airborne dust.
Set Aside Cabinets With Serious Damage
Painting is worthwhile only when the cabinet is still strong and usable. Put the project on hold if you find:
- An active leak beneath the sink
- Swollen or crumbling MDF
- Soft particleboard around the plumbing
- Large areas of lifting veneer
- Mold or a persistent damp smell
- Split rails or loose cabinet joints
- Doors that no longer hold their hinges
- A damaged or unstable countertop
- Deep cracks that continue to move
- An old, unknown coating that may not be safe to sand
Fix the source of any water damage before working on the finish. Paint may cover stains and faded colour, but it will not strengthen wet, swollen, or weakened cabinet material. Severely damaged doors and panels may need to be repaired or replaced before the makeover begins.
For Cabinets in Sound Condition, Inspect:
- The cabinet material, such as solid wood, veneer, MDF, laminate, or particleboard
- Grease, hand cream, soap, and cleaning-product residue
- Chipped or peeling paint
- Scratches and dents
- Loose hinges
- Uneven doors and drawers
- Worn areas around handles
- Swelling near the sink and plumbing
- Gaps, cracks, and old hardware holes
- Glossy surfaces that may need light sanding
- Lifting veneer or loose edging
- Drawer runners and door edges that rub
- Rusted, damaged, or missing hardware
- Signs of mold or trapped moisture
Open every door and drawer during the inspection. Pay close attention to the lower edges, corners, areas around the handles, and the space beneath the sink. These spots usually receive the most water, dirt, and daily wear.
Decide on the new handles before filling any holes. When the new hardware uses different screw spacing, fill and smooth the old holes during preparation rather than after the cabinet has been primed.
Useful Materials and Tools
- Screwdriver or drill
- Painter’s tape
- Labels or masking tape for numbering doors and drawers
- Small bags or containers for screws and hardware
- Drop cloths or protective plastic sheets
- Cleaner suitable for the existing cabinet finish
- Clean water for removing cleaner residue
- Lint-free cloths
- Soft brush for corners and detailed areas
- Vacuum with a brush attachment
- Fine-grit sandpaper or sanding sponge
- Dust mask and protective gloves
- Wood filler or a repair compound suitable for the cabinet material
- Filling knife
- Tack cloth or slightly damp dusting cloth
- Bonding primer for smooth or factory-coated surfaces
- Stain-blocking primer where marks may show through
- Durable cabinet or trim paint suitable for bathrooms
- Angled synthetic paintbrush
- Small smooth-finish roller
- Paint tray
- Stirring stick
- Optional sample board for testing the colour and finish
- Optional compatible protective coat
- Replacement knobs, pulls, hinges, or screws
Choose the cleaner, primer, paint, and protective finish as one compatible system. Test them on the back of a door or another hidden area before coating the complete vanity.
Give Shaker Cabinets a Soft Grey-Green Finish
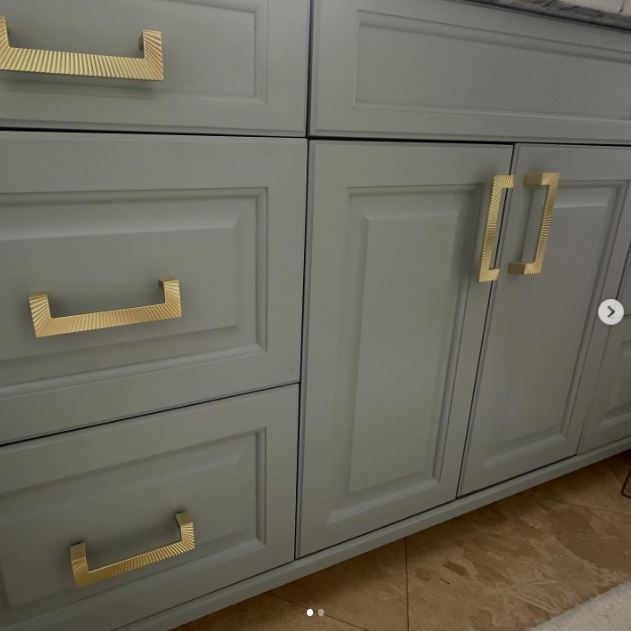
A soft grey-green colour works particularly well on Shaker cabinetry because it settles into the recessed panels without making the door profile feel busy. The visible finish is smooth and even, while the textured gold pulls add a warmer note across the drawers and doors.
The hardware placement matters as much as the paint. Horizontal pulls repeat across the drawer fronts, while matching vertical pulls sit on the doors. Keeping the same metal finish throughout helps the different shapes feel intentional.
For this type of makeover, I would concentrate on crisp panel edges and clean gaps between the doors. Heavy paint around the inside corners can soften the Shaker profile and make drawers rub, so several controlled coats are safer than one generous coat.
Materials and Tools
· Existing Shaker-style vanity with sound doors and drawers
· Cleaner and lint-free cloths
· Fine sanding sponge
· Compatible bonding primer
· Grey-green cabinet paint in the chosen sheen
· Small roller and angled synthetic brush
· Gold pulls with screws that suit the existing holes
· Optional hardware template for consistent placement
Keep the Recessed Panels Sharp
- Remove and label the fronts. Take off the doors, drawer fronts, pulls, and hinges, then mark each piece so it returns to its original location. Store screws in separate labelled bags rather than balancing them in the sink where they will inevitably try to escape down the drain.
- Clean and prepare every edge. Wash away residue around the pulls and along the top rails, then lightly dull glossy surfaces. Vacuum the panel corners and wipe away the final dust before applying primer where the surface needs additional grip or stain control.
- Prime without filling the profiles. Brush the recessed corners first and roll the wider rails and centre panels. Watch for primer gathering in the lower panel edges, then smooth it before it begins to set.
- Build the colour in thin coats. Paint the detailed areas with the brush and immediately roll the broad sections lightly to keep the sheen consistent. Let each coat dry as directed, then inspect the doors from the side for ridges, missed corners, or small runs.
- Reinstall the hardware after curing. Fit the gold pulls using the original holes or a careful template, then hang the doors and test every drawer. Adjust hinges before loading the vanity so freshly painted edges are not forced against one another.
A practical variation: A cooler grey, muted blue, or warm mushroom shade could suit the same Shaker doors. If the existing pulls are sound, cleaning and reusing them may be enough; new hardware should solve a practical or visual problem rather than becoming another unnecessary purchase.
Soften an Orange-Toned Double Vanity with a Muted Taupe Finish
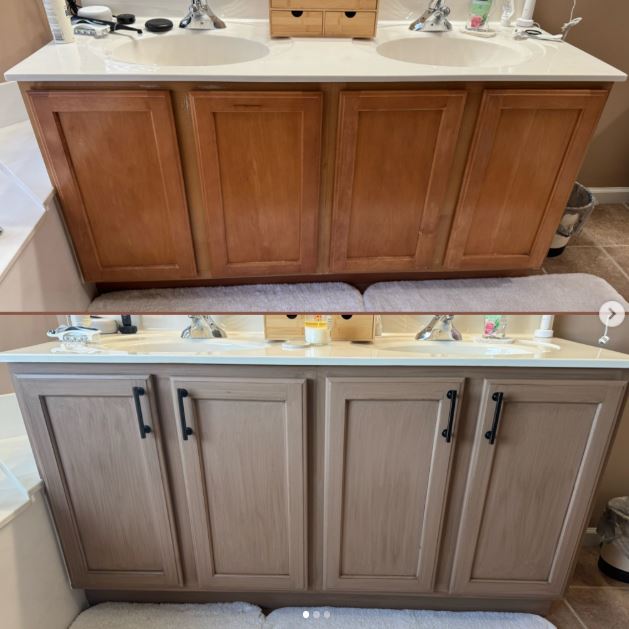
A large double vanity has enough visual weight to influence the whole bathroom. Here, the original warm wood tone is replaced by a muted taupe-brown finish, and the small knobs give way to longer black pulls. The cabinet still reads as wood rather than a flat block of colour because subtle directional variation remains across the doors.
That softened effect could be recreated with an opaque cabinet paint, a thin layered finish, or a paint-and-glaze system, depending on the existing surface and the look you want. I wouldn’t assume the exact method from colour alone. A test on the back of a door is the sensible place to decide whether you prefer full coverage or a little movement beneath the final coat.
Long pulls also change how the doors are handled. They reduce repeated fingermarks in one small area, but the new screw spacing must be planned before painting if the old holes need filling.
Materials and Tools
· Four-door double vanity in sound condition
· Degreasing cleaner suitable for the finish
· Fine abrasive pad or sanding sponge
· Filler for unused hardware holes
· Compatible primer
· Muted taupe or brown-grey cabinet paint
· Optional glaze or second close shade for gentle variation
· Long black cabinet pulls and an installation template
· Brush, roller, and small detail brush
Change the Colour Without Losing Control of the Grain
- Decide on the hardware before coating the doors. Hold the new pulls against the fronts, check their length, and confirm whether the existing holes can be reused. Fill unwanted holes neatly, let the repair settle, and sand the area level so the old positions do not telegraph through the finish.
- Clean the vanity in sections. Pay close attention to the central doors, the area beneath each sink, and the upper rail where products are often placed. Remove cleaner residue and allow the cabinet to dry fully before dulling the finish.
- Test the complete finish on a hidden area. Apply the proposed primer and paint, then look at the sample in both daylight and bathroom lighting. A taupe that feels calm on a sample card can look much warmer beside a cream counter or cooler beside bright white sinks.
- Apply controlled coats in the direction of the panels. Use the brush around moulded edges and the roller on flatter areas. If you want slight wood-like movement, add it sparingly with a compatible glaze or close second shade rather than leaving patchy coverage by accident.
- Fit the black pulls and realign the doors. Use a template so the handles sit at the same height, then adjust the hinges until the gaps look even. Leave the vanity lightly used until the finish has cured according to the product guidance.
A practical variation: For a simpler update, retain the original knobs and use a solid warm grey paint. A beginner may find one even colour easier than a layered grain effect, especially across four large doors that need to match.
Convert a Carved Vintage Cabinet into a Painted Bathroom Vanity
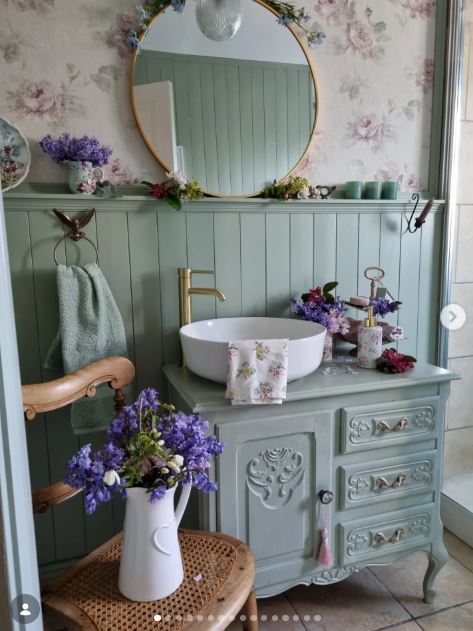
A vintage cabinet brings a very different character to a bathroom than a standard fitted vanity. This piece keeps its curved feet, raised decoration, small drawer fronts, and single cupboard door, while a white vessel sink sits on the newly adapted top.
The paint colour is pale and quiet, which allows the carved details to remain visible without turning the cabinet into a heavy focal point. The important work, however, sits behind the finish. Plumbing openings, drawer clearance, countertop protection, and structural support all need planning before the first coat of paint.
I especially like the idea of reusing furniture that is too useful to discard, but not every chest is suitable. The top and frame must be sound, and any alteration for plumbing should leave enough material to support the basin and normal use.
Materials and Tools
· Sound vintage cabinet or small dresser
· Screwdriver and basic repair tools
· Cleaner suitable for old finishes
· Fine sandpaper and dust removal supplies
· Primer suited to the existing coating and timber
· Pale cabinet paint
· Small brush for carvings and a smooth roller for flat areas
· Moisture-resistant top or compatible countertop finish
· Vessel basin and plumbing fittings selected by a qualified installer
· Optional replacement knob
Preserve the Detail While Adapting the Function
- Check the cabinet before conversion. Tighten loose joints, inspect the feet, and make sure the top can be adapted safely. Plan the basin and plumbing with an experienced installer so holes do not cut through essential rails or leave the cabinet unstable.
- Remove what can be removed. Take out drawers, hardware, and loose internal fittings, then decide which drawers can remain functional after plumbing is added. A false drawer front may be more practical than forcing a working drawer around pipes.
- Clean and prime the carved surfaces carefully. Use a soft brush and cloth to reach the decorative recesses, then dull glossy areas without flattening the raised pattern. Apply primer in thin layers so it does not collect around scrollwork and soften the detail.
- Paint the cabinet from the inside edges outward. Brush the carvings, mouldings, and feet, then roll the broad panels and top surfaces that will remain exposed. Check beneath the decorative edges for drips before moving on.
- Protect the top and finish the installation. Use a surface and sealing method suitable for splashes around the basin, then install the sink and plumbing correctly. Once the cabinet is back in place, test for leaks before storing towels or toiletries inside.
A practical variation: A plain side table or small chest can be adapted in the same spirit when ornate furniture is not available. Keeping one original knob, a carved leg, or a small section of wood visible can preserve the piece’s history without making the room feel overly decorative.
Create a Layered Wood-Look Finish on Raised-Panel Cabinets
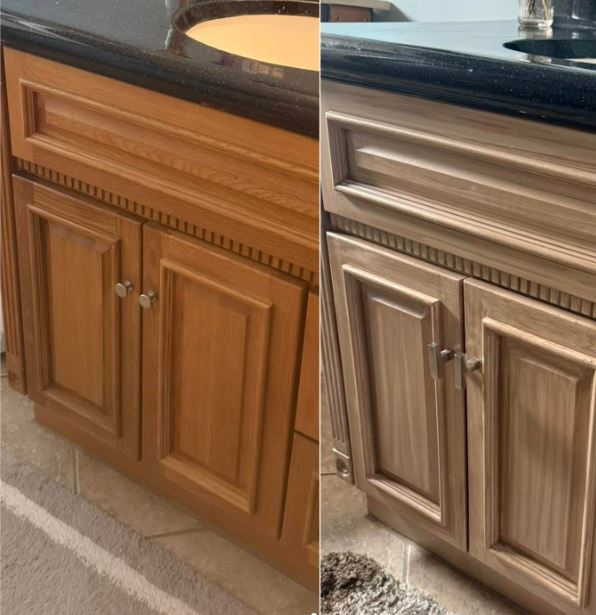
Some cabinets benefit from a colour adjustment rather than a completely flat painted surface. The original vanity has a strong orange-brown tone, while the updated version appears cooler, deeper, and more varied. Light lines remain across the rails and raised panels, giving the finish a brushed or grained character.
A similar result may involve paint, glaze, stain-like products, or a combination designed for the existing substrate. Compatibility matters more than the name of the technique. Mixing unrelated coatings can leave a surface that scratches, stays tacky, or separates around the handles.
The black countertop creates a strong boundary above the cabinet, so the lower finish can carry more texture without competing with a patterned worktop. Small metal pulls also keep the focus on the door profiles.
Materials and Tools
· Raised-panel vanity with intact mouldings
· Cleaner and fine abrasive pad
· Compatible primer or bonding base when required
· Base paint in a muted brown-grey tone
· Compatible glaze or close accent shade for linear movement
· Wide soft brush, detail brush, and lint-free cloth
· Sample board or hidden door back for testing
· Existing or replacement cabinet hardware
· Optional compatible protective coat
Build Subtle Movement Instead of Random Streaks
- Prepare a sample first. Recreate the cabinet material on a spare board or use the back of a removable door, then test the cleaner, base coat, decorative layer, and protective finish together. Let the sample settle before scratching it lightly and checking the colour under bathroom lighting.
- Apply an even base. After cleaning and appropriate preparation, use thin primer and paint coats to create a consistent foundation. The decorative layer should add controlled movement, not compensate for missed patches underneath.
- Work one panel at a time. Brush the glaze or close accent shade in the same general direction as the door rails and centre panel. Soften harsh lines with a clean brush or cloth before the material begins to set, keeping corners from becoming much darker than the centre.
- Match neighbouring doors as you go. Stand back after each section and compare the direction, contrast, and amount of texture. I know it can feel tempting to keep brushing until every line looks dramatic, but restraint usually makes a wood-look finish more convincing.
- Seal only when the system requires it. Let the decorative layer dry fully, then apply a compatible finish in thin coats if recommended. Refit the doors and check that the added coating has not made tight edges rub.
A practical variation: If layered finishing feels uncertain, choose one opaque mushroom or brown-grey colour instead. The raised panels will still create shadow and depth, and a single-colour system is easier to repair later.
Use Tailored Taupe Paint for a Built-In Vanity
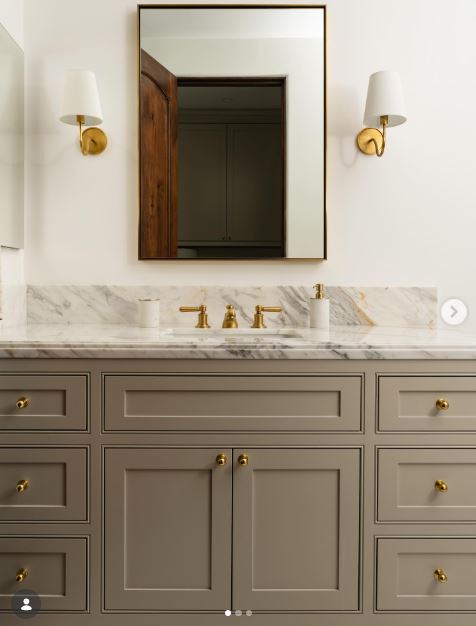
A large built-in vanity needs a finish that remains calm across many drawers and doors. This one uses a medium taupe-grey colour with narrow framed details, small brass knobs, a pale stone top, and a simple metal-framed mirror. The result feels balanced because no single element is trying to carry the entire room.
On cabinetry this wide, preparation and consistency become more important than decorative technique. Small differences in sheen, roller texture, or colour mixing can become obvious across repeated drawer fronts. Keeping a wet edge and using the same application method on every section helps the finish read as one continuous installation.
The brass hardware is deliberately small. It adds warmth without covering the framed drawer details, and it connects visually with the taps and wall lights.
Materials and Tools
· Large built-in vanity with framed doors and drawers
· Labels and separate hardware containers
· Cleaner, cloths, and vacuum
· Fine sanding sponges
· Compatible primer
· Taupe-grey cabinet paint with enough material for the complete project
· Quality brush and matching smooth rollers
· Small brass knobs or cleaned existing hardware
· Painter’s tape and counter protection
Keep a Large Vanity Consistent from End to End
- Create a clear labelling system. Number the drawers, doors, hinges, and openings before removing anything. Photograph the cabinet first so the order of different drawer sizes and knob positions remains easy to check.
- Prepare the full run in the same way. Clean every section, repair small defects, and dull the existing surface evenly. Prime all comparable parts with the same tools so one bank of drawers does not develop a different texture from the next.
- Organise the painting sequence. Complete the frames, doors, and drawer fronts in manageable groups, using the same brush-and-roller method throughout. Stir the paint regularly and avoid switching tools halfway through the visible fronts.
- Inspect the finish under the vanity lighting. Side light from wall sconces can reveal roller ridges and missed moulding edges that are difficult to see from straight ahead. Correct small defects between fully dry coats rather than loading extra wet paint onto the area.
- Reassemble and balance the hardware. Install the brass knobs consistently, adjust the hinges, and check the drawer gaps across the full vanity. Then keep the surface free from standing water and heavy cleaning until the coating has cured as directed.
A practical variation: The same tailored effect could work with muted navy, warm off-white, or soft olive paint. Hardware can remain brass, change to black, or be reused in its existing finish, but repeating one metal throughout the vanity usually looks calmer than mixing several.
Bathroom Cabinet Finish Problems Worth Catching Early
Painting over hand cream and cleaner residue
Bathroom vanities collect invisible films around handles and beneath the sink. Paint may separate, crater, or peel over that residue. Clean thoroughly with a suitable product, remove the cleaner itself, and test the prepared surface before coating the whole cabinet.
Ignoring swollen board near plumbing
Paint cannot reverse water damage. If MDF or particleboard has expanded, the edges may remain rough and weak beneath a smooth colour. Repair or replace unsound parts and resolve any leak before decorating.
Filling hardware holes after priming
Late repairs can leave visible patches and broken layers. Choose the hardware first, fill unused holes during preparation, and sand the repair level before primer goes on.
Letting paint gather in panel corners
Thick paint softens moulded detail and can create runs along the lower edges of recessed panels. Brush out the corners, roll the broad areas, and inspect each door from several angles while the coat is still manageable.
Painting hinges, runners, and rubbing edges
Added coating can make drawers stick and doors close badly. Remove hardware where practical, keep paint off moving surfaces, and test clearances before returning the vanity to regular use.
Choosing colour without checking the countertop
A cabinet shade changes beside cream, bright white, black, or veined stone. Paint a movable sample board and view it beside the countertop in daytime and evening light before committing.
Reinstalling too soon
A surface can feel dry while remaining vulnerable to fingerprints, water marks, and tight hardware. Follow the coating guidance for recoating and curing, and use the vanity gently during the early period.
Treating every cabinet material as bare wood
Factory-coated MDF, veneer, solid timber, and old paint do not respond identically to sanding and primer. Identify the surface, use a compatible system, and avoid aggressive sanding on thin veneer or moulded board.
Frequently Asked Questions
Do bathroom cabinets always need sanding before painting?
They usually need cleaning and enough abrasion to remove defects and dull a glossy surface, but that does not always mean heavy sanding. Follow the primer and paint guidance, and use a light touch on veneer, factory coatings, and moulded MDF.
Should I remove bathroom cabinet doors?
Removing them usually makes edges, hinges, and panel details easier to paint neatly. It also prevents wet doors from swinging into the frame. Label every part so the doors return to the openings where they already fit.
What type of paint works best on a bathroom vanity?
Choose a durable cabinet or trim coating that the manufacturer considers suitable for the cabinet material and an interior bathroom. The complete system matters: cleaner, primer, paint, and any protective coat need to be compatible.
Do I need a separate topcoat?
Some cabinet paints are designed to stand alone, while layered decorative finishes may need compatible protection. A random clear coat can change the sheen or colour, so follow the paint-system guidance and test it first.
Can I paint laminate or factory-coated bathroom cabinets?
Often yes, provided the surface is sound and prepared with a bonding system intended for that material. Clean carefully, dull the surface only as appropriate, and test adhesion on a hidden area before painting every door.
How do I stop painted cabinet doors from sticking?
Keep coatings thin along tight edges, avoid painting hinge contact points and runners, and allow adequate curing before closing doors firmly. If an edge rubs, adjust the hinge or correct the tight area rather than forcing it through fresh paint.
Can an old dresser safely become a bathroom vanity?
It can when the structure, top, plumbing alterations, and moisture protection are planned properly. A qualified installer should assess basin support and pipe openings, especially when drawers or internal rails need modification.
Let the Cabinet Shape Lead the Makeover
Learning how to paint bathroom cabinets is less about hiding every trace of the old vanity and more about choosing a finish that suits the cabinet already in the room. Shaker panels benefit from crisp edges, carved furniture needs light coats around its detail, and a large built-in vanity depends on consistency across every repeated drawer front.
Begin with one honest assessment: is the cabinet sound enough to keep? If it is, clean it properly, repair what needs attention, test the full coating system, and give the finish time to settle before normal bathroom life resumes. That waiting stage is not the most photogenic part of the project, but it often decides whether the paint remains tidy around the first frequently used handle.
Which direction suits your bathroom best: soft grey-green with warm metal pulls, a muted wood-look taupe, or a pale painted furniture vanity with its original carved detail still showing?