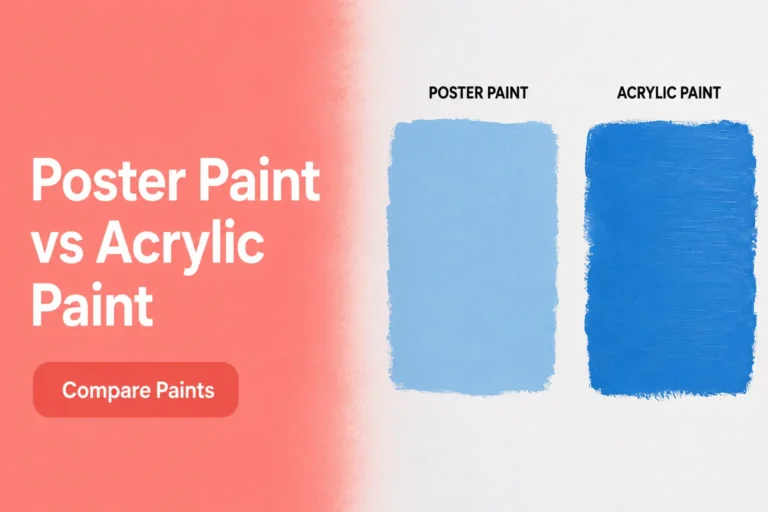
Acrylic paint can change a tired piece of furniture without asking you to buy a cupboard full of specialist supplies. It dries quickly, comes in small affordable quantities, and gives you far more colour choice than many ready-mixed furniture paints. That makes it useful for a bedside table, a drawer-front pattern, painted handles, or a small cabinet that needs one clear update.
The important part is matching the paint to the job. Ordinary craft acrylic is helpful for decorative details and low-wear surfaces, but it may need a suitable primer and protective finish on furniture that is touched every day.
A water-based acrylic enamel or acrylic furniture paint is usually a more practical choice for large areas, tabletops, drawers, and cupboard doors. The label matters more than the front-of-tin colour sample.
I don’t think every old dresser needs to be stripped back to bare timber. Sometimes the wood is damaged, the previous finish is uneven, or the piece simply works better in colour.
A careful acrylic-painted finish can keep useful furniture in the room, but only when cleaning, repairs, and adhesion come before the enjoyable part with the brush.
Prepare the Furniture Before Opening the Paint
Furniture collects polish, cooking residue, hand oils, dust, wax, and cleaning products. Paint placed over that layer may look fine at first and then peel around handles, edges, and drawer fronts. Empty the piece, remove loose hardware, and clean it with a method suitable for the existing material. Let every surface dry before sanding or priming.
Check the structure while the furniture is bare. Tighten loose screws, repair sound wooden joints, fill small dents when appropriate, and smooth splinters. Paint will not stabilise a loose leg, support a cracked chair rail, or make swollen board flat again. If the piece is seating, repair it properly before anyone uses it.
Choose the Right Acrylic Product
· Craft acrylic for stencils, line work, small motifs, knobs, and other decorative areas
· Acrylic furniture paint or water-based acrylic enamel for larger surfaces and regular use
· Bonding primer for glossy laminate, sealed wood, metal, or an uncertain previous coating
· A compatible clear topcoat when the painted surface needs extra resistance to handling
· A small test patch when you do not know how the old finish will react
Light sanding can dull a glossy surface and remove raised defects, but sanding alone does not remove grease or silicone polish. Vacuum the dust and wipe it away with a clean lint-free cloth. On veneered or laminated furniture, sand gently. The top layer may be much thinner than it looks.
Work with ventilation and follow the instructions for the primer, paint, and topcoat you choose. Do not coat food-preparation surfaces, heat-exposed areas, electrical fittings, or a child’s chewing surface unless the product is specifically suitable for that use. Keep paint away from drawer runners, hinges, locks, and other parts that need to move freely.
Give a Dining Table a Soft Acrylic Paint Wash
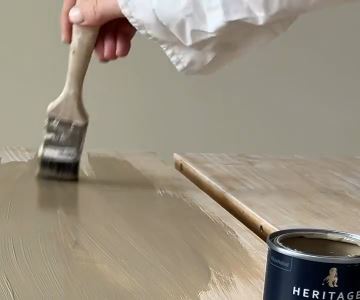
A paint wash sits between a solid painted surface and a stain-like finish. The colour is diluted enough to let some grain and variation remain visible, so an ordinary wooden table can feel lighter without losing every sign of the timber underneath. This works best on clean, absorbent wood or a properly prepared surface that accepts the chosen product.
Use only a water-based acrylic paint that the manufacturer allows you to thin. A tabletop receives more wear than a decorative drawer, so the wash also needs a compatible protective finish. I’d test the complete paint-and-topcoat system underneath the table first, because a pale wash can change colour when the sealer goes on.
Materials and Tools
· Sound wooden table or small side table
· Cleaner suitable for the existing finish
· Fine and medium sandpaper
· Water-based acrylic paint suitable for furniture
· Clean mixing container and measuring spoon
· Wide synthetic brush and lint-free cloth
· Protective sheet and gloves
· Compatible clear furniture finish
Build the Colour in Thin Layers
1. Prepare a clean, even surface. Remove grease, polish, and loose finish, then sand in the direction of the grain. If the table has a heavy sealed coating, a wash may not absorb evenly; use an appropriate primer or choose a solid painted finish instead.
2. Mix a small test wash. Combine a little paint with clean water only when the product instructions permit it. Start weaker than you think you need. Brush the mixture onto a hidden area, wipe the excess in the grain direction, and let it dry before changing the ratio.
3. Work one manageable section at a time. Apply the wash along the grain and keep a wet edge. Use a clean cloth to soften puddles before they begin to set. Avoid going back repeatedly over an area that has started to become tacky, because that can leave drag marks.
4. Add depth with another light layer. Let the first coat dry according to the paint guidance, then decide whether the colour needs strengthening. A second transparent layer usually looks calmer than one heavy, cloudy application. Keep the edges and corners from becoming much darker than the centre.
5. Protect the finished tabletop. Allow the wash to dry fully, then apply a compatible protective finish in thin coats. Keep the table out of regular use until the complete system has cured as directed, not merely until it feels dry to the touch.
The part I would keep simple is the colour. A paint wash already contains movement from the grain and wiping, so several competing shades can make a dining table look patchy rather than softly aged.
A beginner can try the same method on a wooden stool or plant stand. The smaller surface gives you time to understand the mixture before working across a full tabletop.
Paint a Small Nightstand in One Calm Colour
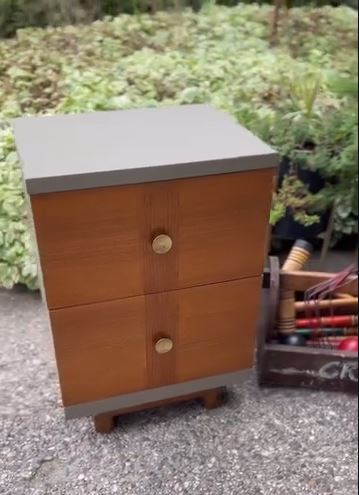
A small nightstand is a sensible first furniture project because it has enough flat surface to practise on without becoming an all-weekend negotiation. The straight sides and drawer fronts suit a smooth acrylic finish, while the top, legs, or handles can remain wood if they are in good condition.
For the main body, choose an acrylic furniture paint or water-based acrylic enamel rather than relying on a tiny bottle of craft paint. Craft acrylic can work for a very small decorative cabinet, but large areas may show brush marks and need many coats. A product made for furniture usually gives you more working time and better resistance to daily handling.
Materials and Tools
· Small bedside table or two-drawer cabinet
· Screwdriver and labelled container for hardware
· Cleaner and lint-free cloths
· Fine sandpaper or sanding sponge
· Bonding primer when needed
· Acrylic furniture paint or water-based acrylic enamel
· Small foam roller and quality synthetic brush
· Optional compatible clear topcoat
Create a Smooth Painted Body
1. Remove what should not be painted. Take out the drawers and remove handles, knobs, and loose fittings. Label parts if the drawers fit differently. Keep paint away from runners and the sides of drawers unless there is enough clearance for the added coating.
2. Clean, repair, and dull the finish. Wash away polish and hand residue, fill small defects if appropriate, and sand glossy areas lightly. Remove every trace of dust before priming. The corners around drawer openings deserve extra attention because they are often touched and chipped.
3. Prime the difficult surfaces. Use a compatible bonding primer on laminate, glossy factory coatings, bare repair filler, or wood that may bleed through pale paint. Apply it thinly and avoid ridges around mouldings and edges.
4. Apply thin acrylic coats. Roll the broad areas and use the brush for corners, then lightly finish in one direction. Let each coat dry as instructed before adding the next. Thick paint can stay soft underneath and may make drawers stick even when the surface looks dry.
5. Reassemble only after the finish has settled. Add a topcoat if the paint system or expected use calls for one. Let the piece cure, replace the hardware carefully, and test every drawer before loading it with heavy items.
I know it can feel tempting to paint the inside of every drawer as well. Unless those areas are stained or damaged, a good clean and a paper liner may be less likely to cause sticking.
A two-tone version can leave the top or legs natural. If the wood is scratched beyond a tidy repair, paint the complete piece and use new or reused hardware to create the contrast instead.
Add Hand-Painted Botanical Detail to a Dresser

Acrylic craft paint becomes especially useful after the base furniture finish is complete. Drawer fronts offer a broad, stable surface for leaves, flowers, lines, borders, or a simple landscape. The decoration can cross several drawers, but the design still needs to make sense when the small gaps between them interrupt the image.
The strongest botanical furniture painting is usually planned before the first visible stroke. Tape paper templates across the closed drawers, sketch the main branches lightly, and mark where each drawer gap falls. Then remove one drawer at a time for painting so wet edges do not bridge the opening and glue the furniture together.
Materials and Tools
· Prepared and fully dry painted dresser
· Artist acrylic or craft acrylic paint
· Small round and liner brushes
· Chalk pencil or removable light-coloured pencil
· Paper for a full-size layout
· Low-tack painter’s tape
· Palette and clean water
· Compatible clear protective finish
Paint the Design Without Losing the Drawer Lines
1. Plan the composition on paper. Draw the main branch or flower placement at the same approximate size as the furniture front. Keep important petals, faces, or focal details away from drawer gaps and handles, where the image will be interrupted.
2. Transfer only the useful guide marks. Close the drawers, tape the paper plan in place, and mark the main route of the design. Remove the template and open the drawers before painting. Use light marks that can be covered by the acrylic rather than a dark pencil line that may show through pale petals.
3. Block in the large shapes first. Paint branches, larger leaves, and main flower shapes with thin, controlled colour. Let each area dry before adding overlapping detail. Acrylic dries quickly, so mix enough of each custom shade to avoid obvious changes halfway across the dresser.
4. Add line work and small accents. Use a liner brush for stems and veins, resting your hand on a clean support rather than on the painted surface. Step back often. A few clear details usually read better from across the room than dozens of tiny marks crowded together.
5. Protect the artwork carefully. Allow the decorative paint to dry, then test the chosen topcoat over a sample painted in the same colours. Apply thin layers so the brush or roller does not drag and blur raised details.
For me, the layout matters more than perfect flowers. A slightly uneven petal can still look natural, but a branch that disappears into a handle and reappears in the wrong place is harder to ignore.
Beginners can paint one small sprig on a single drawer or side panel. Another quiet option is to repeat one leaf shape along the lower edge rather than covering the entire front.
Stencil a Honeycomb Pattern With Acrylic Paint
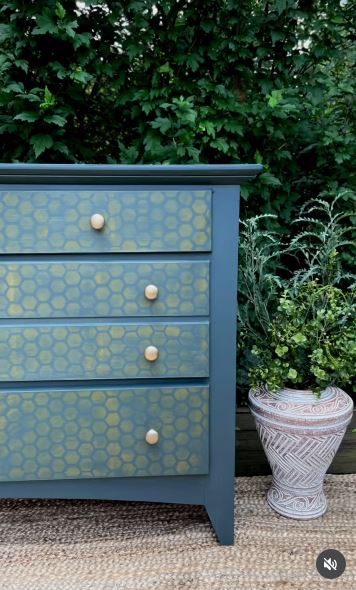
A stencil gives acrylic paint a completely different job. Instead of covering the furniture, the paint creates a repeated surface pattern over a dry base coat. Honeycomb, scallop, stripe, and simple floral designs all work, but the result depends on alignment and paint control rather than on loading the brush heavily.
The common problem is bleed beneath the stencil. Too much paint, a loose stencil, or a rough base surface pushes colour beyond the intended edge. Use a nearly dry foam applicator and build coverage with several light passes. This is where patience matters more than buying another pot of paint.
Materials and Tools
· Prepared dresser with a fully dry base coat
· Reusable furniture stencil
· Low-tack tape or repositionable stencil adhesive when suitable
· Craft acrylic or furniture acrylic paint
· Stencil brush or dense foam applicator
· Paper towel or scrap card for offloading paint
· Tape measure and removable guide marks
· Compatible topcoat
Keep the Repeated Pattern Clean
1. Find the centre and test the repeat. Measure the drawer front and place the stencil where the design will look balanced at both edges. Test the repeat on paper first, especially when several drawers need to line up as one larger pattern.
2. Secure the stencil flat. Tape the stencil without stretching it and press down around the section you are painting. On carved or uneven furniture, choose a simpler pattern with larger openings rather than forcing a detailed stencil over bumps.
3. Remove most of the paint from the applicator. Load a small amount of acrylic, then dab it on paper until the tool feels almost dry. Apply the colour with light vertical taps. Scrubbing sideways can push paint beneath the stencil and lift the base coat.
4. Lift and reposition before the paint builds up. Peel the stencil away carefully and clean it when paint begins to gather around the openings. Align the registration marks for the next section, then check the overall pattern before continuing across another drawer.
5. Correct small edges after drying. Use the base colour and a fine brush to tidy minor bleeds rather than wiping wet paint across the surface. Once the pattern is dry and even, protect it with a compatible clear finish if the furniture will be handled regularly.
I’d rather leave a small plain border than squeeze half a honeycomb into an awkward edge. The border can make the pattern look intentional and saves a surprising amount of fiddly correction.
Use one contrasting colour for a crisp modern look, or two close shades for a softer pattern. Keep both colours in the same finish so one section does not reflect more light than the other.
Modernise an Old Dresser With a Two-Tone Finish

A two-tone dresser keeps some of the original material visible while using acrylic colour where the finish needs the most help. The body may be painted while the top remains wood, or the drawers may stay natural against a painted frame. This approach is useful when one section has attractive grain and another has repairs, mismatched veneer, or an awkward old colour.
Decide on the dividing line before sanding. If the top will remain wood, protect it while cleaning and priming the painted body. If the wood is only a thin veneer, do not assume it can tolerate aggressive stripping. A painted top may be the safer choice when the surface has already worn through.
Materials and Tools
· Old dresser with sound frame and drawers
· Cleaner, cloths, and vacuum
· Screwdriver and hardware bags
· Sandpaper and sanding block
· Primer suited to the surface
· Acrylic furniture paint or water-based acrylic enamel
· Brush and small roller
· Wood finish or clear protective coat when needed
· Reused or replacement hardware
Separate the Painted and Natural Areas Neatly
1. Choose what deserves to stay visible. Inspect the top, drawer fronts, and frame in daylight. Keep wood exposed only where the veneer or timber is sound enough to finish neatly. Mark the final painted boundary before removing hardware.
2. Prepare each material for its own finish. Clean the entire dresser, then sand the painted and natural areas according to what they need. Mask the retained wood before primer goes onto the body. Remove the tape while coatings are still manageable rather than letting thick paint bridge the edge.
3. Prime and paint the main colour. Apply primer where required, followed by thin acrylic coats. Roll broad panels and brush along mouldings and corners. Keep paint out of keyholes, drawer runners, and the screw holes for hardware.
4. Finish the contrasting section. Treat the natural top or drawers with a suitable clear finish or stain only after the painted boundary is clean. If both sections are painted, choose colours with enough contrast to look deliberate but not so many that the hardware becomes another competing element.
5. Fit the hardware and test daily movement. Let the coatings cure, then install the cleaned or replacement handles. Open every drawer and check the painted edges for rubbing. Sand and touch up a tight area rather than forcing the drawer through fresh paint.
The good thing about a two-tone finish is that it can preserve the best part of an old piece. It does not need to become half paint and half bare wood by rule; the division should follow the furniture you actually have.
For a lower-cost update, clean and reuse the existing handles. A little metal polish or a carefully chosen paint can change their appearance, but do not coat moving parts or screw threads.
Match the Paint Method to the Furniture Surface
Solid Wood and Veneer
Solid wood usually gives you the most preparation options, while veneer requires a lighter touch. Sand just enough to smooth defects and dull the surface. Stop if the grain pattern begins to change or a different layer appears beneath it.
Laminate and Factory-Coated Furniture
Smooth laminate gives ordinary acrylic very little grip. Clean it thoroughly, scuff it lightly where appropriate, and use a bonding primer designed for the material. A small adhesion test can save you from painting an entire cabinet that scratches with a fingernail.
Metal Furniture
Remove loose rust and unstable coatings, then use a primer suitable for metal. Choose paint and a protective finish that match the location. Indoor craft acrylic alone is not a reliable outdoor system.
High-Wear Tops and Seats
Desks, dining tables, shelves, stools, and chair seats receive friction, spills, and repeated cleaning. Use a paint made for that level of handling and protect it as directed. Decorative acrylic details belong away from areas where plates, hot items, or constant sliding will damage them.
Common Mistakes to Avoid
Painting Over Furniture Polish
Silicone and wax can cause craters, separation, or peeling. Clean properly and repeat the cleaning if water still beads strangely across the surface.
Using Craft Acrylic for Every Surface
Small bottles are helpful for artwork and accents, but covering a large dresser with them can create uneven sheen, colour variation, and a less durable finish. Use a furniture-grade acrylic product for the main body.
Applying One Heavy Coat
Thick acrylic may skin over while remaining soft underneath. It also gathers around edges and makes drawers or doors fit badly. Several thin coats are easier to smooth and protect.
Skipping the Adhesion Test
An old finish may contain wax, oil, laminate, or an incompatible coating. Test the cleaner, primer, paint, and topcoat together in a hidden area before committing to the visible surface.
Painting Moving Hardware
Paint can clog hinges, locks, runners, and screw threads. Remove hardware where practical and keep coatings away from surfaces that rub together.
Sealing Too Soon
A clear finish placed over acrylic that has not dried properly may trap softness, pull colour, or create cloudiness. Follow the product guidance rather than relying on a quick touch test.
Choosing a Topcoat That Changes the Colour
Some clear finishes deepen pale colours or add a warmer cast. Test over a sample board painted with the same primer and acrylic before using it across white, cream, or pastel furniture.
Ignoring Drawer Clearance
Primer, paint, and topcoat all add thickness. Keep them off tight runner surfaces and test the movement before the piece returns to daily use.
Treating Paint as a Structural Repair
A painted chair can still be unsafe, and a coated drawer can still have a broken joint. Repair the furniture first, then decorate the stable piece.
Frequently Asked Questions
Can ordinary acrylic craft paint be used on furniture?
Yes, especially for small motifs, stencils, drawer details, and low-wear decorative pieces. For a complete cabinet or regularly handled surface, an acrylic furniture paint or water-based acrylic enamel is usually more practical.
Do I need to sand furniture before using acrylic paint?
Not every surface needs heavy sanding, but glossy and damaged finishes usually need cleaning and light preparation. Follow the primer and paint guidance, and avoid aggressive sanding on thin veneer or laminate.
Does acrylic paint need a primer on wood?
Primer may be helpful on bare repairs, glossy finishes, laminate, stain-prone timber, and surfaces with uncertain coatings. A sound, dull, previously painted surface may need less preparation, but a test patch is still sensible.
Should acrylic-painted furniture be sealed?
Decorative areas that are rarely touched may not need a separate topcoat when the paint is designed to stand alone. Tabletops, drawers, cupboards, and frequently cleaned furniture often benefit from a compatible protective finish.
Can I thin acrylic paint with water for furniture?
Only thin the product when its instructions allow it. Too much water may weaken coverage or adhesion. For a paint wash, make a small measured test and protect the final surface with a compatible system.
How can I reduce brush marks?
Use a suitable synthetic brush, apply thin coats, and avoid working paint after it begins to tack. A small foam roller can help on flat panels, while light sanding between fully dry coats may smooth raised dust or fibres.
Can acrylic paint be used on laminate furniture?
It can, but the smooth surface usually needs careful cleaning, light scuffing where appropriate, and a bonding primer made for laminate. Test adhesion before painting the complete piece.
Let the Furniture Decide How Much Paint It Needs
Learning how to use acrylic paint on furniture is less about covering every inch and more about choosing where colour will solve a real problem. A paint wash can calm an orange-toned table, a smooth coat can settle a small nightstand, and craft acrylic can add flowers or a geometric stencil without replacing a sound dresser.
Begin with one stable piece and one clear finish. Clean it properly, test the paint system, and keep the coats thin. Then give the surface time to cure before the furniture returns to ordinary life. That quiet waiting stage is not very exciting, but it is often the difference between a finish that lasts and one that comes away around the first drawer handle.
Which piece would you paint first: a bedside table in one calm colour, a dresser with a small hand-painted detail, or a wooden table softened with a light acrylic wash?