Acrylic paint can change an old pair of jeans without covering the qualities that made the denim useful in the first place. A flower painted beside a pocket, a trail of fruit along one leg, or a small design placed over a faded patch can make the garment feel considered again while leaving most of the fabric untouched.
Denim gives paint a firm surface, but it still bends around the knees, hips, and pockets. Thick acrylic may look smooth while the jeans are lying flat, then become stiff or develop cracks once the fabric starts moving. The paint mixture, placement, and layer thickness all matter.
I don’t think painted jeans need a full-leg illustration to earn another place in the wardrobe. One useful detail can be enough, especially when it covers a permanent mark or directs attention away from uneven fading.
I’d begin with jeans that still fit comfortably and remain structurally sound. Paint can improve the appearance of worn denim, but it cannot strengthen a weak seam, repair thinning fabric, or stop an unstable rip from widening.
Understand Acrylic Paint Before Using It on Denim
Ordinary acrylic paint contains pigment held in an acrylic binder. Once the paint dries, that binder remains around the fabric fibres rather than becoming part of the denim in the same way as a textile dye.
That is why untreated acrylic can make fabric feel firm. A small, thin design may remain comfortable, while a heavily painted panel can behave more like a patch attached to the denim.
A compatible fabric medium can modify artist acrylic for use on textiles. Some mediums help the paint flow into the weave and leave a softer surface. Others require heat setting to improve wash performance, so the instructions for the exact product matter more than a general rule.
GOLDEN advises against filling large fabric areas with thick acrylic because the finished garment can become stiff. Its GAC 900 medium is designed to be mixed with acrylic paint for wearable textiles and requires appropriate heat setting after the paint has dried.
The fabric medium does not make every paint mixture identical. Test the paint, medium, denim, drying method, and intended care process together before working on the visible part of the jeans.
Choose the Best Area for the Design
Denim painting is easier when the artwork follows the construction of the jeans rather than fighting against it.
Useful areas include:
- One back pocket
- The outer side of one leg
- The lower leg above the hem
- A small section beside the knee
- The front pocket edges
- The space beneath the waistband
- A faded thigh panel
- The fabric around an existing repair
- A narrow section beside the outer seam
- Small repeated details across both legs
Avoid placing one heavy block of paint directly over the deepest knee crease. Small flowers, broken patterns, thin lines, or separate motifs will usually move more comfortably in that area.
Try the jeans on before finalising the placement. A design that looks centred while the trousers lie flat may shift towards the inner or outer leg once the denim is being worn.
I’d also check where the pockets sit. A thick design across a pocket opening may make it awkward to use, while paint pushed through the pocket fabric may accidentally attach it to the layer underneath.
Prepare the Jeans Properly
Wash the jeans before painting unless their care label requires another cleaning method. Avoid fabric softener because it can leave residue around the fibres.
Let the denim dry completely. Press the chosen area only when the care label allows it, as deep creases can affect both the sketch and the painted edges.
Preparation may include:
- Washing and drying the jeans
- Removing lint
- Repairing loose seams
- Reinforcing unstable rips
- Checking the care label
- Trying the jeans on
- Marking the design position
- Testing paint inside the waistband
- Protecting existing labels
- Placing cardboard inside the leg
- Separating pocket layers
- Covering the work surface
- Gathering paint before beginning
- Keeping wet materials away from children and pets
Use firm cardboard inside the leg or pocket. It should support the denim without stretching it into a shape the garment does not naturally hold.
Paint may pass through the weave, particularly when the first layer is worked firmly into the fibres. A protective insert stops the front and back of the leg from sticking together.
Gather the Basic Tools
- Clean old jeans
- Acrylic paint
- Compatible fabric medium
- Fabric paint, if preferred
- Flat synthetic brush
- Small round brush
- Filbert brush
- Angled brush
- Fine liner brush
- Cosmetic sponge
- Acrylic paint markers
- Mixing palette
- Small measuring cup
- Tailor’s chalk
- Washable fabric marker
- Stencil or paper template
- Low-tack masking tape
- Firm cardboard
- Clean water
- Paper towels
- Scrap denim
- Protective table covering
- Pressing cloth
- Heat-setting equipment when required
Keep the brushes organised by purpose. A broad brush can place the foundation, while a small round brush is easier for petals, fruit, lettering, and narrow outlines.
Do not leave the brush dripping with water. Too much moisture can spread colour beyond the sketched edge, especially across faded or loosely woven denim.
Paint Sakura Flowers Along One Jeans Leg
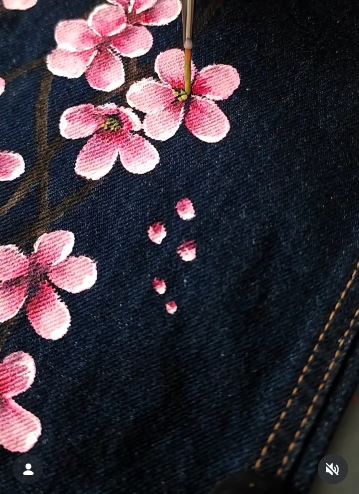
A Sakura branch suits the shape of a jeans leg because it can curve around seams, worn areas, and natural fading. The branch gives the design direction, while individual flowers can be placed wherever the composition needs more colour.
This approach also works well when there is one narrow stain or faded strip that does not justify painting the entire leg. The flowers can pass beside the mark instead of forming a heavy block directly over it.
Materials and Tools
- Clean denim jeans
- Pink acrylic paint
- White acrylic paint
- Brown or deep grey acrylic
- Compatible fabric medium
- Filbert brush
- Angled brush
- Fine detail brush
- Tailor’s chalk
- Cardboard insert
- Scrap denim
Build the Flowering Branch
- Plan the direction while wearing the jeans. Mark where the branch should begin and end, then check how it sits from the front and side. A branch rising from the ankle towards the outer thigh usually follows the leg more naturally than one running straight through the centre.
- Test the paint mixture. Combine small amounts of acrylic and fabric medium according to the product instructions. Paint a few petals and one thin line on scrap denim, then let the sample dry before checking its flexibility.
- Sketch the main structure. Place cardboard inside the leg and draw one loose branch with chalk. Add several shorter offshoots, keeping enough space between them for flowers, buds, and small areas of visible denim.
- Paint the branches and petals. Add the dark branch first, then build each flower with several rounded brush marks. Use white or pale pink along selected petal edges and a deeper colour near some centres.
- Finish the smaller details. Add buds, flower centres, and a few loose petals around the main branch. Let everything dry, then complete the curing or setting process required by your paint system.
For me, the spaces between the flowers are just as important as the petals. They allow the branch to remain visible and stop the design becoming one long pink stripe.
A beginner can paint one small cluster near the ankle or beneath a pocket. Daisies, lavender, tiny leaves, or simple berry branches can follow the same arrangement.
Turn a Back Pocket Into a Sunflower Panel
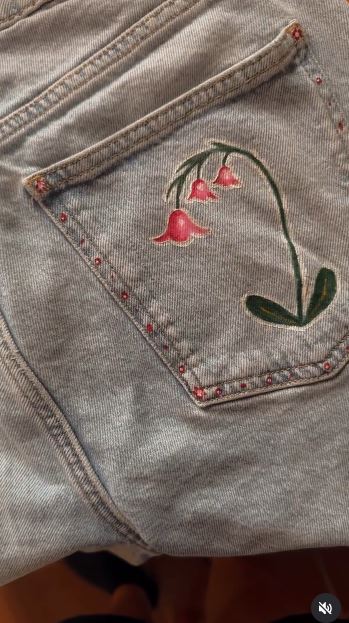
A back pocket creates a useful boundary for a first denim-painting project. The stitching already frames the available surface, and a small cardboard insert can protect the jeans beneath it.
The top edge of the pocket needs special attention. Thick paint placed directly across the opening may make the pocket uncomfortable to use or cause the two fabric layers to stick together.
Materials and Tools
- Jeans with sound back pockets
- Yellow acrylic paint
- Brown acrylic paint
- Green acrylic paint
- White or cream acrylic
- Fabric medium
- Flat brush
- Filbert brush
- Fine detail brush
- Tailor’s chalk
- Small cardboard insert
- Mixing palette
Paint the Sunflower
- Support and inspect the pocket. Slide cardboard inside the pocket so the front fabric remains separate from the jeans underneath. Smooth the denim gently without stretching the pocket into a wider shape.
- Mark the flower position. Draw the central circle first, then add broad petal guides around it. Let a few petals extend towards the pocket edges rather than forcing the flower into a perfectly symmetrical shape.
- Add a thin pale foundation. Dark denim can dull yellow paint, so place a light base beneath the brightest petals when needed. Keep the foundation slightly smaller than the final flower so no pale outline remains around it.
- Build the colour gradually. Paint the petals from their outer edges towards the centre, using several light layers. Add the brown centre and a few green leaves without filling the entire pocket background.
- Refine the surface. Add narrow highlights, seed details, and limited shadows. Once the design is dry and properly set, remove the cardboard and check that the pocket still opens freely.
I know it can feel tempting to paint the second pocket immediately. One detailed pocket beside one plain pocket often has more impact than two matching flowers competing for attention.
A smaller daisy, moon, fruit, initial, or simple sunset can work in the same space. You could also paint a narrow border around the pocket instead of filling its centre.
Add an Original Character to the Lower Leg

A character illustration needs more planning than scattered flowers because the face, hands, clothing, and proportions need to work together. The lower leg usually provides a flatter surface than the knee and receives less severe bending.
Use artwork that you created, commissioned, or have permission to reproduce. An original character influenced by a broad visual style gives you more freedom than copying commercial artwork line for line.
Materials and Tools
- Clean jeans
- Original character sketch
- Acrylic colours
- Fabric medium
- White base paint
- Small flat brush
- Fine round brush
- Liner brush
- Chalk or removable transfer material
- Cardboard insert
- Mixing palette
Build the Character Painting
- Plan the scale on paper. Measure the available lower-leg panel and resize the drawing before transferring it. Keep the face, hands, and other important details away from thick seams and deep folds.
- Prepare the working surface. Place cardboard inside the leg and smooth the denim without stretching it. Transfer only the main outlines so the surface does not become crowded with guide marks.
- Add the broad foundation. Apply a thin pale base beneath bright clothing, skin, or hair colours when the denim is dark. Let the weave remain slightly visible instead of repeatedly coating every blue fibre.
- Build the large shapes first. Paint the clothing, hair, skin, and background sections before moving to facial features. Then add shadows, highlights, outlines, and narrow decorative details with smaller brushes.
- Check the artwork on the body. Allow the design to dry, remove the insert, and try the jeans on carefully. Correct any section that looks distorted by the natural curve of the leg before completing the required setting process.
The face is the part I would keep simple. A few clear lines often read better on textured denim than tiny details that disappear into the weave.
A beginner can paint a character symbol, eye, emblem, small face, or original cartoon animal near the ankle. These smaller designs require less colour mixing and are easier to position.
Paint Small Fruit Across Faded Jeans
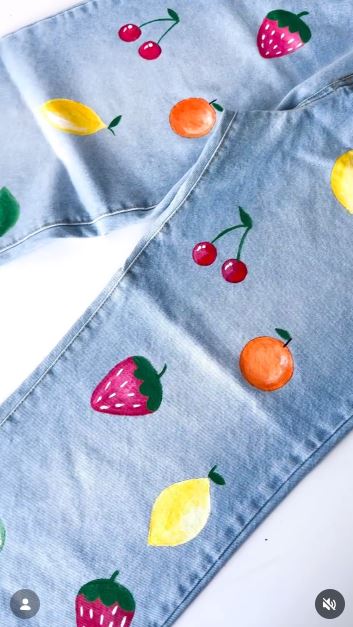
Small fruit motifs are useful when several marks or faded areas are spread across the jeans. Each fruit can remain separate, so the design feels connected without requiring a continuous background.
The colours do not need to match the denim. Red cherries, yellow lemons, green pears, orange slices, and small strawberries can sit clearly against blue fabric when their shapes remain simple.
Materials and Tools
- Clean old jeans
- Acrylic paint
- Compatible fabric medium
- White base paint
- Small round brush
- Fine detail brush
- Acrylic paint markers, if useful
- Tailor’s chalk
- Small paper templates
- Cardboard insert
- Scrap denim
Add the Fruit Pattern
- Map the marks and faded sections. Try the jeans on and identify the areas you want to disguise. Place the largest fruit motifs over the most noticeable marks, then plan smaller ones to connect the arrangement.
- Limit the first palette. Choose three or four fruit colours and test them on scrap denim. Adding every shade in the paint box can make the pattern feel scattered rather than playful.
- Paint the larger fruit shapes. Use a thin pale base where yellow, pink, or orange needs more visibility. Then add the main colour while keeping a narrow area of denim between neighbouring motifs.
- Add leaves, stems, and small details. Use a fine brush for seeds, outlines, highlights, and narrow stems. Vary the direction slightly so every fruit does not appear to be floating upright in a straight line.
- Balance both legs. Place a few related motifs on the second leg without copying the first arrangement exactly. Let the paint dry and finish it according to the product instructions before wearing or washing the jeans.
I’d keep a few completely empty areas between the fruit. The pattern needs pauses, otherwise the jeans can start resembling a very enthusiastic tablecloth.
A quieter version can use only cherries, lemons, or strawberries. Small flowers, stars, mushrooms, or hearts can follow the same scattered layout.
Turn a Small Rip Into a Painted Feature
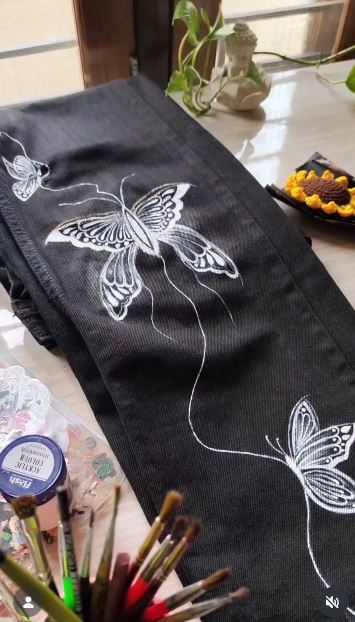
A painted repair works best when the damaged fabric is reinforced first. Acrylic colour may disguise the repair line, but it cannot stop a weak hole from widening by itself.
This is a useful place to combine two forms of upcycling. A patch or hand-stitched repair restores the fabric, while the painted design connects the repaired section with the rest of the jeans.
Materials and Tools
- Jeans with a small repairable tear
- Denim or strong fabric patch
- Hand-sewing needle
- Strong thread
- Acrylic paint
- Fabric medium
- Small flat brush
- Fine detail brush
- Chalk
- Cardboard insert
- Pins or fabric clips
Repair and Paint the Area
- Inspect the fabric beyond the visible tear. Find where the denim becomes strong again and choose a patch large enough to support that area. Trim only loose threads that cannot be secured safely.
- Attach the supporting patch. Place the patch behind the hole and hold it with pins or clips. Hand stitch around the stronger denim, keeping the thread tension firm without gathering the leg.
- Plan a design around the repair. Use the shape of the patch or stitching as part of the composition. A flower, starburst, leaf cluster, eye, heart, or abstract shape can extend beyond the repaired section.
- Paint in light layers. Add a thin base where needed, then build the main colour around and partly across the repair. Avoid filling the flexible stitched edges with a thick line of acrylic.
- Check the repaired leg. Let the paint dry and complete the required setting process. Bend the fabric gently and reinforce any stitch that begins lifting before the jeans return to regular use.
For me, a visible repair does not need to pretend the damage never happened. Letting the stitching remain partly visible can make the painted section feel more honest.
A contrasting fabric patch can become the centre of the design. You could also use embroidery thread, painted leaves, small stars, or a colour-block shape around the repair.
Add Bold Shapes With Acrylic Paint Markers
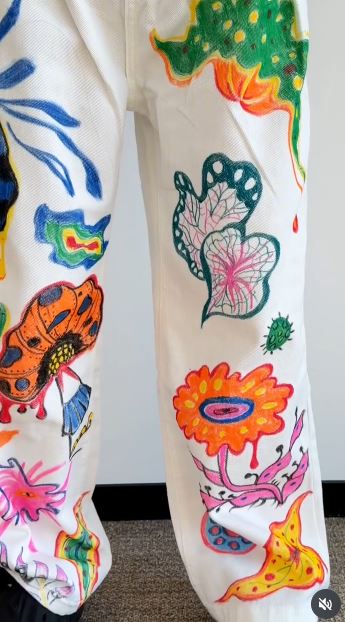
Acrylic paint markers can feel easier than brushes when the design relies on lines, writing, dots, and solid graphic shapes. The firm tip keeps the paint contained and removes the need to carry a palette around the jeans.
Markers still place acrylic paint onto the fabric, so they need the same testing and care as bottled colour. A broad tip may catch on rough denim, while pressing too hard can release a heavy pool into one spot.
Materials and Tools
- Clean jeans
- Broad acrylic paint markers
- Fine acrylic markers
- Scrap denim
- Tailor’s chalk
- Ruler
- Paper templates
- Low-tack masking tape
- Cardboard insert
- Protective table covering
Draw the Graphic Pattern
- Prime the markers away from the jeans. Follow the marker instructions and test each tip on scrap denim. Check the line width, colour coverage, paint flow, and dried flexibility.
- Plan the largest shapes. Put cardboard inside the leg and mark broad blocks, curves, letters, or symbols with chalk. Keep the most important edges away from thick seams that may interrupt the marker.
- Apply the light colours first. Fill the main shapes using steady strokes and avoid pressing repeatedly in one place. Turn the marker slightly as you work so the tip wears evenly against the rough weave.
- Add outlines and smaller marks. Let the first sections settle, then draw darker borders, dots, lines, or lettering. Repeat one or two shapes on the second leg so the design feels connected.
- Inspect and set the finished pattern. Remove the cardboard only when the painted sections are stable. Follow the marker manufacturer’s care instructions before washing or wearing the jeans.
I don’t think every shape needs an outline. Leaving some edges soft or unframed gives the broader pattern more variation.
A beginner can outline one pocket, add stars around the cuffs, write one word beside a seam, or paint a small checkerboard near the ankle.
Common Mistakes to Avoid
Painting Jeans That Have Not Been Washed
Dust, oil, detergent residue, and fabric softener can interfere with the paint. Clean and dry the denim before beginning.
Forgetting the Cardboard Insert
Paint may travel through the weave and attach the two sides of the leg. Always separate the layers beneath the working area.
Using Thick Acrylic Without Testing It
Heavy acrylic may cover the blue fabric quickly, but it can leave the denim stiff. Test the complete paint-and-medium mixture on scrap denim first.
Assuming Every Medium Uses the Same Ratio
Mixing and setting instructions differ between products. Follow the manufacturer’s directions rather than using a ratio taken from an unrelated paint system.
Painting Large Blocks Across the Knee
The knee bends repeatedly and places stress on the painted film. Use smaller shapes, thin layers, or broken patterns in high-flex areas.
Skipping the Pale Base on Dark Denim
Yellow, pink, cream, and pale blue can appear dull over dark fabric. A thin white or light foundation may help, but it should not become a thick patch.
Drawing With a Dark Permanent Pencil
Pencil marks can remain visible beneath light paint. Use chalk, removable fabric marker, or suitable transfer material.
Overloading the Brush
Too much paint creates ridges and can hide the denim weave. Build coverage with controlled layers instead.
Adding Fine Details Too Early
Tiny outlines cannot rescue a poorly placed design. Check the main shapes and spacing before painting highlights, veins, seeds, or lettering.
Painting Over Weak Fabric
Acrylic does not strengthen thinning denim. Repair holes, weak knees, and unstable seams before adding the design.
Applying Heat Without Checking the Jeans
Stretch denim, synthetic fibres, patches, labels, and decorations may react differently to heat. Check both the care label and the medium instructions before setting the paint.
Washing the Jeans Too Soon
A painted surface may feel dry before it has completed the required curing or heat-setting process. Follow the product instructions rather than guessing.
Frequently Asked Questions
Can regular acrylic paint be used on jeans?
Regular acrylic may be used with a compatible fabric medium or according to the paint manufacturer’s textile guidance. Thick untreated acrylic is more likely to leave the denim stiff.
Is fabric paint easier than acrylic paint?
Fabric paint is already formulated for textile use, which can make it more convenient. Acrylic and fabric medium give you access to colours already in your art supplies, but the mixture needs proper testing.
Do painted jeans always need heat setting?
No single setting method suits every product. Some fabric mediums require heat, while other paint systems use a different curing process. Follow the instructions for the exact materials.
Should I use white paint underneath the design?
A thin pale foundation can help bright colours appear over dark denim. It may not be needed for black lines, deep colours, transparent effects, or pale jeans.
Can acrylic paint cover a stain?
Yes, provided the denim is clean and strong. Plan the design slightly larger than the mark so the stain does not remain visible around the edges.
How can I stop paint from reaching the other side?
Place firm cardboard inside the leg or pocket and avoid flooding the fabric with an overly wet mixture. Check the reverse before applying another layer.
Will acrylic paint crack on jeans?
Cracking becomes more likely when the paint is thick, poorly prepared, or placed across a high-flex area. Thin layers and careful placement help the design move with the denim.
Can acrylic paint markers be used on denim?
They can work well for lettering, symbols, outlines, and graphic shapes when the marker is suitable for fabric. Test the marker on scrap denim before using it on the jeans.
How should painted jeans be washed?
Follow the paint or medium manufacturer’s care instructions. Gentle handling and reducing direct abrasion against the artwork can help protect the painted sections.
Let the Denim Stay Visible
Learning how to use acrylic paint on jeans is not about covering every blue thread. The original denim should still contribute colour, texture, and movement to the finished garment.
A Sakura branch can follow the shape of one leg. A sunflower can turn a plain pocket into a focal point, while fruit motifs can work around scattered marks and fading. Character artwork and bold marker shapes offer larger changes, and a painted repair can keep damaged jeans in use without hiding their history.
Begin with one small section, a tested paint mixture, and a firm cardboard insert. Build the colour slowly, let it settle, and try the jeans on before deciding whether the design needs anything more.
Which detail would you add first: a painted pocket, a narrow flower branch, small fruit, a repaired feature, or one bold shape near the ankle?