Acrylic paint can change a tired pair of shoes without hiding everything that made them wearable in the first place. A faded canvas upper may only need a few painted panels, while an old leather sneaker can carry a completely different colour arrangement once its factory finish has been prepared properly.
Shoes are less forgiving than a flat canvas. They bend at the toes, rub against one another, collect dust, and come into contact with damp pavements. Thick paint may look smooth while the shoe sits on a table, then crack as soon as the upper begins flexing again.
I don’t think every shoe-painting project needs to cover the entire pair. A small floral panel, coloured heel tab, geometric side section, or repaired scuff can make old shoes feel useful again without turning the project into a week-long painting marathon.
The right preparation depends on the shoe material. Smooth leather usually needs its factory coating removed before painting, while canvas needs clean fibres and a paint mixture that remains flexible. What matters most is matching the acrylic system to the surface rather than treating every shoe in exactly the same way.
Understand the Shoe Material Before Choosing the Paint
Acrylic paint can work on several shoe materials, but one paint mixture will not suit all of them.
Smooth leather usually has a protective factory finish. Paint applied directly over that coating may struggle to grip the surface. A leather preparer or deglazer removes oils and part of the original finish so that flexible acrylic leather paint can adhere more effectively. Angelus recommends testing the preparer first, then using it across the leather before painting.
Canvas behaves more like heavy fabric. It absorbs moisture and allows colour to settle between the woven fibres. Ordinary artist acrylic may leave the canvas stiff when applied heavily, so a compatible fabric medium can be useful when you want to modify acrylic colour for a flexible textile surface. GOLDEN describes GAC 900 as a liquid acrylic medium intended for mixing with acrylic colour for fabrics, garments, and other textiles.
Synthetic leather, vinyl, rubber, mesh, and coated fabric require more caution. Their finishes and flexibility vary, and some surfaces resist ordinary acrylic paint. Test the complete system on a hidden area before committing to the whole shoe.
Choose the Right Acrylic System
The phrase acrylic paint can refer to several different products.
Acrylic Leather Paint
Acrylic leather paint is formulated to flex on properly prepared leather and similar surfaces. It is a more reliable choice for leather sneakers, boots, heels, and synthetic panels than thick general-purpose craft paint.
Angelus describes its shoe-customising paints as flexible acrylic colours intended for shoes, bags, canvas, and other surfaces. The manufacturer also recommends applying several thin layers rather than one heavy coat.
Artist Acrylic With Fabric Medium
Canvas shoes can be painted with acrylic colour modified by a compatible fabric medium. The medium may improve flow and reduce the rigid feel created by thick paint.
Do not assume that adding a large amount of water produces the same result. Water changes consistency, but it does not add the ingredients found in a purpose-made textile medium.
Acrylic Paint Markers
Acrylic markers are useful for outlines, small shapes, lettering, dots, and controlled details. They are particularly convenient on canvas because the tip can move across the woven surface without requiring a separate palette.
Markers still need testing. A very fine tip may catch on rough fabric, while a heavily pressed marker can release too much paint into one spot.
Finishing Products
A compatible acrylic finisher may help protect painted leather and adjust the final sheen. A canvas project may require a different protective product, or no additional coating at all, depending on the paint system.
A finisher cannot repair weak preparation or excessively thick paint. Think of it as the final layer of a sound system, not an emergency rescue coat.
Prepare the Shoes Properly
Begin with shoes that remain structurally wearable. Paint will not repair split soles, torn heel linings, broken stitching, or crumbling synthetic material.
Preparation may include:
- Removing the laces
- Brushing away loose dirt
- Cleaning the soles and uppers
- Allowing the shoes to dry completely
- Stuffing the toes with clean paper
- Removing a leather factory finish
- Testing a preparer on a hidden area
- Lightly sanding only when suitable
- Masking soles, labels, eyelets, and logos
- Sketching the design on paper
- Testing paint on a concealed section
- Covering the work surface
- Working in a ventilated area
- Wearing gloves when required
- Keeping preparation products away from flames
Do not use a strong preparation product blindly. Leather, coated synthetic material, printed panels, and decorative finishes may react differently. Follow the product instructions and test first.
For smooth leather, Angelus recommends removing the factory finish and oils with a leather preparer and deglazer. High-grit sanding may be used gently on crease-prone areas when appropriate, followed by another cleaning pass to remove dust.
Gather the Basic Tools
- Clean pair of shoes
- Acrylic leather paint or acrylic colour
- Fabric medium for canvas, if required
- Leather preparer or deglazer
- Mild shoe cleaner
- Soft cleaning cloth
- Cotton pads
- Small flat brush
- Fine detail brush
- Angled brush
- Cosmetic sponge
- Acrylic paint markers
- Mixing palette
- Small mixing cup
- Low-tack masking tape
- Removable pencil or chalk
- Clean paper for stuffing
- Protective table covering
- Gloves
- Compatible acrylic finisher
- Scrap material for testing
Keep separate brushes for preparation products and paint. A brush carrying traces of cleaner or deglazer can disturb the colour before you have even finished the first panel.
Paint a Clean Design on Canvas Shoes
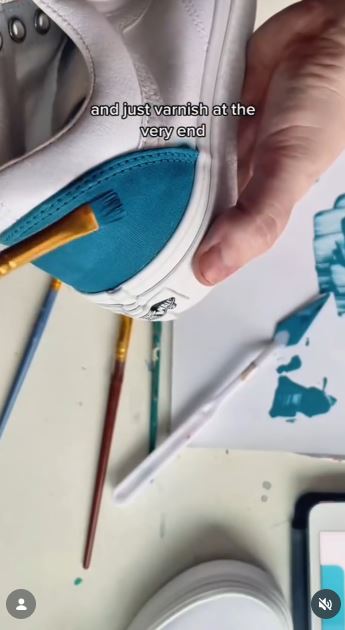
Plain canvas shoes provide a useful surface for practising brush control. The woven upper already behaves like firm fabric, so colour can be added to selected panels, around the eyelets, or across the outer sides without repainting the entire pair.
The reel demonstrates a step-by-step approach to painting canvas shoes and credits the tutorial to @beccadwyerdesign. Acrylic markers are also presented as a useful option for adding controlled details to fabric-painted sections.
The important detail is keeping the paint light enough that the weave remains visible. A solid plastic-looking layer may become stiff and can interrupt the way the shoe naturally bends.
Materials and Tools
- Clean canvas shoes
- Fabric paint or acrylic paint with fabric medium
- Acrylic paint markers
- Soft brushes
- Masking tape
- Clean paper for stuffing
- Pencil or removable chalk
- Small palette
- Protective table covering
Paint the Canvas Uppers
- Clean and support the shoes. Remove the laces and brush dirt from the canvas. Let the pair dry completely, then fill the toes with clean paper so the fabric remains firm beneath the brush.
- Plan and mask the design. Decide which panels will receive colour and protect the rubber sole, labels, and eyelets with low-tack tape. Sketch large shapes lightly rather than pressing a dark pencil line into the fabric.
- Apply the main colour in light layers. Use a soft brush to work the paint across the weave without flooding it. Let the first layer settle before adding more coverage, especially near areas that crease.
- Add the smaller details. Use a fine brush or acrylic marker for lines, symbols, dots, and narrow shapes. Then compare both shoes from a distance so the designs feel connected without becoming exact copies.
- Finish according to the paint system. Remove the tape carefully and complete any setting or protective process recommended for the products. Replace the laces only when the painted areas are ready to handle.
For me, the canvas texture should still look like fabric. If the first coat has already hidden every thread, another heavy layer probably won’t improve it.
A beginner can paint only the heel panels or tongue. This gives you a smaller working area and keeps most of the original shoe untouched.
Turn Leather Sneakers Into a Painted Floral Garden
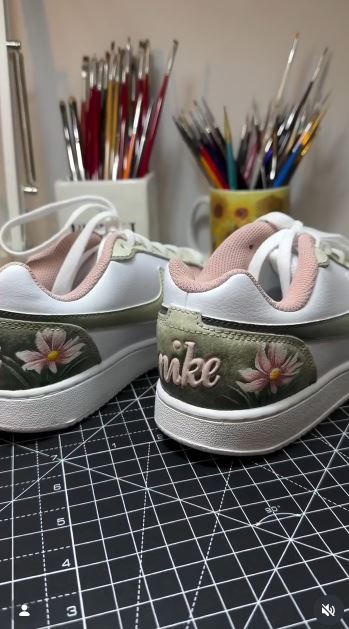
Floral designs work naturally around the curved panels of a sneaker. Stems can follow seams, small leaves can fill narrow spaces, and larger flowers can sit on flatter side sections where the artwork is less likely to distort.
The project demonstrates a floral sneaker transformation using surface preparation followed by light layers of acrylic leather paint. The advice accompanying the reel emphasises removing the top coating and avoiding thick paint that could crack as the shoes flex.
An older pair with scuffed side panels can suit this idea particularly well. The flowers do not need to hide every mark. A few imperfections beneath the design can remain part of the shoe’s history.
Materials and Tools
- Sound leather sneakers
- Leather preparer or deglazer
- Acrylic leather paint
- Fine round brush
- Small flat brush
- Cotton pads
- Palette
- Removable sketching pencil
- Low-tack masking tape
- Compatible acrylic finisher
Build the Floral Design
- Prepare the leather carefully. Remove the laces and clean the shoes before applying the correct surface preparer. Work in a ventilated space and test the product on a hidden area before treating visible panels.
- Plan the flower placement. Sketch the largest flowers first and allow smaller stems to follow the shoe seams. Keep some open leather between the groups so the design does not become one crowded block.
- Paint the broad shapes. Apply the petals and leaves in thin layers, allowing each colour to build gradually. Avoid one heavy base coat, particularly near the toe box and other areas that bend.
- Add outlines and small details. Use a fine brush for leaf veins, flower centres, and narrow stems. Then step back and remove any planned detail that makes the design feel too busy.
- Protect the finished surface. Allow the paint to complete its required drying process before applying a compatible finisher. Keep the finisher light and follow its instructions rather than repeatedly coating the artwork.
I know it can feel tempting to fill every empty section with another leaf, but the plain leather around the flowers helps each shape remain readable.
A simpler version can use one flower on each outer heel. Daisies, small vines, lavender stems, and simple five-petal flowers are easier to control than highly detailed roses.
Draw Bold Patterns With Acrylic Paint Markers
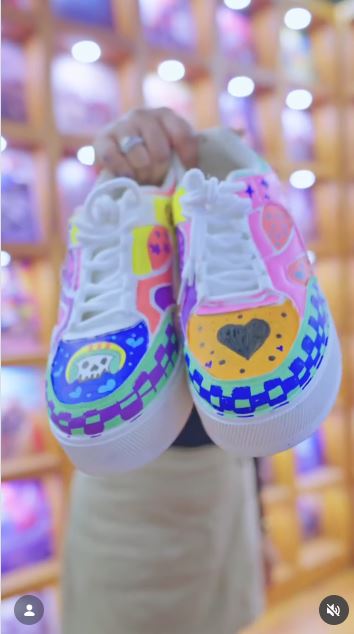
Acrylic markers offer a different kind of control from a wet brush. They suit graphic lines, repeated symbols, small botanical shapes, dots, lettering, and outlined blocks of colour.
This project turns ordinary canvas shoes into wearable artwork using acrylic paint markers. The collaboration identifies ABHYARTHANA.art and IMPAKTO, with acrylic markers used as the main drawing tool.
Markers work best when the shoe remains supported from inside. A soft, collapsing toe makes straight lines far more difficult than they need to be.
Materials and Tools
- Clean canvas shoes
- Acrylic paint markers
- Scrap canvas for testing
- Pencil or removable chalk
- Low-tack masking tape
- Clean paper for stuffing
- Ruler or flexible guide, if useful
- Protective surface
Add the Marker Design
- Test each marker first. Shake and prime the marker according to its instructions on scrap material rather than directly over the shoe. Check the line width and paint flow before beginning.
- Support and sketch the shoe. Stuff the shoe until the canvas feels firm, then mark the main pattern lightly. Plan the largest shapes before adding small decorative marks.
- Build the design from light to dark. Place pale colours first and keep the marker moving steadily across the fabric. Let one section settle before drawing a dark outline beside it.
- Repeat selected elements. Carry a few shapes or colours onto the second shoe so the pair feels connected. There’s no need to reproduce the first design line for line.
- Check and finish the surface. Correct small gaps with the marker tip, then complete any setting or protection recommended by the manufacturer. Keep the shoes untouched while the painted areas settle.
The first line can feel strangely serious, especially when the shoe is sitting there looking very white and expensive. Starting near the heel usually feels less dramatic than beginning across the toe.
A beginner-friendly pattern can use dots, short dashes, stars, small hearts, or simple leaves. Limit the palette to three colours if you want the surface to remain calm.
Create a Sunset Ombré Across Old Cleats
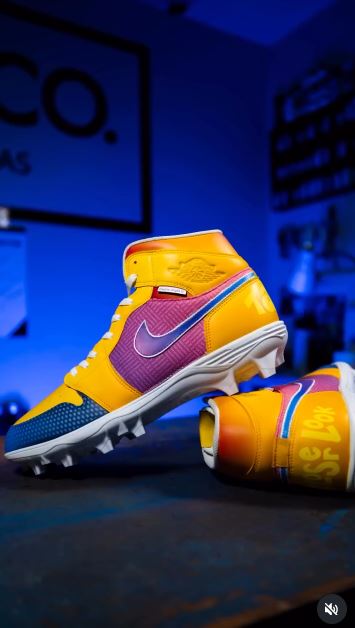
An ombré finish depends on a controlled transition rather than a hard line between colours. Yellow can move into orange, orange into red, or pale blue into a deeper evening shade.
The reel features sunset ombré cleats and highlights the importance of preparing the surface so factory finishes, oils, and silicone do not interfere with adhesion. It also presents flexible acrylic paint as the colouring system for the customised athletic shoes.
Cleats and other athletic shoes receive more stress than decorative sneakers. Paint only a pair that remains safe and structurally sound, and avoid covering traction surfaces, hardware, or functional sole areas.
Materials and Tools
- Sound sports cleats
- Suitable surface cleaner
- Leather preparer or material-specific primer
- Flexible acrylic shoe paint
- Cosmetic sponges
- Soft brushes
- Mixing palette
- Masking tape
- Gloves
- Compatible finisher
Blend the Sunset Gradient
- Inspect and prepare the cleats. Check the sole attachment, studs, stitching, and upper material before painting. Clean and prepare only the sections that are compatible with the chosen paint system.
- Protect functional areas. Mask the sole, studs, logos, lace hardware, and any panel that should remain unpainted. Press the tape into curved edges without stretching it too tightly.
- Place the lightest colour. Sponge or brush a thin yellow layer onto the brightest area. Keep the paint light and allow some prepared surface to remain visible until the next coat.
- Blend the neighbouring shades. Add orange beside the yellow and red near the darkest end, overlapping the edges while the layers remain workable. Then rebuild the colours lightly rather than scrubbing the same transition repeatedly.
- Inspect and protect the finish. View both shoes together and correct only obvious breaks in the gradient. Complete the drying and finishing process recommended for the paint before returning the cleats to use.
The transition does not need to disappear completely. A slight change between the colours often looks clearer than one overworked mixture that turns the whole shoe orange.
The same method can create blue-to-violet evening shoes, green-to-teal panels, or a monochrome fade using three strengths of one colour.
Combine Organic Lines With Geometric Panels
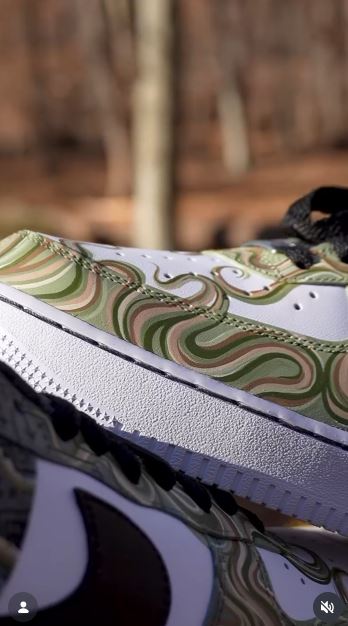
Straight-edged colour blocks can make a shoe feel structured, while curved lines soften the result. Combining both styles works particularly well on sneakers that already contain several stitched panels.
The reel pairs natural flowing forms with rigid geometry on painted footwear. The accompanying guidance stresses the use of flexible acrylic leather paint to reduce cracking on a bending surface.
Use the existing shoe construction as a map. A seam can become the edge of a painted panel, and a curved overlay can guide a vine, wave, or loose abstract line.
Materials and Tools
- Clean leather or synthetic-panel sneakers
- Surface preparation products
- Flexible acrylic shoe paint
- Low-tack masking tape
- Flexible curve or paper template
- Small flat brush
- Fine liner brush
- Palette
- Pencil suitable for the surface
- Compatible finisher
Balance the Two Pattern Styles
- Prepare and study the panels. Clean the shoes and complete the correct surface preparation. Look at the seams and overlays before deciding where the geometric sections should stop.
- Mask the straight shapes. Use low-tack tape to create blocks, stripes, or angled panels. Press the edges down carefully so paint does not travel beneath them.
- Paint the geometric areas. Apply several light layers rather than one opaque coat. Remove the tape carefully once the paint reaches the stage recommended for the product.
- Add the organic lines. Draw curved forms beside or across selected blocks using a fine brush. Then repeat one or two curves on the second shoe to connect the pair.
- Refine and finish the design. Correct uneven edges with a small brush and leave some original shoe colour visible. Apply a compatible protective finish only after the paint is ready.
For me, the straight panels need the curved lines, and the curved lines need the quiet structure of the panels. Too much of either one changes the balance.
A simpler version can use one painted rectangle and one curved line on each outer side. You can also replace the organic motif with waves, leaves, clouds, or a loose topographic pattern.
Refresh Old Sneakers With Small Acrylic Marker Details
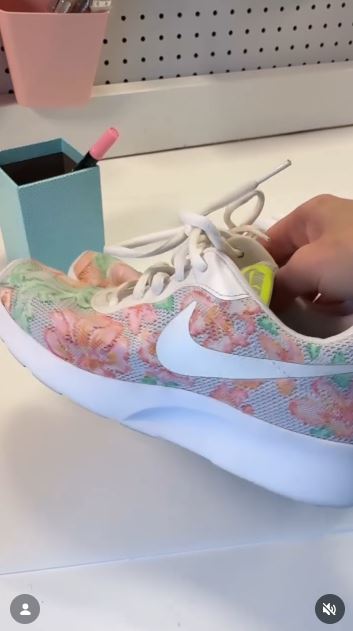
Not every old pair needs a complete repaint. Small acrylic marker details can distract from mild discolouration, add interest to a plain heel, or connect several existing colours.
The reel focuses on old Nike shoes that were nearly donated before being customised with acrylic paint markers. That makes the project particularly relevant to reuse because the original footwear remains recognisable beneath the new marks.
Choose marks that suit the shoe’s condition. Do not paint over cracks, peeling synthetic layers, or damaged stitching and pretend the underlying problem has disappeared.
Materials and Tools
- Clean old sneakers
- Acrylic paint markers
- Suitable surface preparation product
- Removable pencil
- Masking tape
- Clean paper for stuffing
- Cotton swabs
- Small brush for corrections
- Compatible protective product, if required
Add Small Upcycled Details
- Decide whether the shoes remain worth painting. Inspect the soles, lining, stitching, and upper panels. Clean the pair and complete any material-specific preparation before drawing.
- Choose the areas that need attention. Mark the heel, side logo, eyelet panel, or narrow overlay where colour will have the greatest effect. Avoid spreading details across every surface.
- Test and apply the markers. Prime each marker on scrap material, then add small shapes in light layers. Work slowly around seams because the tip may release extra paint when it catches.
- Connect the two shoes visually. Repeat the palette or one small symbol on the second shoe. Then stop before the design becomes a collection of unrelated doodles.
- Finish and return the pair to use. Let the details settle according to the marker instructions and apply a suitable protective product where recommended. Replace the laces and check the design while wearing the shoes.
I’d keep the original colour visible in a project like this. The point is to refresh an old pair, not make it pretend it has never been worn.
You can use the same approach on heel tabs, canvas slip-ons, children’s trainers, boot panels, or a pair with one stubborn mark that ordinary cleaning cannot remove.
Common Mistakes to Avoid
Using One Paint System on Every Shoe
Canvas, leather, synthetic leather, mesh, and rubber do not behave alike. Identify the material and choose a compatible preparation, acrylic paint, and finishing system.
Painting Over Dirt or Factory Finish
Dust, oil, polish, and smooth factory coatings can interfere with adhesion. Clean every shoe and prepare smooth leather properly before painting.
Applying Thick Coats
Heavy acrylic layers may look opaque quickly, but they are more likely to form ridges or crack as the shoe bends. Angelus recommends thin layers with drying time between them rather than one heavy application.
Sanding Every Surface Automatically
Sanding may help on some smooth leather areas, but it can damage canvas, thin synthetic coatings, decorative prints, and delicate materials. Use it only when it suits the surface and product instructions.
Painting Damaged Shoes
Colour cannot secure a separating sole or strengthen crumbling synthetic leather. Repair structural problems first or choose another pair.
Ignoring the Crease Areas
Toe boxes and other bending sections receive more stress. Keep the paint especially thin there, or position the main artwork on flatter side and heel panels.
Flooding Canvas With Paint
Too much paint fills the woven texture and may leave the shoe stiff. Work the colour into the fibres lightly and build coverage in controlled layers.
Removing Masking Tape Carelessly
Pulling tape sharply can disturb fresh edges or lift a weak coating. Remove it slowly and follow the paint manufacturer’s timing guidance.
Assuming a Finisher Fixes Everything
A finisher cannot correct oil beneath the paint, a glossy unprepared surface, or a thick brittle coat. Good preparation remains the most important protective step.
Painting the Main Outsole
The bottom of a shoe experiences constant abrasion and direct contact with the ground. Keep decorative acrylic away from functional traction areas unless you are using a product specifically intended for that purpose.
Wearing the Shoes Too Soon
Paint may feel dry before the complete system is ready for bending, rubbing, or outdoor exposure. Follow the paint and finisher instructions before wearing the pair.
Frequently Asked Questions
Can I use ordinary acrylic paint on shoes?
That depends on the shoe material and intended use. Canvas may accept acrylic colour modified with a suitable fabric medium, while smooth leather is better suited to flexible acrylic leather paint after correct preparation.
Will acrylic paint crack on shoes?
It may crack when the surface is poorly prepared, the paint is incompatible, or the layers are too thick. Thin applications and a flexible shoe-painting system reduce the risk, especially around crease areas.
Do I need to prepare leather shoes before painting?
Yes. Smooth leather commonly has a factory coating that needs to be removed or prepared so the paint can adhere. Test the preparer on a hidden area before treating the full shoe.
Can I paint canvas shoes without fabric medium?
Some paints are already intended for fabric and do not need another medium. General artist acrylic may produce a firmer result, so check the product guidance and test a small area first.
Should I seal acrylic paint on shoes?
Use a finisher when the chosen paint system recommends one. Match it to the shoe material and paint rather than applying a random craft varnish.
Can acrylic markers be used on shoes?
Yes, acrylic markers can work well for controlled details on compatible canvas, leather, or prepared synthetic surfaces. Test the tip and paint flow before drawing directly on the shoe.
Can I paint rubber sections?
Some specialised products are intended for selected rubber or sole applications, but ordinary acrylic may not withstand constant flexing and abrasion. Avoid painting traction surfaces and test decorative rubber sections carefully.
How do I clean acrylic-painted shoes?
Use gentle cleaning methods recommended for the paint and finisher. Avoid soaking the shoes, scrubbing the artwork aggressively, or using strong cleaners without testing them.
Can painted shoes be worn in rain?
A compatible finish may improve protection, but painted shoes should not automatically be considered waterproof. The original shoe construction, paint, preparation, and finishing product all affect water resistance.
Are old shoes suitable for painting?
Yes, provided they remain structurally sound. Mild fading, scuffs, and unwanted colour can make an older pair a sensible upcycling project, but split soles and deteriorating uppers need repair or replacement.
Let the Original Shoes Guide the Design
Learning how to use acrylic paint on shoes begins before the brush touches the surface. The shoe material determines the preparation, the paint system, and the type of design that is likely to remain practical.
Canvas can carry soft colour, marker patterns, and controlled brushwork. Prepared leather suits thin layers of flexible acrylic paint, while old sneakers may need only a few details rather than a complete repaint. Floral artwork, gradients, geometric sections, and small marker designs all work best when they follow the shoe’s existing seams and movement.
Begin with a pair you already own and still feel comfortable wearing. Clean one small section, test the full paint system, and bend the material after it dries. Then decide whether the design should cover a full panel or simply give one worn area a more considered purpose.
Which pair would you paint first: plain canvas shoes, faded leather sneakers, old cleats, or trainers that nearly ended up in the donation bag?