A laminate bookcase can look awkwardly separate from the room even when its size and storage are useful. The shiny surface catches light differently from painted walls, exposed shelf holes make it feel temporary, and a thin factory finish can leave the whole piece looking flatter than its shape deserves. None of that means the bookcase needs replacing.
I usually begin by asking how the finished bookcase should belong in the room. It might need to sit quietly beside wall panelling, hold its own as a dark display cabinet, or join several units to resemble built-in shelving. That decision affects more than colour.
It determines whether the shelves stay natural, whether trim should be added, and how carefully joins, cables, doors, and hardware need to be planned.
Laminate is smooth and gives ordinary paint very little grip, so preparation matters more than adding an extra decorative coat. Clean it, dull the sheen, use a primer intended to bond to slick surfaces, then build the colour in thin layers.
I know it can feel slow before the first coat appears, but this is the part that keeps the finish attached once books, baskets, and hands begin rubbing against it.
Check Whether the Bookcase Is Worth Painting
Paint can change colour and visual weight, but it cannot correct a weak structure. Inspect the unit before buying supplies or removing the first shelf.
· Press gently on opposite corners to check whether the frame twists, rocks, or separates at the joints.
· Look for swollen panels, peeling laminate, deep water damage, crumbling particleboard, or shelves that sag under light pressure.
· Open every cupboard door and drawer. Tighten hinges, check catches, and make sure moving parts do not already rub against the frame.
· Confirm that removable shelves still sit securely on their supports and that fixed shelves have no loose edges.
· Check the back panel and wall-fixing points, especially if the bookcase is tall, narrow, or likely to hold heavy books.
· Measure the final location, nearby skirting boards, sockets, switches, coving, and doors before planning trim or a fitted surround.
Gather Materials That Suit a Slick Laminate Surface
The exact products will depend on the existing finish and the paint system you choose, but the basic kit should support cleaning, adhesion, and a smooth application.
· Mild degreasing cleaner and clean lint-free cloths
· Fine sanding pads or fine-grit abrasive paper for dulling the sheen
· A bonding primer suitable for laminate, melamine, or other non-porous furniture surfaces
· Durable furniture or cabinet paint that is compatible with the primer
· A small smooth roller for broad panels and a quality brush for corners and moulding
· Painter’s tape, a dust sheet, a tray, and mixing sticks
· Wood filler or a surface-compatible repair filler for small chips and unused holes
· Screwdrivers, labelled bags, and a pencil for removing and organising hardware
· Optional trim, plinth pieces, shelf edging, new handles, or low-voltage lighting for the planned design
· Gloves, eye protection for sanding, and ventilation suited to the coatings being used
Decide What Will Be Painted and What Will Stay Visible
A clear finish plan prevents awkward stopping points and makes masking much easier. Stand back from the unit and decide how colour, wood, lighting, and trim should divide the surfaces.
· Paint the full unit one colour when you want shelves, frame, doors, and added trim to read as a single fitted cabinet.
· Keep shelf interiors or shelf boards in a wood finish when the contrast will warm a dark exterior and make displayed objects easier to see.
· Use the same colour as nearby walls or panelling when the bookcase should recede rather than become the room’s main feature.
· Choose a deeper colour when the outline, hardware, and lighting need stronger definition.
· Plan cable routes, switch positions, ventilation, and removable access before fitting any lights.
· Mark where separate units will join and where filler, cover strips, cornice, or a plinth will hide factory gaps.
Keep the Shelves Warm and Paint the Outer Frame Dark
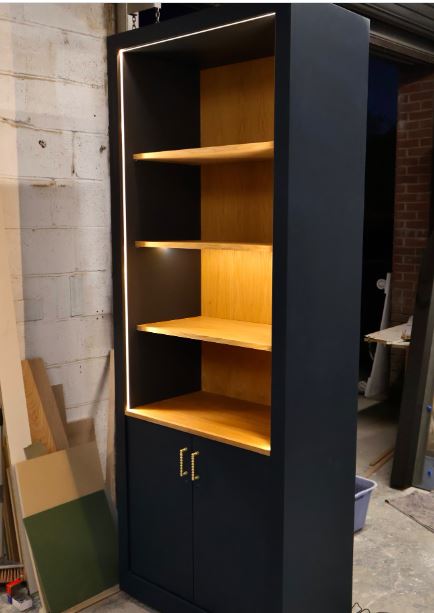
This version treats the bookcase as two connected surfaces rather than one block of colour. The outer frame, side panels, and lower doors have a deep navy or near-black finish, while the shelves and inner back retain a warm timber tone. A slim light strip outlines the inner opening and creates a clean border around the display area.
Contrast works here because the divisions are deliberate. The dark colour is kept on the broad vertical structure, and the wood remains inside where light can catch it. Randomly leaving one shelf unpainted would look unfinished; repeating the wood across the shelf area makes it part of the design.
Materials and Tools
· Laminate bookcase with shelves that can be removed or masked cleanly
· Cleaner, fine abrasive pads, bonding primer, and deep-coloured cabinet paint
· Painter’s tape and masking paper for protecting wood surfaces
· Small roller and angled brush
· Optional timber veneer, shelf boards, or a retained wood-effect interior
· Brass-toned handles or similarly scaled hardware
· Low-voltage light strip, suitable channel or clips, and cable-management accessories
· Wall anchor and fixings appropriate to the bookcase weight
Build the Contrast Without Untidy Paint Lines
1. Choose the exact colour boundary. Remove the shelves if possible and decide whether the inner back, shelf tops, shelf undersides, and shelf fronts will remain wood. Write the plan down before masking; changing the boundary halfway through usually creates inconsistent edges.
2. Prepare the dark sections. Clean and lightly abrade only the laminate areas that will be painted. Repair chips and unused handle holes, then remove dust carefully so the bonding primer can contact the surface rather than sitting on sanding residue.
3. Mask and prime in a logical order. Protect the wood sections with low-tack tape and paper, pressing the tape firmly along straight edges. Apply primer to the frame and doors in thin coats, then inspect the boundary before paint hides a lifted tape edge.
4. Apply the dark finish and remove masking carefully. Use the roller on large panels and the brush along the inner frame. Remove or reset masking at the stage recommended for the coating so the line remains crisp, then touch up small gaps with an artist’s brush rather than widening the painted border.
5. Add hardware and lighting last. Route the cable so it does not cross shelves or become trapped behind the unit. Follow the light manufacturer’s instructions, keep adhesive or clips off uncured paint, provide access to the power connection, and secure the finished bookcase before loading it.
The part I like most is the warm shelf light against the dark surround, but lighting should remain secondary to the cabinet. A bright exposed strip or loose cable can make a careful paint finish look unfinished. A small channel, neat clips, and a planned exit point keep the attention on the shelves.
For a simpler variation, keep the interior wood and leave out the light strip. A pale timber centre against charcoal, dark green, or inky blue still creates enough contrast to make ordinary laminate feel more considered.
Join Several Laminate Bookcases into One Wall-to-Wall Unit
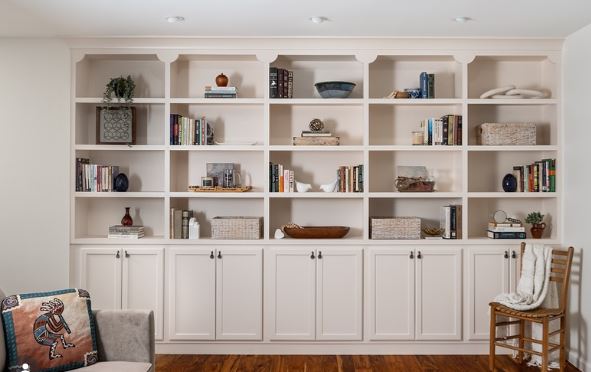
A wall of open shelves above panelled cupboards changes the scale of a room, yet the finished effect depends on alignment more than decoration. The vertical divisions are repeated at even intervals, the lower doors create a continuous storage line, and the upper trim closes the awkward gap beneath the ceiling. Warm off-white paint allows the books, baskets, and ceramics to provide the stronger colours.
Several laminate bookcases can create a similar result, but they need to behave as one structure. Small height differences, uneven floors, exposed joins, and mismatched shelf lines become much more obvious across a wide wall. Measure the units together before committing to filler and trim.
Materials and Tools
· Matching or compatible laminate bookcases and lower cupboard units
· Tape measure, long level, square, pencil, and shims
· Wall-fixing hardware selected for the wall type and expected load
· Connecting screws or brackets suitable for the cabinet construction
· Cover strips, plinth pieces, cornice, filler panels, and optional decorative top blocks
· Surface cleaner, fine abrasive pads, repair filler, bonding primer, and durable off-white paint
· Small roller, brushes, caulk where appropriate, and painter’s tape
· Handles of consistent size and spacing
Turn Separate Cases into a Continuous Built-In
1. Dry-fit and level every unit. Place all cases in position before filling, trimming, or painting. Use shims to correct floor variation, align shelf lines as closely as possible, and check that cupboard doors have enough clearance above the finished floor or rug.
2. Connect and secure the structure. Fasten adjoining units through strong internal points using fixings suited to their construction, then anchor the assembly to the wall. Do not rely on decorative trim to hold tall furniture upright, and keep heavy items planned for the lower sections.
3. Hide factory gaps with measured trim. Add a shared plinth, side fillers, vertical cover strips, and top trim to close gaps against walls and ceilings. Scribe visible fillers where walls are uneven rather than forcing a straight board into a crooked space.
4. Prepare and paint the full elevation. Clean and abrade the laminate surfaces, prime them with a bonding product, and treat added timber trim according to its material. Paint from the upper shelves downward, maintaining thin coats around shelf corners, door edges, and the repeated vertical divisions.
5. Finish the doors and load the shelves gradually. Align handles with a template, refit doors, and adjust gaps before filling the storage. Allow the paint system to become ready for normal use, then return books and baskets in stages so fresh shelf edges are not scraped by heavy objects.
I know a full wall can feel like the place to add every decorative idea at once, but repetition already gives this design enough detail. Matching shelf heights, consistent door spacing, and a clean top line matter more than adding several different moulding profiles.
A smaller home can use the same principle across two cases instead of an entire wall. Join them, add one top board and one plinth, then paint everything together. The eye reads the shared boundaries before it counts how many original units are underneath.
How to Get a Smooth Finish on Laminate Shelves and Doors
A smooth result comes from thin coats and disciplined edges. Laminate does not absorb paint in the way bare wood can, so heavy application tends to sit on the surface, collect in corners, and leave roller ridges.
· Stir the primer and paint thoroughly without whipping in excess air.
· Use a roller suited to smooth furniture surfaces and avoid overloading it.
· Brush corners first, then roll nearby flat sections before the brushed paint begins to set.
· Lay doors and removable shelves flat when possible so the coating can level without running.
· Lightly correct roughness only when the coating system allows it and remove all dust before recoating.
· Protect finished shelf fronts during reassembly instead of sliding boards across one another.
Do not judge the finish under one overhead light. Side light reveals missed primer, dry roller marks, and paint gathered along door edges. Correcting those areas before reassembly is much easier than finding them after the bookcase is full.
Painting Errors That Make Laminate Peel or Look Patchy
Painting over furniture polish or grease. Residue creates a weak layer between the laminate and primer. Clean first, rinse away cleaner where required, and allow the surface to dry before abrading it.
Sanding through the laminate. Heavy sanding can expose or damage the board beneath the thin surface. Use fine abrasion only to dull the sheen and remove loose material.
Skipping a bonding primer. Ordinary paint may appear fine at first but scrape away from slick laminate under daily use. Use a primer designed to grip non-porous furniture surfaces and keep the paint system compatible.
Applying thick coats around shelf corners. Heavy paint gathers where horizontal and vertical surfaces meet, then chips when shelves are fitted. Spread thin coats and clear excess from corners while it remains workable.
Reassembling doors too soon. Hinges, knobs, and door edges place pressure on the coating. Follow the product guidance for recoating and handling instead of assuming that touch-dry paint is ready for normal use.
Adding lights without planning the cable. Loose wires and improvised holes can spoil the finish and make shelves harder to use. Plan the power route before painting and follow the lighting instructions.
Leaving a tall unit unsecured. Paint does not make lightweight furniture stable. Anchor the bookcase using fixings suitable for the wall and the cabinet load.
Frequently Asked Questions
Can you paint laminate without sanding?
Some bonding systems require little abrasion, but the surface still needs thorough cleaning and preparation according to the chosen products. Lightly dulling a glossy finish often helps reveal damage and gives a more consistent base.
What kind of primer should I use on a laminate bookcase?
Use a bonding primer labelled for slick, non-porous furniture surfaces such as laminate or melamine. Check that it is compatible with the paint you plan to apply over it.
Can I use wall paint on laminate shelves?
Wall paint may not tolerate the rubbing and weight that shelves receive. A durable furniture or cabinet coating is generally a more practical choice, particularly on shelf fronts, doors, and frequently handled areas.
Should I paint the removable shelves separately?
Yes, when they can be removed safely. Painting them flat gives better control over edges and helps prevent runs, but keep track of their original positions if the openings vary slightly.
How do I stop painted shelves from sticking?
Avoid thick paint on shelf ends and support holes, and do not force shelves into openings before the finish is ready for handling. Small clear protectors or careful shelf lining may help after the coating has settled.
Can I add trim to particleboard or laminate furniture?
Trim can be added when the underlying cabinet remains sound and the fixing method suits its construction. Use measured cover pieces to hide gaps, but do not depend on trim to repair weak joints or support heavy loads.
Do I need a clear topcoat?
That depends on the paint system and expected use. Some cabinet paints are intended to serve as the final finish, while others may accept a compatible protective coat; follow the chosen product guidance rather than mixing systems.
Let the Bookcase’s New Role Guide the Paintwork
The most convincing laminate bookcase makeover begins before the paint tin opens. Decide whether the unit should disappear into the room, frame warm shelves, or connect with neighbouring cases as built-in storage. Once that purpose is clear, the colour boundaries, trim, hardware, and lighting become much easier to judge.
Learning how to paint a laminate bookcase is mostly an exercise in preparation and restraint. Clean the slick surface, dull the shine without damaging it, apply a suitable bonding primer, and build the finish in thin coats. Then give doors, shelves, and painted edges enough time before asking them to carry everyday use.
Begin with one structurally sound bookcase and the simplest version that suits its room. A careful single-colour finish can be enough; trim, lighting, and a full wall of storage can come later when the basic method feels familiar.