Laminate cabinets can remain sturdy and practical long after their colour or glossy finish begins to feel dated. The doors may close properly, the shelves may still provide useful storage, and the layout may work well, yet the plastic-looking surface can make the entire kitchen or bathroom feel tired.
I’d rather work with sound cabinets than remove them simply because the finish no longer suits the room. Paint can change white laminate, glossy coloured doors, faux-wood surfaces, and cabinets with contrasting timber trim, but the result depends heavily on what happens beneath the final colour.
Laminate is smooth and non-porous, so ordinary wall paint may struggle to grip it properly. Cleaning, gentle surface preparation, a compatible bonding primer, and cabinet-grade paint are usually more important than buying an expensive brush or choosing a fashionable colour.
Paint manufacturers specifically recommend cleaning laminate carefully, dulling glossy surfaces when required, and using products intended to bond to difficult finishes.
I don’t think the goal should be finishing the kitchen as quickly as possible. A professional-looking result comes from labelled doors, thin coats, clean edges, and enough patience to let each product do its job.
Map the Doors, Finish, and Wear Zones
Open every cabinet and inspect the doors, drawer fronts, frames, side panels, shelves, kickboards, and areas around the handles. Kitchen grease often collects around pulls, upper doors, cooking areas, and the edges people touch without noticing.
Identify whether you are dealing with:
- Laminate
- Melamine
- Vinyl-wrapped doors
- Thermofoil
- Painted MDF
- Wood veneer
- Solid timber trim
- A combination of several materials
This distinction matters. A sound laminate surface can often be cleaned, prepared, primed, and painted, while loose vinyl wrap may need a different repair or removal method. Peeling edges, swollen fibreboard, and crumbling corners must be corrected before paint is applied.
Number each door and drawer with removable labels. Mark the cabinet opening with the same number, and place every hinge, screw, handle, and fixing in a labelled container. Even doors that appear identical may hang differently after years of adjustment.
Check for:
- Loose laminate or edge banding
- Peeling vinyl
- Grease and cooking residue
- Water damage
- Swollen MDF or particleboard
- Chipped corners
- Old hardware holes
- Misaligned hinges
- Doors that rub against the frame
- Silicone sealant along painted edges
- Deep scratches
- Glossy surfaces
- Loose shelves or cabinet frames
Clean before sanding. Sanding a greasy cabinet can spread residue across the surface and drive it into scratches rather than removing it. Cabinet-painting guidance recommends removing grease and food residue before surface preparation because contamination can interfere with adhesion.
Whether sanding is required depends on the selected primer and coating system. Some specialised bonding products are designed to grip glossy surfaces with little or no sanding, while other systems instruct you to dull the laminate first. Follow one complete product system rather than combining preparation instructions from several unrelated paints.
When sanding is required, work gently. The aim is to remove shine and provide a better key for the primer, not grind through the decorative laminate into the board underneath.
Useful Materials and Tools
- Screwdrivers or drill driver
- Removable labels
- Containers for hardware
- Cabinet-safe cleaner or degreaser
- Microfibre cloths
- Fine sanding sponges
- Vacuum with brush attachment
- Dust-removal cloths
- Filler suited to the damaged surface
- Filling knife
- Adhesive for loose edge banding
- Bonding primer suitable for laminate
- Cabinet, furniture, or trim paint
- Angled synthetic brush
- Fine-finish mini roller
- Paint tray
- Painter’s tape
- Door supports or painting stands
- Drop cloths
- New hinges, knobs, or pulls if required
- Hardware primer and paint
- Protective gloves
- Eye protection
- Suitable respiratory protection
Keep the room well ventilated and follow the safety information supplied with cleaners, primers, paints, fillers, and spray products. Remove doors safely and ask for help with heavy panels rather than balancing them against counters or walls.
Refresh an Entire Laminate Kitchen With Bonding Primer
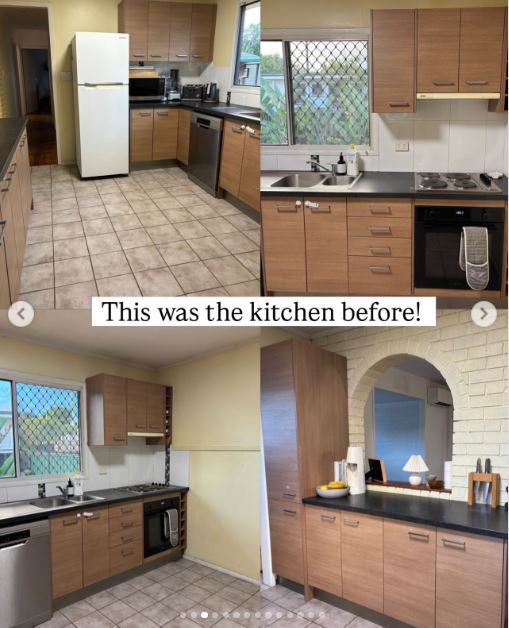
A complete laminate-kitchen transformation shows how much can change when the original layout and cabinet boxes remain in place. The selected makeover works with the existing surfaces and uses a high-adhesion primer before the decorative colour is added.
Painting a whole kitchen requires consistency. The same cleaning, preparation, primer thickness, roller technique, and drying conditions should be used across every door. If one door receives heavier paint or less preparation, it may look different even though the same colour appears on the tin.
Materials and Tools
- Labelled cabinet doors and drawers
- Cleaner or degreaser
- Fine sanding sponge when required
- Bonding primer
- Cabinet-grade paint
- Angled brush
- Fine-finish roller
- Door stands or supports
- Painter’s tape
- New handles if desired
Paint the Kitchen in Five Steps
- Remove and organise every movable part. Label the doors, drawers, hinges, and handles before taking them apart. Photograph unusual hinge positions and keep each door’s hardware together so the final alignment remains manageable.
- Clean and repair the surfaces. Degrease the fronts, backs, edges, frames, and areas around the handles. Secure loose laminate, fill chips, and correct doors that rub before any primer is applied.
- Prepare and prime the laminate. Sand only as directed by your coating system, then remove the dust completely. Apply an even layer of bonding primer to the doors and fixed cabinet sections, paying attention to corners and edges without creating ridges.
- Apply the cabinet colour in thin layers. Brush detailed areas first and use a fine roller on broad flat sections. Smooth drips immediately and avoid repeatedly rolling paint that has already begun to set. Sherwin-Williams similarly recommends brushing detailed areas and following promptly with a roller across the flatter sections.
- Let the finish strengthen before reassembly. Follow the paint manufacturer’s handling and curing instructions rather than treating touch-dry paint as fully hardened. Rehang each door carefully, adjust the hinges, and avoid scrubbing the new finish immediately.
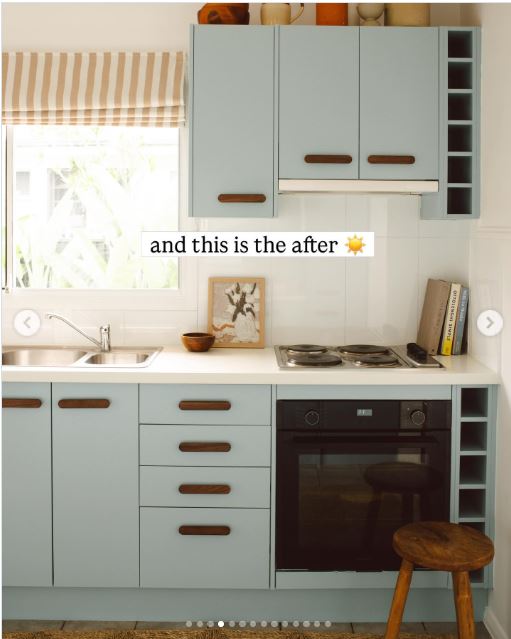
For me, the fixed cabinet frames deserve as much care as the doors. Freshly painted doors will not create a convincing transformation when grease, chips, or uneven brush marks remain around the openings.
A restrained single-colour kitchen is easier for beginners. Another option is to paint only the lower cabinets and keep sound upper doors in their existing colour.
Repaint Laminate Doors With Contrasting Wood Trim
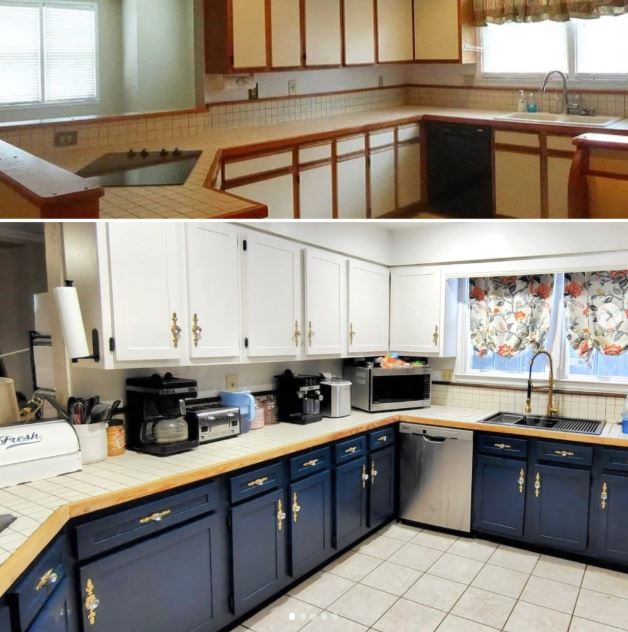
Many older kitchen doors combine a laminate centre with real or imitation wood edging. The selected project keeps this familiar door style but changes the colour balance with a two-tone painted finish.
These doors need careful inspection because the centre and trim may be different materials. The laminate may need bonding primer, while unfinished or previously coated timber may require another preparation method. Use compatible products and test them together before committing to every door.
Materials and Tools
- Laminate doors with wood trim
- Degreasing cleaner
- Fine sanding materials
- Primer suited to laminate
- Primer suited to the trim when different
- One or two cabinet colours
- Painter’s tape
- Angled brush
- Fine-finish roller
- Small detail brush
Create the Two-Tone Finish in Five Steps
- Determine what each section is made from. Check the centre panel, edging, and back separately. A laminate centre and real-wood frame may not need identical preparation.
- Clean the joints and corners carefully. Grease can settle along the line where the trim meets the laminate. Use a cloth and small brush to clean the recess without forcing water beneath loose edges.
- Prepare and prime each material correctly. Mask the sections when separate primers are necessary. Keep the primer layer thin at the joint so the painted edge does not develop a raised ridge.
- Apply the main and accent colours. Complete the lighter or larger section first, allow it to reach the taping stage specified by the product, and then mask for the second colour. Remove tape carefully before it tears the new finish.
- Inspect every door as part of the full set. Place the doors beside one another before rehanging them. Correct obvious colour or edge inconsistencies while they remain easy to reach.
I know it can feel tempting to use the strongest contrast possible, but the door already contains several visual lines. Closely related colours may allow the trim detail to show without making every cabinet look outlined.
You could paint the laminate centre and retain a sound natural-wood border. Another approach is to paint the complete door one colour and use contrasting hardware to simplify the design.
Repair and Paint Peeling Laminate Bathroom Cabinets
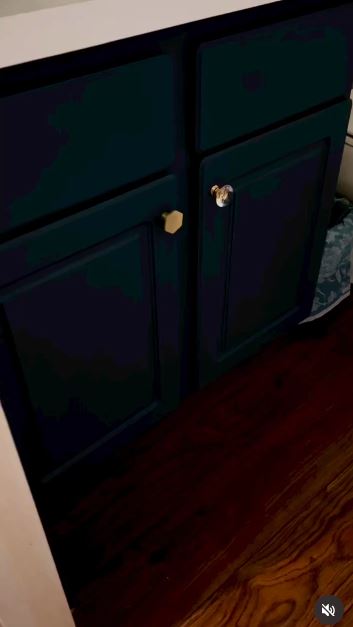
Bathroom cabinets face splashes, damp hands, cleaners, and changing humidity. The selected project refreshes peeling laminate bathroom cabinetry with paint rather than removing the whole vanity.
Paint should not be used to glue down a loose surface. Identify whether the laminate can be reattached, whether a small failed section needs removal, or whether the underlying board has swollen beyond a sound repair.
Materials and Tools
- Bathroom vanity or cabinet
- Cleaner
- Scraper or seam tool
- Adhesive compatible with laminate
- Small clamps
- Filler
- Fine sanding sponge
- Bonding or stain-blocking primer
- Cabinet paint
- Fine roller and brush
- Replacement caulk where appropriate
Restore the Vanity in Five Steps
- Find the cause of the peeling. Look for water entering around the sink, floor, plumbing, side panels, or door edges. Correct active leaks and let the cabinet dry before beginning cosmetic work.
- Secure or remove unstable material. Reattach sound laminate when a suitable adhesive and clamping method can hold it flat. Remove only sections that cannot be stabilised, then fill and smooth the transition.
- Clean and prepare the cabinet. Remove soap residue, cosmetics, oils, and cleaning-product buildup. Sand and prime according to the selected coating system, paying close attention to repaired edges.
- Apply paint in controlled coats. Use a brush around mouldings and a fine roller across the doors. Keep paint out of hinge joints and avoid creating thick layers on edges that meet when the cabinet closes.
- Seal surrounding joints appropriately. After the finish reaches the required stage, replace failed sealant where water could enter. Keep the painted surface dry and gently handled during its initial curing period.
The part I would check carefully is the lower edge of each door. That is where water often sits after wet hands reach for a handle, and it may reveal the first sign of a failed repair.
A dark vanity can hide minor variations around repaired edges, while a pale finish may make a small bathroom feel more open. You could also paint the outside and leave sound interiors unchanged.
Get a Smooth Finish Without Using a Paint Sprayer
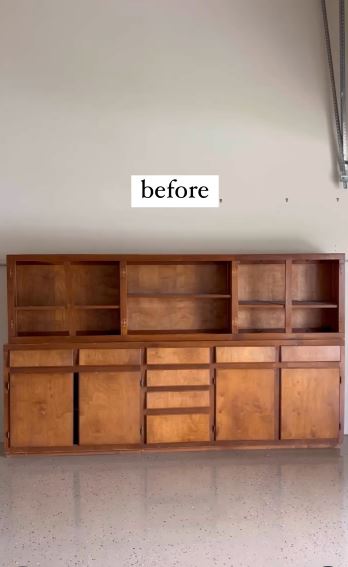
A spray system can produce a very smooth surface, but it is not the only way to repaint laminate cabinets. The selected tutorial demonstrates a cabinet process based on door removal, surface preparation, and hand application rather than relying on a paint sprayer.
The brush and roller need different jobs. An angled brush reaches profiles, corners, and narrow edges, while a fine roller spreads paint consistently across flat panels. Official cabinet-painting guidance also recommends combining a brush for detail with a mini roller for broad areas.
Materials and Tools
- Prepared laminate doors
- Angled synthetic brush
- Fine-finish mini roller
- Paint tray
- Cabinet paint
- Door supports
- Fine abrasive between coats when directed
- Dust-removal cloths
- Strong side lighting
Roll and Brush the Cabinets in Five Steps
- Set up a clean painting area. Raise doors on stable supports so you can reach the edges without touching the main surface. Keep dust, pets, loose fabric, and regular household traffic away from wet paint.
- Brush the detailed sections first. Apply paint to recessed panels, profiles, and edges with a small amount of product. Feather the brush marks outward before they begin setting.
- Roll the flat areas immediately. Use the roller to spread and level the paint across the broad panel. Maintain a consistent direction and avoid pressing hard enough to squeeze paint into ridges.
- Inspect between coats. Follow the paint instructions for recoating and sanding. Remove nibs, drips, or rough texture gently, then clean away every particle before applying the next layer.
- Finish every door with the same sequence. Brush and roll in the same order, using a similar amount of paint each time. Consistency usually matters more than trying to complete each door rapidly.
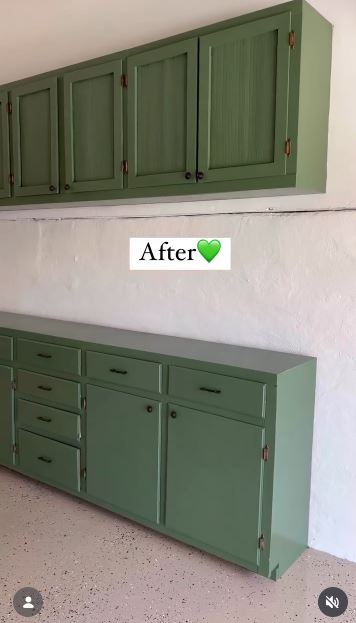
For me, the roller should do the levelling rather than carry a heavy amount of paint. An overloaded roller may look efficient for approximately thirty seconds, right before the drips begin travelling toward the floor.
A foam roller can work with some paint systems, while certain coatings level better with another fine-finish sleeve. Test the paint, roller, and primer combination on one door back or sample panel.
Spray the Doors and Refresh the Cabinet Hardware
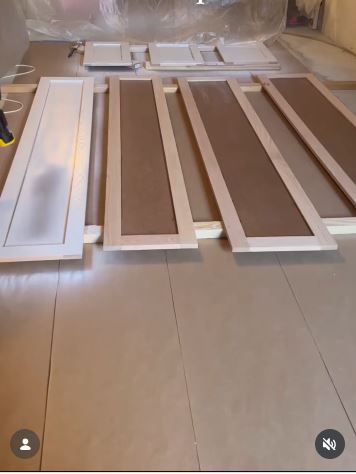
Spraying can create a fine, even finish across flat cabinet doors when the equipment, paint, ventilation, masking, and technique are appropriate. One selected project uses an affordable sprayer and enamel-style cabinet paint, while the second focuses on cleaning, priming, and spray-painting the removed hardware.
This method requires more preparation than simply carrying the doors outside. Overspray can travel beyond the immediate work area, and every door needs stable support, consistent distance, and a clean environment.
Materials and Tools
- Properly prepared cabinet doors
- Compatible paint sprayer
- Paint suited to spraying and cabinets
- Filters or strainers when recommended
- Large protected work area
- Door supports
- Appropriate ventilation
- Suitable respiratory and eye protection
- Clean cabinet hardware
- Metal-compatible primer
- Hardware spray paint
- Cardboard or holding jig
Spray the Doors and Hardware in Five Steps
- Prepare a safe spray area. Follow the equipment and coating instructions for ventilation, protective equipment, masking, and cleanup. Protect surrounding surfaces well beyond the doors themselves.
- Practise the spray pattern. Test the material flow, fan shape, distance, and movement on scrap material. Correct spitting, heavy edges, or dry overspray before approaching the prepared cabinet doors.
- Spray the doors in light passes. Begin moving before pulling the trigger and continue beyond the door edge before stopping. Overlap each pass consistently without lingering at corners.
- Clean and repaint the hardware separately. Remove grease and loose coating, then use a primer and paint suitable for the handle material. Support each piece so all visible surfaces can be coated without touching wet paint.
- Inspect and reassemble the complete set. Let both the doors and hardware reach their recommended handling stage. Install the pulls gently and avoid tightening screws so aggressively that they cut into the new finish.
I’d rather apply another controlled pass than try to make the first spray coat completely opaque. Heavy application can sag along the door edges before the front appears evenly covered.
New handles remain an option when the old ones are damaged or uncomfortable. Reusing the originals, however, preserves more of the existing kitchen and avoids drilling another set of holes.
Why Painted Laminate Cabinets Chip, Peel, or Stick
Leaving Grease Around Handles
Primer cannot bond properly through cooking residue, furniture polish, or skin oils. Clean the handles, door edges, frames, and recessed corners rather than wiping only the visible centre panels.
Choosing Wall Paint Instead of a Cabinet Finish
Cabinets receive repeated handling and cleaning. Choose paint intended for cabinets, furniture, doors, or trim so the finished surface is better suited to regular contact.
Skipping the Bonding Layer
Slick laminate can resist ordinary coatings. A compatible bonding primer creates a more reliable base unless the chosen cabinet system specifically states that a separate primer is unnecessary.
Sanding Through the Decorative Surface
Laminate can be thin. Sand only enough to dull the finish when required, and stop before exposing the fibreboard or particleboard underneath.
Painting Over Loose Vinyl or Laminate
Paint may temporarily cover a lifting edge, but it will not restore adhesion beneath it. Secure, repair, or remove unstable material before priming.
Applying Heavy Coats
Thick paint can run, remain soft underneath, collect along edges, and interfere with closing doors. Build the finish gradually and correct drips while they are still manageable.
Letting Painted Edges Rub Together
Painted doors and frames can chip when the hinges are poorly adjusted. Test every opening and correct rubbing before regular use.
Reinstalling Handles Too Early
A surface may feel dry but remain vulnerable to pressure. Tight screws and twisting handles can damage paint that has not reached the required handling or curing stage.
Mixing Incompatible Products
A strong primer does not guarantee that every topcoat or clear finish will bond to it. Check compatibility across the cleaner, filler, primer, paint, and optional protective coating.
Forgetting to Label Doors
Unlabelled doors can return to the wrong openings, leading to uneven gaps and unnecessary hinge adjustments. A small piece of removable tape can prevent a surprisingly long reassembly afternoon.
Frequently Asked Questions
Can laminate cabinets really be painted?
Yes, provided the laminate remains sound and the surface is cleaned and prepared with compatible products. Bonding primer and cabinet-grade paint are commonly recommended for slick laminate surfaces.
Must I sand laminate cabinets?
It depends on the coating system. Some manufacturers instruct users to dull the surface, while specialised primers or complete cabinet systems may be designed to work with little or no sanding. Follow the instructions for the exact products you use.
Should I remove the cabinet doors?
Removing and labelling the doors normally makes cleaning, edge preparation, painting, and hinge adjustment easier. It also reduces the risk of paint collecting around hinges.
Can I paint cabinets without a sprayer?
Yes. An angled brush and fine-finish mini roller can create a smooth result when the paint is applied in controlled layers.
Do painted cabinets need a clear topcoat?
Not every cabinet paint requires one. Some products are designed as complete finishes, while other systems include or recommend a separate protective layer. Follow the selected paint manufacturer’s instructions.
Can peeling laminate be painted?
Only after the unstable surface has been repaired or removed. Paint over an actively peeling edge is likely to fail along with the material beneath it.
How should I clean painted laminate cabinets?
Use gentle cleaning methods compatible with the finished coating. Avoid abrasive pads and harsh cleaners unless the paint manufacturer confirms that they are suitable.
Let the Existing Cabinets Earn Their New Colour
Learning how to paint laminate cabinets like a pro begins with resisting the urge to open the paint tin first. The finish depends on accurate labels, thorough cleaning, sound repairs, suitable preparation, and products designed to grip a slick surface.
A complete kitchen can be changed with one restrained colour, while timber-trimmed doors can take a two-tone design. Glossy units can become softer, a peeling vanity can be repaired, and cabinet doors can be finished with either a brush and roller or a carefully controlled spray system.
Begin with one test door. Complete the full preparation, primer, paint, and handling process before repeating it across the kitchen. That small trial can reveal adhesion, texture, colour, and roller problems while they remain easy to correct.
Which laminate cabinets would you paint first: glossy kitchen doors, a bathroom vanity, wood-trimmed units, or a plain utility-room cupboard?