Funky decor works best when it feels personal rather than polished within an inch of its life. A boot covered in flowers, a fish made from old denim, or a handbag dotted with tiny mirrors can make a room feel lively because the object still hints at what it used to be. That small reminder of its earlier purpose is part of the fun.
I enjoy projects that give ordinary belongings a second chance without sanding away every trace of character. I don’t think unusual decor has to be expensive or complicated. It usually begins with one forgotten item, a clear idea of where it will be displayed, and enough patience to arrange the details before fixing them permanently.
These five projects use very different materials, but they share the same practical lesson: start with a sound base, choose one strong visual idea, and let the reused object remain recognisable. The result should be playful, useful, or both—not just covered in decoration for the sake of it.
Before You Start
Funky projects often use lots of small pieces, so preparation matters more than it first appears. Clean the base item thoroughly, remove loose threads or flaky finishes, and check that it can still support the weight of whatever you plan to add. A cracked handbag, weak boot sole, or thin wall hanging may need reinforcement before decoration begins.
Lay out the full arrangement before using glue, stitches, or nails. I know it can feel tempting to attach the first flower or mirror as soon as it looks right, but the whole composition may need to move several times. Then you can check balance, colour distribution, spacing, and whether the finished object will still be practical.
Use eye protection when cutting wire, wood, or mirror-backed pieces. Work in a ventilated area with strong adhesive, and keep small beads, buttons, mirror discs, and loose decorations away from young children and pets.
Set Aside Items Used Around Hazardous Materials
Before using old household objects for funky décor, separate anything that may be contaminated or unsafe.
Set aside items previously used around:
- Fuel, motor oil or workshop chemicals
- Pesticides, paint thinner or strong cleaning products
- Mould, mildew or serious water damage
- Pest infestations or animal waste
- Gas lines or unknown plumbing systems
- Fire, smoke or excessive heat
- Flaking old paint or unknown surface coatings
- Damaged electrical wiring, plugs or sockets
Do not use furniture with severely weakened legs, crates with rotten wood, silverware with sharp broken edges or pipes that previously carried hazardous substances. Items that cannot be cleaned or repaired safely should be disposed of responsibly rather than used as home décor.
Inspect Each Item Before Starting
For ordinary, clean items, inspect:
- Loose furniture legs, joints and screws
- Cracks, splinters or exposed nails in wooden crates
- Rust, sharp edges or bent areas on silverware
- Mould, damaged soles or trapped moisture inside boots
- Dirt, corrosion or damaged threads on metal pipes
- Peeling paint, grease or old adhesive residue
- The weight and balance of the finished decoration
- Whether the surface can accept paint, glue or découpage medium
- Whether wall fixings can support shelves or framed artwork
- The condition of any electrical parts used for lighting
Clean every object according to its material before painting, drilling or attaching decorations. Complete structural repairs first so the finished item remains stable and practical.
Boots used as planters need drainage holes, while crate shelves require secure wall anchors. Pipe lamps should only be wired or checked by someone familiar with electrical safety.
Useful Materials and Tools
The exact supplies will depend on the chosen décor project, but these items are useful for working with furniture, crates, silverware, boots and metal pipes:
- Surface cleaner and soft cloths
- Protective gloves, safety glasses and a dust mask
- Sandpaper or sanding blocks
- Wood filler, wood glue and clamps
- Screwdrivers, drill and suitable drill bits
- Measuring tape, ruler and spirit level
- Pliers and wire cutters
- Primer suitable for wood or metal
- Furniture paint, spray paint or wood stain
- Paintbrushes, small rollers and painter’s tape
- Patterned paper, fabric or découpage medium
- Strong craft adhesive
- Picture frames, backing boards and hanging wire
- Screws, wall plugs and suitable shelf anchors
- Potting soil, small stones and suitable plants
- Clean pipe fittings and a stable lamp base
- Compatible bulb socket, cable, plug and switch
- Clear protective finish
Prepare the object and gather the required supplies before beginning. Choosing tools, paints, adhesives and fixings that suit the original material will help the finished décor remain secure and long-lasting.
Cover an Old Boot with Faux Flowers for Funky Decor
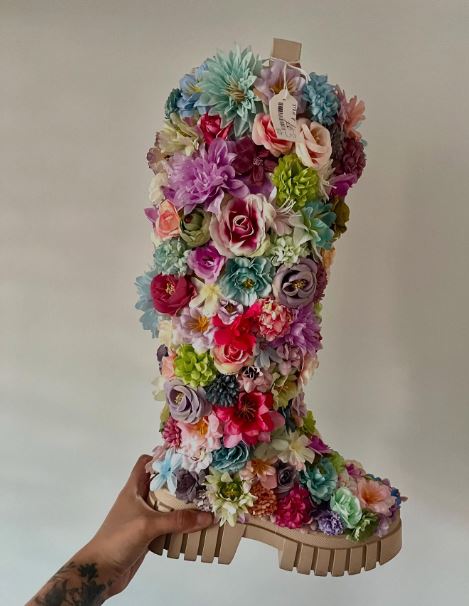
A tall boot gives this flower-covered sculpture a strong shape before any decoration is added. The chunky sole, high shaft, and curved toe make the piece recognisable even though almost every upper surface is hidden under petals. That contrast is what keeps it from looking like an ordinary flower arrangement.
A similar version could use an old fashion boot that is no longer comfortable to wear but still holds its shape. Faux flowers are the sensible choice because they are light, easy to trim, and available in many sizes. Small blooms fill gaps around seams and curves, while larger flowers create focal points along the shaft and toe.
This type of object works best as shelf decor, a window display, or a prop rather than footwear. I’d keep the sole undecorated so the boot still sits flat and the floral surface does not scrape against furniture.
Materials and Tools
· One clean, structurally sound tall boot
· Assorted faux flowers in several sizes
· Strong flexible craft adhesive or low-temperature glue
· Small scissors or wire cutters
· Scrap felt for reinforcing weak areas
· Pins or clips for temporary placement
· Protective work mat and gloves
How to Make a Similar Version
1. Prepare and reinforce the boot. Clean the outside and remove loose dirt, flaking material, or damaged trim. Stuff the boot firmly with paper or fabric so the shaft stays upright while you work, then patch any weak spots from the inside with felt and flexible adhesive.
2. Sort the flowers by size and colour. Remove long stems, leaving only a short base that can sit close to the boot. Arrange larger flowers along the shaft and toe, then place medium and small blooms between them. Keep turning the boot so one side does not become noticeably heavier or more crowded.
3. Attach the main flowers. Fix the largest flowers first, beginning near the centre of each visible area rather than along the edges. Hold each bloom until the adhesive grips, then allow the first group to set before working around it. This gives the smaller flowers stable points to overlap.
4. Fill gaps without flattening the design. Add medium flowers over obvious joins and use tiny blooms or leaves around curves, seams, and the ankle. Leave a little depth between layers instead of pressing every petal flat. The varied height makes the surface feel full rather than pasted on.
5. Check stability and finish the edges. Set the boot on a level surface and make sure it does not lean. Remove glue strings, trim visible stems, and secure any petals that catch on nearby flowers. Keep the sole and bottom edge clear so the piece can be displayed safely.
One Detail I Would Keep in Mind
The part I would keep simple is the colour plan. A generous mix can work, but repeating a few colours from top to bottom helps the whole boot feel connected.
Variations and Alternatives
For a quieter version, use flowers in one colour family. You could also cover only the heel and upper edge, leaving more of the original boot visible.
Decorate an Old Handbag with Small Mirrors

A structured handbag makes a useful base for mirror work because its flat panels hold a repeating layout. Here, round mirrors in several sizes cover the flap and body, while the pale bag surface remains visible between them. The different diameters stop the pattern from feeling too rigid.
This idea can rescue a bag with scuffed panels or a finish you no longer like, provided the handles, seams, and closures are still secure. Flat-backed craft mirrors are safer and easier to attach than broken household mirror. Silver braid or beaded trim around each circle gives the edges a finished appearance and helps disguise small spacing differences.
The final piece could still be carried occasionally, but it is better suited to light use or display. Mirrors add weight, and repeated bending can loosen them. A small evening bag, box bag, or decorative storage case would be a sensible beginner version.
Materials and Tools
· Structured handbag or small box case
· Flat-backed craft mirrors in mixed sizes
· Narrow silver cord, braid, or bead trim
· Adhesive suitable for both the bag surface and mirrors
· Paper template or removable marking pencil
· Small scissors and tweezers
· Soft cloth for cleaning mirror faces
How to Make a Similar Version
1. Inspect the bag and plan the usable areas. Check the handles, hinges, flap, and closure before adding weight. Avoid flexible folds and areas that rub against the body. Cut paper circles matching the mirror sizes and move them around until the layout feels balanced.
2. Prepare the surface. Wipe the bag clean and test the adhesive on a hidden area. Lightly mark the centres of the largest mirror positions, keeping screw heads, closures, and stitched edges clear. There’s no need to create a perfect grid; a slightly irregular arrangement suits the playful finish.
3. Fix the largest mirrors first. Attach the biggest circles across the flap and main panel, spacing them so smaller mirrors can fit between. Work with the bag lying flat and support curved sections from inside. Let each area settle before turning the bag or moving to another side.
4. Add smaller mirrors and edging. Fill open spaces with medium and small discs without forcing them into tight corners. Attach narrow trim around each mirror or around selected larger pieces. Then clean away any adhesive before it dries on the reflective surfaces.
5. Test the finished bag gently. Open and close the bag several times and check whether any mirrors touch or lift near moving parts. Reinforce loose edges, polish the mirrors with a soft cloth, and store the bag where the decoration cannot be crushed.
One Detail I Would Keep in Mind
For me, spacing matters more than using every mirror. A little uncovered background gives the circles room to stand out.
Variations and Alternatives
Use mirror pieces on only the flap or one front panel for a lighter bag. Coloured acrylic mirror discs are another option when real glass feels too heavy.
Turn Old Denim into a Fish-Shaped Wall Organiser
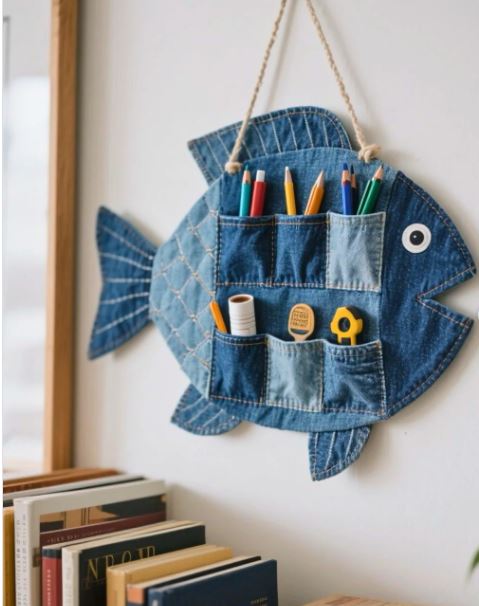
This fish-shaped organiser combines decoration with storage, which is often the easiest way to make funky decor feel welcome in a working room. The body uses several shades of old denim, while stitched pockets create practical places for pencils, tape, scissors, or small tools. A simple eye and rope hanger finish the character without making it fussy.
Jeans are especially useful because the fabric is strong and already includes pockets, seams, and colour variation. You can cut pocket sections directly from several pairs or make new pockets from lighter denim scraps. Quilting or topstitching helps the body keep its shape and makes the recycled sections look intentional.
A wall organiser should remain light. Use it for stationery and craft supplies rather than heavy tools, and hang it from a secure hook. I don’t think every fin needs to be perfectly symmetrical; a slightly uneven shape makes the fish feel handmade rather than factory-cut.
Materials and Tools
· Old jeans and denim scraps
· Paper or card for a fish template
· Backing fabric or felt
· Light batting or interfacing
· Existing jean pockets or cut denim rectangles
· Strong thread and sewing machine or hand needle
· Cord or rope for hanging
· Large button, felt circle, or fabric eye
How to Make a Similar Version
1. Make the fish pattern. Draw a broad fish body with a separate tail and fins on paper. Keep the centre wide enough for several pockets and avoid a very narrow hanging point. Test the paper pattern against the wall so the finished organiser will fit the intended space.
2. Cut and strengthen the body. Cut a front fish shape from joined denim pieces and a matching back from denim or sturdy backing fabric. Add light batting or interfacing between them, then stitch around the outer edge while leaving a turning opening. Turn, press carefully, and close the gap.
3. Create the pockets. Reuse small jean pockets or fold denim rectangles with finished top edges. Arrange taller pockets near the upper centre and smaller ones below, leaving room for the fish eye and side outline. Pin everything before stitching so the pockets do not overlap awkwardly.
4. Add fins, tail, and facial details. Construct the tail and fins from two denim layers, adding simple stitched lines for texture. Attach them securely to the body and sew on the eye. Reinforce the top edge where the hanging cord will carry the organiser’s weight.
5. Attach the hanger and test the storage. Tie or stitch a strong cord through reinforced loops. Hang the organiser and add supplies gradually, checking for sagging. Keep the heaviest items close to the centre and remove anything that pulls the fish out of shape.
One Detail I Would Keep in Mind
The easiest way to make mixed denim look connected is to repeat the same thread colour across every section.
Variations and Alternatives
A whale, cat, cloud, or house shape could use the same pocket method. For a no-machine version, use strong hand stitching and fewer, larger pockets.
Create Framed Cat Art from Old Denim Scraps
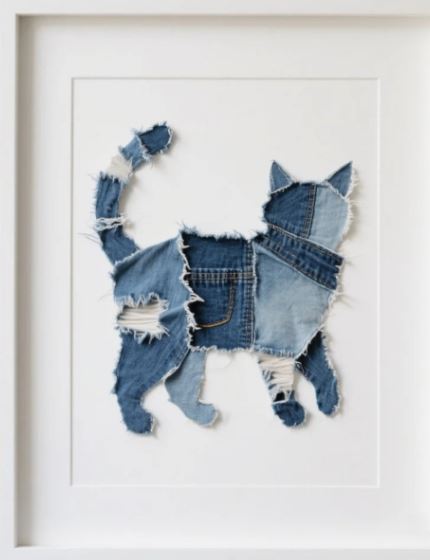
Framed textile art is a useful home for small denim scraps that are too interesting to throw away but too irregular for another sewing project. This cat silhouette uses pale and dark blue pieces, frayed edges, pockets, seams, and worn patches to build shape and texture. The plain white background keeps those details easy to read.
The design does not need to be copied exactly. A standing cat, sitting cat, dog, bird, or even a simple house can work as long as the outline is clear. Large pieces establish the main body, while narrow strips create legs, tail, ears, and small changes in direction.
I’d treat the frame as part of the project from the beginning. A deep frame or shadow box prevents thick seams from pressing against glass, and a simple mount keeps the patchwork from competing with decorative borders.
Materials and Tools
· Denim scraps in several shades
· Firm white card, fabric-covered board, or mount board
· Simple cat silhouette template
· Fabric scissors
· Pins or removable fabric adhesive
· Needle and thread or suitable textile glue
· Deep frame or shadow box
· Optional iron-on interfacing for very soft scraps
How to Make a Similar Version
1. Choose a clear silhouette. Draw or print a cat outline that fits comfortably inside the frame. Keep the legs, tail, and ears broad enough to cut from fabric without losing their shape. Transfer the main sections lightly to the background board as a placement guide.
2. Sort the denim by texture and value. Separate pale, medium, and dark scraps, along with any useful seams or pocket details. Place darker pieces where you want stronger outlines and lighter fabric where the body needs contrast. Leave selected frayed edges visible, but trim loose threads that could continue unravelling.
3. Build the body in large sections. Arrange the torso, head, and hindquarters first, overlapping pieces slightly. Do not secure them permanently until the full outline is recognisable. Then add the legs, ears, tail, and smaller patches, moving the pieces until the proportions feel balanced.
4. Attach the fabric carefully. Use small hand stitches, hidden tacking, or minimal textile adhesive around the strongest parts of each scrap. Avoid saturating thin denim with glue, which can leave dark marks. Press the artwork flat under clean paper while the attachment sets.
5. Mount and frame the finished cat. Fix the backing board securely inside a deep frame and check that no fabric touches the glass. Remove stray threads from the mount, centre the silhouette, and hang the frame with hardware suitable for its weight.
One Detail I Would Keep in Mind
I especially like using an original jean seam as one strong line, rather than cutting every scrap into a smooth shape.
Variations and Alternatives
Create a set of two or three smaller animals using scraps from the same jeans. A frameless version can be stitched onto a fabric banner with a wooden dowel.
Turn Empty Essential-Oil Bottles into Rustic Wall Decor

Small amber bottles often look too useful to discard, but keeping them in a drawer is not much of a second life. Mounted on a rustic board, they become tiny vases that can hold dried lavender, grasses, or slim artificial stems. The repeated bottles create a tidy rhythm, while the bark edges keep the piece relaxed.
The bottles should be thoroughly cleaned and completely dry before mounting. Because glass is involved, secure attachment matters more than decoration. Wire loops, small metal clamps, or fitted holders are safer than relying only on a dot of glue, especially if the panel will hang above furniture.
This piece suits a bathroom, kitchen, bedroom, or craft room. Use dried materials rather than water unless the bottles can be removed easily for filling and cleaning. What matters here is keeping the wall hanging light and making sure each bottle remains upright.
Materials and Tools
· Five clean empty amber bottles
· Dry, smooth reclaimed wood or bark-edged board
· Fine wire, small bottle clamps, or secure metal straps
· Small screws or suitable fasteners
· Drill with appropriate bit
· Rope or picture-hanging hardware
· Dried lavender or lightweight stems
· Eye protection and work gloves
How to Make a Similar Version
1. Prepare the bottles and board. Remove labels and adhesive from the bottles, wash them, and let them dry fully. Sand splinters from the board while keeping any attractive natural edge. Mark a straight horizontal line where the bottle centres will sit.
2. Test the spacing. Set the bottles on the board and measure equal gaps from both ends. Check that the dried stems will not overlap too heavily. Mark each fixing point, then step back and make sure the row looks centred before drilling anything.
3. Install secure bottle holders. Drill pilot holes and attach wire loops, clamps, or straps sized to hold each bottle firmly. Support the board on a stable surface and wear eye protection. The bottle necks should remain accessible so stems can be changed without removing the whole fixture.
4. Add the hanging system. Fit strong picture hardware or a rope hanger to the back or upper corners of the board. Use fixings suitable for the combined weight of wood and glass. Test the panel close to the floor before hanging it in its final position.
5. Arrange the dried stems. Place a small bundle in each bottle, varying the height slightly while keeping the overall row balanced. Avoid packing the necks tightly, and remove loose plant material that could fall beneath the display.
One Detail I Would Keep in Mind
I’d rather use fewer stems than hide the amber bottles completely; the glass colour is part of the finished design.
Variations and Alternatives
Use matching spice jars, miniature medicine bottles, or small bud vases. A narrow painted board creates a cleaner look when rustic wood does not suit the room.
Where Funky Upcycling Projects Often Go Wrong
Decorating before checking the base
A project can look finished and still fail because the original item was cracked, weak, or unstable. Repair the bag, boot, frame, or board before adding anything that increases weight.
Using too much adhesive
Excess glue can stain fabric, fog mirrors, squeeze between flowers, or leave hard ridges. Use the smallest amount that creates a secure bond and test it on a hidden area first.
Ignoring movement and flex
A handbag flap, boot shaft, or fabric organiser bends during use. Keep heavy decoration away from hinges, folds, handles, and unsupported edges where repeated movement can loosen it.
Making every gap disappear
Crowding mirrors, flowers, pockets, or denim scraps can flatten the design. A little visible background often helps shapes remain clear and makes the finished object easier to clean.
Choosing weak hanging hardware
Wall art that includes glass, wood, or stored objects needs fixings that suit the full weight. Test hangers and wall anchors before displaying the piece above a bed, desk, or seating area.
Forgetting how the object will be cleaned
Dust settles quickly on layered flowers, textured denim, and small bottles. Plan for gentle cleaning and avoid arrangements that trap loose debris where it cannot be reached.
Frequently Asked Questions
Can beginners make funky upcycled decor?
Yes. Start with a project that has one main technique, such as mounting bottles or layering denim scraps. Projects with mirrors, extensive flower coverage, or structural sewing need more patience, but they can still be broken into manageable stages.
Which adhesive is best for mixed-material projects?
The correct adhesive depends on both surfaces, so check the manufacturer’s guidance and test a small hidden area. Flexible adhesive suits items that bend, while rigid glass or wood pieces may need a stronger material-specific option.
Can I use real flowers on the decorated boot?
Fresh flowers would wilt, stain the boot, and add moisture. Faux flowers or thoroughly dried lightweight flowers are more practical for a lasting display.
How do I stop denim edges from unravelling too far?
Leave only the amount of fraying you want, then secure the fabric with a line of stitching just inside the edge. Interfacing on the back can also stabilise thin or heavily worn scraps.
Are mirrored accessories safe to carry?
Use smooth flat-backed craft mirrors rather than broken glass, and inspect every edge before carrying the item. Even then, keep the bag for light use because impact and repeated bending may loosen the pieces.
Can the essential-oil bottle wall art hold water?
It is safer to use dried or artificial stems unless the bottles are removable and the holders are designed for regular handling. Water increases weight and can spill onto the wood or wall.
How can I make these projects suit a calmer room?
Reduce the colour range and repeat one material. For example, use cream flowers only, denim in two shades, or amber bottles with identical dried stems while keeping the unusual object shape.
Let One Unusual Object Lead the Room
The strongest funky decor usually begins with an object that already has a clear shape or history. A boot, handbag, pair of jeans, small bottle, or leftover fabric panel does not need to disappear under the makeover. Letting part of the original item remain visible gives the finished piece more personality and makes the reuse easy to understand.
Choose one manageable project, prepare the base carefully, and arrange every part before attaching it. Then stop when the idea feels complete. Upcycling for funky decor should make you smile when you pass it, not leave you wondering where one more bead could possibly fit.
Which forgotten object in your home would make the most interesting starting point?