A wedding veil can be surprisingly difficult to put away. The fabric may weigh almost nothing, yet it carries the shape of the ceremony, the movement of the photographs, and all the small moments when someone adjusted it before you walked into the room.
That emotional value is exactly why cutting a veil without a plan can feel wrong. Tulle can stretch, fine lace can unravel, and beaded sections may depend on hidden threads that are not obvious until one snip loosens several details at once. A thoughtful second use should preserve the part of the veil that matters most rather than simply turning it into another craft material.
I don’t think repurposing always means changing the entire piece. Sometimes the most respectful option is to modernise the veil so it can be worn again. In other cases, a small lace section can become a hair accessory or a family keepsake while the remaining fabric stays safely stored.
The three projects below are closely connected to real bridal heirloom transformations. Each one asks for a different level of commitment, so begin with the option that suits the condition of your veil and how comfortable you feel altering it.
Examine the Veil Before Cutting or Restyling It
Lay the veil on a clean white sheet or large table where the full edge can be seen. Avoid placing delicate tulle directly on rough timber, carpet, or a surface with splinters. Natural light makes it easier to notice yellowing, loose beads, tiny holes, and repairs from the wedding day.
Check the veil for:
· Brittle or yellowed tulle
· Loose lace motifs and lifting appliqués
· Missing beads, pearls, or sequins
· Rust or tarnish around the comb
· Hairspray residue near the top edge
· Small tears close to the gathering stitches
· A hem that has begun to unravel
· Glue that has hardened or changed colour
· Different layers that can be separated safely
· A meaningful embroidered section worth preserving intact
Do not cut an antique, handmade, or heavily beaded veil before a textile or bridal-restoration specialist has examined it. One decorative motif may be connected to several others by the same thread.
If the veil needs cleaning, begin with professional advice rather than assuming ordinary dry cleaning is suitable. Some synthetic tulles, silk nets, glues, trims, and older beads react differently to water, heat, and solvents. A veil that looks slightly dull may still be structurally strong, while a very white vintage veil may have brittle fibres hidden beneath the surface.
Photograph the veil from the front, back, and side before making changes. Include close-ups of the comb, lace placement, gathering, and edge finish. Those pictures will help you restore the original arrangement if the project pauses halfway through.
Decide What Must Stay Intact
Mark the most meaningful elements with loose paper labels placed beside the fabric rather than pins pushed through it. You may care most about the lace border, an embroidered date, a section visible in a favourite photograph, or the original comb worn during the ceremony.
Once you know what cannot be sacrificed, the remaining design becomes much easier. I know it can feel tempting to save every centimetre, but a project usually works better when one feature is treated as the focal point and the rest supports it.
Use Veil Tulle or Lace in a Christening Keepsake
@marusyagrace
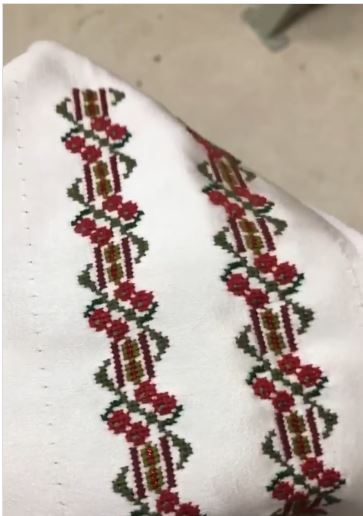
The Reel inspiration uses wedding-gown fabric for a christening garment, but the same heirloom approach can include suitable sections of a veil. Soft lace may trim a bonnet, line a collar, cover a sash, or form a removable overlay without requiring the entire veil to be cut apart.
This project should be planned around the child’s comfort. Beads, stiff lace, scratchy edges, and loose threads do not belong near a baby’s face or hands. Decorative veil material works best as an outer detail backed with soft new fabric.
Materials and Tools
· Clean, sound section of wedding veil
· Soft new fabric suitable for the main garment
· Christening gown, bonnet, or shawl pattern
· Fine lining fabric
· Matching sewing thread
· Sharp fabric scissors
· Hand-sewing needle or sewing machine
· Pattern paper
· Soft ribbon or fabric-covered fasteners
· Professional dressmaker for valuable or fragile veils
Plan the Christening Piece
1. Select the safest veil section. Choose soft lace or undecorated tulle away from brittle edges, old glue, and loose beads. Keep heavily embellished areas for display rather than placing them on a baby garment.
2. Make the garment from new fabric first. Cut and assemble the main gown, bonnet, or shawl in a comfortable washable fabric. Treat the veil as decoration rather than relying on delicate tulle for the garment’s structure.
3. Test the placement with paper. Use tissue-paper shapes to plan a collar, hem panel, bonnet crown, or sash. This step shows how little heirloom fabric may actually be needed and prevents unnecessary cutting.
4. Back and attach the veil detail. Support lace with lining or fine net, then sew it with small removable-looking stitches where practical. Keep seams smooth and place all knots away from the child’s skin.
5. Check comfort and future storage. Remove loose threads, test every trim, and make sure the piece allows easy movement. Store the finished keepsake with a note explaining which wedding veil supplied the lace.
The part I would keep simple is the amount of decoration. A narrow lace panel often carries more meaning than covering the entire garment, and it leaves enough veil for another family keepsake later.
A less permanent alternative is a removable christening sash, bonnet flower, or small lace wrap for a keepsake Bible. These use very little material and can be taken off before washing the main garment.
Choose a Repurpose That Matches the Veil’s Condition
Keep the Veil Whole
Choose restoration or a new comb when the veil is structurally sound, contains valuable handwork, or may be worn by another bride. A removable change preserves the greatest number of future options.
Use Only the Decorative Details
Choose hair accessories when the lace and beading remain strong but the tulle is torn, stained, or difficult to modernise. Back every motif before cutting so the original threads stay controlled.
Use a Small Section in a Family Keepsake
Choose a christening sash, bonnet detail, handkerchief, or framed panel when you want a clear connection to the wedding without changing the whole veil. Small projects are easier to reverse and share among relatives.
Preserve It Without Alteration
There is nothing wasteful about keeping a meaningful textile intact. Wrap the clean veil in acid-free tissue, store it in a breathable archival box, and add photographs and written history so it does not become an unidentified bundle in the next generation’s cupboard.
Veil Repurposing Choices That Deserve Extra Care
Cutting Before Identifying the Construction
A lace motif may be attached across several areas with one continuous thread. Examine the front and back, photograph the stitching, and stabilise the chosen section before cutting.
Assuming the Veil Can Be Dry-Cleaned Normally
Tulle, silk net, old glue, metal combs, and decorative beads may react differently to cleaning. Ask a bridal-textile specialist to assess valuable or vintage pieces.
Using Old Tulle as Structural Fabric
Aged tulle may look sound while tearing under tension. Use new fabric for the body of a garment or accessory and treat the veil as a supported decorative layer.
Attaching Heavy Hardware to Fine Lace
A clip or comb can pull through delicate motifs. Add a stable backing and distribute the stitches across several strong points.
Removing Too Much Volume at Once
A bulky veil can change dramatically after only one layer or stiff frame is removed. Baste and try the new shape before shortening or discarding additional fabric.
Placing Beads on a Baby Keepsake
Loose pearls, sequins, and stiff trims create snagging and choking concerns. Keep christening details soft, securely sewn, and away from the child’s face and hands.
Using Permanent Glue on an Heirloom
Glue may discolour, stiffen, or become difficult to remove. Fine hand stitching is usually easier to repair and kinder to valuable lace.
Throwing Away the Removed Pieces
Original combs, spare lace, and discarded layers help explain the history and construction of the veil. Store them together with photographs and labels.
Frequently Asked Questions
Can I repurpose a wedding veil without cutting it?
Yes. You can replace the comb, remove a detachable pouf, shorten a separate layer, rewear it for an anniversary shoot, or preserve it as an heirloom. Begin with reversible changes when the veil has family or financial value.
Can ordinary tulle be sewn on a home sewing machine?
It can, but fine tulle may stretch, gather, or disappear into the needle plate. Test scraps first, use a fine needle, and support the fabric with tissue paper or a suitable stabiliser when needed.
How do I know whether my veil is too fragile to alter?
Gently support a hidden area rather than pulling it. Brittle fibres, powdery residue, cracking glue, widening holes, and threads that snap with very light handling are signs that the veil needs professional assessment.
Can veil lace become a hair comb?
Yes, provided the motif is sound and attached to a new stable backing. The comb should be sewn through reinforced areas instead of glued directly to fragile lace.
Can a wedding veil be used for a christening gown?
Suitable lace or tulle can be used as an outer detail, trim, sash, bonnet panel, or removable overlay. Build the main garment from soft new fabric and avoid loose beads or scratchy decoration.
What should I do with the remaining veil after a small project?
Wrap it in acid-free tissue and store it in a breathable archival box. Include the wedding date, names, photographs, and a note describing which section was removed.
Should I add the creator’s original tutorial to my project?
Use the Reel for visual inspiration, then plan the method around your own veil’s material and condition. Valuable heirlooms often need a bridal-restoration specialist rather than a general craft technique.
Let the Veil Carry One Memory Forward
Creative ways to repurpose your wedding veil do not need to begin with scissors. A new comb can return an inherited veil to the aisle, a supported lace motif can become a hair clip, and a small piece of tulle can connect a christening keepsake to an earlier family ceremony.
The most useful decision is often choosing what not to change. Protect the strongest lace, keep meaningful embroidery intact, and save every removed section with clear labels. That care leaves room for another person to understand and use the veil later.
Begin with one reversible step. Photograph the veil, identify its construction, and test a temporary arrangement before making a permanent cut. Then the finished project can feel like a continuation of the veil’s story rather than the end of it.
Which idea feels right for your veil: a modern restyle, a small set of bridal hair accessories, or a family christening keepsake made from one carefully chosen section?