Empty feed bags tend to collect quickly because they are too sturdy to feel disposable. Woven plastic sacks resist tearing, paper feed bags unfold into broad printable sheets, and many designs are far more cheerful than the average storage material.
Their strength is useful, but it also changes how they should be handled. A woven sack can fray into sharp plastic strands when cut carelessly, while a paper bag may hold dust or oily residue from the original feed. Cleaning, drying, and choosing the right project come before sewing or decorating.
I’m Stella Eve Louise, and I don’t think every bag needs to become a complicated craft. One may work best as a washable tote, another as a vegetable grow bag, and a damaged paper sack may simply protect a work surface. Reuse is most helpful when the bag solves a real problem rather than moving from the barn into a crowded craft cupboard.
Start by checking the material and the original contents. Bags that held medicated, mouldy, contaminated, or strongly scented feed should not become food carriers, children’s items, pet bedding, or indoor storage.
Clean and Sort the Bags Before Cutting
Shake out every loose grain outdoors and turn the bag upside down so material trapped in the corners can fall away. A soft brush helps remove dusty residue from stitched seams without driving it further into the weave.
Sort the bags into woven plastic, laminated plastic, paper, and cloth feed sacks. Each type behaves differently under scissors, needles, moisture, and weight.
Check every bag for:
· Mould, dampness, or a sour smell
· Oily residue that remains after cleaning
· Rodent damage or insect contamination
· Split seams and weakened creases
· Sharp plastic strands around torn edges
· A printed coating that flakes when folded
· Old staples, strings, or metal fasteners
· Enough undamaged material for the planned project
· Whether the original contents make the new use unsuitable
· A fully dry interior before sewing or storage
Do not use bags that held medicated feed, pesticides, mouldy material, or unknown chemicals for food, children, pets, or skin-contact projects. Wear eye protection when cutting thick plastic and keep loose strands away from animals.
Woven plastic bags can usually be wiped or rinsed with mild soapy water, then hung open until completely dry. Paper bags should be brushed and aired rather than soaked. Cloth sacks may be washable, but check the weave and printed design before putting them into a machine.
I know it can feel tempting to stack the cleaned bags and decide later, but that is how a useful material turns into a new category of clutter. Keep only the strongest examples and assign each one a purpose.
Sew a Sturdy Feed-Bag Market Tote

A tote is one of the most practical uses for a woven feed bag because the original material is already designed to carry weight. The printed panel can stay on the front, while the bag’s side seams and trimmed sections provide extra material for handles.
The project works best when the sack has no deep fold cracks and the printing remains flexible. Thin, brittle material may split beside the stitching even when the seam itself looks neat.
Materials and Tools
· Clean and fully dry woven feed bag
· Sewing machine
· Medium or heavy-duty needle suited to the material
· Strong polyester thread
· Clips instead of pins where practical
· Ruler and marker
· Sharp utility scissors
· Cotton webbing or saved bag strips for handles
· Optional binding tape
Make the Reusable Tote
1. Choose the front design. Lay the bag flat and centre the printed section you want to keep. Mark the top and bottom cuts only after checking where the original folds and weak areas sit.
2. Close and shape the base. Turn the bag inside out and stitch across the bottom with a secure seam. Flatten each corner into a triangle, sew across it, and trim the point to create a base that can stand rather than collapsing into a flat envelope.
3. Finish the top edge. Fold the upper edge inward twice or cover it with binding so cut plastic cannot scratch hands. Use clips to hold the material because ordinary pins may leave stretched holes.
4. Reinforce the handles. Position webbing or folded bag strips evenly on both sides. Stitch each end with a box and cross pattern, then test the handles with light weight before carrying groceries or books.
5. Check every cut edge. Trim loose strands and cover any rough areas. Load the tote gradually and watch the seams instead of discovering the weak point after filling it with tins.
For me, comfortable handles matter more than showing every part of the original print. A handsome bag that cuts into your hand will spend most of its second life hanging on a hook.
A smaller version can become a garden-harvest bag or beach tote. Turn the plain inner side outward when the original branding does not suit the new use.
Make a Wipe-Clean Garden or Coop Apron
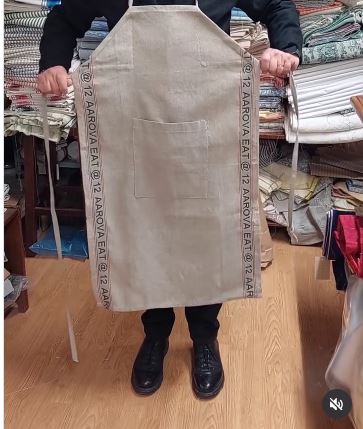
Feed-bag material suits a garden or coop apron because soil, dust, and splashes wipe away more easily than they do from ordinary cotton. A broad printed panel can form the front, while smaller offcuts become pockets or tie reinforcements.
This is not the right project for brittle sacks or bags with sharp laminated edges. The apron needs to bend around the body without cracking or rubbing.
Materials and Tools
· Clean flexible feed bag
· Paper for making a simple pattern
· Strong thread
· Sewing machine and suitable needle
· Clips
· Fabric or cotton webbing for the waist ties
· Binding tape for the outer edge
· Scissors
· Optional cloth backing for comfort
Sew the Work Apron
1. Draft the shape around the print. Use paper to test the width and length before cutting the bag. Keep the strongest uninterrupted panel across the waist and remove damaged corners.
2. Soften the edges. Bind the top, sides, and lower edge or fold them neatly before stitching. Covering cut plastic prevents rough strands from catching clothing.
3. Build useful pockets. Add one broad pocket from an offcut, then divide it with vertical seams. Keep pockets shallow enough that tools do not swing against your legs.
4. Attach comfortable ties. Use fabric or cotton webbing rather than narrow plastic strips for the waist. Reinforce the attachment points with several lines of stitching.
5. Test it with light tools. Wear the apron and bend, walk, and sit before loading it. Reserve heavy secateurs and sharp tools for a proper belt or secure holster.
The part I would not skip is a comfortable waist tie. Feed-bag material is practical, but it is not known for suddenly becoming softer because we have admired the print.
A half apron is easier for beginners than a full bib style. You can also make a small kneeling mat or tool roll from the remaining flat sections.
Choose the Reuse That Fits the Bag Material
Woven Plastic Bags
These are suited to totes, grow bags, aprons, and wipe-clean outdoor projects. Seal or bind every cut edge and avoid high heat.
Laminated Paper Bags
Use them for wall art, gift wrap, drawer liners, or temporary drop cloths. Avoid projects that require repeated washing or sharp folds.
Plain Paper Feed Sacks
The unprinted side can protect craft surfaces or become drawing paper when the bag is clean and uncontaminated. Paper may also be compostable in some circumstances, but check the inks, coatings, and local guidance first.
Cloth Feed Sacks
Older cotton sacks may suit cushions, patchwork, aprons, or framed textile art after careful washing and strength testing. Repair weak fibres before putting the fabric under tension.
Feed-Bag Projects That Can Fail at the Seams
Sewing Through a Dirty Bag
Residual dust works into the machine and the finished seams. Clean and dry the bag before measuring, and discard contaminated examples rather than trying to hide the problem inside a lining.
Using Ordinary Pins Everywhere
Pins can stretch holes in woven plastic and create a line where the material later tears. Use sewing clips or place pins only within a seam allowance.
Leaving Cut Plastic Exposed
Frayed strands can scratch hands, catch fabric, or become accessible to animals. Fold, bind, or otherwise cover every frequently handled edge.
Choosing Weak Thread or a Fine Needle
The machine may skip stitches or break thread when the needle cannot pass through several layers. Use a needle and strong thread suited to the material, then test on an offcut.
Making Handles Too Narrow
Thin straps concentrate the load and can pull through the sack. Use wider webbing and reinforce the connection with box stitching.
Moving a Filled Grow Bag by Its Handles
Wet soil is far heavier than the original feed. Support the base with both hands or place the container on a movable platform before filling.
Using Old Bags Around Food
A clean-looking bag may still contain residue or have held unsuitable products. Keep reused feed packaging away from loose human food unless a separate food-safe liner fully contains it.
Adding Sharp Tools to an Apron Pocket
A simple pocket does not protect the wearer from blades or pointed tools. Use a proper sheath or tool belt for sharp equipment.
Letting Pets Chew the Material
Plastic strips, thread, and printed coatings can be swallowed. Keep feed-bag crafts away from unsupervised pets and do not make chew toys from sacks.
Saving Every Bag
Reuse should reduce waste, not create a wall of empty packaging. Select the best bags for planned projects and handle the rest through appropriate local disposal or recycling routes.
Frequently Asked Questions
Can feed bags go in a washing machine?
Woven plastic sacks are usually better rinsed or wiped by hand because machine agitation and heat may damage the coating. Cloth sacks may be washable, but test the print and seams first.
What needle should I use for a woven feed bag?
A medium or heavy-duty machine needle often works better than a fine universal needle. Test on an offcut because bag thickness and lamination vary.
Can I make a tote without a sewing machine?
A simple carry bag may be joined with suitable hand stitching, eyelets, or carefully installed fasteners, but load-bearing seams still need reinforcement. Sewing generally creates the neatest and most dependable result.
Are feed-bag planters safe for vegetables?
Use only clean bags that held ordinary uncontaminated feed and have no questionable coating or residue. When uncertain, grow ornamental plants or place a suitable separate liner between the bag and potting mix.
How do I remove the feed smell?
Shake and brush the sack, wash woven plastic with mild soapy water, rinse well, and dry it open. Discard the bag when a strong or unpleasant smell remains.
Can paper feed bags be used as wrapping paper?
Yes, when they are clean, dry, and free from contamination. Cut away stitched seams and dusty folds, then use the unprinted side or an attractive printed panel.
How long will a feed-bag tote last?
That depends on the original material, load, stitching, sunlight, and how often it is folded. Inspect the handles, base corners, and crease lines regularly and retire the tote when splitting begins.
Give the Strongest Bags a Useful Second Job
Creative ways to reuse feed bags begin with the material rather than the decoration. A flexible woven sack can carry shopping or hold soil, while a weakened paper bag may be better suited to a frame or temporary work-surface cover.
Choose one clean bag and one practical purpose. Bind the cut edges, reinforce the areas that carry weight, and keep old feed packaging away from uses that demand food-safe, child-safe, or chew-safe materials.
The tote is the most useful everyday project, the grow bag makes good seasonal use of a sturdy sack, and the framed print saves a memorable design without stressing it. Each option keeps the new function connected to what the bag can genuinely handle.
Which bag would you reuse first: the colourful woven sack waiting to become a market tote, the wide bag suited to patio vegetables, or the old paper panel that deserves a simple frame?