A sustainable classroom is easier for students to understand when reducing, reusing, and recycling are visible in ordinary routines rather than saved for one special lesson. A worksheet with a blank back, an empty can, a plastic bottle, a cardboard tube, or a half-used notebook may look like a small thing, but each one gives students a chance to decide whether an object is actually finished with or simply ready for another purpose.
I’m especially interested in the point where practical reuse meets everyday learning. Children notice what adults repeatedly do. If paper is always thrown away after one side is used, that becomes the normal pattern. If a classroom has a clear place for scrap paper, reusable containers, shared supplies, compostable material, and project offcuts, students begin to see resources differently without needing a lecture every time.
The strongest creative curriculum for reducing, reusing, and recycling gives students real jobs, useful objects to work with, and enough structure to understand why the activity matters. The aim is not to make every lesson look “green.” It is to help students build habits of observation, problem-solving, care, and resourcefulness while still meeting ordinary classroom goals in art, science, literacy, design, and teamwork.
Start With the Waste Students Can Actually See
Waste becomes much easier to discuss when students can connect it to something they handle every day. A general conversation about “saving the planet” can feel enormous, especially for younger children. A pile of one-sided worksheets, a bin of worn folders, or a box of clean cardboard pieces is much more concrete. Students can count it, sort it, compare it, reuse it, and notice how quickly it builds up.
I would begin by looking at the classroom itself. Which materials appear repeatedly? Paper is often the obvious one, but there may also be packaging from supplies, cardboard tubes, plastic bottles, old display materials, dry markers, containers, damaged books, fabric scraps, and leftover project pieces. The useful question is not simply, “Can this be recycled?” It is, “Can we reduce the need for it, use it again, repair it, share it, or repurpose it before recycling becomes the final option?”
That order matters because recycling can accidentally become a permission slip for overuse. If students believe every recyclable item is automatically harmless, they miss the value of reducing and reusing. A classroom recycling station works best when it sits inside a wider system: print only what is needed, use both sides of suitable paper, keep reusable materials accessible, share supplies, and sort whatever truly has reached the end of its useful classroom life.
There is also a good curriculum opportunity in the sorting itself. Younger students can identify materials by touch, shape, or function. Older students can compare packaging choices, design labels, create instruction cards, or evaluate whether a material belongs in local recycling at all. I don’t think every sustainability activity needs a complicated final product. Sometimes the most useful learning is simply noticing what passes through our hands.
Make Reuse Easier Than Throwing Something Away
A reuse system only works if students can understand it quickly. If scrap paper is hidden in a cupboard, reusable containers are mixed with rubbish, and donated supplies are stored in an adult-only cabinet, the class may still reach for new materials first. Convenience shapes behaviour. That means the physical layout of the classroom is part of the lesson.
Keep the most frequently reused items where students can see them. One-sided paper can sit in a labelled tray near the drawing or writing area. Clean cardboard can be grouped by size so students are not digging through an overflowing box. Short pencils can have their own cup rather than disappearing into drawers. Reusable jars or cans can hold brushes, rulers, or coloured pencils. A swap shelf can separate notebooks, folders, pencil cases, and books so students know what is available without turning the area into a jumble sale.
The wording on labels matters too. “Scrap” can sometimes sound like “worthless.” A label such as “paper for drafts,” “cardboard for making,” or “materials ready for another use” gives the object a purpose. Students are more likely to treat reused supplies with care when those materials are presented as resources rather than leftovers.
I know it can feel tempting to save absolutely everything because it might become useful later. That usually creates the opposite problem. A classroom packed with random lids, tiny plastic pieces, torn packaging, and unstable containers becomes harder to manage and may create safety or hygiene issues. Set limits. Keep materials that are clean, reasonably durable, and connected to projects you genuinely expect to use. Responsible reuse includes knowing when an item is no longer suitable.
Prepare the Classroom for Safe, Repeatable Projects
Reused materials need the same level of preparation as new craft supplies, sometimes more. Containers should be empty, clean, dry, and free from sharp edges. Labels can be removed if they interfere with paint or glue, although there is no need to strip every surface for purely functional classroom use. Cardboard should be checked for moisture, food residue, staples, and crushed sections that make construction unreliable.
For younger students, I would avoid glass jars and any metal can with a rough or sharp rim. Smooth cans with safe edges can be useful for older children with close supervision, but plastic tubs, cardboard cartons, and sturdy paper containers are easier choices for early-years settings. Cutting thick plastic bottles may also be an adult-preparation job. Once the bottle has been safely cut and any rough edge covered, students can take over the planting, decorating, or observation work.
Plan the cleanup before the activity begins. A tray for reusable offcuts, a recycling container for genuine waste, a compost caddy for suitable organic material, and a place for tools prevent the end of the lesson from becoming a rush to throw everything into one bin. This is where the curriculum becomes a routine rather than a slogan.
It also helps to separate the learning goal from the craft result. If the aim is to explore plant growth, the bottle planter is a useful container, not the whole lesson. If the aim is engineering, the cardboard model needs to solve a problem or test a structure rather than simply look decorative. If the aim is resource use, students should be able to explain what was reused and why. The finished object matters, but the thinking around it matters more.
Set Up a Classroom Recycling Station Students Can Use Independently
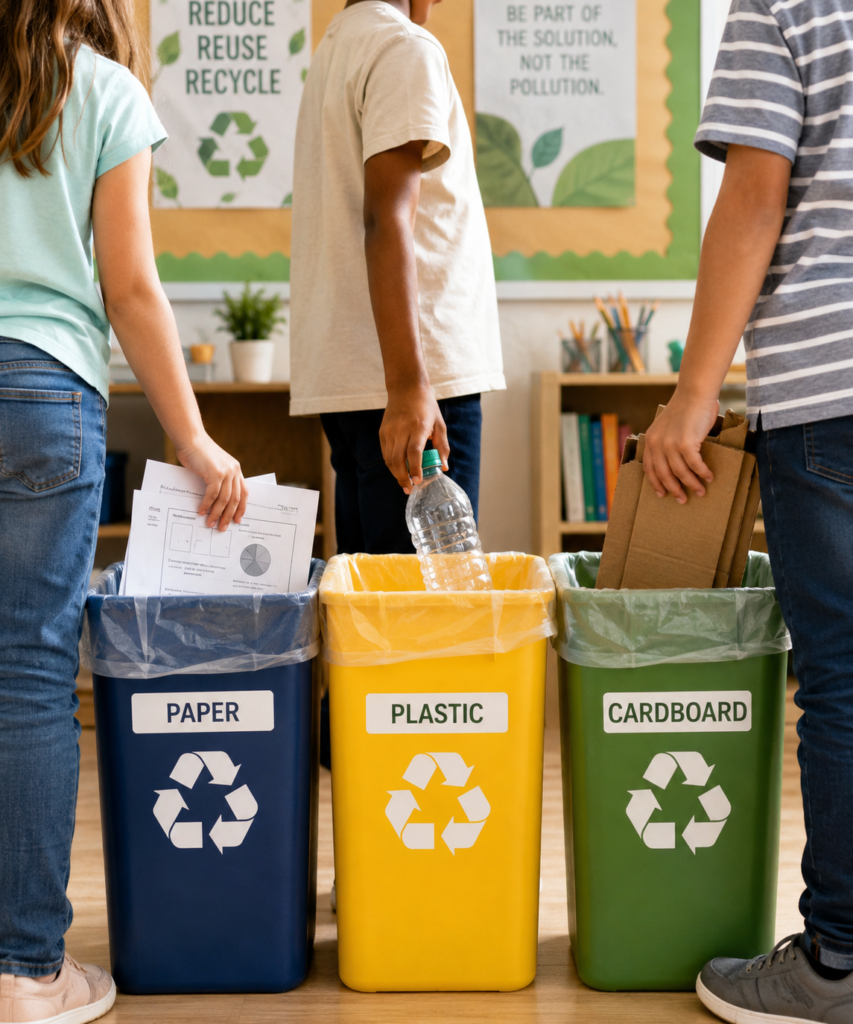
A recycling station is one of the simplest sustainability systems to make visible, but its usefulness depends on more than placing three coloured bins against a wall. Students need to know what belongs in each container, what should be reused first, and what should never be dropped in because it is dirty, mixed with another material, or unsuitable for the local recycling stream. The station becomes more educational when students help define those rules rather than receiving them as a finished poster.
The faceless classroom scene works because the action is obvious: worksheets move toward paper, a bottle moves toward plastic, and flattened packaging moves toward cardboard. That clear visual separation is exactly what a real classroom needs. If students have to guess which bin is which, the system will quickly become contaminated with the wrong materials. Large labels, simple icons, and consistent colours reduce that uncertainty.
I would place the station near the point where the waste is created but not so close to ordinary rubbish that students can throw items without looking. A few seconds of decision-making is useful. Before a student drops something in, they should be able to ask: Is this still usable? Is it clean? Is it made from one material or several? Does our school actually collect this type? Those questions turn sorting into a small reasoning task.
What Students Practice Here
Younger students can practise classification, vocabulary, turn-taking, and responsibility. Ask them to identify paper, cardboard, and plastic by handling clean samples and comparing texture, flexibility, and thickness. Older students can audit the station for a week, note recurring mistakes, redesign labels, or research which items the school’s waste contractor accepts. That moves the activity from simple compliance into evidence-based improvement.
The station also creates useful maths and literacy work. Students can tally how many sheets were recycled compared with how many were reused, write short instructions for classmates, make a flow chart for tricky items, or calculate which material appears most often. None of that requires invented environmental statistics; the data comes from their own classroom.
Materials and Tools
· Clearly labelled containers or bins for the materials your school actually collects.
· Large paper labels, simple icons, or laminated instruction cards.
· A small tray for items that might still be reusable before recycling.
· Clean sample materials for sorting practice.
· Markers, tape, reusable sign holders, or card for student-made labels.
· Gloves for an adult waste audit if handling classroom rubbish is necessary; students should only sort clean, safe materials.
A Classroom Method
- Choose the categories your school can genuinely recycle. Check the school’s collection rules before students design the station. It is better to have two accurate categories than five impressive-looking bins that send mixed or unacceptable material into the wrong stream.
- Create labels with examples, not just names. Add a few familiar classroom items beneath each category, such as clean worksheets for paper or flattened supply boxes for cardboard. Include one or two “not here” examples when students repeatedly confuse similar materials.
- Teach the reuse check before the recycling check. Ask students to look at paper, folders, boxes, and containers and decide whether they still have classroom value. A sheet with a blank back may belong in the reuse tray rather than the paper recycling bin.
- Give students rotating responsibility. Assign a small team to check labels, flatten cardboard, move reusable items to the correct shelf, and tell the teacher when a bin is nearly full. The job should be simple enough to complete without turning into a daily cleaning burden.
- Review what goes wrong and adjust. After the system has been used for a while, examine clean visible mistakes together. If plastic appears in paper or reusable card is being discarded, change the sign, move the bin, or reteach the decision rather than simply telling students to be more careful.
One Thing I Would Keep Visible
I would keep a small “Can this be used again?” prompt above the recycling bins. Recycling should feel like the final sorting decision, not the first one. That single reminder keeps the hierarchy clear without needing a long explanation every time a student finishes a worksheet or unpackages a classroom supply.
Ways to Adapt the Station
· Use picture-only labels for early readers.
· Add a reuse tray beside the recycling station for one-sided paper and sturdy cardboard.
· Let older students create a short induction for new classmates.
· Use a temporary mobile station during art or design projects, then return sorted materials to the main area.
· Add a separate compost caddy only if the school has a reliable compost system and students understand what belongs there.
Turn Used Cans and Jars Into Everyday Classroom Organizers
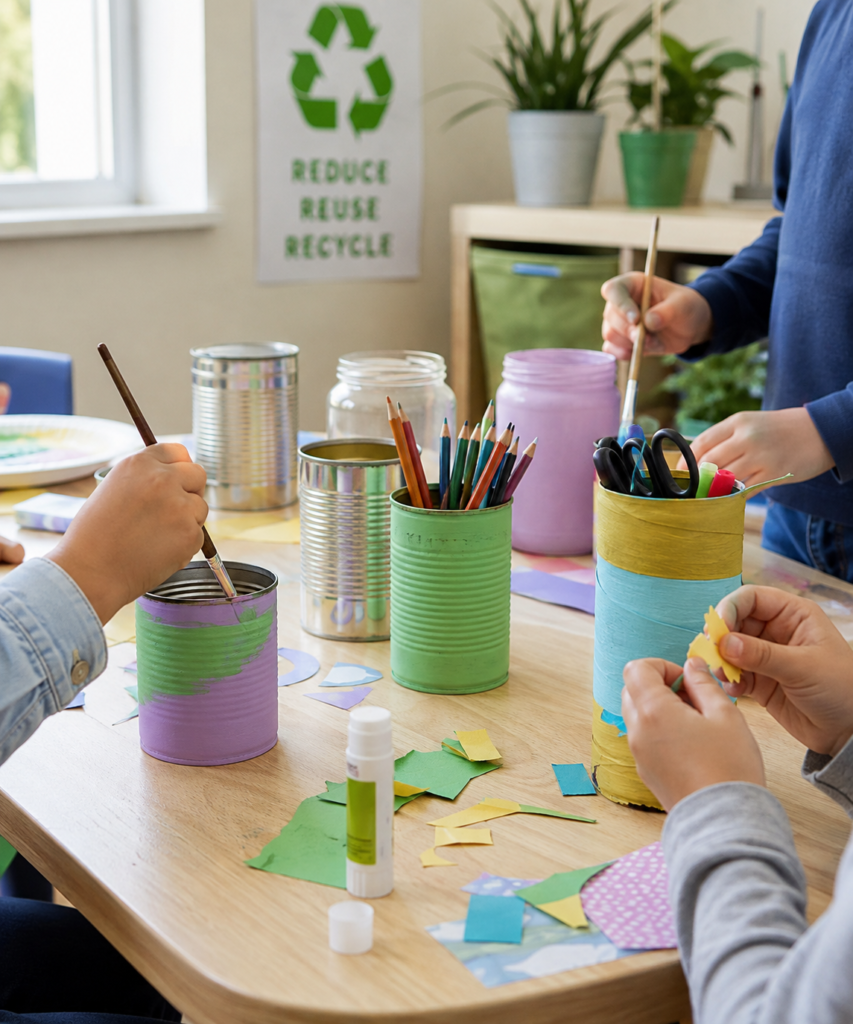
A container upcycling project becomes much more useful when the finished item solves a real classroom problem. Pencil holders, brush cups, ruler containers, small supply pots, and tool organisers are handled repeatedly, so students can see the reused object continuing to work long after the art lesson ends. That is a stronger message than making something decorative that is admired for a day and then stored away.
The safest materials depend on the age group. Smooth-edged tins can work for older students if an adult has checked every rim. For younger children, sturdy plastic tubs, cardboard food canisters, paper cups from clean unused stock, or wide plastic jars are more forgiving. Glass can look attractive, but I would generally keep it out of busy primary classrooms unless it is used by an adult in a protected area.
The visible project uses paint and paper to distinguish the containers, but the decoration does not need to be elaborate. In fact, the best classroom organisers are easy to clean, easy to identify, and not so heavily decorated that pieces fall off whenever someone reaches for a pencil. A simple painted band, colour code, or paper label is often enough.
What Students Practice Here
This activity fits naturally with design thinking because students can begin with a storage problem. Where do scissors gather? Which pencils are hardest to find? Do paintbrushes need a taller holder than crayons? Students can compare container height, width, stability, and opening size before choosing what each one should hold.
That small planning stage prevents the project from becoming “paint a can because we are learning about recycling.” The reused material is selected for a purpose. Students can sketch a label, measure the container, decide whether a heavier base is needed, and test whether the finished organiser tips when tools are removed from one side.
Materials and Tools
· Clean, dry cans with fully safe edges, or safer plastic/cardboard containers.
· Water-based craft paint or paper for wrapping and labelling.
· Brushes, washable palettes, and table protection.
· Glue suitable for the chosen container and decoration.
· Scissors for paper decoration.
· Pencils, rulers, markers, brushes, or other supplies to test the finished organizer.
A Classroom Method
- Collect only containers that pass a safety check. Wash and dry each item, remove food residue, and reject anything cracked, sharp, rusty, greasy, or difficult to clean. If using metal, an adult should inspect every edge before the container reaches the student table.
- Match the container to a real storage job. Let students test empty containers with pencils, brushes, markers, or rulers before decorating. A container that is too short, too narrow, or too light will remain frustrating no matter how good the paint looks.
- Prepare the surface and plan the label. Wipe away dust and loose label residue. Students can choose a simple colour code, painted band, paper wrap, or written label that helps classmates know what belongs inside.
- Decorate without blocking function. Keep the top opening clear and avoid bulky decorations near the base. If glue or paint is used, allow the finish to set fully before putting tools inside; patience may not be the most exciting part of the lesson, but sticky scissors are even less exciting.
- Put the organizer into service and evaluate it. After several days, ask whether the container stays upright, holds the right quantity, and is easy to return to its place. Students can modify the label or change its use if the first plan does not work.
The Part I Would Keep Simple
I don’t think every container needs to look like a separate art project. A class set looks calmer and works better when students use a shared system: perhaps one colour for drawing tools, another for cutting tools, and simple labels for everything else. Reuse becomes part of organisation rather than extra visual clutter.
Ways to Adapt the Project
· Use old cardboard tubes bundled inside a box to create divided pencil storage.
· Wrap containers in leftover maps, damaged book jackets, or student-made scrap-paper patterns instead of paint.
· Let older students design modular organisers that fit a measured shelf.
· Use wide containers as shared table caddies and smaller ones for individual stations.
· Turn plain reused tubs into labelled parts bins for STEM components, counters, clips, or craft offcuts.
Grow Seedlings in Reused Plastic Bottle Planters
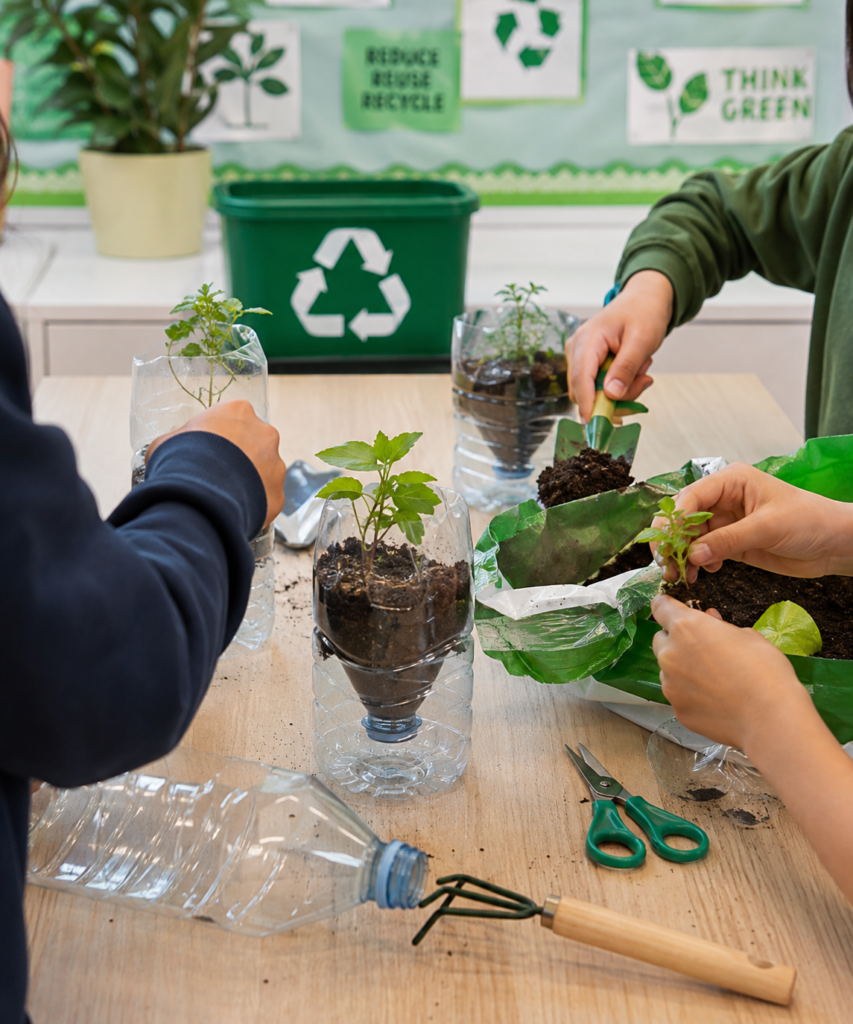
Plastic bottle planters work well in a creative curriculum because they connect two ideas that students can observe directly: a container can have another use, and a living plant changes over time. The planter does not need to be sophisticated. A carefully prepared bottle base, drainage plan, suitable growing medium, and small seedling are enough to turn packaging into a science observation tool.
The preparation is where adult judgement matters. Cutting a bottle can leave a sharp edge, and some plastic is thin enough to crack or deform. I would have an adult cut and inspect bottles before the lesson, then cover any uncomfortable edge with tape if needed. Students can handle the soil, planting, labelling, watering plan, and observation records once the containers are safe.
Clear plastic has one useful classroom advantage: students may be able to observe moisture and some root development near the side. It also has limits. Light reaching roots can encourage algae, and a bottle can dry more quickly than a larger pot. Treat the reused container as a short-term learning vessel rather than assuming it is the ideal permanent home for every plant.
What Students Practice Here
Planting creates natural opportunities for sequencing, measurement, scientific observation, and responsibility. Students can compare seedling height, count leaves, record watering, sketch changes, or write short observations. Older students can test variables such as container covering, drainage approach, or location while keeping other conditions as consistent as the classroom allows.
It is also a good place to discuss what “reuse” means. The bottle has not disappeared; it has changed function. Students can consider what happens when the growing project ends. Can the planter be washed and used again? Can the plant move to a longer-term pot? Does the bottle eventually belong in local recycling? The second use is valuable, but it is still part of a material journey.
Materials and Tools
· Clean plastic bottles prepared and cut by an adult where necessary.
· Potting mix suitable for the plants being grown.
· Small seedlings or seeds appropriate for classroom conditions.
· A small scoop or trowel.
· Labels made from reused card, craft sticks, or washable markers.
· A tray or waterproof surface beneath indoor planters.
· Scissors or cutting tools for adult preparation only when required.
A Classroom Method
- Prepare stable, safe planter containers. Choose bottles that stand securely or can be supported in a tray. An adult should make the cuts, smooth or cover rough edges, and decide how drainage will be handled so students are not working with sharp plastic.
- Add the growing medium without overfilling. Students can spoon soil into the container, leaving enough room for the seedling and watering. Encourage them to keep soil on the work tray rather than compressing the pot until there is no air space.
- Plant and label carefully. Make a hole large enough for the seedling roots, position the plant upright, and press the soil gently around it. Add a clear label with the plant name, date, group, or investigation variable.
- Set a realistic care routine. Place planters where the chosen plants receive appropriate light and assign watering checks rather than automatic daily watering. Students should observe the soil before adding more water so care becomes a decision, not a ritual.
- Record growth and plan the next home. Use sketches, measurements, photographs taken by the teacher, or short written observations. Before roots become crowded, decide whether the plant will be transplanted to a garden, larger reused container, or longer-term pot.
A Practical Observation
I would resist turning every bottle into the same planter. Let the science question decide the setup. If students are studying root visibility, clear sides may be useful. If the plant needs longer growth, a larger reused container may make more sense. The reuse idea should support the learning rather than forcing the learning to fit the container.
Ways to Adapt the Planting Activity
· Use larger food-safe plastic tubs as group planters when individual bottles are too small.
· Cover some clear planters with reused paper sleeves and compare what students can observe.
· Grow herbs for a sensory lesson, fast seedlings for observation, or native plants where appropriate to the school context.
· Create a watering rota that includes observation notes rather than simple tick boxes.
· Move mature plants into a school garden and clean suitable containers for another planting cycle.
Build Environmental Collages From Old Magazines and Scrap Paper
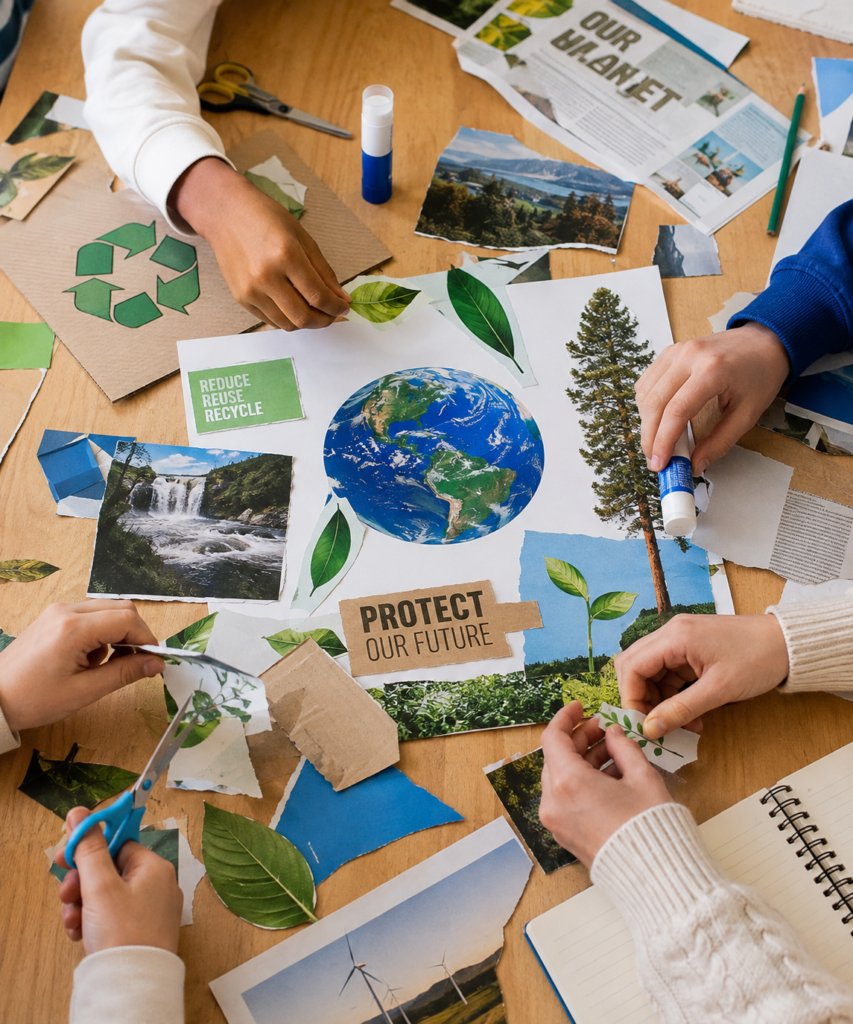
Collage is an easy place to reuse paper because the marks, folds, colours, and printed fragments already have visual character. Damaged magazines, outdated catalogues, old brochures, misprints, packaging card, and small construction-paper offcuts can all become useful once students stop seeing them as full sheets that have been “spoiled” and start seeing them as shapes, textures, words, and images.
The environmental theme shown in the project gives the collage a communication purpose. Students are not only decorating. They are deciding what message to build, which images support that idea, what text should stand out, and how the arrangement guides the viewer’s attention. That makes the activity useful for art, literacy, media awareness, and sustainability at the same time.
I would be selective about source materials. Reuse does not mean handing children any discarded paper. Remove personal information, unsuitable advertising, staples, food-stained packaging, and heavily coated materials that are difficult to cut or glue. A smaller tray of safe, varied materials is more productive than a mountain of random paper.
What Students Practice Here
Students can practise visual hierarchy by choosing one main idea and supporting it with smaller pieces. A central Earth, a large word such as “protect,” or a repeated leaf shape can anchor the page. They can then add secondary imagery without covering every empty area. For me, the strongest collages usually leave some breathing room; filling every gap can make the message harder to read.
The project can also support discussion about the source material itself. Why was this magazine page no longer needed? Which part are we using? What happens to the offcuts? Can small leftover pieces return to the collage tray? Can clean paper scraps be recycled when they are too small to use? Students begin to see a project as a flow of materials rather than a single finished poster.
Materials and Tools
· Old magazines, catalogues, brochures, maps, or discarded print material with personal information removed.
· Scrap construction paper, used card, and clean cardboard pieces.
· Safe scissors appropriate for the age group.
· Glue sticks or a small amount of suitable craft adhesive.
· Reused card or heavy paper as the collage base.
· Optional natural materials such as fallen leaves if they are clean, dry, and suitable for indoor use.
· Pencils for planning words or layout before gluing.
A Classroom Method
- Choose one message before cutting. Ask students to write or discuss the main idea in one sentence. The message might focus on reuse, protecting local habitats, reducing waste, or caring for shared resources. A clear idea makes material selection easier.
- Sort source material by usefulness. Students can look for colour, texture, words, objects, landscapes, plants, and shapes that support the message. Encourage them to tear or cut only what they may genuinely use rather than chopping through entire magazines for the sake of activity.
- Arrange everything without glue. Place the largest shapes first, then move smaller pieces around them. I know it can feel tempting to glue the first exciting image immediately, but a dry layout gives students room to change their minds and usually prevents a crowded final page.
- Attach from background to foreground. Glue larger background shapes first and add text, leaves, or smaller images after the main structure is secure. Use enough adhesive to hold the paper flat without saturating thin magazine pages.
- Review the message and reuse the leftovers. Ask students to explain what the viewer should notice first and why. Return useful scraps to the material tray, recycle suitable paper waste, and keep only the fragments that are likely to be used again.
What Matters More Than Perfect Cutting
The collage does not need machine-straight edges. Torn paper, uneven borders, and mismatched textures can make the reuse story more visible. What matters is that students make intentional choices. If every piece is added only because it was available, the poster becomes clutter rather than communication.
Ways to Adapt the Collage
· Create a shared class mural where each student contributes one reused-paper section.
· Use only typography from old print materials for a literacy-focused poster.
· Make habitat collages from nature imagery and packaging textures.
· Create before-and-after panels showing a wasteful classroom habit and a better alternative.
· Let older students annotate the collage with short explanations of why each visual was chosen.
Give One-Sided Worksheets a Second Classroom Use
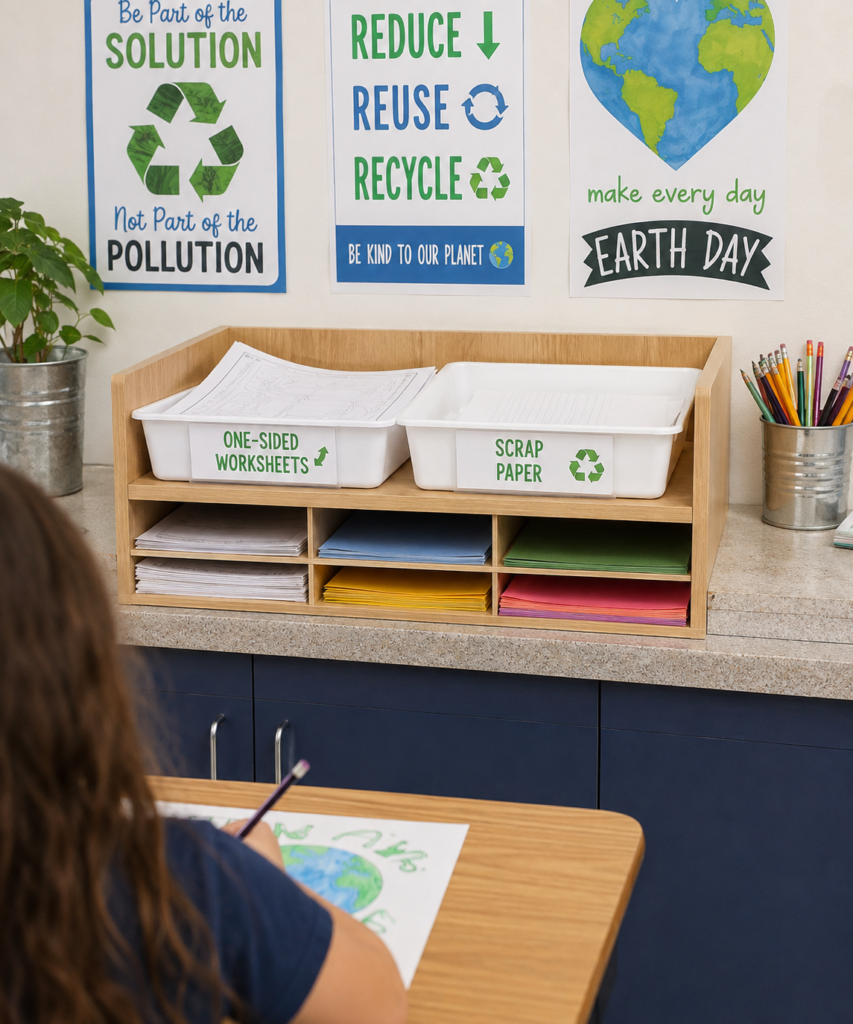
Paper is so ordinary in schools that it can become almost invisible. A worksheet is handed out, used once, and cleared away. A printout with a mistake is replaced. A display is taken down. A student needs paper for a rough sketch and reaches for a fresh sheet. A reuse station interrupts that automatic flow by giving suitable paper an obvious second destination.
The station shown in the project separates one-sided worksheets from general scrap paper and keeps coloured sheets in accessible compartments. That separation is useful because students need different kinds of paper for different jobs. A clean blank back may be appropriate for drafts, working-out, drawing, planning, or practice. Small scraps may suit labels, collage, testing markers, or quick notes.
Privacy is important. Do not place assessment papers, student records, contact information, confidential notes, or anything containing sensitive personal data into a shared reuse tray. The paper needs to be safe to circulate. I would also keep heavily crumpled, greasy, wet, or glitter-covered sheets out of the station because “reusable” should still mean pleasant and practical to use.
What Students Practice Here
A paper reuse station teaches resource judgement in a very quiet way. Students decide whether they need a clean presentation sheet or whether reused paper is entirely suitable. That distinction matters. The goal is not to make children feel guilty for using new paper when it is genuinely needed; it is to stop new paper being the automatic choice for every rough task.
Older students can help run a paper audit. Instead of relying on general claims about school waste, they can count how quickly the reuse tray fills, note which types are used most often, or track how many rough-draft sheets come from the station over a chosen period. Their own classroom evidence can then inform changes to printing or paper access.
Materials and Tools
· A sturdy organiser, tray unit, or repurposed shelf.
· Separate trays for one-sided full sheets and smaller scrap paper.
· Labels that clearly explain acceptable uses.
· A recycling bin nearby for paper that is genuinely finished.
· Pencil cups or drawing tools if the station doubles as a drafting area.
· Optional coloured-paper compartments for reusable offcuts.
A Classroom Method
- Decide what paper is safe to circulate. Create a simple rule: only clean, non-confidential paper with a genuinely usable side or useful size enters the station. Adults should remove anything containing sensitive information before students handle it.
- Separate full sheets from small scraps. Full one-sided paper is useful for drafts and drawing; smaller pieces work better for labels, testing, maths working, or collage. Separate trays stop students from scattering the whole stack while searching.
- Place the station where rough work happens. A reuse tray near writing, art, or printer areas will be used more often than one stored across the room. Make it slightly easier to choose reused paper than to open a new ream.
- Teach when new paper is appropriate. Final presentations, certain assessments, formal letters, and some art tasks may require clean new sheets. Students should learn to match the quality of the material to the purpose rather than treating reuse as an absolute rule.
- Clear the station regularly. Remove paper that has become torn, scribbled on both sides, or too small to be useful. Recycle suitable paper and keep the station neat enough that students see it as a resource, not a holding area for classroom clutter.
A Small Habit With a Large Teaching Value
I especially like this idea because it does not need a special project day. Students can use the station during ordinary maths, art, planning, and writing. That repetition is what turns sustainability from a topic into a habit. The tray quietly asks the same question every day: do I need something new for this job?
Ways to Adapt the Paper System
· Create a small desktop tray for each table group in younger classrooms.
· Use full one-sided sheets for handwriting practice or rough maths work.
· Cut larger damaged sheets into uniform note cards for classroom messages.
· Keep coloured offcuts by approximate size for art and design work.
· Let student monitors tidy the station and move fully used paper into recycling.
Connect Composting Lessons With a Working School Garden
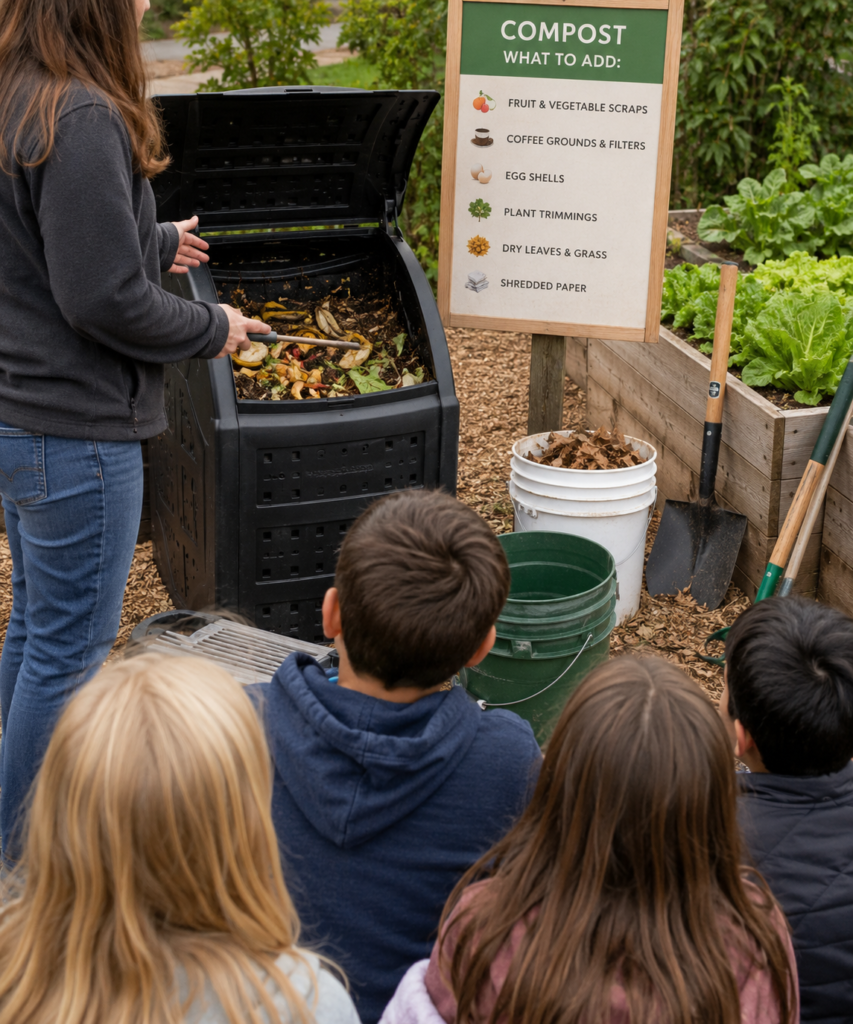
Composting is easier to understand when students can see the whole loop: suitable organic scraps go into a managed system, the material changes over time, and finished compost can eventually support soil and plant growth. A poster alone can explain what belongs in a compost bin, but a working garden gives the process a destination.
The project scene includes an open compost container, a clear “what to add” sign, buckets of dry material, tools, and a raised bed. That combination is important. Composting is not simply throwing food scraps into a black box. The system needs appropriate inputs, maintenance, observation, and an adult who understands the setup being used.
Schools should follow their own hygiene, pest, food-waste, and site-management rules. Students should not handle mouldy food, unknown waste, animal waste, sharp contamination, or decomposing material without an appropriate supervised procedure. I would keep student participation focused on clean, known inputs such as fruit and vegetable scraps, suitable plant trimmings, dry leaves, and shredded plain paper when the school’s compost method accepts them.
What Students Practice Here
Composting naturally supports science because students can observe decomposition, moisture, temperature concepts, organisms, and changes in texture. Younger children can classify “compost” and “not compost” examples. Older students can investigate how the balance of wet and dry material affects the system or record changes over time without needing to handle the contents directly.
It also creates a strong systems-thinking lesson. A banana peel does not simply disappear. Students can trace where it came from, why it is unsuitable for recycling, what happens during decomposition, and how the resulting material can return to soil. That sequence helps them understand that waste categories are connected to material properties and management, not just coloured bins.
Materials and Tools
· A school-approved compost bin, tumbler, or managed compost area.
· A clear sign showing accepted and excluded materials for that specific system.
· Collection caddies or buckets for approved scraps.
· Dry brown material such as leaves or shredded plain paper if appropriate to the method.
· Garden gloves and tools for adult or supervised use.
· Raised beds, planters, or another school growing area if finished compost will be used onsite.
· A simple observation chart or compost log.
A Classroom Method
- Define the accepted inputs before collecting anything. Use the rules for the school’s actual compost system. Make a short visual list and keep it beside the collection point so students are not relying on memory when they dispose of snack or garden material.
- Teach the difference between collection and compost management. Students can place approved clean scraps in a caddy, but an adult may need to transfer, mix, cover, or manage the main compost system. This separation keeps the educational routine safe and realistic.
- Observe the balance of materials. Show students that compost is not a bucket of wet food scraps. Depending on the system, dry leaves, shredded plain paper, or plant material may help balance wetter inputs. Use the school’s method rather than applying one universal recipe.
- Connect observations to the garden. Students can record changes in the compost area, compare soil textures, or identify where finished compost will eventually be used. The garden gives the decomposed material a clear role in the wider school system.
- Review contamination quickly. If unsuitable packaging, cutlery, stickers, coated paper, or other rubbish appears in the compost stream, use it as a sorting lesson. Remove it safely and adjust the sign or collection point so the same confusion is less likely next time.
One Detail I Would Not Skip
Keep the compost rules physically beside the place where decisions happen. A beautifully designed poster inside the classroom is less useful if the collection bucket is outside by the garden and students cannot remember whether a particular item belongs. Clear instructions are part of the system, not decoration.
Ways to Adapt the Compost Lesson
· Use a sealed classroom observation container only if it is appropriate, supervised, and part of a planned science activity.
· Create picture sorting cards before students use the real compost caddy.
· Let older students maintain a compost log and report recurring contamination.
· Compare garden soil with finished compost using observation rather than exaggerated claims.
· Use dry leaves collected from the school grounds as a visible example of a material that can return to the system where appropriate.
Create a Swap Corner for Books, Folders, and School Supplies
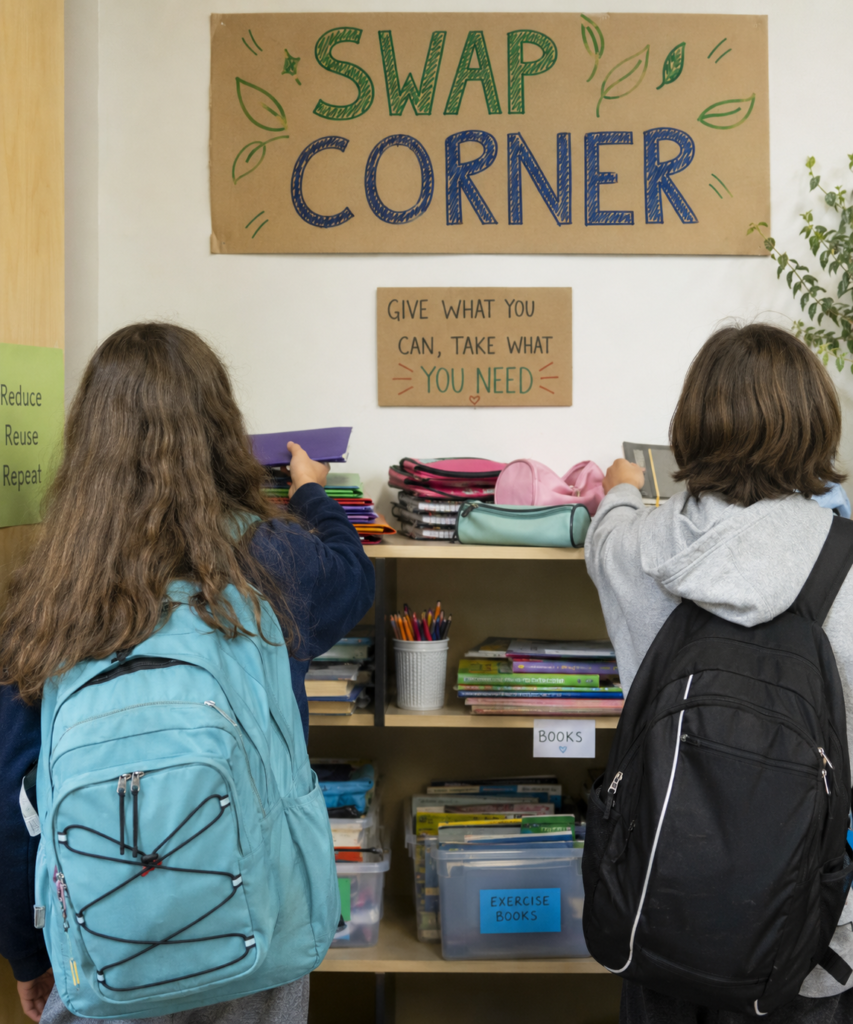
A swap corner brings reuse into the social life of the classroom. Instead of turning an old folder or half-used notebook into a craft material immediately, it asks whether the item can continue doing its original job for someone else. That is often the most efficient form of reuse because it requires little or no transformation.
The strongest swap areas are organised and limited. A shelf with categories for books, exercise books, folders, pencil cases, and usable supplies gives students a clear way to contribute and choose items. A box where everything is dumped together quickly becomes difficult to browse, and good materials disappear under broken or unsuitable ones.
The idea also needs sensitivity. Students should never be made to feel that taking a reused item means they cannot afford a new one. Present the swap as a normal class resource available to everyone. A student might choose a barely used folder because they like the colour, pick a spare notebook for a club, or return a pencil case they no longer need. The purpose is circulation, not charity.
What Students Practice Here
A swap corner can support decision-making, care, and community responsibility. Students evaluate condition: Is this notebook still usable? Does the zip work? Are most pages blank? Is the book appropriate for the age group? That simple quality check teaches that reuse works best when the next person receives something worth using.
Older students can write the swap rules, design the labels, manage a check-in system, or run a short campaign before the end of a term when unused supplies often accumulate. Literacy, organisation, and sustainability sit together naturally because the class is solving a real resource problem.
Materials and Tools
· A shelf, bookcase, or set of clean labelled bins.
· Categories such as books, folders, notebooks, pencil cases, and usable writing tools.
· A simple sign explaining that students may give usable items and take what they need.
· A small inspection tray for items that need an adult check before being shelved.
· Labels or dividers made from reused card.
· Optional sign-in sheet for classes that need to track shared materials.
A Classroom Method
- Set clear acceptance standards. Only clean, working, age-appropriate items should enter the swap. Reject anything broken, dirty, heavily written in, unsafe, or containing personal information. Reuse should not mean passing a problem to the next student.
- Organize by item type. Use labelled shelves or bins so students can browse without unpacking the whole area. Keep the categories broad enough to manage; too many tiny labels create more work than value.
- Make giving and taking equally normal. Introduce the shelf as a shared resource rather than a donation program for a particular group. Students can contribute something one week and take something another week without explanation.
- Schedule quick maintenance. A student team can straighten books, return folders to the right category, and flag damaged items for an adult. A five-minute check prevents the swap corner from becoming permanent clutter.
- Refresh the system at natural transition points. End-of-term cleanouts, project changes, and new school-year preparation are good times to move usable materials into circulation. Items that remain unwanted after a reasonable period can be reassessed for another reuse, recycling, or appropriate disposal route.
The Social Side Matters
For me, the success of a swap corner depends as much on tone as on storage. If students hear “used” as a negative word, the shelf may be ignored. If the class treats good materials as resources that deserve to keep working, choosing a reused folder feels practical rather than second best.
Ways to Adapt the Swap Corner
· Create a book-only shelf for younger classrooms.
· Run a temporary supply swap before a new term rather than keeping a permanent station.
· Add art materials such as clean folders, sketchbooks with many blank pages, and unused craft packs.
· Let students create condition labels such as “ready to use” and “needs a small repair.”
· Pair the swap with a repair session for binders, book covers, or pencil cases that only need minor attention.
Build STEM Models From Cardboard Tubes, Boxes, and Leftover Materials

Cardboard tubes and boxes are useful STEM materials because they already arrive in different shapes, thicknesses, and sizes. Students can cut, join, brace, fold, stack, measure, and test them without needing expensive model-making kits. The sustainability value comes from using the material thoughtfully, but the learning becomes stronger when the model is built to answer a design question.
The project scene suggests a small sustainable-community model with a cardboard building, paper trees, cylindrical structures, and a wind-turbine element. That type of model can support discussion about energy, buildings, green space, water, transport, or material choice. The exact science should match what students have actually learned; the model should not become a collection of symbols that students cannot explain.
I would begin with a problem statement rather than a pile of materials. For example: design a small shelter that uses limited cardboard, create a model schoolyard with space for shade and water collection, or build a tower that holds a stated load using only recovered tubes and card. Constraints make reused materials more interesting because students have to work with what is available.
What Students Practice Here
The project naturally develops planning, measurement, prototyping, collaboration, and revision. Students can compare strong and weak folds, test which tube orientation supports more weight, examine how a wide base affects stability, or document why one joint failed. The imperfect nature of reused materials can actually help because students must adapt rather than expect identical components.
It also creates a useful conversation about material efficiency. If a student uses a full cardboard sheet to make one tiny wall, ask what happened to the offcut. Could the design be rearranged before cutting? Could a smaller piece do the job? Reducing waste during an upcycling project is just as important as announcing that the materials are recycled.
Materials and Tools
· Clean cardboard tubes, boxes, corrugated card, paperboard, and sturdy offcuts.
· Reused paper for trees, labels, roofs, or surface features.
· Safe scissors and, for older students under supervision, suitable cutting tools used according to school rules.
· Glue, tape, string, paper fasteners, or other simple joining materials.
· Rulers, pencils, set squares, and measuring tools.
· Small reused plastic pieces or bottle parts only when they are clean and safely prepared.
· Optional low-voltage model components supplied and supervised by the school for age-appropriate STEM work.
A Classroom Method
- Define the problem and the material limits. Give students a clear design goal and a set quantity or category of recovered materials. Constraints encourage planning and stop the activity from becoming free-form decoration with every available scrap.
- Sketch before cutting. Students should mark approximate dimensions, decide which pieces need to remain strong, and test where tubes or boxes will join. Planning on reused paper can prevent the first large cardboard sheet from being cut into unusable fragments.
- Build the main structure first. Create the base, frame, walls, supports, or primary mechanism before adding trees, signs, or decorative details. Test stability as the model grows and reinforce weak joints with small braces rather than layers of unnecessary material.
- Add features that have an explanation. A wind turbine, solar panel, green roof, water tank, or planted area should connect to the lesson. Students should be able to say what the feature represents and how it relates to the design problem.
- Test, revise, and sort the leftovers. Use a simple test such as stability, load, height, movement, or fit. After revision, return useful card to the materials box, keep standard-size offcuts, and recycle pieces that are genuinely too small or damaged for another build.
I Would Keep the Design Question in View
A recycled-material model can become visually impressive very quickly, but appearance should not replace reasoning. Keep the problem statement on the table or board. When students want to add another feature, ask what it does. That question usually leads to better STEM thinking and less unnecessary material use.
Ways to Adapt the STEM Build
· Build bridges from corrugated card and compare span or load.
· Create marble runs from tubes and test slope and connection changes.
· Design packaging that protects a classroom object using limited recovered material.
· Build model habitats and justify material choices or structural features.
· Create a class-scale city model in which groups are responsible for different connected systems.
Curriculum Habits That Can Weaken a Sustainability Project
A creative sustainability lesson can look successful while teaching the wrong habit underneath. The most common problem is treating reuse as a reason to collect more stuff. If every family is asked to bring in bags of containers for one small project, the classroom may receive far more material than it can use. Collect only what the activity needs, give clear size and cleanliness requirements, and stop the collection when there is enough.
Another problem is making the craft more important than the resource decision. Students may decorate a container but never discuss why that container was selected, whether it replaced a new purchase, or what will happen to it after the lesson. A stronger project asks students to explain the second use and test whether the object actually works.
Using unsafe or unhygienic materials can also undermine the lesson. Sharp metal, cracked plastic, glass, food residue, mouldy packaging, unknown chemical containers, and personal-data papers do not become appropriate simply because they are reusable. Adults should screen materials before students use them and choose a safer alternative whenever there is doubt.
Overdecorating practical items is another easy mistake. A pencil holder covered with loose buttons, thick glued layers, or dangling pieces may be difficult to clean and awkward to use. A swap corner overloaded with signs can be harder to browse. A planter covered in non-water-resistant paper may become soggy. Let function guide decoration.
It is also possible to teach “recycling” without teaching reduction. If students make a poster about recycling while the activity uses fresh card for every draft, individual plastic decorations, and more printouts than necessary, the process sends a mixed message. Use scrap paper for planning, share tools, measure before cutting, and make the material choices part of the lesson.
Avoid turning sustainability into a competition over who can be the “greenest.” Students have different home circumstances, access to materials, transport patterns, and family routines. Keep the focus on shared classroom actions and thoughtful choices rather than personal judgement. A child should be able to participate fully without bringing special recycled items from home.
Finally, do not assume an item is recyclable because it looks like paper, plastic, or cardboard. Coatings, mixed materials, food contamination, and local collection rules matter. The safest educational approach is to use the school’s actual system. If a material cannot be confirmed, treat that uncertainty as a research question rather than presenting a guess as fact.
Frequently Asked Questions
How can reducing, reusing, and recycling fit into the curriculum without becoming a separate subject?
Use the practices inside lessons that already need materials, observation, writing, measurement, design, or teamwork. A paper reuse station supports drafting, bottle planters support science observation, and cardboard models support STEM. Sustainability becomes a practical context for the curriculum rather than an extra unit competing for time.
Which of these activities is easiest to start with?
A paper reuse station or a clearly labelled recycling station usually requires the least preparation and can begin as a classroom routine. Both create visible behaviour changes without needing a long craft session. Once students understand the reuse-before-recycle idea, the more involved projects make more sense.
Should students bring recyclable materials from home?
Only if the school has a clear need and provides precise guidance. Open-ended requests often produce too much material, unsuitable packaging, or items that are difficult to store. It is usually better to begin with clean resources already generated by the classroom or school.
Are metal cans and glass jars suitable for young children?
They need caution. Glass is breakable, and metal cans can have sharp edges even when they appear smooth. For younger students, sturdy plastic tubs, cardboard canisters, and other unbreakable containers are usually easier choices; any risky cutting or edge preparation should remain an adult task.
How do I stop a reuse area from becoming cluttered?
Limit categories, set quality standards, and schedule regular clearing. Keep only materials connected to real classroom uses, and give each type a labelled home. If an item has remained unwanted for a long time, reassess whether it should be repaired, recycled, donated through an appropriate route, or discarded.
How can older students make these projects more challenging?
Add measurement, constraints, data collection, testing, research, and written justification. Older students can audit recycling errors, design more efficient storage, track paper reuse, investigate compost inputs, or build STEM prototypes that must meet a stated performance requirement.
How can teachers assess learning from reuse projects?
Assess the thinking rather than the amount of decoration. Ask students to explain the original material, why it was suitable for reuse, what problem the new use solves, how they reduced additional waste during the process, and what they would change after testing the result. Short reflections, design notes, labelled diagrams, and group explanations can all provide evidence of learning.
Build the Sustainable Habit Into Ordinary School Days
The most useful lesson in a creative curriculum for reducing, reusing, and recycling is that sustainability does not need to sit outside normal classroom life. It can appear in the paper students choose for a rough draft, the container that holds their pencils, the way they sort packaging, the materials they select for a model, and the question they ask before something enters a bin: can this still do another job?
The eight ideas here work because each one gives a material a clear next purpose. Paper stays in circulation. Containers become storage. Bottles support plant observation. Old print becomes visual communication. Organic scraps connect with a garden system. Usable supplies move to another student. Cardboard becomes a testable design material. Recycling remains important, but it sits after reduction and reuse rather than replacing them.
I would begin with one system that the class can maintain well. A neat paper reuse tray used every day is more meaningful than several ambitious stations that adults have to rescue after a week. Once one routine feels normal, add another. Then give students real responsibility for improving it.
A sustainable future in education is built from those repeated decisions. Which resource can stay in use? What can be shared? What can be repaired or repurposed? What truly needs recycling? When students practise those questions in ordinary lessons, the classroom itself becomes part of the curriculum. Which everyday material in your classroom is ready for a second use first?