Shoe boxes often survive long after the shoes have left them. They are sturdy enough to feel wasteful to discard, yet ordinary enough to gather in wardrobes without a clear purpose. After a while, the boxes themselves become the clutter they were supposed to organise.
I find shoe boxes most useful when each one receives a specific job. A sound box can become a covered storage container, a small cabinet, a keepsake trunk, a set of drawer dividers, a miniature dollhouse shelf, or a desk organiser. The lid, corners, and existing folds already provide much of the structure.
I don’t save every box. Cardboard that smells damp, bends under light pressure, or has crushed corners will not improve simply because it is wrapped in attractive fabric. Strong, clean boxes are worth adapting; weak ones are better flattened and recycled where local collection accepts them.
The best ways to reuse shoe boxes begin with function. Decide what the finished object needs to hold, reinforce the pressure points, and then decorate it. That order prevents a neat-looking project from sagging as soon as it enters everyday use.
Check the Cardboard, Labels, and Corners Before Cutting
Empty the box completely and remove loose tissue paper, plastic inserts, size stickers, security tags, and any personal purchase labels you do not want to keep. Lift the lid and press gently along the base, sides, and corners.
Keep boxes that are:
- Clean and completely dry
- Free from mould or unusual smells
- Firm enough to hold their shape
- Not heavily crushed at the corners
- Large enough for the intended project
- Easy to open and close
- Made from cardboard that can be cut without crumbling
- Free from oily products, food residue, or leaking cosmetics
A slightly torn corner can usually be reinforced. A box with widespread softness or water damage is less reliable because covering the outside does not restore the weakened fibres.
Remove glossy labels carefully rather than pulling away the upper cardboard layer. When a sticker refuses to lift, cover it with paper or fabric instead of scraping until the box becomes thin.
Decide where the project will live before choosing decoration. Fabric suits a keepsake trunk, while smooth paper may be easier to wipe on a desk organiser. A box intended for a child’s room needs secure edges and decorations that cannot easily detach.
Use a metal ruler and cutting mat with a craft knife. Make several light passes instead of forcing the blade through thick cardboard in one movement. Adults should handle sharp tools, and children’s projects should have no sharp points, exposed staples, or loose small parts that may present a hazard.
Boxes that are not suitable for crafting can often be flattened for paper recycling, although local rules still matter. The EPA specifically includes shoe boxes among commonly recyclable cardboard containers and advises flattening boxes before collection.
Useful Materials and Tools
- Clean shoe boxes and lids
- Extra cardboard
- Metal ruler
- Pencil
- Craft knife
- Cutting mat
- Strong scissors
- Paper adhesive
- Double-sided tape
- Strong craft glue
- Masking or paper tape
- Fabric scraps
- Old curtains or clothing
- Decorative paper
- Reused wrapping paper
- Jute cord or ribbon
- Paint suitable for cardboard
- Soft paintbrush
- Drawer labels
- Small handles
- Hook-and-loop fastener
- Felt or fabric lining
- Clips or light weights
- Bone folder
Keep adhesive away from the lid edges and moving drawer parts. Let covered boxes dry with their lids or drawers slightly open so they do not become permanently sealed.
Cover a Shoebox as a Lidded Storage Box
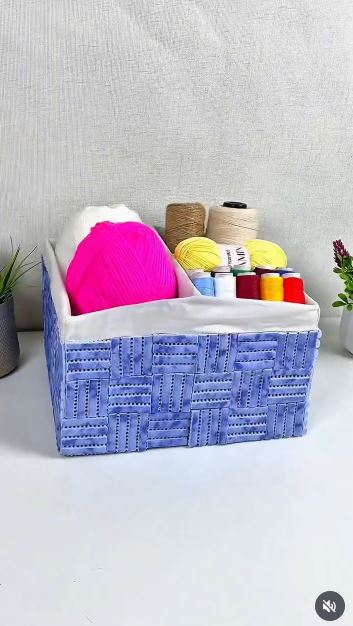
A covered shoebox is one of the most practical projects because the original lid remains useful. The container can hold scarves, photographs, craft supplies, charging cables, stationery, or seasonal accessories while looking tidier on an open shelf.
The transformation works best when the covering follows the box closely. Thick folds around the corners may prevent the lid from fitting, while too much glue can wrinkle thin paper or soak through fabric.
Materials and Tools
- Strong shoebox with fitted lid
- Fabric or decorative paper
- Paper or fabric adhesive
- Scissors
- Ruler
- Bone folder
- Extra cardboard
- Label holder or paper tag
- Optional small handle
Cover the Box
- Repair the structure first. Reinforce loose corners from the inside with paper tape or small cardboard patches. Place the lid on the repaired box and confirm that it still closes without force.
- Measure each surface separately. Cut one piece for the base and longer pieces for the sides rather than wrapping a thick bundle around every corner. Leave only the amount needed to fold neatly over the upper rim.
- Attach the covering gradually. Apply adhesive to one panel at a time and smooth from the centre towards the edges. Then clip or lightly weight the surface while it dries, taking care not to crush the cardboard.
- Cover the lid with extra clearance. Keep bulky seams away from the inner edge where the lid meets the box. Test the fit before the adhesive becomes completely fixed.
- Add a useful label. Mark the contents clearly or use a removable label when the purpose may change. A small fabric handle can help, but it should be reinforced from inside rather than glued only to the decorative surface.
For me, the covering should improve the box without disguising its function. A simple label is more useful than several trims that catch whenever the box slides from a shelf.
Wallpaper offcuts, maps, old book jackets, or a sound section of a curtain can replace new fabric. For closed cupboards, you may only need matching labels rather than fully covered boxes.
Build a Mini Storage Cabinet With Cardboard Drawers
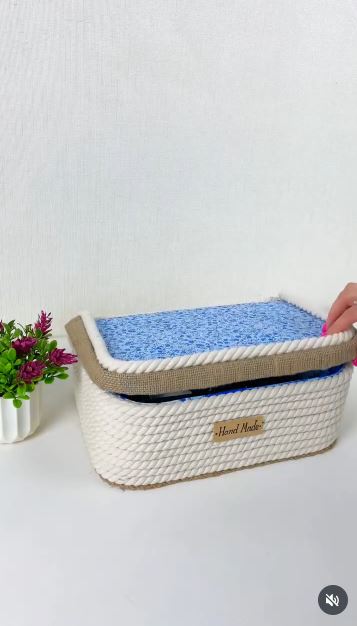
A mini cabinet gives the shoebox more structure than a simple lidded container. The main box becomes the outer shell, while smaller cardboard trays slide inside as drawers.
This works for lightweight belongings such as jewellery pouches, hair accessories, sewing notions, coins, stationery, or watch straps. It is not suitable for glass jars, heavy tools, or anything that may pull the cardboard frame out of shape.
Materials and Tools
- Sturdy shoebox
- Shoebox lid or spare cardboard
- Ruler
- Pencil
- Craft knife
- Cutting mat
- Paper tape
- Strong adhesive
- Decorative paper
- Small beads, ribbon loops, or cardboard handles
- Thin felt or paper lining
Construct the Cabinet
- Plan the drawer sizes. Measure the inside of the shoebox and divide the available height into two or three sections. Allow a small amount of clearance around every drawer so paper and decoration do not make the fit too tight.
- Reinforce the outer shell. Add a second cardboard layer to the base and sides when the original box flexes. Keep the front open and check that the shell remains square while the adhesive dries.
- Make the drawer trays. Cut and score separate pieces of cardboard, then fold them into shallow boxes. Tape the inner corners neatly and test each drawer before adding decorative paper.
- Add shelves or runners. Insert horizontal cardboard panels between the drawers and support their edges with narrow folded strips. Then slide the drawers repeatedly to locate areas that catch or sag.
- Finish the fronts. Cover the drawer faces, line the interiors, and add lightweight pulls. Keep the handles small so opening a drawer does not twist the entire cabinet.
The part I would check carefully is drawer clearance. I know it can feel sensible to make everything fit closely, but one layer of paper and glue can turn a neat drawer into a permanent resident.
A one-drawer version is easier for beginners. The upper section can remain open as a tray for daily items while the drawer hides smaller accessories.
Turn a Shoebox Into a Soft Keepsake Trunk
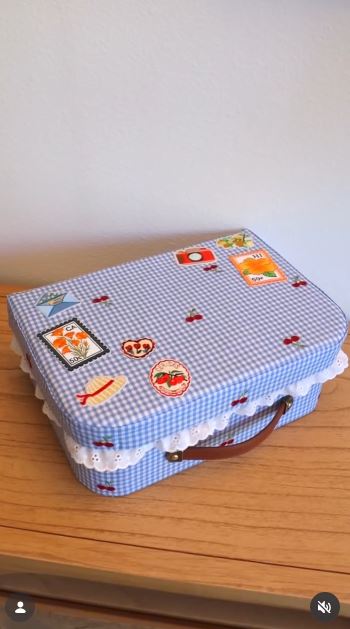
A keepsake trunk is useful for letters, cards, children’s drawings, fabric pieces, travel mementos, or photographs. The featured idea uses fabric, ruffled trim, a handle, and decorative patches to give an ordinary shoebox the character of a small vintage case.
The box should remain easy to open. A handle may add to the trunk appearance, but the cardboard container should still be lifted from underneath when it contains anything valuable.
Materials and Tools
- Shoebox with attached or separate lid
- Strong fabric
- Thin lining fabric
- Fabric adhesive or spray adhesive used safely
- Strong craft glue
- Ruffle, lace, or fabric trim
- Small leather or fabric handle
- Cardboard reinforcement
- Decorative patches
- Ribbon or elastic closure
- Scissors
Make the Keepsake Trunk
- Choose a box with a reliable lid. Repair the corners and reinforce the area where the handle may sit. If the lid is separate, consider joining one long edge with a strong fabric hinge.
- Cut the fabric with the pattern in mind. Decide which section will appear on the top and front. Leave enough fabric to fold over the edges, but remove bulky excess from the corners.
- Cover the box in sections. Attach the largest panels first and smooth the fabric before adding the next side. Keep adhesive controlled near the opening so the lid remains flexible.
- Add the trunk details. Reinforce the handle from beneath with extra cardboard or a stitched fabric patch. Then add trim and patches only where they will not interfere with the hinge or closure.
- Line and label the inside. Cover rough folds with a thin removable liner or fitted paper panels. Add a date or contents label so meaningful objects do not disappear into another anonymous box.
I’d keep the handle decorative unless the entire attachment has been properly reinforced. Carrying a full keepsake box by one small glued strip is a rather dramatic way to rediscover every memory at once.
A simpler version can use brown paper, jute cord, and a luggage-label-style tag. Children can decorate prepared boxes with drawings or fabric shapes after an adult completes the cutting.
Cut Two Shoeboxes Into Custom Drawer Dividers
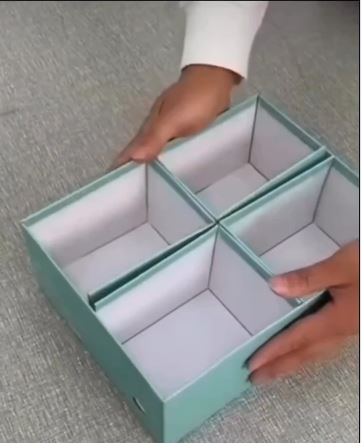
Drawer dividers use the shoebox material without requiring the container to remain intact. The cardboard can separate socks, scarves, underwear, craft tools, cables, makeup, or office supplies according to the drawer’s actual dimensions.
This is more useful than creating equal compartments automatically. Long items need narrow channels, while folded clothing may need wider sections.
Materials and Tools
- Two clean shoeboxes
- Measuring tape
- Pencil
- Metal ruler
- Craft knife
- Cutting mat
- Paper tape
- Decorative paper, if desired
- Removable labels
Fit the Dividers
- Empty and measure the drawer. Group its contents before designing the layout. Measure the usable width, depth, and height rather than assuming the shoebox panels will fit as they are.
- Cut the main strips. Use the longest shoebox sides for the primary dividers and trim them slightly below the drawer height. Keep the lower edges straight so they sit flat.
- Create interlocking sections. Cut halfway slots into crossing strips and slide them together. Test the grid inside the drawer before reinforcing anything.
- Strengthen the layout. Tape the outer joins or add folded cardboard supports where the dividers lean. Avoid attaching them permanently to the drawer if you may need to change the arrangement later.
- Return the contents by category. Place the most frequently used items in the easiest sections. Then adjust any compartment that forces fabric to be folded awkwardly or cables to be bent tightly.
For me, custom sizing is the whole advantage. There’s no reason to make twelve tiny squares simply because a commercial organiser happens to look that way.
The shoebox lid can become a shallow removable tray for jewellery, stationery, or sewing tools. It can sit above less frequently used items in a deep drawer.
Make a Shoebox Dollhouse Shelf for Miniatures
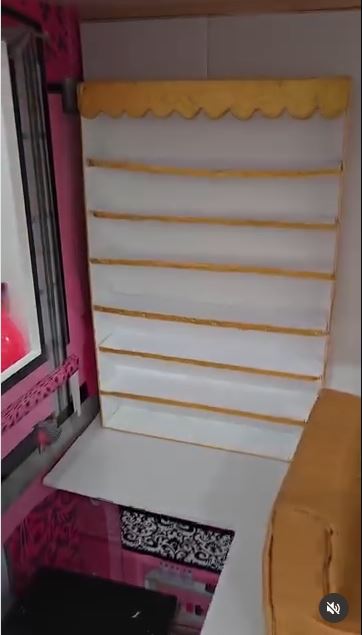
A shoebox already resembles a small room when it is placed on its side. Adding shelves or partitions can turn it into a dollhouse, miniature library, or display for tiny objects.
The finished structure should remain a tabletop toy or decorative shelf. Cardboard walls cannot carry the weight expected from real furniture, and the box should never be treated as a seat or climbing object.
Materials and Tools
- Strong shoebox
- Extra cardboard
- Craft knife
- Cutting mat
- Ruler
- Paper adhesive
- Paint or decorative paper
- Fabric scraps
- Small cardboard furniture
- Large child-safe decorations
- Optional transparent cover
Build the Miniature Rooms
- Reinforce the open box. Place the shoebox on its side and add a second cardboard layer to the back when it bows. Tape or glue the corners square before inserting shelves.
- Plan the rooms with paper templates. Mark the floor and shelf positions without cutting immediately. Leave enough height for the miniature objects and enough depth for fingers to reach inside.
- Install the partitions. Double the cardboard for horizontal shelves and support the ends with folded strips. Then test the structure with lightweight objects before decorating it.
- Finish the rooms. Use wallpaper scraps, fabric offcuts, drawn windows, and cardboard furniture. Keep the layers light so the back panel does not pull away from the box.
- Check it for safe use. Smooth every edge, remove loose glue strings, and avoid beads, magnets, pins, or detachable tiny pieces when young children may use it. Adult supervision and age-appropriate materials remain important.
I don’t think every wall needs furniture. An open miniature room is easier to play with and usually lasts longer than one crowded with delicate paper objects.
The box can also become a dinosaur scene, reading nook, model shop, or seasonal display. Collectors may prefer a clear removable cover to reduce dust.
Create a Book and Pencil Holder for the Desk
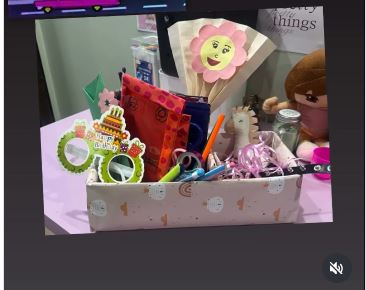
Turning a shoebox into a desk organiser makes use of both the base and lid. One section can hold notebooks upright, while narrower compartments keep pencils, rulers, scissors, and markers visible.
The organiser needs a wide base and reinforced partitions. Tall books can pull against thin cardboard, so keep the heaviest items near the centre or against a supported back.
Materials and Tools
- Shoebox and lid
- Extra cardboard
- Ruler
- Pencil
- Craft knife
- Paper tape
- Strong adhesive
- Decorative paper
- Small recycled containers
- Labels
- Non-slip material
Assemble the Desk Holder
- Decide what the organiser must hold. Place the books, notebooks, and tools beside the box and group them by height. Designing around the real contents prevents compartments that look tidy but fit nothing.
- Cut the box profile. Lower the front edge for easier access while keeping the back tall enough to support notebooks. Round or cover the cut rim so hands and book covers do not catch.
- Add reinforced dividers. Double the cardboard for book sections and use smaller folded pieces for pen compartments. Attach every divider to both the base and back where possible.
- Cover and label it. Apply paper or fabric without creating thick seams inside narrow compartments. Add labels only where they help the user return items to the correct place.
- Test the balance. Fill the organiser gradually and press lightly against each side. Add a non-slip base or an internal weight made from secured cardboard layers if the empty structure slides.
The taller section should not become a place for every unused notebook in the house. Keep current materials on the desk and store the rest elsewhere.
A beginner can place reused tins or small cardboard tubes inside an uncut shoebox. The box then acts as a tray that keeps the separate pencil holders together.
Why Shoebox Projects Sag, Split, or Look Uneven
Decorating a Weak Box
Fabric and paper hide damage but do not restore cardboard strength. Reinforce small faults and recycle boxes that feel soft across large areas.
Using Too Much Wet Glue
Cardboard absorbs moisture and may warp as it dries. Apply adhesive in thin, even layers and hold the surface flat without crushing it.
Forgetting the Thickness of the Covering
A lid or drawer that fits before decoration may stick afterwards. Leave clearance for fabric folds, paper seams, and adhesive.
Building Shelves From One Thin Layer
Horizontal cardboard bends quickly under pressure. Double the material and support the ends when making drawers, dollhouses, or book organisers.
Attaching Handles Only to Fabric
The covering may peel away from the cardboard under load. Reinforce handles through the box structure and carry heavier containers from underneath.
Cutting Before Measuring the Contents
A desk organiser or drawer divider should fit the objects it will hold. Group and measure those items before drawing the first line.
Treating Cardboard Like Wooden Furniture
Shoebox projects suit light storage and display. They should not become seating, wall shelves for heavy objects, steps, or containers for wet materials.
Adding Small Decorations to Children’s Projects
Loose beads, buttons, magnets, and pins may create hazards. Use age-appropriate materials, secure every part, and let an adult complete the cutting.
Saving More Boxes Than You Can Use
Reuse should solve a problem, not create a cardboard collection. Keep the strongest boxes with planned purposes and flatten the rest for local recycling when accepted.
Frequently Asked Questions
What is the easiest shoebox project for a beginner?
Drawer dividers or a simple covered storage box require the least structural construction. Begin with a strong box and avoid complicated handles or moving parts.
Can I paint a shoebox?
Yes. Use thin coats and allow each side to dry before turning the box. Heavy wet paint may soften the cardboard or cause the panels to curve.
Which glue works best on shoebox cardboard?
A paper adhesive, PVA-style craft glue, double-sided tape, or another product suitable for cardboard may work. Test it on an offcut because glossy coatings and fabric coverings behave differently.
How can I strengthen a shoebox?
Add fitted cardboard panels inside the base and sides, reinforce corners with paper tape, and use doubled cardboard for shelves. Strengthen the box before decorating it.
Can shoeboxes store photographs?
They can hold non-valuable copies or short-term craft materials, but ordinary cardboard is not automatically suitable for archival storage. Important original photographs and documents deserve storage materials made for preservation.
Can children make these projects?
Children can help choose colours, cover prepared boxes, and arrange decorations. Adults should use craft knives, handle strong adhesives, and inspect the finished project for sharp edges or loose small parts.
What should I do with boxes that are too damaged to reuse?
Remove non-paper materials, flatten the cardboard, and follow local recycling instructions. Shoe boxes are commonly recyclable, but local collection requirements still apply.
Let the Box Earn Its Place Before Saving Another One
The most practical ways to reuse shoe boxes begin by matching the box to a genuine need.
A strong lid makes useful storage. Firm cardboard can become drawers, dividers, a keepsake trunk, a dollhouse shelf, or a desk organiser. The result lasts longer when the corners are reinforced and the decoration remains secondary to function.
Begin with one box rather than saving an entire stack. Choose the project that would solve a small problem in your home, measure carefully, and let the cardboard keep as much of its original structure as possible.
Which shoebox would be most useful to you next: a covered storage box, miniature cabinet, keepsake trunk, drawer organiser, dollhouse shelf, or desk holder?