Shredded paper looks rather unimpressive when it spills from the machine. The strips tangle together, cling to clothing, and somehow travel across the room even when nobody remembers touching the bag. Even so, that loose pile can become packaging filler, handmade stationery, plantable paper, sculptural bowls, garden seed shapes, and lightweight home décor.
I don’t save every scrap simply because it has passed through a shredder. The paper needs to be clean, dry, and suitable for its next purpose. Plain office paper behaves differently from glossy advertising, thermal receipts, plastic-coated sheets, and heavily coloured packaging.
Confidentiality matters too. Crafting with shredded documents is only sensible when the pieces are small enough that private information cannot be reconstructed or read. A project shared at school, online, or inside a gift should never reveal somebody’s address, account number, medical details, or signature.
Once the paper has been sorted properly, its looseness becomes useful. You can keep the strips dry for cushioning or soak them into pulp, where the original pages disappear and the fibres take on a completely new shape.
Sort the Shreds Before They Reach Water, Soil, or Packaging
Begin by separating clean craft paper from anything unsuitable. Remove plastic windows, sticky labels, tape, staples, laminated sheets, metallic finishes, food-stained paper, photographs, and glossy coatings.
Documents containing personal or financial information should be shredded before disposal, but shredding does not automatically make every piece suitable for visible craft projects. Review the material carefully and keep sensitive shreds inside a secure disposal or recycling route rather than putting them into gift baskets, school crafts, or public displays.
Create separate containers for:
- Plain white office-paper shreds
- Coloured paper
- Brown kraft paper
- Tissue-paper strips
- Newspaper
- Glossy or coated paper
- Confidential documents
- Paper containing tape, plastic, or adhesive
- Clean paper suitable for pulp
- Paper intended for local recycling
Plain, non-glossy and uncoloured shredded paper can be used as a carbon-rich material in suitable home-compost systems. Coated, waxed, heavily coloured, or contaminated paper should be kept out unless reliable local guidance confirms otherwise.
Shredded paper recycling rules vary. Some programmes accept it only when contained in a paper bag, while others exclude it because the small pieces interfere with sorting equipment. Check the requirements of your local collection service before placing unused shreds in the recycling bin.
For pulp projects, I would use a blender reserved for craft work rather than returning the same container to food preparation. Work in small batches, keep electrical equipment away from spilled water, and unplug the appliance before clearing paper from the blades.
Useful Materials and Tools
- Clean shredded paper
- Large bowls or buckets
- Warm water
- Craft-only blender
- Fine mesh screen or mould and deckle
- Old towels
- Sponges
- Rolling pin
- Non-stick drying sheets
- Paper adhesive
- Flour paste or papier-mâché medium
- Mixing spoon
- Measuring containers
- Reused gift boxes and baskets
- Plain tissue paper
- Seeds suitable for your local area
- Balloon or existing bowl mould
- Reusable plastic sheet
- Acrylic paint
- Craft knife
- Scissors
- Protective gloves
- Dust mask for handling dry pulp ingredients
- Battery-operated fan for ventilation, if useful
Keep wet paper pulp away from electrical sockets and appliance cords. Blenders, craft knives, small seeds, adhesives, and loose shredded paper require adult supervision around children.
Cushion Gift Boxes With Reused Paper Filler
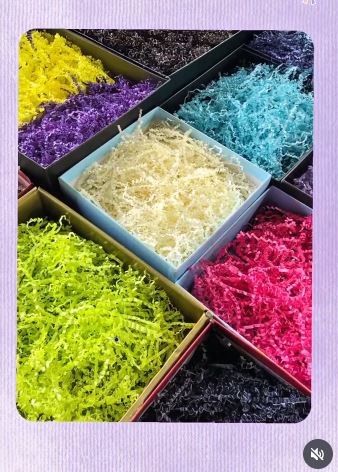
Dry shredded paper can be reused immediately as decorative filler. The featured project cuts leftover paper into narrow pieces for hampers, gift baskets, boxes, and other packaging, where the strips add height and keep lightweight items from sitting directly against one another.
Choose paper that suits the gift. Plain kraft shreds work well with natural packaging, while a restrained mixture of two colours can connect the contents to a birthday, wedding, or seasonal theme.
Avoid using confidential paperwork, dusty office shreds, or paper that leaves ink on your hands. Shredded paper provides light cushioning, but it should not be relied upon as the only protection for valuable glass or another highly fragile item.
Materials and Tools
- Clean leftover paper
- Paper shredder or scissors
- Reused box, basket, or tray
- Plain tissue paper
- Ribbon or paper band
- Small gifts
- Optional paper confetti
Prepare the Gift Filler
- Select clean paper with suitable colours. Remove handwritten personal information, tape, labels, staples, and damaged sections. Use paper of a similar weight so the finished filler feels consistent rather than combining soft tissue with stiff card strips.
- Create manageable shreds. Pass the paper through a shredder or cut several folded sheets into narrow strips with scissors. Separate any long pieces that wrap around objects rather than settling into the box.
- Build a supportive base. Crumple a sheet of reused tissue paper loosely in the bottom when the container is deep, then cover it with shredded paper. This gives the gifts height without requiring a box full of tightly packed strips.
- Arrange and test the contents. Nestle each item into the filler and move the box gently. Add more paper around gaps, then remove excess from the top so the presentation does not resemble a gift disappearing into a paper nest.
For me, one or two paper colours are enough. Mixing every shade from the recycling basket can make the filler distract from the items it is meant to present.
After the gift is opened, the clean shreds can be saved for another parcel, used in a pulp project, composted when suitable, or handled according to local paper-recycling rules.
Pull New Handmade Paper Sheets From Office Shreds
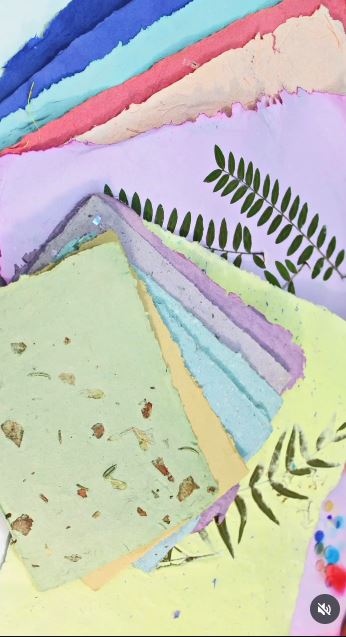
Handmade paper changes anonymous strips into a new flat surface. The selected process fills a blender with shredded paper or junk mail and forms the pulp into sheets that can later become stationery, gift tags, bookmarks, journal pages, and artwork.
The finished texture depends on the pulp. Shorter blending produces visible fibres, while a smoother pulp creates a more even sheet. Small amounts of tissue paper can change the colour, and dried petals may add detail, although bulky additions can weaken thin paper.
Materials and Tools
- Plain shredded paper
- Large bowl
- Warm water
- Craft-only blender
- Mould and deckle or framed mesh
- Water-filled tray
- Sponge
- Old towels
- Rolling pin or flat board
- Dried petals or paper flecks, if desired
Form the Handmade Paper
- Soak the shreds thoroughly. Place the clean paper in a bowl and cover it with warm water until the fibres soften. Break apart compacted bundles with your fingers before blending so the machine is not forced to process one dense lump.
- Blend the paper in small batches. Add plenty of water and only a modest quantity of softened paper to the craft blender. Pulse until the mixture becomes fibrous pulp, then pour it into a wider tray of water.
- Lift an even sheet. Move the mould and deckle beneath the pulp, lift it horizontally, and shake it gently from side to side. Then let excess water drain while checking for thin holes and heavy clumps.
- Press and dry the paper. Transfer the wet sheet onto absorbent cloth, sponge away moisture, and press it carefully. Let it dry completely before peeling it from the surface or stacking it with other sheets.
The first sheet rarely looks like shop-bought paper, and that’s the point. I’d keep the deckled edges and visible fibres rather than trimming away everything that shows how the paper was made.
Thicker sheets can become tags or covers. Thin sheets suit collage, letter writing, gift wrapping for tiny items, or backing for pressed flowers.
Press Plantable Seed Paper Into Simple Shapes
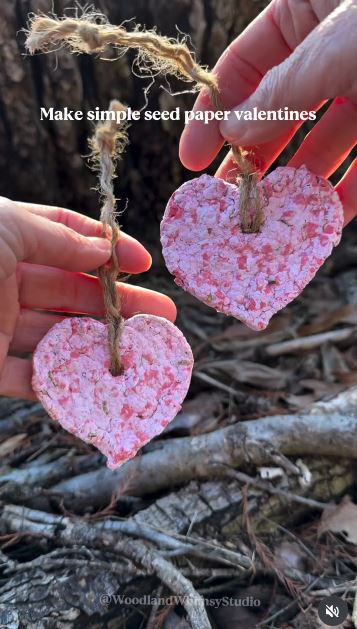
Seed paper begins with the same basic pulp as handmade paper, but seeds are mixed in after blending. The selected project turns old paper into plantable pieces suited to small gifts and thoughtful messages.
Choose seeds that suit the recipient’s climate, growing space, and local rules. Avoid mixing unknown wildflower packets into paper intended to be mailed across regions, and do not place the seeds in the blender, where the blades may damage them.
Materials and Tools
- Plain shredded paper
- Warm water
- Craft-only blender
- Bowl
- Fine mesh screen
- Spoon
- Suitable seeds
- Sponge
- Towels
- Biscuit cutter or simple mould, if desired
Make the Seed Paper
- Create a soft paper pulp. Soak and blend the shredded paper with water until the fibres separate. Transfer the pulp to a bowl and let it cool fully if warm water was used.
- Fold in the seeds by hand. Sprinkle a modest amount into the pulp and stir gently with a spoon. I know it can feel tempting to add a thick layer, but too many seeds make the paper lumpy and leave little fibre to hold the piece together.
- Shape and press the pulp. Spread a thin layer over mesh or press it inside a simple cutter. Remove as much water as possible with a sponge without crushing the seeds or creating an extremely dense sheet.
- Dry it without high heat. Leave the paper in an airy location until both sides are completely dry. Then add a short planting note on a separate recycled-paper label rather than covering the seed paper with heavy ink or paint.
Simple rectangles usually dry more evenly than thick hearts or flowers. A beginner can make plantable gift tags by pressing a thin pulp sheet and cutting it only after it has dried.
Mould a Papier-Mâché Bowl From Junk-Mail Pulp
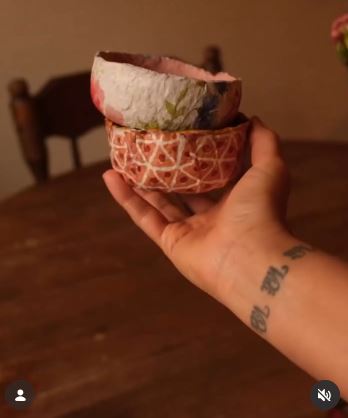
A papier-mâché bowl is useful when the shreds are too mixed or uneven for fine handmade sheets. The featured project turns junk mail into a moulded bowl, using the pulp’s rough texture as part of the finished surface.
Treat the result as a decorative container unless the materials and finish have been designed for another use. Paper bowls should not hold food, water, candles, hot items, or soil directly.
Materials and Tools
- Shredded paper
- Water
- Craft-only blender
- Fine cloth or strainer
- Papier-mâché paste
- Existing bowl used as a mould
- Reusable plastic barrier
- Spoon or spatula
- Sandpaper
- Paint
- Protective finish, if suitable
Shape the Decorative Bowl
- Prepare and drain the pulp. Soak the paper, blend it, and strain away most of the water through cloth. The pulp should hold together when squeezed without releasing a stream of liquid.
- Protect the mould. Cover the outside of an existing bowl with a reusable barrier so the paper form can be removed later. Turn the mould upside down on a stable work surface.
- Apply an even pulp layer. Mix the drained fibres with a suitable papier-mâché medium and press the material over the mould. Keep the base fairly flat and avoid creating a thick rim that dries much more slowly than the sides.
- Dry and remove the shell. Leave the bowl undisturbed until the outside feels firm, then remove it carefully and allow the inside to dry. Sand only sharp or unstable ridges before painting or sealing the surface.
I don’t think every bump needs sanding away. A slightly irregular rim makes sense on a bowl formed from loose paper fibres.
Use the finished piece for wrapped items, jewellery, craft supplies, or dried decorative materials. Smaller bowls can organise buttons, clips, or balls of thread.
Shape Paper-Pulp Seed Bombs for a Local Planting Area
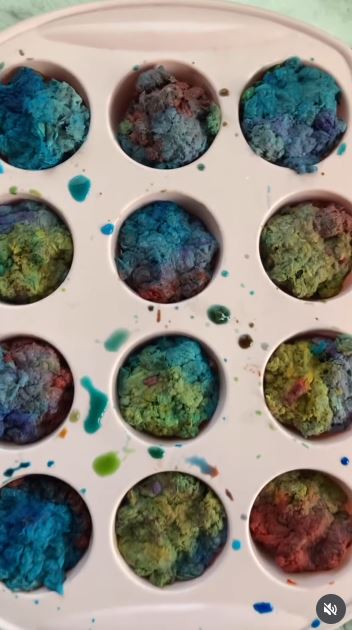
Paper-pulp seed bombs use a thicker mixture than flat seed paper. The featured method soaks recycled paper, blends it into pulp, mixes it with seeds, and shapes the material into small planting pieces.
Use them only where you have permission to plant. Select locally appropriate, non-invasive seeds and match them to the light, soil, and moisture available in the intended location.
Materials and Tools
- Plain shredded paper
- Bowl of warm water
- Craft-only blender
- Strainer
- Appropriate seeds
- Spoon
- Reusable drying tray
- Gloves
- Paper labels
Form the Seed Bombs
- Turn the paper into coarse pulp. Soak the shreds until soft, then blend them with water. Strain the mixture thoroughly so the finished shapes do not remain wet for an unnecessarily long period.
- Add the seeds gently. Allow the pulp to cool and mix the seeds in by hand. Keep the amount moderate so every ball contains enough paper fibre to hold together.
- Make small, loose shapes. Roll or press the pulp into compact pieces without squeezing them into hard stones. Then arrange them separately on a tray where air can reach every side.
- Dry, label, and plant responsibly. Let the shapes dry completely and label the seed type. Place them in suitable soil on your own property or another approved planting space, then follow the seed supplier’s growing guidance.
For me, smaller pieces make more sense than one dramatic ball packed with seeds. They dry more evenly and allow the seeds to be spread with better spacing.
Flat discs are a practical alternative because they stay in contact with the soil and are less likely to roll away.
Turn a Large Batch Into Paper-Clay Home Décor
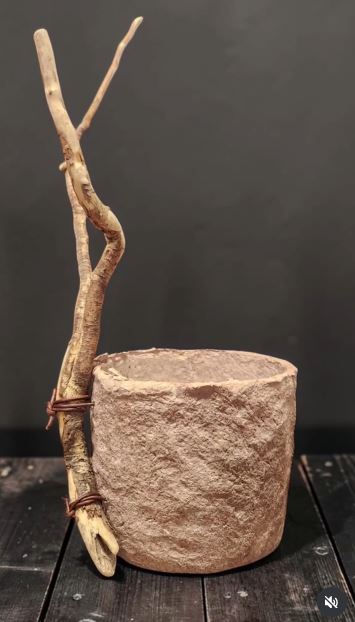
Paper clay is useful when you have more shreds than a few handmade sheets can absorb. The selected process begins with a large bag of paper, softens it in water, and converts the fibres into a mouldable material for lightweight home décor.
The exact binder can vary, so test a small batch before committing the entire supply. The mixture should hold a shape without dripping, but it should not be so dry that the fibres refuse to join.
Materials and Tools
- Shredded paper
- Large bucket
- Hot or warm water
- Craft-only blending or pulping tool
- Fine cloth
- Suitable paper-clay binder
- Mixing bowl
- Gloves
- Existing form or armature
- Sculpting tools
- Paint and compatible finish
Build a Decorative Form
- Soften the paper in a large container. Add water gradually and make sure every strip becomes saturated. Break up dry pockets before pulping so the final clay does not contain stiff paper bundles.
- Drain and mix the fibres. Remove excess water and combine the damp pulp with the chosen binder in small additions. Knead it until the material feels consistent enough to press onto a mould or simple armature.
- Build the shape in controlled layers. Add the clay gradually rather than forming one very thick wall. Thin layers reduce cracking and make it easier to correct uneven areas before the surface hardens.
- Dry, refine, and finish the piece. Support the object while it dries and turn it when possible so moisture does not remain trapped underneath. Fill small cracks with fresh paper clay, then paint or seal only after the structure is dry throughout.
The larger the sculpture becomes, the more important its internal support is. I’d begin with a shallow relief panel, small vessel, or simple abstract shape rather than paper furniture on the first attempt.
Paper clay can also form ornaments, masks, wall tiles, plant-pot covers, or decorative lamp bases. Keep finished paper objects away from standing water and direct flame.
Why Shredded-Paper Projects Clump, Crack, or Cause Problems
Using Confidential Shreds in Visible Crafts
A shredder can leave names, account fragments, and signatures readable. Keep sensitive documents out of gifts, school projects, photographs, and products intended for sale.
Mixing Coated Paper Into Compost or Seed Projects
Glossy, laminated, waxed, and plastic-lined papers behave differently from plain office paper. Use non-glossy, uncoloured shreds for home composting and check local advice for everything else.
Overloading the Blender
A dense mass of wet paper can strain the appliance and create uneven pulp. Work in small batches with sufficient water and use equipment reserved for craft projects.
Leaving Thick Pulp Wet in the Centre
Bowls, seed shapes, and sculptures may feel dry outside while moisture remains trapped within. Build thinner layers, provide airflow, and avoid painting before the material has dried fully.
Adding Seeds During Blending
Blender blades may crush or damage seeds. Prepare the pulp first, let it cool, and fold the seeds in by hand.
Treating Paper Packaging as Protective Shipping Material
Loose shreds can cushion lightweight gifts but may settle during transport. Fragile or valuable objects need a properly fitted box and protection suited to their weight and breakability.
Using Paper Bowls for Food or Water
A decorative finish does not automatically make paper food-safe or waterproof. Reserve pulp vessels for dry objects unless the full construction has been designed and verified for another use.
Making Paper Clay Too Thick
A heavy outer layer dries unevenly and may crack or slump. Apply several controlled layers and support the structure until it becomes firm.
Assuming Local Recycling Accepts Loose Shreds
Shredded paper acceptance depends on the collection programme. Ask whether it must be contained in a paper bag or delivered separately before recycling it.
Frequently Asked Questions
Can all shredded paper be reused?
No. Plain office, kraft, tissue, and newspaper shreds offer many options, but thermal receipts, laminated paper, photographs, plastic-coated sheets, and contaminated paper need separate handling.
Can I compost shredded office paper?
Plain, non-glossy and uncoloured shredded paper can be used as a brown material in an appropriate home-compost pile. Mix it with other materials rather than adding one compact dry mass.
What is the easiest shredded-paper project?
Gift-box filler requires no water, blender, or drying period. Handmade paper is a good next step when you are ready to work with pulp.
Can I make pulp without a blender?
Yes. Soaking the paper longer and breaking it apart by hand can create a coarse pulp, although the texture will be less even. A manual mixing or pounding method may also work for small quantities.
Which paper is best for handmade sheets?
Plain office paper produces a pale, fairly consistent pulp. Kraft paper, tissue, and coloured scraps can be added in smaller amounts to change the tone and texture.
Can children make projects with shredded paper?
Children can arrange gift filler, press simple pulp shapes, or help form handmade sheets with adult supervision. An adult should operate the shredder, blender, craft knife, and any electrical equipment.
What should I do with shreds I cannot craft with?
Check whether your local recycling programme accepts shredded paper and how it must be contained. Suitable plain paper may also enter an appropriate compost system, while contaminated or coated material may require disposal.
Let the Loose Strips Become a New Material
The most useful ways to reuse shredded paper begin with sorting rather than saving every strip together.
Clean dry shreds can cushion gifts immediately. With water and patience, the same paper can become fresh sheets, plantable tags, seed shapes, papier-mâché bowls, or mouldable paper clay.
Begin with the material you already have and choose the least complicated project that suits it. A small batch of handmade paper will teach you more about the fibres than soaking an entire office bag on the first afternoon.
Which pile would you use first: white office shreds for handmade paper, kraft strips for packaging, or mixed clean scraps for a textured papier-mâché bowl?