Empty tape rolls are small enough to disappear into a drawer, yet sturdy enough to feel wasteful when they are thrown away. The thick cardboard rings from masking tape, packing tape, decorative tape, or labels already have a useful shape: they are smooth circles with firm walls and open centres. That shape can divide tiny objects, hold folded fabric, frame a photograph, or surround a lightweight light without requiring complicated construction.
I like reuse projects that respect the real size of the material. A short tape core will not become a convincing pencil cup or a deep plant pot, but it can manage napkins, paper clips, earrings, keepsakes, and battery tea lights very well. Working within those limits makes the finished projects easier to build and more useful after the photographs are taken.
The first job is not decorating. It is checking whether the cardboard still feels firm, dry, and clean. Once the strongest rolls are separated from crushed or sticky ones, a little paper, fabric, paint, or glue can give them a much neater second purpose.
Sort the Tape Rolls by Size and Strength
Tape cores vary in width, wall thickness, and condition. Sorting them first helps you match each ring to a project without forcing a fragile roll to carry more than it should.
· Keep firm cardboard rolls that stay circular when pressed gently between your fingers.
· Separate very short rolls for jewelry compartments, clips, pins, and LED tea light surrounds.
· Set aside medium-width rings for napkin holders and small wall frames.
· Choose rolls with similar diameters when several pieces need to sit together in a tray or box.
· Remove loose labels, tape residue, torn paper, and rough fibres before measuring or covering the surface.
· Discard any roll that feels damp, smells musty, has been exposed to food spills, or has started to delaminate.
· Test the fit with the intended item before decorating, because the inside diameter matters more than the outer colour.
Gather Simple Covering and Assembly Supplies
These projects use ordinary paper-craft materials. You may already have most of them at home, and there is no need to buy a long list of specialist tools for such small pieces.
· Empty cardboard tape rolls in clean, firm condition
· Decorative paper, wrapping-paper offcuts, fabric scraps, ribbon, or paint
· Pencil, ruler, paper template, and sharp scissors or a craft knife
· Cutting mat and metal ruler when trimming thicker cardboard
· PVA craft glue, double-sided tape, or another adhesive suited to paper and cardboard
· Small brush or scrap card for spreading glue in a thin layer
· Shallow tray, gift box, backing card, or wooden board depending on the project
· Fine sandpaper for smoothing rough edges
· Battery-operated LED tea lights for the candle-holder project
Decide Which Roll Edges Should Stay Visible
The circular edge is the detail that makes a tape-roll project recognisable. Covering every surface can make the work bulky, so decide whether the natural cardboard should remain visible inside, along the rim, or on the base.
· Leave the inner cardboard visible when it is clean and smooth; this keeps small organizers simple and lightweight.
· Cover only the outside wall when the roll will hold napkins, clips, rings, or LED tea lights.
· Wrap the rim as well when torn paper fibres would otherwise catch on fabric or jewelry.
· Use one colour family across several rolls when they will be grouped in a tray or hung together on a wall.
· Keep photo and flower displays quiet enough that the object inside the ring remains the focal point.
· Trim paper joins at the back or underside instead of placing them where they will be seen first.
· Avoid thick embellishments on rings that must slide around a napkin or fit closely inside a box.
Turn Tape Rolls Into Simple Napkin Rings
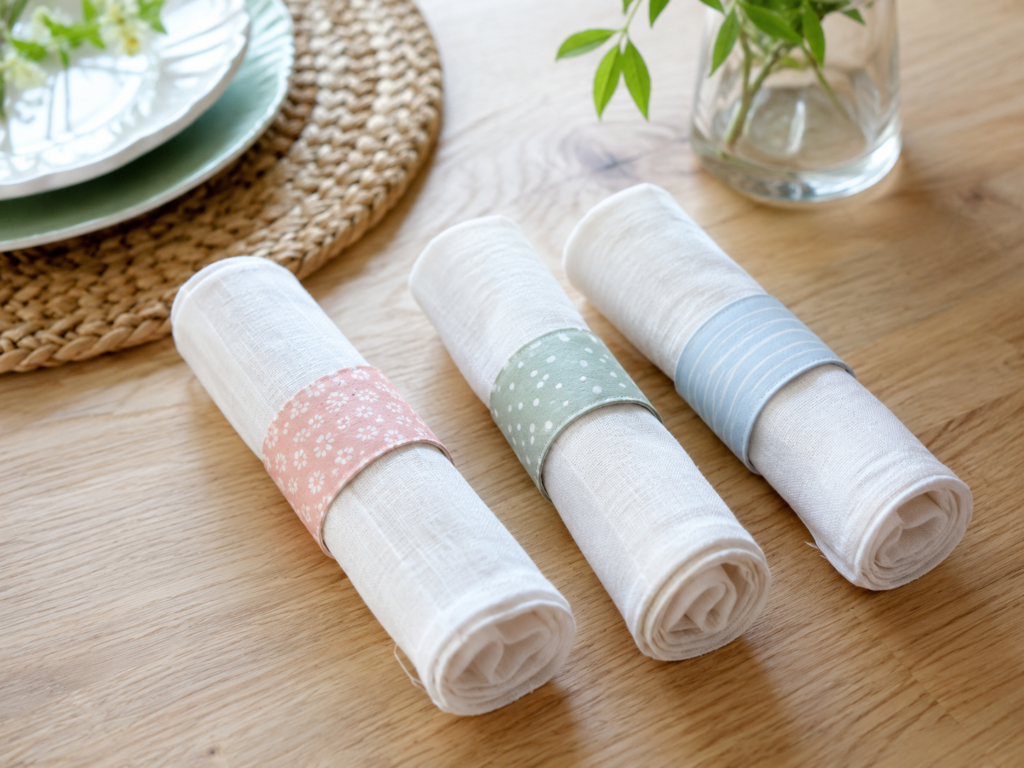
A tape roll already has the shape of a napkin ring, so this project needs very little structural work. The main task is making the cardboard edge smooth enough to slide over fabric without snagging it. Pastel paper gives the three rings a coordinated look, but leftover fabric, plain paint, or narrow ribbon can work just as well.
Choose rings that are wide enough to feel stable without hiding too much of the folded napkin. If a tape core is unusually wide, it can be cut into two shorter rings, provided the cardboard remains firm and the cut edge is sanded carefully.
Materials and Tools
· Clean tape rolls or sections cut from a wider cardboard core
· Decorative paper, fabric strips, ribbon, or furniture-safe craft paint
· Measuring tape or paper strip for measuring the circumference
· Scissors, craft knife, cutting mat, and ruler
· PVA glue, double-sided tape, or fabric adhesive
· Fine sandpaper or nail file for smoothing edges
· Clean cloth napkins for testing the fit
Steps for the Napkin Rings
1. Prepare the rings before adding colour. Remove every remaining piece of adhesive tape and rub away loose fibres. If you cut a wide core into smaller sections, mark the line all the way around, cut slowly on a protected surface, and sand both rims until they feel smooth against your fingertips.
2. Measure and cut the covering. Wrap a paper strip around one roll to find the correct length, then add a small overlap for the join. Cut the strip to match the roll height or leave a narrow extra margin when you plan to fold the paper over the rims. Use the first strip as a template for the remaining rings.
3. Attach the covering in a thin, even layer. Spread glue lightly across the outside of the roll, align one straight edge, and wrap the material around without stretching it. Press the overlap flat and wipe away excess adhesive before it dries. If using fabric, secure the join neatly rather than creating a thick lump.
4. Finish the edges and test the napkin. Fold any extra paper or fabric inward, or leave a clean cardboard rim visible. Allow the ring to dry fully, then slide it over a rolled napkin. I would remove any rough point immediately, because one small paper edge can pull a thread from an otherwise good napkin.
A very easy version uses plain kraft paper and one narrow ribbon around the centre. For seasonal table settings, make removable paper sleeves that wrap over the original ring instead of permanently decorating the cardboard.
Build a Tray of Small Desk-Supply Cups

Short tape rolls are much better for clips, drawing pins, binder clips, elastic bands, beads, and other tiny supplies than for pens or scissors. Grouping them inside a shallow tray stops the rings from sliding and creates clear categories without building a complicated organizer.
The mix of different heights is useful rather than accidental. Larger rolls suit bulky binder clips, while shorter rolls make paper clips and pins easier to see and reach.
Materials and Tools
· Five or more empty tape rolls in two or three sizes
· Shallow tray, sturdy lid, or low box
· Decorative paper, paint, or fabric for the outside of the rolls
· Cardboard for optional bases
· Pencil, scissors, ruler, and craft knife
· PVA glue or strong double-sided tape
· Small felt circles or paper labels if desired
Steps for the Desk Organizer
1. Arrange the empty rolls inside the tray before decorating them. Move the circles around until the tray feels balanced and the largest compartments sit where your hand can reach them easily. I know it can feel tempting to glue immediately, but the first arrangement rarely uses the available space as well as the second.
2. Clean and cover each roll. Use matching paper for a calm look or different soft colours to separate categories. Keep the covering thin so the rolls still fit beside one another. Smooth every join and make sure no adhesive remains inside where it could stick to metal clips or rubber bands.
3. Add bases only when the tray will be lifted often. Trace each roll onto thin cardboard, cut slightly inside the line, and glue the disk beneath the ring. For a stationary desk tray, the tray itself can serve as the base. This simpler option also makes it easier to lift out a roll and empty its contents.
4. Secure or leave the compartments removable. Glue the rings to the tray when the layout is final, or use small removable adhesive dots when you may want to rearrange them. Fill one category at a time, then remove any roll that makes the tray feel crowded. Empty space is useful when new supplies appear.
A rectangular gift-box lid can replace the round tray. You could also label the outer edges with simple symbols, although the colours and visible contents may already provide enough organization.
Create Jewelry Compartments Inside a Drawer or Box
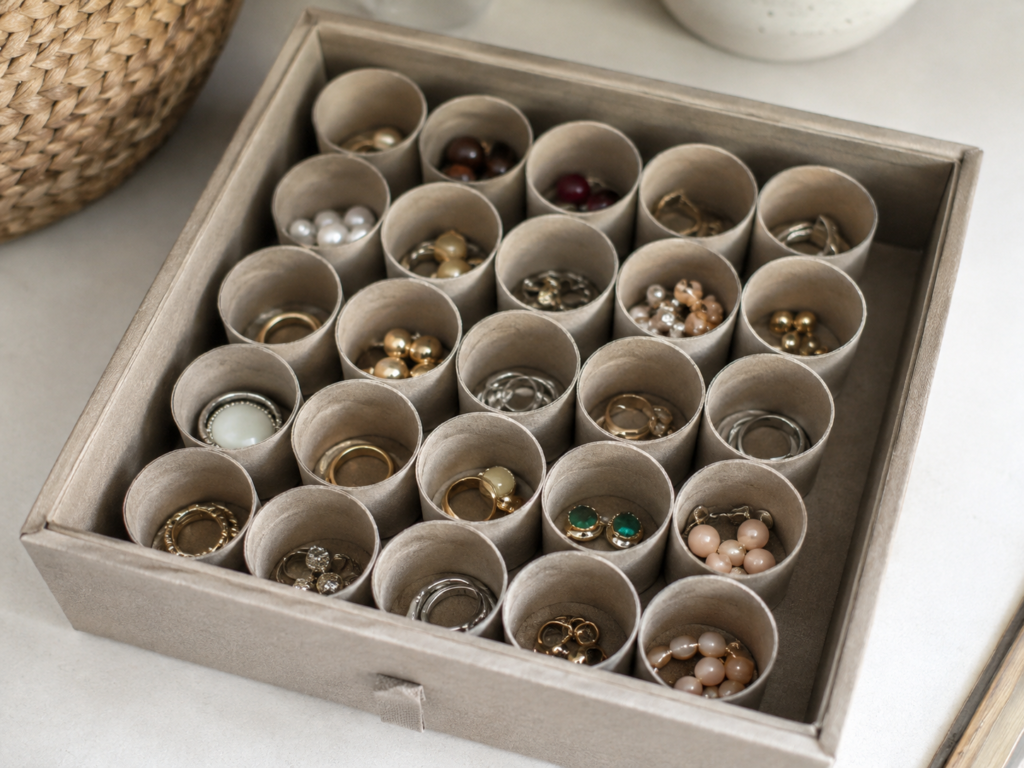
Jewelry is exactly the right scale for small tape rolls. Rings, earrings, beads, and delicate chains can sit in separate circles instead of collecting in one tangled pile. The neutral cardboard in the photographed version keeps attention on the jewelry, while the fabric-covered box gives the whole organizer a softer finish.
This idea works best for small pieces rather than long necklaces. A very fine chain can still knot inside a ring, so use the compartments for studs, short drops, rings, brooches, and loose beads.
Materials and Tools
· A shallow drawer, gift box, or sturdy lidded box
· Enough small tape rolls to fill most of the base
· Optional fabric, felt, or decorative paper for lining
· Thin cardboard for roll bases when needed
· PVA glue, fabric glue, or removable adhesive dots
· Scissors, craft knife, ruler, and pencil
· Optional felt circles for cushioning delicate jewelry
Steps for the Jewelry Organizer
1. Measure the box and test a dry arrangement. Place the rolls in rows or a staggered pattern and check whether the lid still closes. Leave a small gap around the outside rather than forcing the cardboard tightly against the box walls, because a crowded layout is difficult to remove or repair later.
2. Prepare the box and compartments. Line the base with felt or fabric if the jewelry needs a softer surface. Trim the rolls to a consistent height only when necessary, then sand rough rims. Add small cardboard or felt bases to rings that will be lifted independently from the box.
3. Fix the layout lightly. Use a small amount of adhesive under each roll, keeping glue away from the inner compartment. A removable method is useful when you may want to create a larger space later. Press the rolls into alignment and allow the organizer to sit flat while the adhesive settles.
4. Sort jewelry by size and frequency of use. Place everyday rings and earrings near the front, and keep tiny loose parts in shallower compartments where they remain visible. One detail I would keep simple is decoration inside the rolls; bulky paper seams or glitter can scratch metal and catch on fine chains.
For a travel version, place fewer compartments inside a small lidded box and add soft fabric pads above them. Do not rely on the tape rolls alone to secure valuable jewelry during transport.
Arrange Tape Rolls as Small Wall Frames
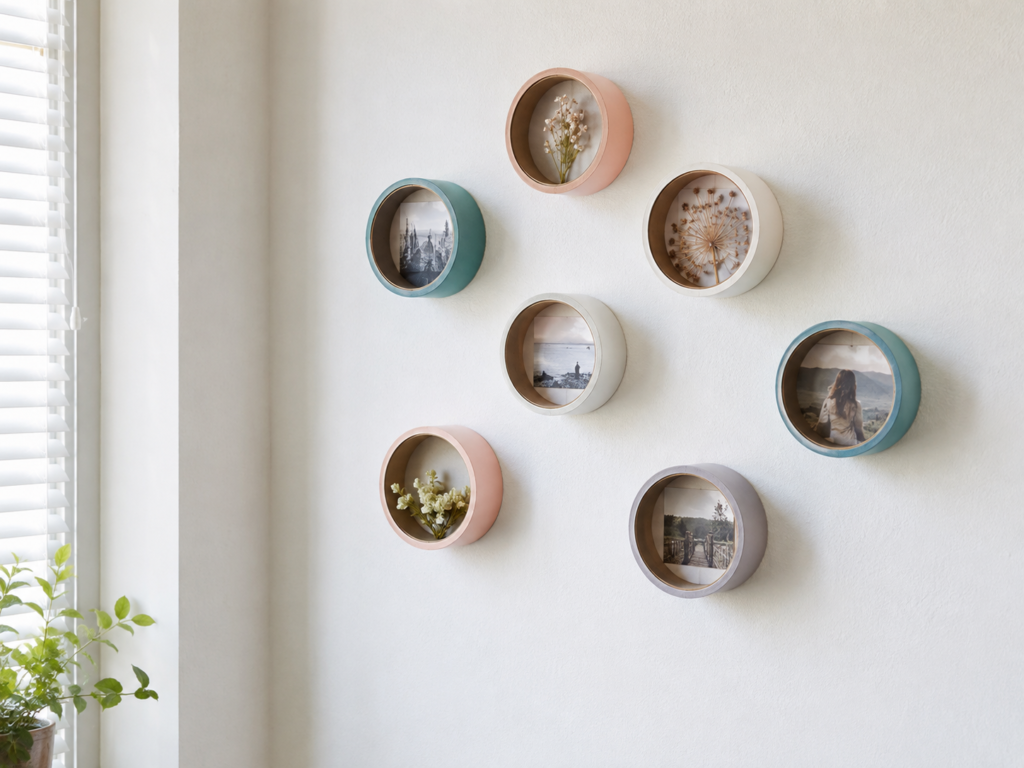
The depth of a tape core turns a small photograph into a miniature shadow box. Several rings can be arranged loosely across a wall, each holding a cropped image, pressed flower, or tiny paper artwork. The project stays lightweight, but the individual frames still need proper backing so the contents do not fall through.
Keep the objects inside very light. Dried flowers, printed photographs, paper silhouettes, and flat keepsakes work well; stones, glass, candles, and small plant pots do not belong in wall-mounted cardboard rings.
Materials and Tools
· Five or more clean tape rolls
· Decorative paper or paint for the outer walls
· Strong card or thin lightweight board for backings
· Small photographs, pressed flowers, or paper art
· Pencil, compass, scissors, and craft knife
· PVA glue or another paper-and-cardboard adhesive
· Removable picture strips or suitable lightweight wall fixings
· Level, paper templates, and low-tack tape for planning the wall arrangement
Steps for the Wall Display
1. Prepare the rings and choose the contents together. Clean the cardboard, cover or paint the outside, and place each photograph or botanical piece inside its intended ring. Crop paper items gradually, leaving enough border to attach them securely to a backing rather than wedging them against the wall.
2. Make a backing for every frame. Trace the outside of the roll onto sturdy card, cut the disk neatly, and attach the photograph or pressed flower to its front. Then glue the roll onto the backing. Keep the contents behind the front rim so they remain protected from casual contact.
3. Plan the wall layout with paper circles. Trace the rings onto scrap paper, cut out the shapes, and tape them to the wall. Move them until the gaps feel balanced and the grouping suits the available space. For me, an irregular arrangement works better than forcing every circle into a perfect grid.
4. Mount the finished frames with lightweight fixings. Follow the instructions for the chosen removable strips or hooks, and make sure the wall surface is clean. Press each ring in place, then check it from the side. Remove anything that begins to lean or pull away rather than adding more adhesive over a weak bond.
A renter-friendly version can arrange the rings on a single lightweight backing board, which then hangs from one appropriate wall fixing. That also makes the whole display easier to move.
Use Tape Rolls as Holders for Battery LED Tea Lights
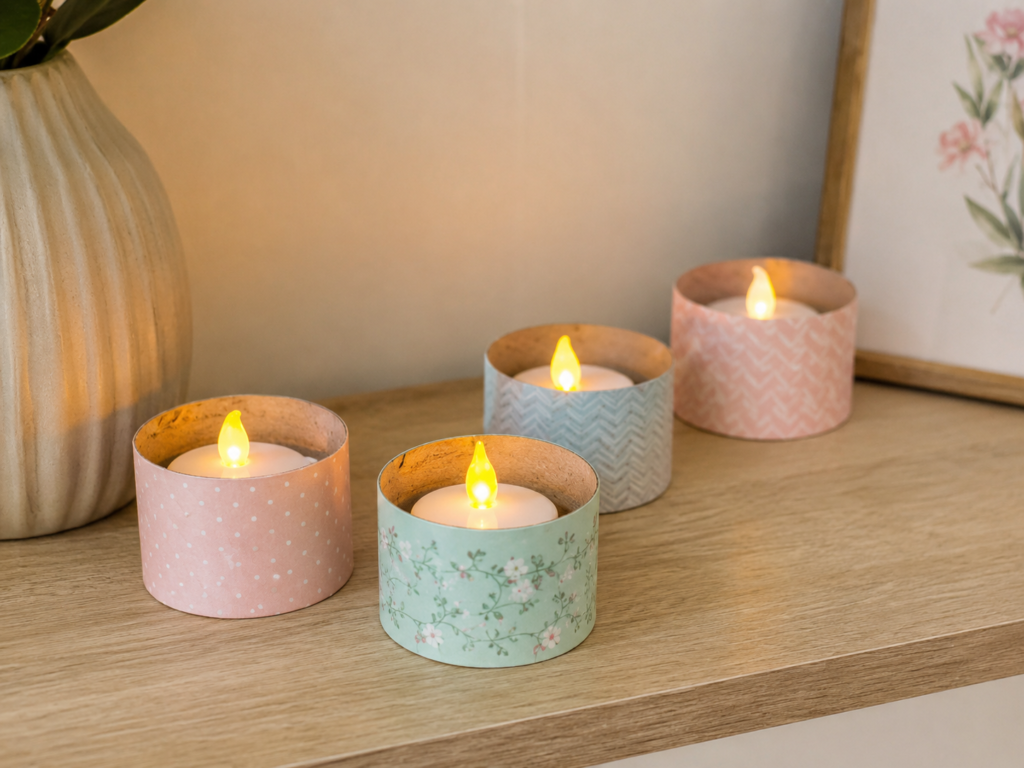
Short tape rolls can frame battery LED tea lights and hide the plain plastic edges. This is the safest way to recreate the warm candle-like look because cardboard and decorative paper must never sit around a real flame. The LED units should remain removable so they can be switched off and their batteries can be changed.
The holder should be slightly wider than the tea light, with enough room to lift it out using your fingers. A ring that grips the light tightly can block the switch or trap heat from an unsuitable device.
Materials and Tools
· Short, sturdy tape rolls
· Battery-operated LED tea lights that remain cool in use
· Decorative paper, thin fabric, or paint
· Scissors, ruler, craft knife, and cutting mat
· PVA glue or double-sided tape
· Optional thin cardboard base rings that do not cover switches
· Fine sandpaper for smoothing rims
Steps for the LED Light Holders
1. Test every LED tea light before building the holder. Confirm that it operates from a battery, remains cool, and can be switched on and off easily. Place it inside the empty tape roll and check the space around the sides. The light should lift out without pulling on the decorative covering.
2. Clean and decorate only the cardboard ring. Wrap the outside with paper or fabric, keeping the top and inner wall clear of loose fibres. Avoid metallic foil, thick beads, or decorations that could fall onto the light. Then smooth the rim so the LED unit is not scratched when it is removed.
3. Add a base only when the design needs one. A narrow cardboard ledge can stop a small light from sliding through, but it must not block the battery cover or switch. Do not glue the LED tea light into the holder. Keeping it removable makes inspection, cleaning, and battery replacement much easier.
4. Arrange the holders on a stable surface away from fabric and moisture. Switch on the LEDs and check them after a short period to confirm that nothing feels warm or distorted. Use only battery LED lights – never real candles, matches, incense, or any other flame inside cardboard tape rolls.
A single holder on a bedside shelf is enough for a subtle glow. Several coordinated rings can form a table display, but leave space between them and turn the lights off when the room is unattended.
Tape Roll Reuse Mistakes That Make Small Projects Fall Apart
Using crushed or damp tape cores is the quickest way to create a project that loses its shape. Cardboard may look acceptable from one angle while the layers are already separating. Keep only rolls that feel firm all the way around.
Leaving sticky tape residue inside an organizer causes clips, jewelry, and fabric to snag. Remove adhesive carefully and cover damaged areas before using the roll. If the surface cannot be cleaned, choose another core.
Applying too much wet glue can soften the cardboard and create flat spots. Spread a thin layer, work on one roll at a time, and allow the pieces to dry without stacking weight on their rims.
Forcing small tape rolls to hold tall tools makes the project unstable. Use them for short objects such as clips, pins, rings, napkins, and tea lights. A taller cardboard tube is a different material and should be treated as a separate project.
Mounting wall rings without a backing can allow photographs and flowers to fall through. Build the content onto a card disk first, then attach the roll around it. Use only lightweight contents and suitable wall fixings.
Treating cardboard LED holders like candle lanterns is unsafe. The holders are for cool battery-operated tea lights only. Keep real flames, hot bulbs, incense, and heat sources completely away from the project.
Finally, covering every surface with thick decoration can make small rings clumsy to use. I would rather keep a clean natural rim than add another layer that catches on a napkin, jewelry chain, or box lid.
Frequently Asked Questions
Which empty tape rolls are best for reuse?
Choose clean cardboard cores that remain round and firm. Rolls with deep creases, moisture damage, mould, or heavy adhesive residue are not worth covering because the weakness usually returns after the project is finished.
Can beginners complete these tape-roll projects?
Yes. The desk organizer and napkin rings are the easiest because they need little more than cleaning, measuring, and covering. The wall display needs more careful planning and secure lightweight mounting.
Do I need to paint the tape rolls?
No. Paper, fabric scraps, ribbon, or the natural cardboard surface can all work. Keep the covering thin and smooth, especially when several rolls must fit closely together.
How do I cut a wide tape core into smaller rings?
Mark an even line around the full circumference and cut on a protected surface with a sharp suitable tool. Work slowly, keep hands away from the blade, and sand the cut rim before using it near fabric or jewelry.
Can tape rolls be used as plant pots?
Small cardboard tape rolls are not good long-term pots because moisture can weaken them quickly and their depth is limited. Use a proper waterproof container for plants and reserve tape cores for dry projects.
Can I use real candles in the decorated holders?
No. Cardboard, paper, fabric, and glue are flammable. Use only battery-operated LED tea lights that stay cool, keep them removable, and turn them off when the display is unattended.
How can I make the organizers easier to clean?
Leave the compartments removable or line the tray rather than gluing every part permanently. Empty the rolls, wipe dry surfaces gently, and replace any cardboard that becomes stained, damp, or distorted.
Let Small Tape Cores Do Small Jobs Well
The most useful lesson in learning how to reuse tape rolls is to respect their scale. These short cardboard circles are not deep storage containers, but they are excellent dividers, rings, frames, and lightweight holders. Once the project matches the material, the result feels practical rather than forced.
Begin with one easy idea, such as a napkin ring or a tray for paper clips. Clean the core, keep the covering simple, and test the finished item before making a larger set. The same careful approach can then turn more empty rolls into jewelry compartments, miniature wall displays, or safe holders for battery LED tea lights.
Which small job would you give your next empty tape roll: organizing a drawer, setting the table, or framing a tiny keepsake?