Fruit baskets often remain useful after the fruit has gone, but the next purpose depends on what the basket is made from. A clear berry container can trap warmth around seedlings.
A wire tiered basket can support shallow plants. A woven basket may be strong enough for a floral display, but too open for loose craft supplies unless it receives a liner.
The useful details are already there: ventilation holes, hinged lids, handles, wire frames, and lightweight woven sides. Reusing those features usually creates a better result than covering the basket with so much decoration that it can no longer do its job.
I don’t think every fruit basket needs to become permanent home decor. Some plastic containers are most helpful for one growing season, while a strong metal or woven basket may last through several different uses. What matters is checking the condition first and choosing a project that suits the material.
A basket that once held soft berries will behave differently from a heavy countertop fruit stand. Clean it carefully, test the weak points, and decide whether it needs to carry soil, water, weight, or only lightweight decoration before you begin.
Check the Fruit Basket Before Reusing It
Remove all fruit, paper pads, stickers, ties, and packaging film. Wash plastic baskets with warm soapy water and let the hinges, corners, and ventilation slots dry fully. Wipe woven baskets instead of soaking them unless you know the material tolerates water.
Inspect the basket for:
· Cracked plastic around the hinge or rim
· Sharp edges or broken slats
· Rust at wire joins and chain connections
· Loose weaving or splintered fibres
· A base that bends under light pressure
· Old food residue trapped in corners
· Mould, staining, or a persistent smell
· Handles that no longer support the basket
· Peeling paint or coating
· Missing clips, hooks, or fasteners
Do not use a damaged basket where falling soil, water, plants, or wall-mounted weight could injure someone. Keep plastic fruit containers away from open flames and high heat.
If the basket will hold plants, think about drainage before adding soil. If it will hang on a wall or door, test the complete weight of the finished project, not only the empty basket. A handful of flowers feels light; wet soil and several pots do not.
Separate Food Use From Craft Use
Once a basket has held soil, paint, glue, floral foam, fertiliser, or craft materials, do not return it to storing unpackaged food. Mark garden and craft baskets clearly so they do not drift back into the kitchen by accident.
Use a Berry Basket as a Small Herb Planter

Clear berry containers already contain many of the features that a temporary plant pot needs. The holes allow excess water to escape, while the lid can remain attached when the container is used for propagation or removed when the plant needs more room.
This works best for shallow-rooted herbs, cat grass, cuttings, or young plants that will move into a stronger pot later. The plastic is light, so place the basket on a tray and avoid filling it with a large, top-heavy plant.
Materials and Tools
· Clean berry basket or ventilated fruit container
· Seed-starting mix or light potting mix
· Small herb plant, cutting, or seeds
· Shallow waterproof tray
· Spoon or small scoop
· Plant label
· Water mister or small watering bottle
· Optional paper liner for very large openings
Plant the Berry Container
1. Prepare the container. Wash the basket thoroughly and inspect the hinge, base, and openings. Place it on a waterproof tray before adding soil because the drainage that helps the plant can be less helpful to a windowsill.
2. Control the largest gaps. If soil falls freely through wide slots, add a small piece of plain paper, coffee filter, or other breathable liner across the base. Do not block every opening because the container still needs drainage.
3. Add a light growing mix. Fill the basket without pressing the soil into a hard block. Leave space below the rim so water does not carry soil out through the sides whenever you move the container.
4. Plant and settle the roots. Add a shallow-rooted herb, cutting, or a small number of seeds. Water gently, then allow the excess to drain into the tray before placing the container in its growing position.
5. Move the plant at the right time. Watch for roots gathering around the base or pushing through the openings. Transfer the plant to a stronger pot before the plastic begins bending under the weight of wet soil and growth.
For me, this is a nursery container rather than a forever pot. I know it can feel satisfying to keep the plant in the original basket, but the thin plastic is much easier to manage when the plant is still small.
A beginner can use the basket for water propagation instead. Place small jars inside the container so they remain upright, then use the basket as a carrying tray for several cuttings.
Turn a Tiered Fruit Basket Into a Flower Tower

A tiered fruit basket creates height before a single plant has been added. Once each wire bowl receives a fitted liner, the levels can hold flowers, compact herbs, or lightweight nursery pots without soil falling through the frame.
The main challenge is weight. Wet soil can make a delicate stand unstable, especially when the upper tier carries a tall plant. Choose shallow-rooted plants, keep the heaviest layer low, and confirm that the central support does not wobble.
Materials and Tools
· Sound tiered wire or woven fruit stand
· Coconut coir liners or landscaping fabric
· Scissors
· Light potting mix
· Compact flowers, herbs, or trailing plants
· Small scoop
· Watering can with a narrow spout
· Waterproof saucer or outdoor-safe base
· Optional metal-suitable paint
· Gloves and protective sheet for painting
Build the Tiered Planter
1. Test the empty stand. Place it on a level surface and press each tier gently. Tighten any removable fasteners and stop if the centre post, chains, or bowl connections feel weak.
2. Fit the liners. Cut coir or landscaping fabric so it sits against the bottom and sides of each basket. Overlap joins rather than leaving gaps where wet soil can wash through.
3. Plan the plants by weight and height. Place the heaviest or fullest plants in the lowest basket. Use compact plants above and trailing plants near outer edges where their stems can fall without covering everything below.
4. Add soil and plants gradually. Fill one level at a time and step back after each tier. Then water lightly and check whether the stand leans, twists, or settles unevenly under the new weight.
5. Protect the surrounding area. Use a large saucer indoors or keep the tower on a surface that tolerates drainage. Turn the stand occasionally only if the frame allows safe movement while planted.
The part I would keep simple is the plant selection. Three levels do not need three completely different watering routines. A tower is much easier to care for when the plants prefer similar light and moisture.
For a no-soil version, place small nursery pots inside the lined baskets. You can lift each pot out for watering and change the display without emptying the complete stand.
Make a Mini Greenhouse From a Lidded Fruit Container
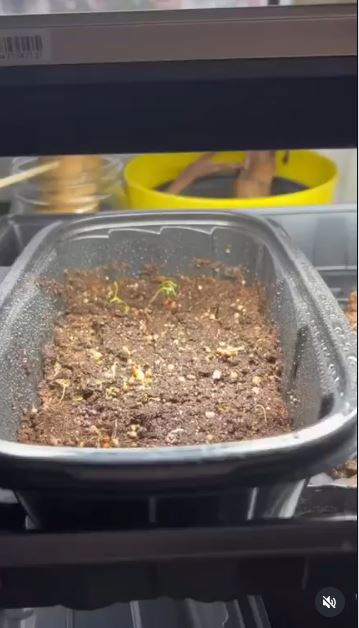
A hinged plastic fruit container can act as a temporary humidity cover while seeds begin to grow. The clear lid lets you check the soil without opening the container every few minutes, and the existing ventilation holes reduce the chance of trapping completely still air.
The lid is useful only during the earliest stage. Once seedlings touch it or remain constantly wet, open the container more often and remove the cover. A mini greenhouse should support growth, not create a permanently damp box.
Materials and Tools
· Clean clear fruit clamshell with lid
· Seed-starting mix
· Seeds
· Shallow waterproof tray
· Water mister
· Plant label and pencil
· Small spoon
· Optional extra ventilation tool used carefully
· Optional small seed cells placed inside the basket
Start Seeds in the Container
1. Clean and test the lid. Wash the container, dry it, and close it several times. The hinge should move without cracking, and the lid should sit loosely enough that it can be opened without shaking the seedlings.
2. Add seed mix. Place a shallow layer directly in the base or set small seed cells inside the container. Moisten the mix before sowing so you do not need to pour a strong stream of water over the seeds.
3. Sow and label the seeds. Follow the spacing and depth guidance for the seeds you selected. Add a clear label because young seedlings can look remarkably alike when several containers begin growing at once.
4. Use the lid as a temporary cover. Close the lid and place the container in suitable light. Check it daily, wipe away excessive standing condensation, and open it briefly when the interior remains heavily wet.
5. Harden the seedlings gradually. Open the lid for longer periods as the seedlings grow, then remove it before the plants become crowded. Move the seedlings into individual pots when they have developed enough to handle transplanting.
I don’t think a tightly sealed lid is an advantage here. Some air movement is useful, and a container that stays dripping wet needs more ventilation, not another spray of water.
A simpler variation is to place ordinary seed pots inside the fruit container and use the base only as a carrying and drainage tray. The lid can still provide short-term cover without the roots growing directly against thin plastic.
Hold Deep Seed Pots in a Plastic Fruit Basket

Cardboard tubes make useful narrow seed pots for plants that benefit from a deeper root run. Their weakness is stability. Once filled with damp soil, the tubes can lean, open at the base, or fall against one another. A plastic fruit basket keeps the group contained while allowing air to move around them.
The basket is acting as a holder rather than the planter itself. This makes it easier to lift the whole group, catch loose soil, and separate damaged tubes without disturbing every seedling.
Materials and Tools
· Clean plastic fruit basket or clamshell base
· Plain cardboard toilet-roll tubes
· Paper tape or folded paper for tube bases
· Seed-starting mix
· Seeds suited to deeper starter pots
· Shallow waterproof tray
· Plant labels
· Water mister
· Scissors
· Optional twine to group loose tubes
Build the Seed-Pot Tray
1. Prepare the cardboard tubes. Fold the lower edges inward or secure the bases with paper tape so dry mix does not fall through. Avoid plastic tape if you intend to plant the cardboard tube directly into soil later.
2. Arrange the empty tubes. Stand them inside the fruit basket before filling. Add enough tubes that they support one another, but do not force them so tightly together that air and fingers cannot reach between them.
3. Fill and sow. Add damp seed mix gradually, then sow the seeds at the appropriate depth. Label the rows or individual tubes before moving the tray, as the arrangement may shift during watering.
4. Water with restraint. Use a mister or a narrow stream so the cardboard does not become soaked at once. Keep the fruit basket on a tray and empty standing water rather than allowing the tube bases to remain submerged.
5. Plant on before the cardboard fails. Move the seedlings when the roots are established and the tubes still hold their shape. Tear away any folded base that could restrict roots, then plant according to the needs of the seedling.
I would not save these tubes for months after they become wet. The fruit basket helps with support, but it cannot stop damp cardboard from softening forever. Timing matters more than making the holder look tidy.
For a more durable version, use narrow reusable nursery pots inside the same basket. You keep the carrying system while avoiding the short life of cardboard.
Reuse a Woven Fruit Basket as a Front-Door Floral Display

A shallow woven fruit basket can sit against a door more naturally than a deep round basket. Its open top holds flowers, while the handle, latch, or woven frame provides a place for a hanging loop.
This project is most practical with artificial or dried stems. Fresh flowers need a watertight inner container, and the extra water can make the basket heavier than the door hook or old handle can safely support.
Materials and Tools
· Sound shallow woven fruit or picnic basket
· Soft brush and cloth for cleaning
· Crumpled paper or lightweight filler
· Floral foam intended for artificial stems, or a removable wire grid
· Artificial or dried flowers
· Wire cutters
· Floral wire
· Ribbon or strong hanging loop
· Door hook rated for the finished weight
· Optional fabric liner
Arrange the Door Basket
1. Clean and strengthen the basket. Brush dust from the weave and check the base, handle, latch, and upper rim. Reinforce a loose decorative handle only if the basket frame itself remains sound; do not ask a weak handle to carry the display.
2. Create a lightweight inner base. Fill the deepest empty space with crumpled paper or another light material. Place a small block of suitable floral foam or a removable wire grid near the top so the stems do not require a basket full of heavy filler.
3. Arrange the largest stems first. Set the height and width with a few main branches, then add medium flowers and smaller pieces. Keep the back flatter than the front so the basket rests close to the door.
4. Secure the hanging point. Thread ribbon or wire through strong sections on both sides rather than one fragile strand of weave. Hang the basket temporarily and check that the door can open and close without crushing the flowers.
5. Finish and maintain the display. Trim protruding wire, remove anything that catches on clothing, and bring the basket indoors during severe weather unless every material suits outdoor use. Change a few stems by season instead of rebuilding the whole arrangement.
For me, the slightly uneven shape of an old basket makes this more interesting than a perfectly round wreath. I would keep the ribbon quiet and let the weave and flowers do most of the work.
A renter-friendly version can hang from an over-door hook without screws. The same basket can also sit on a shelf as a table arrangement when you do not want anything on the door.
Match the Project to the Basket Material
Clear Plastic Berry Containers
Use these for temporary growing, seed trays, propagation, sorting lightweight craft pieces, or protecting delicate items during transport. Avoid heavy soil, high heat, and long outdoor exposure that makes the plastic brittle.
Wire Fruit Baskets
Wire baskets suit plant displays, vertical storage, and projects that need airflow. Check welds, chains, centre posts, and coatings before loading them. Cover or repair sharp ends rather than hiding them beneath fabric.
Woven Fruit Baskets
Woven baskets are useful for flowers, wrapped gifts, towels, paper, and lightweight storage. Add a removable liner for small objects, and keep untreated natural fibres away from constant moisture.
Wooden Slatted Fruit Baskets
Wooden baskets may become shelf storage, garden carriers, or painted display boxes when the slats and handles remain secure. Sand splinters, tighten loose fasteners, and avoid loading thin vintage wood with more weight than it originally carried.
Common Mistakes to Avoid
Skipping the Cleaning Stage
Fruit juice and residue can remain in hinges, woven corners, and slats. Clean the basket according to its material and let it dry before adding soil, fabric, paint, or flowers.
Treating Thin Plastic Like a Permanent Pot
Berry containers are useful for seedlings and temporary herbs, but wet soil and mature roots can distort them. Transplant before the basket loses its shape.
Blocking Every Drainage Hole
A liner should stop soil from escaping without turning the container into a sealed bowl. Leave clear routes for excess water and use a tray underneath.
Overloading a Tiered Stand
The top basket may become unstable when it holds tall plants or wet soil. Keep heavy material low and test the stand after watering.
Keeping Seedlings Under a Lid Too Long
A clear lid can help during germination, but constant condensation and crowded growth create problems. Increase ventilation and remove the lid as the plants develop.
Soaking Cardboard Seed Pots
Cardboard tubes need moisture, not a bath. Water gently and empty the tray so the bases do not collapse before transplanting.
Using Weak Door Hardware
A floral basket becomes heavier than expected once it contains foam, wire, and stems. Use a suitable hook and spread the load across strong sections of the basket.
Returning a Garden Basket to Food Storage
Soil, fertiliser, glue, paint, and floral materials make the basket unsuitable for loose fruit. Give craft and garden baskets a permanent separate role.
Painting Over Rust or Splinters
Decoration does not repair structural damage. Remove loose rust, smooth splinters, and reinforce sound joints before adding a finish.
Saving Every Basket Without a Plan
Reuse should reduce clutter rather than move it into another cupboard. Keep the baskets that match a real project and recycle or discard the rest according to local guidance.
Frequently Asked Questions
What is the easiest way to reuse a fruit basket?
Use a clean plastic berry container as a seed tray or use a woven basket for lightweight storage with a removable liner. Both options need little structural work and can be reversed easily.
Can I plant directly in a plastic fruit container?
Yes, for temporary seedlings, shallow herbs, or small plants. Use light soil, keep the container on a tray, and transplant before roots and wet soil become too heavy for the plastic.
Can a tiered fruit basket stay outdoors?
Only when the frame, coating, liner, and plants suit outdoor conditions. Check for rust, wind exposure, drainage, and stability, and move a lightweight stand to shelter during severe weather.
How do I stop soil falling through a wire or plastic basket?
Use coir, landscaping fabric, a breathable paper layer, or nursery pots placed inside the basket. Do not seal the drainage completely.
Can I reuse a fruit basket for food after using it for plants?
It is better to keep it permanently assigned to gardening or crafts. Soil, fertiliser, paint, glue, and hidden residue make a return to loose food storage impractical.
How do I hang a woven basket without damaging it?
Spread the load across two strong points in the weave or use the original handle only when it remains secure. Choose a hook rated for the finished weight and test the basket close to the floor first.
What can I do with a cracked berry container?
Do not use it where sharp edges can cut hands or roots. Check local recycling guidance, or use only an undamaged flat section as a temporary craft template before disposing of it responsibly.
Let the Basket Shape Choose Its Next Job
Learning how to reuse fruit baskets begins with noticing what each container already does well. Clear lids hold humidity, ventilation slots release water, tiered frames create height, and woven sides give flowers a natural background.
Begin with one clean, sound basket and one manageable purpose. Use plastic containers for temporary growing, keep heavy wet soil low in a tiered stand, and protect woven baskets from moisture and weak hanging points.
There is no need to force a damaged basket into a decorative project. The best reuse is practical, safe, and clear enough that the basket will actually be used instead of returning to storage.
Which fruit basket would you reuse first: the clear berry container for seedlings, the tiered stand for flowers, or the woven basket waiting to become a seasonal door display?