Flower bouquets rarely stop feeling meaningful at the exact moment the petals begin to droop. A bunch may mark a birthday, a thank-you, a celebration, or an ordinary day that someone decided to make kinder. Throwing it away immediately can feel wasteful, yet leaving the flowers in cloudy water until every stem collapses does not preserve the memory either.
I prefer to separate the flowers while they still have useful colour and shape. Some petals are better for a loose potpourri bowl, flat blooms can become a bookmark or card, and stronger stems can hang from a simple garland.
The bouquet does not need to stay whole to remain recognisable. In fact, using only the healthiest pieces often creates a neater result than trying to save every curled leaf and bruised petal.
The best time to decide what to make is before the bouquet becomes damp, mouldy, or extremely brittle. Remove the flowers from water, look at each stem separately, and choose a project according to what is still in good condition. I know it can feel tempting to postpone the decision for another day, but a little sorting now gives you far more useful material later.
Sort the Bouquet Before the Flowers Become Too Fragile
Spread the bouquet on a clean, dry surface and separate it gently. This first check helps you save the parts that can dry well while removing anything that may spoil the rest.
· Keep firm flower heads that still hold their shape, even when the outer petals have begun to curl.
· Collect clean loose petals in a separate tray for potpourri instead of mixing them with damp leaves.
· Choose flatter petals, tiny filler flowers, and delicate leaves for bookmarks and greeting cards.
· Set aside strong stems and complete small flower heads for the hanging garland.
· Remove leaves that feel slimy, spotted, or unusually soft because they may hold too much moisture.
· Trim bruised outer petals when the centre of a rose or another flower is still worth saving.
· Discard any flower with mould, an unpleasant smell, or insect damage rather than trying to hide it inside a craft.
Gather Simple Flower-Craft Supplies
These projects do not need a specialist craft room. A few basic tools, some reused household materials, and enough space for the flowers to dry flat will handle most of the work.
· Sharp household scissors or small floral snips for shortening stems and removing damaged petals
· Absorbent paper, plain printer paper, or unprinted paper for pressing flowers
· Several heavy books or a simple flower press
· A glass bowl or shallow dish for loose dried petals
· Clear self-adhesive laminating sheets for an easy transparent bookmark
· A hole punch, ribbon, or tassel for finishing the bookmark
· Twine and small wooden clothespins for the garland
· Blank folded card, paper adhesive, and tweezers for the greeting card
· Clean trays, paper bags, or labelled envelopes for keeping dried pieces separated
Decide Which Flower Details Deserve to Stay Visible
A bouquet often contains more colour, greenery, and filler flowers than one small project can use. Choose a few details to repeat, then leave enough empty space for the arrangement to look intentional.
· Keep the deepest-coloured petals as focal points and use pale petals around them rather than spreading every colour equally.
· Preserve one recognisable flower head when the bouquet has sentimental value, then use loose petals from the remaining blooms.
· Use tiny white filler flowers to connect larger petals without making the design heavy.
· Press leaves only when they remain flat and clean; thick or curled leaves may create bulky results.
· Place damaged edges under another petal or trim them away instead of showing every imperfect section.
· Repeat one or two colours across a bookmark, card, or garland so the finished project feels connected.
· Keep the simplest pieces for your first attempt. There is no need to use the most sentimental flower while learning the method.
Turn Loose Bouquet Petals Into a Simple Potpourri Bowl
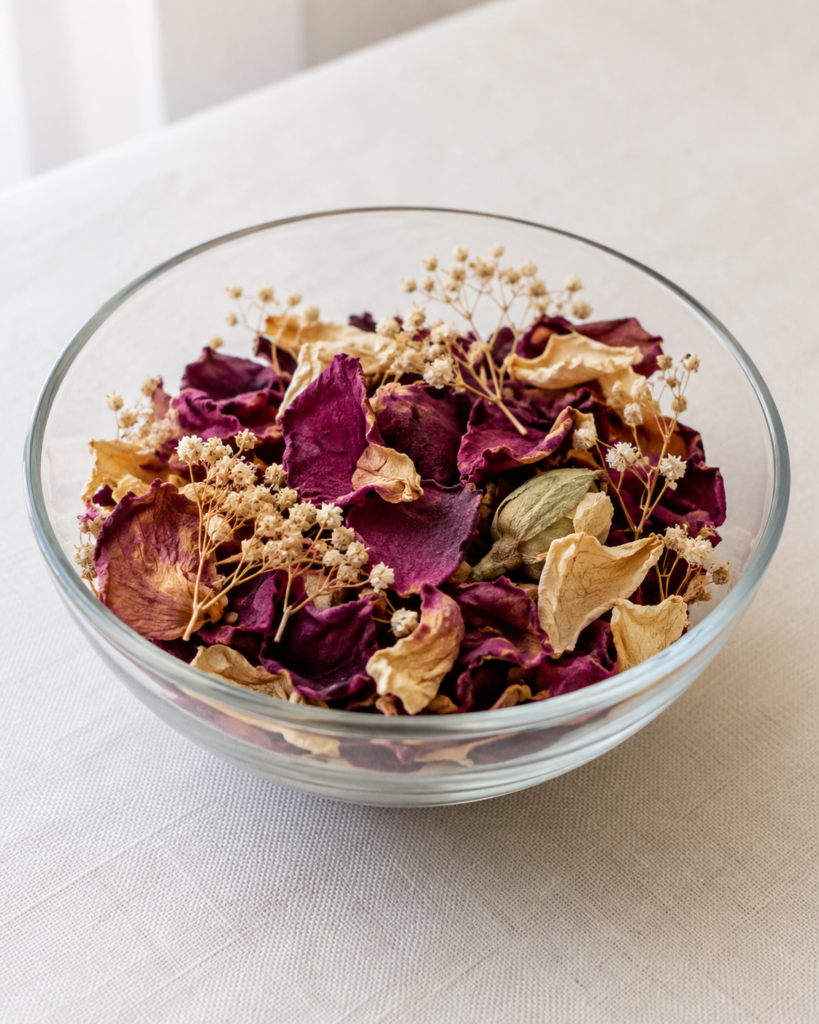
A potpourri bowl is the easiest option when the bouquet has already begun to shed. The petals do not need to remain perfectly flat, and small curled edges actually add texture. What matters is that every piece is completely dry before it enters the bowl. Damp petals trapped under a larger layer can spoil the whole collection.
The photographed arrangement relies mainly on burgundy and cream rose petals with small pale filler flowers. You could recreate a similar look from one bouquet without buying extra materials. I don’t think fragrance is essential here; the colour and memory can be enough, especially when you are unsure whether added oils will mark nearby furniture.
Materials and Tools
· Clean petals and small flower heads from the bouquet
· Tray or baking sheet lined with plain absorbent paper
· Small scissors for removing damaged areas
· Glass bowl, ceramic dish, or reused wide jar
· Optional dried citrus peel or cinnamon pieces for visual texture
· Optional fragrance suitable for potpourri, used very sparingly
· Paper bag or breathable box for temporary storage
A Method for Drying and Displaying the Petals
1. Separate and inspect the petals. Pull away the cleanest petals before the flower heads become damp or brown, and remove pieces with bruising, spots, or sticky surfaces. Keep small filler flowers on short stems when they remain dry and firm. Spread everything in a single layer so hidden moisture is easier to notice.
2. Dry the material slowly in a ventilated place. Set the lined tray somewhere dry and away from direct sunlight, then turn thicker petals occasionally so both sides receive air. Do not pile petals together while they still feel cool or flexible. They are ready for storage when they feel dry throughout and no longer bend like fresh petals.
3. Build the bowl in light layers. Place a few larger petals at the bottom, add smaller petals and filler flowers, then continue without compressing the arrangement. Mix the colours as you go instead of placing every dark petal on one side. A loose bowl looks fuller and allows you to remove any piece that changes later.
4. Add scent only when you genuinely want it. If using a potpourri fragrance, test one small batch first and apply very little, keeping the mixture away from finished wood and delicate fabrics. Do not use unknown bouquet flowers in baths, teas, cooking, or skin products because decorative flowers may have been treated or may not be suitable for contact.
5. Check the display during the first few weeks. Keep the bowl in a dry room, gently turn the petals now and then, and remove any piece that develops an unusual smell or softness. Store extra dried petals in a breathable paper container rather than an airtight jar unless you are certain all moisture has gone.
For the simplest beginner version, fill a small clear bowl with only dried rose petals and a few sprigs of baby’s breath. A smaller amount is easier to monitor and often looks more considered than a large bowl filled to the rim.
Make a Clear Pressed-Flower Bookmark
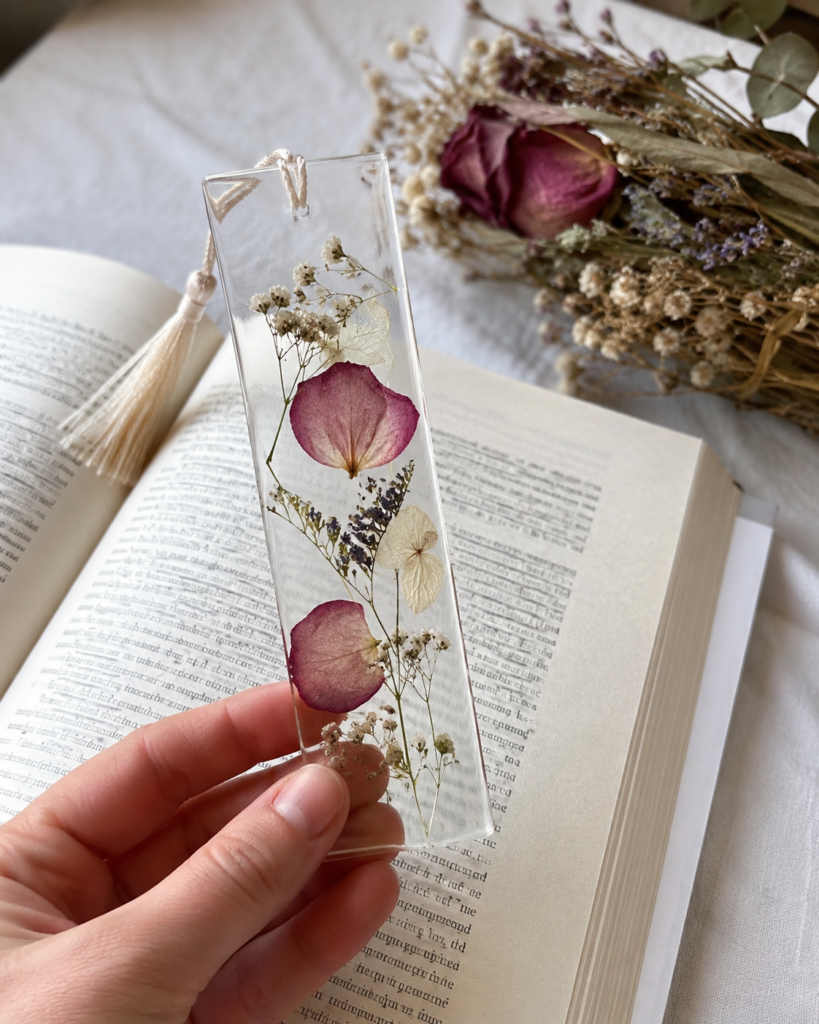
A transparent bookmark suits petals that retain colour but no longer have enough structure for a standing display. The easiest way to recreate the clear look is with self-adhesive laminating sheets rather than poured resin. That keeps the process beginner-friendly and avoids mixing chemicals, moulds, and sanding.
Use the thinnest pieces from the bouquet. A thick rose centre may look attractive on the table but will create a raised lump inside a book. Individual rose petals, tiny filler flowers, and fine leaves press far more evenly.
Materials and Tools
· Thin petals, small filler flowers, and delicate leaves
· Plain absorbent paper and several heavy books
· Clear self-adhesive laminating sheets or clear contact film
· Ruler and scissors
· Tweezers for positioning small dried pieces
· Hole punch
· Ribbon, cord, or a light tassel
· Optional plain card strip for a non-transparent version
How to Make the Bookmark Without Resin
1. Press the flowers before assembling anything. Place the petals and small stems between clean sheets of absorbent paper, keeping each piece separate. Close them inside a heavy book and add more weight on top. Replace damp paper when necessary, then wait until the pieces feel completely flat and dry before opening the press fully.
2. Plan a narrow arrangement on the backing sheet. Cut one piece of clear self-adhesive film slightly larger than the final bookmark and place it sticky side up on a clean surface. Use tweezers to arrange one or two larger petals with fine filler flowers around them. Leave clear space at the edges so the seal can close properly.
3. Seal the flowers slowly. Place a second clear sheet over the arrangement, beginning at one short edge and lowering it gradually to reduce trapped air. Press from the centre outward with a clean cloth or smooth card. If a large air pocket forms directly over a flower, lift the top layer carefully before the adhesive grips completely.
4. Trim and finish the shape. Use a ruler to mark an even border around the flowers, then cut the bookmark with rounded or gently squared corners. Punch a hole near the top without cutting too close to the edge. Thread through a light ribbon or tassel that will remain outside the book rather than adding bulk between the pages.
5. Test the finished bookmark in an ordinary book. Close the book gently and check that no stem creates a hard raised point. Trim any sharp plastic corner and wipe the surface clean. For me, fewer flowers work better here because the clear spaces are part of the design, not unused areas that need filling.
A non-transparent version is even easier: glue the pressed petals to a strip of sturdy card and cover the front with clear self-adhesive film. This also gives you space to write the bouquet date or occasion on the back.
Hang a Dried-Flower Garland With Clothespins
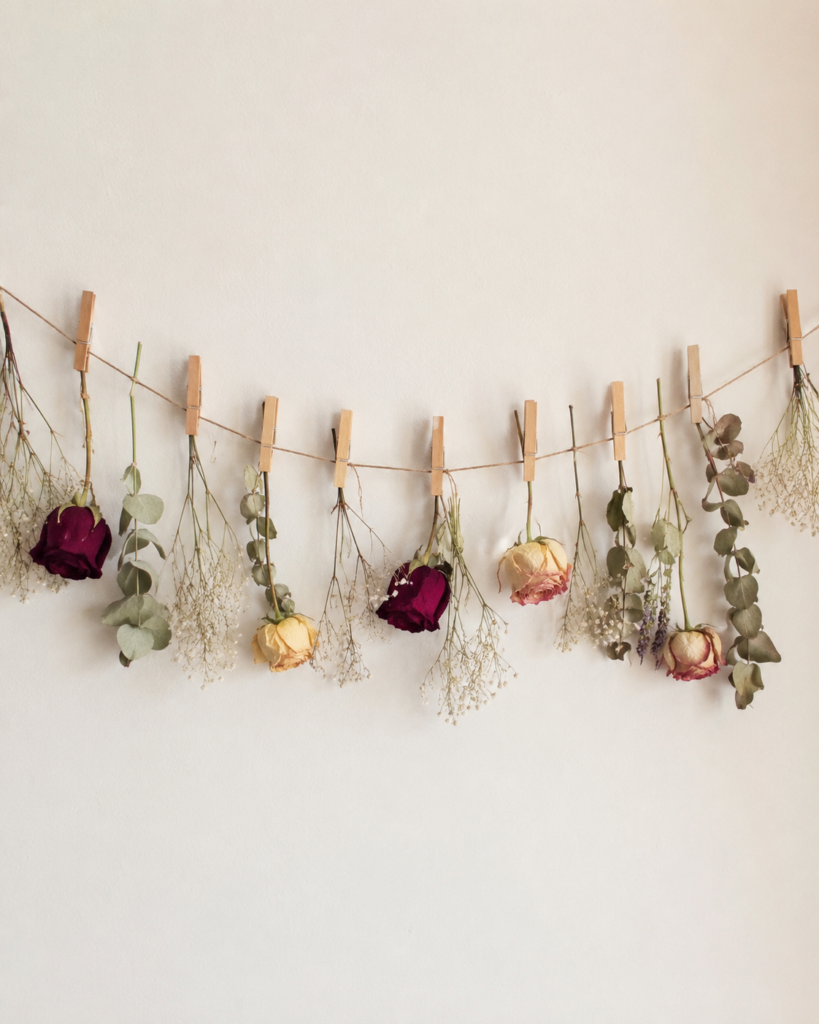
A clothespin garland keeps the flowers in recognisable stem form without requiring wire, wreath frames, or complicated tying. Each piece clips onto ordinary twine, so you can rearrange the spacing or remove a stem that becomes too fragile. It also works well when only part of the bouquet dried successfully.
The mix of roses, eucalyptus, and small pale filler stems gives the garland variation without needing every clip to hold a flower head. Empty-looking greenery between the roses helps the heavier blooms stand out.
Materials and Tools
· Complete dried flower stems and small greenery pieces
· Twine, cotton cord, or narrow ribbon
· Small wooden clothespins
· Scissors
· Two removable wall hooks or secure hanging points
· Optional short pieces of thread for reinforcing heavier stems
· Paper or tray to catch falling petals while arranging
A Practical Way to Assemble the Garland
1. Dry the stems in small groups first. Remove excess leaves, shorten very long stems, and tie a few similar pieces loosely together. Hang them upside down in a dry, shaded place with air around each bundle. Do not make thick bunches because the centre may stay damp after the outside feels dry.
2. Prepare and test the hanging line. Cut a length of twine that suits the wall or shelf area and tie loops at both ends. Hang it temporarily before adding flowers, allowing a gentle curve rather than pulling it tight. Check that the hooks can hold the combined weight and that the line is away from heaters, candles, and damp windows.
3. Arrange the stems on a table before clipping them up. Alternate larger rose heads with lighter eucalyptus or filler flowers, and vary the hanging lengths slightly. I know it can feel tempting to clip every piece immediately, but a quick floor or table layout prevents all the heavy flowers from collecting in one section.
4. Clip and balance the garland. Attach each stem near a strong point rather than squeezing a brittle flower head. Add heavier pieces closer to the support points or reinforce them with a small thread loop. Then step back, move any crowded stems, and leave gaps so the separate shapes remain visible.
5. Maintain the display gently. Keep the garland indoors, avoid frequent handling, and place paper beneath it temporarily if it sheds during the first few days. Remove a crumbling flower rather than letting loose fragments collect. The clothespin method makes replacements simple, which is one reason I like this version.
For a shorter beginner project, hang five or six stems across a shelf rather than filling a whole wall. You can also clip small photographs or handwritten notes between the flowers, provided the line remains light and balanced.
Decorate a Handmade Card With Pressed Bouquet Flowers
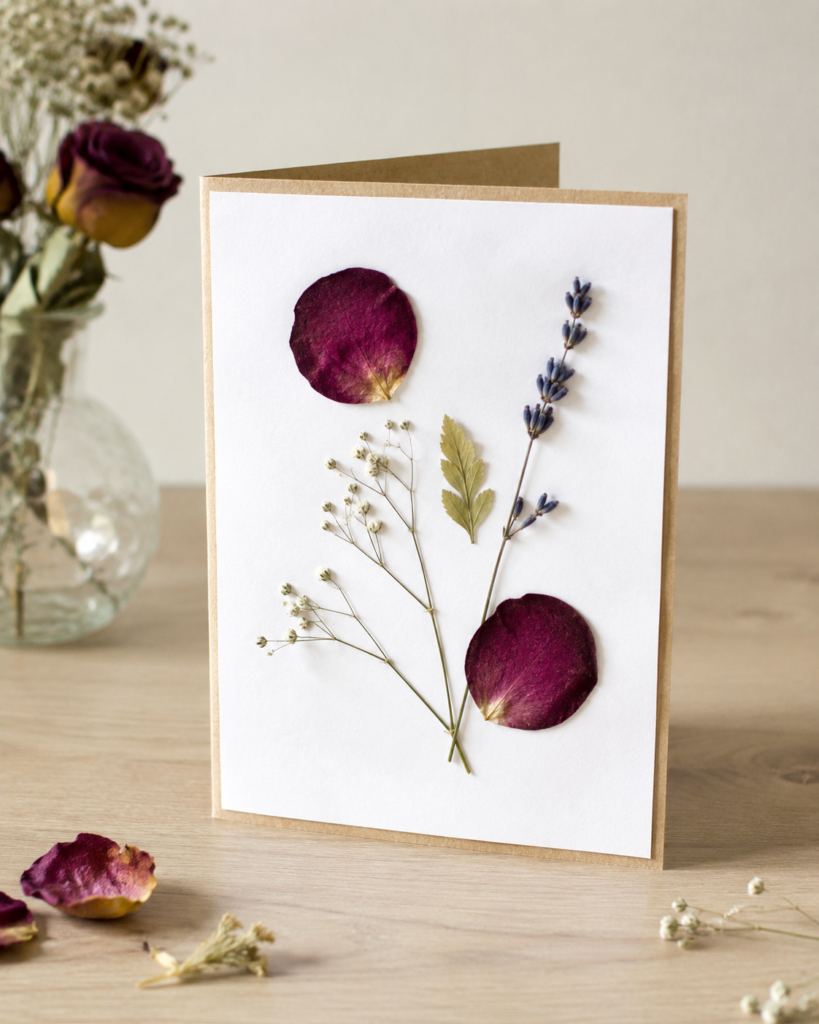
A handmade card is useful when only a few petals and stems survive. The design can remain very simple: two rose petals, a fine branch of baby’s breath, one small leaf, and a narrow lavender stem already create a balanced arrangement. The blank space is important because it leaves room for a message and keeps the delicate flowers from looking crowded.
This project also lets you share part of a meaningful bouquet with someone else. A card made from celebration flowers could become a thank-you note, an anniversary message, or a quiet keepsake placed inside a gift.
Materials and Tools
· Pressed petals, tiny dried stems, and one or two flat leaves
· Blank folded card or recycled heavyweight paper
· Paper adhesive that dries cleanly
· Tweezers
· Small paintbrush or toothpick for applying adhesive
· Plain paper for protecting the work surface
· Heavy book and clean paper for pressing the finished front
· Optional envelope with enough room for the flower texture
How to Build a Clean Botanical Card
1. Choose a limited group of pressed pieces. Pick one or two larger petals as focal points, then add no more than a few fine stems or leaves. Place the card in portrait or landscape position and move the pieces around without glue. Keep the fold and the message area clear while checking that the arrangement does not lean too heavily to one side.
2. Prepare the card surface and adhesive. Use a clean, dry card and place scrap paper underneath. Apply tiny dots or a very thin line of adhesive to the strongest parts of each pressed piece rather than coating the whole back. Too much wet glue can darken petals, curl the card, or squeeze out around fine stems.
3. Attach the lightest pieces in a sensible order. Fix the delicate filler stems first, then add leaves and larger petals over their lower ends. Use tweezers to avoid crushing the flowers and press each piece through clean paper. Then leave the card open and flat while the adhesive settles instead of closing it against the opposite page.
4. Flatten and inspect the finished front. Once the adhesive no longer moves, place clean paper over the card and press it beneath a heavy book. Check the edges when you remove it, then add a tiny amount of adhesive beneath any loose point. Avoid sealing thick natural material inside an ordinary envelope if it may snag or break.
5. Write and store the card carefully. Use the inside for the personal message and note the bouquet occasion discreetly if it matters. Keep the finished card dry and away from direct sunlight. If it will travel through the post, place it inside a protective outer envelope or small rigid mailer so the pressed details are not crushed.
A very easy variation uses one pressed petal and one short filler stem positioned near the lower corner. Simplicity is not a compromise here; it usually makes the natural shapes easier to notice.
Flower Bouquet Reuse Mistakes That Can Spoil the Keepsake
Waiting until the bouquet is mouldy before sorting it. Once moisture and decay spread through the stems, the safest option is disposal rather than crafting. Separate useful pieces while the flowers still smell fresh and feel structurally sound.
Drying petals in a pile causes uneven results. The outer pieces may feel crisp while moisture remains trapped underneath. Spread the flowers in one layer or use small hanging bundles with enough air between them.
Using thick flower centres in flat crafts creates lumpy bookmarks and cards. Choose individual petals, tiny blooms, and fine stems for projects that need to close inside a book or envelope.
Adding too much adhesive can stain petals and buckle paper. Use small amounts on the strongest contact points, then press through clean paper instead of rubbing the flower directly.
Placing dried flowers near flames or strong heat is unsafe and also makes them more brittle. Keep garlands, cards, petals, and other dry plant material away from candles, heaters, cooking areas, and hot light fittings.
Assuming every decorative bouquet is suitable for skin, food, tea, or bath products is another mistake. You may not know how the flowers were grown or treated, so keep these ideas decorative unless the material was specifically prepared for another safe use.
Trying to save every part can weaken the finished design. I’d rather preserve four clean pieces than hide damaged petals among them. The memory belongs to the bouquet as a whole, even when only the strongest details continue into the new object.
Frequently Asked Questions
When should I start reusing a flower bouquet?
Begin sorting it when the flowers start to soften but before the stems smell unpleasant or show mould. Firm petals and clean stems dry more successfully than flowers left in old water for several extra days.
Can I press flowers that have already dried in a vase?
You can press thin petals and small flat pieces when they remain flexible enough to lie down without crumbling. Fully dried thick flower heads are better for a bowl or garland because pressing may break them.
Do I need resin to make the transparent bookmark?
No. Clear self-adhesive laminating sheets can create a similar transparent effect with fewer tools. Press the flowers completely flat first and leave a sealed clear border around them.
Should I add essential oil to the potpourri?
It is optional. The dried petals can remain an unscented decorative display. When adding any fragrance, test a small amount and keep the bowl away from children, pets, delicate furniture, and fabrics.
How can I stop dried flowers from shedding?
Handle them as little as possible, keep them away from strong airflow, and remove very loose outer petals before arranging. Some natural shedding is normal, especially with roses and tiny filler flowers.
Can children help with these bouquet projects?
Children can help sort colours, arrange flat petals, and choose card layouts with supervision. Adults should handle sharp scissors, strong adhesives, wall hooks, and any material that may be unsafe if touched or swallowed.
How should I store leftover pressed flowers?
Place them flat between clean sheets of paper inside a labelled envelope or book. Keep them dry, out of direct sunlight, and separate from thick stems that could crush the more delicate petals.
Keep the Meaning Without Keeping the Whole Bouquet
The most useful lesson in learning how to reuse flower bouquets is that you do not need to preserve every stem exactly as it arrived. A bowl of dry petals, one transparent bookmark, a short garland, or a simple pressed-flower card can hold the colour and memory in a form that is easier to use and care for.
Begin with the project that suits the bouquet’s current condition. Loose petals belong in the bowl, flat pieces work in paper crafts, and complete dry stems can hang on the garland. Once you stop asking every flower to do the same job, the sorting becomes much easier.
Which part of your next bouquet would you save first: the petals, the fine filler flowers, or one recognisable rose?