A broken umbrella often looks completely useless because one bent rib or torn panel can stop it from doing the job it was made for. Even so, the frame, canopy, shaft, handle, and opening mechanism may still offer several practical materials. The curved ribs can support plants or hold lightweight items, while a clear canopy can protect something without blocking the light.
I like to separate an unwanted object into useful parts before deciding that it belongs in the bin. I don’t think every umbrella needs to be restored as an umbrella. Sometimes the easiest and safest second use comes from accepting the damage, removing the unreliable parts, and using what remains in a completely different way.
The four projects below keep the construction manageable. Two use the shape of an open umbrella outdoors, and two take advantage of the frame as a lightweight hanging structure.
What matters most is checking the metal carefully, covering sharp tips, and choosing a location where wind, moisture, or weight will not turn a simple reuse idea into a problem.
Before You Begin with an Old Umbrella
Open the umbrella slowly in a clear area and watch how the ribs move. A damaged mechanism can snap shut without warning, and broken metal ends can be sharper than they appear. Wear gloves while inspecting the frame, keep your face away from the tips, and remove the canopy only after deciding which parts the new project needs.
Leave These Umbrellas Out of a Repurposing Project
· Frames with several cracked, loose, or heavily twisted ribs
· Umbrellas with a locking mechanism that releases without warning
· Metal parts covered in deep rust, sharp flakes, or severe corrosion
· Canopies with mould, a persistent damp smell, or unknown contamination
· Clear plastic that has become brittle, cloudy, or split around the seams
· Fibreglass ribs that are splintering or exposing fine fibres
· Handles or shafts that cannot support the planned weight
· Umbrellas that cannot be secured safely against wind or movement
· Frames with sharp tips that cannot be capped, removed, or turned inward
A frame with minor damage may still be useful after the unsafe part has been removed. However, an umbrella that continues to collapse, shed rust, or expose sharp material is not worth forcing into another project.
Before Reusing a Broken Umbrella, Inspect
· The condition of every rib, stretcher, joint, and tip
· Whether the opening catch stays locked in position
· Whether the central shaft is straight enough for the new use
· The strength of the handle, top cap, and runner
· Loose wire, protruding fasteners, and rough cut edges
· Rust around hinges and places where water collects
· Tears, stretched seams, and weak areas in the canopy
· Whether the project will remain indoors, under cover, or fully outdoors
· How the frame will be fixed to a pot, beam, post, planter, or stand
· Whether the finished project can be taken down during strong wind
· Whether children, pets, wildlife, or passing people can reach sharp parts
Test the arrangement without plants, seed, or other contents first. Gently shake the support, check every fixing point, and make sure the umbrella cannot rotate or drop unexpectedly.
Useful Materials and Tools
· Protective gloves and safety glasses
· Pliers, wire cutters, and screwdrivers
· Metal file or fine abrasive paper for rough edges
· Rubber end caps, corks, beads, or other secure tip covers
· Cable ties, coated garden wire, strong cord, or small metal clips
· Outdoor-safe paint or rust-resistant coating where appropriate
· A sturdy planter, barrel, post, beam hook, or weighted base
· Drill and suitable fixings for the chosen supporting surface
· Wooden clothes pegs or small stainless-steel clips
· Scrap timber for a tray or mounting block
· A level, tape measure, pencil, and scissors
· Cleaning cloths, mild soap, and a soft brush
Choose only the items needed for the individual project. A plant support may require a heavy pot and soft ties, while a hanging rack depends more on a properly rated ceiling hook and balanced weight.
Turn a Bare Umbrella Frame Into a Flowering Vine Support
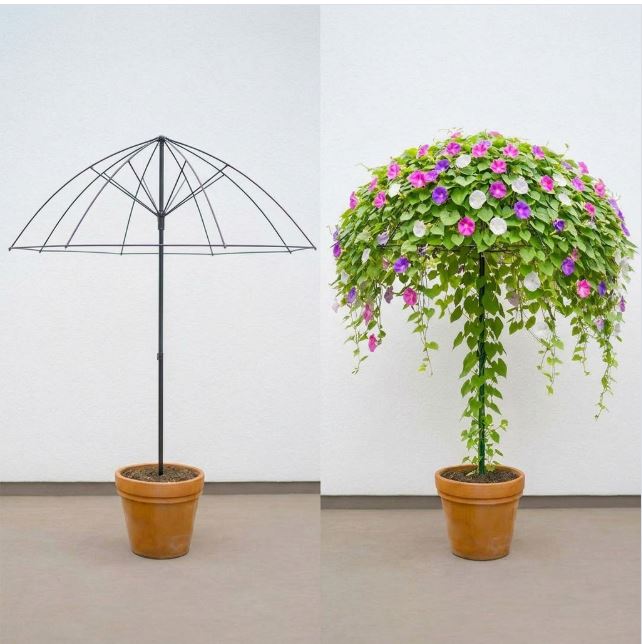
The open ribs of an umbrella already create the rounded outline that many climbing plants need. Fixed upright in a large pot, the frame becomes a dome-shaped trellis rather than a weather cover. As the stems move across the ribs, flowers and leaves gradually soften the metal structure and create a compact canopy above the container.
This idea works best with a trailing or twining plant that can be guided without thick, woody growth. The pot needs enough width and weight to keep the central shaft upright, especially once the foliage becomes wet. I would treat the frame as a support rather than the plant’s only anchor, because a full canopy can catch far more wind than the empty umbrella suggests.
The spacing between the ribs also makes training simple. Stems can be directed outward from the centre and tied loosely along several lines instead of being forced onto one narrow stake. A little uneven growth is not a problem here; the natural variation helps the finished canopy feel softer.
Materials and Tools
· Umbrella frame with the fabric removed and the mechanism securely locked
· Large, heavy planter with drainage holes
· Potting mix suitable for the chosen flowering vine
· Trailing or twining plant suited to the local light and climate
· Soft plant ties, garden twine, or reusable clips
· A strong stake, pipe sleeve, or hidden support for the central shaft
· Rubber caps or another secure covering for every exposed rib tip
· Optional rust-resistant coating for a bare metal frame
A Practical Way to Recreate the Look
1. Prepare the frame safely. Remove loose fabric and thread, then inspect every rib and joint. File rough edges, cap exposed tips, and make sure the open frame cannot suddenly collapse while you are working around it.
2. Build a stable base inside the planter. Position a strong stake or sleeve through the centre of the pot, then secure the umbrella shaft to it rather than relying on soil alone. Add potting mix around the support and press it firmly without blocking the drainage holes.
3. Plant around the central support. Space the vine according to its growing needs and leave enough room for watering. Direct the strongest stems toward different ribs so growth begins to spread evenly across the frame.
4. Guide the canopy gradually. Tie stems loosely at several points, keeping the ties away from soft new growth. Then check the frame every few weeks, move stems into open areas, and remove any tie that begins to tighten around the plant.
5. Keep the structure manageable. Trim excessive weight, water at soil level, and move the planter to shelter before severe weather where possible. If the pot cannot be moved, use additional ground or wall support so the canopy does not pull the frame sideways.
For a smaller version, use a compact umbrella frame over a deep balcony planter and choose a light trailing plant. You could also leave part of the frame visible instead of aiming for complete coverage. I know it can feel tempting to plant several vigorous vines for faster growth, but one manageable plant is often easier to train and safer for the support.
Reuse Clear Umbrellas as Protective Garden Cloches
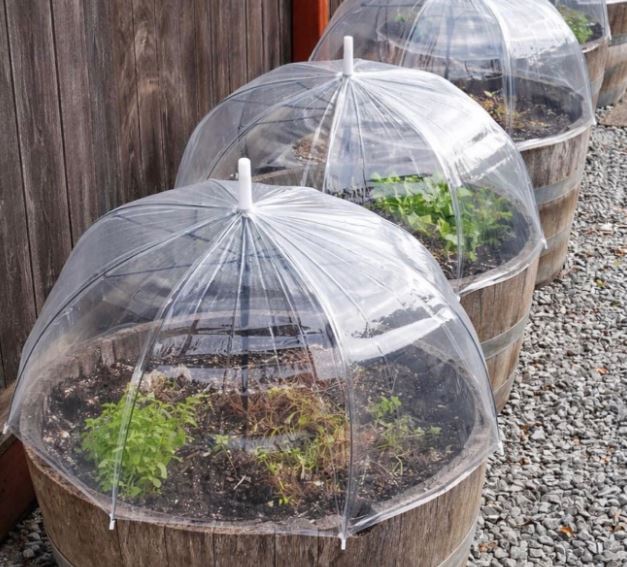
A clear umbrella can work like a simple removable cloche when its canopy remains intact. Opened over a raised planter, the dome keeps light rain, light frost, and some garden debris away from young growth while allowing daylight through. The ribs hold the plastic above the leaves, so the cover does not rest directly on delicate stems.
Ventilation matters more than creating a perfect seal. A clear canopy can warm quickly in direct sun, particularly when the edges sit close to the planter. Leave controlled gaps around the base, lift the cover during warm periods, and check the soil rather than assuming the protected planter needs less water.
The umbrella should remain easy to remove. That makes watering, harvesting, and temperature control much simpler than permanently fixing plastic over the planter. The handle or shaft may be shortened only when this can be done safely and the cut end is properly covered.
Materials and Tools
· Clear umbrella with a sound canopy and stable ribs
· Raised bed, barrel planter, or large container narrower than the open canopy
· Soft cord, reusable ties, or clips for light anchoring
· Rubber caps for exposed tips and any shortened metal ends
· Small spacers or blocks to create ventilation gaps where needed
· Thermometer for checking heat beneath the cover, especially in spring sun
· Optional rust-resistant coating for exposed metal joints
A Practical Way to Recreate the Look
1. Clean and inspect the clear canopy. Wash both sides gently, check the seams, and open the umbrella several times away from people. Do not use a brittle canopy or a frame that releases from the locked position.
2. Test the fit over the planter. The ribs should sit outside the growing area without pressing against leaves. Confirm that the cover can be lifted easily and that the edges do not scrape the planter or create sharp contact points.
3. Create safe ventilation. Support one or two edges slightly above the rim or leave regular gaps around the base. On bright days, check the temperature beneath the canopy and remove it if heat or condensation builds up.
4. Anchor it lightly but securely. Use soft ties or clips that prevent the umbrella from shifting in a breeze while still allowing quick removal. Never depend on a lightweight planter to hold a large open umbrella during strong wind.
5. Use the cover only when it helps. Replace it after watering or during cool, wet conditions, then remove it in warm weather and whenever the plants need pollinator access. Dry the umbrella before storage so moisture does not remain around the joints.
A clear child’s umbrella may suit a single container, while a larger canopy can cover a barrel planter. For a simpler arrangement, place the umbrella over the bed only at night or during persistent rain. I would not use this as a sealed mini-greenhouse; the good thing about the umbrella is that it can be lifted in seconds whenever the plants need fresh air.
Hang an Umbrella Frame as a Herb-Drying Rack
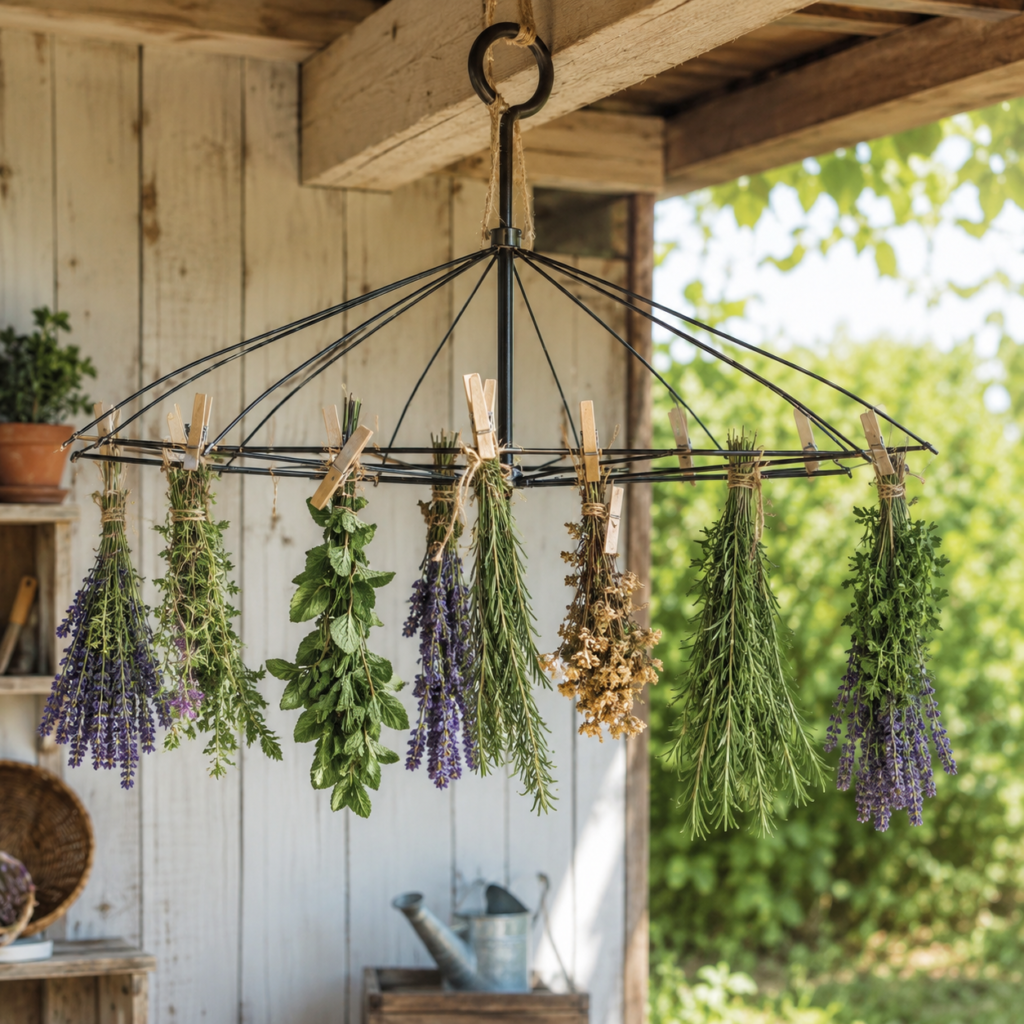
Once the canopy has been removed, an umbrella frame offers several evenly spaced places for clips. Hanging the frame upside down beneath a covered beam turns the outer rib ends into a circular drying rack. Small herb bundles can sit around the rim with enough space between them for air to move.
This use is particularly practical because the frame is already light and collapsible. It can be taken down after the harvest season or folded for storage if the mechanism still works safely. The location should remain dry, shaded, and well ventilated; direct rain or strong sun will undo the purpose of careful drying.
Balance matters. Heavy wet bunches on one side may tilt the frame and strain the hanging point, so keep the bundles small and distribute them evenly. I would rather dry several light batches than crowd every rib and wait longer for damp leaves in the centre to dry.
Materials and Tools
· Clean umbrella frame with the canopy removed
· Properly rated ceiling, beam, or wall hook
· Strong cord, chain, or closed metal ring for suspension
· Wooden clothes pegs or small stainless-steel clips
· Kitchen twine for tying loose herb bundles
· Fresh, clean herbs suitable for air drying
· Rubber caps for every reachable rib end
· Optional washable tray below the rack to catch small leaves
A Practical Way to Recreate the Look
1. Strip and clean the frame. Remove every scrap of canopy fabric, thread, and loose wire, then wash and dry the metal. Cap the rib ends and confirm that the runner stays firmly in the open position.
2. Install a reliable hanging point. Fix a hook into a structural beam or use another support rated for more than the finished rack will weigh. Do not hang the umbrella from decorative trim, a weak nail, or an adhesive hook that may release without warning.
3. Suspend the frame level. Attach cord or a closed ring around a strong central point and test the empty rack first. Adjust the connection until the rim sits approximately level and cannot slide along the shaft.
4. Prepare and space the herbs. Shake away soil, remove damaged leaves, and tie small bundles loosely at the stems. Clip them around the rim with gaps between each bunch, then rotate or rebalance the bundles if the frame begins to tilt.
5. Check the drying herbs regularly. Remove any leaves that show mould or remain damp, and keep the rack away from cooking steam and dust. Once the herbs are fully dry, store them appropriately and wipe the frame before the next batch.
Small flowers, seed heads, or non-food foliage could be dried in the same way on a separate clean rack. A beginner can use only four or five clips rather than filling the entire circle. The frame should never hang where people will walk into the ribs, so a sheltered corner above a workbench is much better than the centre of a doorway.
Make a Rain-Sheltered Bird Feeder with a Clear Umbrella
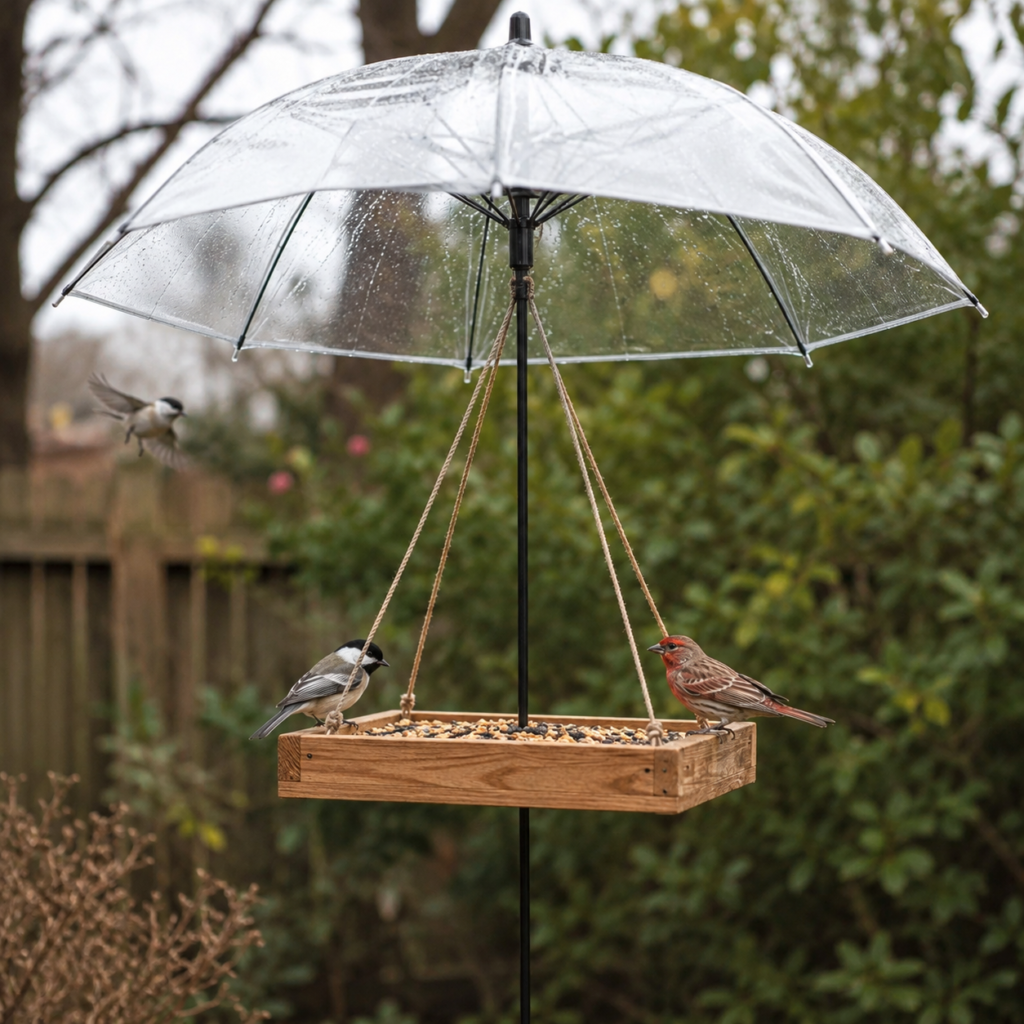
A clear umbrella can provide a simple roof above an open bird-feeding tray. The broad canopy helps keep part of the seed drier, while the transparent material preserves an open view of the surrounding garden. The tray remains fully accessible from the sides, which is important because the umbrella should shelter birds rather than enclose them.
The safest version uses the umbrella as a separate cover with the feeder suspended below it. Birds need clear flight paths, and there should be no loose cord loops near the tray. The canopy also needs enough height above the feeding surface so wings cannot strike the ribs during landing or departure.
A covered feeder still requires regular cleaning. Damp seed can spoil even when the canopy blocks direct rain, especially if wind blows water under the edge. I would keep the tray shallow, add drainage, and refill it with smaller amounts rather than allowing old seed to collect.
Materials and Tools
· Clear umbrella with an intact frame and canopy
· Stable post, pole, or support that can hold the umbrella upright
· Shallow wooden feeding tray with drainage holes
· Three or four equal lengths of strong weather-resistant cord
· Closed screw eyes or secure tray fixings
· Bird seed suited to common local garden birds
· Rubber caps for all exposed tips and cut metal ends
· Outdoor-safe finish for the wooden tray if needed
· Brush and mild cleaning supplies reserved for the feeder
A Practical Way to Recreate the Look
1. Prepare the umbrella and support. Clean the canopy, inspect the ribs, and secure the shaft to a stable post or weighted base. The umbrella must not spin, lean, or lift in normal weather, and it should be removed before strong winds.
2. Build or refresh a shallow feeding tray. Smooth the edges, add small drainage holes, and avoid deep sides that reduce visibility. Fix closed attachment points near the corners so the suspension cords cannot slip free.
3. Hang the tray evenly below the canopy. Use equal cord lengths and keep every knot or connector tight against the tray rather than leaving loose loops. Adjust the height until birds have generous open space between the seed and the umbrella ribs.
4. Test the flight path and stability. Step back and confirm that birds can approach from several directions without passing through cords. Add a small amount of seed, watch the tray for tilting, and correct any imbalance before regular use.
5. Maintain the feeder routinely. Discard wet or spoiled seed, brush away husks, and clean the tray regularly. Move the feeder if droppings collect beneath it or if the location allows predators to hide close to the feeding area.
A smaller tray can sit on a post beneath the umbrella instead of hanging from cords. You could also use an opaque canopy if visibility beneath it remains good, although a clear one keeps the area brighter. Avoid placing the feeder directly beside a reflective window; choose a calmer garden position with a clear route to nearby cover.
Umbrella Repurposing Problems That Are Easier to Prevent
· Leaving sharp rib tips exposed where hands, pets, or wildlife can reach them
· Using the original locking mechanism as the only protection against collapse
· Placing an open umbrella outdoors without planning for wind
· Adding more weight than the shaft, hook, planter, or tray can safely support
· Ignoring rust at joints because the rest of the frame still looks clean
· Allowing a clear garden cover to overheat plants in direct sun
· Hanging herb bundles so closely that air cannot circulate
· Using loose strings or open loops around a bird feeder
· Treating a canopy as waterproof after its seams have begun to split
· Forcing a damaged frame to open or close after it begins catching
The most common mistake is trying to preserve every part of the umbrella. There is no need to keep a broken handle, torn canopy, or unreliable hinge simply because it belongs to the original object. Removing the unsafe part usually makes the second use cleaner and more dependable.
Looking After a Repurposed Umbrella
Check outdoor frames after windy weather and whenever the season changes. Tighten loose ties, replace cracked caps, and remove rust before it spreads around a moving joint. Clear plastic should be washed with a soft cloth rather than an abrasive pad that could scratch or weaken the surface.
Hanging projects need regular attention at the hook and centre connection. Take the rack down before adjusting clips or cleaning the frame instead of reaching into exposed ribs overhead. For the bird feeder, clean the tray more often than the umbrella; the canopy is useful only when the food beneath it remains fresh and safe.
When the umbrella reaches the end of its second use, separate the materials where local recycling services allow. Metal frames, fabric panels, plastic canopies, wooden trays, and cords may need different disposal routes. Reuse is most helpful when it remains practical and safe rather than delaying disposal of material that has already failed.
A Broken Umbrella Can Still Have a Practical Second Use
The curved frame is what makes an unwanted umbrella so adaptable. It can guide climbing stems, hold clips around a drying circle, or support a canopy above something that needs partial shelter. None of these uses requires complicated decoration. The useful shape is already there.
I especially like projects that keep the parts easy to inspect and remove. A plant support can be trimmed and secured, a clear cloche can be lifted when the weather changes, a drying rack can be taken down after use, and a feeder can be cleaned without dismantling the whole garden arrangement. That simplicity is what gives an old umbrella a realistic chance of staying useful rather than becoming another unfinished craft project.
Frequently Asked Questions
Can every broken umbrella be repurposed?
No. Avoid frames with severe rust, splintered fibreglass, unpredictable locking mechanisms, or several broken ribs. Repurpose only the parts that remain strong enough for the planned use.
How can I cover sharp umbrella ribs?
Use secure rubber caps, cork pieces, strong beads, or another covering that cannot slip off easily. File rough metal first and check the covers regularly, especially outdoors.
Will a clear umbrella cloche overheat plants?
It can. Clear plastic traps warmth quickly in direct sunlight, so leave ventilation gaps, monitor the temperature, and remove the cover during warm periods.
Can the herb rack be used indoors?
Yes, provided it hangs from a structural support in a dry, airy position where nobody can walk into the ribs. Keep it away from cooking steam, damp rooms, and dusty areas.
Is an umbrella bird feeder safe in windy weather?
An open umbrella can catch strong wind, so the structure must be firmly supported and removable. Take it down before storms or persistent high winds, even if the base feels heavy.