Old lamp shades are awkward things to throw away because even a tired shade often has more structure left in it than you first notice. The fabric may be dated, the trim may be loose, or the colour may no longer suit the room, yet the rings, spokes, lining, and overall shape can still be surprisingly useful. A lamp shade is already a ready-made form: it can hang, stand, contain, display, or frame something else with only a modest amount of work.
I’m always interested in the point where an ordinary household leftover starts to suggest a new job. With lamp shades, I don’t think the best approach is to disguise every trace of the original object. The tapered sides, circular rims, and open framework are exactly what make these projects interesting. If the original shape helps the new purpose, keeping some of it visible usually makes the finished piece feel more deliberate.
These repurposed lamp shades range from practical storage to garden and craft-room ideas, but the same principle runs through all of them: choose a new use that respects the strength, material, and scale of the shade you already have. That is what turns a leftover object into something you will actually keep using.
Before You Start
Set the shade on a clear work surface and look at it as a structure rather than as part of a lamp. Check the top and bottom rings, the central fitting, any vertical spokes, the fabric covering, and the trim. A shade that looks fine from across the room can have a loose seam, cracked plastic lining, rust, bent wire, brittle paper, or a wobbly ring that becomes more obvious once you start handling it. Small cosmetic flaws are often easy to work around; structural weakness matters much more.
Clean the shade in a way that suits its material. A soft brush or vacuum attachment can lift dry dust from fabric, while a lightly damp cloth may be suitable for a painted metal frame. Avoid soaking paper-backed or glued fabric shades because water can soften adhesive and distort the covering. If you plan to strip off the fabric, remove it carefully rather than tearing randomly around the frame. A slow removal lets you see how the material was attached and gives you a cleaner frame to reuse.
Think about where the finished item will live before you choose the project. Indoor shades are not automatically suitable for outdoor use, and a delicate decorative shade should not be expected to carry wet soil, heavy tools, or a large pet. The same rule applies to hanging projects: the frame, chain, connector, ceiling hook, and wall fixing all need to suit the final weight. I know it can feel tempting to decide that an old frame is ‘probably strong enough,’ but this is one of those moments when checking first saves a lot of trouble later.
Keep any original electrical components completely separate from these repurposing projects. The ideas here reuse the shade or shade frame, not the lamp wiring, bulb holder, damaged cord, or electrical fitting as a new powered object. If a shade has soot marks, heat damage, melted plastic, or brittle material from previous lamp use, treat that as a sign to remove the damaged parts rather than decorating over them.
Match the Lamp Shade Shape to the New Purpose
The shape of the shade tells you a lot about what it can become. Drum shades have straight sides and a wide opening, so they are naturally suited to storage bins, memo boards, and low pet beds. Tapered shades create a basket-like silhouette, which works well for hanging planters, jewelry storage, and feeders. Bare wire frames are especially useful in craft rooms because the rings and spokes already provide places to hang ribbon, tools, tags, or lightweight accessories.
Size matters just as much as shape. A small bedside shade can become a compact bracelet holder or little dried-flower hanging piece, while a large floor-lamp shade has enough capacity for towels, yarn, or a cushion. Try not to force a tiny shade into a job that needs volume, or a very large frame into a small wall area where it will feel awkward. One of the easiest ways to make an upcycled object look intentional is simply to keep the scale appropriate to the room and the function.
The existing finish can also help you decide. A neutral linen drum shade might only need a clean edge to work as shelf storage. A frame with attractive aged metal can look good left exposed in a craft room. A stained or patterned fabric shade may be better stripped back completely. There is no prize for preserving every original layer. Reuse is about keeping what still contributes value and removing what gets in the way of the new job.
Before you cut, paint, glue, or remove trim, make a quick mock-up. Put the shade where you plan to use it, place a cushion inside it, drape a few necklaces over the frame, or set an empty liner into it. That five-minute test often reveals whether the proportions make sense. The first idea is not always the right one, and changing direction before you permanently alter the shade is much easier than trying to rescue a project halfway through.
Clean, Repair, and Test the Frame Before Repurposing
A repurposed lamp shade will only look as finished as the frame underneath it. Straighten minor bends gently with your hands or pliers, working a little at a time so you do not kink thin wire. Tighten loose wrapped joins where possible, remove flaking rust, and cover sharp cut ends. If the frame is badly distorted or a ring has separated from several spokes, choose a very lightweight decorative use or set that frame aside rather than asking it to carry weight.
Fabric shades need a different kind of repair. If the covering is worth keeping, trim loose threads, reattach lifting edging, and test any glue on a hidden area first. Old adhesives can stain some fabrics, and too much new glue can create darker patches that show through when the shade is viewed in daylight. For projects such as memo boards and storage bins, a simple fabric wrap or liner can hide tired areas without requiring a full re-covering job.
For outdoor ideas, think beyond appearance. A frame that is structurally fine indoors may rust quickly outside, and decorative trims can hold water. A planter liner needs drainage; a bird feeder needs a surface that can be cleaned; a hanging arrangement needs hardware that will not pull free in a breeze. If the shade material is not suitable for weather, adapt the idea for a covered porch or use only the bare metal frame.
Finally, test the new function before adding the decorative finishing touches. Hang the empty basket, place the storage bin on its shelf, set the pet-bed form on the floor, or load the ribbon frame with a few sample spools. Once you know the structure works, then you can refine the look. I would rather spend time correcting a practical issue early than perfectly finish a project that never quite works.
Turn a Wire Lamp Shade Into a Hanging Herb Basket
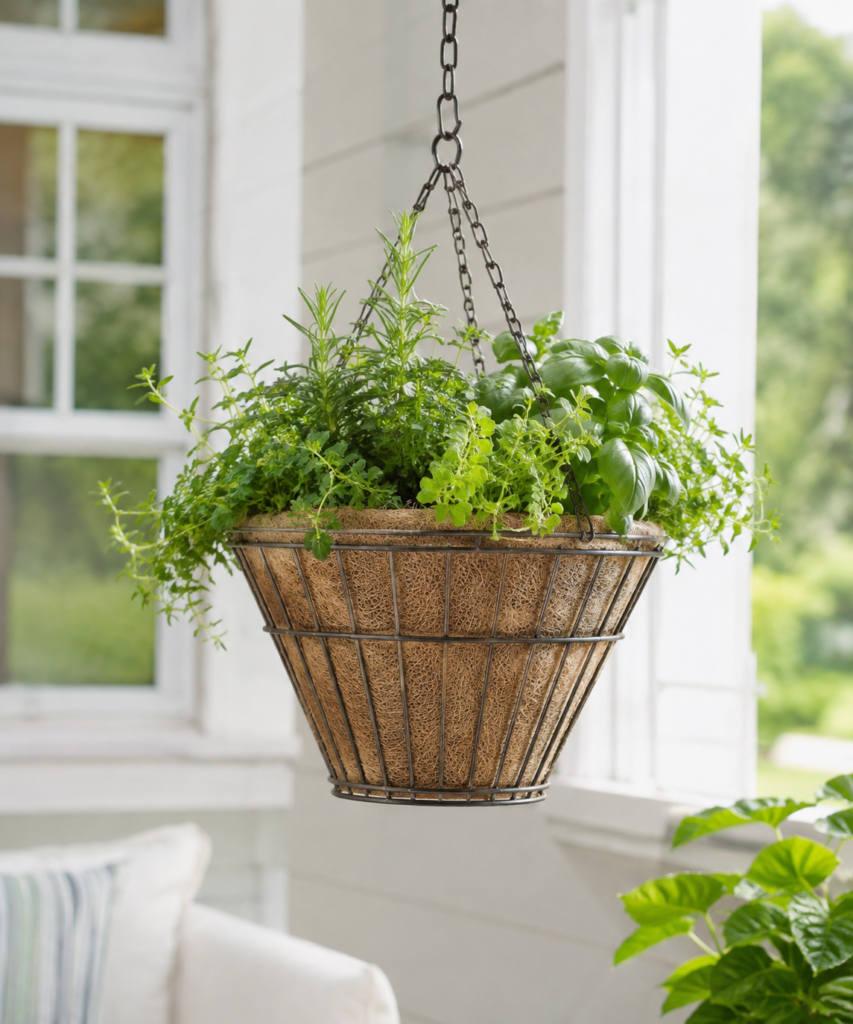
A wire lamp shade has almost the same basic geometry as a hanging basket: a top opening, a tapered body, strong rings, and several points where a chain can be attached. That makes a stripped shade frame a very natural starting point for an herb planter. The visible frame gives the finished basket a slightly industrial or vintage character, while a coir-style liner softens the look and keeps the planting mix contained.
The important part is choosing a frame that can genuinely handle the new load. Dry potting mix may feel light in your hand, but once it is watered and filled with plants, the basket becomes much heavier. Look for a frame with firm rings, secure spokes, and no loose soldered or wrapped joins. If the frame flexes when you press the sides, I would use it for a lightweight faux-greenery project instead of a real planter.
Herbs suit this kind of container because many stay compact enough for a hanging arrangement and are useful near a kitchen or porch. Basil can give the basket a fuller centre, while thyme, oregano, or other trailing herbs can soften the outer edge. Rosemary-like upright growth adds height. You do not need to copy one exact planting combination; choose herbs that suit the light available and the size of your basket.
The liner matters more than decoration here. It needs to sit snugly against the frame and hold the growing medium without collapsing through the gaps. A natural coir or basket liner is a practical option because it can be shaped into a tapered frame. If the liner is slightly oversized, fold and overlap it neatly rather than trimming aggressively at the first attempt. You can always remove a little more later, but you cannot add the missing edge back.
Think carefully about drainage and where the planter will hang. Water needs somewhere to go, which means an indoor basket can drip unless you water slowly or temporarily move it over a sink or tray. A covered porch, sunroom with a protected floor, or bright kitchen area with an easy watering routine is more practical than placing it directly above upholstery. The finished basket should be reachable enough that trimming and watering do not become a weekly balancing act on a chair.
Visually, the strongest part of this idea is the contrast between the dark frame and the soft green herbs. There is no need to hide every wire. In fact, I think the frame looks more convincing when it remains readable as the original structure. If you paint it, keep the finish simple and suitable for the environment rather than adding so many decorative layers that the planter becomes harder to maintain.
Materials and Tools
· A sturdy wire lamp shade frame
· Coir or similar hanging-basket liner
· Potting mix suited to the chosen herbs
· Compact herb plants or seedlings
· Three-point hanging chain or balanced cord system
· Secure hook or hanging support rated for the finished load
· Scissors and pliers for small adjustments
· Work tray or sheet for catching potting mix
A Practical Way to Make It
1. Prepare and test the bare frame. Remove old fabric and loose trim, then clean the metal and check every connection. Press gently on the rings to see whether they stay round and secure. Cover or file any sharp wire ends, and hang the empty frame briefly to check that it balances before adding weight.
2. Fit the liner before adding soil. Set the liner inside the frame and shape it into the taper, keeping the top edge even all the way around. Fold excess material neatly and trim only what is genuinely unnecessary. Then lift the empty lined basket by its chain to make sure the liner is not pulling one side out of shape.
3. Add potting mix and arrange the herbs. Fill the liner partway, place the plants in position, and check the overall balance before adding the remaining mix. Keep taller herbs nearer the centre and trailing varieties closer to the rim. Then firm the soil lightly around the roots without packing it so hard that water cannot move through the container.
4. Hang, water, and adjust. Move the planter to its final location and water slowly the first time so you can see how the liner drains. If the basket tilts, correct the chain rather than compensating with more soil on one side. Trim and rotate the herbs as they grow so the arrangement stays usable and balanced.
One thing I would check carefully
I would test the hanging point with the planted basket while keeping one hand beneath it the first time. The shade frame may be the interesting part of the project, but the ceiling hook or wall bracket is what ultimately carries the weight. That support deserves just as much attention as the frame itself.
Troubleshooting and Finishing Notes
If the basket leans, first check the chain lengths and attachment points rather than moving the plants around. Uneven suspension is usually easier to correct at the hardware.
If the liner dries too quickly, move the basket out of intense direct heat or choose a location that is easier to monitor. A smaller hanging container often needs more attentive watering than a large floor pot.
If the frame starts to rust, move it to a more sheltered location and decide whether an appropriate protective finish makes sense for future use.
Variations and Alternatives
· Use trailing flowers instead of herbs for a covered porch display.
· Fill the basket with faux greenery if the original frame is too light for soil.
· Use a natural metal finish for a rustic look or a restrained indoor paint finish if the frame needs refreshing.
· Turn a smaller shade frame into a hanging succulent-style display using lightweight pots nested inside rather than filling the entire frame with soil.
Make a Lamp Shade Jewelry Organizer for a Bedroom Wall
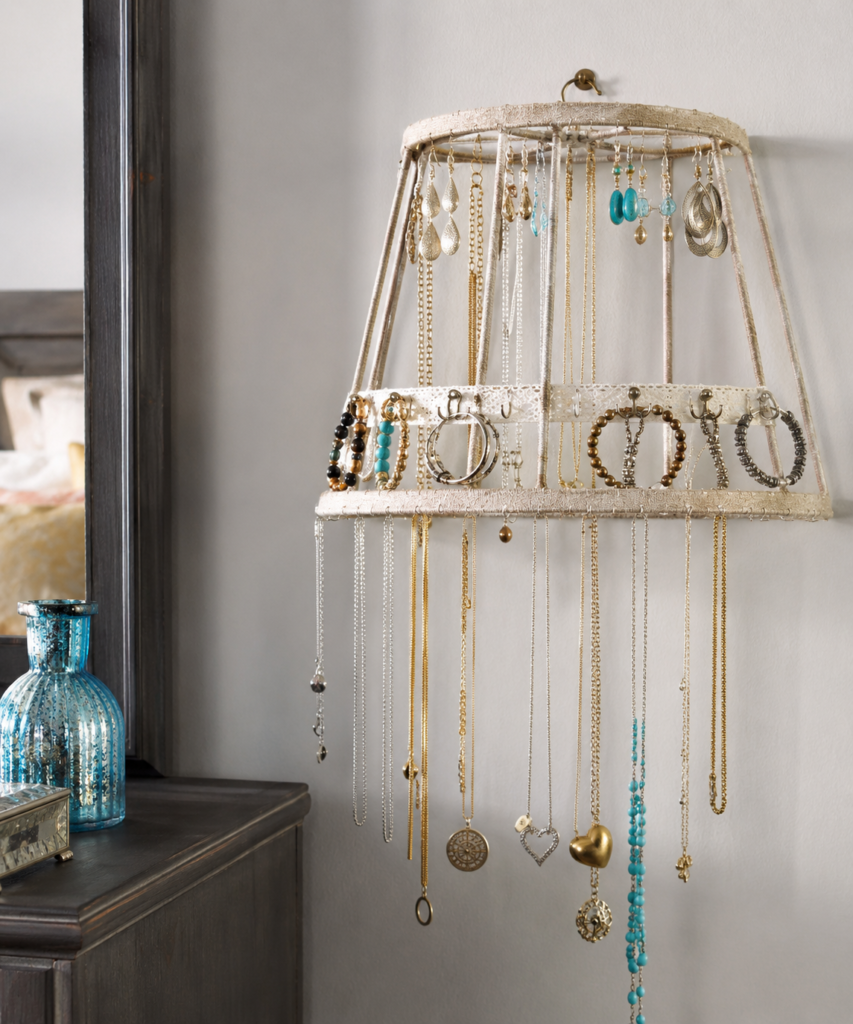
A tapered lamp shade can become a surprisingly useful jewelry organizer because the shape naturally separates different kinds of pieces. Long necklaces can hang from the lower rim, earrings can use small openings near the top, and bracelets can sit around a middle band or on added hooks. Instead of hiding jewelry inside a drawer, the organizer keeps it visible and turns the collection into part of the room.
This works best with a frame that is reasonably open. If the original shade has thick opaque fabric, you can strip it away and keep the metal skeleton, or retain narrow fabric bands if they provide useful places to attach clips. A softly wrapped frame can look finished without becoming bulky. What matters is that the jewelry has clear hanging space and that the frame itself does not have rough points that could scratch delicate chains.
Before adding hooks, sort the jewelry you actually wear. A person with mostly long necklaces needs a different layout from someone with many earrings and bracelets. Measure the longest pieces against the shade so you know whether the bottom rim offers enough drop. If necklaces will touch a dresser top or overlap one another heavily, a taller frame or higher mounting point will work better.
The wall placement is important. Put the organizer where you can reach it comfortably and where swinging necklaces will not knock against a mirror edge, door, or lamp. A small wall hook can be enough for a lightweight frame, but the fixing still needs to match the wall surface. If you prefer a renter-friendly option, a sturdy frame can sometimes sit on a dresser stand or hang from an existing rail rather than being permanently mounted.
I like the way this project makes the shade form visible instead of trying to disguise it. The curved outline gives the jewelry room to hang at slightly different depths, which helps reduce tangling. The shape also means you can rotate or reposition the organizer if it hangs from a single top point, although a fixed wall position may be better if you use it every day.
Avoid turning every inch into a hook. Jewelry storage needs negative space just as much as decorative display does. A row of necklaces with a finger-width gap between them is usually easier to use than twenty chains compressed into the same area. The organizer should make choosing a piece quicker, not turn the morning routine into a puzzle.
Materials and Tools
· Tapered lamp shade or bare shade frame
· Wall hook, rail hook, or other suitable hanging support
· Small S-hooks, earring loops, ribbon tabs, or clips
· Optional narrow ribbon, lace, or fabric wrap
· Pliers for shaping small hooks
· Soft cloth for cleaning the frame
· Small felt pads if any part of the frame rests against the wall
A Practical Way to Make It
1. Clean and simplify the frame. Remove dust and any loose fabric, then decide which original materials still help the design. Keep strong bands that can hold clips and remove only the parts that block access. Smooth sharp points and straighten small bends so delicate chains will not snag.
2. Map out the jewelry zones. Lay a few necklaces, earrings, and bracelets around the shade before attaching extra hardware. Give long pieces the lowest or widest areas, keep frequently used earrings near eye level, and leave enough open space that you can lift one item without disturbing several others.
3. Add only the hooks you need. Use existing rings and openings first, then add small hooks, loops, or ribbon tabs where they solve a real storage problem. Keep the additions lightweight and evenly distributed. If one side starts to feel crowded or heavy, move pieces before adding more hardware.
4. Mount it and load it gradually. Hang the empty organizer securely and check that it sits level against the wall. Add a few jewelry pieces at a time, starting with lighter items, then watch for twisting or sagging. Once the balance feels right, arrange the rest of the collection by type or frequency of use.
For me, spacing matters more than decoration
I would rather see twelve necklaces hanging clearly than twenty-five overlapping in a shiny tangle. The shade already has visual character, and the jewelry adds plenty of colour and texture. Extra embellishment is optional; usable spacing is not.
Troubleshooting and Finishing Notes
If earrings fall through wide gaps, add one narrow strip of mesh, lace, or tightly spaced ribbon rather than covering the whole frame.
If necklaces twist together, move the hooks farther apart or stagger them at different heights.
If the frame marks the wall, add small felt pads at contact points or hang it slightly forward from the surface.
Variations and Alternatives
· Use a small shade only for bracelets and hoop earrings.
· Add a narrow mesh panel for studs and small hooks while leaving the rest of the frame open.
· Keep a neutral wrapped frame in a bedroom or use a bare aged-metal frame in a more industrial dressing area.
· Place the organizer inside a wardrobe door if you want the jewelry hidden when the door is closed.
Use a Lamp Shade as a Hanging Botanical Planter Cover
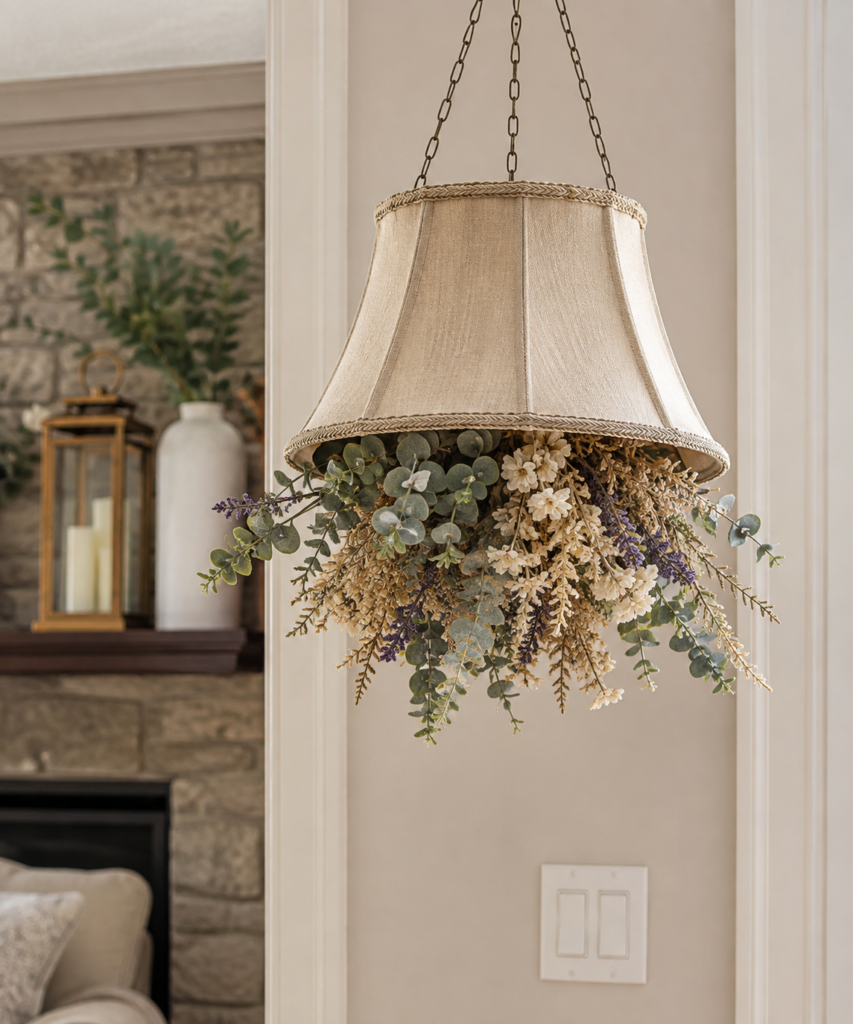
Some lamp shades are worth keeping because the fabric still looks attractive even after the lamp itself has gone. Turning one into a hanging botanical feature lets you use that finished outer surface without asking it to behave like a heavy planter. The shade becomes a collar around a lightweight arrangement of greenery and flowers, while the original trim and taper create a natural boundary for the stems.
This is a particularly good option for a shade that would not cope well with wet soil. Faux greenery, dried grasses, preserved stems, or lightweight seasonal florals can create fullness without adding much weight. That means the hanging hardware can stay simple, and the fabric is less likely to be stained by water. You still need a stable frame, but the structural demands are much lower than they are for a planted basket.
Look at the shade from below before you begin. The underside will be visible once the piece is hanging, so any rough glue, torn lining, or exposed cardboard ring may need tidying. A narrow fabric wrap or simple trim around the inner rim can make a big difference. I do not think every inner surface has to look factory-finished, but obvious loose edges will stand out at eye level.
The plant material should follow the outline of the shade. Start with a few stems that create the main direction, then build around them with softer foliage. A mix of round leaves, finer trailing pieces, and a small amount of floral colour usually looks more balanced than packing in many unrelated shapes. If every stem points straight down, the arrangement can feel stiff; if everything spreads outward, the shade itself disappears.
Consider the room around it. A neutral arrangement can work near a fireplace, console, or reading corner, while brighter seasonal stems may suit an entryway. Keep enough clearance from doors, ceiling fans, heat sources, and walking routes. Because the piece hangs lower than a normal shade might, it needs to feel intentionally placed rather than accidentally suspended in the path of anyone taller than average.
This is also one of the easiest ideas to refresh later. The shade can stay in place while the botanical material changes with the season. Spring foliage, dried autumn grasses, or simple winter greenery can all use the same frame, which means the repurposed object keeps earning its place instead of becoming a one-season craft.
Materials and Tools
· Fabric lamp shade with a sound frame
· Lightweight chain, cord, or hanging hardware
· Faux, dried, or preserved greenery and flowers
· Floral wire or reusable ties
· Lightweight floral foam, inner ring, or hidden support if needed
· Wire cutters for stems
· Optional trim for tidying the inner rim
A Practical Way to Make It
1. Prepare the visible underside. Clean the shade and inspect the lower and inner edges because they will be seen from below. Reattach loose trim, remove hanging threads, and cover rough areas with a narrow finish only if needed. Check that the top fitting can take the lightweight hanging hardware.
2. Create a hidden support for the stems. Fit a lightweight floral base, inner ring, or tied wire structure inside the shade so the stems have something secure to grip. Keep the support high enough that it disappears behind the outer fabric. Then hang the empty shade temporarily to confirm the support does not pull it out of shape.
3. Build the arrangement in layers. Place the main greenery first, then add trailing stems and small floral accents. Turn the shade or step around it frequently so the arrangement looks balanced from more than one angle. Then remove any piece that hides too much of the original silhouette.
4. Hang it at the right height. Use a secure hook and adjust the chain or cord so the arrangement has breathing room around it. Check clearances from doors, furniture, and heat sources. After it is hanging, make the final stem adjustments while viewing it from normal room height.
I know it can feel tempting to add more
This kind of project can go from full to overloaded very quickly. I would stop while the bottom edge of the lamp shade is still visible and the greenery looks as though it is emerging from the form, rather than completely swallowing it.
Troubleshooting and Finishing Notes
If the arrangement looks lopsided, remove weight from the heavy side before adding more to the light side. Less material often fixes the balance better than more.
If the floral base shows, move it higher into the shade or use a few strategically placed trailing stems to conceal it.
If the shade twists on its chain, use three balanced attachment points or a stabilizing inner ring rather than tightening the hanging cord excessively.
Variations and Alternatives
· Change the stems seasonally while keeping the same shade and hanging hardware.
· Use all-dried grasses for a more textural neutral look.
· Turn a very small shade into a compact hanging arrangement over a side table.
· Use only faux greenery if you want the piece to stay consistent with minimal maintenance.
Create a Fabric Storage Bin From a Large Lamp Shade
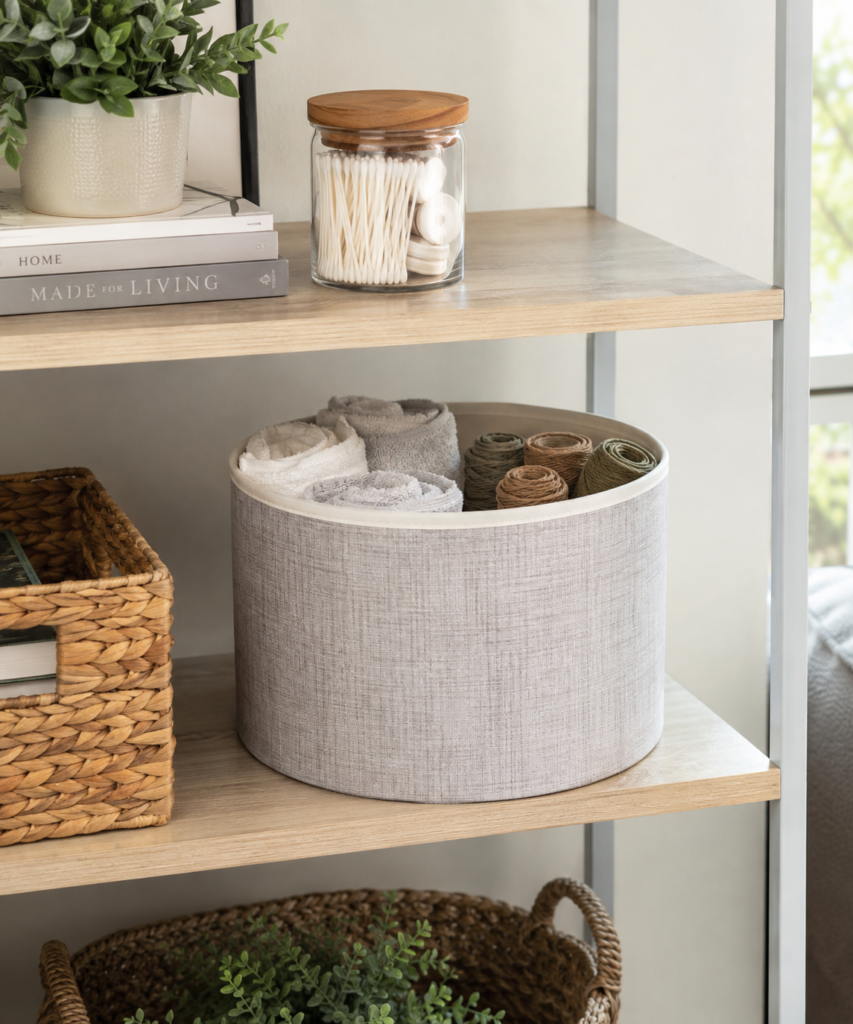
A large drum shade already looks a lot like a fabric storage basket. The sides are straight, the rim is finished, and the interior is usually deep enough to hold rolled towels, yarn, ribbon, spare fabric, or other lightweight household supplies. This is one of the simplest ways to repurpose lamp shades because you are not fighting the original construction; you are simply changing how the form is used.
The first question is whether the shade can stand steadily. Some drum shades have a lower ring that sits flat, while others have fittings or inner hardware that prevent the base from resting evenly. If the shade rocks, you may need to remove a protruding internal fitting that is no longer required or add a lightweight flat base insert. Do not cut structural spokes casually, because those parts often keep the circular shape from collapsing.
A base insert can be made from sturdy card, thin lightweight board, or another flat material that fits inside the bottom ring. It does not need to carry heavy loads if you are storing textiles. Its job is to stop small items dropping through and help the bin feel complete. Covering the insert with leftover fabric can make the interior look more finished, especially if the shade will sit on an open shelf where the top is visible.
The original shade covering may already be attractive enough. Neutral linen, textured weave, or simple cotton can look very similar to store-bought soft storage. If the outside is stained or too decorative for the room, wrap it with new fabric rather than adding many little embellishments. A clean continuous surface usually looks more polished and is easier to dust.
Think about what belongs inside. Towels, throws, yarn, craft paper rolls, soft toys, and lightweight supplies all make sense. Heavy books, hardware, sharp tools, or bottles do not. The frame was designed to hold fabric around a lamp, not to behave like a wooden crate. The more the contents match the softness and strength of the original shade, the longer the finished bin is likely to stay neat.
Placement can make the project look intentional. A single large bin on a shelf works well if its tone connects with nearby baskets or books. Two similar shades can create a matched pair, but they do not need to be identical. If the shapes are similar and the fabrics coordinate, slight differences can make the storage feel collected rather than mismatched.
Materials and Tools
· Large drum lamp shade
· Sturdy card or thin lightweight board for an optional base
· Fabric scrap or liner material
· Fabric adhesive or hand-sewing supplies for simple finishing
· Measuring tape and pencil
· Scissors or craft knife for cutting the base insert away from the finished shade
· Soft household items for storage
A Practical Way to Make It
1. Check how the shade sits. Place the empty shade on a level surface and see whether the bottom ring rests evenly. Remove only non-structural fittings that prevent it from sitting flat. If the frame wobbles because it is bent, correct that first rather than hiding the problem with a thick base.
2. Make a simple base insert. Trace the inside of the lower ring onto sturdy card or lightweight board and cut the piece slightly smaller so it can slide into place. Test the fit before covering it. Then wrap the insert with leftover fabric if you want a softer interior finish.
3. Tidy or recover the sides. Reattach loose trim and clean the original fabric if it is worth keeping. If the covering is badly marked, use a single fabric wrap or liner rather than layering many decorations. Keep the top rim smooth because that is the edge your hands will touch most often.
4. Fill it with appropriate items. Use the finished bin for towels, yarn, fabric, or other lightweight materials and avoid overfilling above the rim. Place it on a shelf where you can lift the contents out without dragging the shade by its fabric sides.
The part I would keep simple
A storage bin earns its keep by being easy to use. I would not add handles unless the frame can genuinely support them, and I would not cover the sides with bulky embellishment. A clean edge, stable base, and useful contents are enough to make this repurpose feel finished.
Troubleshooting and Finishing Notes
If the shade slides on a smooth shelf, add a thin non-slip pad underneath rather than weighing the bin down.
If the fabric sides collapse inward, the frame is probably too weak for this use; switch to a decorative cover or lighter contents.
If the top edge frays, bind it with a narrow fabric strip or reattach the original trim before the damage spreads.
Variations and Alternatives
· Use the bin for rolled hand towels in a bathroom or guest room.
· Store yarn, ribbon, or fabric scraps in a craft room where the open top makes colours easy to see.
· Recover two different drum shades in coordinating leftover fabric for a matched shelf pair.
· Add a removable fabric liner if the inside is rough or you want to wash the lining separately.
Repurpose a Lamp Shade as a Curved Memo Board
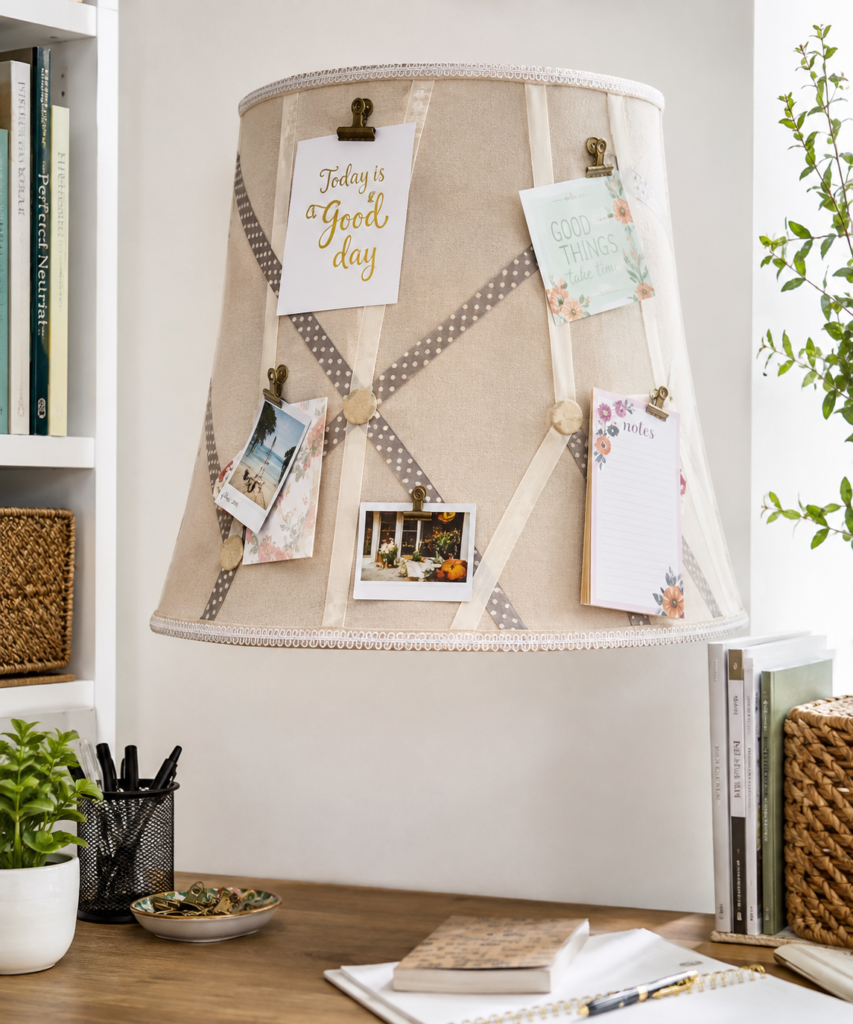
A broad lamp shade has enough fabric surface to work like a notice board, and the curve makes it feel less ordinary than a flat cork panel. Ribbons stretched across the shade can hold postcards, notes, small photographs, appointment cards, or a shopping list. Clips add another layer of flexibility because papers can be changed without pushing pins through the original covering.
A shade with plain, tightly woven fabric is ideal because the background does not compete with the notes. If the original print is busy, recovering it with leftover neutral fabric can create a calmer base. The frame should remain intact so the board holds its curve. Removing too much of the inner structure can make the shade twist or flatten once the ribbons are tensioned.
Plan the ribbon pattern before attaching it. Diagonal crossing bands create lots of small holding points, while vertical bands are cleaner and better for clips. A combination can work, but keep the arrangement deliberate. I would lay all the ribbons loosely across the shade first, secure them temporarily with clips, and stand back before gluing or stitching anything permanently.
Ribbon tension is one of the details that separates a polished memo board from a frustrating one. If the bands are loose, cards slide down. If they are pulled too tight, they can distort the shade or create puckers in the fabric. Aim for firm contact against the surface without visibly compressing the frame. Small fabric-covered buttons at intersections can be decorative, but they should not be relied on as the only structural attachment.
The board also needs a sensible mounting method. Depending on the frame, you may be able to hang it from the original top fitting, mount it on a strong wall hook, or suspend it from a short length of chain. Keep it close enough to the wall that papers do not flap behind it, but not so tight that clips scratch the surface. A desk or command-centre wall is usually a better location than a narrow hallway where people may brush against it.
What makes this repurpose useful is that it can change with daily life. Unlike framed wall art, the content is temporary. A holiday card can be replaced with a note, a photo can move to a different ribbon, and the whole board can shift from family reminders to craft inspiration without changing the underlying shade.
Materials and Tools
· Large fabric lamp shade with a broad surface
· Ribbon, twill tape, or narrow fabric strips
· Small clips or mini binder clips
· Buttons or covered fasteners for optional intersections
· Needle and thread, fabric glue, or another suitable attachment method
· Wall hook or mounting support
· Optional leftover fabric for recovering the shade
A Practical Way to Make It
1. Prepare the shade as the background. Clean the surface and repair loose trim. If you plan to recover the shade, keep the fabric smooth and taut so the ribbons lie flat. Leave the structural rings and spokes in place unless you are certain a part is purely decorative.
2. Arrange the ribbon pattern dry. Lay the ribbons across the shade and hold them temporarily at the back or inner rim. Move the lines until the spacing looks balanced from normal viewing distance. Then test a few sample cards to make sure the openings are actually useful sizes.
3. Secure the ribbons with even tension. Attach each band firmly without pulling hard enough to distort the shade. Work around the frame gradually rather than fixing one entire side first. Add buttons or decorative intersections only after the main bands are secure.
4. Mount it and edit the contents. Hang the memo board at a comfortable height, then add only the notes and photos you want to see. Leave some empty areas so new reminders have somewhere to go. Refresh the board regularly instead of letting old papers build into permanent clutter.
One detail I would not skip
I would test the ribbon tension with real cards before finalizing the back attachments. A ribbon that looks neat while empty can still be too loose to grip paper. That small test is easier than redoing half the board after it is hanging.
Troubleshooting and Finishing Notes
If notes slide down, add clips at key points or tighten only the loose ribbon rather than reworking the entire pattern.
If the shade pulls out of round, the bands are probably too tight; release and retension them evenly around the form.
If the board feels too busy, remove half the decorative extras and let the notes become the changing visual layer.
Variations and Alternatives
· Use elastic instead of ribbon for a more flexible grip.
· Create a photo-only display for a bedroom or studio.
· Use removable clips rather than pins if you want to protect cards and paper keepsakes.
· Cover the shade in a single neutral fabric to coordinate an outdated shade with a modern home office.
Turn a Lamp Shade Into a Garden Bird Feeder
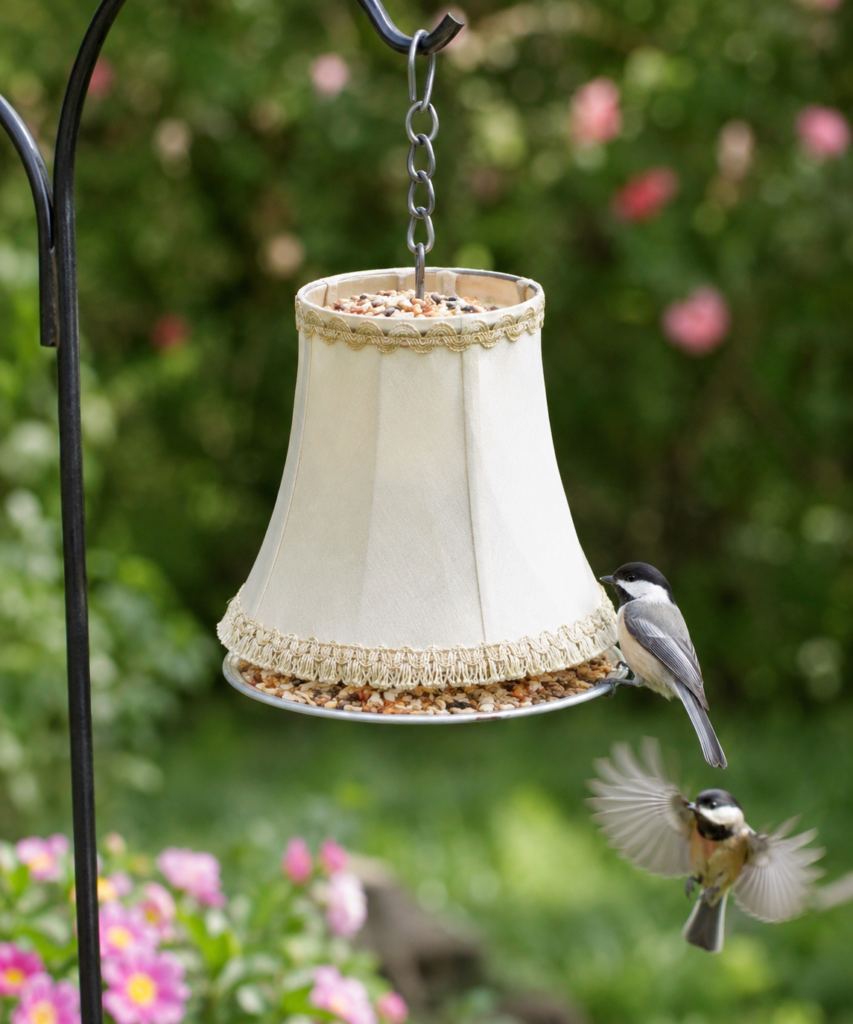
A lamp-shade bird feeder is one of the more playful repurposing ideas, but it is also one of the projects where function has to come before appearance. The shade can provide a recognizable canopy shape and a ring that works as a perch or support for a seed tray. However, anything placed outdoors for wildlife needs to be easy to keep clean and free from sharp, loose, or water-trapping materials.
Start with the frame rather than the fabric. A bare metal shade frame can be easier to maintain than one covered in delicate paper or absorbent cloth. If you keep some fabric for the look, choose a sheltered location and inspect it often. Decorative fringe can look charming, but it should not hang into wet seed, tangle around the feeding area, or make cleaning awkward.
The seed needs a stable surface. Depending on the frame, you might attach a shallow tray or dish beneath the lower ring so birds have somewhere to perch and feed. The tray should sit level and be easy to remove or wipe. Avoid deep containers that collect rainwater. The goal is a simple feeding area, not a complicated structure with lots of corners where damp seed can remain hidden.
Hanging height and location affect how practical the feeder is. Choose a position where you can reach it for refilling and cleaning without climbing awkwardly. Keep it away from places where seed will fall directly onto outdoor furniture. A sheltered garden hook or covered area can help protect an older frame, but birds should still have a clear approach and exit route.
Check all fasteners regularly. Outdoor movement, wind, moisture, and repeated use can loosen wire and chain over time. If a hook starts to open, a tray shifts, or the frame develops a sharp rusted area, take the feeder down and repair it before putting it back. A repurposed feeder should be treated as a working garden object, not as a decoration that is installed once and forgotten.
I also prefer a restrained design because birds do not need elaborate ornament. The old shade form is already the visual idea. A clean tray, safe perch, balanced hanger, and tidy frame are enough. If the original fabric makes those things harder, remove it and let the structure do the work.
Materials and Tools
· Sturdy lamp shade or bare metal shade frame
· Shallow removable seed tray or dish
· Secure outdoor hanging chain and hook
· Bird seed suited to local feeder birds
· Outdoor-suitable wire or fasteners
· Pliers and basic hand tools
· Brush and cloth for regular cleaning
A Practical Way to Make It
1. Strip the project back to safe materials. Remove anything loose, sharp, brittle, or difficult to clean. Check the frame for rusted weak points and make sure all remaining trim stays well clear of the seed surface. If the original covering is too fragile for weather, use the bare frame instead.
2. Create a shallow feeding area. Fit a removable tray or dish so it sits level beneath or inside the lower ring. The tray should give birds a clear landing edge while keeping seed contained. Test that it can be removed easily because regular cleaning is part of the design, not an optional extra.
3. Balance the hanging hardware. Attach the chain at even points and hang the empty feeder before adding seed. Watch whether the tray remains level. Then add a small amount of seed and check again, correcting the suspension rather than compensating by piling seed on one side.
4. Maintain it as a working feeder. Refill modestly, remove wet or old seed, and clean the tray and perches regularly. Inspect the hanging chain, hooks, and frame whenever you refill it. Take the feeder down promptly if a part becomes sharp, unstable, or difficult to clean.
A practical point worth remembering
I would choose cleanability over decorative detail every time with this project. If a piece of trim looks pretty but traps damp seed or prevents you from wiping the tray properly, removing it is the better design decision.
Troubleshooting and Finishing Notes
If seed gets wet frequently, move the feeder to a more sheltered position rather than adding more fabric around it.
If the tray tips when a bird lands, widen the support or rebalance the chain before using it again.
If the frame develops rust that creates rough edges, take it down and repair or retire the feeder rather than leaving the damaged area exposed.
Variations and Alternatives
· Use only the bare frame and a simple tray for a cleaner, more weather-resistant look.
· Place the feeder under a covered porch if you want to preserve some original fabric trim.
· Use a smaller shade as a compact feeder where large garden structures would look heavy.
· Adapt the concept into a decorative seed tray without fabric if maintenance is your main priority.
Build a Ribbon Holder From the Frame of a Lamp Shade
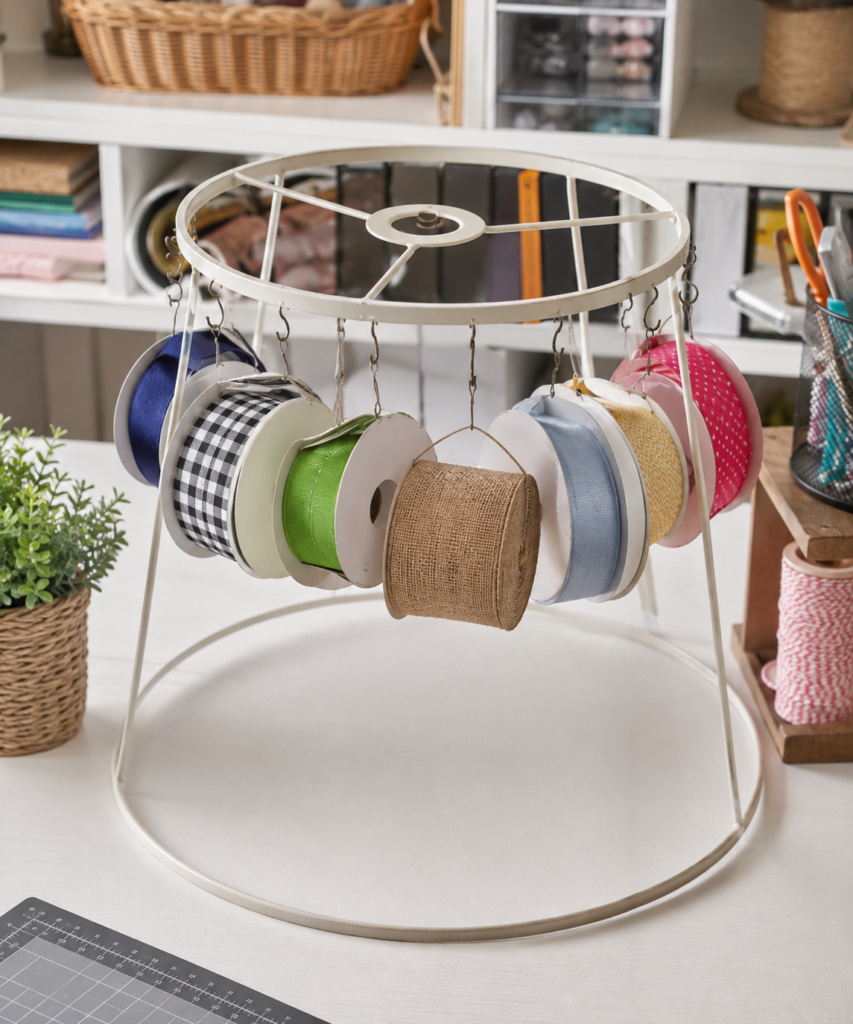
Ribbon is one of those craft supplies that becomes messy as soon as several spools share a drawer. A bare lamp-shade frame solves that problem by turning vertical space into storage. The top ring offers a line of attachment points, the open middle keeps every spool visible, and the wide base helps the structure stand on a table without needing a complicated build.
This project suits a frame that has lost its fabric or looks better stripped back. Remove old glue, loose binding, and any sharp clips so the metal feels clean in the hand. You can repaint the frame if it is badly marked, but a simple white, black, or natural metal finish is often enough. The ribbon itself supplies plenty of colour, so the organizer does not need to be decorative before you load it.
Think about how you actually use ribbon. If you usually cut short pieces for cards, bows, or packaging, individual hanging spools are convenient because you can lift one off and bring it to the work area. If you prefer to pull ribbon directly from the holder, the spool needs to rotate freely. That may mean using a small rod, open hook, or loop that keeps the centre hole clear rather than clamping the spool tightly to the frame.
Spacing is the main design decision. Wide burlap rolls need more room than narrow satin ribbon, and large spools can bump into the legs of the frame if they hang too low. Place the biggest rolls first, then fill gaps with smaller ones. If every spool touches its neighbour, removing one will disturb several others and the organizer will quickly become annoying to use.
The finished holder can sit on a craft table, open shelf, or cutting station. Keep it close enough that you will return ribbon to it instead of dropping spools into a temporary box. Good organization works because the correct storage place is easier than the messy alternative. If the frame has to be moved each time you want a ribbon, it will probably stop being used.
This same structure can hold more than ribbon. Baker’s twine, bias tape, lace rolls, trim, small cords, or even lightweight washi tape can use the same idea. Just keep the total weight reasonable and avoid hanging sharp tools from a thin decorative frame.
Materials and Tools
· Bare lamp shade frame
· Small S-hooks, wire loops, or spool hangers
· Ribbon, twine, trim, or tape rolls
· Pliers for shaping hooks
· Optional gentle frame-cleaning supplies
· Optional indoor paint if the frame needs refreshing
· Felt pads if the frame may scratch a work surface
A Practical Way to Make It
1. Strip and clean the frame. Remove fabric, loose glue, and old binding until the rings and supports are easy to access. Straighten small bends and cover any sharp wire ends. Then set the frame on a level work surface and make sure it stands without rocking.
2. Test how your spools need to move. Hang one narrow and one wide spool from temporary hooks. Decide whether you want each roll to lift off completely or spin while hanging. Choose the hook style around that real use rather than attaching the same hardware everywhere by default.
3. Space the spools around the ring. Hang the largest rolls first and distribute them around the frame so the weight stays balanced. Then fill smaller gaps with narrower ribbon. Keep enough room between neighbouring spools that you can remove one without knocking several others loose.
4. Place it where the system will stay useful. Set the holder near your cutting or wrapping area and make small adjustments after a few sessions. If one ribbon is constantly blocked, move it higher or closer to the front. A storage system should adapt to the way you work rather than stay fixed just because the first arrangement looked neat.
For me, the simplest setup is the best one
The ribbon already brings pattern, colour, texture, and movement. I would keep the frame visually quiet and spend the effort on spacing the spools well. That makes the organizer look calmer and makes it easier to see what you actually have.
Troubleshooting and Finishing Notes
If spools swing too much, shorten the hooks or group similar sizes so the centres sit at roughly the same height.
If the frame tips, redistribute heavier rolls around the ring or move them closer to the wider base supports.
If ribbon unravels, secure the loose end with a reusable clip rather than winding it tightly around neighbouring spools.
Variations and Alternatives
· Use the frame for baker’s twine, lace, cord, and narrow trims.
· Turn a small shade frame into a washi-tape or embroidery-ribbon holder.
· Hang labels from the frame if you organize ribbon by colour family or project type.
· Mount a sturdy frame on a wall bracket if your craft table is short on surface space.
Transform a Lamp Shade Into a Cozy Pet Bed
[Insert Supplied Image 8 Here]
Creator credit: Original article image.
Suggested file name: lamp-shade-pet-bed.jpg
Alt text: Large repurposed drum lamp shade converted into a cushioned pet bed in a cozy living room corner.
Caption: A deep drum shade can form a soft, contained resting spot for a cat or very small dog when the frame is stable.
A large drum shade can look surprisingly natural as a small pet bed because the round wall creates the same kind of contained boundary found in many commercial beds. Add a soft cushion inside and the shade stops reading as lighting almost immediately. This idea is best suited to a shade with strong straight sides, a smooth rim, and enough diameter for the animal to turn around comfortably.
Safety has to come before the appearance of the finished bed. Remove every metal fitting that protrudes into the sleeping area, check the bottom ring for sharp wire, and make sure the frame cannot collapse if the pet leans against it. A cardboard or plastic lining that has become brittle should be removed or fully covered. The bed should feel smooth from every direction your hand can reach because a paw or nose will find the rough spot you missed.
The base also needs attention. Some shades sit neatly on their lower ring; others rock because of the central fitting. A flat lightweight insert can create a more stable floor inside the frame, and a non-slip mat beneath the bed can stop it skating across wood or tile. Do not make the base so rigid and heavy that the bed becomes difficult to move for cleaning.
Choose a cushion that fills the bottom without forcing the sides outward. A removable washable cover is more useful than a permanently glued cushion. If you already have an old pillow or spare pet cushion that fits, reusing it keeps the project simple. A softly tufted centre can create a nest-like shape, but the pet still needs a flat enough area to settle naturally.
Placement matters more than matching the room decor. Put the bed in a quiet corner the pet already uses, away from busy doors, heaters, and direct drafts. Adding a familiar blanket or washable throw can make the new shape more inviting. Some animals will climb in immediately; others may ignore it for days. I would not move the bed around constantly, because a consistent location gives the pet time to investigate it on their own terms.
Watch how the animal uses the edge. If a cat likes to rest its chin on the rim, the top needs to be padded or naturally smooth. If the pet steps on the side to enter, make sure the ring does not bend. A repurposed pet item only succeeds when it remains comfortable under real use, not just when it looks attractive in the corner of a room.
Materials and Tools
· Large sturdy drum lamp shade
· Soft cushion, old pillow, or pet-bed insert
· Washable fabric cover
· Lightweight flat base insert if needed
· Non-slip pad for hard floors
· Soft edge binding or fabric strip if the rim needs covering
· Needle and thread or suitable fabric adhesive for finishing
A Practical Way to Make It
1. Make the empty shade pet-safe. Remove protruding fittings, loose staples, brittle lining, and anything the pet could scratch against. Press around every rim with your hand and cover or remove rough areas. Then set the shade on the floor and check whether the frame remains stable when you press gently on the sides.
2. Create a stable base. If the shade rocks or has a large open bottom, fit a lightweight flat insert inside the lower ring. Add a non-slip pad beneath the bed if it will sit on wood or tile. The finished base should stay level without making the shade heavy or difficult to lift for cleaning.
3. Fit a washable cushion. Choose a cushion that fills the footprint without pushing hard against the walls. Use a removable cover so routine cleaning stays easy. Then test the depth by pressing down where the pet will lie; the cushion should feel soft without lifting the animal uncomfortably close to the top edge.
4. Introduce the bed gradually. Place the finished bed in a familiar quiet spot and add a blanket or item the pet already uses. Let the animal investigate without being placed inside repeatedly. Watch the frame during the first few uses and stop using the bed if the sides bend, the rim shifts, or the pet appears cramped.
One thing I would not force
A pet bed can be nicely made and still not suit the pet. If the animal avoids the enclosed shape or seems too large for it, I would repurpose the shade again rather than treating the project as a failure. The practical user gets the final vote here.
Troubleshooting and Finishing Notes
If the bed slides, use a thin non-slip layer underneath instead of adding heavy objects inside the shade.
If the pet chews the rim or fabric, stop using the bed and choose a more suitable material rather than trying to hide the damage with trim.
If the cushion bunches, add a simple removable inner liner or use a cushion cut closer to the shape of the base.
Variations and Alternatives
· Use a removable washable liner for pets that shed heavily.
· Keep the outside neutral so the bed blends with baskets and soft furnishings.
· Place a small blanket over the cushion for easy day-to-day washing.
· If the shade is too shallow for a bed, reuse it as a basket for pet blankets and toys instead.
Lamp Shade Repurposing Mistakes That Can Ruin the Result
The first mistake is choosing a new function based only on how the shade looks. A delicate paper shade may have a lovely shape, but that does not make it suitable for wet soil, outdoor weather, or a pet bed. A bent wire frame may look rustic, but it should not carry a heavy planted basket. Start by matching the strength and material to the job. Appearance can be adjusted later; structure is harder to fake.
Another common problem is removing too much too early. Once the fabric, central fitting, trim, or support spokes are cut away, you may discover that one of those parts was keeping the frame round or stable. I would strip a shade in stages and test it between each change. If a component is not clearly in the way, leave it until you know the new design works without it.
Skipping cleaning is a smaller mistake with surprisingly visible consequences. Dust and old grease can stop glue from holding, and loose trim can continue to unravel after the project is finished. On a jewelry organizer, grime can transfer to chains. On a memo board, old adhesive can stain new ribbon. On a planter, dirty frame sections become harder to reach once the liner is in place. Cleaning is not glamorous, but it is one of the easiest ways to make an upcycle look deliberate rather than improvised.
Using too much glue is another trap. Thick glue lines can soak through fabric, create hard ridges, or make future repairs impossible. Test the adhesive on a hidden area and use the minimum amount needed for the job. If a part can be stitched, clipped, tied, or mechanically secured in a cleaner way, that may be a better choice than covering the surface in adhesive.
Hanging projects can fail when the shade is treated as the only structural component. The hook in the ceiling, the screw in the wall, the chain, and the connection to the frame are all part of the system. A secure herb basket attached to a weak hook is still unsafe. Test the complete hanging setup with the finished weight in mind, especially for soil, plants, or other materials that become heavier after watering.
Outdoor projects often suffer because indoor materials are asked to cope with rain and humidity. Fabric can hold moisture, untreated metal can corrode, and trim can loosen. If you want to keep an original shade covering, use the project in a sheltered location and inspect it regularly. Otherwise, strip the shade to a more durable frame and let the new function provide the visual interest.
Overdecorating is another easy way to make a repurpose less useful. The jewelry organizer needs open space. The memo board needs clear areas for notes. The ribbon holder needs room for spools to move. The storage bin needs an uncluttered rim. I know it can feel tempting to use every leftover ribbon, button, tassel, and scrap on one project, but restraint usually makes the finished piece easier to live with.
A final mistake is ignoring the maintenance that comes after the photo-worthy finish. Herb planters need watering and pruning. Bird feeders need cleaning. Pet beds need washable cushions. Storage bins need contents that do not overload the frame. When you choose a project, ask not only whether you can make it, but whether you will be happy to maintain it. That question often leads to the most successful second use.
Frequently Asked Questions
Can a beginner repurpose a lamp shade without special tools?
Yes. The storage bin, memo board, jewelry organizer, and many decorative hanging ideas can be made with basic hand tools, scissors, clips, and simple attachment methods. A beginner should choose a shade that is already structurally sound and avoid projects that require major frame cutting. The easiest upcycle is usually the one that uses the existing shape rather than rebuilding it.
Do I need to remove all the original lamp-shade fabric?
No. Keep the fabric when it is clean, strong, and useful to the new design. A drum shade can keep its covering for a storage bin or pet bed, while a craft-room ribbon holder usually works better as a bare frame. Remove material because it interferes with the new purpose, not simply because the object is being repurposed.
What is the safest way to clean an old fabric lamp shade before reusing it?
Start with dry cleaning methods such as a soft brush or gentle vacuum attachment. If the material tolerates a lightly damp cloth, test a hidden section first and avoid saturating glued seams or paper-backed fabric. If the covering is heavily stained, brittle, or musty, removing it may be more practical than trying to restore it for a new project.
Can I paint the metal lamp-shade frame?
You can refresh an indoor frame if the surface is properly cleaned and the coating is suitable for the material, but exact paint choice depends on the frame and where the project will be used. Remove loose rust or flaking finish first and work in an appropriately ventilated area. For outdoor planters or feeders, durability and maintenance matter more than choosing a decorative colour.
How do I know whether a shade is strong enough for a hanging planter?
The frame should keep its shape when handled, the rings should not pull away from the spokes, and the hanging connection should feel secure before any liner or soil is added. Test the empty frame first, then the lined frame, and finally the planted basket carefully. If the metal flexes noticeably or a joint moves, choose a lighter use such as faux greenery instead.
Can a lamp-shade bird feeder stay outside all year?
That depends on the materials and the exposure. A bare metal frame with a simple removable feeding tray may be easier to maintain than a fabric-covered shade, while delicate indoor fabric is better in a sheltered location. Whatever version you use, clean it regularly and inspect for loose fasteners, sharp rust, and trapped damp seed.
Are repurposed lamp-shade pet beds safe for cats and dogs?
They can work for cats or very small dogs when the shade is large enough, stable, smooth, and free from protruding hardware. The cushion should be washable and the base should not slide or tip. If the pet chews the material, bends the frame, looks cramped, or avoids the shape, choose a different bed and repurpose the shade for storage instead.
What can I do with a very small lamp shade?
Small shades are useful for jewelry, bracelets, ribbon, dried-flower displays, or compact wall organizers. They can also become little containers for lightweight craft supplies if they stand securely. Scale the idea down rather than trying to force a bedside shade into the same job as a large floor-lamp drum.
How can I make a repurposed lamp shade look more polished?
Straighten the frame, clean the surface, finish visible edges, and keep the new function simple. One continuous fabric, a restrained trim, or an organized layout usually looks more intentional than lots of small decorations. Also place the finished item where its scale makes sense; even a neat project can look awkward if it is too large or too small for the surrounding area.
Give Old Lamp Shades a Useful Place Beyond the Lamp
The most useful lesson in these repurposed lamp shades is that the original shape does much of the design work for you. A tapered frame already wants to hang. A drum shade already wants to contain something. Open wire rings naturally organize lightweight objects. Once you notice those qualities, the project becomes less about disguising an unwanted shade and more about matching an existing structure with a new purpose.
That is why I would begin with the shade you actually have rather than choosing a project first and trying to force the material to cooperate. Pick it up, check the frame, look at the scale, and decide whether it is better suited to storage, display, gardening, craft organization, or a softer decorative use. Then keep the alterations as simple as the new job allows.
Repurposing lamp shades can be practical as well as decorative. The herb basket earns space by growing something useful, the memo board holds everyday information, the ribbon frame solves a craft-room problem, and the storage bin gives textiles a home. Even the more decorative botanical piece uses an existing form instead of buying a new hanging structure simply for display.
If you have an old shade waiting in a cupboard, start with one manageable idea and make the structure work before worrying about the finishing touches. A clean frame, secure attachment, and sensible new function will always do more for the result than extra decoration. Which of your old lamp shades already has the right shape for a second job?