An old trophy is a difficult object to discard. It may no longer need a place on the main shelf, yet its handles, engraved base, reflective cup, and connection to a particular achievement make it feel more personal than ordinary clutter. Even a trophy with tarnish or a missing plaque can still carry a useful shape.
I prefer repurposing trophies in ways that keep their recognisable form. A cup trophy already behaves like a container, while its stem and weighted base lift whatever it holds. That simple construction can support flowers, kitchen tools, desk supplies, or even a lamp fitting without stripping away every trace of the original object.
The careful part is deciding what should remain permanent. A sentimental trophy may deserve a removable insert and no drilling at all. A damaged, unclaimed piece can accept a more involved conversion.
I know it can feel tempting to polish, paint, cut, or glue immediately, but checking the material and construction first usually protects both the object and the finished idea.
Check the Trophy Before You Change It
Trophies that look similar can be made from very different materials. Inspect the cup, stem, handles, and base before choosing a cleaning product or structural method.
· Look for hallmarks, maker marks, engraved dates, or removable plaques that may have family or collector value.
· Check whether the cup is solid metal, plated metal, plastic with a metallic finish, resin, glass, or a combination of materials.
· Hold the trophy by its base and test for movement between the cup, stem, and plinth. Tighten accessible fasteners before adding weight.
· Inspect the inside for corrosion, peeling finish, residue, holes, or sharp edges that would make direct contact with water or utensils unsuitable.
· Check whether the black or wooden base sits flat and whether old felt underneath needs replacing to protect furniture.
· Decide whether the engraving should stay visible, be turned towards the wall, or be covered with a removable label rather than altered permanently.
· Photograph the trophy before dismantling anything so washers, threaded rods, and decorative pieces can return in the correct order.
Gather Materials for the New Purpose
You will not need every item below. Choose only the materials that match the trophy and the project, and test cleaners on a hidden area first.
· Soft cloths, cotton swabs, a mild cleaner, and a small soft brush for detailed handles and crevices
· A removable glass, jar, liner, or food-safe insert when the trophy itself should not hold water or utensils directly
· Felt pads, cork, or a non-slip mat for protecting the trophy base and nearby furniture
· Floral tape, reusable supports, or narrow foam only when needed to steady an inner container
· Approved lamp components and professional electrical help for any wired conversion
· A removable cup or divider insert for organising pens, brushes, or kitchen tools
· Screwdrivers, small spanners, and labelled containers for trophies held together by threaded fittings
· Protective gloves and eye protection if drilling or removing damaged metal becomes necessary
· A clear, compatible protective finish only when the existing surface genuinely needs sealing
Decide How Much of the Original Trophy to Preserve
A good trophy repurpose does not have to hide what the object used to be. The best level of change depends on its condition, history, and the new function.
· Use a removable insert for a meaningful trophy so the conversion can be reversed without drilling or adhesive.
· Keep original handles and bases visible because they give a vase, lamp, or organiser its distinctive shape.
· Leave gentle tarnish when it adds age and depth, but remove dirt, sticky residue, and active corrosion.
· Avoid painting engraved plaques unless the inscription has no personal importance and the finish is already damaged.
· Choose a no-water arrangement when the bowl leaks, has internal corrosion, or uses a finish that should remain dry.
· Drill only a non-valuable trophy after confirming where internal rods, fasteners, or hollow spaces are located.
· Keep all removed parts in a labelled bag in case the trophy is restored or passed to another family member later.
Use a Cup Trophy as a Flower Vase
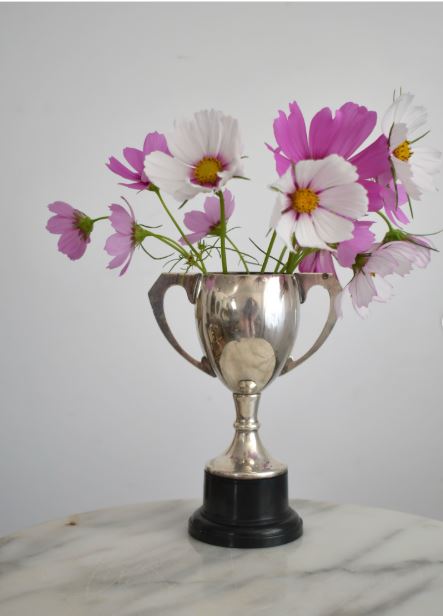
The silver cup, twin handles, narrow stem, and black base remain completely recognisable in this flower arrangement. Pink and white blooms sit loosely above the rim, with fine green stems passing between the handles. The contrast works because the flowers are soft and irregular while the trophy has a formal, balanced shape.
The safest version uses a small watertight container inside the cup rather than filling the trophy itself. That protects plated metal, old seams, internal screws, and engraved areas from prolonged moisture. It also makes changing the water far easier because the entire insert can lift out.
Materials and Tools
· Old cup trophy with a stable base and secure handles
· Small jar, glass, or narrow waterproof container that fits inside the bowl
· Soft cleaning cloth and mild cleaner suitable for the trophy finish
· Felt, cork, or removable packing material for steadying the insert
· Fresh flowers, dried stems, or artificial flowers
· Scissors or floral snips
· Protective mat or coaster for the surface beneath the trophy
Detailed Steps for the Trophy Vase
1. Clean without erasing the aged finish. Remove dust with a soft cloth, then clean fingerprints and residue using a method suitable for the trophy material. Work around engraving, handle joints, and decorative ridges carefully. Stop polishing once the surface is clean; a slightly aged silver tone can suit flowers better than an aggressively bright finish.
2. Test the inner container before adding water. Lower an empty jar or glass into the trophy cup and check that it sits below the rim. Add a little removable felt, cork, or folded cloth around it if the fit is loose. Then fill the insert at a sink and confirm that it can be lifted without spilling onto the trophy.
3. Build the arrangement around the handles. Trim the main stems so the flowers rise above the cup without hiding both handles. Place a few taller blooms near the centre, then add lighter side stems that move outward. Rotate the trophy as you work because the arrangement should look balanced from the front and slightly from each side.
4. Protect the base and monitor moisture. Place a coaster or fresh felt pad beneath the plinth before moving the vase to furniture. Wipe the insert dry whenever water is changed, and check that condensation has not reached the cup. Remove fallen leaves promptly because trapped organic material can stain an aged interior.
5. Choose a dry variation when water is risky. Use dried flowers, paper stems, or artificial blooms when the trophy leaks or the finish is delicate. A narrow weighted insert can still keep the stems upright. Then the arrangement remains removable and the cup never needs direct contact with water.
For me, the handles are the part worth protecting visually. If the flowers spread so widely that both disappear, the arrangement begins to look like an ordinary metal vase. Fewer stems with a little open space usually show the trophy shape more clearly.
A seasonal version could use seed heads in autumn, bare branches in winter, or one simple bunch of garden flowers in summer. There is no need to rebuild the arrangement permanently; the insert keeps the idea flexible.
Turn a Damaged Trophy into a Small Table Lamp
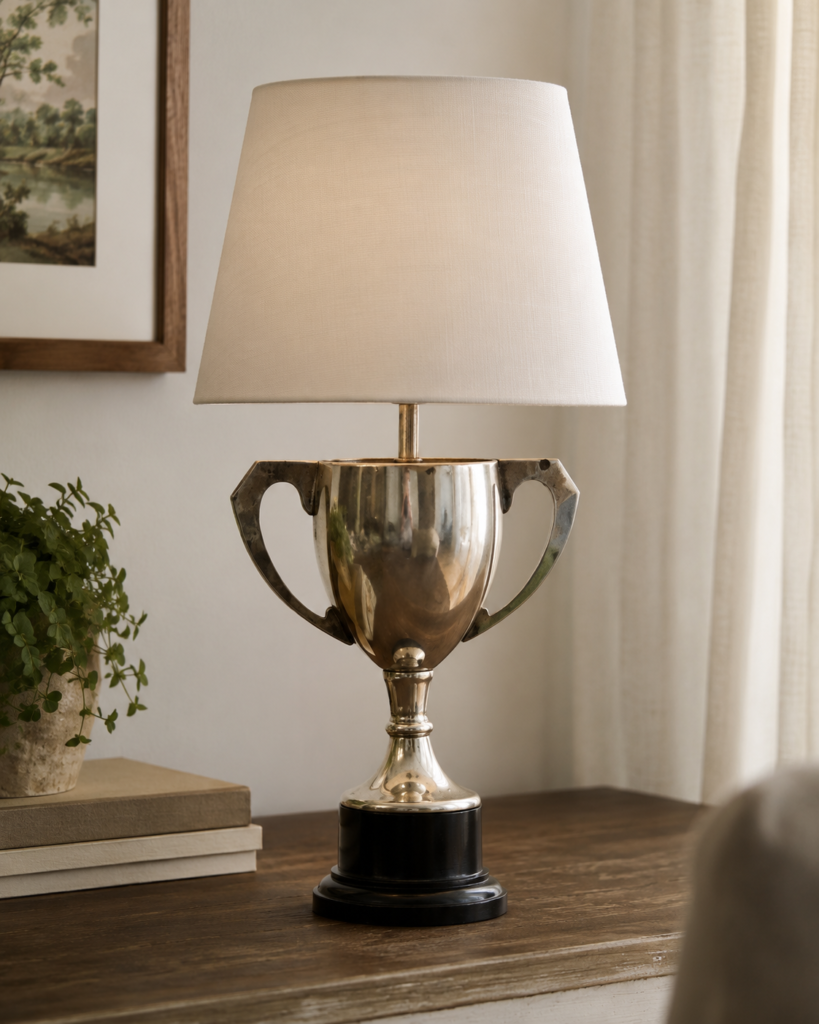
A trophy lamp works because the cup already has the visual weight of a lamp base. The broad handles balance the shade, the stem creates height, and the dark plinth keeps the finished object grounded on a side table. A plain cream shade is enough; a highly patterned shade would compete with the reflective body and decorative handles.
This is the only project here that should not be improvised around live electrical parts. Use components intended for lamp making, follow their instructions, and ask a qualified electrician or experienced lamp repairer to assemble and test the wiring. The trophy can provide the decorative structure without becoming an electrical experiment.
Materials and Tools
· Non-valuable trophy with a stable base and secure threaded construction
· Approved lamp kit or professionally fitted lampholder, cord, switch, and plug
· Suitable lamp rod, washers, nuts, and strain-relief components
· Shade support and a lightweight fabric lampshade sized to the trophy
· Protective grommet for any cable opening
· Soft cloths and material-appropriate cleaner
· Professional drilling and electrical assistance when the trophy has no safe cable route
Detailed Steps for the Trophy Lamp
1. Choose a trophy that can accept a permanent conversion. Avoid drilling an important award or a trophy with collector value. Check whether the cup and base are hollow, threaded, or already connected by a central rod. A lamp professional can often use that existing route, which is safer and neater than making a random opening through the side.
2. Stabilise the structure before wiring. Tighten the cup, stem, and base so no section rotates when the shade is touched. Replace damaged washers and add a discreet support plate if the top of the cup is too thin for the fitting. The finished lamp should remain upright when the cord is moved gently or the switch is used.
3. Have approved electrical parts fitted and tested. Use a lamp kit designed for the local electrical system and let a competent person handle the cable route, lampholder, insulation, strain relief, plug, and testing. Any drilled opening should be smooth and protected with a proper grommet so metal cannot cut into the cord.
4. Select a shade that matches the trophy scale. Fit a light shade that is wider than the cup but not so large that the handles disappear. Check the lamp from seated eye level because the bulb and fitting should not be uncomfortably exposed. Then choose the bulb type and output recommended for the fitted holder and shade.
5. Finish the base and position the lamp safely. Replace worn felt beneath the plinth and keep the cord away from hot surfaces, water, and walking routes. Place the lamp where it cannot be pulled by children or pets. Recheck stability after the shade is installed because the extra height changes the centre of gravity.
I would resist adding paint, ribbon, and extra trim to this one. The lamp conversion already changes the trophy’s purpose, so keeping the metal body visible makes the result feel deliberate rather than disguised.
A no-wire alternative is to place a small rechargeable light beneath a shade support designed for battery lighting, provided the chosen component is made for that use and does not create heat. This can preserve more of the trophy, though it still needs a secure structure.
Repurpose a Trophy as a Kitchen Utensil Holder
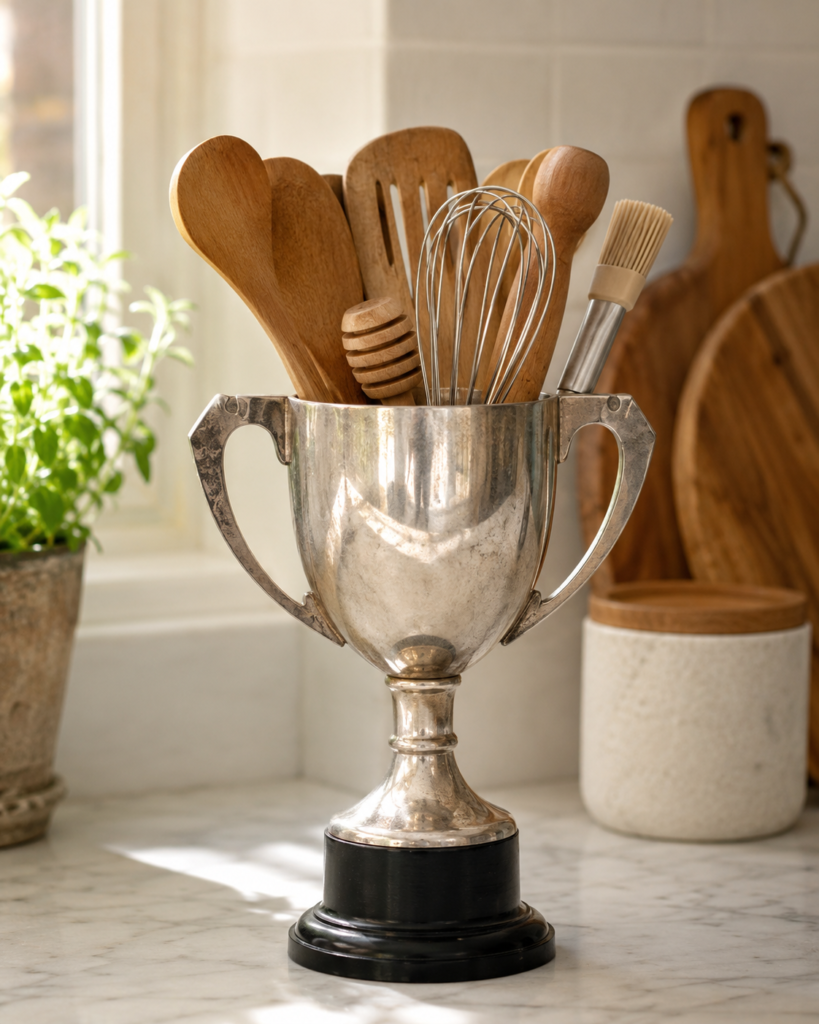
A deep trophy cup can hold wooden spoons, a whisk, a pastry brush, and other long tools without needing any structural change. Its raised base keeps handles clear of the worktop, and the side handles make the container easy to turn when one tool is hidden behind another. The aged silver finish also sits comfortably beside warm wood utensils.
Food-area use needs one extra decision: whether the trophy surface should touch utensils at all. Old plating, unknown coatings, corrosion, and polishing residue make a removable liner the more practical option. The utensils can stay inside a washable cup while the trophy remains the decorative outer holder.
Materials and Tools
· Wide, stable cup trophy with enough depth for long utensils
· Washable food-safe inner cup or cylindrical liner
· Non-slip pads or removable spacers
· Soft cloth and suitable cleaner for the exterior
· Frequently used wooden, silicone, or metal kitchen tools
· Optional cork mat beneath the base
· Small removable divider if thin tools fall to one side
Detailed Steps for the Utensil Holder
1. Inspect the cup for kitchen suitability. Check the interior for flaking finish, rust, sharp edges, trapped dirt, and old adhesive. Even when the cup looks clean, use a liner if the metal composition or coating is unknown. The trophy itself should act as the decorative shell rather than a food-contact container.
2. Fit a washable inner holder. Choose a cup that sits below the trophy rim and leaves enough width for utensils to move freely. Add removable non-slip pads around the liner if it rattles. Make sure the insert can lift out easily for washing without catching on the handles or inner fasteners.
3. Balance the tools by height and weight. Place broad wooden spoons and spatulas towards the back, then add the whisk and smaller tools near the front. Keep the heaviest handles close to the centre so the trophy does not tip. Turn the holder and check that no long utensil pulls strongly towards one side.
4. Position it away from direct heat and splashes. Set the trophy on a stable section of worktop where steam, grease, and hob heat will not damage the finish. Add a cork mat if the plinth could scratch stone or wood. Leave enough clearance above the tools so they can be removed without striking a shelf.
5. Clean the insert more often than the trophy. Lift out and wash the inner cup whenever utensils are cleaned or spills occur. Wipe the trophy exterior with a soft dry or lightly damp cloth suited to its finish, then dry around the handles and stem. This separates everyday kitchen hygiene from delicate trophy care.
One practical detail I wouldn’t skip is the removable liner. It makes the idea genuinely useful rather than merely decorative, and it allows the trophy to return to display condition later if the family changes its mind.
The same setup can hold paintbrushes or knitting needles in a craft room. Replace the food-safe cup with a divided organiser and keep the rest of the trophy unchanged.
Use a Trophy Cup as a Desk and Art-Supply Organiser
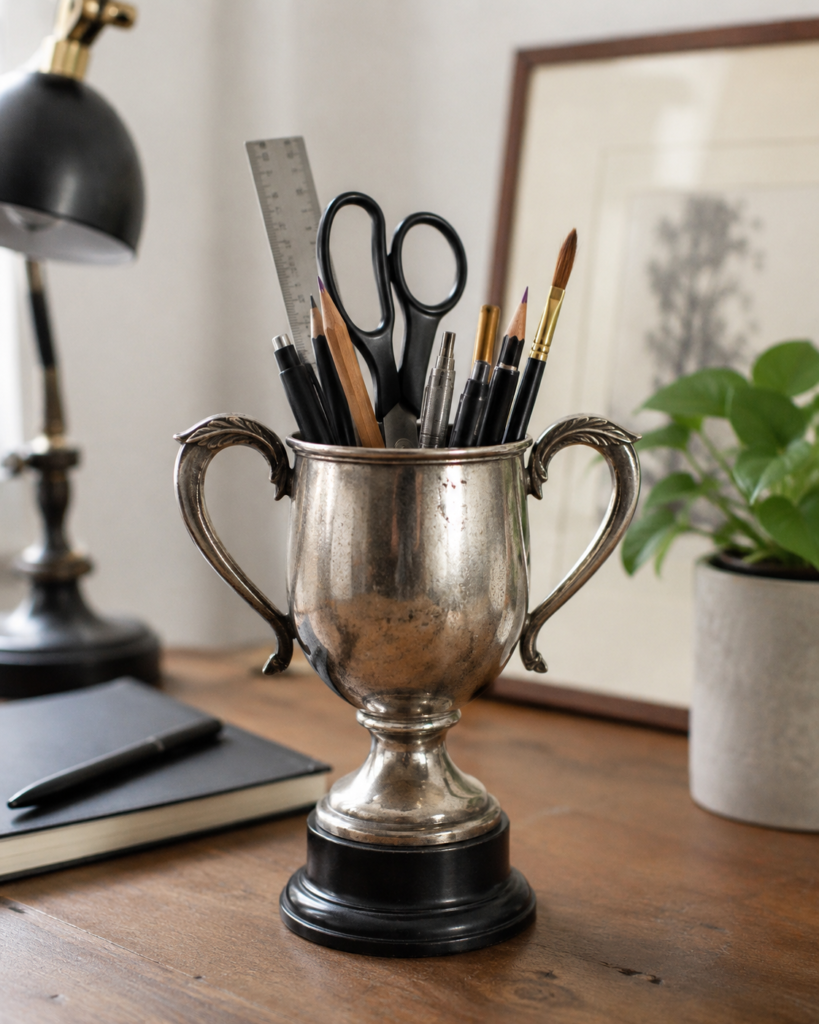
The trophy’s bowl naturally gathers pens, pencils, rulers, scissors, markers, and a few brushes into one upright group. On a desk, the handles frame the supplies and make the organiser feel less like a random container. The black base also raises shorter tools, so the cup can sit beside notebooks without disappearing behind them.
Unlike the lamp, this is a fully reversible project. Nothing needs drilling, painting, or gluing. That makes it especially suitable for a trophy whose engraving still matters but whose owner would rather use it than keep dusting an empty cup.
Materials and Tools
· Old trophy with a wide, stable bowl
· Removable inner cup, felt liner, or small divided insert
· Pens, pencils, scissors, markers, ruler, and selected brushes
· Soft cloth and gentle cleaner suitable for the trophy
· Fresh felt pads for the base
· Optional short cardboard or cork divider for separating sharp tools
Detailed Steps for the Desk Organiser
1. Clean the trophy and desk-contact surfaces. Remove dust from the cup, handles, stem, and base, then clean the exterior without soaking joints or engraved plates. Replace worn felt underneath so the organiser slides without scratching the desk. Check the base after cleaning because trapped grit can cause more damage than the trophy’s weight.
2. Add a removable liner or divider. Fit a cup, felt sleeve, or simple divided insert inside the bowl. This stops metal tools from scraping the finish and keeps narrow pens from leaning into one crowded corner. If scissors are included, give their points a separate protected section rather than letting them rest directly against the trophy.
3. Sort supplies before filling the cup. Keep only tools used regularly on the desk and move duplicates elsewhere. Place tall, light items such as the ruler at the back, scissors near the centre, and everyday pens towards the front. Then rotate the trophy until the most frequently used items are easy to reach between the handles.
4. Check stability with the full load. Press the desk gently and make sure the loaded trophy does not wobble. Remove unusually heavy tools or shift them closer to the centre. A trophy with a narrow plinth may suit pens and brushes but not a large pair of metal shears or several heavy rulers.
5. Keep the organiser useful rather than crowded. Return stray tools to the cup at the end of a work session, but clear out items that no longer belong there. Wipe the insert periodically and dust around the handles. The aim is to make the trophy part of the working desk, not a new place for clutter to hide.
For me, the best detail is that the engraved side can face forward or backward depending on the day. The trophy keeps its history, yet it no longer needs a separate display shelf to justify its space.
A child’s version could hold coloured pencils and washable markers, but keep scissors and sharp tools elsewhere. In a sewing area, the same cup could organise fabric markers, tracing tools, and rulers with a padded insert.
Trophy Makeover Choices That Can Ruin the Result
Polishing before identifying the finish. A cleaner intended for solid metal can remove plating or cloud a plastic metallic coating. Test a hidden area and clean only as aggressively as the material allows.
Filling an untested trophy directly with water. Old seams, threaded rods, and plated interiors may leak or corrode. Use a removable waterproof container and keep moisture away from the base.
Drilling a trophy with sentimental or collector value. A permanent hole cannot be reversed easily and may destroy an inscription or internal fitting. Reserve drilling for damaged, non-valuable pieces and use professional help.
Using the trophy itself as a food-contact container. Unknown metal, old polish, corrosion, and decorative coatings may be unsuitable for utensils or food. Add a washable liner so the trophy remains an outer shell.
Overloading a narrow base. Tall tools, heavy shades, or water-filled containers can raise the centre of gravity. Keep weight centred, test stability, and add a non-slip surface beneath the plinth.
Hiding every original detail. Painting handles, covering the base, and filling the bowl completely can make the object lose the character that made it worth repurposing. Keep at least one defining feature clearly visible.
Treating electrical work as a decorative shortcut. A trophy lamp still needs approved components, safe cable protection, strain relief, and proper testing. Let a competent person complete the wiring rather than improvising it.
Frequently Asked Questions
Should I remove the engraved plaque before repurposing a trophy?
Keep it when the inscription matters or helps tell the object’s story. If you prefer a plainer front, turn the plaque towards the wall or cover it with a removable label rather than damaging it.
Can I paint an old trophy?
You can paint a non-valuable trophy after identifying the material and preparing it properly. Even so, leaving the handles, rim, or base in the original finish often keeps the object recognisable.
How can I tell whether a trophy will hold water?
Do not assume it is watertight. Test a removable inner container instead of filling the trophy, especially when the cup has seams, a threaded stem, plating, or visible corrosion.
Is tarnish safe to leave on a repurposed trophy?
Stable tarnish can be part of the aged appearance, while dirt, sticky residue, and active corrosion need attention. Clean gently and stop if the finish begins changing unevenly.
Can a plastic trophy be repurposed in the same ways?
Yes for lightweight ideas such as flowers, pens, or craft tools, but it may not support heavy contents or a lamp conversion. Check glued joints and keep plastic away from heat.
What should I do with a trophy that wobbles?
Look beneath the base for loose screws, a central threaded rod, damaged felt, or an uneven plinth. Tighten accessible parts carefully; if the structure remains weak, use it only for very light decoration.
How do I clean a repurposed trophy later?
Remove the insert and clean it separately. Dust the trophy with a soft cloth, use a material-appropriate cleaner only when needed, and dry around handles, seams, and the base promptly.
Let the Trophy Hold Something Useful Again
The easiest way to repurpose an old trophy is to respect the form already there. The cup can hold flowers, utensils, or desk tools, while the stem and base provide height and stability. A more involved lamp conversion can work too, but only when the trophy has little sentimental value and the electrical parts are fitted safely.
Start with a reversible idea and use a removable insert wherever water, food-area tools, or sharp supplies are involved. That approach protects the finish, keeps cleaning simple, and leaves the trophy’s story intact. Repurposing does not need to erase the achievement; it can give the object a reason to remain visible.
Choose the trophy that has been sitting unused the longest and decide what it could hold today. Flowers, wooden spoons, pens, or light – which new role would make you notice it again?