Vintage hankies are the sort of small textile that can be difficult to part with. They may have a faded floral border, a hand-rolled edge, a little embroidery, or simply the soft feel that only comes after years of washing and use. Even when they are no longer practical as handkerchiefs, there is often far too much character in the fabric to treat them as scraps.
I’m always drawn to projects that keep the most recognizable part of an old object while giving it a useful new role. Vintage hankies work especially well for that because they are already finished pieces of cloth. Their hems, prints, lace, and embroidery can become part of the design instead of something you need to hide.
The key is to work with the hankie rather than against it. A strong cotton square can handle a little sewing and everyday use, while a very fine or sentimental piece is better suited to a low-stress project where the fabric can be seen without being pulled, scrubbed, or stretched.
Why Vintage Hankies Are Worth Saving
Vintage hankies are small, but they often contain details that would take far more time to recreate from new fabric. Scalloped edges, narrow lace, tiny printed flowers, monograms, and hand embroidery can all become ready-made design features. That makes them useful for small upcycling projects where you want something decorative without buying specialty trim or patterned fabric.
They are also easy to store until you have the right project. Unlike a large piece of furniture or a box of jars, a stack of hankies takes up very little room. I don’t think you need to force every one into a project immediately. Sort them by strength and condition, keep the most fragile pieces flat, and use the sturdier ones when you want to make something handled more often.
Another advantage is scale. A hankie can cover the front of a cushion, wrap around a jar, become a pocket, or fit inside an embroidery hoop without much cutting. Using the existing edges also reduces waste and keeps the original character visible.
How to Choose the Right Hankie for Each Project
Before you decide what to make, look at the fabric itself. Hold the hankie up to the light and check for thin patches, small holes, stains, weak hems, or areas where the fibers have started to separate. A piece can still be useful even if it is imperfect, but the condition should decide where you place it.
For sachets, pouches, tote pockets, and cushion panels, choose cotton or linen that still feels reasonably strong. If the hankie tears when you gently pull opposite corners, it is better saved for framed art or another project with almost no strain. Very delicate lace can also be layered over a stronger backing fabric so the decorative part is supported.
Think about the pattern placement too. A border print works nicely around the edge of a pouch or pillow, while a large central flower is ideal for hoop art. If only one corner is attractive, there is no rule saying you must use the whole square. A small section can become a patch, label, sachet front, or decorative panel and leave the rest available for another craft.
How to Clean and Prepare Vintage Hankies Safely
Cleaning matters because old textiles can hold dust, perfume, starch, or storage marks. Start gently. If you know the fiber content and the hankie is sturdy, hand-washing in cool or lukewarm water with a mild detergent is usually the least aggressive approach. Avoid twisting or wringing; press the water out between clean towels instead.
For fragile or highly sentimental pieces, test a hidden corner first or consider leaving the fabric unwashed if cleaning could damage embroidery, dyes, or lace. I know it can feel tempting to scrub a stain until it disappears, but old fibers often lose the argument before the stain does. A faint mark is easier to live with than a hole.
Once the fabric is dry, press it on a suitable heat setting with a pressing cloth if necessary. Then decide whether the project needs a lightweight backing. Fusible interfacing can strengthen a sturdy cotton hankie, but it may be inappropriate for very old or delicate fabric, so a removable stitched backing is often the safer choice. Prepare the base material at the same time so you can arrange everything before making permanent cuts or stitches.
Sew a Vintage Hankie Lavender Sachet
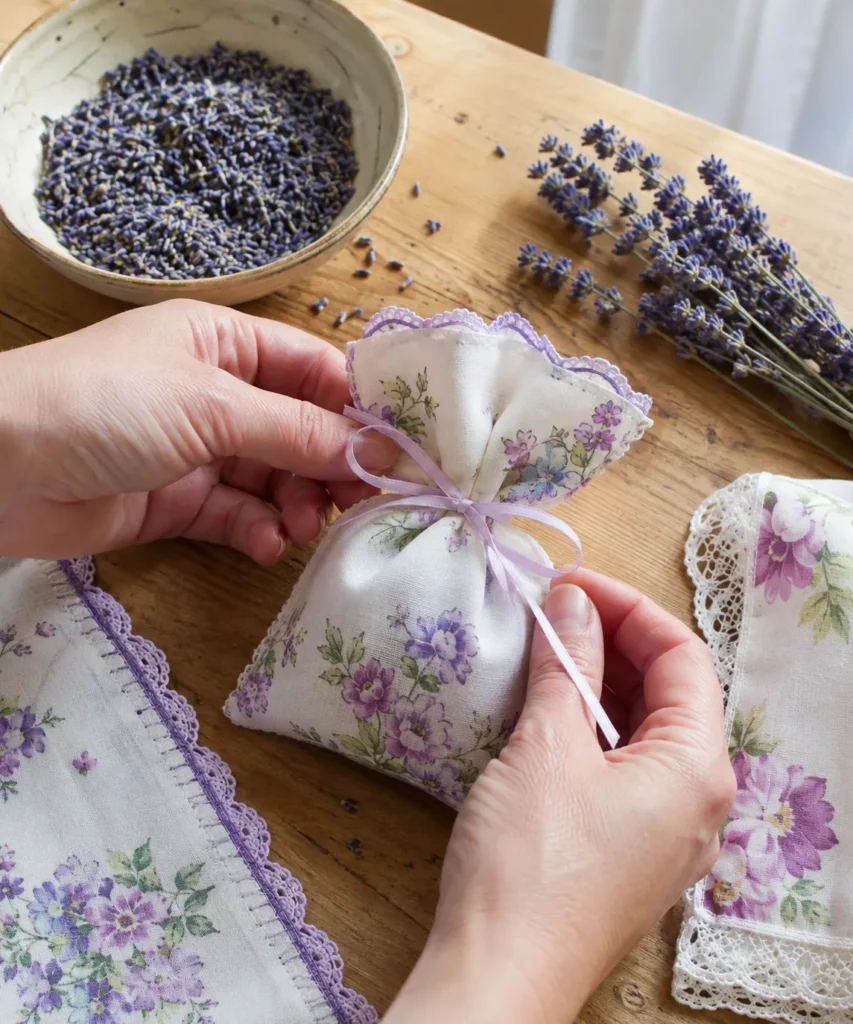
A sachet is one of the easiest ways to repurpose vintage hankies because the project uses a small amount of fabric and puts very little strain on it. A floral corner can become the front of the bag, while an existing decorative edge can form the top. If the hankie has a tiny stain or worn patch elsewhere, you can often position the pattern so the strongest section is used.
The finished sachet can hold dried lavender, cedar chips, or another dry aromatic filling. It works in a linen cupboard, bedside drawer, or storage box. I especially like this project for single hankies that are too pretty to cut into tiny scraps but not strong enough for a bag or cushion that will be handled every day.
Materials and Tools
· One clean vintage hankie or a strong section from one
· Dried lavender or another dry sachet filling
· Sewing thread in a coordinating color
· Hand-sewing needle or sewing machine
· Fabric scissors
· Straight pins or sewing clips
· Narrow ribbon, cotton tape, or soft twine
· Optional lightweight cotton lining for a delicate hankie
Steps
1. Choose the strongest part of the hankie. Lay the fabric flat and decide which floral detail or border you want to show on the front. If the material is thin, cut a matching piece of lightweight cotton to sit behind it so the old fabric does not have to carry the filling by itself.
2. Fold and secure the sides. Fold the hankie section with the decorative sides facing inward, keeping a finished edge at the top when possible. Pin the side and bottom edges, then sew them with a short, secure seam that stays away from any frayed area.
3. Turn the pouch and add the filling. Turn the sachet right side out and gently push the corners into shape with your fingers rather than a sharp tool. Add enough dried lavender to give the bag a soft shape without packing it tightly; overfilling can put unnecessary pressure on old seams.
4. Close the top without overworking the fabric. Gather the open top softly and tie it with ribbon, or hand-stitch it closed if you prefer a flatter sachet. Then trim loose threads and check that no lavender buds can escape through worn sections or open lace.
A Practical Detail I Would Keep Simple
I would avoid adding beads, heavy charms, or several layers of trim here. The print and original edging already provide the visual interest, and a light sachet is kinder to older fabric. If the hankie is particularly sentimental, make the inner pouch from plain cotton and use the vintage fabric only as an outer sleeve.
Beginner Shortcut and Everyday Care
If sewing tiny corners feels fiddly, make the sachet from a folded rectangle rather than trying to shape it. A simple rectangular pouch still shows the floral print clearly, and the top can close with ribbon instead of a stitched casing. This also makes it easier to open later if you want to refresh or replace the dried filling.
Keep the finished sachet dry and avoid placing it directly against pale fabric if you are unsure whether the vintage print is colorfast. When the scent fades, untie the ribbon and replace the filling rather than washing the entire sachet repeatedly. A small inner muslin bag is especially useful because it keeps lavender dust away from the old textile.
Variations and Alternatives
You can make a flatter sachet for a drawer, a taller one for hanging in a wardrobe, or a tiny version from a damaged hankie corner. If you do not want fragrance, fill the pouch lightly with clean cotton batting and use it as a decorative ornament instead. A plain hankie can also be finished with one small embroidered initial rather than extra trim.
Frame a Floral Hankie in an Embroidery Hoop
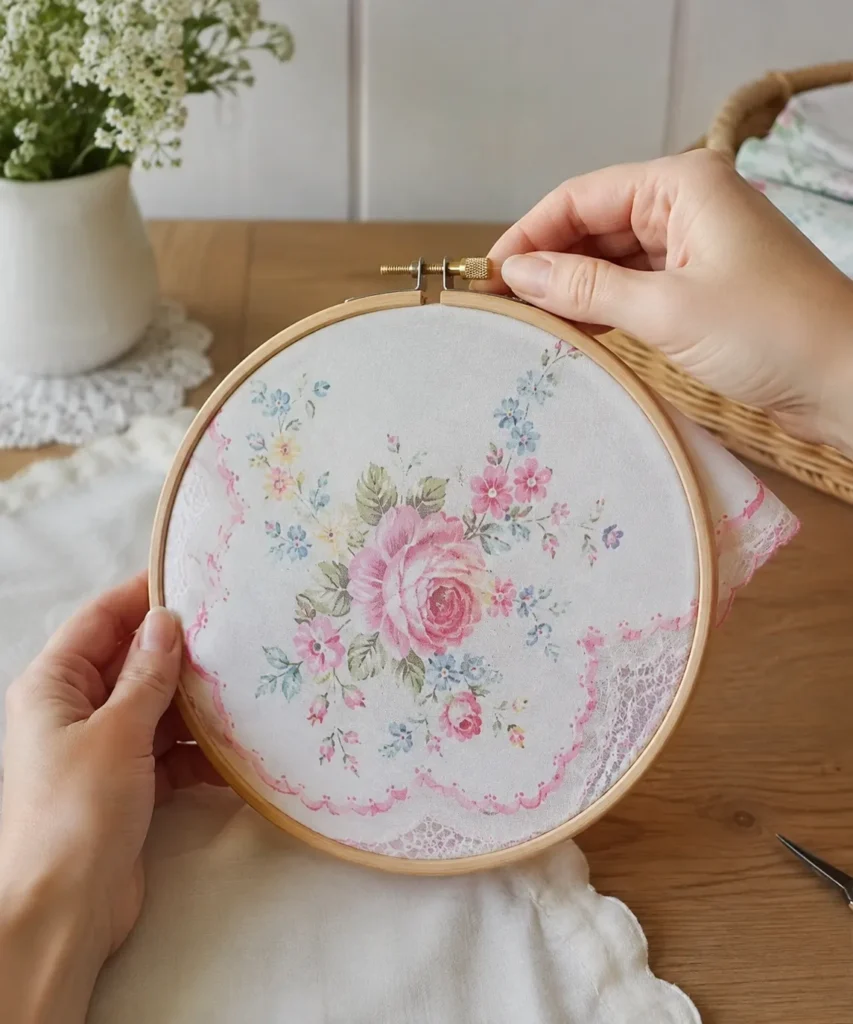
Some hankies are far more valuable as fabric art than as material for a practical object. If the cloth is fine, the embroidery is delicate, or the print has a large central motif, an embroidery hoop gives the hankie a purpose without asking it to withstand much handling.
This is also a useful option when you want to preserve most of the original square. You can position the design in the hoop and fold the extra fabric neatly behind it rather than cutting immediately. That makes the project more reversible, which is worth considering for family pieces or hankies with sentimental value.
Materials and Tools
· One vintage hankie
· Wooden embroidery hoop
· Clean backing fabric if the hankie is translucent
· Small scissors
· Needle and thread for a reversible finish
· Optional acid-free backing card for extra support
Steps
1. Test the composition before tightening the hoop. Lay the inner ring beneath the hankie and move the fabric until the main flower, monogram, or border sits where you want it. If the background shows through too strongly, place a plain cotton backing behind the hankie before adding the outer ring.
2. Tighten gradually. Fit the outer ring over the fabric and tighten the screw a little at a time, smoothing from the center toward the edges. The cloth should look flat, but it should not be stretched so firmly that old threads begin to distort.
3. Finish the fabric at the back. For a reversible approach, fold the extra cloth inward and loosely gather it with hand stitches so it can be removed later. If you are using a common, sturdy hankie and do not mind trimming, leave a generous margin rather than cutting flush with the hoop.
4. Hang it away from harsh conditions. Display the hoop on an interior wall where it will not sit in strong direct sunlight or a damp room. Dust the frame gently and avoid repeatedly touching the fabric surface.
What Matters More Than a Perfect Circle
For me, the placement of the printed motif matters more than centering the entire hankie. A flower can sit slightly low or to one side and still look balanced, especially if part of a decorative border enters the frame. The fabric does not need to behave like a perfectly symmetrical piece of modern printed cloth.
An Easy Way to Make the Display Look Finished
If the back of the hoop will remain visible from the side, cover it with a plain circle of cotton or lightweight card rather than leaving gathered fabric exposed. Keep that backing removable if the hankie matters to you. A neat back does not need to be elaborate; it simply stops loose folds from catching dust or being tugged when the hoop is moved.
For a beginner, I would also choose a hoop slightly smaller than the hankie so there is generous fabric around the edge. Trying to stretch a tiny fragment into a large hoop gives you very little room for adjustment and often puts too much tension on the old weave.
Variations and Alternatives
Group three small hoops with different floral hankies, use an oval frame instead of a hoop, or place a monogrammed corner in a tiny frame for a bedside display. If the hankie is very fragile, sandwich it loosely between supportive fabrics rather than stretching it directly in the hoop.
Make a Light Vintage Hankie Garland
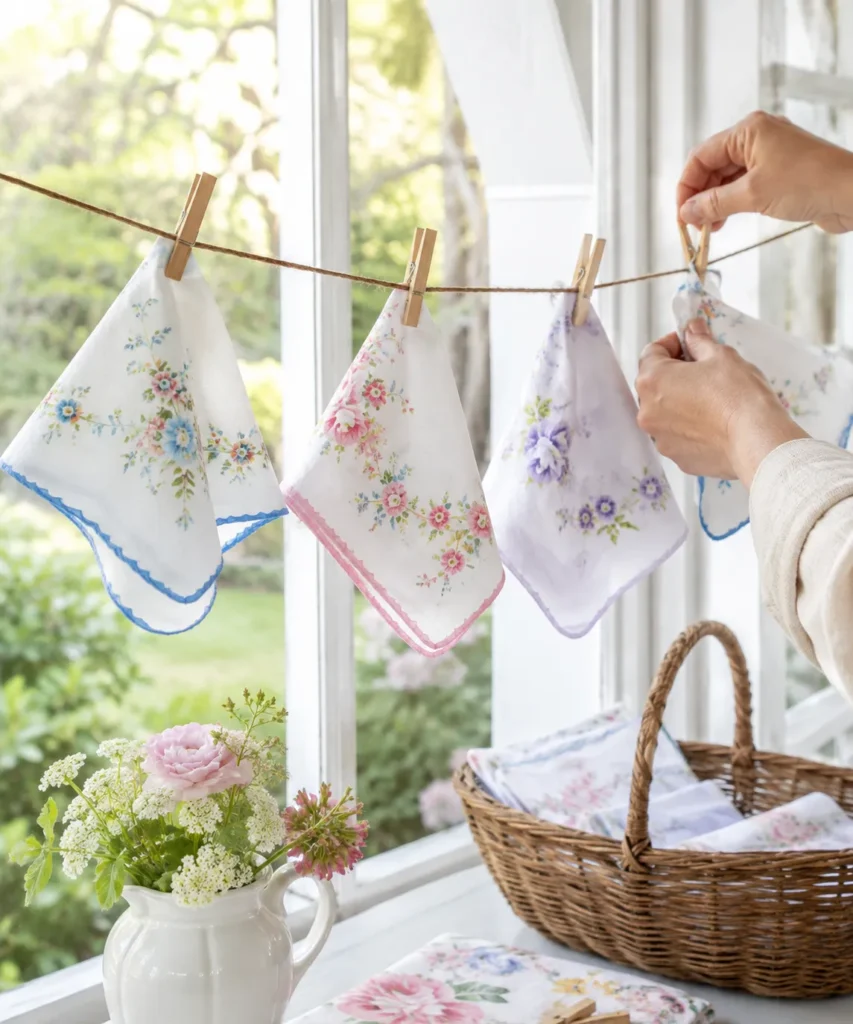
A hankie garland is useful when you have several pieces that look good together but you do not want to cut them. The idea is simple: display them like small textile flags, allowing the borders and prints to remain intact. Because the attachment can be completely removable, this is one of the gentlest options for vintage fabric.
The finished garland can work across a craft-room wall, over a dresser, at a small celebration, or along a window where the cloth can be seen in soft light. I would avoid leaving old textiles in intense sun for long periods, but a temporary display can be a lovely way to enjoy pieces that normally stay folded away.
Materials and Tools
· Several vintage hankies
· Cotton twine, ribbon, or soft cord
· Small wooden pegs or removable clips
· Optional mini safety pins for sturdy fabric
· Measuring tape
· Two secure hanging points
Steps
1. Sort the hankies into a loose color story. Spread them out and look for repeated colors rather than trying to make every print match. A mix of pink, blue, lilac, and white can feel connected even when the flowers and borders are different.
2. Plan the line before hanging anything. Measure the area and cut the cord with enough extra length for knots at both ends. Hang it with a gentle curve rather than pulling it extremely tight, especially if you are attaching the line to lightweight removable hooks.
3. Clip each hankie with minimal pressure. Fold one corner over the cord or attach the top edge with two small pegs so the piece hangs flat. Place clips on sturdy hemmed areas instead of fragile lace, then adjust the spacing until the group looks balanced.
4. Check the display from across the room. Move any piece that looks too crowded or heavy in one section. Then make sure the hankies are clear of candles, cooking steam, open windows in bad weather, and any place where they are likely to be pulled.
Why I Prefer Removable Fastening Here
I know stitching every hankie to a ribbon might feel more secure, but there is little reason to make a permanent change for a decorative garland. Small clips let you wash, rotate, or store the fabric individually later. They also make it easy to swap one damaged piece for another without taking the entire display apart.
Make the Garland Easy to Store and Reuse
One practical advantage of the clip-on method is storage. When you are finished with the display, remove each hankie, lay it flat, and store the pieces separately from the twine and pegs. This prevents a clip from leaving a long-term pressure mark in the same place and means the fabric can return to a drawer without dangling hardware attached.
If you are decorating for a short event, label the cord or wind it around a scrap of cardboard when you take it down. Then the whole setup is ready to reuse without tangles. The hankies remain separate, clean, and available for another project later.
Variations and Alternatives
For a quieter look, use only white and cream hankies with different embroidered edges. You can also fold each square diagonally to create triangular flags, although I would only crease sturdy cotton and avoid pressing sharp folds into delicate embroidery. For a party, mix hankies with plain fabric scraps so you need fewer vintage pieces.
Turn a Hankie Into a Small Envelope Pouch
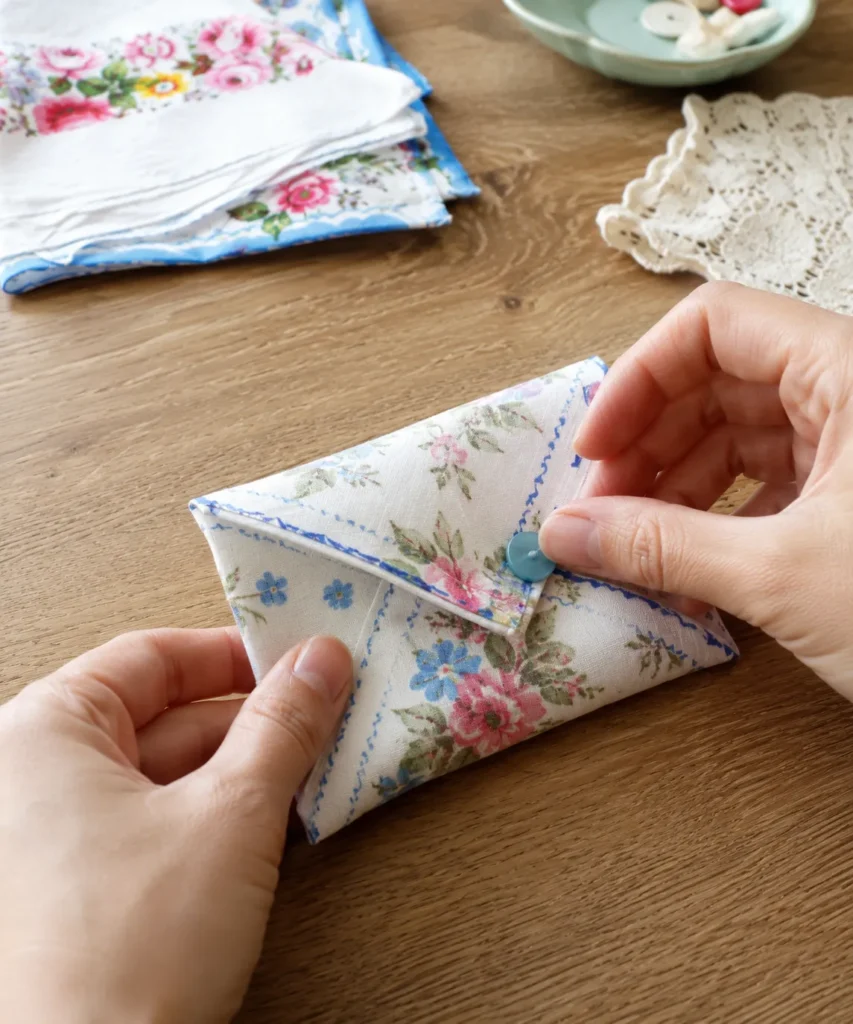
A small envelope pouch makes good use of the finished edges of a hankie. Instead of building a bag from several pattern pieces, you can fold one square into a compact shape and stitch only the areas that need to stay closed. The result works well for sewing notions, wrapped jewelry, small keepsakes, or other lightweight items.
This project needs a hankie that still has some strength. A very thin, brittle, or lace-heavy piece may look lovely but will not enjoy repeated opening and closing. If you are unsure, reinforce the inside with a separate cotton square so the vintage layer remains decorative rather than structural.
Materials and Tools
· One sturdy vintage hankie
· Matching thread
· Hand-sewing needle or sewing machine
· Straight pins or clips
· One small button
· Narrow elastic loop, thread loop, or soft cord for closure
· Optional cotton lining
· Iron and pressing cloth if suitable for the fabric
Steps
1. Fold the hankie into an envelope shape. Place it with the decorative side down and bring the lower corner upward, then fold the side corners inward. Adjust the overlap until the floral pattern sits where you want it and the top corner can fold down as a flap.
2. Reinforce before sewing if needed. If the fabric feels thin, slide a matching cotton lining into the folded shape or baste a backing to the inside. Then pin the side overlaps, keeping the original hems aligned so you can use them instead of creating bulky new seams.
3. Stitch the pouch body. Sew the side edges with small stitches, stopping below the flap so it can open freely. Keep the stitches within stronger areas of the fabric and avoid sewing repeatedly through an old embroidered motif.
4. Add a gentle closure. Sew a lightweight button to the pouch body and add a small thread or elastic loop to the flap. Test the closure several times; it should hold the pouch shut without requiring enough force to pull the old fabric out of shape.
Keep the Contents as Light as the Fabric
The pouch may look like a tiny wallet, but I would not treat it like one if the hankie is old. Coins, keys, and other hard objects can wear through fine fabric quickly. Use it for light items, or add a proper lining if you need more durability.
A Beginner-Friendly Folding Trick
Before threading a needle, practice the envelope shape with a paper square about the same size as the hankie. That lets you understand where the side overlaps and flap will sit without repeatedly creasing the old fabric. Once the paper version feels right, copy the fold gently in cloth and pin it before sewing.
You can also make the first version with a modern cotton handkerchief or fabric square, then move to the vintage piece when you are comfortable with the construction. That may sound cautious, but it is much easier to correct a folding mistake on practice fabric than on a one-of-a-kind embroidered hankie.
Variations and Alternatives
Skip the button and use a ribbon tie, make a flat pouch for a gift card, or tuck the finished pouch inside a handbag as a soft organizer. A damaged hankie can still work if the worn section ends up hidden inside the folded flap and the load-bearing areas remain strong.
Add a Vintage Hankie Panel to a Cushion
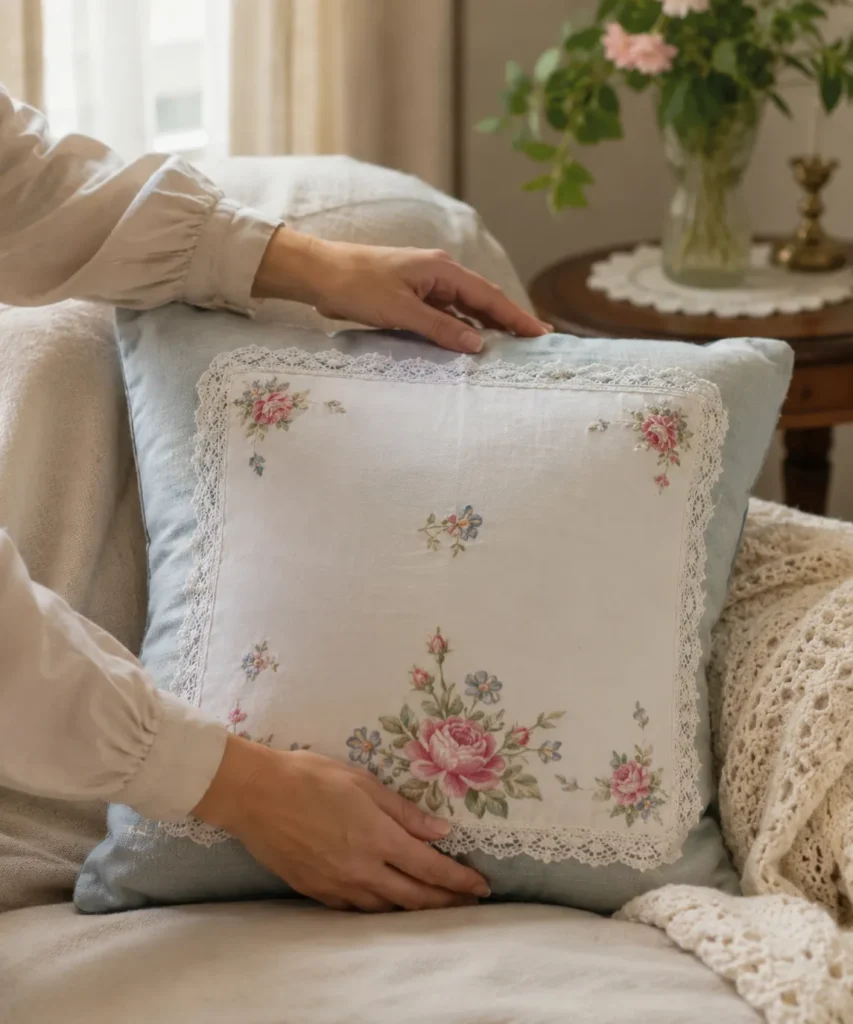
A cushion is a good compromise when you want to see a large hankie in everyday life but do not want the vintage fabric to form the whole cover. The plain cushion fabric provides the structure, while the hankie acts as an appliqué or decorative front panel. That keeps the old cloth visible and reduces stress on its edges.
The safest version is a removable cover used on a decorative cushion rather than a pillow that will be washed every week. If the hankie has lace, I would also keep it away from zippers, rough upholstery, pet claws, and other things that can catch the edge.
Materials and Tools
· One large vintage hankie
· Plain cushion cover or fabric for making one
· Matching sewing thread
· Hand-sewing needle
· Straight pins or fine sewing clips
· Optional lightweight backing fabric
· Cushion insert
Steps
1. Position the hankie on the empty cover. Remove the cushion insert and lay the cover flat. Move the hankie until the main floral motif and lace border look balanced, leaving enough plain fabric around it to visually frame the old textile.
2. Support fragile areas. If the hankie is thin, baste a piece of lightweight cotton behind it before attaching it to the cushion. This hidden layer can take some of the tension from the stitches and helps prevent the vintage cloth from stretching when the cushion is used.
3. Attach the panel with small stitches. Pin carefully around the strongest hemmed edges, then hand-sew the hankie to the cover using spaced, neat stitches. Sew through the backing where possible and avoid pulling the thread so tight that the edge puckers.
4. Reinsert the cushion and inspect the corners. Once the panel sits smoothly, add the insert and check how the fabric behaves under light pressure. Reinforce any area that lifts, but resist the urge to stitch every millimeter; fewer well-placed stitches are often kinder to delicate fabric.
Let the Plain Fabric Do the Hard Work
The best part of this approach is that the new or reused cushion cover carries the strain. The hankie does not need to wrap around corners, hold a zipper, or support the insert. That is exactly how I would treat a pretty textile that deserves to be used but no longer has the strength of new fabric.
Cleaning a Cushion With a Vintage Panel
If the cushion cover becomes dusty, remove the insert first and deal with the vintage panel as gently as possible. Light vacuuming through a clean mesh screen or careful surface dusting may be enough for a decorative cushion. If washing is necessary, follow the needs of the oldest and most delicate fabric on the cover rather than the care label of the newer base cloth.
A removable panel is another option if you expect frequent cleaning. You can hand-stitch the hankie to a separate fabric patch, then attach that patch to the cushion with hidden snaps or a few removable stitches. It adds one extra layer, but it keeps the old textile out of the wash more often.
Variations and Alternatives
Use one hankie on each side of a reversible cushion, frame a small hankie with strips of plain fabric before attaching it, or place only an embroidered corner on a lumbar cushion. If you want the vintage piece to remain removable, use discreet hand stitches that can be snipped later rather than permanent adhesive.
Wrap a Glass Jar With a Vintage Hankie
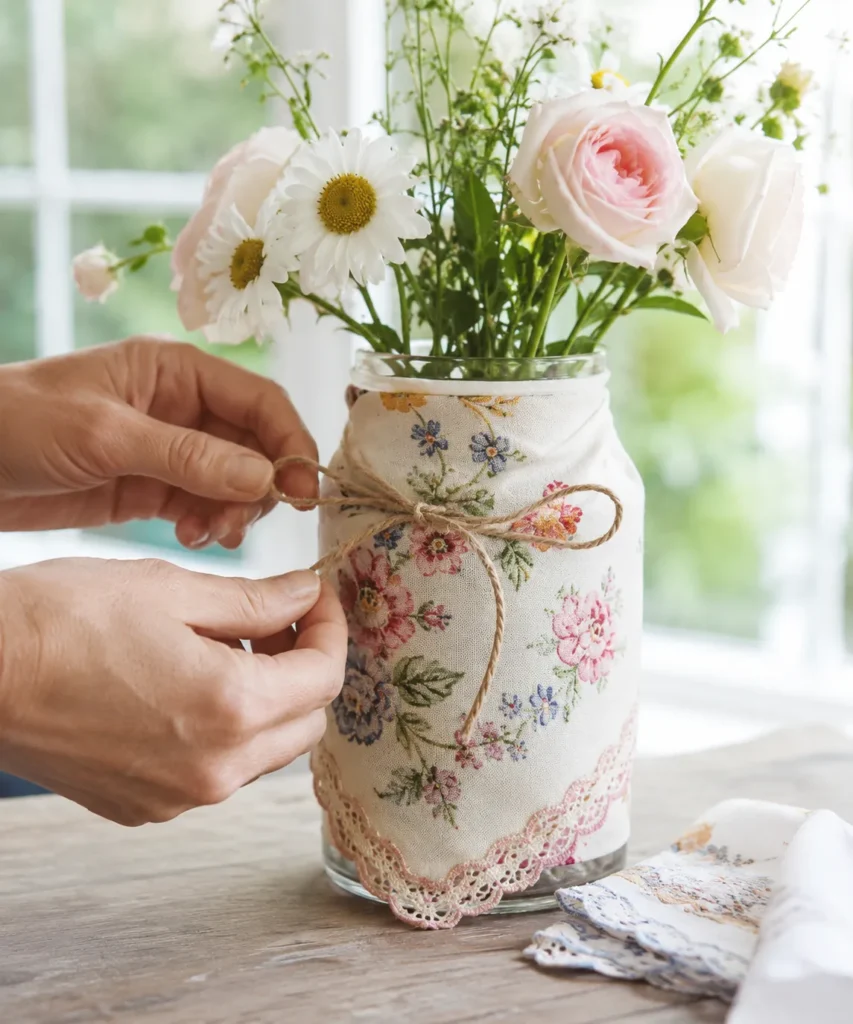
This jar wrap is a good option when you want a project that involves almost no cutting. The hankie is wrapped around the outside of a clean jar, folded to show its decorative section, and held in place with twine or ribbon. The fabric can be removed again whenever you need to wash the glass.
A removable wrap is much more practical than gluing old cloth directly to a vase. Water spills happen, flower jars need cleaning, and vintage fabric rarely benefits from being scrubbed alongside glass. Keeping the two parts separate makes the idea easier to maintain.
Materials and Tools
· One vintage hankie
· Clean glass jar with smooth edges
· Cotton twine, ribbon, or soft cord
· Scissors for cutting the tie only
· Optional plain cotton band to support very delicate fabric
· Fresh or dried flowers
Steps
1. Choose a jar that suits the hankie. A straight-sided jar is easiest because the fabric can sit evenly around it. Check the rim for chips or sharp edges, then wash and dry the glass completely before bringing the textile onto the work surface.
2. Wrap without cutting first. Fold the hankie so the most attractive border or floral area faces outward, then wrap it around the jar. Tuck excess fabric neatly at the back or overlap the ends rather than trimming until you are certain you want a permanent size.
3. Tie the fabric securely but gently. Wrap twine or ribbon around the middle and knot it with enough tension to stop the hankie slipping. The tie should not bite into lace or crush embroidery; if it does, place a plain cotton band beneath it to spread the pressure.
4. Use and clean the jar separately. Add flowers and water carefully, wiping any drips from the outside straight away. When the water needs changing, remove the hankie before washing the jar, then replace it only once the glass is completely dry.
A Removable Sleeve Makes More Sense
I’d rather tie the fabric than glue it. Adhesive can soak through old cloth, leave dark patches, or make future cleaning awkward. A removable sleeve also means one hankie can move between a jar, small plant pot cover, or seasonal display without being permanently changed.
Keep Moisture Away From the Old Fabric
Condensation is the main thing I would watch with a flower jar. If the room is humid or the jar is filled with very cold water, moisture can form on the outside and dampen the hankie. A narrow strip of plain cotton between the glass and vintage fabric can create a little separation and is easy to wash if it gets wet.
For longer-lasting arrangements, dried flowers remove the water issue completely. They also suit a hankie sleeve well because you can leave the jar styled for longer without constantly taking the fabric off for cleaning.
Variations and Alternatives
Wrap a short jar to make a pencil cup, use a folded hankie around a battery-operated candle holder, or layer a plain strip of fabric beneath a very sheer vintage piece. Keep textile decorations away from open flames, even if the jar originally held a candle.
Use a Vintage Hankie as a Tote Bag Pocket
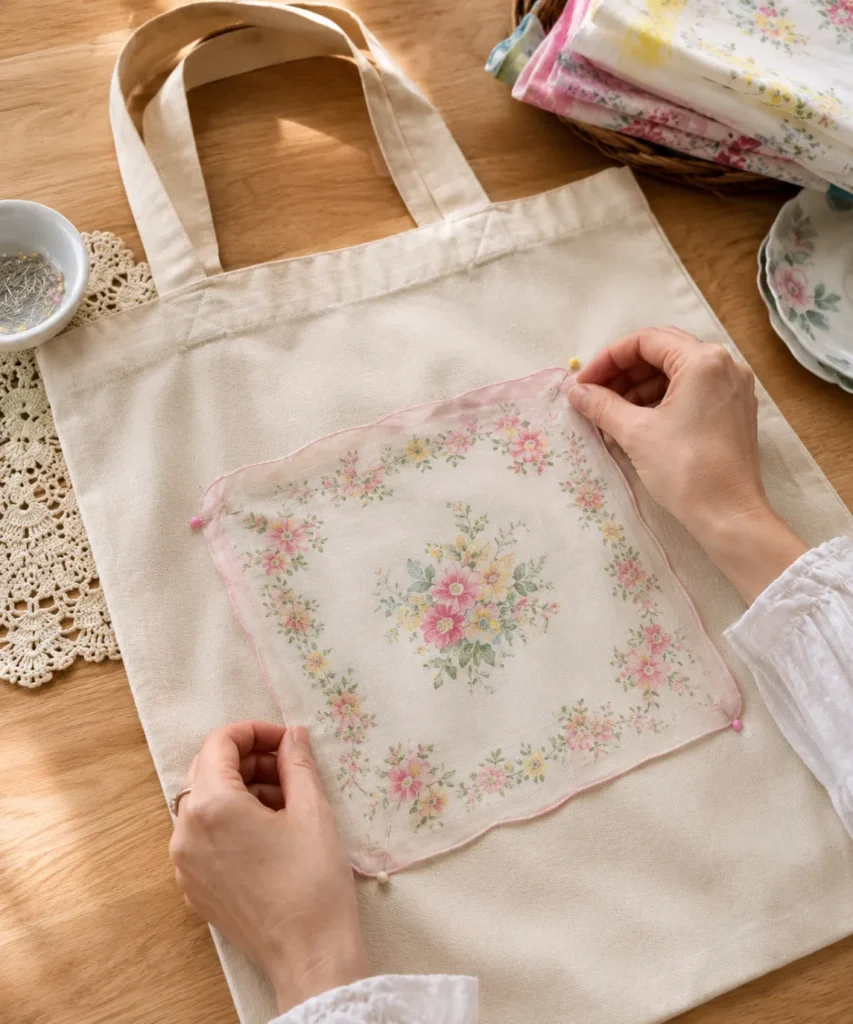
A plain canvas tote gives a vintage hankie something it often lacks: structure. Instead of asking the delicate fabric to carry the entire weight of a bag, you can use it as a decorative pocket on a stronger base. The tote handles the books, groceries, or craft supplies, while the hankie holds only lighter items.
This is one of the more practical ideas in the group, but the fabric choice matters. Pick a hankie with intact hems and no brittle areas along the side that will be stitched. If the print is lovely but the cloth feels weak, add a backing layer so the visible vintage piece is not taking the full strain of the pocket.
Materials and Tools
· Plain canvas tote bag, preferably reused
· One sturdy vintage hankie
· Lightweight cotton backing or interfacing if suitable
· Matching sewing thread
· Sewing needle or sewing machine
· Straight pins or sewing clips
· Fabric scissors
· Iron and pressing cloth if appropriate
Steps
1. Decide which part will remain open. Place the hankie on the tote and choose a top edge for the pocket. An existing finished border is useful here because it reduces the amount of new sewing and keeps the original detail visible.
2. Add backing if the fabric needs help. Cut a piece of plain cotton slightly smaller than the hankie and baste it behind the vintage fabric. Then fold under any edge that cannot use the original hem, keeping the folds shallow so the pocket does not become bulky.
3. Pin and stitch three sides. Position the hankie on the tote while the bag lies flat, then pin the left, right, and bottom edges. Sew around those three sides with secure stitches, leaving the top open and reinforcing the two upper corners where the pocket will receive the most pulling.
4. Test the pocket with light contents. Put a folded shopping list, handkerchief, or other lightweight object inside and check that the top edge does not sag. Then reinforce any weak point from the inside of the tote rather than adding more visible stitching through delicate areas.
Don’t Ask a Vintage Pocket to Carry Everything
A hankie pocket is useful, but I would not put a phone, metal keys, or a heavy water bottle in it unless the piece has been fully lined and reinforced. The aim is to add function without pretending old fabric has suddenly become canvas. Let the tote do the heavy work.
How to Keep the Pocket From Sagging
Pocket shape matters more than adding lots of stitches. If the top edge is wide and soft, add a narrow strip of cotton behind it before sewing the pocket to the tote. That hidden reinforcement can stop the opening from rolling forward and reduces the pull on the hankie when you reach inside.
Also keep the pocket slightly smaller than the flat front of the tote so the bag can flex around it. A pocket stitched right to the side seams may be pulled every time the tote expands. Leaving a little canvas around the hankie creates a visual border and gives the stronger fabric room to move.
Variations and Alternatives
Use the hankie as a flat decorative patch instead of a working pocket, add two smaller corner patches, or place the panel on the inside of the tote as a hidden pocket. If you want a no-sew version for temporary styling, baste the hankie by hand with easily removable stitches rather than relying on fabric glue.
Common Mistakes to Avoid With Vintage Hankie Projects
Vintage fabric rewards a gentler approach than most modern craft materials. The most common problems usually come from treating the hankie as if it were ordinary new cotton rather than a finished textile that may already have decades of wear behind it.
Using the prettiest piece for the hardest job. A heavily embroidered or lace-edged hankie may be the one you most want to turn into a pocket, but it may also be the least suitable. Put fragile pieces in hoops, frames, or removable displays and save stronger cotton for pouches and tote pockets.
Cutting before you test the layout. Many of these projects can use the original square almost intact. Fold, pin, clip, or baste first. Then cut only when the extra fabric truly prevents the project from working.
Pulling stitches too tightly. Tight thread can create puckers and can even cut into weakened fibers. Use small stitches with enough tension to hold the piece flat, not enough to reshape the fabric.
Using permanent adhesive on delicate cloth. Glue may soak through, stiffen the textile, discolor it, or make future repairs difficult. Sewing, tying, clipping, or using a separate support layer often gives you more control and keeps the project reversible.
Ignoring the stress points. Pouch closures, pocket corners, cushion edges, and hanging clips receive more force than the center of the fabric. Reinforce those areas with backing rather than adding more pressure directly to the vintage material.
Washing the finished project like ordinary laundry. A tote or cushion may be washable, but its hankie decoration may not be. Remove detachable pieces when possible, spot-clean carefully, or hand-wash only when you know the vintage textile can tolerate it.
Overdecorating an already detailed print. Floral hankies often have enough color, lace, and pattern on their own. Extra buttons, bows, charms, and trim can make the piece feel crowded and add unnecessary weight. If one simple ribbon or stitch line does the job, I’d stop there.
Frequently Asked Questions
Can I repurpose vintage hankies without cutting them?
Yes. Embroidery hoop art, garlands, and removable jar wraps can all use the hankie largely or completely intact. Even a pouch can often be created through folding and stitching rather than trimming away large sections.
How do I know if an old hankie is strong enough to sew?
Check the fabric in good light and gently test the hems and corners. If the cloth feels brittle, splits under very light tension, or has widespread thinning, use it for a low-stress display instead of a pocket, pouch, or cushion panel.
Should I wash vintage hankies before crafting with them?
Usually, a gentle clean is helpful, but the method depends on the fiber, dye, embroidery, and condition. If the piece is very old, sentimental, or unstable, test a small area first and avoid aggressive stain treatment.
Can I use fabric glue instead of sewing?
For sturdy modern cotton, fabric adhesive may be an option, but I would be cautious with vintage hankies. Adhesive can seep through fine cloth or make it stiff, so removable stitching is often easier to control and repair later.
What can I do with a hankie that has a stain or small hole?
Use the strongest and most attractive section rather than discarding the whole piece. A stained corner can be folded inside a pouch, hidden behind a jar wrap, or excluded from a small sachet, while a central damaged area may still leave a good border for patchwork.
Are vintage hankie projects suitable for beginners?
Several are very beginner-friendly. The jar wrap and clip-on garland require almost no sewing, while a sachet or simple tote pocket is a manageable next step if you can sew a basic straight seam or hand stitch.
How can I make a hankie project more durable?
Give the vintage fabric a stronger partner. Back it with lightweight cotton, attach it to canvas or a cushion cover, reinforce pocket corners, and keep heavy contents away from delicate sections. Durability usually comes from support rather than from adding more stitches to old cloth.
Give Vintage Hankies a Useful Place Again
The nicest thing about learning how to repurpose vintage hankies is realizing that you do not have to choose between storing them forever and cutting them beyond recognition. A simple support layer, a removable tie, a few careful stitches, or a low-stress display can give the fabric a practical role while keeping the details that made it worth saving.
If you have several pieces, begin with the one that is sturdy but not especially precious. A lavender sachet, jar wrap, or clip-on garland is forgiving and lets you get a feel for how older cloth behaves. Then you can decide whether a finer piece belongs on a cushion, in a hoop, or safely folded away for another day.
I’d choose one hankie, look closely at its strongest feature, and let that feature decide the project. The old border, embroidered corner, or faded flowers already give you a starting point. Which forgotten hankie would you like to put back into use first?