Old eyeshadow is one of those small things that can sit in a drawer for years. A shade may be cracked, too glittery for everyday makeup, no longer something you want near your eyes, or simply part of a palette you have stopped using. I do not think that automatically makes the pigment useless. Once you stop treating it as makeup and start treating it as a fine colored powder, it becomes surprisingly handy for paper crafts, clay pieces, decorative painting, and other small projects.
I am Stella Eve Louise, and I am always interested in practical ways to reuse materials before buying something new. With old eyeshadow, the most important change in thinking is also a safety one: keep expired or unwanted makeup out of cosmetic use and give it a second life only in non-skin craft projects. The soft pinks, mauves, taupes, metallics, and shimmers that are awkward in a makeup bag can be lovely on paper, fabric accents, and decorative objects. A little pigment goes a long way, so even the last broken pieces in a pan can be enough for a useful project.
Check Whether the Eyeshadow Is Suitable for Crafting
Before saving every old palette for a future project, sort it with the same common sense you would use for any reused material. Dry pressed powder that is simply old, cracked, or unwanted is the easiest type to repurpose. If a product is wet, moldy, unusually sticky, has a strong changed smell, or has been contaminated with something you would not want on your craft table, discard it rather than trying to rescue it.
For these ideas, I would treat the eyeshadow as a craft pigment only. Do not mix old eyeshadow into lip balm, body products, bath products, children’s face paint, or anything that will be rubbed onto skin. The goal is to keep useful color out of the bin without pretending an expired cosmetic is still a cosmetic. That distinction makes the projects simpler and more sensible.
Matte and satin shades are usually the easiest to control because they behave like a fine powder. Shimmery shades can be excellent for decorative highlights, but they tend to show every fingerprint and can move around more easily. Very chunky glitter formulas may work for ornaments or paper accents, although I would avoid them on projects that need a smooth finish.
Prepare the Pigment Before You Start
Eyeshadow behaves better in crafts when you break it down into a consistent powder. Place a small amount on a washable dish, piece of scrap paper, or palette and crush larger pieces with the back of a spoon or a small craft spatula. You do not need to pulverize the entire compact at once. Working with only what you need keeps the mess under control and lets you save the rest for another project.
If you are combining several shades, mix them dry first. This is much easier than trying to correct a muddy color after adding glue, water, paint medium, or another binder. I know it can feel tempting to tip three or four colors together and hope for the best, but the smallest test batch usually tells you more than a full bowl of pigment ever will.
Keep the work surface protected, especially with deep red, plum, navy, and charcoal shades. Fine powder travels farther than it looks like it should. A slightly damp cloth nearby is more useful than chasing dusty shimmer around the table later. If loose powder bothers your breathing, work gently and avoid blowing or brushing excess pigment into the air.
Match the Pigment to the Right Craft Surface
Old eyeshadow does not behave like acrylic paint on its own. On porous paper it can be rubbed, brushed, or blended directly, while smoother surfaces usually need a binder or a tacky base. That is why the same eyeshadow can create a watercolor-like wash on paper, a dry pastel effect on an ornament, or a soft tinted layer on a primed decorative dish.
I would always test the pigment on a scrap of the actual material first. A pale champagne shade may look almost invisible on white paper but much warmer on kraft card. A lilac that looks cool in the pan can turn dusty gray once mixed with a beige medium. The test does not need to be fancy; a thumb-sized patch is enough to show whether the color and finish are going in the right direction.
For projects that will be handled often, you may want a compatible clear craft sealer after the pigment is fully set. For framed art and decorative paper pieces that are protected from rubbing, a sealer may not be necessary. I would rather use the least complicated finish that suits the object than coat everything automatically.
Turn Old Eyeshadow Into Soft Watercolor-Style Paint
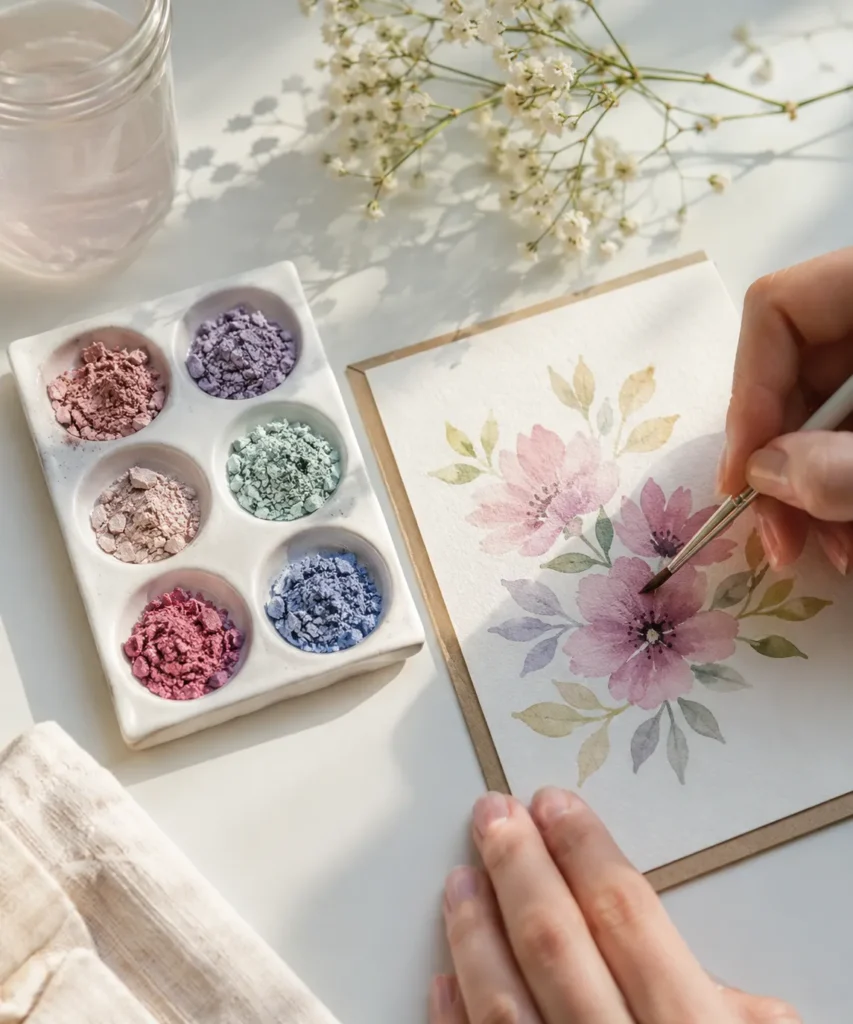
This is one of the most natural ways to repurpose old eyeshadow because the powder already has the fine texture you want from a color pigment. Mixed with a little water and a suitable water-based craft binder, soft shades can become translucent washes for cards, journal pages, small paintings, or handmade gift inserts. The effect is especially nice with muted pink, mauve, blue, champagne, and olive shades that layer without looking too harsh.
The key is not to expect ordinary eyeshadow to behave exactly like artist watercolor. Some formulas contain more fillers or shimmer, so the color may settle unevenly. That irregularity can actually suit flowers, leaves, abstract washes, and backgrounds. For me, the slightly powdery finish is part of the appeal rather than something to fight.
Materials and Tools
· Old pressed powder eyeshadow
· Small ceramic palette, saucer, or mixing dish
· Water
· Small amount of water-based craft medium or watercolor binder, if needed
· Soft watercolor or detail brushes
· Watercolor paper or heavy card
· Paper towel or cloth
How to Make a Similar Version
1. Crush and sort the colors. Scrape a small amount of each eyeshadow into separate wells or dishes. Break the powder down until there are no large chunks, then keep pale and dark shades separate so you can control the mixtures instead of ending up with one brownish puddle.
2. Make a test wash. Add only a drop or two of water at first and stir with the brush. If the pigment refuses to spread or rubs away once dry, mix in a tiny amount of water-based craft medium. Test the wash on scrap paper before moving to the final piece.
3. Build the light shapes first. Paint the palest petals and leaves with diluted color, leaving some white paper visible. Let those areas settle, then add a second pass of stronger pigment to the flower centers, leaf shadows, or overlapping petals. Thin layers are easier to control than one heavy coat.
4. Add details and let the surface dry flat. Use a smaller brush for stems, veins, or dark centers, then place the paper somewhere level until it is completely dry. Brush away any loose dry powder gently rather than rubbing the surface.
A Practical Note
I would keep the first painting small. A greeting-card-sized piece is much easier for testing unusual pigments than a large sheet, and you will quickly see which shades dissolve nicely and which ones are better saved for dry techniques.
Variations and Alternatives
For a simpler version, skip detailed flowers and make abstract washes or color blocks. You can also use metallic eyeshadow only as a final highlight over ordinary watercolor or craft paint, which stretches a small amount of pigment much further.
Tint Small Clay Trinket Dishes With Shimmer Pigment
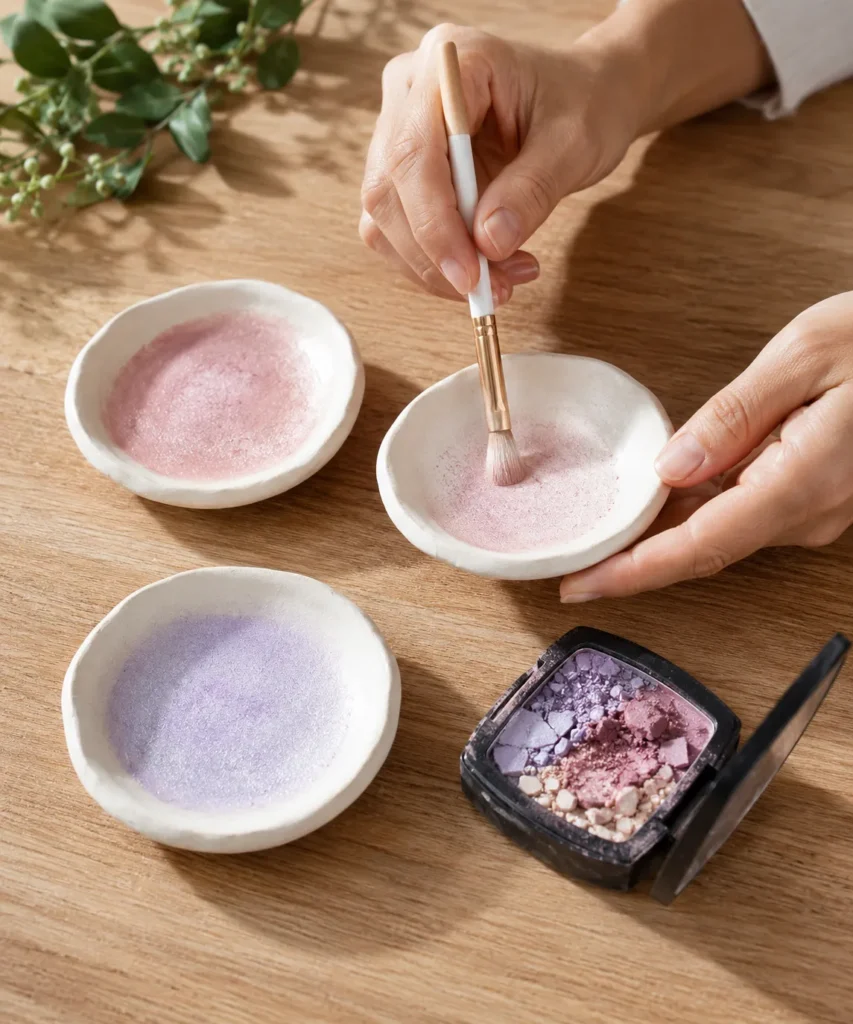
Small air-dry clay dishes are a good surface for old eyeshadow because their matte texture grabs fine powder easily. Instead of painting the whole dish with an opaque color, you can brush pigment into the center, around the rim, or across raised texture to create a softer finish. This works well for decorative catch-all dishes used for paper clips, beads, keys, or other dry craft supplies.
I would not use repurposed cosmetic pigment on food-contact dishes. Keep this project decorative. The simple shape is part of what makes it beginner-friendly: you can make the dish yourself from air-dry clay or refresh a plain unfinished craft dish you already have.
Materials and Tools
· Dry air-dry clay dish or unfinished porous decorative dish
· Old eyeshadow in one or two coordinating shades
· Soft dry brush
· Small dish for crushed pigment
· Optional craft medium or matte sealer compatible with the clay
· Clean cloth
How to Make a Similar Version
1. Prepare a clean, fully dry surface. Dust the dish with a soft cloth and make sure there is no damp clay left. If the surface is very smooth, test the pigment on the underside first. A slightly porous matte finish usually holds dry powder more evenly.
2. Brush on a light layer of pigment. Load a small dry brush with crushed eyeshadow, tap off the excess, and work the powder into the center or along the rim. Build color slowly. Heavy powder tends to sit on top and transfer instead of looking integrated with the surface.
3. Blend the edges. Use a clean brush to soften any obvious lines where one shade ends. You can overlap a pale pearl with pink or lilac for a gentle gradient, but stop before the colors become muddy. The dish should still look like clay rather than a solid block of makeup powder.
4. Seal only if the dish needs handling. If the pigment transfers after a gentle touch, apply a compatible clear craft sealer according to its instructions. Keep the dish for dry decorative storage, not food, water, cosmetics, or anything that needs frequent washing.
A Practical Note
The part I would check carefully is transfer. If a light brush of your finger lifts a lot of color, the pigment needs either a better base or a suitable sealer before the dish goes into regular use.
Variations and Alternatives
Try a single metallic shade only on the rim, or press a lace texture into the clay and brush pigment over the raised areas. A tiny pinch of dark taupe can also make carved details more visible without turning the whole piece dark.
Shade Handmade Paper Flowers With Old Eyeshadow
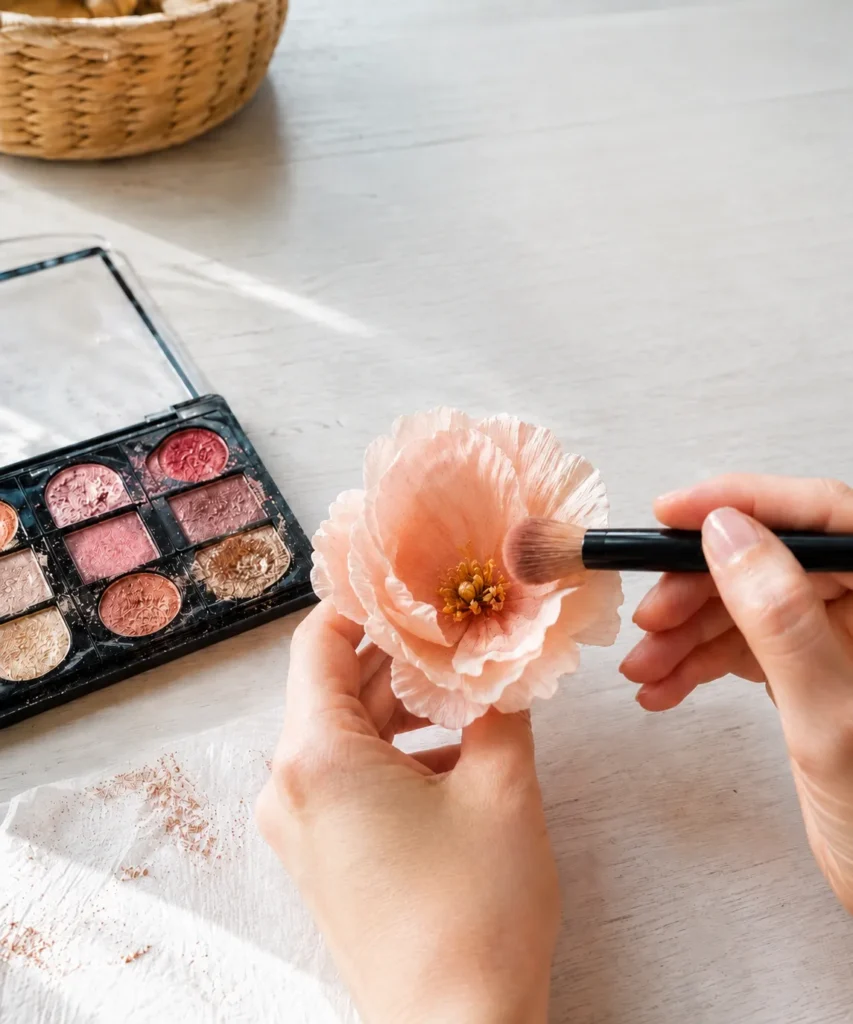
Paper flowers can look flat when every petal is cut from one solid color. Old eyeshadow is useful here because it can be dusted onto crepe paper, cardstock, or handmade tissue petals in a very controlled way. A deeper rose at the center, a soft taupe along a fold, or a pale pearl on the outer edge can make the flower feel more dimensional without introducing another bottle of paint.
This technique is closer to dry shading than painting. It works best when the paper has enough texture to catch pigment. Very slick coated paper may not hold the powder well, so I would test before spending time shaping the full flower.
Materials and Tools
· Handmade paper flowers or cut paper petals
· Old pink, peach, mauve, brown, or shimmer eyeshadow
· Small fluffy brush or soft craft brush
· Scrap paper to catch excess pigment
· Optional clear artist fixative or craft sealer suitable for paper
How to Make a Similar Version
1. Choose where the flower needs depth. Look at the petal shape before adding any color. The center, lower folds, and occasional outer edges are usually enough. If you shade every surface equally, the flower can lose the contrast that makes the layers readable.
2. Apply pigment with a nearly dry brush. Pick up a small amount of crushed eyeshadow, tap off the loose excess, and brush from the darker area outward. Use a circular or feathering motion so the color fades rather than ending in a hard stripe.
3. Layer different tones sparingly. Add a darker shade near the center and, if you want, a lighter shimmer on a few upper petals. Then step back. I do not think every petal needs its own color treatment; a few controlled shadows often look more convincing.
4. Finish the flower before deciding on sealer. Assemble or reshape the petals and check whether the pigment stays in place. If the flowers will be handled often, a suitable light fixative may help. For display flowers in a frame or vase, leaving the surface unsealed may preserve the soft paper texture better.
A Practical Note
What matters here is restraint. Eyeshadow is easy to add and awkward to remove from delicate paper, so I would rather stop slightly early and add another pass than darken a petal all at once.
Variations and Alternatives
Use green or olive eyeshadow on paper leaves, bronze on autumn flowers, or gray-brown on vintage-style cream petals. The same method also works on paper butterflies, leaves, and layered scrapbook embellishments.
Make Gradient Bookmarks With Old Eyeshadow
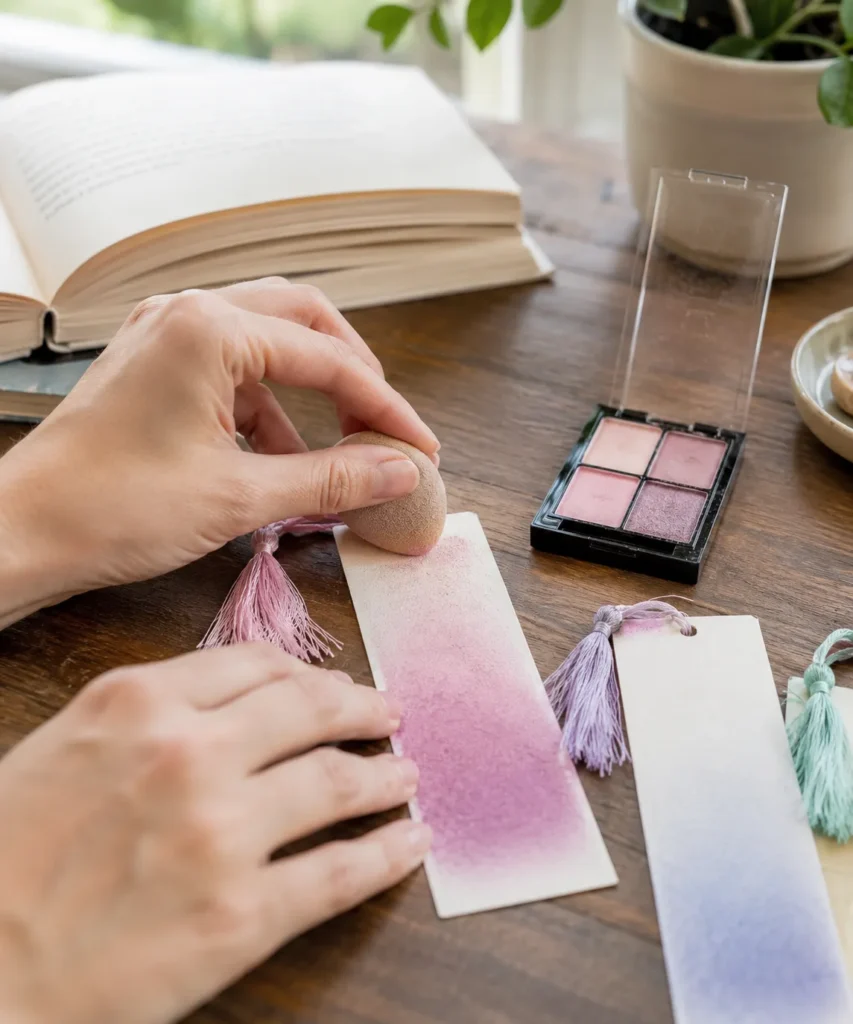
A bookmark is a wonderfully low-pressure project for experimenting with old eyeshadow. The small rectangle gives you enough room to blend color but not enough room to overcomplicate the design. Because the finished piece sits inside a book, the surface should stay smooth and reasonably transfer-resistant, so testing the pigment and finishing method matters more here than it does on framed art.
A makeup sponge, soft brush, or small foam applicator can create a clean gradient from dark to light. Pale pink into mauve, lavender into blue, or bronze into champagne all work well. You can leave the center almost white and color only the edges, or build a full ombre from one end to the other.
Materials and Tools
· Heavy smooth cardstock
· Old eyeshadow
· Foam applicator, makeup sponge used only for crafting, or soft brush
· Hole punch
· Tassel, ribbon, or cord
· Scrap paper
· Optional compatible clear fixative or protective laminate
How to Make a Similar Version
1. Cut and test the card. Trim the cardstock to a comfortable bookmark size and round the corners if you like. Use an offcut to test how the eyeshadow grips the paper. If the powder wipes away too easily, choose a slightly more absorbent card or use a light suitable base medium.
2. Build the gradient in thin passes. Start at the darkest end and blend toward the center with a clean foam tool or brush. Add a second color from the opposite end if you want a two-tone look. Then soften the meeting point with a clean applicator rather than rubbing the paper aggressively.
3. Clean the surface and finish the edges. Tap the bookmark over scrap paper to release loose powder. Punch a hole at the top and add a tassel or ribbon. If the pigment still transfers, protect it with a compatible clear finish or laminate before placing it between book pages.
4. Let the finished bookmark rest before use. Any sealer or adhesive should be completely dry before the bookmark goes into a book. Press the finished piece under a clean sheet of paper and a light book if it has curled during crafting.
A Practical Note
I especially like edge-only shading for this project because your fingers naturally touch the middle of a bookmark. Keeping the strongest color away from the handling area can make the finished piece tidier for longer.
Variations and Alternatives
Stencil tiny stars, moons, leaves, or initials into the gradient, or use kraft card with copper and plum shades for a warmer look. You can also make matching gift tags from the scraps.
Stencil a Canvas Pouch With Eyeshadow Pigment
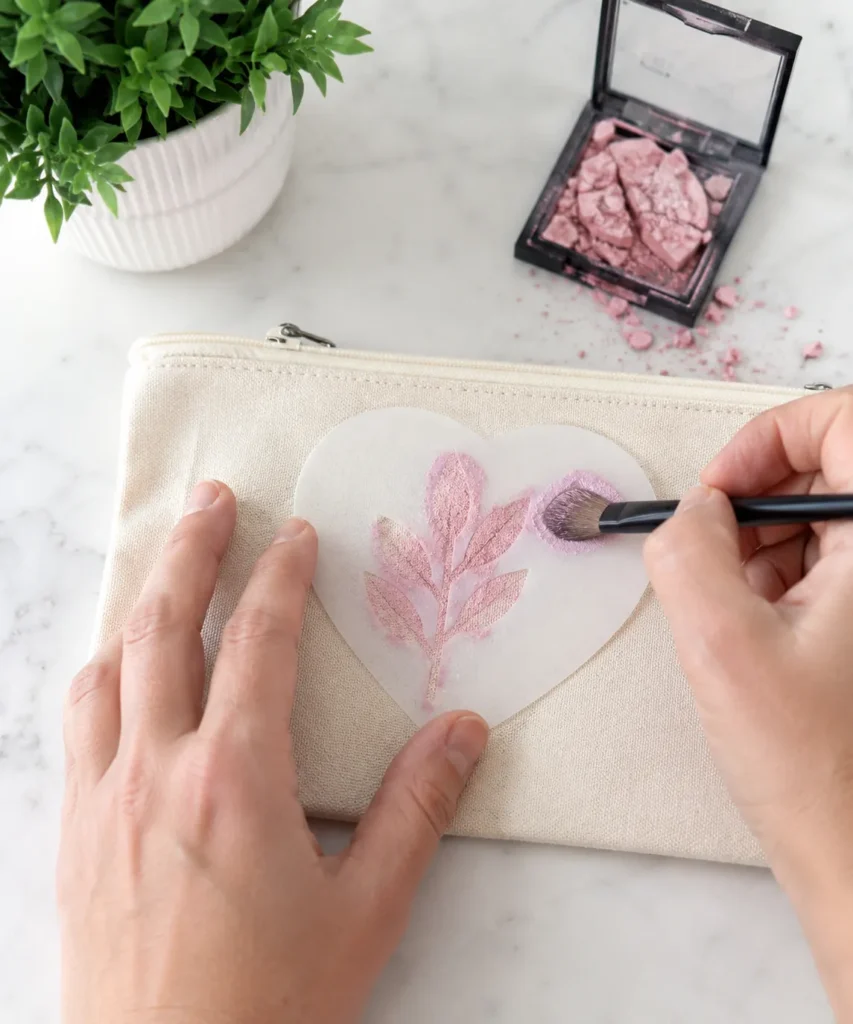
Fabric is a little more demanding than paper because loose eyeshadow can rub off, but a small decorative canvas pouch is still a practical way to experiment. The safest approach is to use eyeshadow as the color component with a fabric-compatible medium rather than brushing dry powder directly onto something that will be handled every day. A stencil keeps the design contained and makes the project manageable even if you do not draw freehand.
Natural canvas, cotton, or another matte woven fabric usually gives the pigment more texture to grip than shiny synthetic fabric. This project is best for a pouch used for craft supplies, stationery, or other dry items. I would not use repurposed old makeup on a bag intended for food or anything that needs frequent washing.
Materials and Tools
· Plain cotton or canvas pouch
· Old eyeshadow
· Fabric-compatible medium or clear textile medium
· Stencil
· Stencil brush or small sponge
· Palette or dish
· Cardboard insert
· Painter tape or removable tape
How to Make a Similar Version
1. Prepare and support the fabric. Wash the pouch first if the fabric instructions recommend it, then let it dry completely. Slide a piece of cardboard inside so pigment or medium does not soak through to the back. Tape the stencil flat so it cannot shift while you work.
2. Mix a small test batch. Crush the eyeshadow and combine a little pigment with a fabric-compatible medium. Test the mixture on scrap fabric or an inside seam. You want enough color to show without making the mixture so powder-heavy that it flakes from the weave.
3. Pounce the design through the stencil. Use a nearly dry sponge or stencil brush and tap the color straight down rather than sweeping sideways. Build the shade gradually, adding more depth toward the center of leaves or petals. Then lift the stencil carefully while the edges are still clean.
4. Set and care for the design appropriately. Follow the textile medium instructions for curing or setting. Do not guess at heat or washing requirements. Once finished, treat the pouch gently and avoid scrubbing the decorated area unless the medium specifically supports washing.
A Practical Note
I know a stronger color can look tempting while the stencil is still in place, but heavy wet layers are the quickest way to push pigment under the edges. A slightly softer design usually looks cleaner.
Variations and Alternatives
Instead of a floral motif, try a simple moon, geometric shape, or border. If fabric feels too uncertain, use the same stencil technique on a paper pencil case insert, notebook cover, or gift bag instead.
Color Air-Dry Clay Ornaments With Shimmer
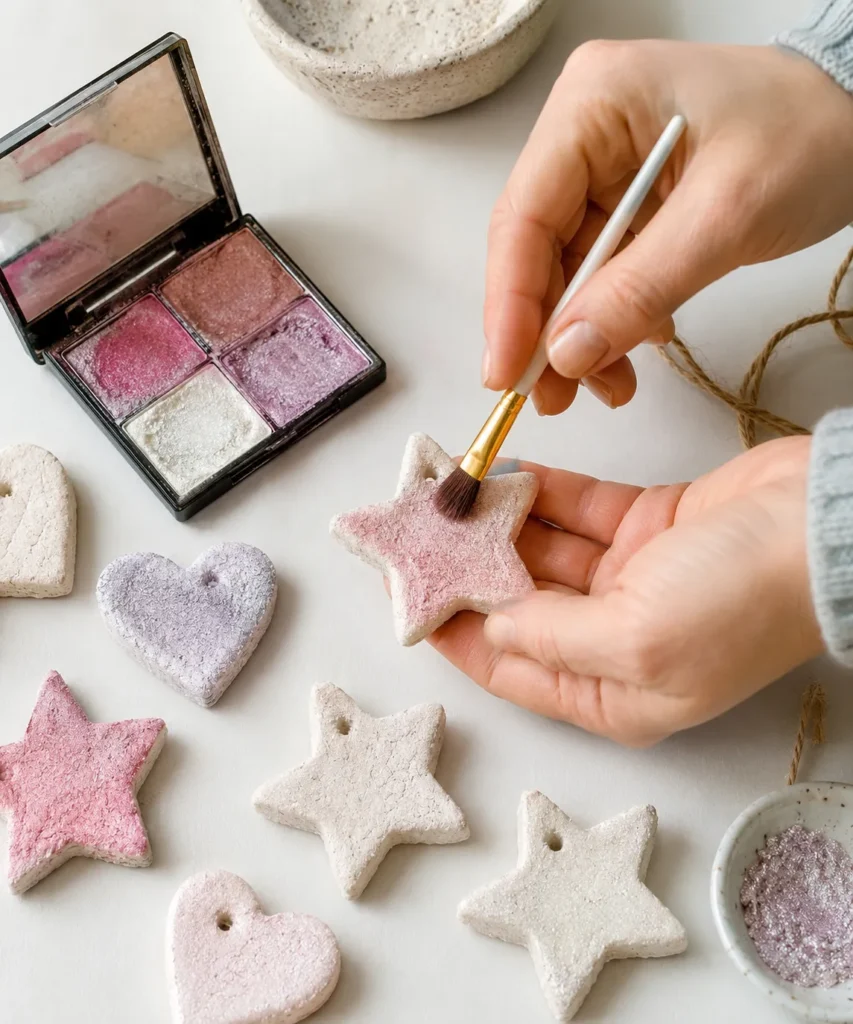
Small clay ornaments are another easy surface for old eyeshadow because they can be colored after drying. A white or pale air-dry clay base makes muted cosmetic shades show clearly, and the powder can settle into stamped texture in a way that ordinary opaque paint sometimes hides. Stars, hearts, circles, and simple leaf shapes all work.
The ornament does not need to be seasonal. A small clay tag can hang from a drawer knob, gift package, peg rail, or craft-room basket. The important part is keeping the finished object decorative and dry, especially if the pigment is only lightly sealed.
Materials and Tools
· Fully dry air-dry clay ornaments
· Old eyeshadow
· Soft craft brush
· Small dish or palette
· Ribbon or twine
· Optional compatible clear craft sealer
· Fine sandpaper for rough clay edges, if needed
How to Make a Similar Version
1. Smooth and clean the ornament. Check the clay edges first and lightly smooth any sharp or crumbly spots if the material allows it. Brush away dust so the eyeshadow does not mix with loose clay particles. The ornament should be fully dry before color is added.
2. Apply pigment to the raised areas. Load a soft brush with a small amount of crushed eyeshadow and sweep it across the face of the ornament. If the piece has stamped texture, use a lighter hand on the high points and a little more pigment in selected recesses for contrast.
3. Blend or layer a second shade. Add a darker pink, mauve, bronze, or pearl shade around the edge or center. Then use a clean brush to soften the transition. A little unevenness is fine; it suits the handmade clay surface and keeps the ornament from looking mass-produced.
4. Seal and add a hanger if needed. If the surface transfers, apply a compatible clear craft sealer after testing it on a spare piece. Once everything is set, thread ribbon or twine through the hole and keep the ornament away from moisture.
A Practical Note
For me, shimmer looks best when it catches light rather than covering the whole ornament. I would use a matte shade for most of the color and reserve a pearl or metallic eyeshadow for a few raised details.
Variations and Alternatives
Make a set in related colors, stamp initials into the clay before drying, or press leaves and lace into the surface for texture. Small offcuts of clay can become gift charms, so this is also a good project for using leftovers.
Create Framed Abstract Pigment Art
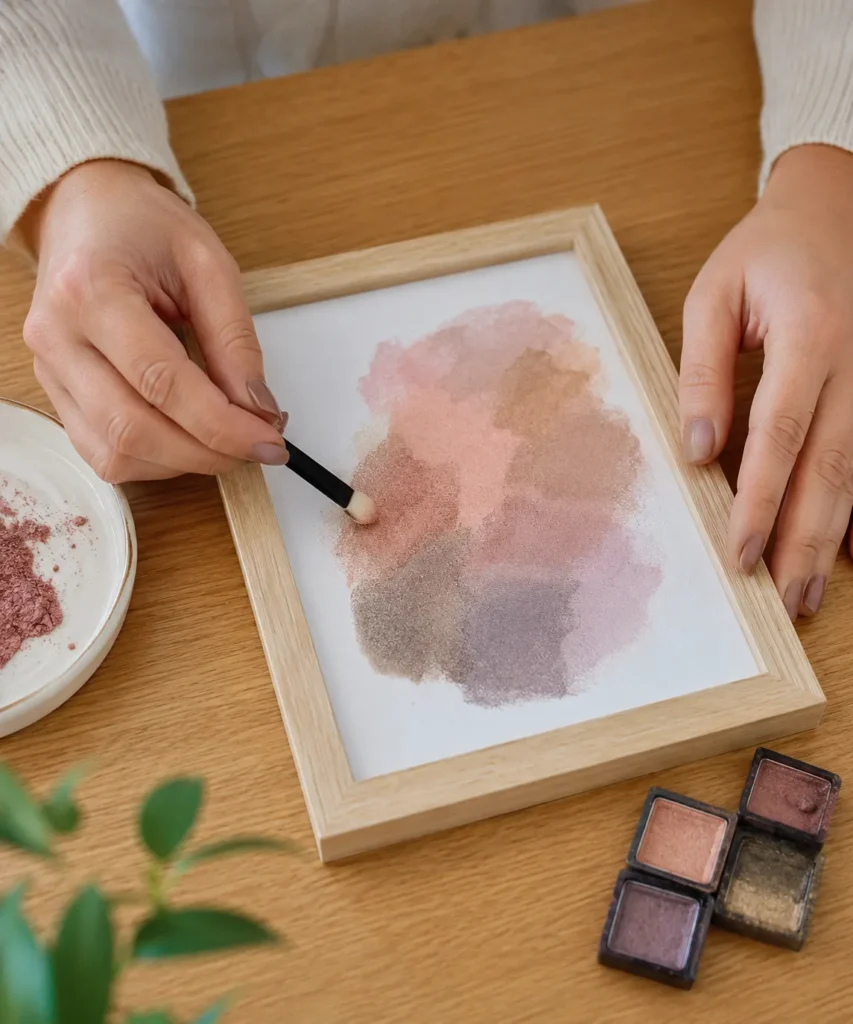
If you have several tiny pans left rather than one strong color, abstract art is probably the most forgiving way to use them together. There is no need to match a flower, landscape, or precise pattern. You can build overlapping clouds of color, soft blocks, arcs, or blurred shapes and let the relationship between the shades do the work.
Framing also solves one practical problem: the finished pigment surface can sit behind glass or acrylic instead of being touched. That means you can preserve a more delicate dry-powder effect without adding a heavy sealer that changes the shimmer.
Materials and Tools
· Old eyeshadow in several coordinating shades
· Heavy art paper or card
· Soft brushes, foam applicators, or craft sponges
· Scrap paper
· Optional water-based craft medium for selected areas
· Simple frame with glass or acrylic front
How to Make a Similar Version
1. Choose a limited color group. Pick three to five shades that share a mood, such as blush, mauve, taupe, and pearl. Lay them together before you begin. Too many unrelated colors can turn the piece muddy quickly, especially once the edges overlap.
2. Block in the largest shapes. Use a sponge or broad soft brush to rub or stipple the palest pigments onto the paper. Leave some untouched space. Then add mid-tone shapes that overlap only part of the first layer so the composition still has breathing room.
3. Add one or two darker anchors. Use the deepest color in smaller areas to give the eye somewhere to rest. You can blend the edges softly or keep one mark sharper for contrast. If dry pigment will not hold, use a small amount of compatible craft medium only where needed.
4. Clean and frame the artwork. Tap away loose powder and check that nothing will shed heavily against the glazing. Once the surface is stable, place the work in a frame. A simple mat or generous white border can make even a very loose pigment study feel intentional.
A Practical Note
The first arrangement rarely needs more color everywhere. I would pause after each darker layer and look at the piece from a few steps away. Empty paper is part of the design, not a mistake that has to be filled.
Variations and Alternatives
Try circular forms, a landscape-inspired horizontal gradient, or a monochrome study using only versions of one color. Small abstract pieces can also be grouped as a set instead of forcing one large composition.
Add Soft Color to Handmade Gift Tags
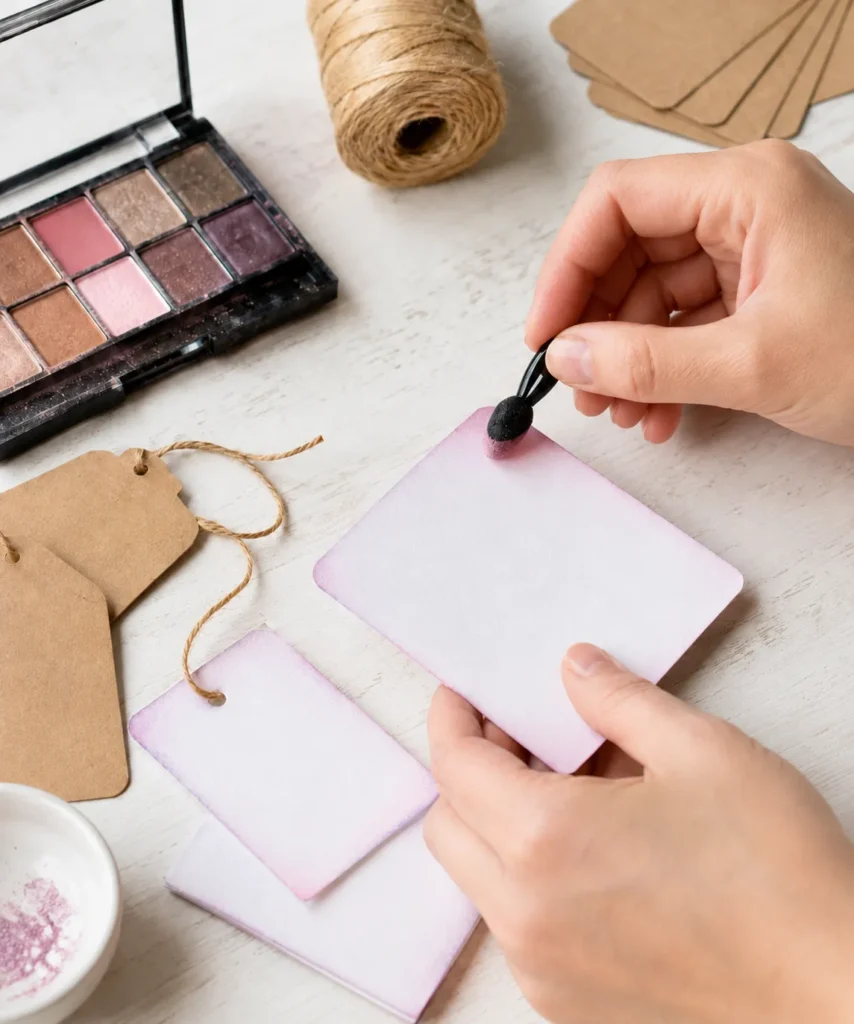
Gift tags are ideal for the very last dusting of eyeshadow because they use so little material. A plain white, cream, or kraft tag can take on a soft vintage edge with a few strokes of pink, mauve, bronze, or taupe. The technique works well for birthdays, wedding favors, handmade-product packaging, or simple holiday wrapping without needing a full stamping ink collection.
Because the color sits mainly around the edge, the center stays clean for handwriting. That practical detail matters. A tag may look lovely covered in shimmer, but it is not very useful if a pen cannot write across it or the pigment smears onto the gift.
Materials and Tools
· Blank cardstock or kraft gift tags
· Old eyeshadow
· Small foam applicator or soft brush
· Scrap paper
· Twine, ribbon, or cord
· Optional stencil for a small accent
How to Make a Similar Version
1. Test the tag stock. Rub a tiny amount of pigment on a spare tag or offcut. Smooth uncoated cardstock usually takes powder more evenly than glossy card. If the pigment slides around, switch paper rather than piling on more product.
2. Shade from the edge inward. Place the tag on scrap paper and blend the eyeshadow around the border with a foam applicator. Keep the darkest color right at the edge and fade toward the center. Rotate the tag as you work so the pressure stays consistent.
3. Add one simple accent if you want it. A tiny stencil, metallic corner, or second color can make the tag feel finished. Keep the writing area clear. Then tap off loose powder and check whether the edge transfers when lightly handled.
4. Thread and store the finished tags flat. Add twine or ribbon and keep the tags in a dry envelope or box until needed. If you choose to seal them, test the finish first because some sprays can deepen or alter the pigment color.
A Practical Note
This is the project I would choose for a nearly empty palette. Even a trace of color on the brush can be enough to shade several tags, so there is no need to scrape out more pigment than you actually need.
Variations and Alternatives
Use champagne shimmer on black tags, plum on kraft paper, or pale blue around white winter tags. The same edging method works on place cards, small note cards, scrapbook labels, and journal tabs.
Store Leftover Pigment as a Craft Material, Not Makeup
Once eyeshadow has moved onto the craft table, I would keep it there permanently. A tiny screw-top jar, small lidded craft pot, or the original palette can work for storage as long as it is clearly separated from makeup you still use. The simplest system is often the best: one box for craft-only pigments, a few small labels with color families, and no need to decant every pan unless it is broken badly enough to spill.
If you do transfer crushed pigment, keep the container dry and do not pack it so full that powder puffs out every time the lid opens. I would rather store several small amounts than one mixed jar whose color becomes unpredictable. Pink, mauve, brown, blue, green, and metallic shades are easier to use later when they remain separate. You can always blend them for a project, but you cannot unmix them once they have become one dusty shade.
A shallow tray under the containers helps catch loose powder. Store the tray away from food preparation areas, children’s craft supplies, and regular cosmetics so there is no confusion about what the pigment is for. If a jar ever gets damp or the powder develops an unusual smell or texture, discard it. Upcycling should make a material more useful, not turn questionable leftovers into something you feel obligated to keep forever.
Choose Binders and Finishes Without Overcomplicating the Project
The most common question with old eyeshadow crafts is what to mix the powder with. There is no single answer because paper, fabric, air-dry clay, and decorative objects behave differently. On absorbent paper, you may need only water plus a small amount of compatible craft medium. On fabric, a textile medium is the more sensible route. On porous clay, dry brushing may be enough for a display piece, while an often-handled ornament may benefit from a compatible clear sealer.
I would not choose a binder based only on what happens to be in the cupboard. White school glue can dry cloudy or stiff, some varnishes can darken shimmer, and oily products can create permanent spots on paper. The better approach is to match the medium to the surface and then make a tiny test sample. That test should include the whole process: pigment, binder, drying, and any final sealer. A color that looks lovely while wet can dry several shades darker or lose its sparkle.
There is also no prize for sealing a project that does not need it. Framed art protected behind glass, paper flowers that sit in a display, or gift tags used once may be fine with no extra coating. Bookmarks, pouches, ornaments, and other handled pieces need more thought because friction can lift loose powder. Use only as much finish as the function requires. A simple craft usually looks better when the surface still feels like the original paper, clay, or fabric rather than being buried under a glossy coat.
Blend Old Eyeshadow Colors Without Turning Them Muddy
Leftover palettes often contain colors that were designed to be worn together, which is useful for crafting, but that does not mean every pan belongs in the same mixture. The easiest way to keep colors clear is to work in families. Warm pink, peach, copper, and champagne usually sit comfortably together. Mauve, plum, cool taupe, and lilac can make a quieter group. Blue and green can work well for leaves or abstract art, especially when you keep one shade dominant.
Mix two colors first, not five. Crush a pinch of each onto white scrap paper and push the powders together with a brush so you can see the dry result. If the blend already looks dull, adding liquid will not rescue it. If it looks balanced, then make the smallest wet or bound test you can. This is where patience saves material; a spoonful of pigment is much harder to correct than two brush-tip amounts.
Metallic and pearl shades are especially useful as accents rather than base colors. A small amount can lift a flat pink or soften a deep brown, but too much shimmer can make paper art look patchy under direct light. I prefer to build the main color with matte or satin shades, then add metallic pigment only where the object naturally catches light – along a clay edge, the center of a flower, or one side of a blended bookmark.
Keep Craft Tools Separate and Clean Up Fine Powder Carefully
Once a makeup brush, sponge, spoon, or applicator has been used with craft binders, glue, clay dust, or a general craft surface, I would mark it as a craft tool and leave it out of the makeup bag. This is an easy habit that prevents confusion later. Old brushes are actually useful for these projects because you can dedicate one fluffy brush to dry blending, one small brush to wet pigment, and one foam applicator to edges and stencils without worrying about cosmetic use again.
Fine eyeshadow powder can settle into wood grain, fabric, and grout surprisingly quickly. Work over scrap paper, a tray, or a washable mat so you can fold or wipe the loose pigment inward instead of spreading it around. Avoid blowing dust from the table or tapping brushes hard in the air. A soft brush for gathering dry powder and a slightly damp cloth for the final wipe usually handle the mess better than a lot of vigorous sweeping.
Wash reusable dishes and tools according to the materials you mixed with the pigment. A water-based craft medium may clean up easily, while a sealer or fabric product may need its own care instructions. Do not pour thick glue mixtures or clay residue down a sink simply because the color came from eyeshadow. The binder determines how the waste should be handled, not the original cosmetic powder.
I also keep the active project small enough that I can see where the pigment is going. Opening an entire palette beside a wet glue dish is asking for one accidental elbow to turn the afternoon into a cleanup project. Put only the shades you need on the table, close the rest, and return unused powder to its craft-only storage once the piece is finished.
Know When an Old Palette Is Better Discarded
Repurposing does not mean keeping every cosmetic indefinitely. If an eyeshadow is damp, visibly moldy, mixed with a leaking cream product, covered in debris you cannot remove, or has changed in a way that makes you uncomfortable handling it, I would discard it. The same applies to a palette that creates more airborne dust than useful color or a formula that refuses to stay on any craft surface you test.
There is also a practical point where the container itself may be more useful than the pigment. Empty metal pans can sometimes be cleaned and reused for sorting beads, tiny hardware, or paint samples, while a sturdy palette case may become a mini mixing tray after it has been thoroughly cleaned. If the powder is not worth saving, that does not mean the whole object has failed as an upcycling opportunity.
For me, mindful reuse includes knowing when to stop. A successful project should reduce waste without creating a drawer full of questionable materials you never want to touch. Keep the colors that genuinely inspire a paper, clay, or fabric idea, use them while they are still convenient to handle, and let the rest go without guilt.
Mistakes That Can Make Eyeshadow Craft Projects Messy
Old eyeshadow is easy to experiment with, but the same fine texture that makes it useful can also make a project frustrating if you treat it like ordinary paint. Most problems come from using too much powder, choosing the wrong surface, or forgetting that an old cosmetic is now a craft material rather than something for the body.
· Using expired eyeshadow as makeup again. Once you have set a product aside for crafting, keep it out of cosmetic use. Craft tools and surfaces can introduce dirt, binders, glue, and other materials that do not belong near the eyes or skin.
· Loading the surface with loose powder. A thick layer may look strong at first but often transfers, flakes, or smears. Build color gradually and use a compatible binder or finish when the project will be handled.
· Skipping a test patch. Different eyeshadow formulas can behave very differently. One may blend like pastel while another barely shows. A scrap test tells you whether to change the paper, binder, brush, or color before you commit to the finished piece.
· Mixing too many shades together. Several leftover colors can quickly become dull once combined. Group related shades first, and let one or two colors remain dominant instead of trying to use every pan in one project.
· Using pigment on food-contact or washable surfaces. Decorative pigment belongs on decorative surfaces. Keep repurposed old eyeshadow away from dishes, cups, utensils, bath products, children’s face paint, and anything that needs frequent washing or contact with food.
· Rubbing delicate paper too hard. Crepe paper, watercolor paper, and handmade tags can pill or crease if you overwork them. Use a soft brush or sponge and add color in light passes.
· Sealing without testing. Clear finishes can darken, spot, or change shimmer. Test the sealer on a spare piece using the same pigment before spraying or brushing it over the final project.
A better approach is usually slower and smaller: test one shade, use less pigment than you think you need, and stop once the surface has enough color to read clearly. That is far easier than trying to remove a heavy dusty layer after it has worked into paper fibers or clay texture.
Frequently Asked Questions
Can I use expired eyeshadow for these crafts?
Dry old eyeshadow can be useful as a non-cosmetic craft pigment if it is not wet, moldy, or otherwise contaminated. Keep it strictly for crafts after repurposing. Do not return it to eye, lip, face, bath, or body use.
Do I need to crush the eyeshadow first?
Usually, yes. Crushing larger pieces gives you more even color and makes it easier to mix a small test batch. You do not need to crush the entire compact; scrape out only what the project requires.
What can I mix with eyeshadow to make craft paint?
That depends on the surface. A water-based craft medium may help on paper, while a fabric-compatible medium is more appropriate for a textile project. Test the specific combination first rather than assuming one binder will work on every material.
How do I keep eyeshadow pigment from rubbing off?
Use thin layers, choose a porous surface, and add a compatible binder or clear finish when the object will be handled. Framed art can often stay unsealed because the glazing protects the surface. Always test sealers because they can change color and shine.
Which eyeshadow finishes are easiest to reuse?
Matte and satin powders are usually easy to blend and control. Fine shimmer is useful for highlights, clay ornaments, and decorative art. Chunky glitter formulas can be harder to keep smooth, so I would reserve them for small accents rather than broad surfaces.
Can I use old eyeshadow on fabric?
Yes, but not as loose powder alone if you expect the design to last. Mix a small amount with a fabric-compatible medium and test it on scrap fabric first. Follow the textile medium instructions for setting and care.
What is the easiest project for a complete beginner?
Gift tags and bookmarks are the simplest places to start because they use very little pigment and do not require complicated tools. Framed abstract art is also forgiving because there is no precise pattern to copy. Start small, see how the pigment behaves, and then move on to clay or fabric projects.
Give Forgotten Eyeshadow a Useful Place on the Craft Table
Repurposing old eyeshadow works best when you stop trying to save it as makeup and instead use its strongest quality: concentrated color in a very fine powder. On paper, it can create soft gradients and watercolor-like washes. On clay, it can settle into texture and add gentle shimmer. On small decorative projects, even the last crumbs in a pan can be enough to make a noticeable difference.
I would begin with one easy project, such as shaded gift tags or a small bookmark, and learn how that particular eyeshadow behaves. Some formulas will blend smoothly, some will need a binder, and a few may simply be more trouble than they are worth. That is fine. Upcycling is not about forcing every scrap into a project; it is about noticing when a material still has a practical use and giving it that chance.
If you have an old palette sitting unused, choose one shade and try it on a piece of scrap paper before you throw the whole thing away. Which small craft would you give that color to first?