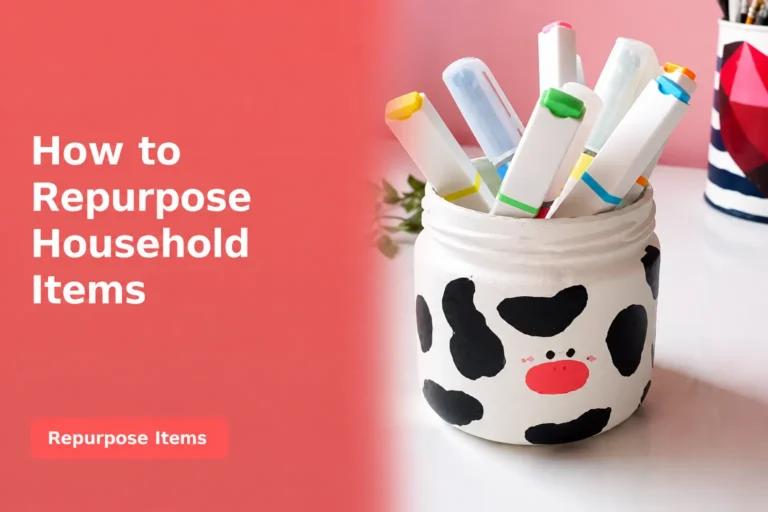
Empty pill bottles have a useful shape that is easy to overlook. They are compact, lightweight, fitted with secure lids, and often just the right size for objects that disappear inside ordinary drawers. Once the medicine and personal information have been dealt with safely, the container can hold sewing supplies, garden seeds, beads, paper clips, or another small collection.
I like pill-bottle projects most when the finished use is clearly different from the original one. That distinction matters. A bottle covered with cardboard and fabric looks like a craft organiser, while a seed container needs a bold label that prevents anyone from mistaking it for medicine.
I don’t recommend reusing prescription bottles for food, spices, cosmetics, pet treats, drinking water, or loose medication. Decorative finishes and craft materials also make them unsuitable for anything that might be swallowed.
The safest projects begin with completely empty bottles. Unwanted or expired medicine should be taken to an authorised collection option whenever one is available, and personal information should be removed or made unreadable before the packaging is discarded or reused.
Empty, De-label, and Separate Craft-Safe Bottles
Do not begin by pouring unwanted tablets into another container. Keeping unneeded medicine around while you prepare the bottle creates an unnecessary risk, particularly in homes with children, visitors, or pets.
Medicine take-back locations are the preferred option for disposing of expired or unwanted medicines. The FDA advises removing or scratching out personal information on empty prescription packaging to protect your privacy.
Once the bottle is genuinely empty:
- Make the prescription information unreadable.
- Remove the label and adhesive residue.
- Wash the bottle and lid with warm, soapy water.
- Rinse them thoroughly.
- Let both pieces dry completely.
- Check for cracks, sharp edges, staining, or persistent residue.
- Reject any bottle that still smells strongly of its former contents.
- Keep bottles intended for crafts separate from current medication.
Check the recycling symbol as well. Amber prescription vials are commonly made from number-five plastic, but local recycling acceptance varies. The EPA recommends checking your local programme rather than assuming the bottle belongs in kerbside recycling.
A child-resistant lid should not be treated as childproof. Once a bottle contains pins, beads, buttons, seeds, or decorative parts, store it where young children cannot reach it. The familiar prescription-bottle shape may also encourage someone to assume that medicine is inside, so cover the original appearance and label the new contents clearly.
Useful Materials and Tools
- Completely empty and cleaned pill bottles
- Mild dish soap
- Small bottle brush
- Clean cloths
- Label-removal scraper
- Paper labels
- Permanent marker
- Washi tape
- Scrapbook paper
- Cardboard
- Fabric scraps
- Felt
- Strong craft adhesive
- Double-sided tape
- Scissors
- Craft knife
- Cutting mat
- Awl or small drill
- Eye protection
- Sewing needles and thread
- Small magnets
- Cord, ribbon, or jute
- Old bangles
- Acrylic paint
- Paintbrushes
- Air-dry clay
- Small decorative pieces
- Plant seeds intended for sowing
- Silica-gel packet intended for storage, if appropriate
Use a craft knife, awl, or drill only on a stable cutting surface and away from your hands. Small plastic pieces, beads, needles, and fasteners should remain out of reach of children and pets.
Turn the Bottle Neck Into a Reclosable Pour Spout
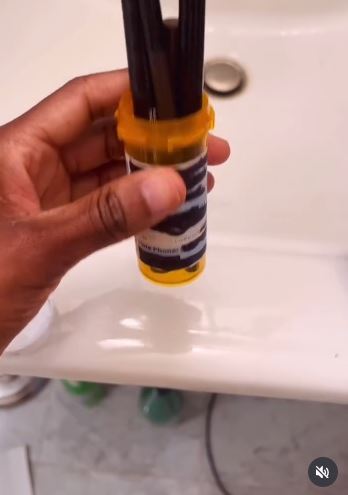
One of the selected reuse ideas removes the threaded bottle neck and uses it as a controlled pour spout for a bag.
Although the original demonstration uses a dry food bag, I would reserve a former medicine bottle for non-food materials only. Suitable contents might include clean craft sand, confetti, sequins, small plastic beads, or another dry material that nobody will eat.
The cut plastic edge must be covered or enclosed so it cannot scratch your hands or tear the bag.
Materials and Tools
- Completely empty pill bottle with screw lid
- Bag of non-food dry craft material
- Permanent marker
- Strong scissors or craft knife suitable for plastic
- Cutting mat
- Eye protection
- Strong tape
- Suitable adhesive
- Label for the bag
Add the Pour Spout in Five Steps
- Mark the section you need. Draw a cutting line below the threaded neck, leaving enough plastic to form a secure flange. Keep the bottle closed while marking so you can judge whether the lid will remain easy to grip.
- Cut the bottle carefully. Support it on a stable surface and work away from your hands. Stop if the plastic splits unpredictably, and discard the piece if you cannot make the edge safe.
- Prepare the bag opening. Cut a hole smaller than the bottle flange so the plastic does not pull through. Push the threaded neck through from inside the bag, keeping every sharp edge away from the contents and your hands.
- Seal the connection. Use strong tape or a compatible adhesive around the flange, following the product instructions. Test the empty bag before adding dry material.
- Label and use the spout. Write the contents clearly and screw the cap on after each use. Do not use the adapted bag for food, medicine, cosmetics, or any substance intended for people or animals.
One detail I wouldn’t skip is the empty-bag test. Filling the bag first and then discovering a loose seal is an excellent way to distribute beads across an entire room.
A safer beginner version is to keep the bottle intact and use it as a scoop container. You can also make a cardboard pouring corner rather than cutting hard plastic.
Create Moon-and-Stars Bottle Art
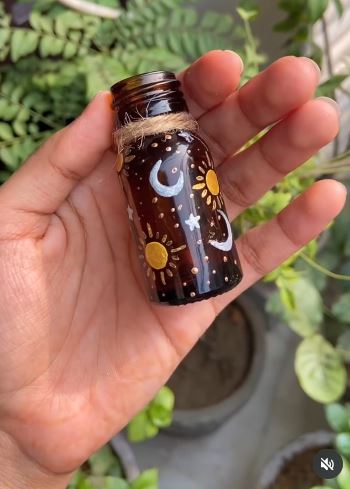
A pill bottle can become the base for a miniature decorative scene rather than another storage container. The selected artwork uses an empty medicine bottle in a sun, moon, and stars-inspired craft.
The amber plastic already provides a warm translucent background. Painting selected areas while leaving others visible can create more depth than covering the entire bottle with one opaque colour.
Materials and Tools
- Clean pill bottle
- Primer suitable for plastic, if required
- Acrylic or plastic-compatible paint
- Small paintbrushes
- Air-dry clay or lightweight dimensional medium
- White pencil or removable marker
- Strong craft adhesive
- Small stars, beads, or paper details
- Battery-operated micro light, if the bottle and light remain cool
- Protective work surface
Make the Decorative Bottle in Five Steps
- Choose the viewing side. Turn the bottle and identify the smoothest area for the main moon or star design. Cover the prescription appearance and mark a simple composition before adding permanent materials.
- Prepare the plastic for decoration. Clean it again with a lint-free cloth and apply a plastic-compatible primer when your chosen paint needs one. Test the coating on the bottom first.
- Build the main design. Paint the night-sky background or attach lightweight clay details. Keep the thickest decorations away from the lid so it can still be removed if needed.
- Add smaller stars and highlights. Use dots, tiny shapes, or fine painted lines to connect the composition. Then step back and remove anything that makes the small bottle feel crowded.
- Finish it as a display object. Add a weighted cardboard or wooden base if the bottle tips easily. Use only a cool battery-operated light when illumination is desired, and never place a flame inside plastic.
For me, the amber colour is an advantage here. There’s no need to fight the bottle’s original appearance when it can become part of a warm evening-sky design.
The same method could create a miniature forest, mushroom cottage, flower garden, or seasonal snow scene. A row of three related bottles may work better than one bottle overloaded with every detail.
Combine an Empty Bottle and Old Bangles as Wall Décor
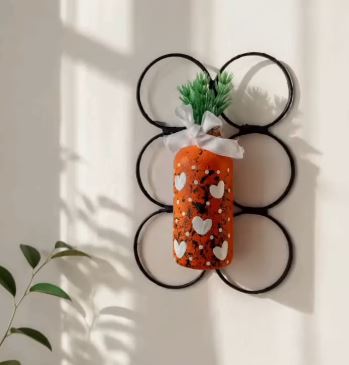
An empty medicine bottle and unwanted bangles can be combined into a lightweight wall decoration. The selected project reuses both objects as part of an aesthetic hanging piece rather than treating either one as rubbish.
The exact design can be adapted around the bangles you have. They might form circles around the bottle, support hanging tassels, or create a frame for a small artificial-flower holder.
Do not fill a wall-mounted plastic bottle with water unless the attachment and wall protection have been designed for it. Dried or artificial stems are the safer decorative choice.
Materials and Tools
- Completely empty pill bottle
- Old bangles
- Jute, cotton cord, or ribbon
- Strong adhesive
- Paint or decorative paper
- Lightweight artificial or dried stems
- Beads or tassels
- Scissors
- Cardboard backing, if needed
- Wall hook suited to the finished weight
Assemble the Wall Hanging in Five Steps
- Arrange the bangles on a flat surface. Try overlapping circles, a vertical chain, or a flower-like formation. Move the bottle among them until it feels connected to the design rather than attached as an afterthought.
- Join the bangles securely. Wrap their meeting points with cord or use an adhesive suited to their material. Let the first connections set before lifting the arrangement.
- Decorate and attach the bottle. Cover the label area with paint, paper, fabric, or cord, then fix the bottle to the strongest part of the design. Keep the lid accessible when you want to change the artificial stems.
- Add lightweight finishing details. Attach tassels, beads, or a small dried arrangement without making the lower half too heavy. Check that none of the pieces can fall into a child’s or pet’s reach.
- Hang and inspect the piece. Use a suitable wall hook and keep the decoration away from beds, cooking areas, and places where it will be knocked. Test the hanging loop before displaying it permanently.
I’d keep the bottle decoration fairly simple when the bangles already provide several circles and colours. Too many extra details can turn a light wall hanging into a busy cluster.
One bangle and one bottle can create a smaller ornament. You could also replace the bottle with its decorated lid when you want an even lighter design.
What Makes Pill-Bottle Projects Unsafe or Impractical
Starting While Medicine Is Still Inside
Crafting should begin only after the medication has been removed through an appropriate disposal method. Take-back locations are the preferred option for expired or unwanted medicine.
Leaving Personal Information Visible
Prescription labels can include private health and identity information. Make the information unreadable before cleaning, decorating, recycling, or discarding the bottle.
Reusing Bottles for Food or Toiletries
A craft bottle should not become a spice jar, snack container, drink bottle, lotion pot, or pet-treat holder. Reserve it for clearly labelled non-consumable contents.
Storing New Medicine in a Craft Bottle
Once a bottle has been relabelled, painted, cut, or altered, keep it away from medications. Prescription labelling communicates essential medicine information, so current medicine should remain in the container supplied or approved for it.
Assuming the Cap Is Childproof
Child-resistant packaging reduces access but does not make pins, seeds, beads, or craft knives safe around children. Store completed organisers in a secure adult area.
Cutting Plastic Without Finishing the Edge
Cut pill-bottle plastic can become sharp or split further. Smooth, cover, or fully enclose every cut edge, and reject any piece that cannot be made safe.
Using Heat or an Open Flame
Do not place candles inside plastic pill bottles or melt the plastic in an ordinary home workspace. Use cool battery-operated lights for decorative projects.
Failing to Label the New Contents
Rows of amber bottles can easily be confused. Cover the medical label completely and identify the new contents in large, plain wording.
Keeping Every Empty Bottle
Reuse only the number you genuinely need. Check local recycling guidance for the rest because acceptance of number-five prescription vials varies by programme.
Frequently Asked Questions
Do I need to remove the prescription label?
Yes. Make all personal and medical information unreadable before reusing or disposing of the bottle. The FDA specifically recommends scratching out personal information on empty medicine packaging.
What should I do with medicine left inside?
Use a medicine take-back location or mail-back option when available. Follow FDA instructions for medicines that cannot be taken back rather than emptying them casually into household bins or drains.
Can empty pill bottles be recycled?
That depends on your local recycling programme. The EPA notes that the amber number-five vials commonly used for prescriptions are not accepted in many areas, so check locally.
Can I store spices or snacks in a washed pill bottle?
I would not use a former medicine bottle for food, drink, spices, supplements, or pet treats. Choose a container manufactured and labelled for food storage instead.
Which project is easiest for a beginner?
A labelled seed container or simple desk organiser requires fewer tools than a cut-plastic pour spout or wall hanging. Begin with a project that keeps the bottle intact.
How can I remove sticky label residue?
Peel away as much paper as possible, then use warm, soapy water and a gentle scraper. Test any stronger residue remover carefully and wash the bottle again afterward.
Can children make these crafts?
Children may decorate an already cleaned and prepared bottle under close adult supervision. Adults should handle medicine disposal, label removal, craft knives, drilling, sharp needles, strong adhesives, and small choking hazards.
Let the Empty Bottle Take on a Clearly New Job
Learning how to repurpose pill bottles begins with safety rather than decoration. Remove unwanted medicine correctly, protect the information on the label, wash the empty container, and choose a project that cannot be confused with its former use.
A travel sewing kit can keep repair supplies together. A seed bottle organises next season’s planting, while cardboard turns the container into a more recognisable craft organiser. Bottle necks, paint, old bangles, and fabric scraps can also become useful parts of larger projects.
Begin with one clean bottle and one purpose you genuinely need. Label it clearly, keep it away from food and medicine, and place it somewhere children and pets cannot reach.
Which small household item would you organise first: sewing supplies, garden seeds, buttons, beads, or paper clips?