Flat sheets often outlast the rest of a bedding set. The fitted sheet may wear through first, the pillowcases may disappear one by one, and the flat sheet is left folded in a cupboard because it still feels too useful to discard. That large, uninterrupted piece of fabric is exactly what makes it worth saving.
I am Stella Eve Louise, and I like projects that begin with materials already sitting at home. I do not think a flat sheet needs to remain bedding forever. Once it has been washed, checked for weak areas, and cut with a clear plan, it can become patchwork, a padded cover, a small sewing accessory, or a practical household item.
The fabric is usually easy to press and large enough to provide matching sections, but every sheet behaves differently. A tightly woven cotton sheet may suit quilting, while a slippery blend may need stabilising. The key is to choose a project that fits the fabric rather than forcing a worn or lightweight sheet to do a job it cannot safely handle.
Check the Sheet Before Cutting It
Wash the flat sheet and let it dry completely before measuring. Fabric can hold dust, body oils, storage odours, or old fabric-softener residue, all of which make marking and sewing less pleasant. Press the sheet so the grain and worn areas are easier to see.
Hold the fabric up to the light and circle thin spots, small tears, stains, and stretched edges with a removable marker or safety pins. Strong sections can become the main panels, while weaker areas may still work for practice pieces, stuffing, or small decorative patches. I know it can feel wasteful to reject part of a sheet, but building a useful item from fragile cloth usually creates more repair work later.
Check the fibre content when the finished item may touch heat. A flat sheet of unknown or synthetic fibre should not be treated as heat-resistant fabric. For bowl holders, mug rugs, or similar projects, use the sheet as a decorative outer layer only when the batting, thread, and construction are suitable for the intended use, and never place an unverified fabric item in a microwave.
Separate Sheets That Are Unsafe to Repurpose
Before cutting or sewing, make sure the flat sheet is clean and safe for household use.
Set aside flat sheets previously used around:
- Paint, bleach or strong cleaning chemicals
- Motor oil, grease or workshop materials
- Mould, mildew or serious water damage
- Pest infestations or heavily contaminated storage areas
- Bodily fluids or contagious illnesses
- Substances that have left strong, permanent odours
- Unknown chemicals or potentially hazardous materials
These sheets should not be turned into cushion covers, table accessories, sewing-machine covers or other items used close to people. If the fabric cannot be cleaned thoroughly and safely, dispose of it responsibly rather than including it in a new project.
Examine the Fabric Before Choosing a Project
For ordinary, clean flat sheets, inspect:
- Thin, transparent or weakened areas
- Small holes, tears and damaged seams
- Permanent stains or discolouration
- Stretched, twisted or uneven edges
- Frayed hems and loose threads
- Fading caused by frequent washing or sunlight
- The fabric’s fibre content and weave
- Whether the material feels slippery, stretchy or unstable
- Any areas that become distorted after washing
Hold the sheet up to a light source to identify weak sections more easily. Strong areas can be used for cushion panels, patchwork or covers, while thinner pieces may be suitable for test sewing, stuffing or small decorative details.
Check the fibre label before using the material near heat. Unknown or synthetic sheet fabric should not be treated as heat-resistant or microwave-safe.
Basic Supplies for Flat-Sheet Upcycling
The materials required will depend on the project, but these supplies are useful for most flat-sheet crafts:
- Mild laundry detergent and fabric-safe stain remover
- Iron, ironing board and pressing cloth
- Fabric scissors or a rotary cutter
- Cutting mat and quilting ruler
- Measuring tape and removable fabric marker
- Paper or card for making templates
- Sewing pins or fabric clips
- Sewing machine and suitable machine needles
- Hand-sewing needles and matching thread
- Lightweight interfacing for thin or slippery fabric
- Batting or felt for padded projects
- Backing fabric and binding strips
- Cushion inserts, zips or envelope-back panels
- Filling for pincushions and other small accessories
- A blunt pencil or turning tool
- Optional buttons, ribbons or decorative fabric scraps
Wash, dry and press the sheet before measuring it. Preparing the fabric and tools in advance will make cutting more accurate and help prevent stretched seams, uneven patchwork and unnecessary fabric waste.
Sew a Geometric Cushion Cover from Flat Sheet Scraps
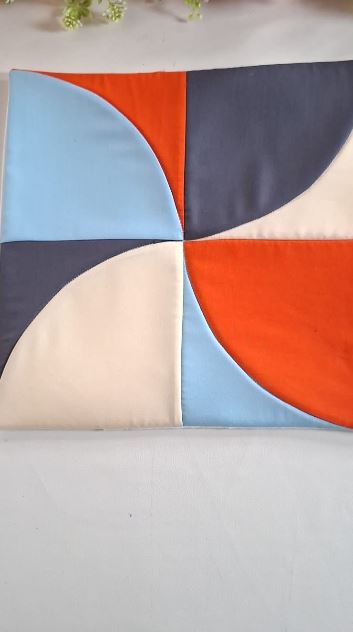
This geometric panel makes good use of solid-coloured flat sheets or sections cut from several unwanted bedding sets. Four curved blocks meet in the centre, while orange, pale blue, navy, and cream create movement without relying on a busy print. The clean colour areas are especially useful when a sheet has faded unevenly because the best sections can be cut into smaller shapes.
A finished panel like this could become the front of a cushion cover, the centre of a tote, or a soft wall hanging. Curved piecing needs a little patience, but it does not require every seam to be perfect on the first try. What matters here is careful marking, gentle pinning, and pressing each seam before the next block is joined.
Materials and Tools
· Strong sections cut from one or more clean flat sheets
· Paper or card templates for the curved block shapes
· Fabric scissors or rotary cutter and cutting mat
· Sewing machine, matching thread, pins, or fabric clips
· Iron and pressing cloth
· Backing fabric, zip, or envelope-back pieces if making a cushion cover
A Practical Way to Build the Curved Panel
1. Make one accurate paper template set for the curved pieces and add a consistent seam allowance. Test the shapes with scrap fabric first, because a small change in the curve can affect how the four blocks meet. Then mark the strongest areas of the flat sheet and cut each colour section with the grain running in a sensible direction.
2. Pair each inner and outer curve with right sides together. Pin at the centre and both ends first, then ease the fabric between those points without stretching the curved edge. Sew slowly and stop to smooth small puckers before they reach the needle rather than trying to press them flat later.
3. Press each curved seam gently toward the darker fabric or open, depending on the thickness. Trim only obvious excess bulk and keep the seam allowances intact around the centre point. Arrange all four finished blocks on the table before joining them so the colours flow in the intended direction.
4. Join the blocks in pairs, match the central seams, and then sew the two halves together. Square the panel only after the full design is assembled. Add a cushion back or another practical backing, then turn and press the finished cover without flattening the seams too aggressively.
One Detail I Would Keep in Mind
For me, the central meeting point deserves more attention than the outer corners. A tiny mismatch at the edge can disappear into a seam, but a crowded or twisted centre immediately changes the whole design.
A Useful Variation
Beginners can replace the curved pieces with straight rectangles or half-square triangles. Another easy version uses four tones from the same old sheet, including faded and unfaded sections, so the colour variation becomes part of the design.
Make Quilted Mug Rugs from Mixed Flat Sheet Pieces
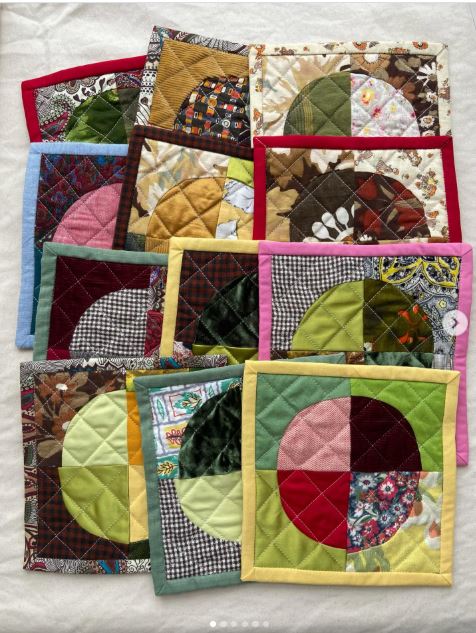
Small quilted mats are ideal for the parts of a flat sheet left after a larger project. The patchwork combines checks, florals, velvet-like scraps, and solid colours inside circular and square shapes, proving that the pieces do not have to match perfectly. A consistent border and repeated diamond quilting make the varied fabrics feel connected.
Used as mug rugs or mini table mats, these pieces can sit under a drink, small plant pot, sewing tools, or a decorative bowl. A flat sheet works well as the quiet background or backing layer, while tiny scraps add the pattern. I do not think every patch needs equal visual weight; one calm section helps the busier prints stand out.
Materials and Tools
· Flat-sheet scraps in solid or printed sections
· Additional small fabric offcuts if available
· Light batting or felt for padding
· Backing fabric and binding strips
· Paper templates for circles or curved patchwork sections
· Sewing machine, thread, ruler, scissors, and iron
A Simple Method for Small Quilted Mats
1. Decide the finished size and sketch one clear patchwork layout. Sort the sheet scraps by colour and value, then cut the largest shapes first. Smaller pieces can fill gaps, but keeping one repeated curve or border colour will help several mats look like a set.
2. Piece the top in manageable sections. Sew straight units first, then add curved or circular shapes only after checking that the seam allowances match. Press as you go and square the top before adding batting, because quilting will not correct a distorted patchwork panel.
3. Layer the backing, batting, and patchwork top. Quilt with simple diagonal lines, gentle curves, or stitching that follows the main shapes. Begin near the centre and work outward so the layers stay smooth rather than pushing a bubble toward one edge.
4. Trim the mat evenly and add a fabric binding around all sides. Join the ends neatly, secure the final edge by machine or hand, and press the mat flat. Use the finished piece for warm mugs and ordinary table items, not as a substitute for certified heat protection around very hot cookware.
One Detail I Would Keep in Mind
For me, binding is what makes a collection of unrelated scraps look finished. Repeating the same binding colour across several mats can calm even a very lively patchwork mix.
A Useful Variation
Skip the circular piecing and make a striped mug rug from long sheet offcuts. You could also enlarge the design into a placemat, sewing-machine mat, or small bedside cloth.
Repurpose Flat Sheet Scraps into a Patchwork Sewing Machine Cover
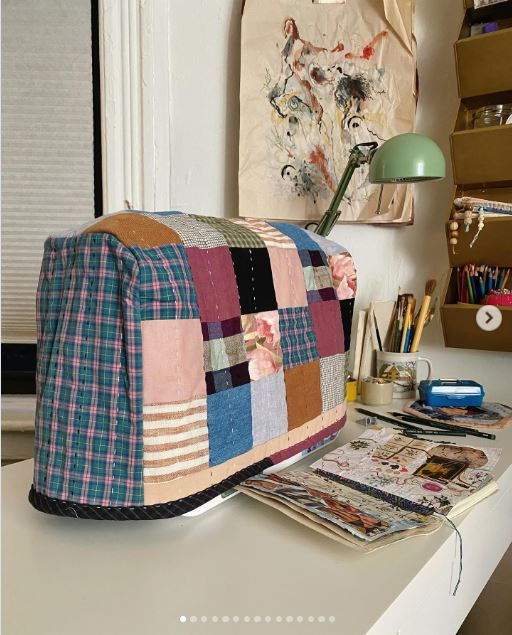
A sewing-machine cover needs a broad front, back, and side panels, so a flat sheet provides an excellent base. The patchwork version combines plaid, stripes, florals, and solids in uneven rectangles, with visible stitching and a darker lower edge that gives the cover a tidy finish. The irregular blocks make it possible to use scraps without cutting every piece to one standard size.
The cover should be roomy enough to slip over the machine without catching the thread guide, spool pin, or controls. It is meant to reduce dust, not to support weight or trap heat around a machine that has just been used. Let the machine cool and remove loose threads before covering it.
Materials and Tools
· Large sound sections of an old flat sheet for lining or foundation panels
· Flat-sheet scraps and other washable fabric offcuts for patchwork
· Light batting or interfacing for body
· Sewing machine, strong thread, scissors, ruler, and marking tool
· Bias binding or a folded hem strip for the lower edge
· Optional handle opening or small fabric loop
How to Build a Box-Style Machine Cover
1. Measure the sewing machine at its widest, tallest, and deepest points, including any fixed spool posts. Add enough ease for the cover to slide on without pulling. Make a simple paper plan for the front, back, top, and sides before cutting the flat sheet or patchwork pieces.
2. Create the patchwork panels over a flat-sheet foundation if the scraps are small or unstable. Join rectangles in rows, then connect the rows while checking the total size. Add lightweight batting or interfacing only after the panels are square and large enough for the pattern pieces.
3. Quilt or topstitch the panels to hold the layers together. Assemble the side and top seams with the right sides facing, clip bulky corners, and test the unfinished cover on the machine. Then adjust any tight area before binding or hemming the lower edge.
4. Finish the bottom with a durable binding or deep hem so the cover keeps its shape when lifted. Add a handle opening only if it can sit clear of the machine’s moving or delicate parts. Place the cover over a cool, switched-off machine and wash it gently when dust begins to build up.
One Detail I Would Keep in Mind
I would leave slightly more room than a fitted-looking cover seems to need. A cover that scrapes every control each time it is removed quickly becomes more irritating than useful.
A Useful Variation
Use one large flat-sheet panel for the back and save the patchwork for the front only. A simpler cover can be made as a lined rectangular hood with no batting, especially when the sheet fabric is already sturdy.
Turn Flat Sheet Scraps into a Patchwork Pincushion
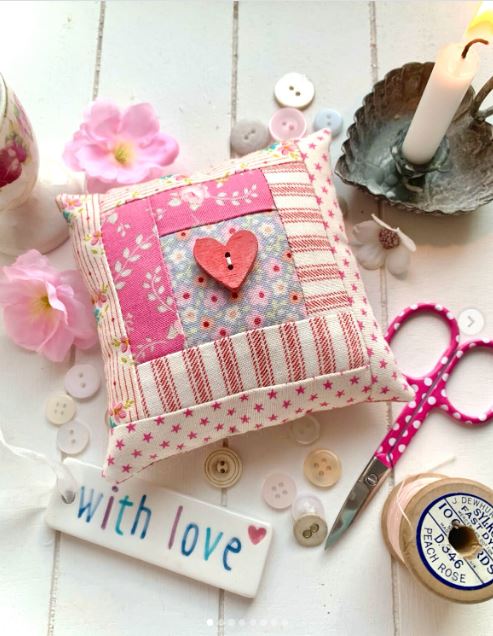
A pincushion is a practical home for the smallest flat-sheet strips, including narrow edges left after cutting a cushion or machine cover. The design uses a central square with strips built around it in a log-cabin arrangement. Pink florals, stripes, and star prints give the small object plenty of detail without needing large pieces of fabric.
The finished cushion should be firmly filled so pins stand upright, but not so hard that the seams strain. A decorative button can sit at the centre, although it should not hide the main pinning area. This is also a good project for testing colour combinations before committing them to a larger quilted piece.
Materials and Tools
· Narrow flat-sheet strips and one small centre square
· Backing fabric
· Sewing machine or hand-sewing needle and thread
· Firm pincushion filling
· Small turning tool or blunt pencil
· Optional decorative button and strong hand-sewing thread
How to Sew the Small Patchwork Cushion
1. Choose a small centre square and arrange the sheet strips around it before sewing. Work from narrow strips to slightly wider ones so the block grows evenly. Press each new strip outward before adding the next, then trim the finished block into a neat square.
2. Cut a matching back and place it right sides together with the patchwork front. Sew around the edge with a short, secure seam, leaving a small turning gap. Clip the corners carefully without cutting the stitching, then turn the cushion and shape the corners with a blunt tool.
3. Fill the pincushion gradually, pushing filling into each corner before adding more to the centre. A firm, even shape is better than one dense lump. Then close the opening with small ladder stitches so the seam remains tidy and strong.
4. Add the heart button or another small embellishment only after checking where pins will normally sit. Stitch through the centre with strong thread and avoid pulling so tightly that the cushion folds in half. Keep the finished pincushion in a stable dish or beside the sewing machine, away from children and pets.
One Detail I Would Keep in Mind
The first strip layout rarely ends up being the final one, and that is normal. I would move the pieces around until one print does not dominate such a small surface.
A Useful Variation
Make a wrist pincushion by attaching the patchwork top to a soft band, or enlarge it into a small pattern weight filled with suitable dense material. A plain flat-sheet back keeps either version economical.
Flat Sheet Sewing Problems That Are Easier to Prevent
Cutting before checking weak areas
A large sheet can look sound while hiding thin patches in the centre or along the fold lines. Mark damage first and position pattern pieces around it. Save weak sections for mock-ups or filling rather than putting them into seams that will be handled often.
Assuming every sheet fabric behaves like quilting cotton
Some sheets are tightly woven and crisp, while others are slippery, stretchy, or very lightweight. Test a seam, needle size, and pressing temperature on a scrap. Stabilise soft fabric when necessary instead of pulling it into shape while sewing.
Ignoring the original grain and stretched edges
Long-used sheets can distort near the edges and centre. Align important pattern pieces with the stable grain, and square the fabric after washing and pressing. Curved blocks and box covers are much easier to assemble when the starting pieces are not already twisted.
Using unknown fibres around heat
A flat sheet does not become heat-safe simply because it has batting inside. Keep unknown or synthetic fabric away from direct flame, oven cookware, and microwave use. Use finished pieces as ordinary table mats or carriers only within the safe limits of their confirmed materials.
Skipping pressing between patchwork stages
Unpressed seams create extra bulk, hide small inaccuracies, and make later pieces harder to measure. Press after each stage with a temperature suited to the fabric. Then trim and join the next section rather than trying to flatten the whole project at the end.
Making useful covers too tight
Cushion backs and sewing-machine covers need enough ease to move without straining seams. Measure the actual object, include depth and hardware, and test the fit before finishing the lower edge. A neat cover should still be easy to remove.
Frequently Asked Questions
Are old flat sheets suitable for patchwork?
Yes, provided the fabric is still strong and stable. Wash and press the sheet, then check it against the light for thin areas. Very lightweight fabric may benefit from a foundation layer or interfacing.
Do I need to use only cotton flat sheets?
No, but the fibre content affects how the fabric cuts, presses, and behaves in use. Cotton is often easier for patchwork, while blends may be slippery or heat-sensitive. Match the project to the material you actually have.
Can I use a flat sheet for bowl holders or pot holders?
It can be used as a decorative layer only when the whole construction suits the intended purpose. Do not assume an unknown sheet, thread, or batting is microwave-safe or suitable for direct contact with very hot cookware.
How can I make thin sheet fabric easier to sew?
Use a sharp needle, reduce pulling, and test the stitch length on a scrap. A lightweight interfacing or flat-sheet foundation can support small patchwork pieces without making them excessively bulky.
Should I remove hems before cutting a flat sheet?
Remove them when they interfere with accurate cutting or create unnecessary thickness. Clean, sturdy hems can sometimes be reused as ties, narrow straps, hanging loops, or internal reinforcement.
What can I make from very small flat-sheet scraps?
Small pieces are useful for pincushions, patchwork motifs, mug rugs, labels, appliques, and test blocks. Long narrow strips can become binding, ties, or the outer rounds of a log-cabin-style block.
Let the Flat Sheet Become Useful Fabric Again
Learning how to repurpose flat sheets begins with seeing them as fabric rather than leftover bedding. The broad sections can become a cover or cushion panel, while the smaller pieces are useful for patchwork, quilted mats, and sewing accessories. Even the plainest sheet can provide a calm background for scraps that might otherwise stay in a drawer.
Start with one project that suits the strength and fibre of the sheet you have. Measure carefully, press as you work, and then let the original fabric guide the design. Which forgotten flat sheet would you most like to turn into something useful?