Egg cartons are easy to overlook because their shape feels so specific. Once the eggs are gone, the rows of little cups can seem useful for nothing else. I don’t think they need to move directly from the kitchen counter to the bin, especially when the separate compartments already provide petals, seed cells, animal faces, storage sections, and small decorative shapes.
I enjoy projects that begin with ordinary packaging rather than a long shopping list. Paper-pulp egg cartons are particularly satisfying to work with because they can be cut, painted, folded, layered, and glued without needing specialist craft equipment.
Some cartons can stay almost completely intact, while others work better when every cup and raised divider is separated. The condition of the carton should decide what it becomes. A clean, firm carton can support a wreath or organiser, while softer offcuts may still provide petals for flowers.
The most useful approach is to begin with one manageable idea, make only the cuts that project needs, and save the remaining sections. Egg-carton scraps have a habit of becoming exactly the shape you need five minutes after you nearly throw them away.
Before You Start
Use only cartons that are clean, dry, and free from visible egg residue, grease, mould, or unpleasant odours. A carton that has absorbed liquid or become badly stained is not a good craft material, no matter how promising its shape looks.
Paper-pulp and cardboard cartons are usually the easiest to cut and paint. Plastic and foam cartons behave differently and may not suit projects involving hot glue, absorbent paint, soil, or composting. Check the material before choosing the project.
Cut the lid away only when necessary. The flat lid can become a backing panel, label, leaf template, paint palette, or support for another craft. The tall centre dividers are useful too, particularly for pointed petals, noses, ears, leaves, and textured decorative pieces.
Useful Materials and Tools
- Clean paper egg cartons
- Craft scissors
- Pencil
- Acrylic or poster paint
- Paintbrushes
- White craft glue
- Hot glue and a low-temperature glue gun, when appropriate
- Cardboard scraps
- Floral wire or wooden stems
- Coloured paper
- String or lightweight cord
- Hole punch
- Potting mix and seeds
- Labels or wooden plant markers
- Decorative scraps such as ribbon, buttons, yarn, or fabric
Adults should handle hot glue and supervise children using scissors, wire, small decorations, or pointed tools. Protect the table before painting, and let every carton section dry completely before assembling it.
Turn Egg Carton Cups Into a Flower Bouquet
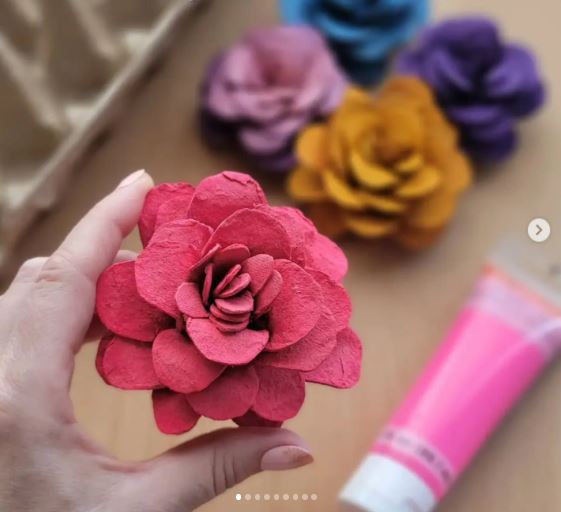
Each cup in a paper egg carton already resembles the centre of a flower. By trimming the rim into petals, adding colour, and attaching a stem, the packaging becomes a decorative bloom rather than remaining recognisable as kitchen waste. The original project creates daisy-like flowers using shaped carton petals, coloured centres, wired stems, and handmade leaves.
The strongest flowers usually come from firm cups that have not been crushed. The raised centre dividers can provide narrower inner petals, while the flatter lid can be cut into leaves or backing circles.
The petals do not need to match exactly. Slight differences in width and curve can make the bouquet feel more natural, particularly when several flower shapes are arranged together.
Materials and Tools
- Paper egg carton cups
- Craft scissors
- Acrylic or poster paint
- Small and medium paintbrushes
- Floral wire, paper-covered wire, or wooden stems
- Coloured paper for centres and leaves
- Craft glue or low-temperature hot glue
- Pencil
- Vase, jar, or bottle for displaying the flowers
Make the Flowers in Four Steps
- Separate and shape the cups. Cut the carton into individual sections, then trim each rim into four, six, or eight rounded petals. Round the corners gradually rather than trying to create the final flower with one large cut.
- Paint both sides of each flower. Apply light coats so the paper carton does not become saturated and lose its shape. Let the first side dry before turning the flower over, then add a contrasting centre or a softer colour around the petal edges.
- Attach the centre and stem. Cut a small paper circle for the middle or reuse a pointed carton divider as a raised centre. Make a careful opening beneath the flower, insert the stem, and secure it without leaving a large lump of glue.
- Add leaves and arrange the bouquet. Cut leaves from paper or flat carton pieces and attach them lower on the stems. Vary the flower heights in the vase so every bloom remains visible rather than forming one crowded row.
I’d paint a few flowers in quieter shades as well as brighter colours. A bouquet made entirely from strong colours can feel busy, while cream, pale pink, muted yellow, or soft green gives the eye somewhere to rest.
You could make roses by nesting several increasingly smaller cups together. A single large flower can decorate a gift box, while several blooms could be added to a mirror frame or wall panel.
Create a Hanging Flower Mobile
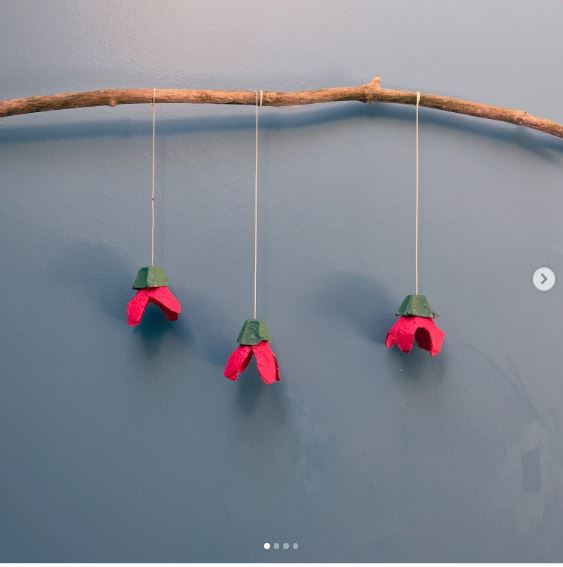
A flower mobile uses the same basic petal shapes as a bouquet, but the movement changes the result completely. Instead of stems, the flowers are suspended on string and arranged at different heights. The original project turns carton flowers into a lightweight hanging decoration using simple recycled materials.
Because the carton is light, you do not need a heavy support. An embroidery hoop, sturdy twig, cardboard ring, or reused wooden frame can hold several flowers when the weight is distributed evenly.
Balance matters more than exact symmetry. The mobile should hang without leaning sharply towards one side, but the individual flowers can vary in shape, colour, and length.
Materials and Tools
- Painted egg carton flowers
- Strong thread or lightweight cord
- Needle or hole punch
- Embroidery hoop, twig, or cardboard support ring
- Scissors
- Craft glue
- Paper leaves or beads, if desired
- Secure ceiling hook suitable for the finished weight
Assemble the Mobile in Four Steps
- Prepare the hanging support. Paint or wrap the hoop, twig, or cardboard ring if you want it to coordinate with the flowers. Add the main suspension cords first and check that the empty support hangs level.
- Make small hanging holes in the flowers. Pierce each piece through a strong central area rather than a thin petal edge. Thread the cord through and secure it with a knot, paper tab, or small amount of glue.
- Arrange the flowers at different heights. Begin with the longest central strand, then add shorter pieces around it. Lift the mobile after every few flowers so you can correct the balance before the design becomes crowded.
- Secure and test the decoration. Trim loose threads, reinforce every knot, and hang the mobile away from flames, heaters, and damp areas. Make sure it is positioned where children or pets cannot pull the strands.
For me, empty space is part of the design. I know it can feel tempting to use every flower you have cut, but a mobile moves more freely when the pieces are not constantly colliding.
A seasonal version could use autumn leaves, white winter flowers, or bright spring colours. You could also add lightweight paper butterflies, moons, or stars between the carton shapes.
Build a Flower-and-Leaf Wreath
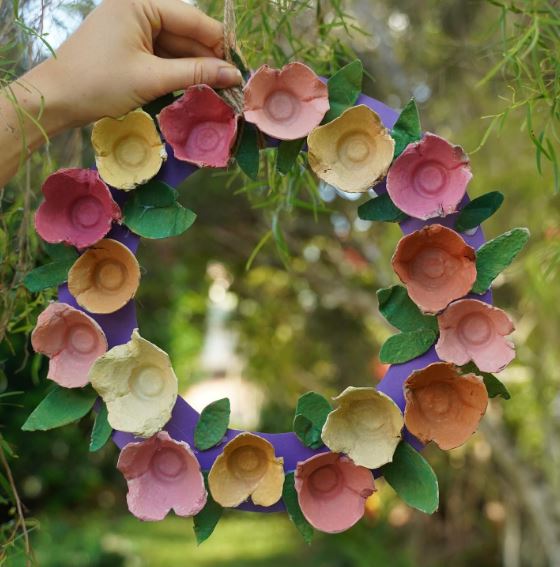
The wreath begins with a simple cardboard ring and builds its texture from individual egg-carton flowers and leaves. The original project cuts a circular base, shapes the carton pieces, paints them, and arranges them around the ring.
This is a useful project for mixed offcuts because the pieces do not need to come from one carton. Large cups can become the main flowers, narrow dividers can form pointed leaves, and smaller scraps can fill spaces between them.
Plan the arrangement before gluing. Once several raised flowers are fixed in place, it becomes difficult to slide another leaf underneath without bending something.
Materials and Tools
- Egg carton cups and divider pieces
- Strong recycled cardboard
- Plate or circular object for tracing
- Pencil
- Craft scissors
- Paint and brushes
- Strong craft glue or low-temperature hot glue
- Ribbon or cord for hanging
- Optional paper leaves or small fabric scraps
Make the Wreath in Five Steps
- Cut the base ring. Trace two circles on strong cardboard and cut away the centre to create a firm ring. Keep the width consistent enough to support the flowers without remaining too visible around the edges.
- Prepare several flower shapes. Cut rounded, pointed, and layered petals from the carton cups. Make a mixture of large and small pieces so the wreath develops depth rather than appearing as one row of identical flowers.
- Paint the pieces separately. Colour the flowers, leaves, and ring before assembly. Let everything dry fully, especially inside folded petals where damp paint can remain hidden.
- Arrange before attaching. Place the largest flowers around the ring first, then add smaller blooms and leaves between them. Move the pieces until the colour and visual weight feel balanced.
- Glue and add the hanger. Lift one piece at a time, attach it securely, and return it to the planned position. Reinforce the hanging ribbon at the back and let the glue set before placing the wreath on a wall or door.
The first arrangement rarely becomes the final one. I’d photograph the layout before gluing so you have a reference after the pieces inevitably shift across the table.
A half-wreath can feel lighter and requires fewer flowers. You could also leave part of the cardboard ring wrapped in fabric, yarn, or brown paper and cluster the carton blooms on one side.
Turn the Carton Into an Animal-Themed Storage Box
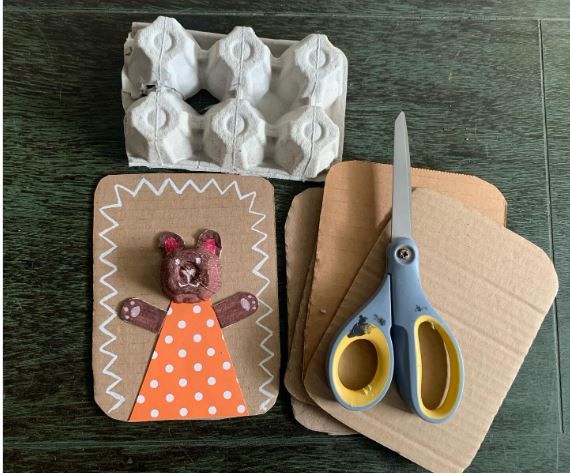
A carton with its lid still attached already functions as a divided box. Decorating the outside as an animal gives the container a clear identity while keeping the inside compartments available for crayons, beads, buttons, erasers, paper shapes, or other small craft items. The original project transforms simple paper boxes into animal-themed storage containers for imaginative play and organisation.
This idea is most practical for lightweight, dry items. Paper cartons are not suitable for wet materials, heavy hardware, food storage after painting, or very small objects when young children are likely to open the box unsupervised.
The raised points and curved lid can suggest ears, noses, eyes, and faces without requiring complicated construction.
Materials and Tools
- Small lidded egg carton
- Acrylic or poster paint
- Paintbrushes
- Coloured card
- Pencil
- Scissors
- Craft glue
- Marker
- Optional yarn, fabric scraps, or large buttons
- Paper labels
Decorate the Storage Box in Four Steps
- Decide which animal suits the carton shape. A rounded lid may work for a bear, pig, frog, cat, or owl. Sketch the face lightly before painting and choose where the ears, nose, or wings will attach.
- Paint the carton with controlled layers. Apply a thin base coat and let it dry before adding the face. Avoid loading the hinge with wet paint because repeated opening may cause thick layers to crack.
- Add lightweight features. Cut ears, wings, horns, or a nose from coloured card or spare carton pieces. Glue them onto strong areas and keep decorations away from the closure so the box still opens properly.
- Organise and label the inside. Use the cups for different colours or categories of supplies. Add a simple label beneath the lid if the animal face makes the outside purpose less obvious.
I’d test the lid several times before the glue dries. An ear placed a little too close to the hinge can turn an otherwise cheerful animal into a box that refuses to open.
A larger carton could organise embroidery thread, jewellery, small toy pieces, or office supplies. For an adult craft room, skip the animal face and cover the lid with paper, fabric, or a painted geometric pattern.
Make a Small Farmyard of Egg Carton Animals
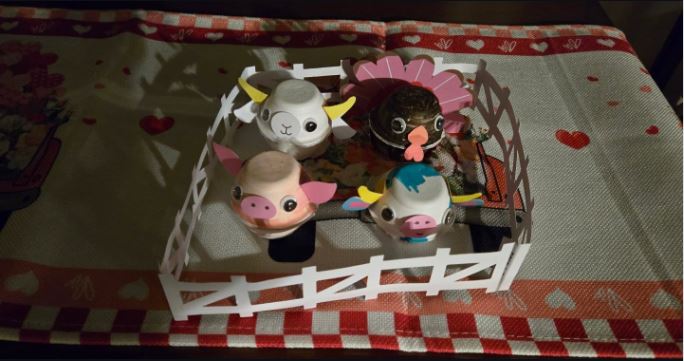
Separated carton sections can become more than flowers. The rounded cups suggest animal heads and bodies, while the centre points can form snouts, ears, beaks, horns, or tails. The original craft creates a cow, pig, goat, and turkey and arranges them together inside a small farm scene.
This project is more interesting when the carton’s existing shapes guide the animals. A protruding divider might already resemble a beak, while two adjacent cups could become a body and head without needing to build both from scratch.
For children’s crafts, use large paper features and drawn eyes rather than loose tiny decorations. That keeps the process simpler and reduces the number of small pieces rolling under the table.
Materials and Tools
- Egg carton cups and dividers
- Paint and brushes
- Coloured paper or card
- Marker
- Craft glue
- Scissors
- Cardboard for the farm base
- Craft sticks or carton strips for fences
- Yarn or paper scraps for tails and details
Create the Animal Scene in Five Steps
- Sort the carton shapes before choosing the animals. Place cups, double-cup sections, and pointed dividers on the table and turn them in different directions. Decide which shape naturally suggests each head, body, beak, or snout.
- Trim only what interferes with the design. Remove rough torn edges and create flat bases where the figures need to stand. Keep useful bumps and points rather than cutting every section into a smooth cup.
- Paint the main animal colours. Apply light coats and let them dry between layers. Add spots, feathers, hooves, or facial markings after the base colour has settled.
- Attach the paper details. Add ears, wings, horns, tails, and faces with glue or marker. Keep the features broad and simple so the animal remains recognisable without becoming overloaded.
- Build a small setting. Use the carton lid or another piece of cardboard as the ground. Add a lightweight fence, painted grass, paper hay, or a small barn backdrop, then arrange the animals once every glued section is secure.
For me, the slightly uneven carton texture suits animals rather well. There’s no need to cover every bump, because those rough areas can suggest feathers, wool, fur, or a wonderfully muddy farmyard resident.
The same method could produce ocean creatures, insects, woodland animals, or birds. A row of joined cups can become a caterpillar, while a single pointed section can form an owl or fox face.
Common Mistakes to Avoid
Using a Dirty or Damp Carton
Paint and glue will not improve a carton that still contains residue or moisture. Discard unsuitable packaging and begin with a clean, dry piece.
Cutting Every Cup Apart Immediately
Some projects need joined compartments, an intact hinge, or the flat lid. Choose the project first, then make only the cuts it requires.
Applying Too Much Wet Paint
Paper pulp absorbs moisture and may soften or lose its shape. Use light coats and let each side dry before adding more colour.
Adding Heavy Decorations
Large stones, thick clay pieces, or too much hot glue can pull the carton apart. Choose paper, yarn, lightweight buttons, fabric scraps, and small amounts of adhesive.
Gluing Before Planning the Layout
Wreaths, mobiles, bouquets, and wall decorations need balance. Arrange the pieces first and photograph their positions before making the design permanent.
Making Seed Cartons Too Wet
The cells are shallow and absorbent. Water gently, use a waterproof tray, and move seedlings when the carton begins weakening or the plants need more room.
Forgetting the Carton Hinge
Thick paint and glued decorations can prevent a storage box from opening properly. Keep the hinge flexible and test the lid throughout the project.
Treating Painted Cartons as Food-Safe
Once a carton has been painted, glued, or decorated, use it for crafts and dry storage rather than direct food contact.
Frequently Asked Questions
Which type of egg carton is easiest to repurpose?
Paper-pulp and cardboard cartons are usually easiest to cut, paint, and glue. Foam and plastic versions behave differently and may not suit the same techniques.
Do egg cartons need to be washed?
Avoid soaking paper cartons because they may weaken or lose their shape. Use only cartons that are already clean and dry, and discard any with visible residue, odour, mould, or absorbed liquid.
Can children make these projects?
Many egg-carton crafts are suitable for children with age-appropriate supervision. Adults should handle hot glue, wire, sharp scissors, pointed tools, and any small pieces that could present a hazard.
Which paint works on paper egg cartons?
Acrylic, poster, or tempera-style craft paints may work well when applied lightly. Test the paint on an offcut first and avoid saturating the carton.
Can I plant the egg-carton cups directly into the garden?
The best method depends on the carton material, plant, local conditions, and how quickly the carton breaks down. Removing or opening the bottom before transplanting may reduce restriction around the young roots.
How can I make an egg-carton craft last longer?
Keep decorative projects dry, use only enough glue to secure the pieces, and store them where they will not be crushed. A suitable craft sealer may help some painted decorations, but test it first because added moisture can affect the carton.
What can I do with the leftover scraps?
Small pieces can become leaves, flower centres, ears, noses, feathers, labels, mosaic shapes, or filler details. Sort the scraps by shape before discarding anything useful.
Let the Carton Shape Suggest Its Next Purpose
Learning how to repurpose egg cartons becomes much easier once you stop seeing only the original packaging. Each cup can become a flower or animal, the full tray can start seeds, the lid can support a miniature scene, and the entire lidded carton can organise small supplies.
Begin with the project that needs the least alteration. A seed tray uses the carton almost exactly as it is, while a bouquet or wreath gives you more room to practise cutting and painting individual sections. Then keep the sound offcuts nearby, because small carton pieces are often more useful than they first appear.
Which empty carton would you try first: a practical seed starter, a painted flower bouquet, or a small animal storage box?