The objects that gather near a recycling bin are often more useful than they first appear. A wide glass jar can hold pens, a sturdy container can become a cleaning caddy, and a small bottle can serve as a decorative desk piece once its original contents are safely removed. The best results do not come from decorating everything in sight. They come from matching the shape and strength of an old item to a realistic new purpose.
I like household upcycles that solve a small problem without creating a larger one. A planter still needs drainage, a caddy needs a handle that can carry its load, and a dispenser must remain easy to clean.
I don’t think paint or embellishment should hide cracks, chemical residue, or weak plastic. Those are signs to choose another container rather than force the project.
A careful makeover can be playful, restrained, or practical. The five projects here use familiar containers in very different ways, but they share the same sensible order: clean first, test the material, decide the new function, and then decorate. That order protects the finish and makes the finished item more useful after the photographs are taken.
Before You Begin Repurposing Everyday Containers
Empty the item completely and identify what it originally held before deciding how to reuse it. Food jars, cosmetic bottles, detergent containers, and solvent bottles need different levels of cleaning, and some should never be redirected to food, drink, pet care, or children’s use. Remove labels, adhesive, loose caps, and residue, then let the container dry fully so trapped moisture does not weaken paint or encourage odour.
Check every edge and seam by hand. Glass should have no chips, plastic should not feel brittle or split when gently flexed, and a pump should work smoothly if it will remain part of the finished project.
For items that will carry soil, water, or cleaning tools, test the base and handle before adding decoration. A charming finish cannot make an unsafe container reliable.
Match the New Use to the Material
A glass jar suits a stationary holder because it is rigid and easy to weight with pens, while a lightweight plastic container can work well as a portable caddy. Planters need a drainage plan and a surface that tolerates moisture.
Bottles that once held strong chemicals are better kept for dry decoration, when reuse is appropriate at all, rather than being turned into containers for food, drink, soap, or lotion.
Protect the Work Area
Paint, primer, adhesives, drilling, and cutting all need a stable work surface and suitable ventilation. Wear eye protection when drilling or trimming plastic, smooth every cut edge, and keep small mirror pieces away from children and pets. Test paint and adhesive on a hidden area because some plastics remain flexible or react badly to coatings.
Set Aside Household Items With:
· Cracks, sharp edges, brittle plastic, or weak handles
· Persistent odour, grease, food residue, or chemical residue
· Unknown contents or containers that held hazardous products
· Damage that makes the item unstable for its planned new use
For Household Items Suitable for Repurposing, Inspect:
· What the item originally held and whether it can be cleaned safely
· The condition of the base, rim, seams, handle, neck, and pump
· Whether the shape and strength suit the intended new purpose
· Whether paint or adhesive bonds to a small hidden test area
· Drainage, balance, or carrying strength where the project needs it
Useful Materials and Tools
· Mild cleaner, bottle brush, sponges, and clean cloths
· Label scraper and fine sandpaper or an abrasive pad
· Surface-appropriate primer, paint, markers, and brushes
· Suitable adhesive and smooth decorative materials
· Drill or cutting tool only when the project requires it
· Gloves, eye protection, and a drop cloth
Turn a Cup-Shaped Household Container into a Planter
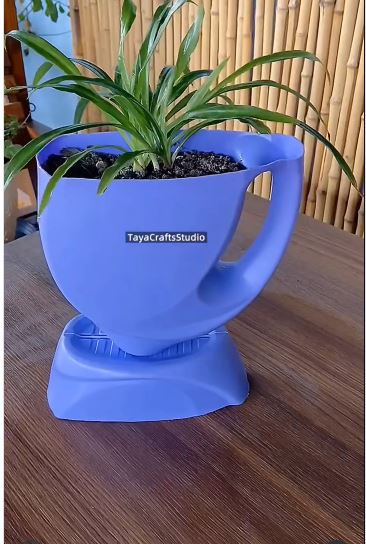
A cup-shaped container already has the wide opening and rounded body of a small plant pot, so this makeover depends more on practical preparation than elaborate decoration.
The bold purple surface and matching base make the object feel intentional, while the large handle gives it a playful scale that works on a table, sheltered patio, or bright shelf.
The first question is drainage. A decorative container without an exit for excess water can keep roots constantly wet, while a hole added carelessly may split thin plastic.
If the material can be drilled safely, add drainage through the base and use the lower piece as a saucer. Otherwise, keep the plant in a removable nursery pot and lift it out for watering.
For me, the matching base is the detail that makes this project useful rather than merely amusing. It catches moisture and visually balances the oversized handle. I know it can feel tempting to fill the cup directly as soon as the paint looks ready, but checking the drainage and finish first saves the plant and the tabletop.
Materials and Tools
· Clean cup-shaped household container with a stable base
· Matching saucer, tray, or waterproof catch dish
· Primer and paint suited to the container material
· Small brush or foam applicator
· Drill and suitable small bit when the material can accept drainage holes
· Removable nursery pot or planting mix and a small plant
· Felt pads for indoor furniture protection
A Practical Way to Recreate the Look
1. Clean and test the container. Remove residue, labels, and adhesive, then wash and dry the piece thoroughly. Press gently around the base and handle to check for splits. Test primer or paint underneath, because glossy plastic often needs light abrasion and a coating designed for slick surfaces.
2. Plan how water will leave the planter. Decide whether the plant will sit in a removable inner pot or whether the outer container can be drilled. If drilling is appropriate, support the base on scrap wood, wear eye protection, and make small holes without forcing the tool. Smooth any raised edges before continuing.
3. Prepare and colour the outside. Lightly degloss the exterior if the material allows, remove dust, and apply compatible primer where needed. Add thin coats of colour rather than one heavy layer, especially around the handle and rim. Keep paint away from areas that will remain wet unless the coating is intended for that exposure.
4. Fit the plant without crowding the opening. Choose a plant and inner pot that can be lifted out easily. Add planting mix only if the container has reliable drainage, then leave a little space below the rim so watering does not wash soil onto the handle. Set the planter on its saucer and check for wobble.
5. Place it where the finish can cope. Use the planter indoors or in a sheltered spot unless the materials are suitable for outdoor weather. Protect wood furniture with felt pads or a waterproof tray and wipe away standing water. Turn the plant occasionally rather than dragging the painted base across the surface.
A quieter version could use one neutral colour and a small herb pot, while a beginner can skip drilling by using a removable nursery pot. The same idea also works with a sturdy bowl-shaped container, provided it sits securely and has a sensible watering plan.
Paint a Glass Ghee Jar as a Cow Pen Holder
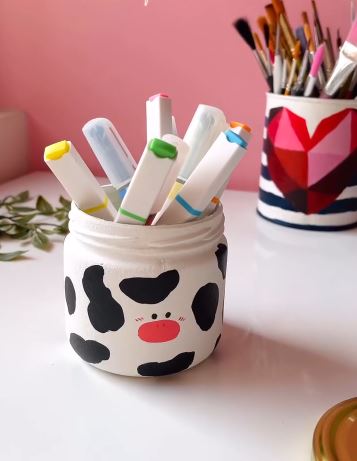
A wide glass food jar is naturally suited to pens because the base has enough weight to stay upright and the opening gives easy access. White paint creates a clean background, while irregular black patches, a red snout, small cheeks, and simple eyes turn the jar into a cheerful desk piece without changing its basic function.
Glass needs careful preparation because grease and label adhesive can remain even after the jar looks clean. A paint system made for glass, or a suitable primer beneath craft paint, gives the design a better chance of staying attached. Keep the inside unpainted so pens do not scrape against a decorative coating every time they are removed.
The face does not need perfect symmetry. A slightly different patch on each side keeps the design friendly, and paper shapes can help with placement before painting. I would keep the rim smooth and undecorated; that is the part hands touch most often.
Materials and Tools
· Clean, undamaged glass ghee or food jar
· Adhesive remover suited to glass and a non-scratching scraper
· Glass primer or paint intended for non-porous surfaces
· White, black, red, and small accent colours
· Fine and medium paintbrushes or paint markers
· Paper templates and low-tack tape for testing the face layout
· Optional compatible clear finish and felt base pad
A Practical Way to Recreate the Look
1. Remove the label and food residue. Soak or clean the jar using a method suitable for glass, then scrape away softened adhesive without scratching it. Wash the rim and threads carefully, rinse, and let the jar dry completely. Reject any jar with a chipped rim or hairline crack.
2. Prepare the outside for paint. Degrease the glass and avoid touching the cleaned surface with oily fingers. Apply a suitable primer or base coat if the paint system needs one. Keep the coat thin around raised threads so the opening remains comfortable to handle.
3. Arrange the face before committing. Sketch the snout, eyes, and black patches on paper or test them with removable shapes. Place the main face slightly below the centre so pens do not hide it completely. Then transfer the design lightly with a pencil or suitable marker.
4. Build the decoration in simple layers. Paint the white base first, followed by the larger black patches and facial shapes. Add small details only after the earlier areas are ready for another layer. Use light brush pressure so the surface stays even instead of developing thick ridges around every shape.
5. Protect the desk and fill the jar. Apply a compatible clear finish only if it suits the chosen paint, keeping the inside and rim free of unnecessary coating. Add a felt pad underneath to prevent scratching, then fill the jar with pens, markers, or brushes that are not so tall that they tip it over.
The same jar could carry a simple fruit, flower, or geometric pattern. A beginner can use adhesive vinyl shapes instead of detailed painting, but the jar should still be clean, chip-free, and stable before it reaches the desk.
Decorate a Reused Pump Bottle with a Blue Mosaic Finish
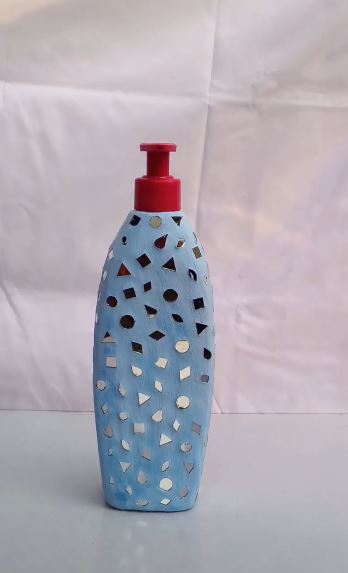
A tall pump bottle has a useful shape for hand soap or lotion, but its exterior can feel disposable. This version uses a pale blue background and scattered reflective pieces in circles, squares, triangles, and irregular shapes. The red pump remains visible, adding contrast without hiding how the container works.
The safest way to create a similar effect is with lightweight, smooth-edged mirror-effect tiles or acrylic mosaic pieces rather than freshly cut glass. Every piece needs full contact with the curved bottle and enough clearance around the pump and grip areas. Decoration should stay on the exterior only and must not interfere with cleaning or refilling.
I would rather use fewer pieces that are firmly attached than cover every gap with tiny fragments. A pump bottle is handled with wet hands, so loose corners become annoying quickly. The open spacing also lets the blue background remain part of the design.
Materials and Tools
· Clean pump bottle suitable for the intended refill
· Primer and light-blue paint compatible with the bottle material
· Smooth, lightweight mirror-effect or acrylic mosaic pieces
· Adhesive designed for both the bottle and the decorative pieces
· Tweezers, cotton swabs, pencil, and paper layout template
· Small brush and optional compatible protective finish
· Gloves and eye protection when handling decorative pieces
A Practical Way to Recreate the Look
1. Check the pump and original contents. Only reuse the bottle for a compatible purpose after it has been emptied and cleaned appropriately. Pump clean water through the mechanism, then let all parts dry. If odour, residue, or an unreliable pump remains, keep the bottle for dry decoration or choose another container.
2. Prepare the exterior without blocking moving parts. Remove labels and lightly degloss the body if the material permits. Mask the pump stem, neck threads, and any area that must twist or slide. Apply a compatible primer and thin blue coats, allowing the bottle to remain flexible without a thick shell of paint.
3. Plan the mosaic on paper first. Arrange circles, squares, and triangles with varied spacing instead of placing them randomly one by one. Keep pieces away from corners, seams, and the area where fingers grip the bottle. A small paper sketch helps balance the pattern before adhesive is involved.
4. Attach smooth pieces in manageable sections. Use only enough adhesive to cover the back of each piece without squeezing around the edges. Press the pieces onto the clean painted surface and support the bottle so they do not slide while setting. Remove excess adhesive before it hardens into rough ridges.
5. Test the dispenser during normal handling. Once the materials are ready for use, fill the bottle with a compatible product and test the pump over a sink. Grip it with damp hands and check every decorative edge. Remove and replace any piece that moves, catches fabric, or feels sharp.
A simpler version could use metallic paint dots or flat adhesive shapes instead of mosaic pieces. That keeps the same scattered pattern while making the bottle easier to wipe clean, which may suit a busy bathroom or kitchen sink better.
Build a Portable Cleaning Caddy from a Sturdy Container
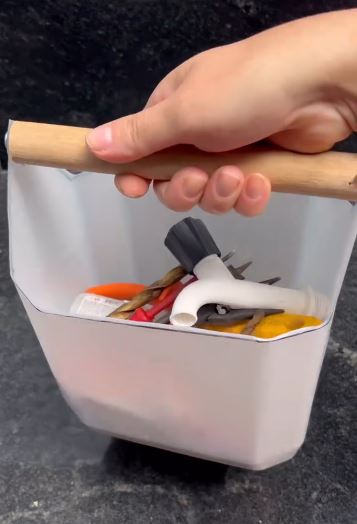
This practical project turns a rectangular household container into a caddy with an open front pocket and a wooden dowel across the top. The straight sides keep brushes and cloths upright, while the handle allows the organiser to move between the kitchen, bathroom, and utility area without gathering supplies one at a time.
The container must be thick enough to support holes or side fittings without tearing. The handle also needs room for a comfortable grip and must sit above the tallest tools. Keep the load light: small brushes, cloths, gloves, and compact bottles suit this scale better than several large containers of liquid.
The part I would test most carefully is the handle. It may look secure when the caddy is empty but pull against the sidewalls once supplies are added. A slow load test over a counter is much kinder than discovering the weak point halfway across a tiled floor.
Materials and Tools
· Clean rectangular container with strong sidewalls and stable base
· Wooden dowel sized for a comfortable hand grip
· Drill and suitable bit, or another cutting method appropriate to the material
· Ruler, marker, square, and masking tape for aligned handle holes
· Washers, end caps, or secure stops suited to the handle design
· Fine file or sandpaper for smoothing openings and edges
· Optional paint or simple label for identifying the caddy
· Eye protection and clamps or support blocks while drilling
A Practical Way to Recreate the Look
1. Choose a container that can carry a light load. Inspect the base and sidewalls for stress marks, cracks, or thin folded areas. Clean away all residue and let the container dry. Place the intended brushes and cloths inside before cutting anything so you know the height and width are genuinely useful.
2. Mark matching handle positions. Measure both sides from the same reference edge and mark the hole centres with tape and pencil. Hold the dowel above the contents to confirm knuckle clearance. The handle should sit level and far enough from the rim that the remaining plastic does not form a narrow weak strip.
3. Create and smooth the openings. Support each side on scrap material and use a tool suited to the container. Wear eye protection and work slowly so the plastic does not crack outward. Smooth the openings with a file or fine abrasive, then check that the dowel moves through without scraping or splitting the edge.
4. Fit the dowel with secure stops. Slide the handle through both sides and use appropriate end stops, washers, or another secure method that prevents it from pulling free. Avoid exposed sharp fasteners where hands will pass. Lift the empty caddy several times and watch the sidewalls for bending.
5. Load and test it gradually. Add lightweight supplies in stages, keeping heavier items low and centred. Carry the caddy a short distance over a safe surface, then inspect the handle holes again. If the sides stretch or whiten around the openings, reduce the load or reinforce the design before regular use.
A beginner can skip the handle and use the same container as an under-sink bin. Another practical variation is to add removable dividers for cloths and brushes, but avoid narrow compartments that trap moisture and become difficult to clean.
Paint a Nail Polish Remover Bottle as a Mini Desk Decoration
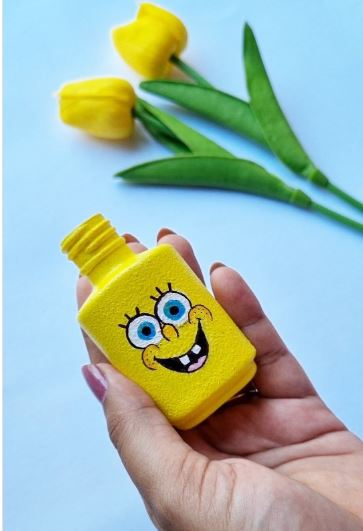
A small nail polish remover bottle has a compact, blocky shape that works well as a miniature desk ornament or holder for one or two artificial stems. Bright yellow paint turns the entire bottle into a background, while blue eyes, a smiling mouth, and black linework create a lively cartoon-style face.
Because the original product may contain strong solvent, cleaning and intended use matter more than the decoration. Follow the container label and local disposal guidance for any remaining liquid, work in good ventilation, and do not redirect the bottle to food, drink, medicine, children’s play, or skin-care storage. If a smell remains after appropriate cleaning, do not continue with the project.
Small bottles reward restraint because there is not much room for correction. I would sketch the main eye and mouth positions first, then add tiny lines after the larger colours are balanced. Too many details can turn a cheerful face into a very crowded square inch.
Materials and Tools
· Empty nail polish remover bottle that can be handled safely after proper cleaning
· Primer and yellow paint suited to the bottle material
· Black, white, blue, and small accent colours
· Fine paint markers or detail brushes
· Pencil, paper template, cotton swabs, and painter’s tape
· Optional compatible clear finish
· Artificial stem or dry decorative item only, when the opening allows
A Practical Way to Recreate the Look
1. Deal with the original product safely. Empty the bottle according to its label and local requirements rather than pouring leftover solvent into a sink. Clean only in a way appropriate to the material and contents, then ventilate and dry it fully. Stop if residue, odour, softening, or damage remains.
2. Test the surface before painting everything. Remove the label and try primer or paint on the underside. Some plastics react to solvents or remain too flexible for a brittle coating. Lightly prepare the surface only if the material allows, then wipe away dust without reintroducing oil.
3. Apply the yellow base in thin layers. Mask the neck if you want to preserve a clean opening, then paint the body evenly. Turn the bottle between coats so colour does not gather along the lower edges. A smooth background makes the small facial details much easier to read.
4. Draw the expression from large shapes to small lines. Place the eyes and mouth first, checking the design from arm’s length before adding lashes, cheeks, or fine outlines. Use a steady support under your painting hand. Then correct edges with the base colour instead of repeatedly widening the black lines.
5. Choose a dry decorative use. Protect the finish with a compatible product if needed, and let the piece remain a desk ornament, shelf accent, or holder for a lightweight artificial stem. Do not use it for drinking, food, medicine, cosmetics, or any item that could be confused with the original contents.
A simple face, flower, or geometric motif would work just as well. Keeping the cap and painting it separately can also give the finished piece a more complete silhouette, provided the cap and threads remain safe to handle.
What Can Make a Household-Item Upcycle Fail
Choosing Decoration Before a Safe New Use
A bottle may have a convenient shape but an unsuitable history. Decide what the item can safely become before choosing colours or embellishments. Containers that held strong chemicals should not be redirected to food, drink, skin products, pet supplies, or children’s storage simply because the exterior has been painted.
Painting over Grease, Adhesive, or Gloss
Paint can lift in sheets when label residue or an oily film remains underneath. Clean the object thoroughly, remove adhesive, and test the full primer-and-paint combination on a hidden area. Heavy coats do not improve weak adhesion; they usually make peeling more noticeable.
Ignoring Water and Drainage
A decorative planter can damage both roots and furniture when water has nowhere to go. Plan drainage before painting, use a removable inner pot when drilling is unsuitable, and place the container on a waterproof saucer. Do not assume a painted exterior makes an unknown container watertight.
Using Sharp or Heavy Mosaic Pieces
A handled pump bottle needs smooth, firmly attached decoration. Freshly cut mirror fragments, raised sharp corners, or heavy pieces can catch hands and slide from a curved surface. Choose lightweight, smooth alternatives and test the bottle with wet hands before regular use.
Making a Caddy Handle before Testing the Container
Thin walls can split around drilled holes once the caddy is loaded. Test the container with the intended supplies, leave enough material around the opening, smooth the cut edges, and increase the load gradually. If the plastic shows stress whitening or stretching, the design needs reinforcement or a lighter job.
Treating Decorative Containers as Food-Safe
Craft paint, primer, adhesive, and clear finish should not be assumed safe for food contact. Keep decorative coatings on the exterior and use finished pieces for stationery, dry tools, plants with an inner pot, or display. A new appearance does not erase the material or the container’s previous contents.
Frequently Asked Questions
Can any household container be repurposed?
No. The original contents, material, damage, and new use all matter. Set aside containers with persistent chemical residue, cracked glass, brittle plastic, mould, or structural weakness, and follow the appropriate local recycling or disposal route.
Do I need primer before painting glass or plastic?
Often, but the correct preparation depends on the paint system and the material. Clean and test a hidden area first, then use a primer intended for the surface when required. Ordinary wall paint is not a reliable shortcut for slick containers.
How can I stop a painted jar from scratching the desk?
Keep the base clean and add a felt or non-slip pad underneath. Avoid dragging the jar when it is filled with pens, and choose a clear protective finish only if it is compatible with the paint. A chipped glass base should not be used at all.
What is the safest way to use a planter without drainage holes?
Place the plant in a removable nursery pot that fits inside the decorative container. Lift it out for watering, let excess water drain, and return it only after the outer container is dry. This is safer than keeping wet soil permanently inside a container that cannot drain.
Can I use real mirror pieces on a pump bottle?
Smooth pre-cut mosaic pieces may be possible, but lightweight acrylic mirror-effect tiles are usually easier to handle on a flexible bottle. Avoid exposed sharp corners, use an adhesive suited to both materials, and test every edge before placing the bottle beside a sink.
How much weight should a homemade cleaning caddy carry?
Only as much as the container and handle can support without bending, cracking, or stretching. Start with cloths and small brushes, then add compact items gradually. Large bottles of liquid can quickly overload a caddy made from thin household packaging.
Can a former nail polish remover bottle hold water or cosmetics?
It is better to keep it as a dry decorative object, especially when the original solvent or plastic compatibility is uncertain. Do not reuse it for food, drink, medicine, cosmetics, or children’s items. A lightweight artificial stem or simple shelf display avoids confusion and repeated liquid contact.
Let Everyday Objects Earn Another Use
The most successful way to repurpose household items is to let the original shape suggest a safe new job. A wide jar can organise pens, a stable cup form can hold a plant, a pump bottle can receive a decorative exterior, and a strong container can carry small cleaning tools. Preparation is what allows the decoration to last.
Begin with one item that is clean, sound, and easy to understand. Keep the first version practical, test it during normal use, and add decoration only where it does not interfere with handling, drainage, refilling, or cleaning. Which everyday object in your home already has the shape of something more useful?