Vintage buffets are often better built than their current condition suggests. A tired finish, dated hardware, or a top marked by years of serving dishes can make a solid cabinet look ready for removal, even when its drawers still run well and the frame remains sturdy. That long, low shape is useful in far more places than a formal dining room.
The first thing I notice is usually the storage layout. Wide drawers can hold table linens, art materials, paperwork, or clothing, while deep cupboards suit dishes, bottles, baskets, or small appliances.
I don’t think an old buffet has to lose every trace of its age to feel relevant again. The carved doors, shaped legs, keyholes, and old brass fittings are often the details worth keeping.
A careful makeover can be as restrained as cleaning the wood and changing the topcoat, or as expressive as adding an ombré finish across the entire front. What matters is choosing a new use before choosing a colour. Once the purpose is clear, the finish, hardware, shelf arrangement, and level of repair become much easier to decide.
Before You Begin Work on an Old Buffet
Remove every drawer and empty the cabinet before judging the condition. Check the back, base, feet, door hinges, drawer runners, and top for movement, damp damage, loose veneer, or old repairs.
Press gently on opposite corners to see whether the frame twists. Repairing the structure first prevents a fresh finish from hiding a problem that will return as soon as the cabinet is loaded.
Clean the surface with a method suited to the existing material. Old wax, furniture polish, kitchen grease, and smoke residue can stop paint or clear finish from bonding properly.
If the coating is very old or unknown, avoid aggressive dry sanding until you have checked the safest way to handle it. Work in a ventilated area, wear suitable eye and breathing protection, and keep dust away from children and pets.
Decide What Deserves to Stay
Set the original hardware, escutcheons, keys, hinges, and decorative fittings aside instead of discarding them immediately. Even when they need cleaning or minor repair, they may suit the proportions better than new pieces. Take a photograph before disassembly and label doors and drawers so each one returns to the opening where it already fits.
Plan the New Use
Measure the objects the finished buffet will store. Wine bottles, serving platters, baskets, folded clothing, and board games all need different clearances. A drinks cabinet may need an adjustable shelf, while an entryway buffet benefits from drawers that open easily and doors that close without catching on a rug or wall trim.
Set Aside Vintage Buffets With:
- Extensive wood rot or crumbling timber
- Severe water damage or swollen panels
- Active mould or a persistent damp smell
- Widespread woodworm or insect damage
- A badly warped or unstable frame
- Broken legs that cannot be securely repaired
- Loose joints that remain weak after tightening
- Cracked or collapsing shelves and drawer supports
- Damaged particleboard that has lost its strength
- Large sections of peeling or unstable old paint
- Missing structural parts that are difficult to replace
- Serious damage that makes the buffet unsafe for its intended use
A buffet with extensive structural, moisture, or pest damage may require professional restoration. Avoid placing heavy equipment, sinks, televisions, or storage items on furniture that remains unstable after basic repairs.
For a Vintage Buffet Suitable for Repurposing, Inspect:
- The strength and stability of the main frame
- Legs, feet, joints, and corner supports
- The condition of drawers and drawer runners
- Cabinet doors, hinges, knobs, and handles
- Shelves and internal storage compartments
- Cracks, dents, scratches, and chipped edges
- Signs of water damage, mould, or woodworm
- The condition of the top surface
- The type of wood, veneer, laminate, or particleboard
- The existing paint, stain, varnish, or wax finish
- The buffet’s height, width, and depth
- Whether it fits its planned location and new purpose
- Whether the drawers can hold the intended items
- Whether additional shelves or dividers are needed
- Whether the back panel can accommodate cables or plumbing
- Whether electronics will have enough ventilation
- Whether the buffet needs reinforcement for a heavy top
- Whether an outdoor project will require weatherproofing
Measure the buffet and its intended space before beginning. Consider how it will function as a bar, vanity, storage station, media console, craft station, garden console, or desk before removing drawers or changing its structure.
Useful Materials and Tools
- Tape measure
- Pencil and carpenter’s square
- Spirit level
- Screwdrivers
- Drill and suitable drill bits
- Hammer
- Adjustable spanner
- Jigsaw or handsaw
- Clamps
- Sandpaper in different grits
- Sanding block or electric sander
- Wood glue
- Wood filler
- Replacement screws and nails
- Metal brackets and corner braces
- Timber strips for reinforcement
- Mild furniture cleaner
- Clean cloths and sponges
- Surface-appropriate primer
- Furniture paint or wood stain
- Paintbrushes and small rollers
- Protective wax, varnish, or clear topcoat
- Replacement knobs, handles, and hinges
- Shelves, baskets, trays, or drawer dividers
- Cable clips or cable-management boxes
- Storage hooks or hanging rods
- Outdoor paint or waterproof sealant
- Drop cloth or protective covering
- Safety gloves
- Safety glasses
- Dust mask or respirator
Choose additional materials according to the buffet’s new purpose. These may include a mirror and lighting for a vanity, bottle racks for a home bar, cable-management accessories for a media console, storage bins for a craft station, or a weather-resistant finish for an outdoor garden console.
Refresh a Vintage Buffet with a Bold Two-Tone Finish
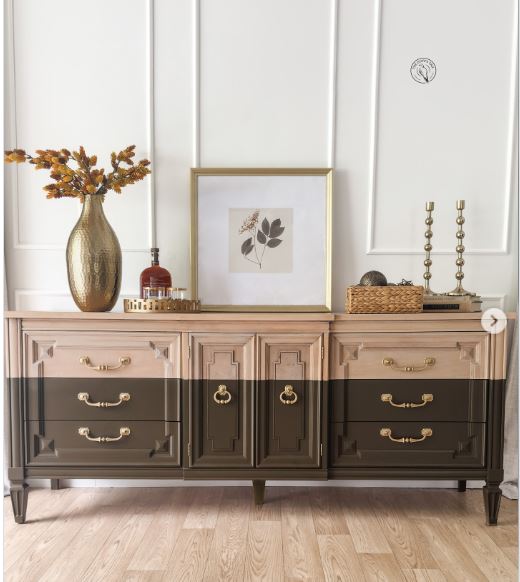
A two-tone treatment suits a long buffet because the colour line can follow the furniture’s natural divisions. Here, the lighter upper section includes the top drawers and upper door panels, while deep charcoal grounds the lower half. The original brass pulls, ring handles, moulding, and narrow legs stop the finish from feeling flat.
The useful lesson is restraint. The colour split is bold, but the palette remains quiet enough for a dining room, entryway, or living room. A perfectly straight line matters more than adding another decorative technique. I’d choose the dividing height by looking at the drawer rails and door moulding rather than measuring halfway and hoping it suits the cabinet.
This approach also helps when the top portion of a buffet needs a softer presence near pale walls, while the bottom needs to hide daily scuffs. The darker paint visually anchors the piece and makes the brass hardware easier to notice.
Materials and Tools
· Sturdy vintage buffet with intact drawers and doors
· Cleaner, sanding pads, filler, and primer suited to the existing finish
· Two compatible furniture paint colours
· Long level or straight edge, measuring tape, pencil, and low-tack painter’s tape
· Small roller, quality brush, and detail brush for moulding
· Cleaned original hardware or replacement pulls of matching scale
· Compatible protective finish for frequently handled surfaces
A Practical Way to Recreate the Look
1. Repair and label every moving part. Remove drawers, doors, pulls, hinges, and catches, then label each piece on a hidden edge. Tighten loose joints and repair chips before sanding. Test the drawers in their original openings because a long buffet may have small differences from one side to the other.
2. Choose the colour line from the furniture. Reassemble the fronts loosely or lay them in order, then identify a rail or moulding line that can carry the change in colour. Use a straight edge and level to continue that line across drawers and doors. Step back before taping; a line that looks correct up close can feel too high or low from across the room.
3. Prepare and paint the lighter section. Clean and degloss the surfaces, apply primer where required, and paint the upper area in thin coats. Work around carved corners with a brush, then smooth broad panels with a small roller if the paint allows. Let the finish settle fully before masking over it.
4. Mask carefully and add the dark base. Apply low-tack tape along the planned line and press the edge down without stretching it. Seal the tape edge with a small amount of the lighter colour if needed, then add the charcoal paint below. Remove the tape while the final coat is still at the stage recommended for the product so the edge remains clean.
5. Reassemble and balance the hardware. Clean the brass or fit new handles only after the paint has hardened enough for careful handling. Align the drawer pulls and central rings, adjust door gaps, and add felt pads where painted parts meet. Then check the buffet under normal room lighting, as uneven sheen often appears more clearly in the evening.
A simpler version could keep the top and upper drawers in natural wood while painting only the base. You could also reverse the colours, but I’d keep the darker tone on the area most likely to be kicked or brushed by bags. The dividing line should support the architecture of the buffet rather than cut awkwardly through raised details.
Give a Small Vintage Buffet a Rustic Olive-and-Wood Makeover
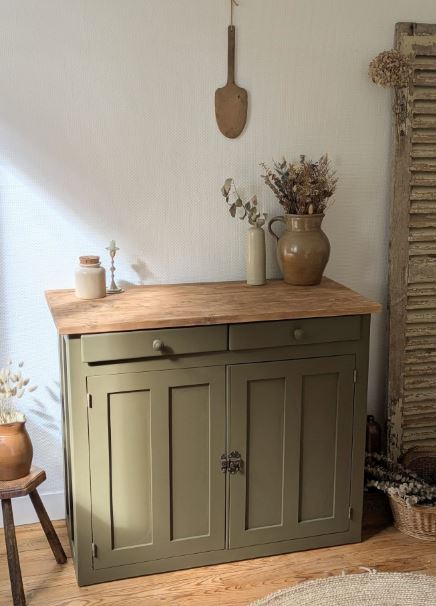
A compact buffet does not need elaborate decoration to become useful again. Muted olive paint gives the base a quiet, grounded look, while the natural top keeps the piece warm. Two shallow drawers and a pair of panelled doors make this size suitable for a small dining area, hallway, kitchen wall, or linen corner.
The central latch is an important part of the character. It looks practical rather than precious and works well with the simple knobs. I don’t think replacing every old fitting would improve this version. The cabinet already has a strong, honest shape, so the finish should support it rather than compete with it.
Because the top is visibly different from the painted body, surface preparation needs to be planned in two separate ways. The timber may need careful stripping or sanding, while the base may only need cleaning, repairs, and enough deglossing for paint to adhere.
Materials and Tools
· Small buffet or cupboard with sound panelled doors
· Cleaner, scraper or sanding tools suited to the top, and fine sanding pads for the base
· Muted olive furniture paint and suitable primer
· Wood stain or clear finish compatible with the stripped top
· Brush, small roller, drop cloth, and painter’s tape
· Wood filler, glue, clamps, and replacement screws as needed
· Original latch and knobs, or simple replacements in a similar style
A Practical Way to Recreate the Look
1. Separate the top from the painted areas. Remove the drawers, doors, hardware, and, when construction allows, the top itself. If the top cannot be removed, mask the joint carefully after cleaning. Repair loose corners and make sure the doors sit square before any decorative work begins.
2. Bring the timber top back gradually. Test the existing coating in a hidden area and choose a removal method that will not cut through veneer. Work evenly across the whole top instead of chasing one dark mark too deeply. Once the surface looks consistent, sand with the grain and soften sharp edges without rounding away the original shape.
3. Prepare and paint the olive base. Clean the cabinet thoroughly, fill only the damage that distracts from the final finish, and degloss glossy areas. Prime where required, then apply olive paint in thin layers. Brush in the direction of the panels and remove paint buildup from door edges before it affects the fit.
4. Protect the top for everyday use. Choose a clear finish or stain that suits the timber and the cabinet’s new purpose. Apply it to an evenly prepared surface and include the exposed edges. Do not place heavy décor or candles on the top until the finish is ready for normal use according to its instructions.
5. Refit the simple hardware. Clean the latch and knobs gently, preserving age where it suits the piece. Reinstall the doors and drawers, adjust the hinges, and check that the latch closes without forcing the painted edges together. Add shelf liner or baskets inside only after measuring the available depth.
For a softer cottage version, use a warm cream or smoky blue base with the same timber top. A beginner could leave the inside untouched and focus on the exterior only. The good thing is that this small buffet does not need extra moulding or decorative transfers; its proportions already do most of the work.
Paint a Curved Vintage Buffet in Deep Charcoal
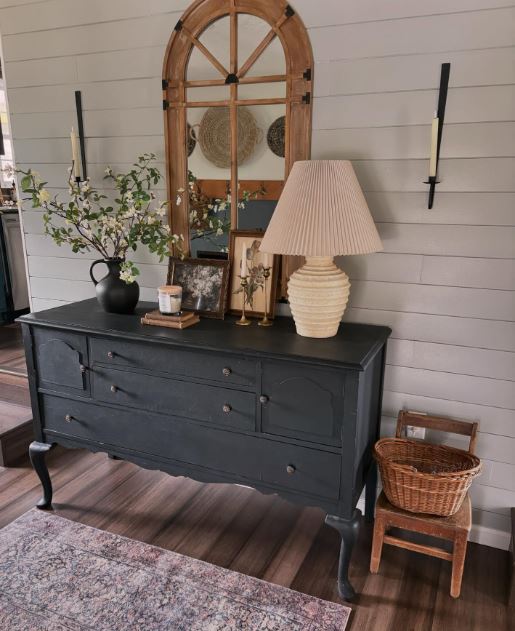
A single deep colour can make a heavily shaped buffet feel calmer without erasing its character. The curved front, long lower drawer, centre drawers, side cabinets, and elegant legs remain easy to read because light still catches the moulding. Matte charcoal gives the piece enough presence beneath a large mirror without demanding extra pattern.
This treatment is especially useful when several wood tones or old repairs make the original surface look uneven. Paint can visually connect replaced veneer, filled chips, and mismatched areas, although it should never be used to hide loose structure. The drawer and door gaps need particular attention because dark paint makes a crooked line surprisingly obvious.
For me, the success of this buffet comes from the quiet hardware. Large bright pulls might fight with the curved body, while small dark knobs let the silhouette remain the main feature.
Materials and Tools
· Curved or bow-front vintage buffet
· Cleaner, fine sanding pads, wood filler, and suitable primer
· Deep charcoal or soft black furniture paint
· Angled brush for moulding and a small roller for flat areas
· Small knobs or cleaned original hardware
· Wax or compatible clear finish if required by the chosen paint system
· Felt pads and furniture anchor where tipping could be a concern
A Practical Way to Recreate the Look
1. Check the curved frame for movement. Remove all movable parts and inspect the curved rails, legs, and long drawer supports. Tighten loose screws and glue separated joints with the cabinet clamped square. A long lower drawer may drag if the frame has shifted, so test it before and after repair.
2. Prepare the surface without flattening detail. Clean old polish from the moulding and use flexible sanding pads around curves rather than a rigid block that may cut high points. Fill chips in stages and reshape missing edges carefully. Vacuum the recesses and wipe away dust before primer reaches the carved lines.
3. Prime the different materials consistently. Older buffets may combine solid wood, veneer, filler, and previous repairs. Use a primer suited to the actual surfaces and apply it thinly around drawer openings. Sand only minor roughness between coats so the original contours remain crisp.
4. Apply charcoal paint in controlled sections. Paint the sides, front rails, doors, and drawers in an order that allows each piece to dry without being handled repeatedly. Use the brush to work paint into moulding, then remove excess before it gathers in corners. Check the sheen under side light and correct lap marks while the coat is still workable.
5. Reassemble with even gaps. Fit doors and drawers without forcing them into freshly painted openings. Adjust hinges and stops, clean the knobs, and add felt pads where fronts meet the frame. Once assembled, confirm that all four feet carry weight evenly and anchor the cabinet if its height or location makes tipping possible.
A dark navy, forest green, or warm espresso could create a similar effect. If the original top remains attractive, leave it natural and paint only the base. I’d avoid heavy distressing on a piece with this much shape; the curves already provide enough movement without artificial wear on every edge.
Convert a Vintage Buffet into a Black Glass-Front Display Cabinet
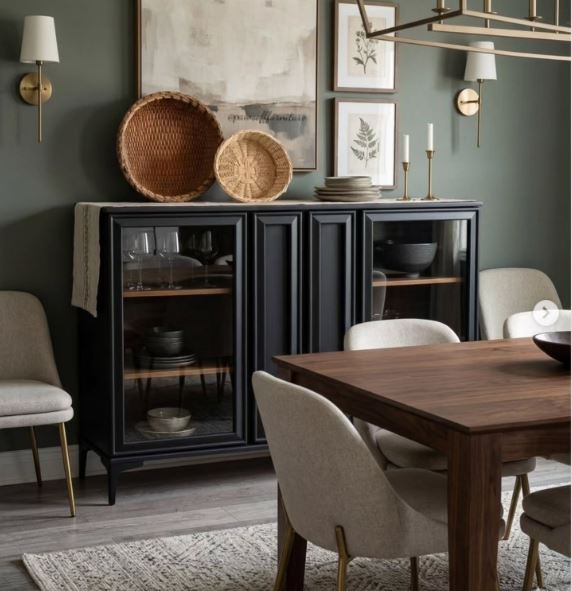
Glass-front doors change the purpose of a buffet more than paint alone. The side cupboards become display areas for glassware, books, ceramics, or a small drinks collection, while the narrow centre panels keep less attractive items hidden. Warm wood shelves prevent the black exterior from making the interior feel too dark.
This project needs careful planning because cutting door panels or replacing them with glass affects both strength and safety. Existing doors with removable inner panels are the easiest starting point. Where the construction is uncertain, a professional glazier or cabinetmaker can help create properly supported inserts rather than relying on adhesive around a fragile edge.
The raised base gives the cabinet a lighter appearance and makes the long rectangular form feel more current. Even so, the original moulding remains visible, which is the part I like most.
Materials and Tools
· Vintage buffet with suitable framed doors or removable panels
· Safety glass or acrylic panels cut for the door construction
· Retaining clips, glazing points, or secure frame moulding appropriate to the insert
· Deep black furniture paint, suitable primer, brush, and small roller
· Timber shelves or veneer finish for the cabinet interior
· Screwdrivers, drill, square, clamps, and hinge-adjustment tools
· Optional replacement legs or metal base rated for the cabinet weight
· Eye protection and gloves for handling inserts and hardware
A Practical Way to Recreate the Look
1. Confirm that the doors can accept inserts. Remove the doors and inspect their construction from the back. Identify whether the centre panels are separate, routed into a frame, or part of one solid front. Do not cut structural rails or thin brittle timber without a clear method for supporting the new insert.
2. Plan shelves and hidden storage together. Measure the objects you want to display and choose shelf heights before finishing the interior. Keep heavier glassware low and allow enough depth for doors to close. Decide which centre compartments should remain opaque so practical storage does not have to be styled constantly.
3. Prepare the cabinet and paint the exterior. Repair the frame, degloss the old finish, and prime where required. Paint the cabinet, door frames, and central panels in thin coats, keeping paint out of hinge recesses and glazing channels. Finish the warm wood shelves separately so they do not pick up black paint at the edges.
4. Fit the clear panels securely. Have the inserts cut with safe edges and enough clearance for the door frame. Seat them against proper supports and use clips or moulding designed to hold them without pressure points. Wear gloves and check that no sharp edge remains exposed on the back of the door.
5. Reinstall and test the doors. Fit the doors, adjust the hinges, and confirm that the added insert weight does not make them sag. Add discreet catches and bumpers, then place a small number of items on the shelves. If electronics or a drinks fridge will be stored inside, provide the ventilation required for that equipment rather than sealing the cabinet tightly.
For a lower-cost version, use clear acrylic where appropriate or remove doors entirely and paint the inner shelves. Reeded or fluted glass can soften the view of stored items. I’d keep the centre doors solid, as the contrast between display and concealed storage is what makes this design practical.
Refresh a Vintage Buffet with Dusty Blue Paint
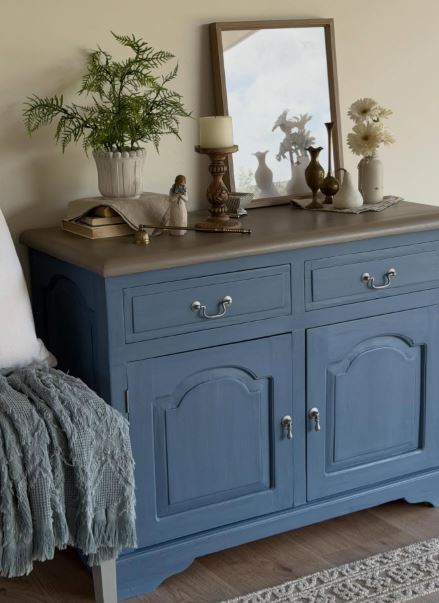
Dusty blue works well on a compact buffet because it brings colour into a room without making the cabinet feel heavy. The darker neutral top adds definition, while silver-toned handles keep the front light. Two drawers and two deep cupboards make the piece useful beside a bed, in a hallway, or as a small dining cabinet.
The curved door panels are the main decorative feature, so they need clean paint application rather than extra transfers or stencils. A slightly deeper blue in the recesses could emphasise the shape, but the visible version stays simple. That makes it approachable for someone who wants a noticeable change without rebuilding the cabinet.
I know choosing blue can feel risky if the room already contains several colours. A greyed, muted shade is easier to live with than a bright primary blue and usually pairs well with warm wood, cream textiles, and aged metal.
Materials and Tools
· Compact buffet with drawers and panelled doors
· Cleaner, sanding pads, filler, and primer
· Dusty or greyed blue furniture paint
· Darker paint, stain, or retained existing finish for the top
· Quality brush, small roller, and detail brush
· Silver-toned handles or cleaned original hardware
· Drawer wax or runner repair supplies where needed
A Practical Way to Recreate the Look
1. Sort out the drawer and door fit first. Remove the fronts and test each moving part before painting. Repair loose drawer bottoms, tighten hinges, and correct rubbing edges carefully. Paint adds a small amount of thickness, so a door that already catches will usually become more troublesome afterward.
2. Prepare the top and base separately. Decide whether the top will remain dark, be stained, or receive a contrasting paint. Mask or remove it if possible, then clean and degloss the blue areas. Fill only the damage that interrupts the final look, leaving small age marks that do not affect use if you prefer a softer finish.
3. Apply the blue without flooding the panels. Prime where required and begin with the recessed door details using a thin brush coat. Smooth the broad faces with a small roller or brush, checking the lower corners for drips. Paint the drawers flat when possible so the finish can level without running around the handle holes.
4. Finish the top and hardware. Refresh the darker top with a compatible coating and protect the exposed front edge well. Clean or replace the handles, then check their spacing before making new holes. Use backplates only when they suit the scale of the drawers and cover unavoidable marks cleanly.
5. Reassemble for its new room. Fit the doors and drawers, add bumpers, and wax or repair the runners if they feel stiff. Choose storage that suits the location: linens in a bedroom, serving dishes in a dining room, or baskets and paperwork in an entryway. Keep heavier items in the lower cupboard to maintain stability.
A smoky green, muted mauve, or warm grey could follow the same method. For a subtle variation, paint the cabinet blue but leave the inner door panels in natural wood. The finish will last better when the top is protected for the way the piece will actually be used, not merely styled for a photograph.
Restore a Vintage Buffet and Keep the Natural Wood Visible
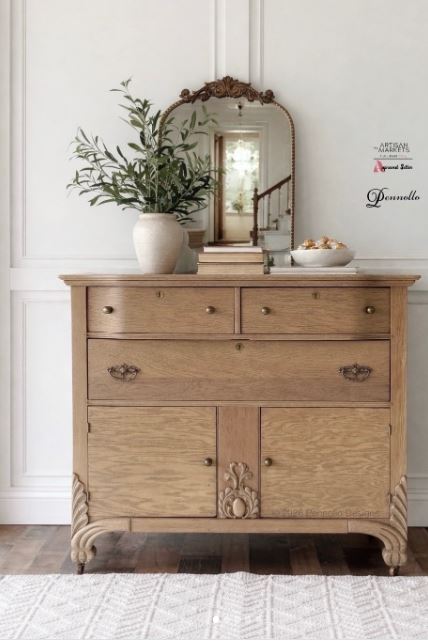
Not every vintage buffet needs paint. This piece relies on light, warm wood, subtle grain, carved corner details, and a decorative centre motif. The old keyholes and metal pulls remain part of the story, while the restrained finish keeps the cabinet suitable for a bright, calm room.
A natural restoration can take more patience than painting because uneven colour, veneer repairs, and old stains remain visible. The goal is not necessarily to make every board identical. Slight variation can show the construction honestly, provided damaged areas are repaired and the overall tone feels balanced.
The part I would check carefully is the veneer. Aggressive sanding can remove the original surface quickly, especially around drawer fronts and carved edges. Slow cleaning, gentle removal of the old coating, and test patches are far safer than trying to erase every mark in one afternoon.
Materials and Tools
· Natural-wood vintage buffet with carvings or decorative veneer
· Cleaner and coating-removal method suited to the existing finish
· Fine scrapers, flexible sanding pads, and sanding blocks
· Wood glue, veneer repair tools, clamps, and colour-matched filler where necessary
· Wood stain, toner, or clear finish selected after test patches
· Small brushes for carvings and lint-free application cloths
· Original pulls, escutcheons, and keys where available
· Dust protection, gloves, and good ventilation
A Practical Way to Recreate the Look
1. Document the original surface. Photograph every side and note areas of veneer, solid wood, carving, filler, and previous repair. Remove the hardware and label the drawers. Test cleaning and finish removal on a hidden section so you know how quickly the old coating releases.
2. Repair veneer before final sanding. Secure lifted edges with the correct adhesive and clamp them flat using protective blocks. Replace missing chips only where the repair can be supported properly. Let repairs stabilise before sanding, otherwise a loose edge may catch and tear farther across the panel.
3. Remove the old finish evenly. Work in manageable areas and follow the chosen product or scraping method carefully. Avoid digging into dark marks until the surrounding surface is thin, as that creates pale hollows. Once the coating is removed, sand lightly with the grain and use flexible pads around carving.
4. Balance the wood tone with test samples. Apply possible stains or clear finishes to hidden areas or matching scrap before treating the whole cabinet. Compare the colour in daylight and room lighting. If different woods absorb unevenly, accept some variation or use a controlled toning method rather than repeatedly darkening the entire piece.
5. Protect and reassemble the restored buffet. Apply the chosen finish in thin, even layers, reaching carved recesses without leaving pools. Clean the hardware gently and reinstall it after the surface is ready for handling. Check drawer movement, add felt pads, and use coasters or trays on the top to protect the restoration from water and heat.
A partly restored version could keep the wood top and drawer fronts natural while painting damaged side panels. I’d rather preserve a few honest marks than sand through valuable veneer while chasing a factory-new appearance. Natural wood looks best when the repair work is sound and the finish feels consistent, not artificially perfect.
Paint a Long Vintage Buffet Deep Green and Keep the Wood Top
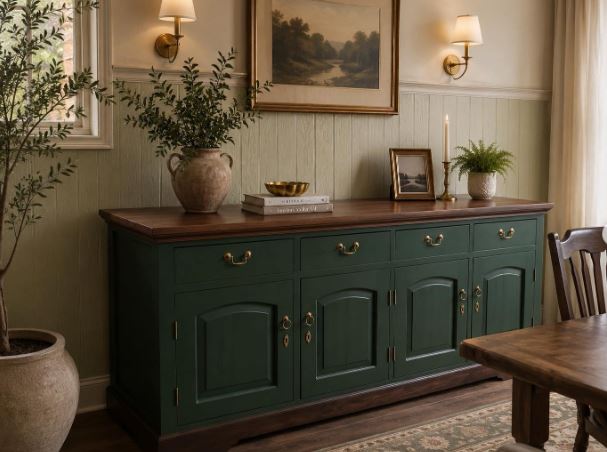
A long buffet can dominate a dining room, so a deep green finish needs a warm counterbalance. The retained timber top and brass hardware do that job here. Four drawers and four cupboard doors provide generous storage, while the dark plinth keeps the large piece visually settled against the floor.
The green works because it is rich rather than bright. It suits wood furniture, woven rugs, warm walls, and traditional artwork without turning the buffet into a novelty colour. Repeating brass across the drawers, hinges, and key plates also gives the long front a steady rhythm.
This is a useful direction for a buffet that will remain in active service. The top can handle serving trays when protected properly, and the painted base hides varied grain or old repairs. Then the interior can be organised for dishes, linens, or larger household items.
Materials and Tools
· Long buffet with multiple drawers and doors
· Cleaner, sanding pads, repair supplies, and suitable primer
· Deep forest-green furniture paint
· Wood stain or clear finish for the top
· Brass pulls, hinges, escutcheons, or cleaned original hardware
· Brushes, small roller, tape, and drop cloth
· Shelf liner, adjustable shelf supports, or baskets for the interior
· Furniture anchor suitable for the wall and cabinet
A Practical Way to Recreate the Look
1. Make the long cabinet square and stable. Remove all drawers and doors, then check the base from end to end with a level. Tighten or repair the plinth, centre supports, and back panel. A long buffet can sag in the middle, so confirm that the internal dividers and feet support the top before loading it again.
2. Prepare the wood top. Strip or sand the top only as much as its construction allows. Work along the full length so one area does not become noticeably lighter. Finish the front edge and ends consistently, then protect the timber with a coating suitable for serving dishes and routine cleaning.
3. Paint the green base in sections. Clean, degloss, and prime the cabinet, then paint one logical section at a time: sides, rails, doors, and drawers. Keep the coat thin around panel edges and hinge mortises. Check the colour in the room before committing to the final coat because deep green can appear almost black in low light.
4. Restore the brass rhythm. Clean the existing handles gently or choose replacements that match the drawer scale. Use a template to keep new holes aligned across the long front. Refit key plates and hinges in the same finish where possible so the hardware does not look collected from unrelated pieces.
5. Organise the interior for dining storage. Adjust shelves to fit the tallest platters and serving bowls, keeping heavy pieces low. Use drawers for linens and smaller tools, and add liners only after the finish is fully ready. Anchor the buffet where needed, especially if several drawers can be opened at the same time.
A shorter cabinet could use the same forest-green and wood combination. For a more modern finish, choose simple bar pulls; for a traditional result, retain the key plates and curved handles. I’d keep the top warm rather than painting everything green, because that contrast prevents a large buffet from feeling like one solid block.
Create a Teal Ombré Finish on an Ornate Vintage Buffet
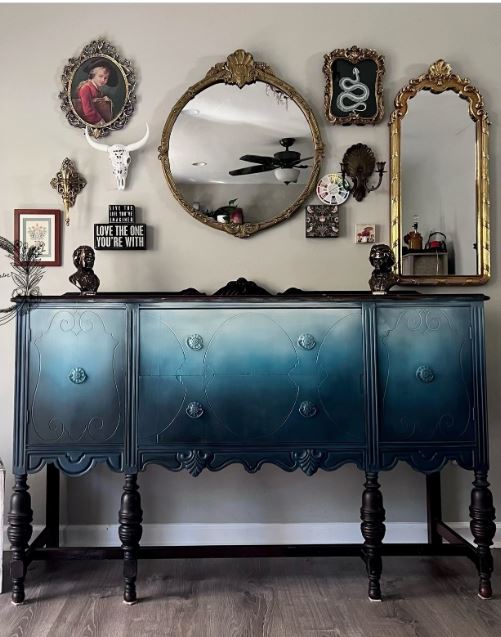
An ombré finish is one of the more expressive ways to repurpose a vintage buffet. Black anchors the turned legs, top, and lower carving, while teal and blue move across the broad cabinet fronts. The original raised door patterns and ornate knobs remain visible beneath the colour shift, which gives the effect depth rather than making it look like a flat painted gradient.
This technique suits a piece with large uninterrupted panels. Narrow drawers or heavily divided fronts can make blending difficult, but broad doors allow colours to overlap gradually. The transition does not need to be perfectly symmetrical. A slightly darker edge or brighter centre can help the buffet feel hand-finished rather than printed.
I know blending paint can become messy quickly. The important part is to practise the colour order and brush pressure on a sample board before working across doors that have already been carefully prepared.
Materials and Tools
· Ornate buffet with broad door or drawer panels
· Cleaner, sanding pads, repair supplies, and primer
· Black, deep teal, medium blue-green, and lighter accent paint from one compatible system
· Several clean brushes, blending brush, small roller, and misting bottle only if suited to the paint method
· Palette or trays for mixing transition colours
· Painter’s tape and drop cloth
· Decorative knobs or cleaned original hardware
· Compatible protective finish after the blended paint is fully ready
A Practical Way to Recreate the Look
1. Choose the direction of the gradient. Photograph the assembled front and mark where the darkest, richest, and lightest areas should sit. Consider the carved apron, legs, and top as part of the colour plan. Prepare sample swatches so you can see how the shades behave when overlapped rather than relying only on the colour in the tin.
2. Repair and prime the ornate surface. Remove hardware and clean every carved recess. Fill damage, degloss the existing coating, and prime the different materials consistently. Keep primer thin around raised lines so the decorative pattern stays sharp beneath several paint colours.
3. Establish the darkest structure first. Paint the top, legs, outer rails, and carved base in the chosen black or deepest tone. Bring some dark colour onto the outer edges of the cabinet fronts where the gradient will begin. Let the structural areas become even before attempting the softer transitions.
4. Blend the teal and blue in workable sections. Work on one door or connected panel group at a time, applying neighbouring colours while their edges can still be softened according to the paint method. Use a clean blending brush and light pressure, moving back and forth across the overlap. Stop before repeated brushing lifts the paint or turns the transition muddy.
5. Refine, protect, and reassemble. Allow the blend to settle, then assess it from several distances and under different lighting. Add a thin corrective glaze or transition coat only where a hard band remains. Protect the finish with a compatible product, reinstall the knobs, and keep styling simple so the ombré remains the main feature.
A beginner could create a gentler version with two neighbouring colours instead of four. Another option is to blend only the centre doors and keep the side cabinets solid. I’d avoid adding transfers or metallic highlights everywhere; the carved shape and changing colour already give the buffet plenty to say.
Turn a Vintage Buffet into a Glossy Black Drinks Cabinet
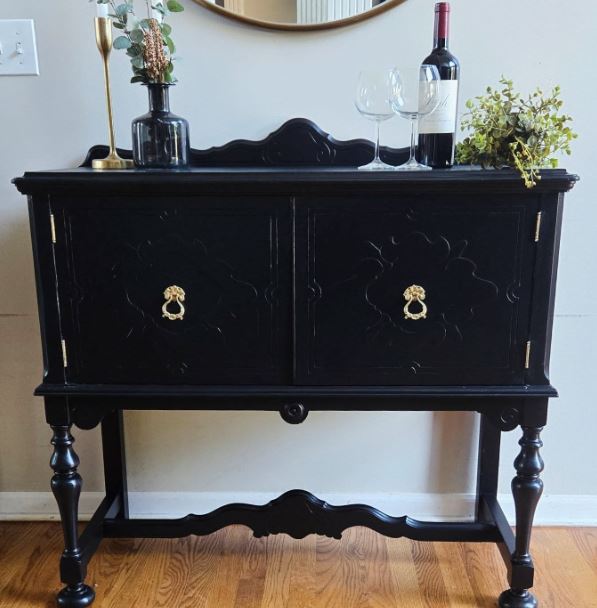
A compact buffet can become a useful home bar without changing its exterior structure. The deep black finish gives the cabinet a formal look, while gold ring pulls stand out against the two large doors. Turned legs, a shaped back rail, and the decorative lower stretcher keep the piece connected to its original period.
The new function should be planned inside. Bottles need upright clearance, glasses need secure shelves, and frequently used tools should be easy to reach. A removable tray on the top protects the finish and makes serving simpler. If the cabinet will hold a powered cooler or lighting, ventilation and safe cable routing need to be designed properly rather than improvised through a door gap.
Glossy black shows dust, brush marks, and uneven repairs more readily than a matte finish. That means preparation and controlled application matter far more than adding extra decoration.
Materials and Tools
· Compact buffet with deep cupboard storage
· Cleaner, sanding pads, filler, and high-adhesion primer suited to the existing finish
· Black furniture paint in the desired sheen
· Fine brush, smooth small roller, and tack cloth or dust-removal method
· Gold ring pulls or cleaned original brass hardware
· Adjustable shelf, glass rack, bottle dividers, or removable trays as needed
· Shelf liner suited to glassware
· Cable grommet and ventilation components only when powered equipment is installed safely
A Practical Way to Recreate the Look
1. Design the inside around bottles and glassware. Measure the tallest bottles, decanters, and glasses before changing shelves. Keep heavy bottles low and allow enough room to lift them without striking the shelf above. Decide whether one side will hold bottles and the other glassware, or whether a single wide adjustable shelf will be more useful.
2. Repair the cabinet for a smooth dark finish. Remove the doors, hardware, and shelves, then clean away polish and residue. Fill dents that will catch light under gloss and sand repairs level without flattening carved details. Prime the cabinet and check the surface from the side, where remaining ridges are easier to see.
3. Apply black paint with dust control in mind. Work in a clean, ventilated area and paint broad panels with a smooth roller or brush suited to the product. Keep a wet edge and avoid repeatedly touching areas that have begun to set. Lightly correct roughness between coats only when the paint system allows, then remove all dust before continuing.
4. Fit the drinks storage. Install sound shelves and use non-slip or washable liners where glassware will sit. Add a removable tray for small tools and consider discreet dividers that prevent bottles from knocking together. Do not overload old shelves simply because the cupboard appears deep.
5. Reassemble and protect the serving surface. Install the gold ring pulls, adjust the doors, and add soft-close bumpers or catches. Place a tray or protective mat beneath bottles on the top, and wipe spills promptly with a method safe for the finish. Keep candles and heat away from alcohol, timber, and painted surfaces.
A satin black finish is more forgiving than high gloss and still gives the cabinet a polished presence. You could also keep the top natural wood or add a removable stone or metal tray. The best drinks cabinet is not the one with the most accessories; it is the one where bottles, glasses, and serving tools can be reached without stacking them precariously.
What Can Spoil a Vintage Buffet Makeover
Choosing Colour Before Checking the Structure
A striking paint plan cannot compensate for a loose base, sagging centre, or split drawer support. Repair the cabinet while it is empty, test every moving part, and only then begin decorative preparation.
Sanding Through Thin Veneer
Many vintage buffets combine solid frames with thin decorative veneer. Heavy sanding can expose the layer beneath in seconds. Test a hidden area, work with the grain, and use the least aggressive method that removes the failing finish.
Painting Doors and Drawers While They Still Rub
Paint adds thickness around edges and openings. Correct sticking, misaligned hinges, and swollen runners first, then keep coats thin near contact points. Forcing a freshly painted drawer usually damages both the edge and the frame.
Losing Track of Original Parts
Doors and drawers that look identical may have been fitted individually. Label every part, bag the screws by location, and photograph the hardware before removal. Reassembly becomes much easier when each piece returns to its original opening.
Using Decorative Hardware That Is Too Small
A long or heavily moulded buffet needs hardware with enough visual weight and grip. Tiny knobs may look lost, while oversized modern bars can fight with old carving. Use paper templates to judge scale before drilling new holes.
Ignoring the Inside
A repurposed buffet should work after the doors close. Plan shelf heights, drawer use, ventilation, and weight distribution around the new function. Decorative paper cannot fix a shelf that bends under bottles or platters.
Rushing the Final Reassembly
Paint and clear finishes may feel dry before they are ready for pressure from hinges, knobs, trays, and stacked décor. Follow the product guidance, use felt pads, and handle the piece gently. Patience at this stage prevents rings, stuck drawers, and chipped edges.
Frequently Asked Questions
Can a beginner repurpose a vintage buffet?
Yes, provided the cabinet is structurally sound and the project stays within your tools and experience. A clean, paint, and hardware refresh is more beginner-friendly than cutting doors for glass or rebuilding a damaged base.
Do I always need to sand before painting?
Not always, but the surface must be clean and suitable for the chosen primer and paint. Glossy coatings usually need deglossing, while loose finish must be removed. Test the full preparation system on a hidden area first.
How can I tell whether the buffet has veneer?
Look at edges, drawer tops, the back of panels, and damaged corners for a thin decorative layer over another material. Grain that changes abruptly at an edge can also be a clue. Treat uncertain surfaces gently until the construction is clear.
Can I use a vintage buffet as a bathroom vanity?
A sturdy buffet may be adapted, but plumbing cuts, moisture protection, countertop support, and drawer changes require careful planning. The cabinet must remain structurally sound, and wet-area work should meet the requirements of the room and local installation practice.
What is the best new use for a small buffet?
Small buffets work well as entryway cabinets, bedside storage, drinks cabinets, linen cupboards, or compact dining-room sideboards. Choose the use by measuring the interior rather than deciding from the exterior appearance alone.
Should I keep the original hardware?
Keep it when it is complete, comfortable to use, and visually suited to the finished piece. Original fittings can be cleaned and reused, while damaged or missing pieces may be replaced with hardware of a similar scale and hole spacing.
How do I protect the top of a repurposed buffet?
Use a finish compatible with the prepared surface and the expected use. Coasters, trays, mats, and prompt cleaning help protect against water, heat, bottles, lamps, and serving dishes. Decorative paint alone may not provide enough protection for a heavily used top.
Let the Buffet’s Shape Lead the Makeover
The most convincing vintage buffet makeovers begin with what the cabinet already offers. A long bank of drawers may suit a two-tone finish, broad door panels can carry an ombré blend, and carved natural wood may need restoration rather than paint. Once the structure, storage, and proportions are understood, the decorative decision feels much less random.
Repurposing vintage buffets also keeps useful furniture in service. The cabinet can move from formal dining storage to an entryway, home bar, display unit, bedroom cupboard, or everyday sideboard without losing the details that made it worth saving. Begin with the project that asks for the fewest structural changes, and give each repair and finish enough time to settle.
Which of these nine buffet ideas would work best with the piece you already have?